
Fine line spider lily sketches are trending on feeds, and their delicate petals read as fragile at first glance. The reality is that how you size and place the flower determines whether it looks soft and crisp after a few years or a faded blur. These sketches focus on line weight, negative space, and spacing so you get a design that still reads as a lily when it has healed and lived on your skin for seasons to come.
1. Fine Line Single Stem on Inner Forearm
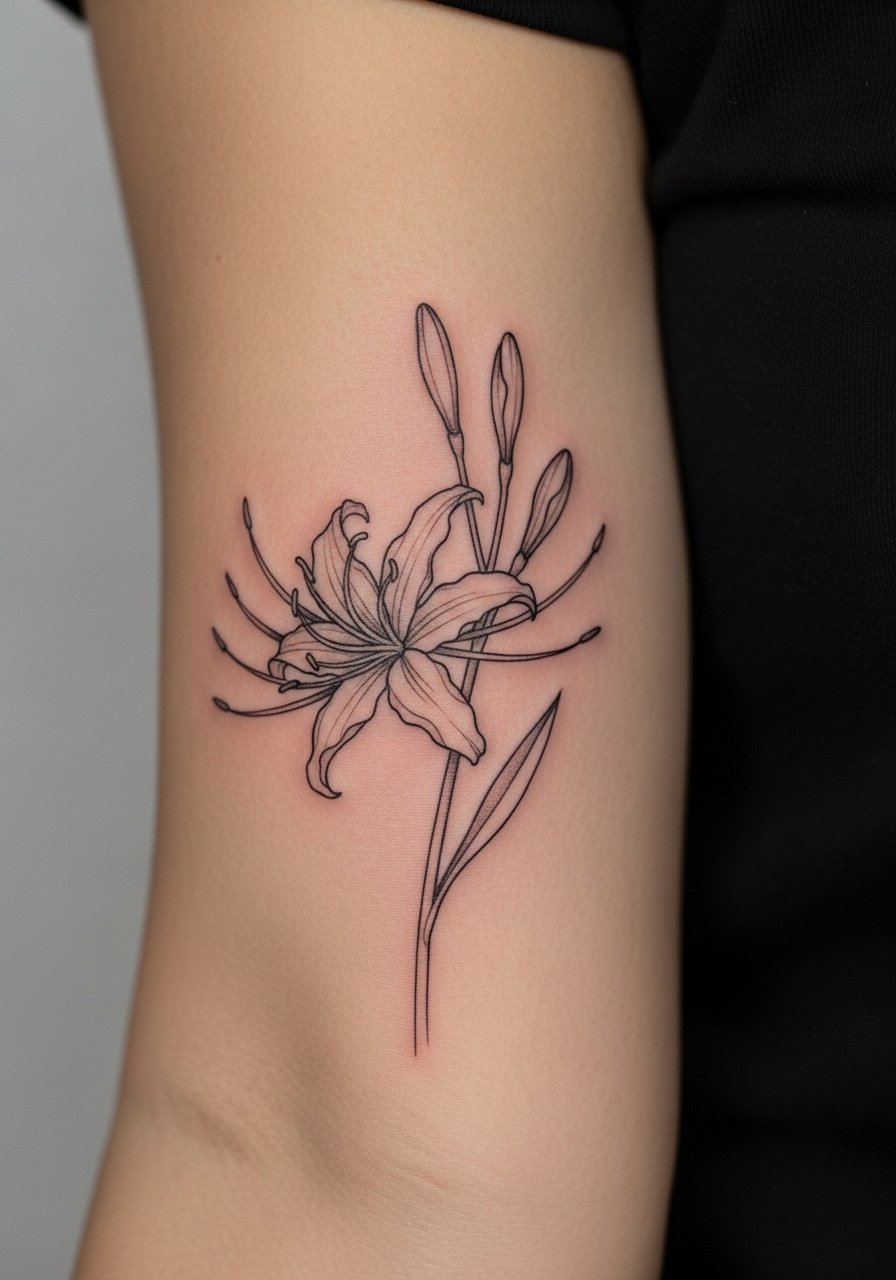
I recommend this when you want something readable at a glance but still slender enough to tuck under sleeves. Ask your artist for slightly thicker linework than ultra-micro to avoid blurring at year three, and request moderate spacing between the petals so negative space holds. The session feels easy, about an hour for a small single stem, and pain is low to moderate on the inner forearm. A common mistake is requesting hairline lines and expecting longevity. For showing it off, rolled-up sleeves and a linen button-up frame the work without competing for attention.
2. Micro-Realism Spider Lily Petal Cluster on Ankle
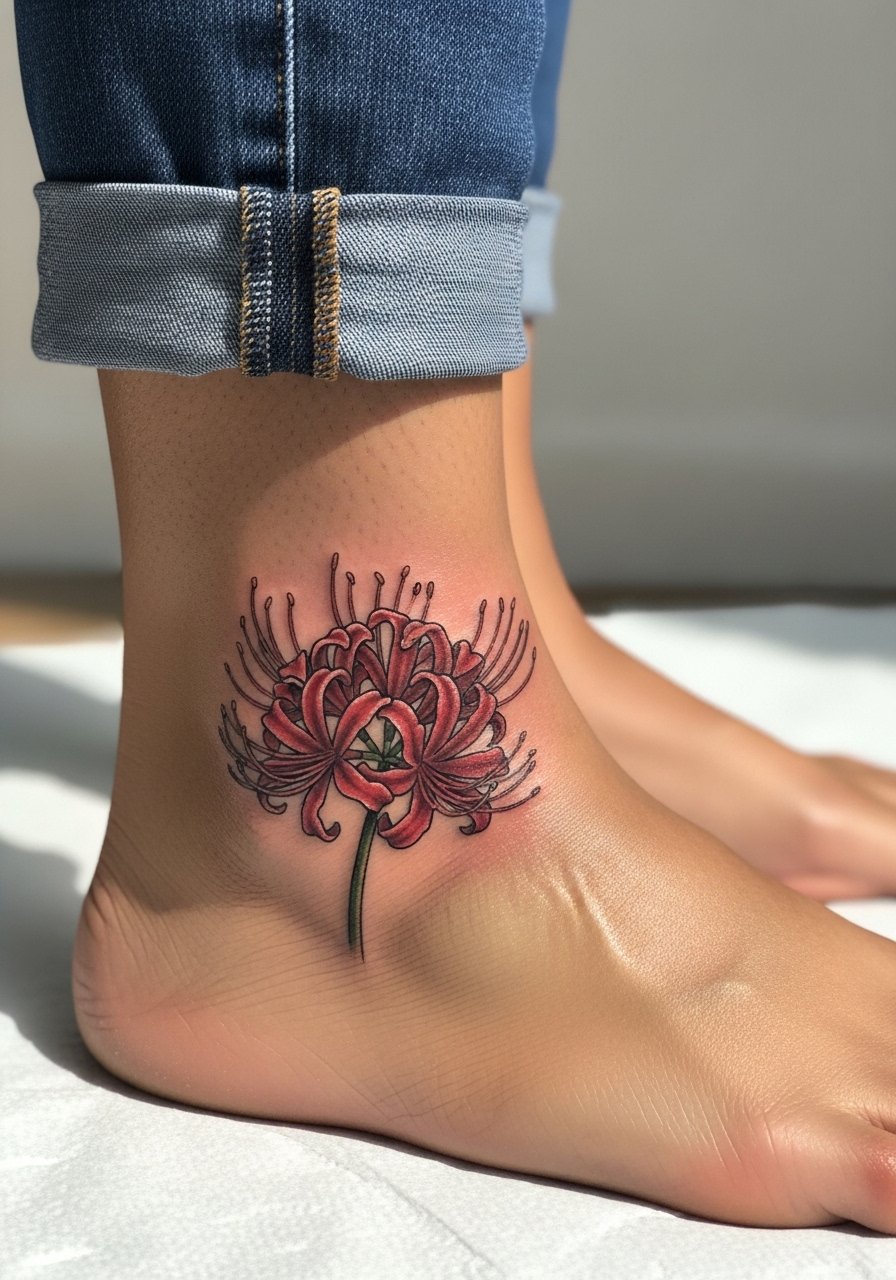
Ankle pieces read small in photos but need careful saturation to avoid patchy healing from friction with socks and shoes. Tell your artist you want fine shading through stipple shading rather than heavy grey wash so the petals keep texture when healed. Expect a short session under two hours and a touch-up at year two for color balance. For session wear, go with slip-on sandals or pants that roll up easily. Pair this placement with a minimal leather ankle cuff when you want to highlight the cluster.
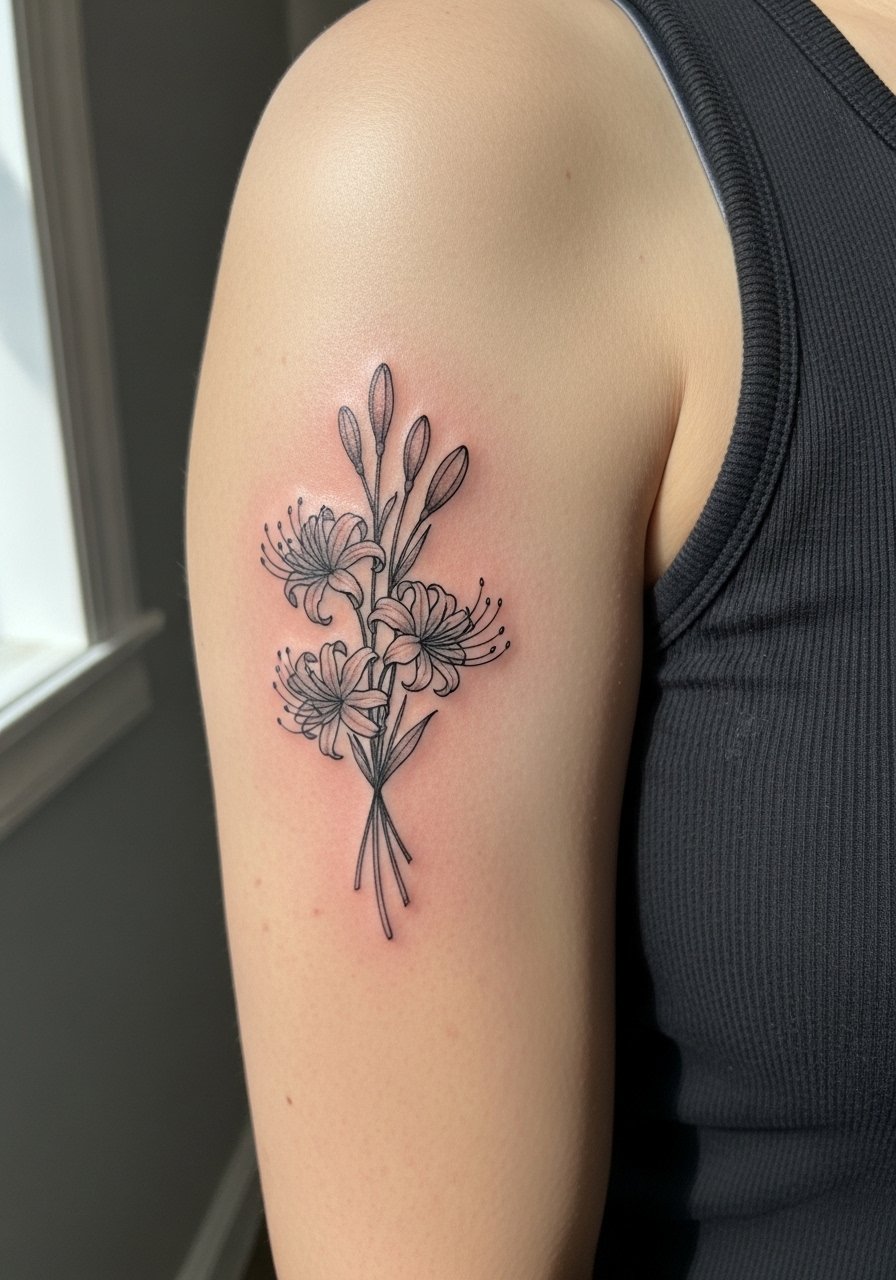
3. Watercolor Spider Lily Splash on Outer Bicep
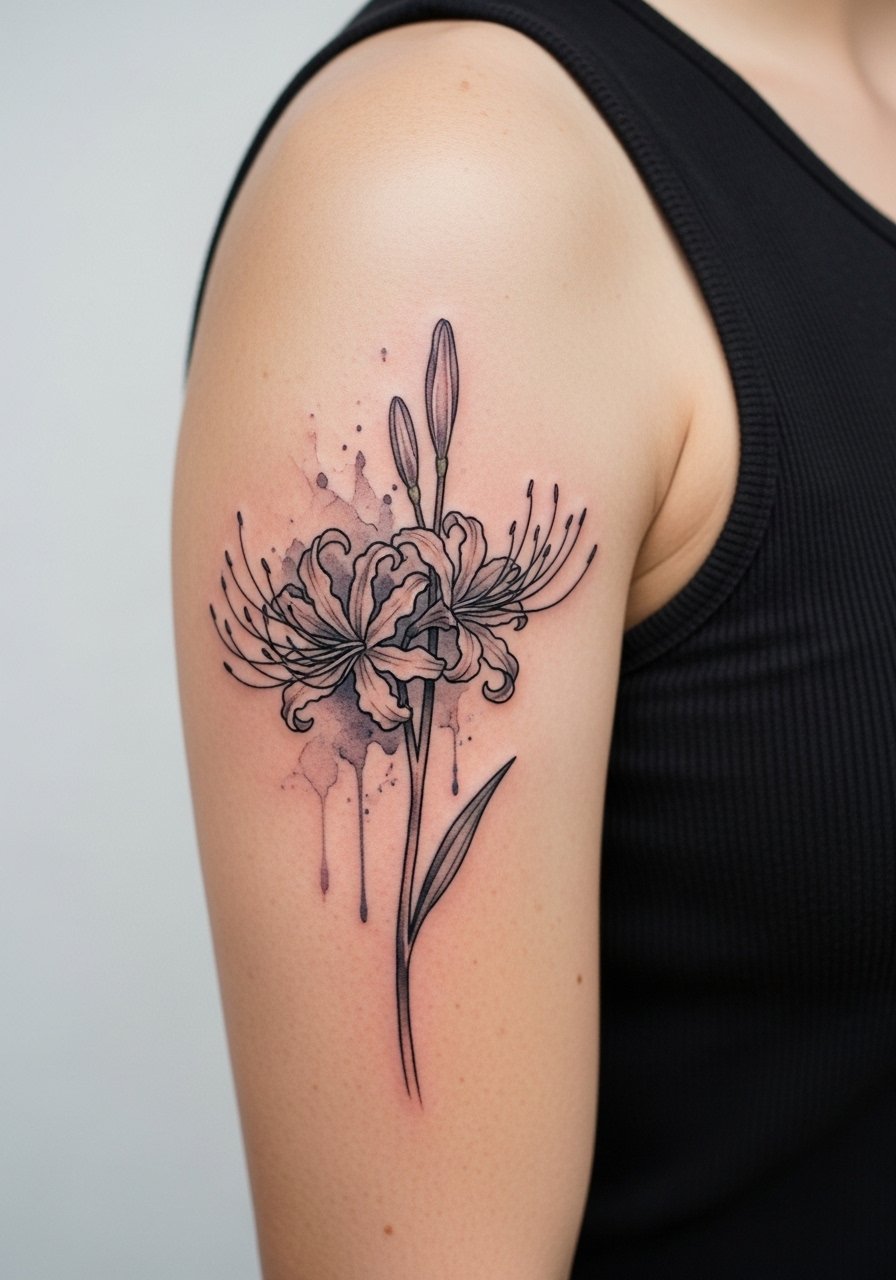
Watercolor techniques look painterly fresh but can fade unevenly if ink is too soft. Ask for saturated color outlines or subtle black anchors behind the wash so the form reads as a lily after a year. The bicep takes ink well and the session is comfortable, usually two to three hours. A common mistake is requesting very pale washes that vanish into the skin. For evenings out, a sleeveless racerback dress shows the outer bicep motif without covering it.
4. Tiny Finger Spider Lily Accent
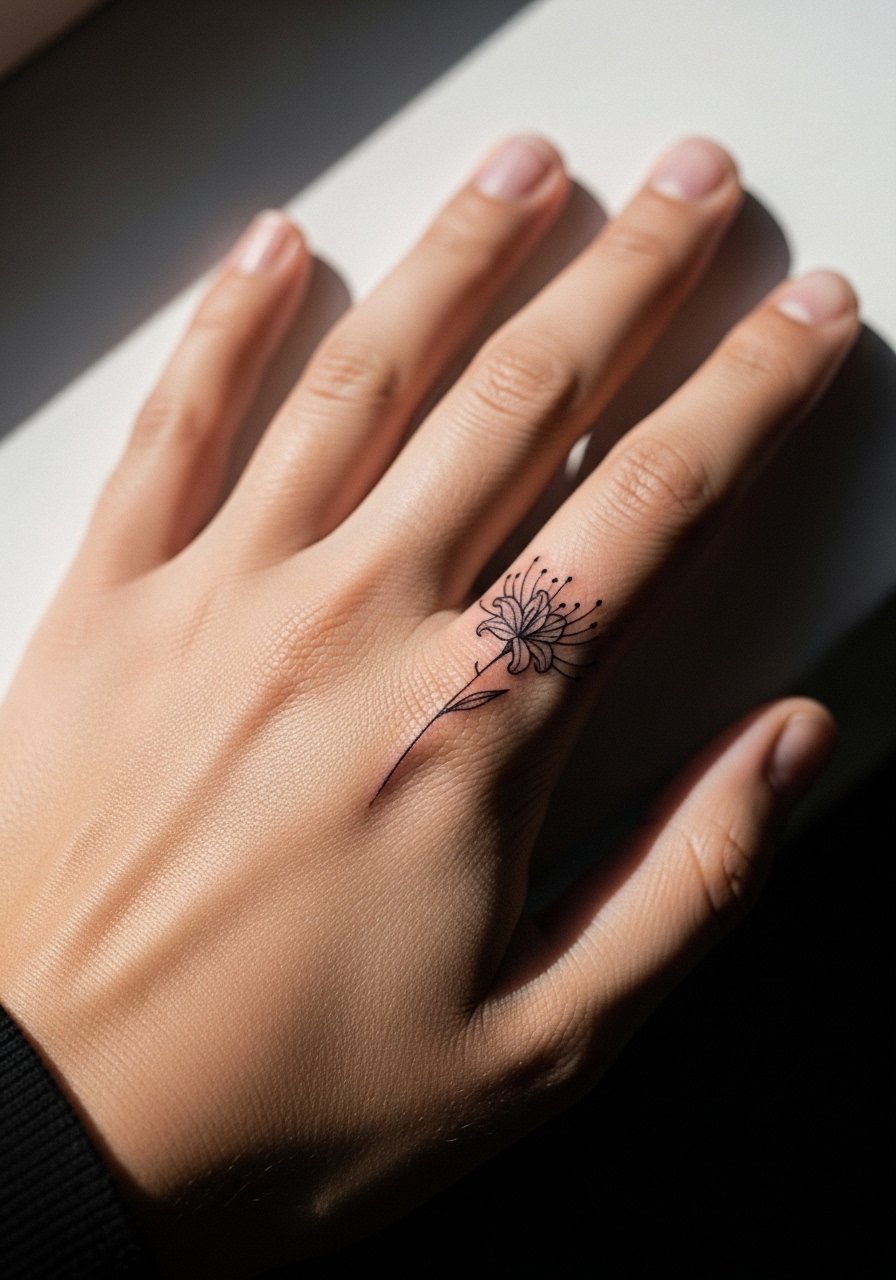
Finger tattoos are visible and charming but they blur faster because of constant hand use and skin turnover. Tell your artist you accept potential touch-ups and want bold enough linework that the petal shape remains clear at year two. Sessions are quick but may require a refill at six to twelve months. The real mistake is asking for hairline details on the finger. If you want to accessorize, a slim stacking ring set draws the eye to the bit of floral linework without crowding it.
5. Single-Petal Minimal Outline Behind the Ear
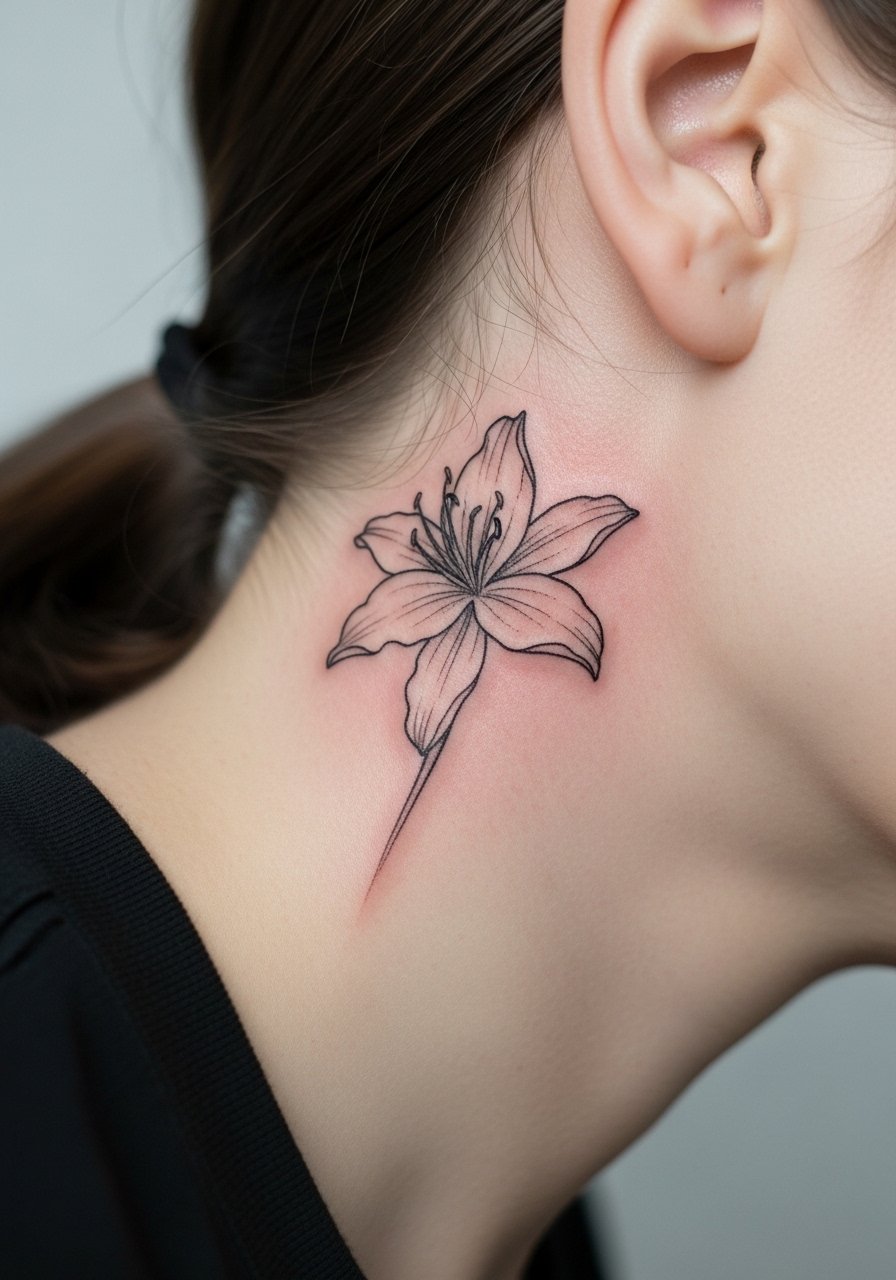
This discreet spot works if you want an accent that peeks through hair. Because the area is small and moves with neck motion, ask for slightly bolder outer lines and avoid micro shading. Sessions are brief and pain is low. One common mistake is assuming behind-ear work will stay precise without a touch-up. For placement access, wear hair clipped up to the side of your head during the appointment. A thin hoop earring pairs naturally with the tiny petal when you let hair fall around it.
6. Collarbone Curve with Negative Space Petals
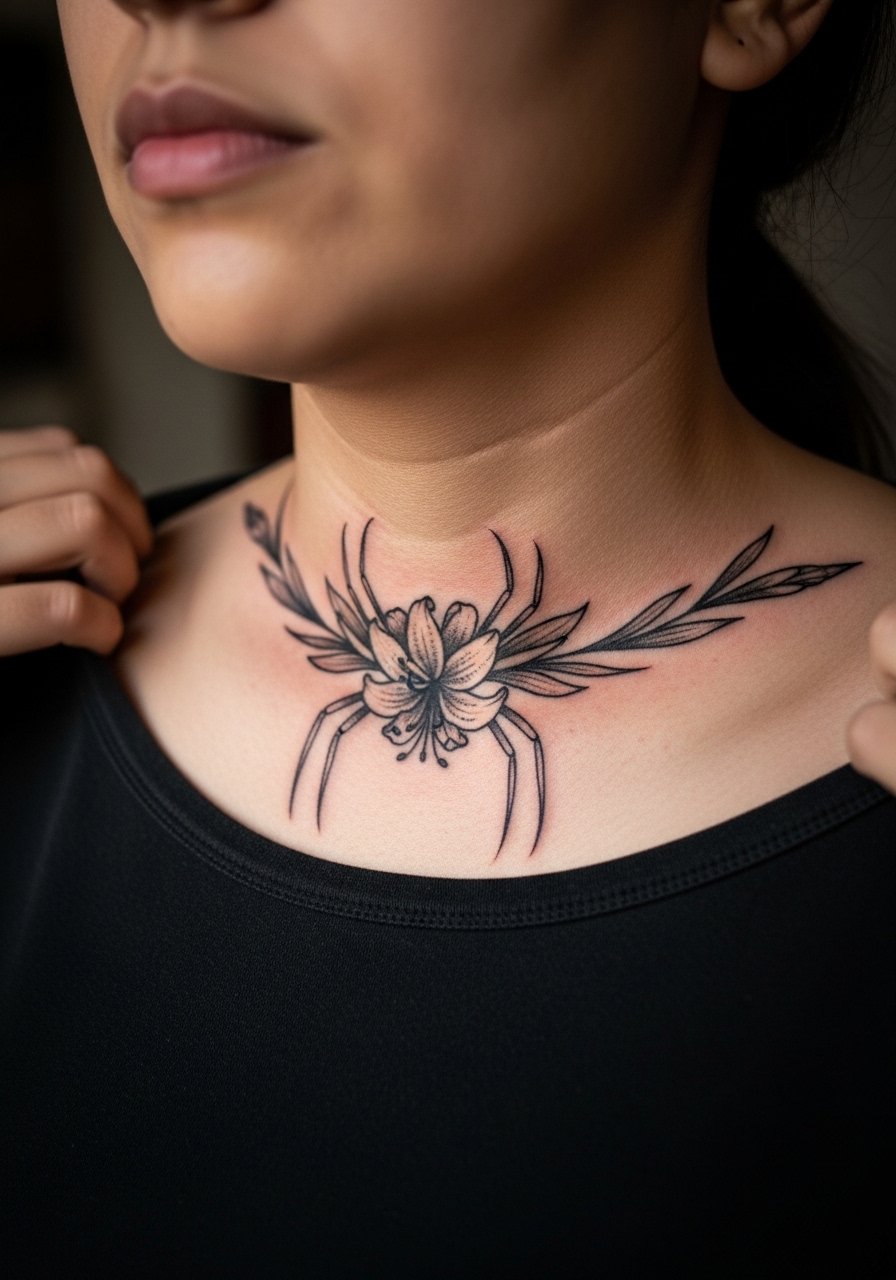
Collarbone tattoos read elegantly if the artist respects bone contours and negative space. Ask for slightly thicker stems to anchor the design and leave open gaps between petals so the work does not merge as it ages. Expect moderate pain and a session under two hours for a small curve. A mistake is packing too much detail into a small collarbone piece. For nights out, an open-shoulder top lets the curve sit above fabric lines where it gets noticed.
Studio Day Picks
The wrist and ankle pieces above need different prep than a collarbone session, and a few carefully chosen items make the appointment and the first week easier.
-
Stencil transfer paper kit. Lets you confirm placement and scale on your skin ahead of time so small spider lily outlines land where you expect.
-
Topical numbing cream. Useful for sensitive spots like the inner bicep or ankle when you want a calmer session without sacrificing linework precision.
-
Thin protective film roll. Keeps small areas such as fingers and wrists protected from friction during the first days of healing.
-
Fragrance-free gentle wash. Cleanses delicate linework without stripping the area, which matters for fine spider lily details.
-
Aquaphor healing ointment. Thin application in the immediate days after a session helps maintain saturation in small linework without clogging pores.
7. Ribcage Spider Lily Bouquet in Stipple Shading
Ribcage designs can be dramatic but they move with breath and posture. Artists split into two camps on fine line here. One camp says the skin stretch blurs lines within two years. The other camp says proper depth and spacing allow fine line to settle well. Ask explicitly where your artist stands and expect a longer session and a realistic touch-up plan. Pain is higher on ribs so plan around comfort. Bring a loose cropped top so the artist can access the area without exposing more than needed.
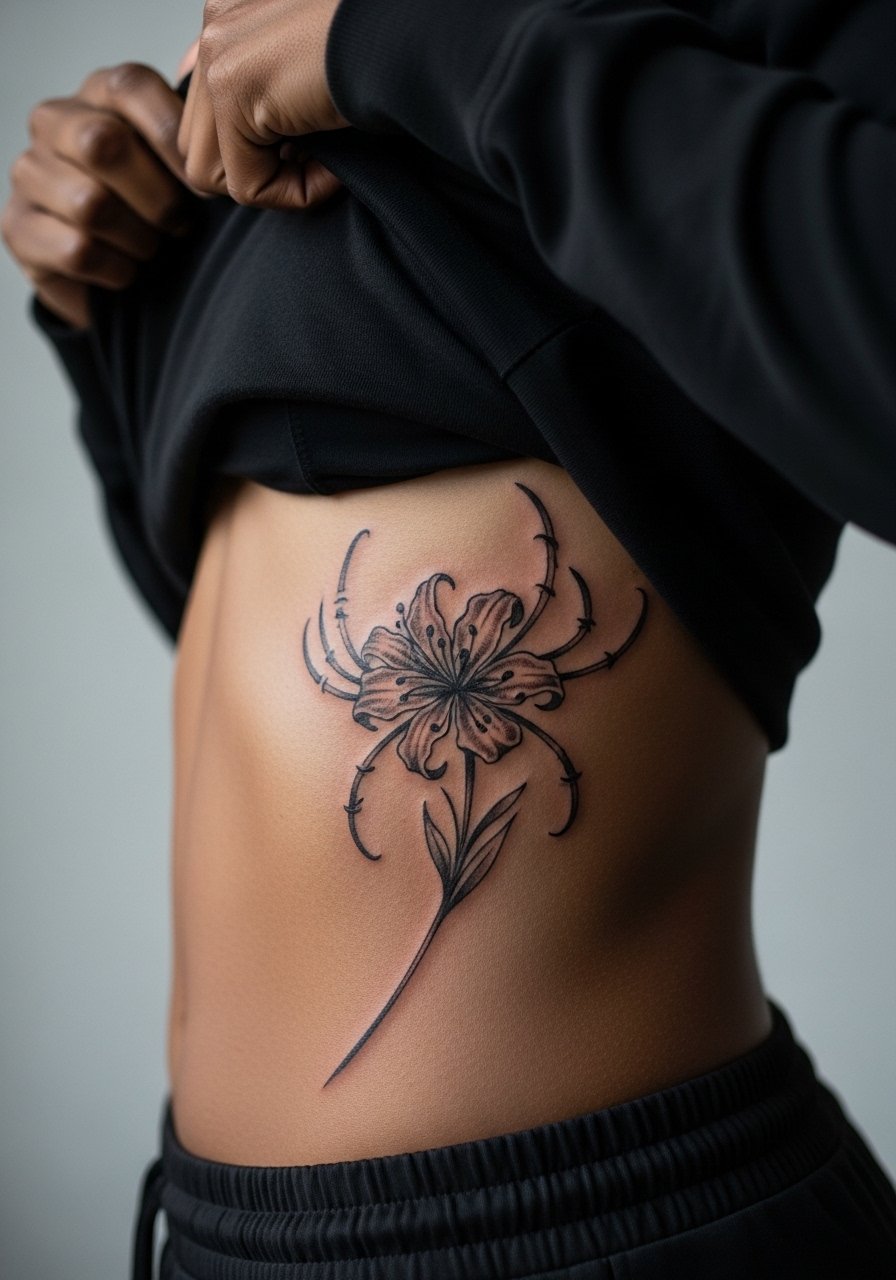
8. Thigh Panel with Negative Space and Dot Work
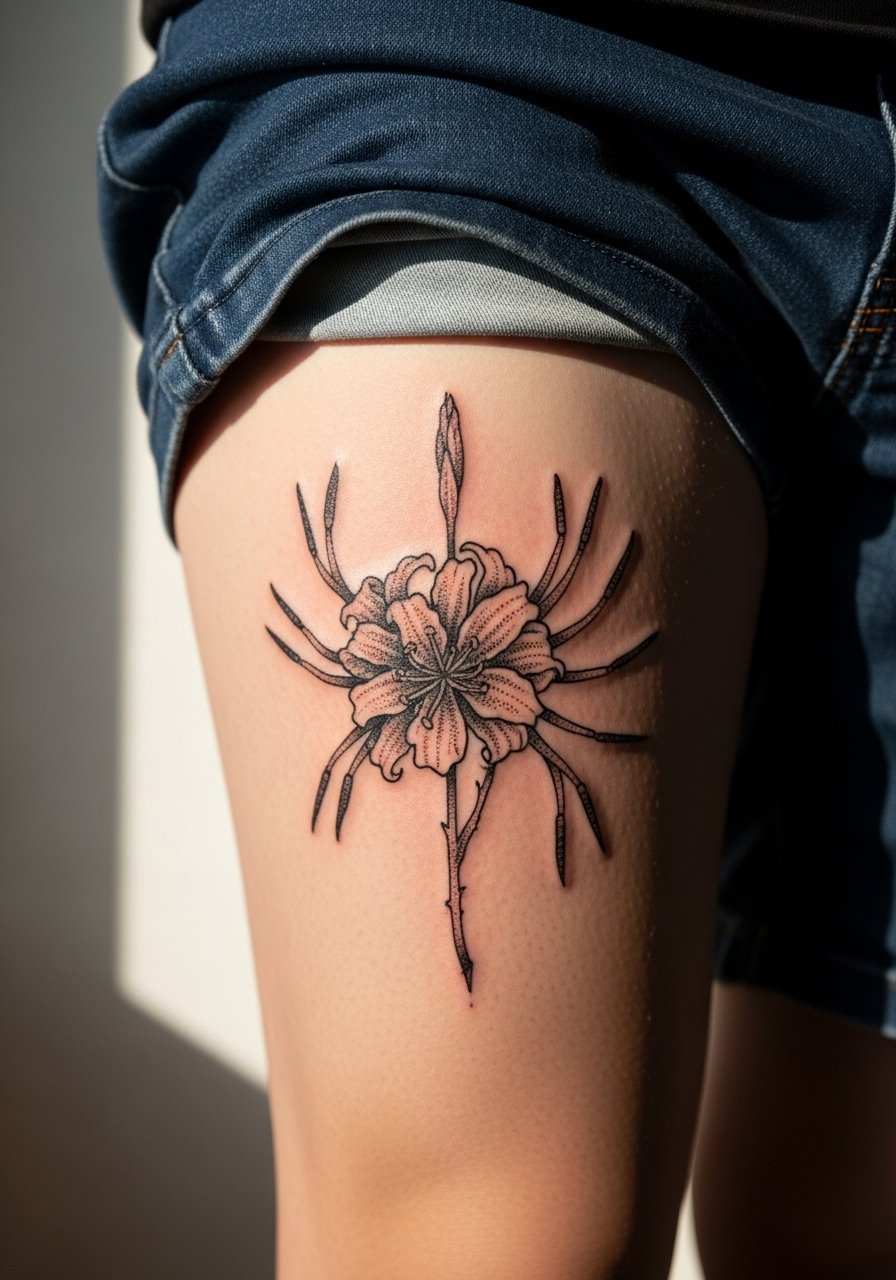
Upper-thigh pieces are forgiving and offer space for dot work and stipple shading that keeps petals readable at distance. Tell the artist you want stipple transitions rather than heavy washes so the lilies keep a delicate texture over time. Sessions can be longer but feel comfortable with plenty of breaks. A common mistake is cramming too many small elements into one panel. For the appointment, wear loose shorts or a skirt so the artist can roll fabric without unnecessary pressure. For evenings when you want to show it, try a wrap skirt.
9. Full Sleeve Cluster with Interspersed Peonies

A sleeve lets you mix scales, combining spider lilies with larger blooms to create depth. Tell your artist you want anchors in strong blackwork where the sleeve meets the elbow, and softer linework higher up. Sessions will span multiple visits and touch-ups are normal between years one and three. A common error is designing everything the same size. Vary scale for longevity. For showing off during cooler months, roll sleeves or pair with a cropped sweater so the elbow cluster still reads through fabric gaps.
10. Blackwork Silhouette Spider Lily on Lower Back
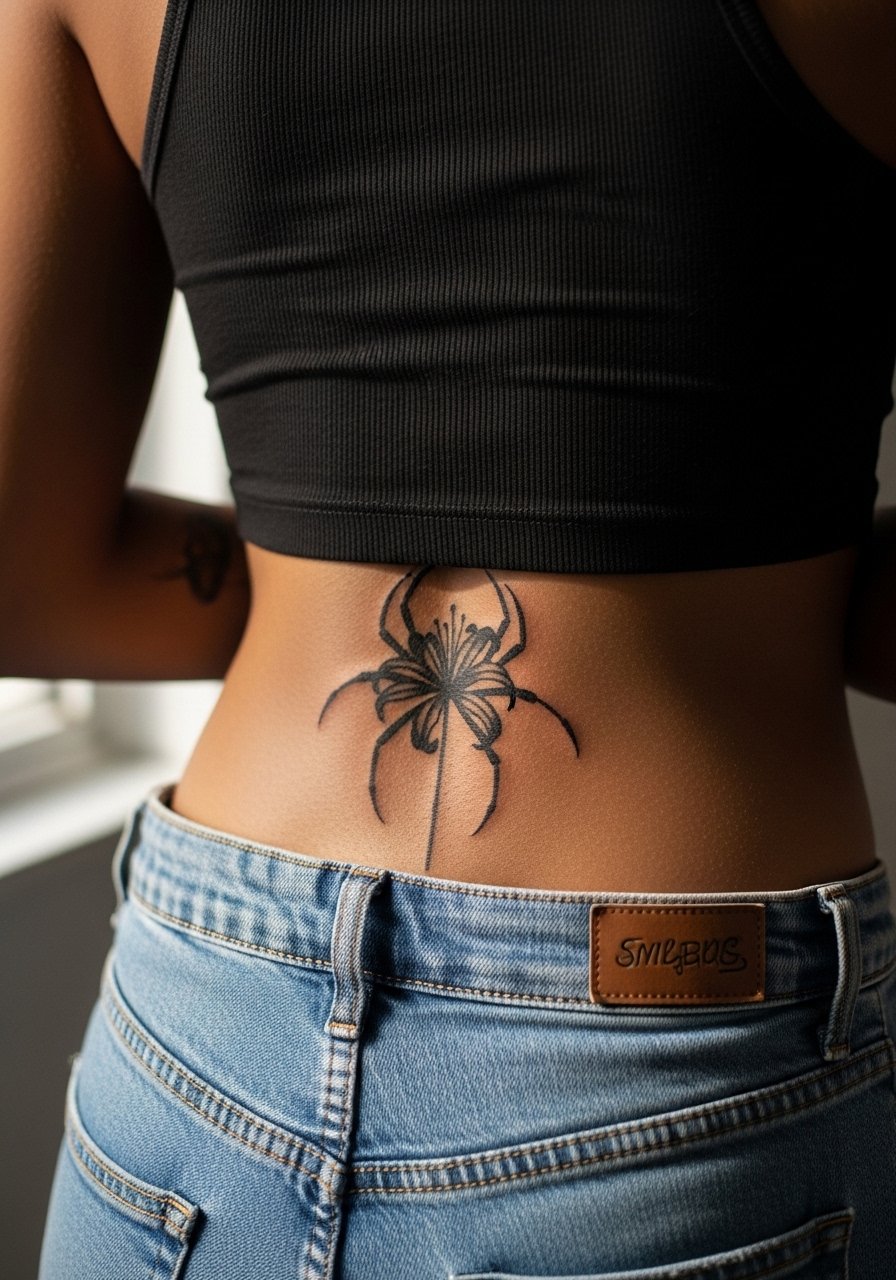
Lower back pieces are durable and less prone to daily abrasion than hands or feet. A silhouette style emphasizes shape instead of fragile line details, and that tends to age well. Tell your artist you want solid saturation and crisp edges to avoid patchy fading. Sessions are moderate and comfortable. A mistake is overloading the area with tiny details that get lost on the curve of the back. For outfits, low-rise or high-waisted combos create a frame, and a backless top highlights the silhouette cleanly.
11. Sternum Spider Lily with Fine Line Halos
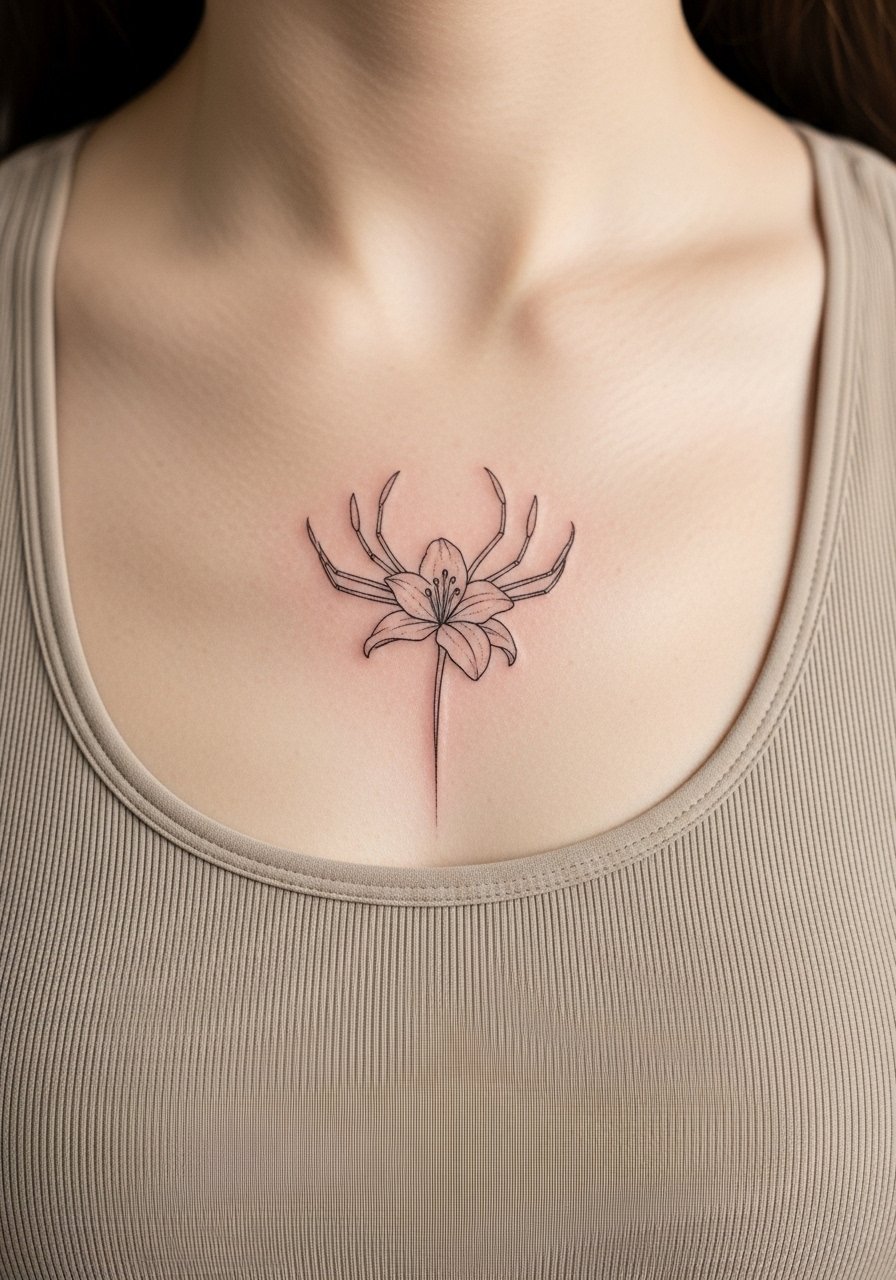
Sternum pieces are intimate and require an artist experienced with the area. The skin there reacts differently, so request slightly bolder outer lines and minimal internal micro detail. Sessions can be uncomfortable and longer than you expect. One common mistake is underestimating how much movement affects healing. For the appointment, a fitted sports bra or zip hoodie makes access simple. Consider delicate necklaces when dressing to keep focus above the work rather than on the band of skin.
12. Calf Runner of Spider Lilies in Whip Shading
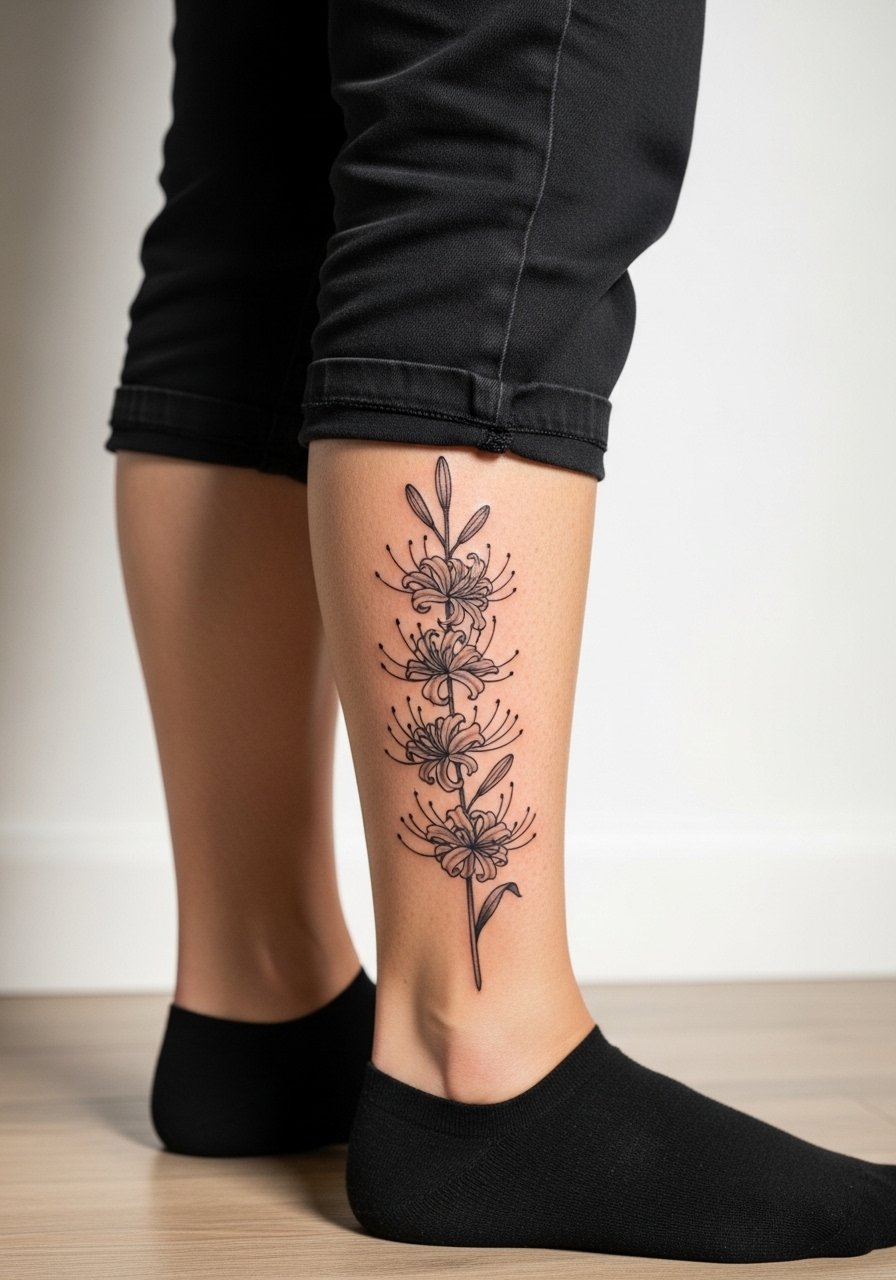
Calf placements give vertical designs room to breathe and are less prone to friction. Ask for whip shading to create gradations in petals without over-saturating the skin. Sessions are comfortable and healing is straightforward. A misstep is tight placement so the runner reads as a block rather than as a gentle flow. For beach days or sandals, calf runners pair well with a low-profile slide sandal that keeps the area visible and relaxed.
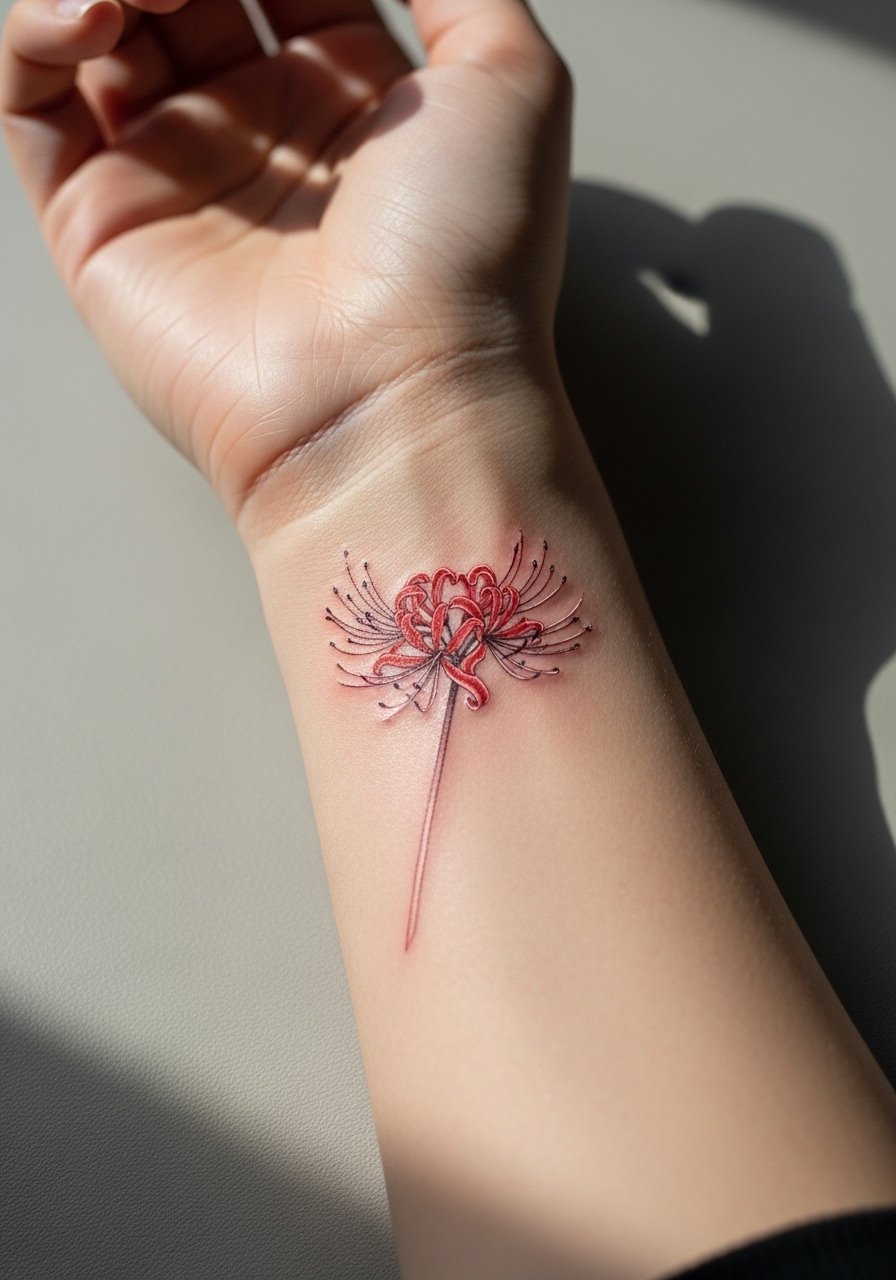
13. Minimalist Single-Line Spider Lily on Wrist
Single-line designs look clever but need careful spacing to avoid early merging. Tell your artist you want a small gap at critical petal intersections and slightly increased line weight compared with true one-point-line flash. The wrist sees lots of sun and washing, so expect maintenance by year three. People often ask for ultra-tiny versions that blur into a squiggle. For showing it off, a thin minimalist watch complements without covering the linework.
14. Geometric Framing with Negative Space Lily on Shoulder Cap
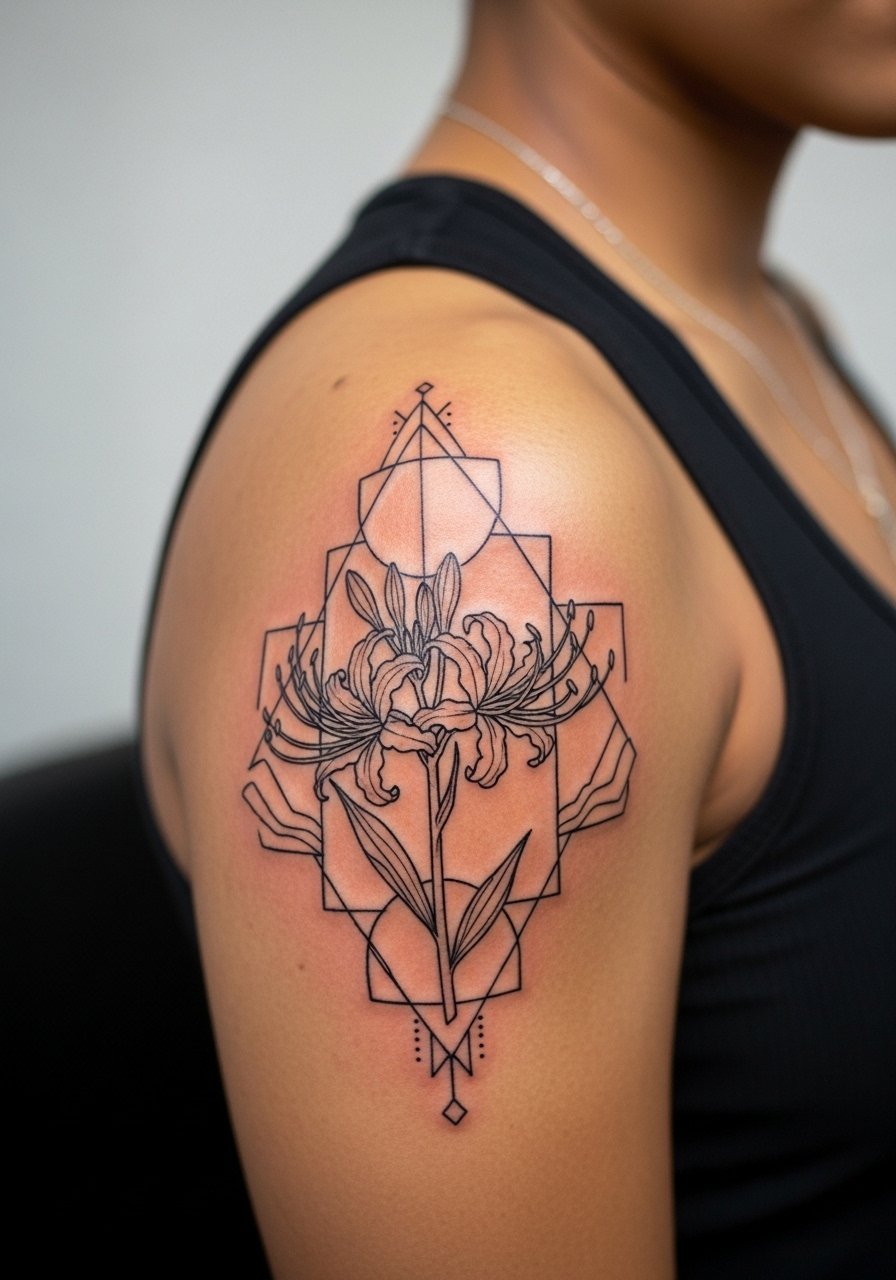
Shoulder caps handle combined styles well because skin there does not stretch as much as the ribs. Ask for defined negative space between floral and geometric elements so both read independently when healed. Sessions are short to moderate and pain is low. A common error is placing tiny geometric repeats that visually compete with the petals. For casual wear, a scoop tank top keeps the cap visible without exposing too much skin.
15. Tattooed Petal Wrist Band with Dot Accents
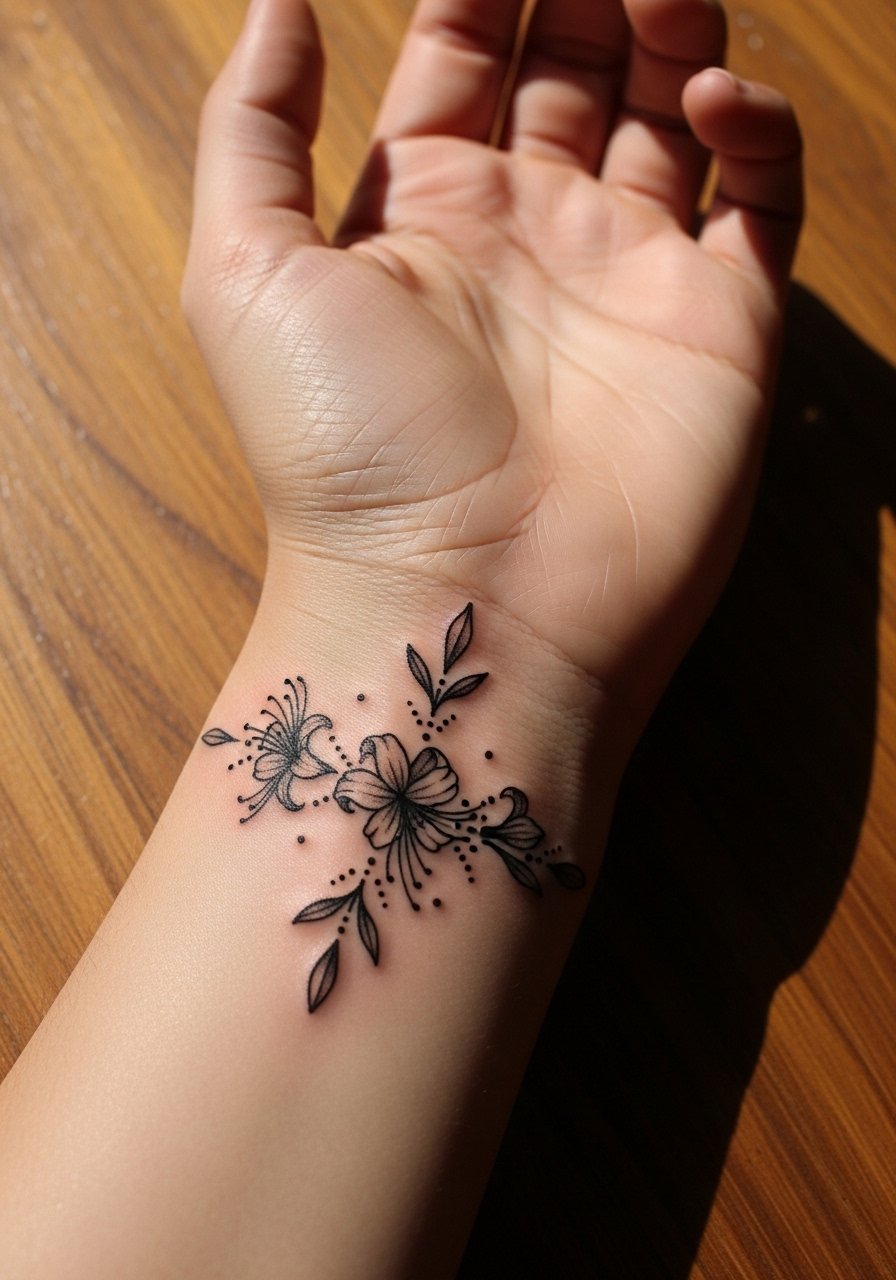
A wrist band creates a continuous statement without a large canvas. Request dot work for the background so the petals pop, and ask for slightly heavier outlines on the outer band to retain shape under friction. Sessions are quick but expect a touch-up at one year. Mistakes include too many tiny dots that fade unevenly. For display, stack with a thin chain bracelet to enhance the band without obscuring it.
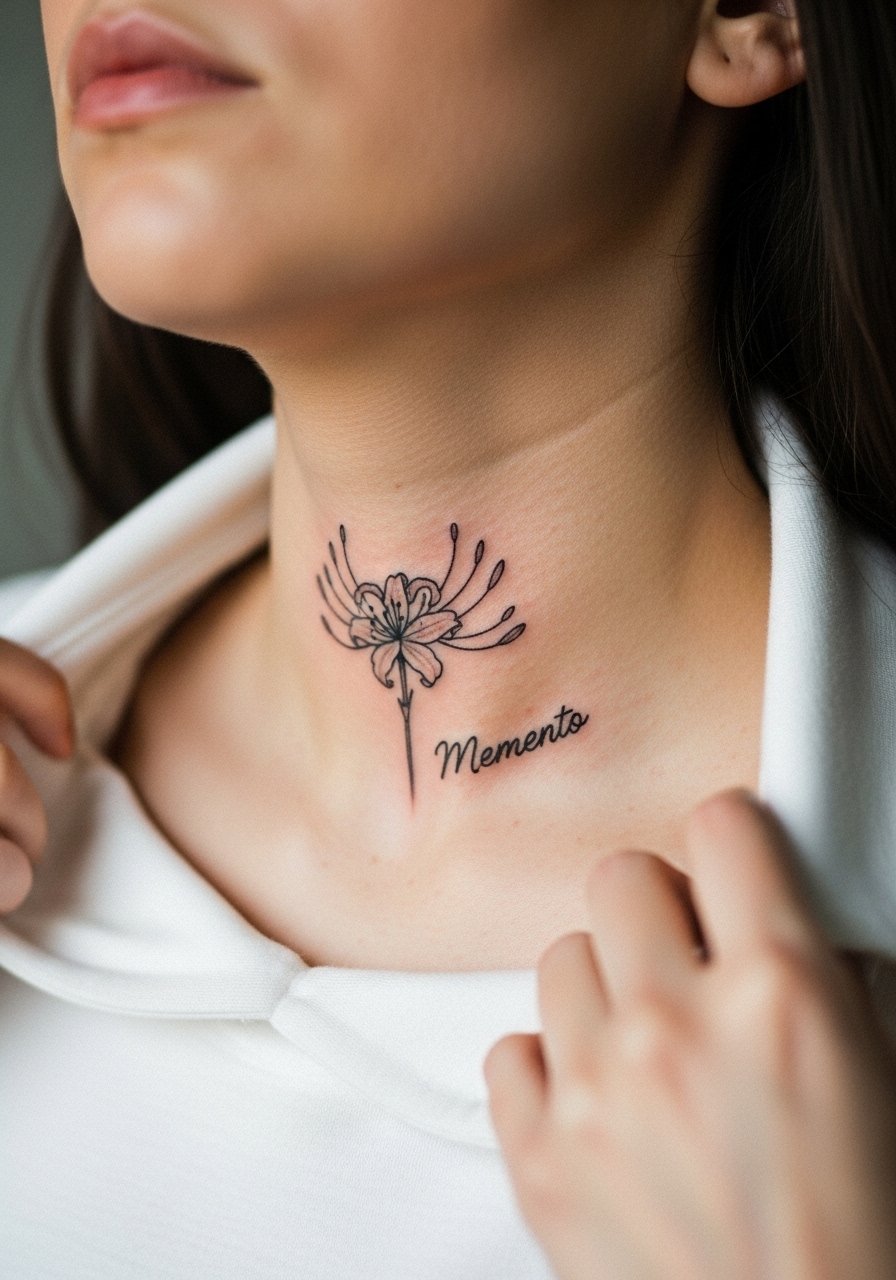
16. Small Back-of-Neck Spider Lily Script Combined
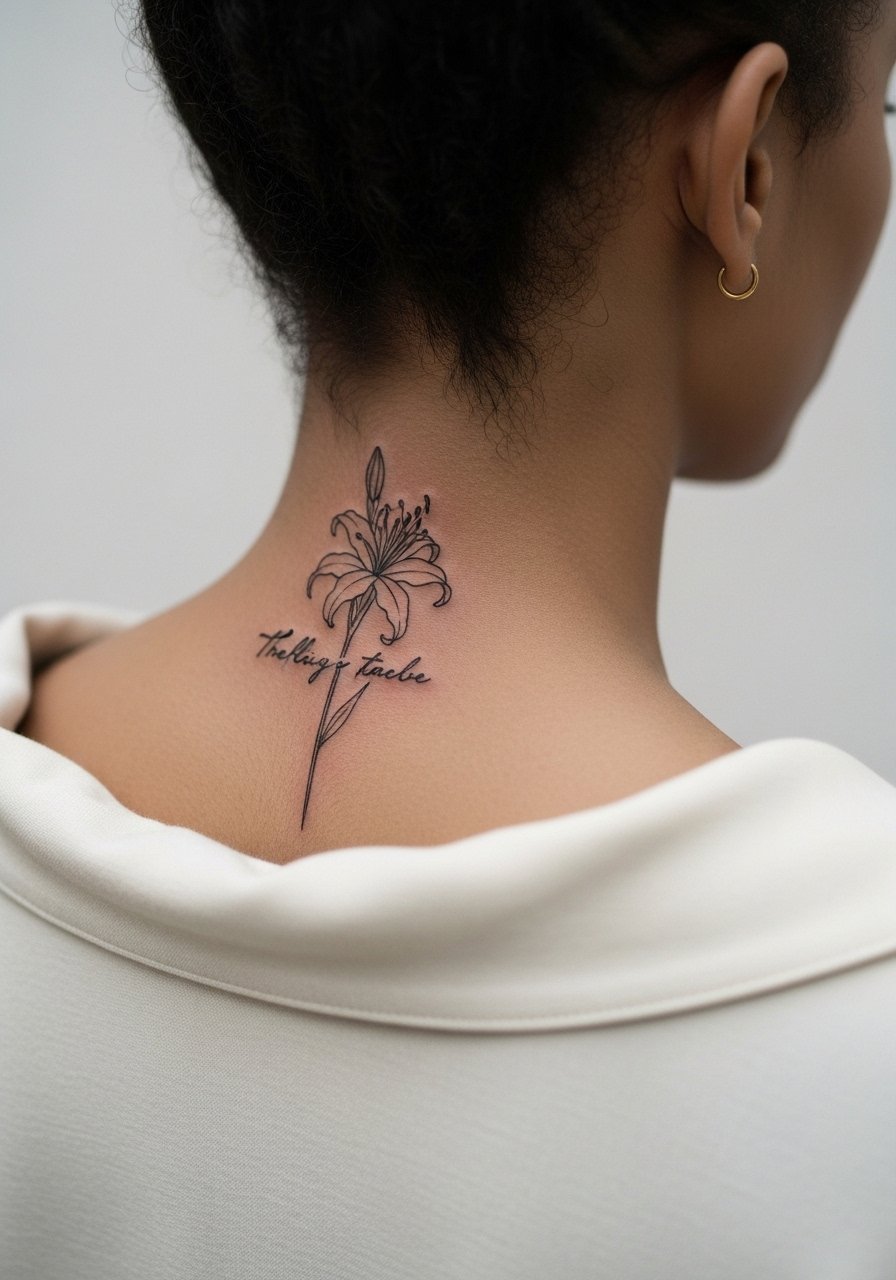
Back-of-neck placements need caution because hairlines and collars can rub. If you want script, specify exact text and font to avoid generator gibberish. Expect a short session and occasional touch-ups if hair growth or collars irritate the spot. Artists differ on recommending fine line here, so ask about their experience. For session access, a wide-neck shirt that you can shift works best. A delicate short chain necklace keeps attention near the design without rubbing it.
17. Hip Blade Single Lily with Soft Grey Wash
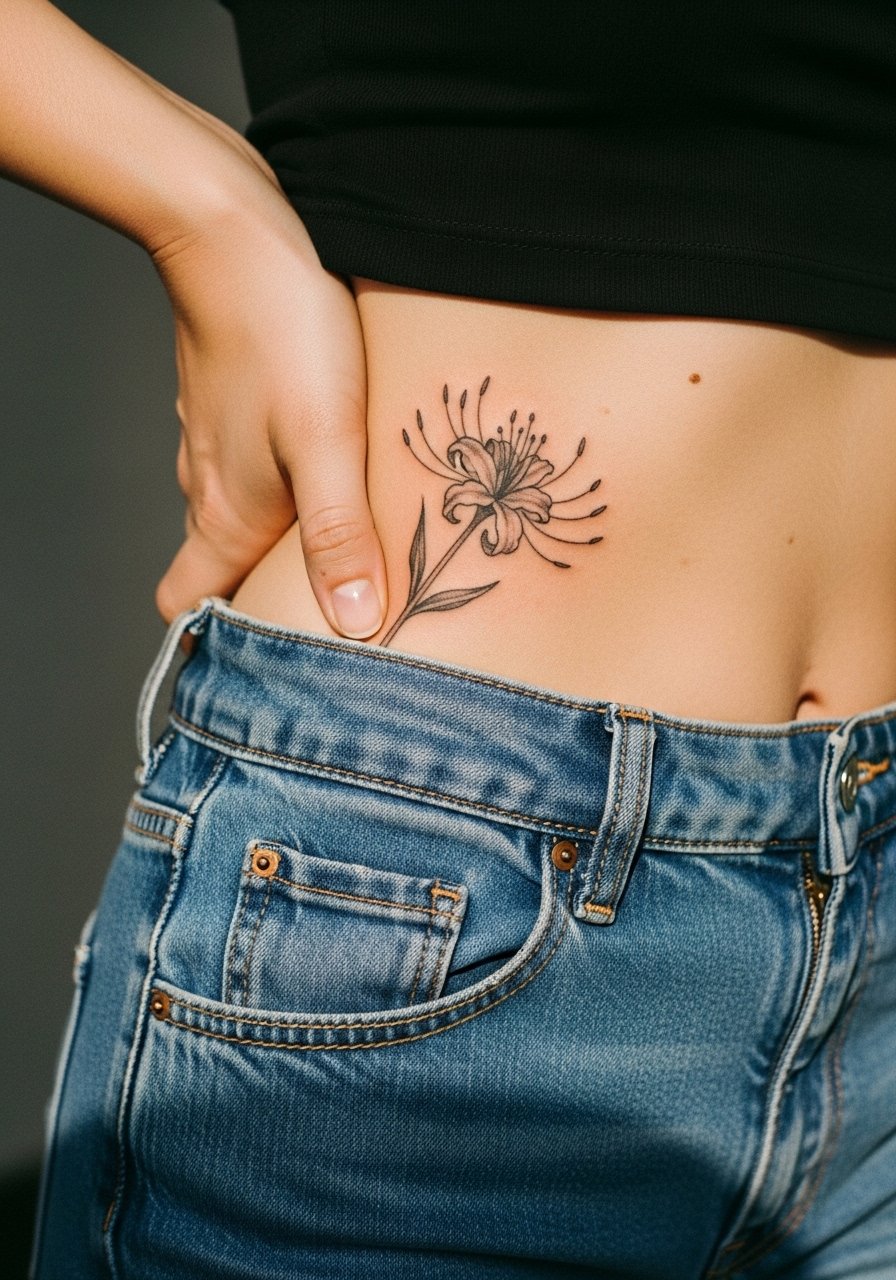
Hip pieces sit where clothing and waistlines can rub the healing skin. Request a soft grey wash that reads like shadow rather than heavy fill so the petal edges keep definition. Sessions are moderate and you should expect to avoid tight waistbands for a few days. The common mistake is underestimating the waistline friction that can pull scabs. For outfits, high-waisted bottoms that sit below the tattoo line or a bikini bottom with higher cut let the motif remain visible without stressing the area.
18. Inner Bicep Micro Bouquet in Fine Line
Inner bicep ink needs a gentle hand because the skin there is softer. Ask for a slightly denser lineweight and stipple shading rather than heavy grey tones. Sessions can be uncomfortable when the artist works near the armpit, so plan for breaks. A mistake is cramming too many tiny elements into the soft area. For session wear, a sleeveless top you can slide to expose the inner arm is ideal. When showing it off casually, short-sleeve shirts that lift slightly do the job.
19. Spine-Aligned Vertical Lily Chain
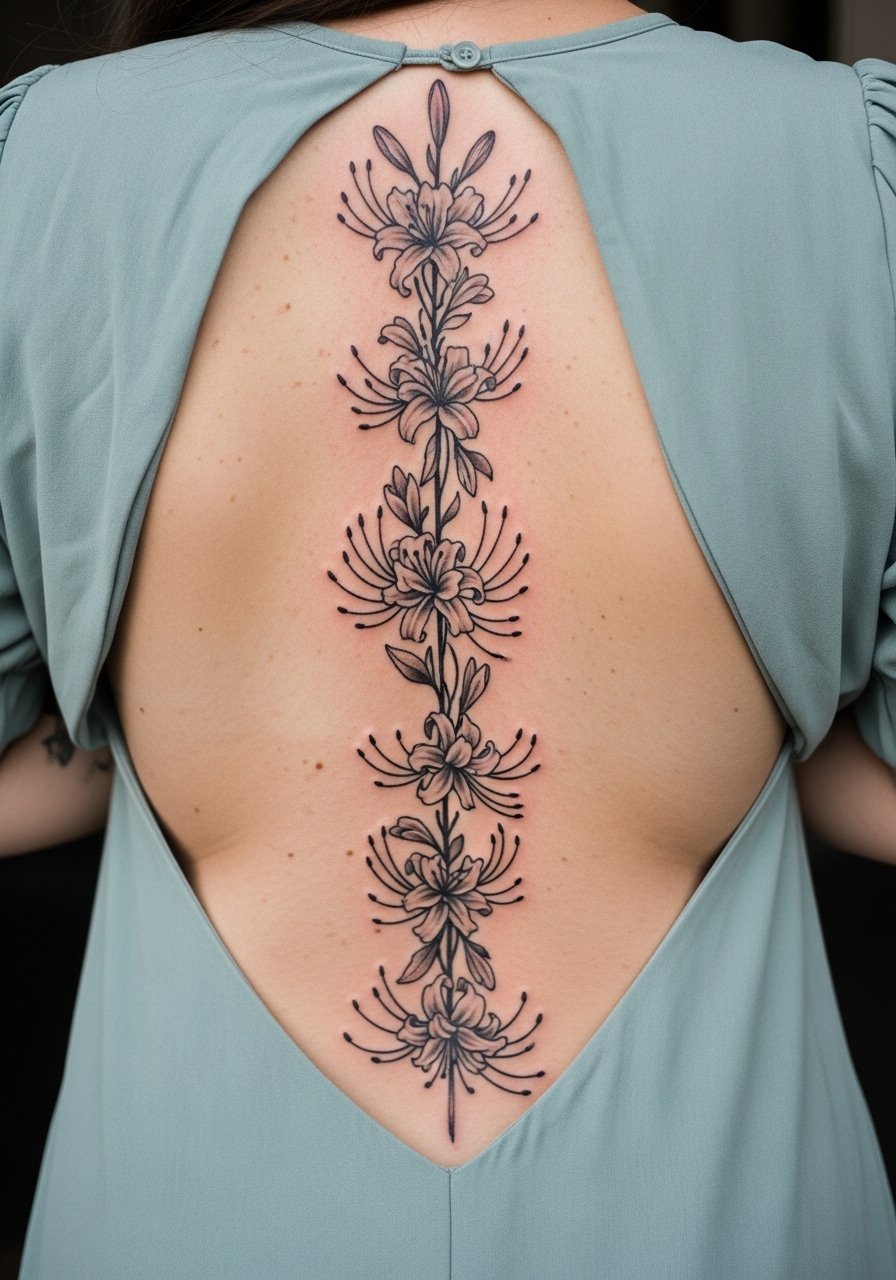
Spine work reads dramatically and ages well when you let each flower have breathing room. Tell the artist you want staggered spacing and slightly bolder stems to anchor the chain against posture changes. Sessions may be lengthy and you should expect soreness afterward. Packing too many flowers too closely is the most common mistake. For occasion wear, open-back dresses frame spinal pieces nicely and keep fabric from rubbing, such as pairing with an open-back midi dress.
20. Finger Knuckle Micro Lily Trio
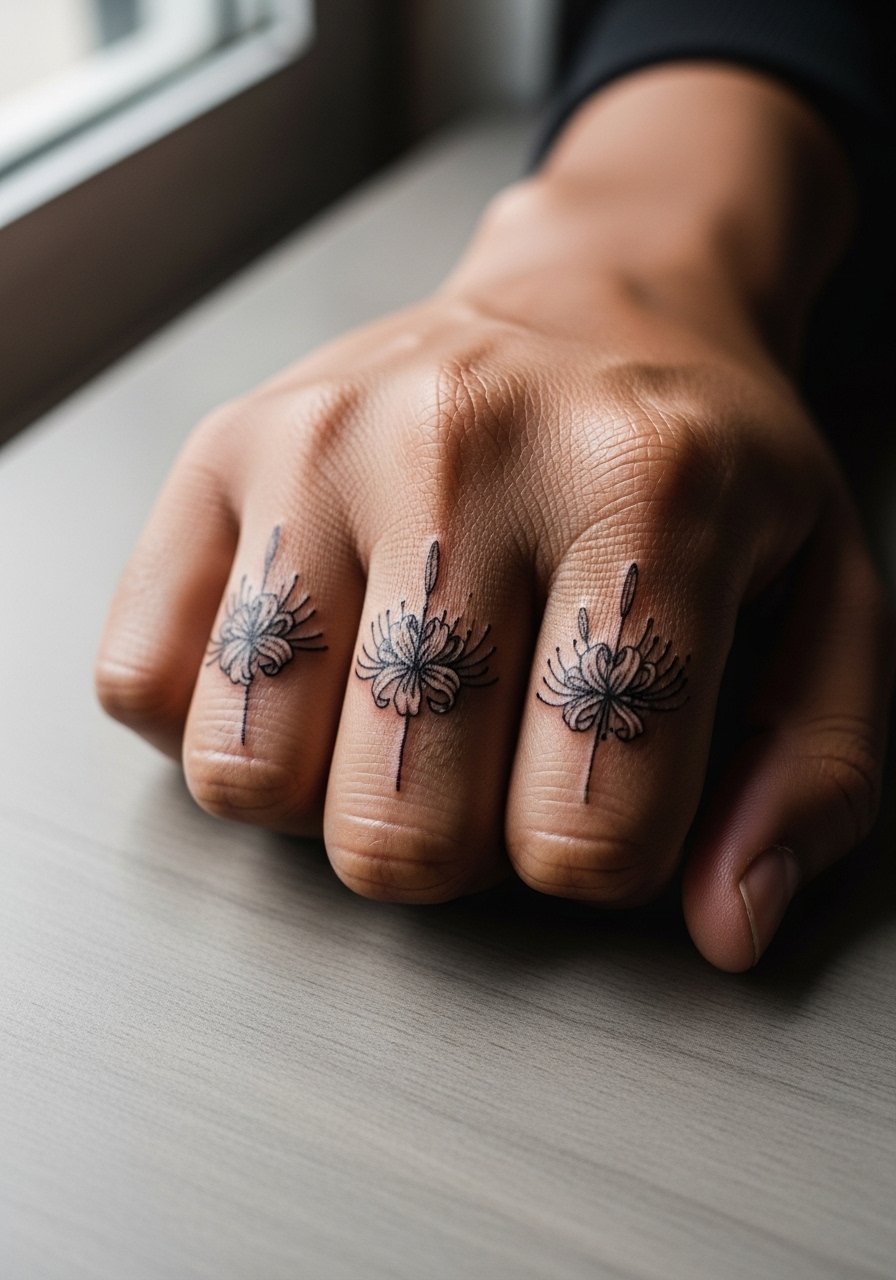
Knuckle tattoos are high-wear and often need refreshing. If you want a trio, request slightly bolder edges and accept a realistic touch-up timeline of one to two years. Sessions are quick but healing is ongoing because of frequent washing and use. A mistake is putting complex detail on each knuckle. For styling, small metal stackable rings keep the hand visually interesting without covering the knuckle motifs.
21. Full Back Botanical Scene with Spider Lilies

A full back composition lets you build narrative and depth. Ask your artist for a healed mockup or stencil test to fine tune scale before ink. Sessions span multiple long sittings and touch-ups are typical. The common mistake is over-detailing small elements that end up muddy from a distance. For practical reasons, choose clothing that opens in the back for sessions so the artist can work without awkward adjustments. A button-down shirt worn backwards is a useful option for access.
22. Small Upper Arm Accent Near the Shoulder Joint
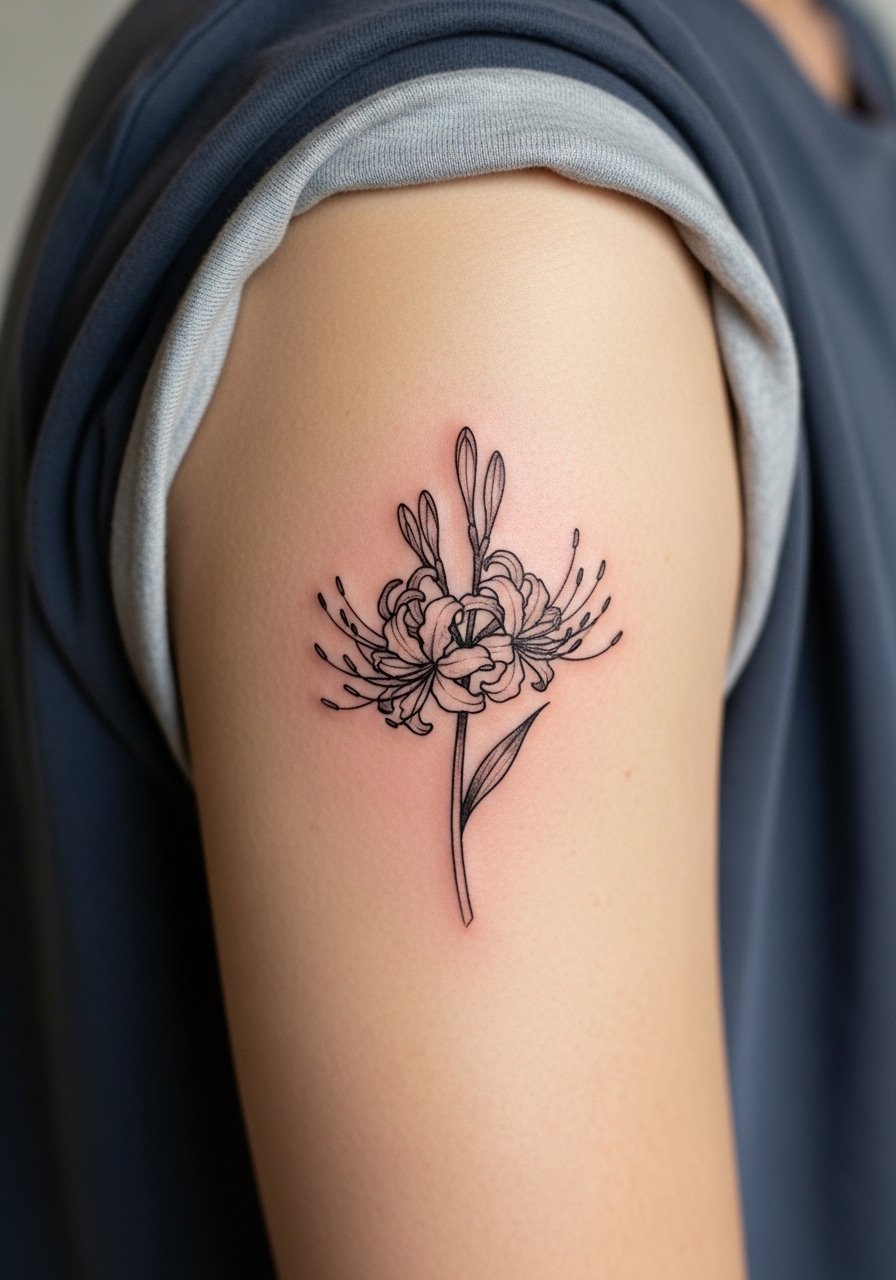
Upper arm accents are classic and durable because the area is not often sun-exposed. Request moderate line weight and minimal internal shading so the lily remains crisp over time. Sessions are short and pain is low. A common error is too-sparse composition that looks incomplete; ask for a small counter element like a bud. For easy display, roll short sleeves or pick a short sleeve linen shirt that frames the shoulder without covering the art.
23. Higanbana-Inspired Spider Lily in Traditional Colorway

Spider lilies have cultural connotations in some traditions, and opinions split on decoratively adapting them. One camp argues these motifs carry specific ceremonial meanings and deserve faithful representation. The other camp says thoughtful personal reinterpretation is acceptable if you approach it respectfully. If you choose a traditional colorway, tell your artist you want authentic color saturation and research origin respectfully. Sessions are moderate and may require layering for color depth. For beach looks, a high-cut swimsuit bottom shows the outer thigh placement cleanly.
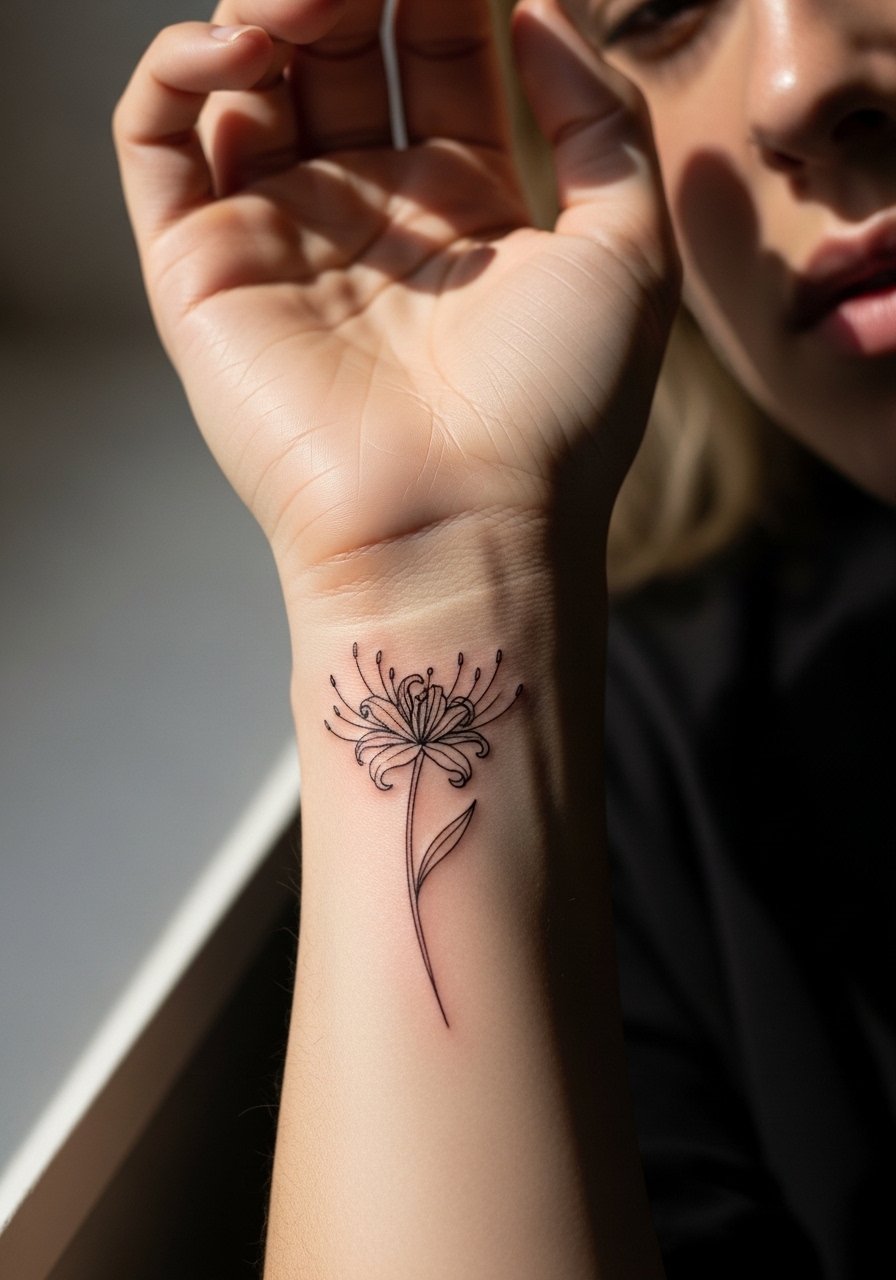
24. White Ink Highlighted Lily on Inner Wrist
White ink can add pop but it fades faster than darker ink and can appear creamy on some skin tones. Ask for white only as highlights on top of black anchors so the lily reads when the white softens. Expect touch-ups earlier than for pure black. Wrist skin sees a lot of wear and washing so plan accordingly. A typical mistake is asking for extensive white fill. For jewelry pairing, a thin bangle bracelet sits above the highlight without rubbing directly on it.
25. Petal Fragment Behind the Knee

Behind-knee tattoos are unusual and move with walking and bending. Request simple, bold outlines and avoid tiny internal detail that the skin will stretch into. The session is quick but healing can be tricky if you sit with knees bent frequently. A mistake is choosing an intricate motif for a high-movement spot. For session day, wear loose shorts or pants you can shift; a loose drawstring short keeps the area accessible without compressing the fresh ink.
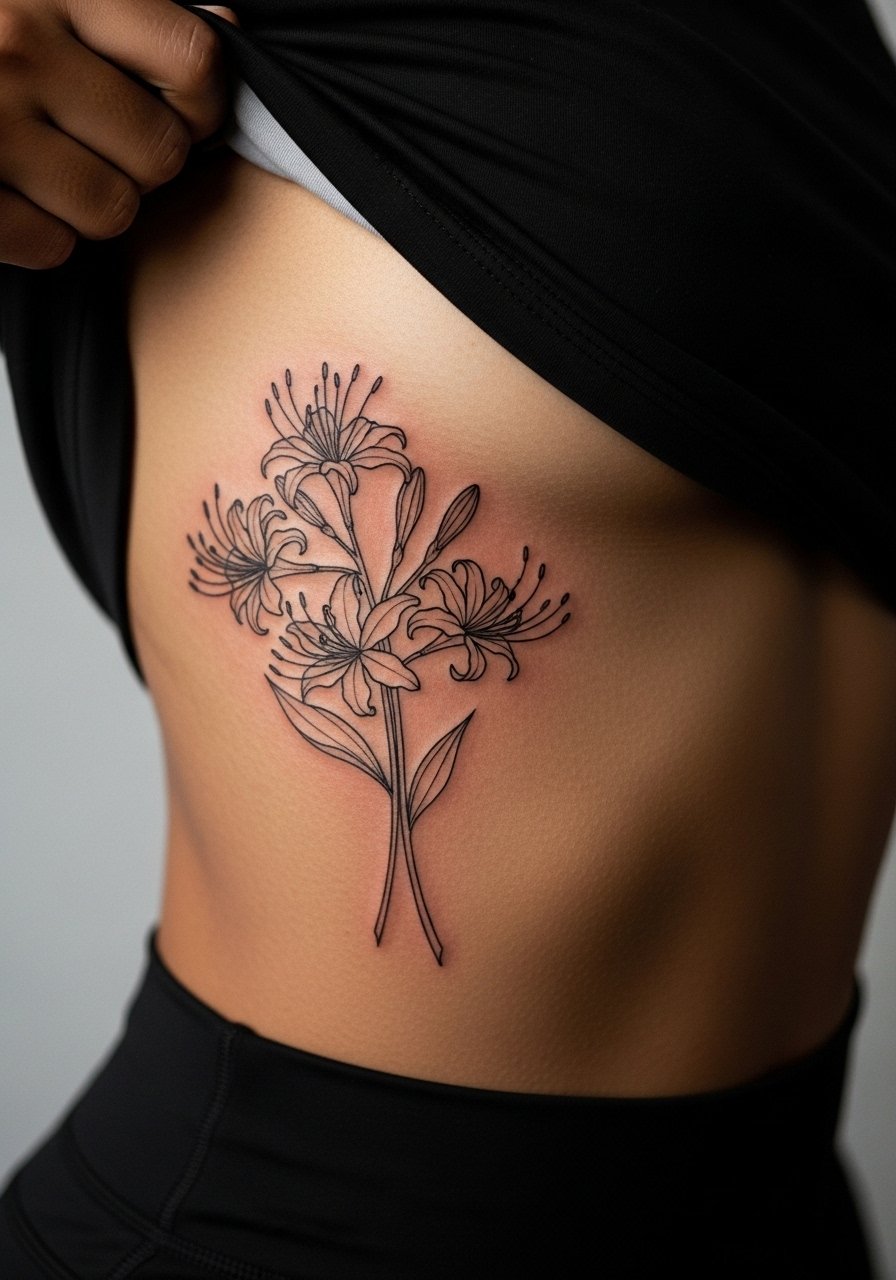
26. Negative Space Spiral Lily on the Side Torso
Side torso and rib work includes the challenge of curvature and breathing. Negative space designs are forgiving when spaced correctly, because contrast is what keeps the form readable. Discuss spacing and line weight with your artist and expect a longer session and a touch-up window. The usual mistake is packing too many thin internal lines. For the appointment, a cropped top you can lift is best. Off the table looks pair well with high-waisted silhouettes.
27. Portrait Petal with Small Script Name at Base of Neck
If you combine text with a floral portrait, specify the exact text and font to avoid surprises in the stencil. The base of the neck is visible and sensitive, so expect a short but potentially twingy session and a possible touch-up. Common errors include tiny script that blurs; choose slightly larger lettering for legibility. For showing a neck piece, a wide-neck or off-shoulder top keeps attention on the area without causing friction during healing.
Frequently Asked Questions
Q: Will fine line spider lily tattoos blur faster on the ribs than on the forearm?
A: It depends on placement and the artist's approach. Ribs move with breathing and can cause very thin lines to spread faster, while forearms are flatter and usually hold linework longer. Ask your artist whether they recommend slightly heavier lineweight or more spacing for the rib design to improve longevity.
Q: How should I dress to prepare for a sternum or ribcage spider lily session?
A: Wear something easy to shift that does not require full undressing, like a fitted sports bra or a zip hoodie you can pull aside. That keeps you comfortable and protects modesty while letting the artist reach the area cleanly. A zip hoodie often works well for this purpose.
Q: Are watercolor spider lilies harder to maintain than black linework?
A: Watercolor pieces rely on softer color transitions and can fade unevenly if not anchored with darker outlines or touch-ups. If you want washes, choose a style with occasional black anchors so the overall shape reads even as colors mellow.
Q: Can I combine cultural Higanbana styling with personal symbolism without being disrespectful?
A: People are divided. Some view faithful motifs as carrying specific cultural meanings and prefer authentic use. Others adapt the imagery thoughtfully for personal work. If you go the adapted route, spend time understanding origin and mention that conversation during consultation so your artist respects context.
Q: How often should I realistically expect a touch-up for a small finger or knuckle spider lily?
A: Fingers and knuckles are high-wear zones. From what I have seen, touch-ups at six months to two years are common, depending on your job, washing habits, and sun exposure. Budget for maintenance if you want crisp long-term lines.
