
Sitting in the chair with the stencil tucked under your collarbone is the moment most people realize how visible this placement will be. The collarbone sits where jewelry, necklines, and camera angles meet, so choices about size, line weight, and spacing determine how a piece ages and how often it needs a touch-up. Below are 21 practical designs and pairing notes that help you pick a look that holds up.
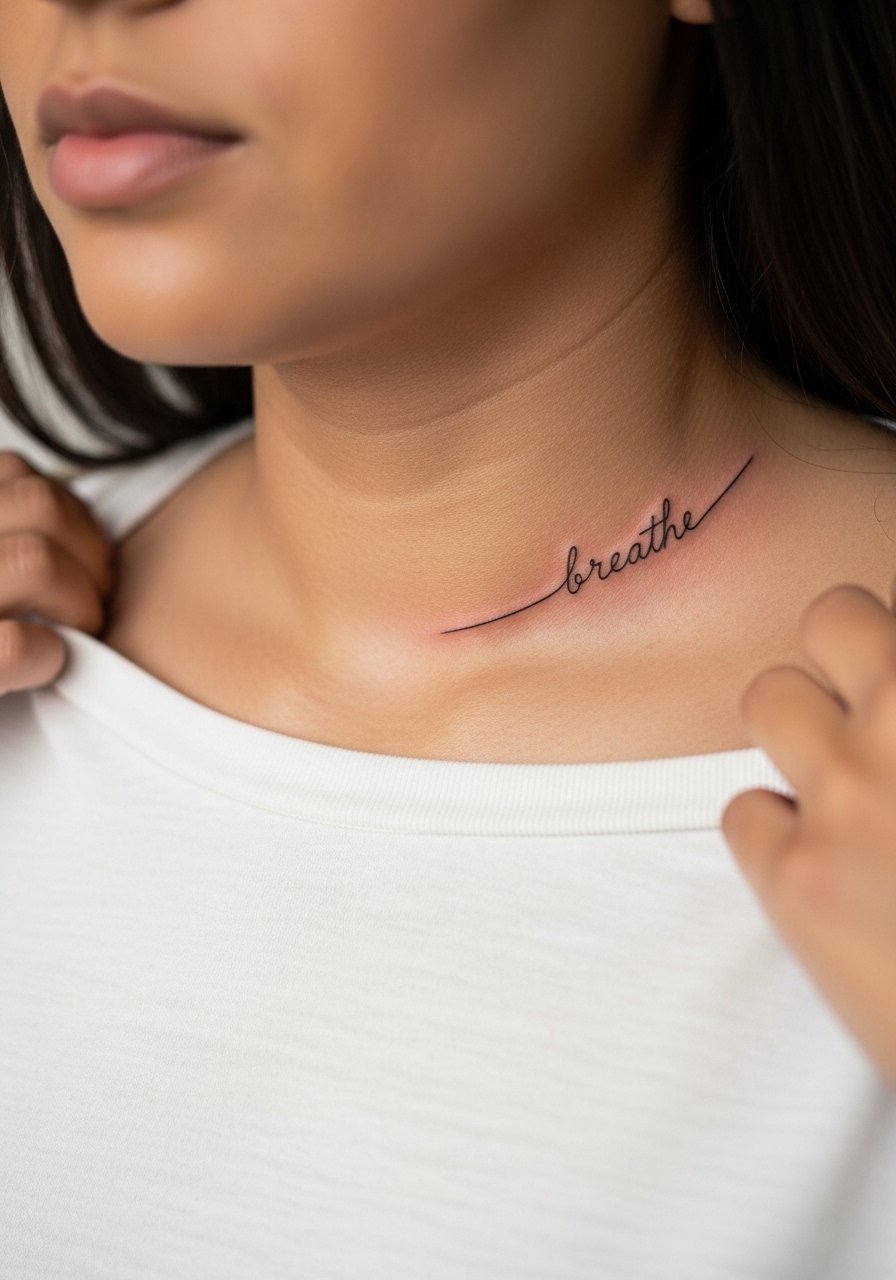
1. Fine Line Script Along the Collarbone
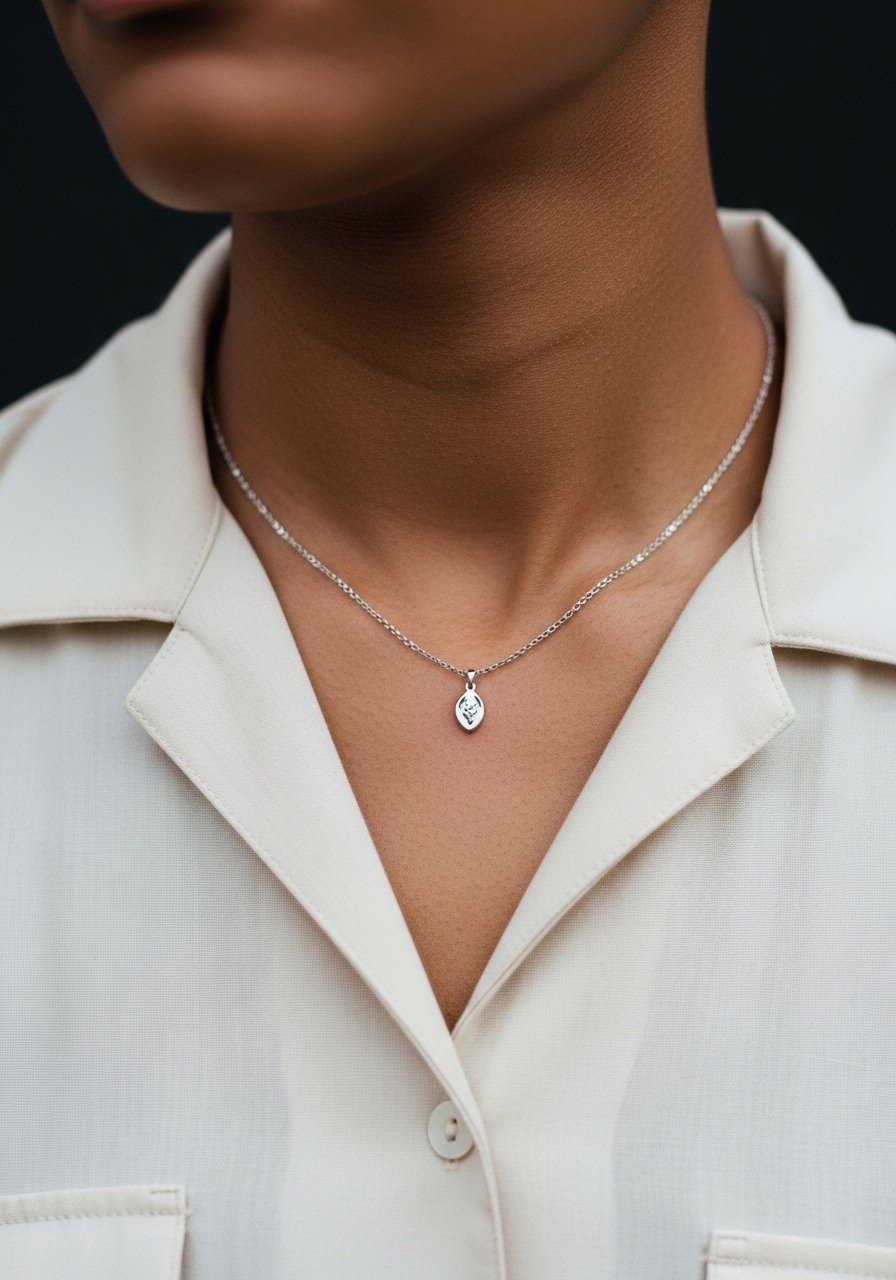
A thin, single-line script along the collarbone reads intimate without dominating. Fair warning, the collarbone is thin-skinned and can be a 6 to 8 on most pain scales, so expect sharp short stings rather than a sustained burn. Ask your artist to use slightly thicker hairlines than what looks perfect on paper. That extra micro thickness gives the letters room as the ink settles. The common mistake is asking for ultra-tiny lettering that blurs after two years. For showing it off, a delicate chain pendant necklace sits just above the line without competing.
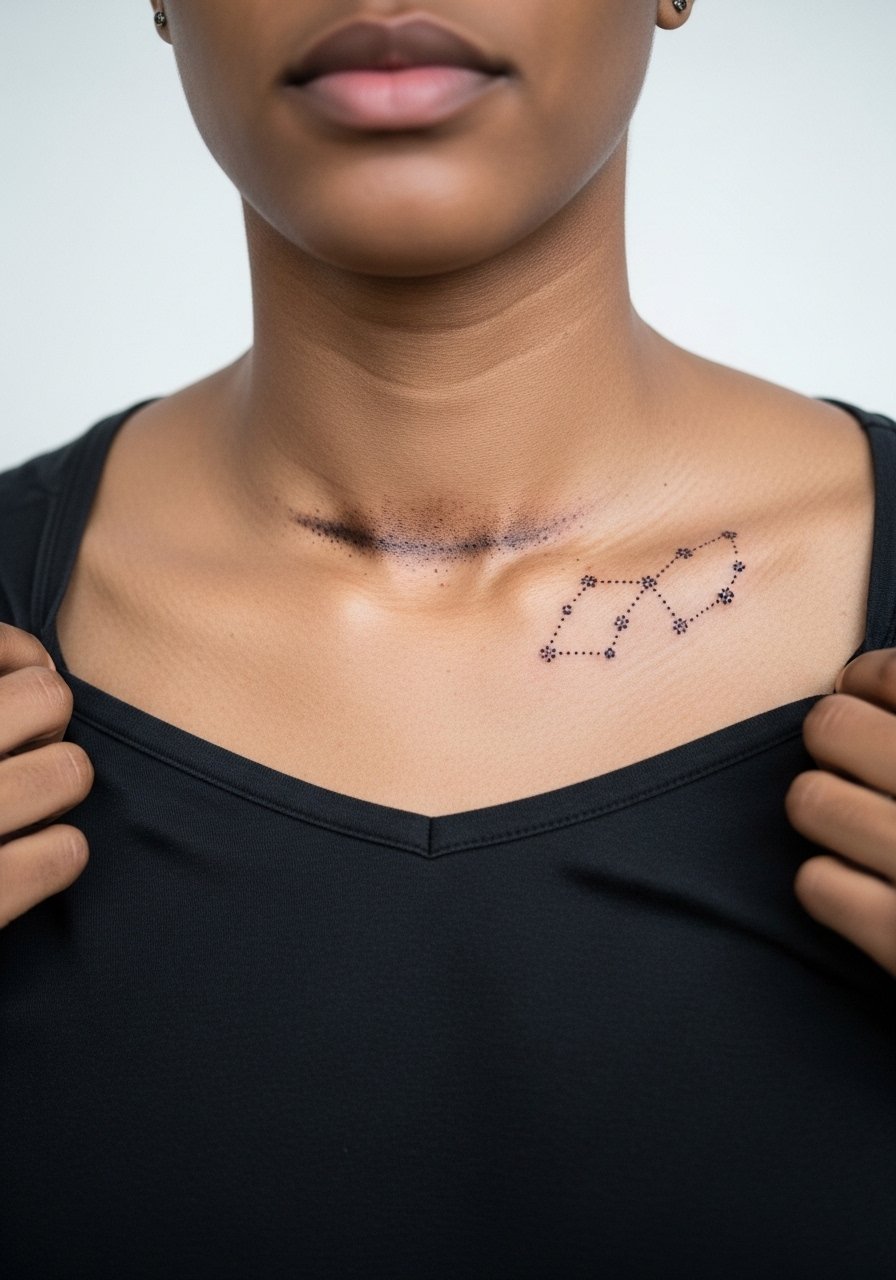
2. Minimalist Dot Work Constellation
A small constellation cluster anchored to the collarbone uses dot work and tiny stars to trace a shape that moves with shoulder motion. Expect short sessions under an hour for a compact cluster. Dot work ages well when dots have slight spacing, so tell your artist to avoid packing dots too tightly. Blowout risk is moderate if the dots are placed too close to the bone. The design reads subtly under crew neck shirts and looks more visible with open collars. No special clothing advice needed for the session, just a loose tank for access.
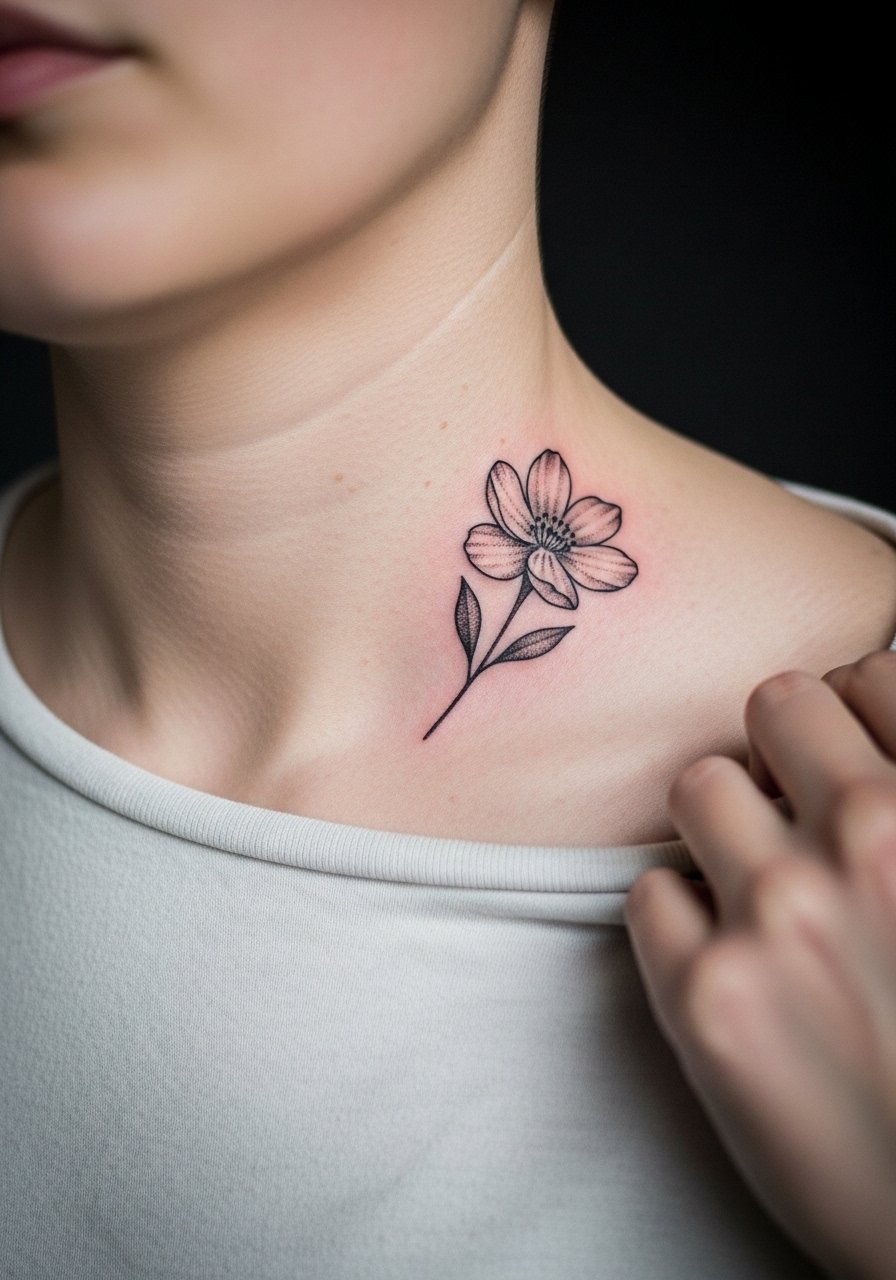
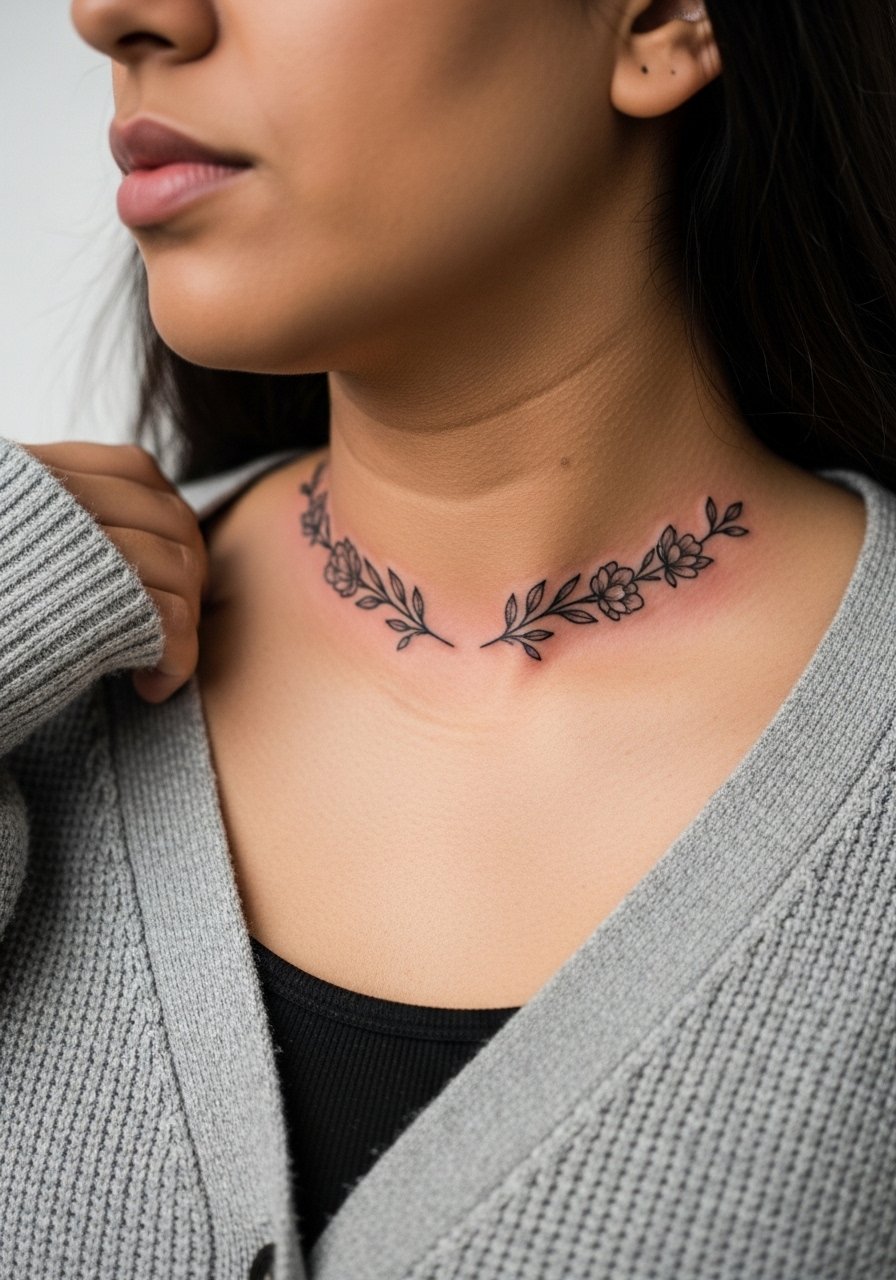
3. Micro-Realism Single Flower
A single micro-realism bloom at the collarbone brings texture without heavy saturation. Micro-realism holds up when artists use shallow, stipple shading rather than dense shading over bone. The session feels like short, precise passes more than long dense fills. Common error is over-shading to mimic a photo, which can muddy on the collarbone. For evenings out, pair with an open-back midi dress that frames the shoulder and collarbone. Mention to your artist that you want healed reference photos in the consultation so they can match spacing.
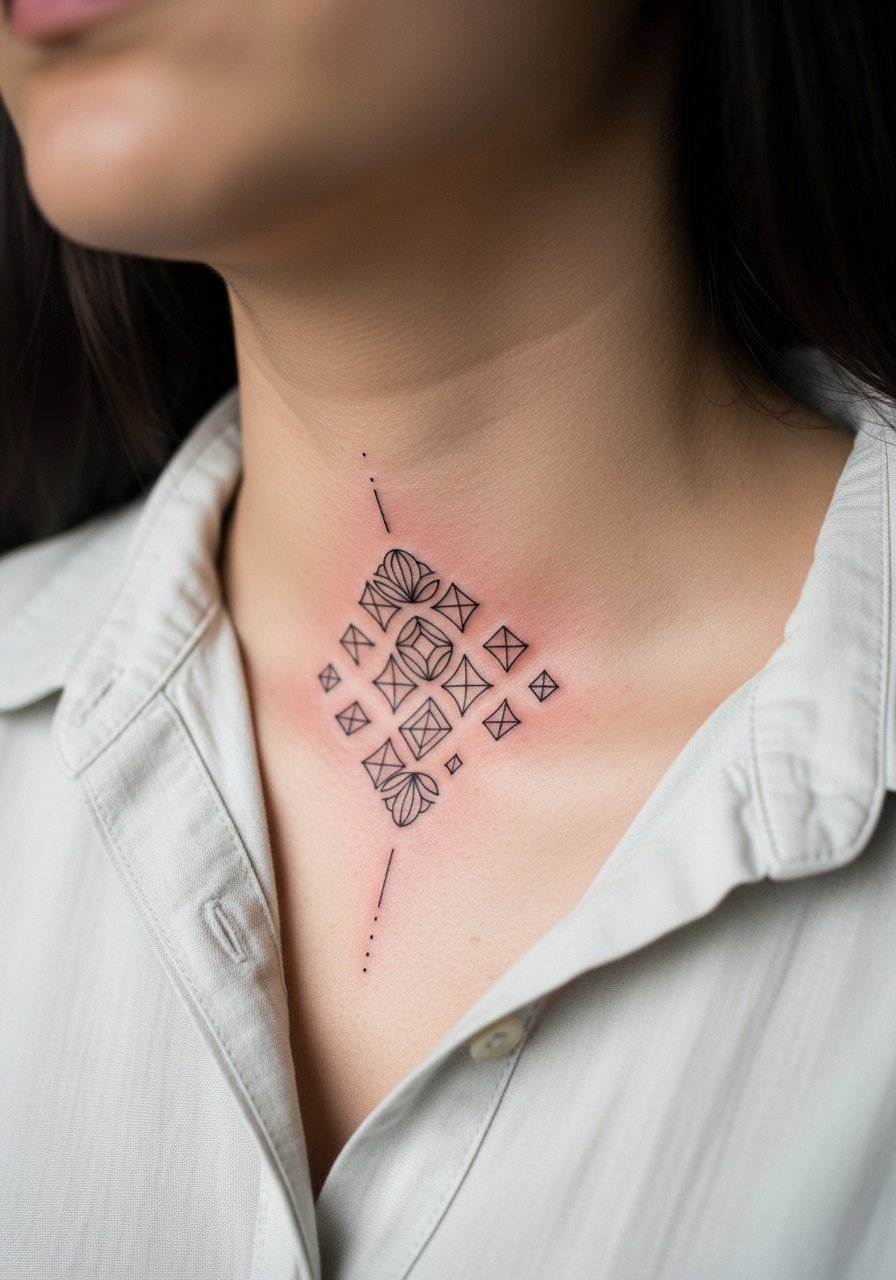
4. Geometric Line Cluster
A small geometric cluster of triangles and lines along the collarbone gives a modern edge. The major mistake is scaling the geometry too small, which causes the angles to blur over time. Ask for negative space between lines and slightly heavier linework than you think you need. Pain is noticeable near the bone but the session is usually 45 to 90 minutes. For a clean everyday look, layer a thin chain choker above the design to frame it without crowding the lines.
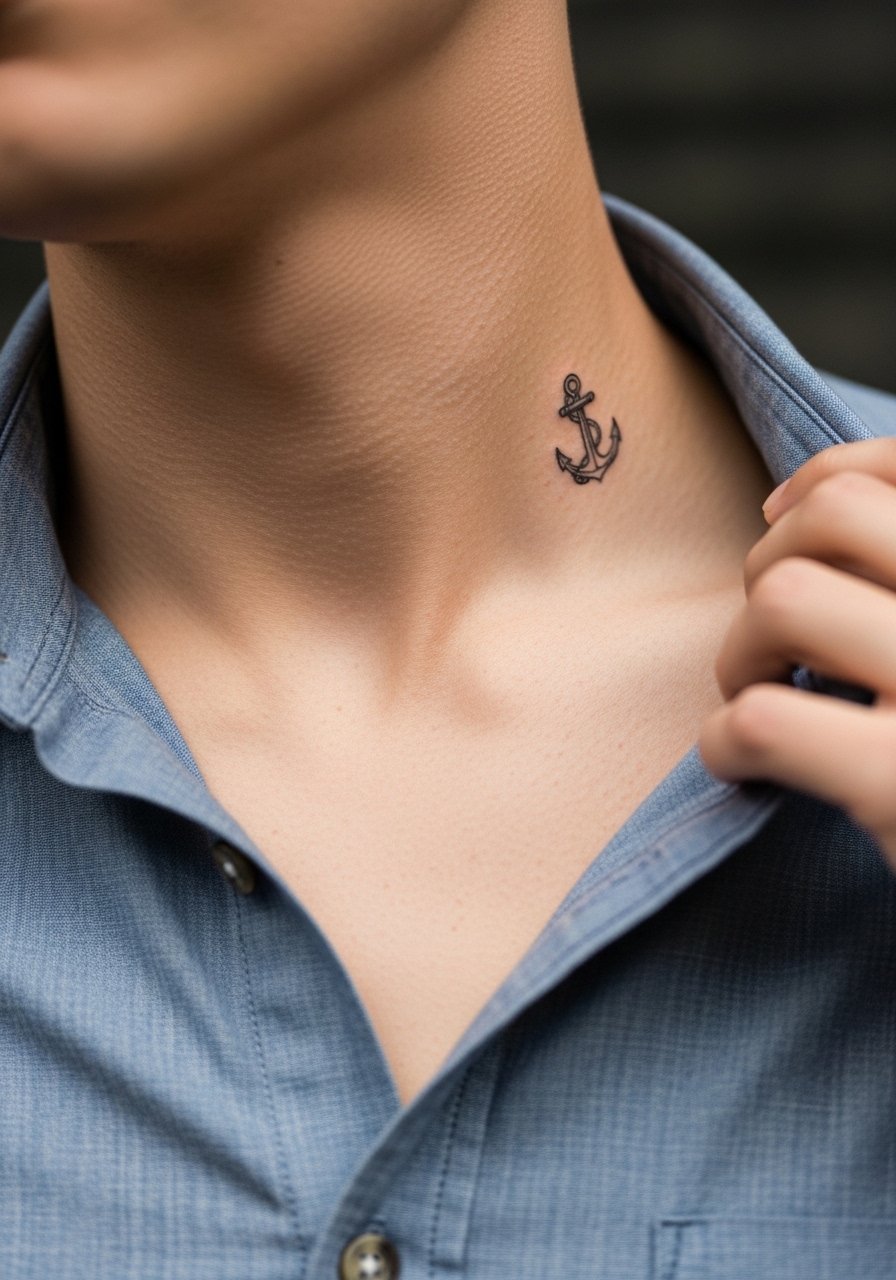
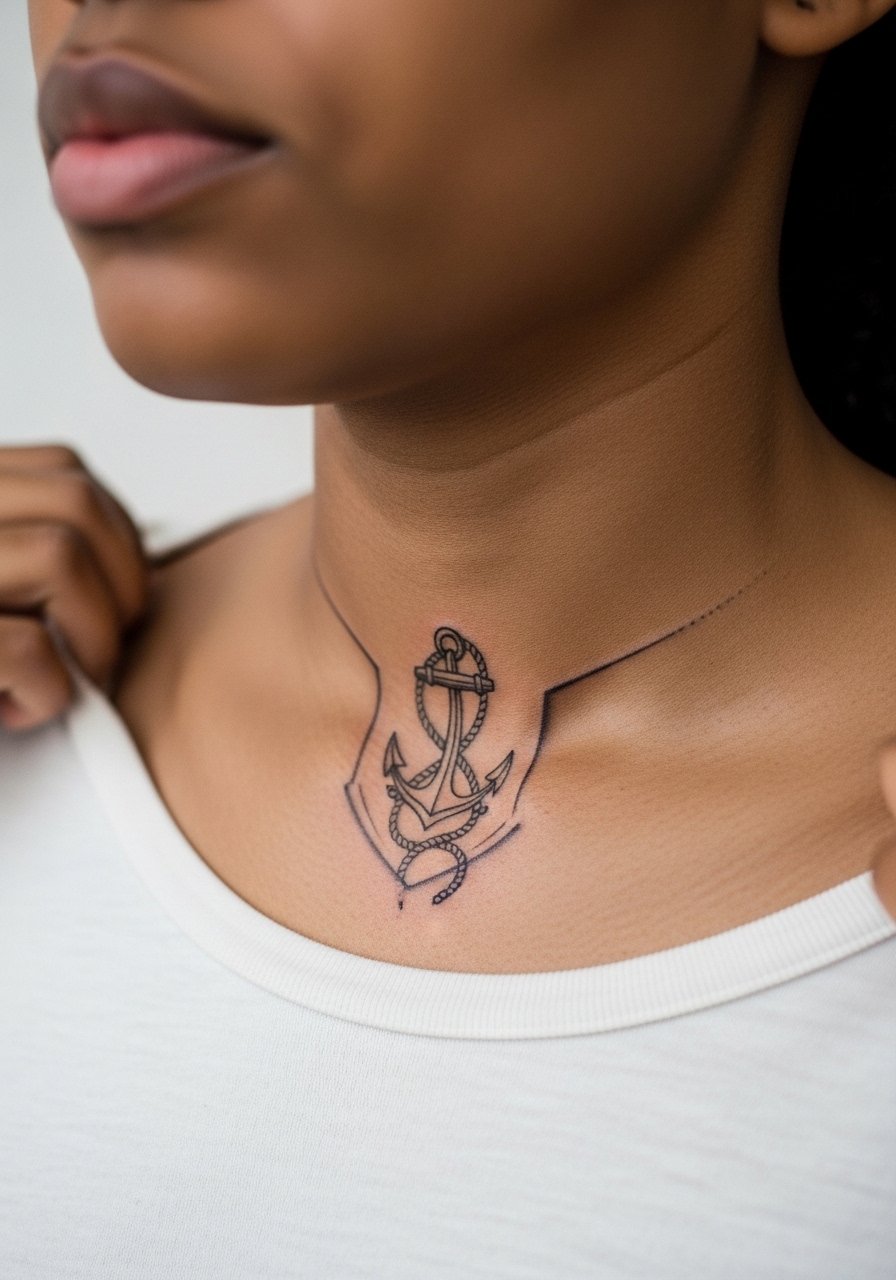
5. Tiny Anchor or Nautical Symbol
A compact anchor or nautical glyph sits naturally on the outer collarbone and translates well into tiny jewelry-like pieces. These are quick sessions that feel like repeated pin pricks. The usual error is too-dense fill inside the tiny shape, which ages into a blob. Request crisp outline with minimal solid fill and plan for a touch-up at year two if you want the crispest edge long-term. For session wear, a loose button-down shirt you can slide aside keeps the area easy to reach.
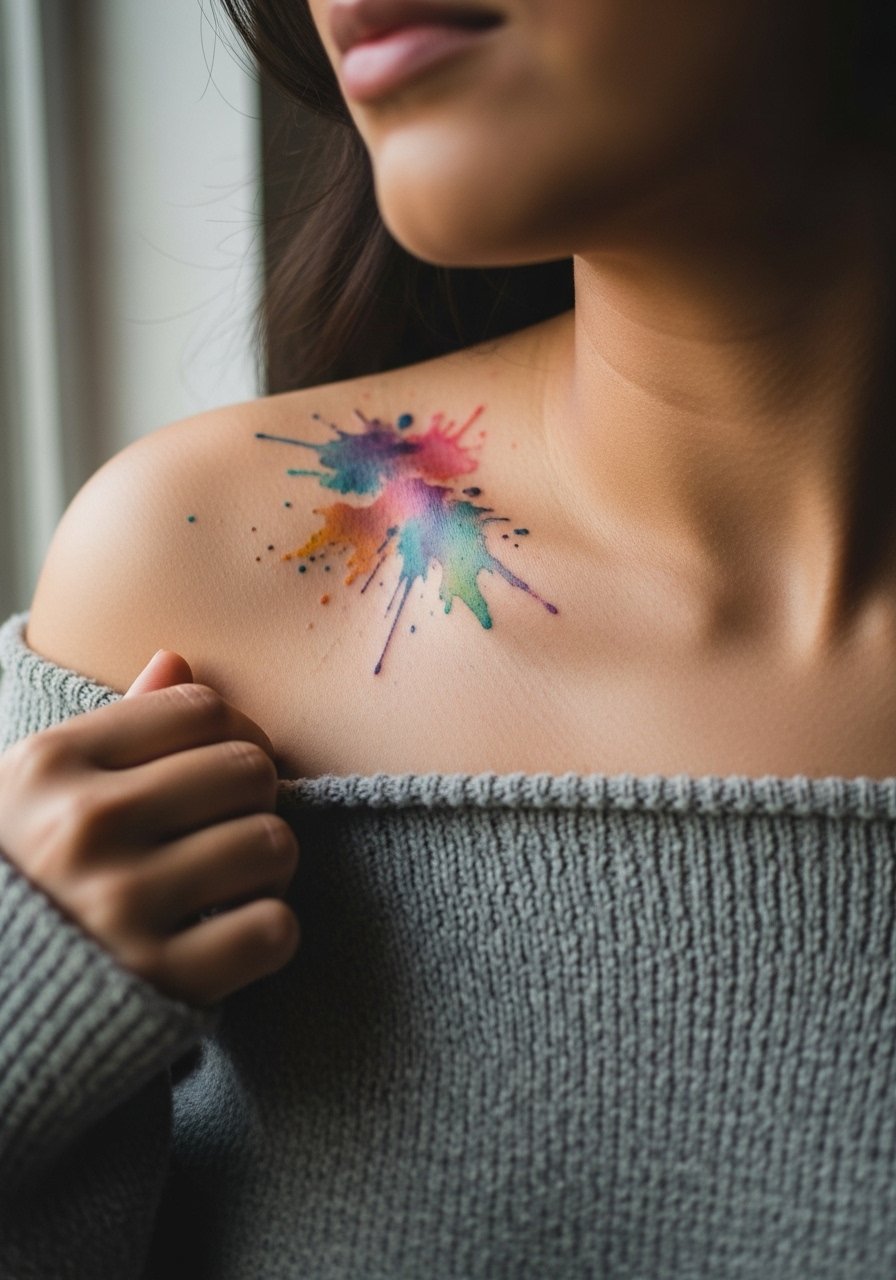
6. Watercolor Splash Accent
A watercolor splash tucked beneath the collarbone offers color without bold outlining. Watercolor fades differently on the collarbone than on fleshy areas. The controversy here is visible. One camp says watercolor should avoid collarbones because color washes diffuse on thin skin. The other camp argues that careful saturation and spacing can keep watercolor tones readable. Ask the artist how they handle pigment depth and expect touch-ups sooner than with black ink. For showing it off, an off-the-shoulder sweater lets the color peek through while keeping overall coverage.
Studio Day Picks
Those first six collarbone pieces span fine line, micro-realism, geometry, and watercolor, and a few small items make the session and the first week much easier.
-
Stencil transfer paper kit. Lets you check exact placement on the collarbone before the needle hits skin, which is crucial for pieces that follow necklace lines.
-
Topical numbing cream. Applied as directed before the appointment it reduces sharp sensations near the bone without affecting the artist's ability to work.
-
Thin protective film roll. Useful for covering delicate collarbone lines during the first days when clothing might rub the area.
-
Fragrance-free gentle body wash. Cleanses the area without irritating sensitive linework, especially important for exposed upper chest pieces.
-
Aquaphor healing ointment. A thin initial layer helps hold moisture on collarbone tattoos where airflow can dry skin faster than on fleshy placements.
7. Single Bold Line Accent
A single bold black line that follows the collarbone ridge reads graphic and holds up years better than ultra-fine lines in the same spot. The session is brief but the needle will feel firmer over bone. Avoid combining bold linework with adjacent ultra-fine details without spacing, because the edges can soften unevenly as they heal. If you want contrast, request a single bold anchor line with spacing for a fine dot cluster nearby. No special clothing notes for showing it off beyond open collars.

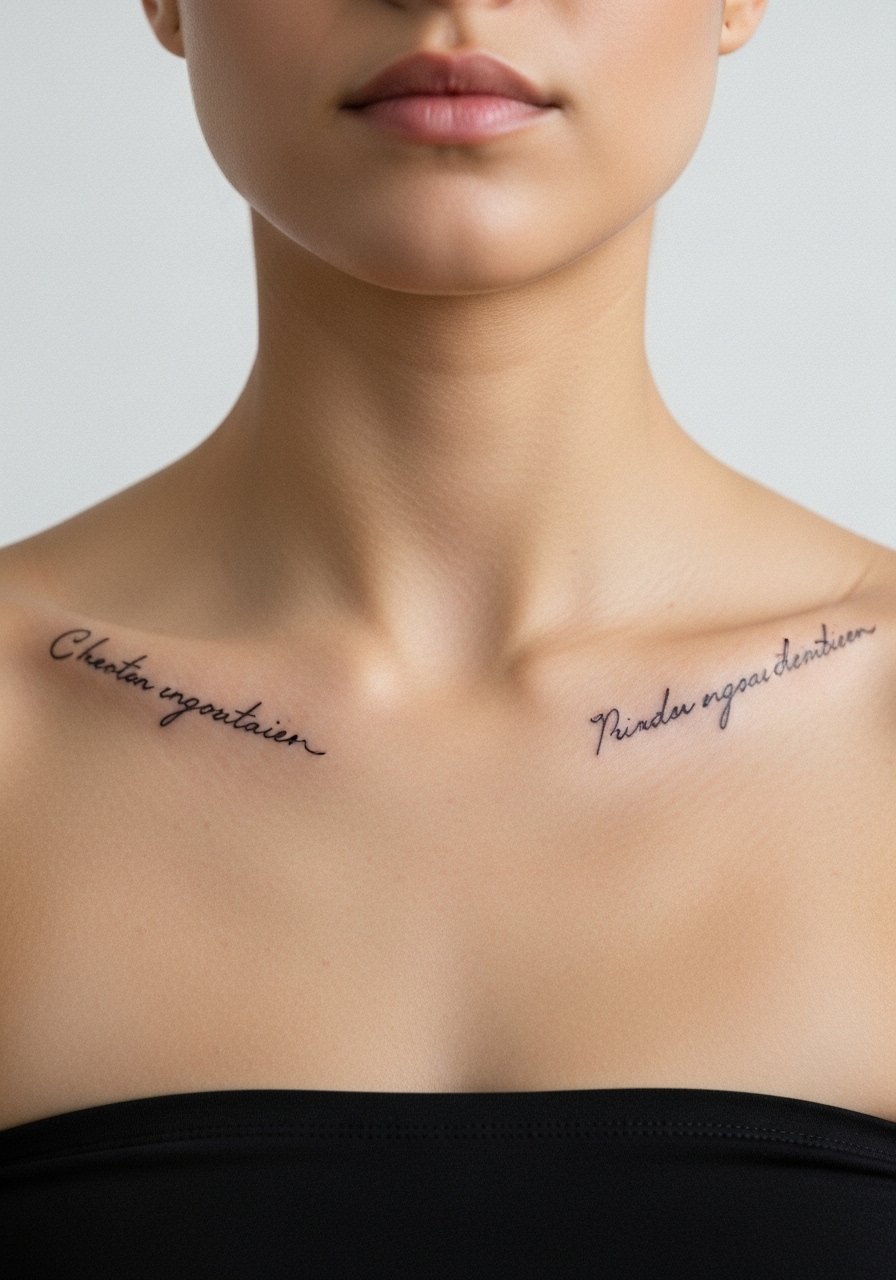
8. Mirror Script Pairing
Two matching scripts placed symmetrically on each collarbone create a framed effect when wearing low necklines. Symmetry is forgiving but only if both sides are stenciled and checked while you are upright. Tell your artist you want mirrored placement checked while you are standing and seated. A common mistake is matching by eye without measuring, which looks off in selfies and mirrors. For nights out, a strapless top shows both scripts evenly.
9. Minimal Symbol with Negative Space
A small symbol that uses negative space around it reads cleaner on the collarbone than fully filled shapes. Negative space reduces blowout risk on thin skin because less pigment is pushed into dense channels. This is a good pick if you want a subtle statement without dense color. The session usually runs under 45 minutes. The usual mistake is choosing too much fill. Keep it airy and ask for proofs of negative space in the stencil stage. No styling link here to avoid repeating accessories.
10. Tiny Anchor Chain or Pendant Tattoo
A small chain link or pendant inked to sit along the collarbone mimics jewelry and layers well with real pieces. Tell the artist you want the chain spacing to drape naturally with movement so it reads like a necklace rather than a rigid line. The session is precise and feels like repeated tiny pricks. For layering with actual jewelry, try a thin pendant necklace that sits slightly higher than the ink so both are visible. Common mistake is matching pendant size to real jewelry, which crowds the area.
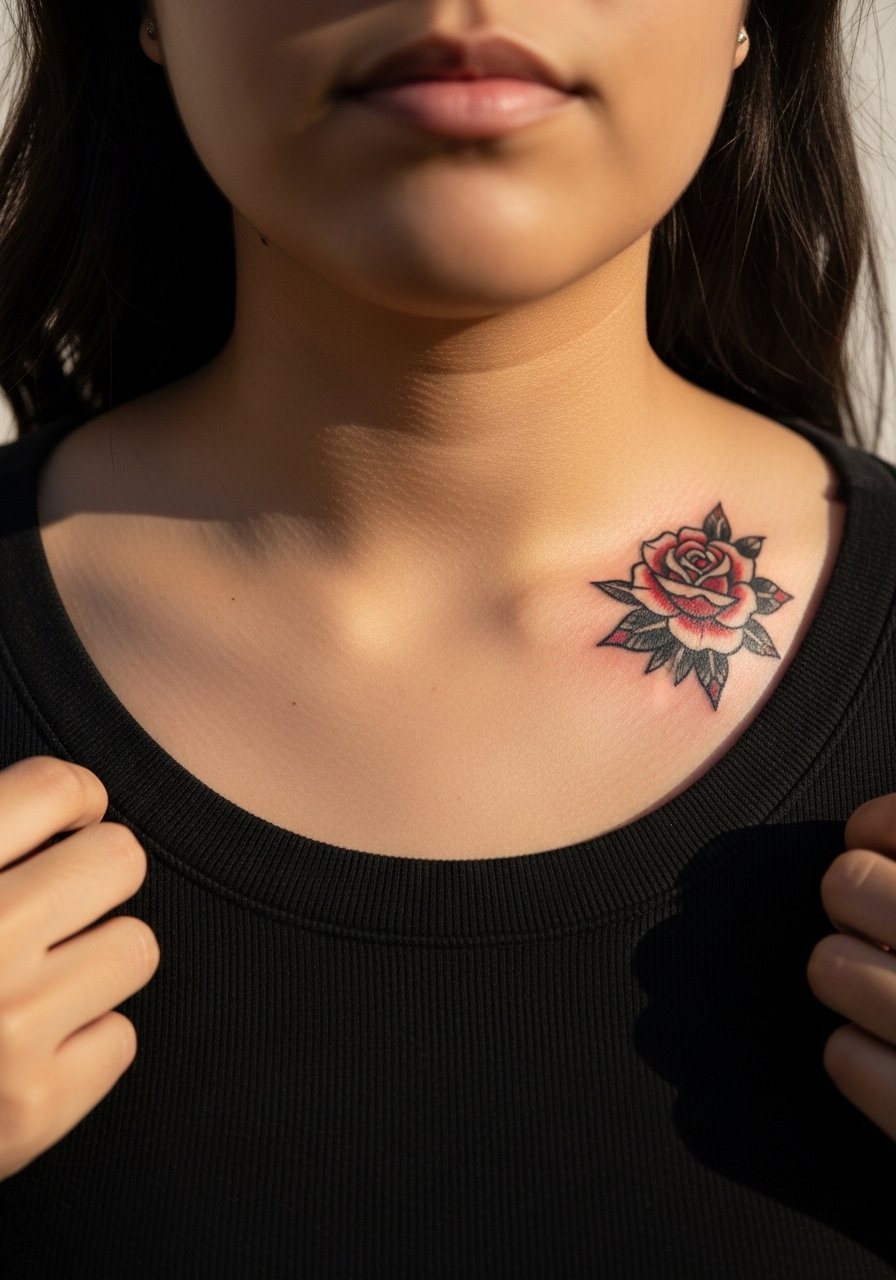
11. Small Traditional Rose
A compact traditional-style rose framed near the collarbone uses bold outlines and selective saturation for longevity. Traditional saturation ages well here because larger black holds against blowout better than extremely fine detail. The session can be 60 to 120 minutes depending on color. A common issue is pushing too much shaded color into the thin skin which can pool. Ask your artist for bold outlines and restrained fill so the rose keeps definition longer. No styling link here because the piece stands well on its own.
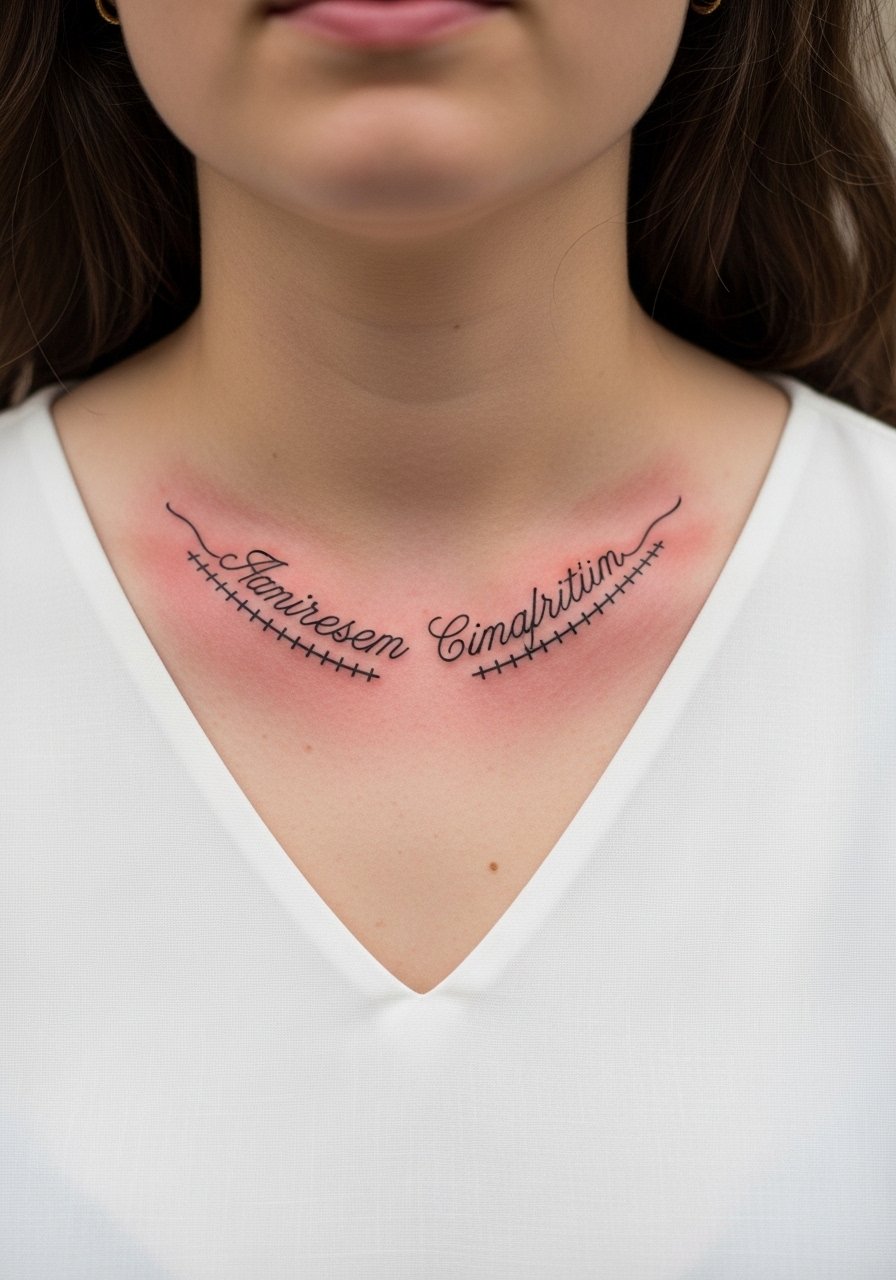
12. Script with Stitched Underline
Script with a subtle stitched underline adds texture and prevents the words from floating visually. The stitched underline acts as an anchor and gives the eye a tie-in when wearing V-necks. Tell your artist you want slight spacing between thread dots so the stitches remain readably separate as they age. The collarbone can make script look longer than expected, so preview the stencil while seated upright. For showing it off, a v-neck blouse frames the line neatly.
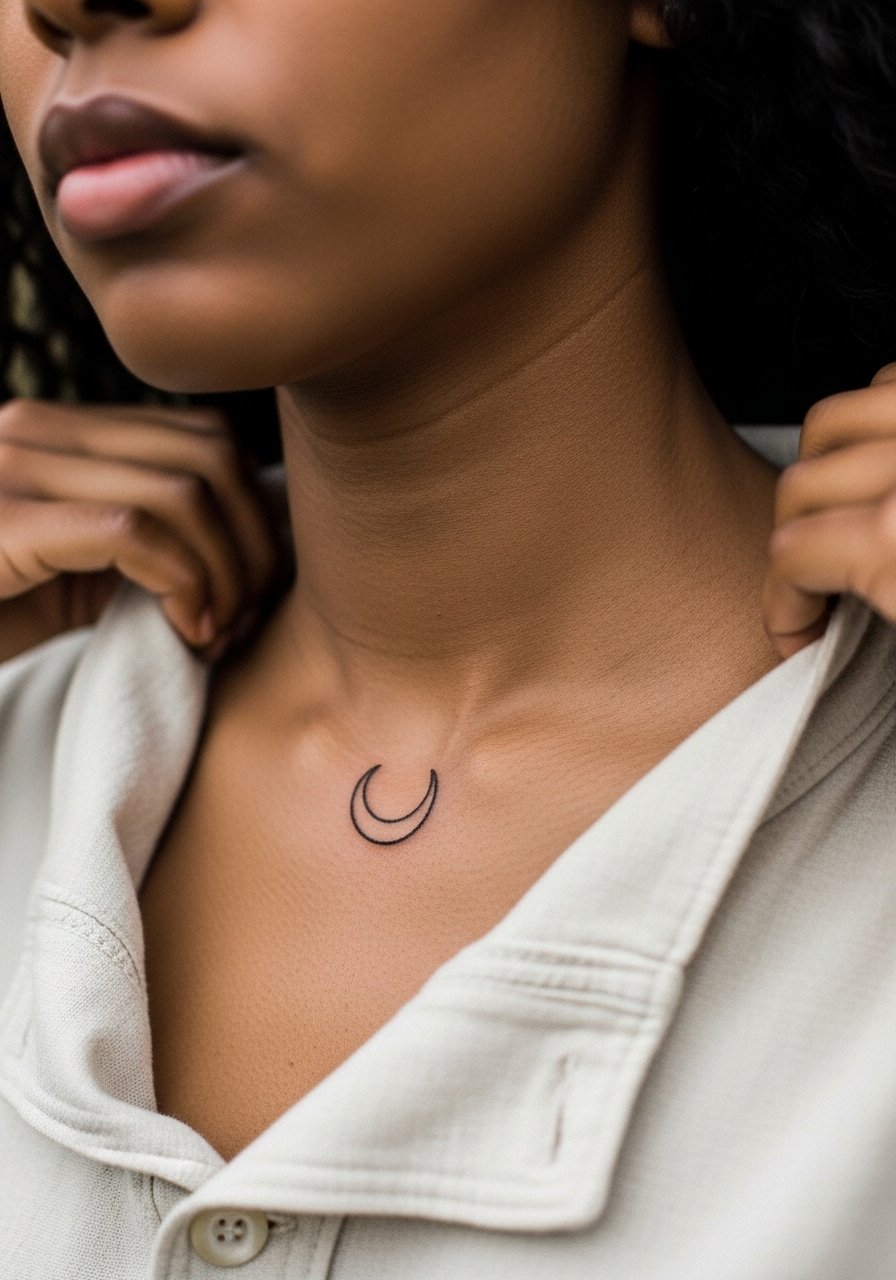
13. Crescent Moon Accent
A tiny crescent moon near the collarbone uses curvature to complement the bone shape. Crescent symbols are low risk for blowout when sized correctly and placed to sit on the fleshy bit next to the bone. The session is quick and tolerable. A mistake is placing it too close to the bone edge where touch-ups are more likely. For the consultation, show photos of how your collarbone sits when you shrug and relax so placement works across movement.
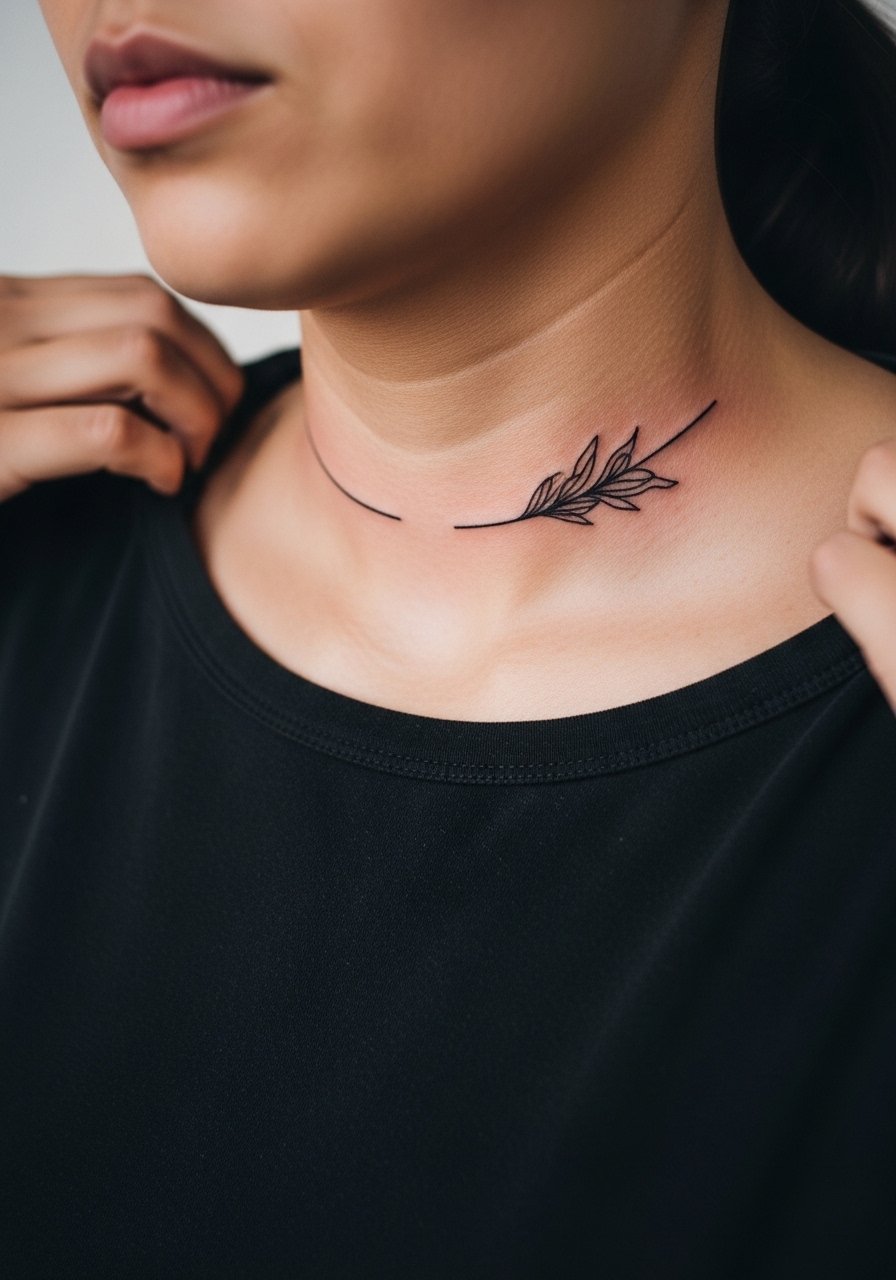
14. Minimal Floral Vine Along the Ridge
A delicate vine that follows the collarbone ridge uses negative space and small leaves to age more gracefully than dense petals. Vines require spacing so the leaves do not merge after two years. Ask for slightly bolder stems and airy leaves in the consultation. Expect a session around 60 minutes. For day-to-day wear, a lightweight kimono or open cardigan lets the vine peek without friction from collars. Mention career considerations if you need to keep it subtle.
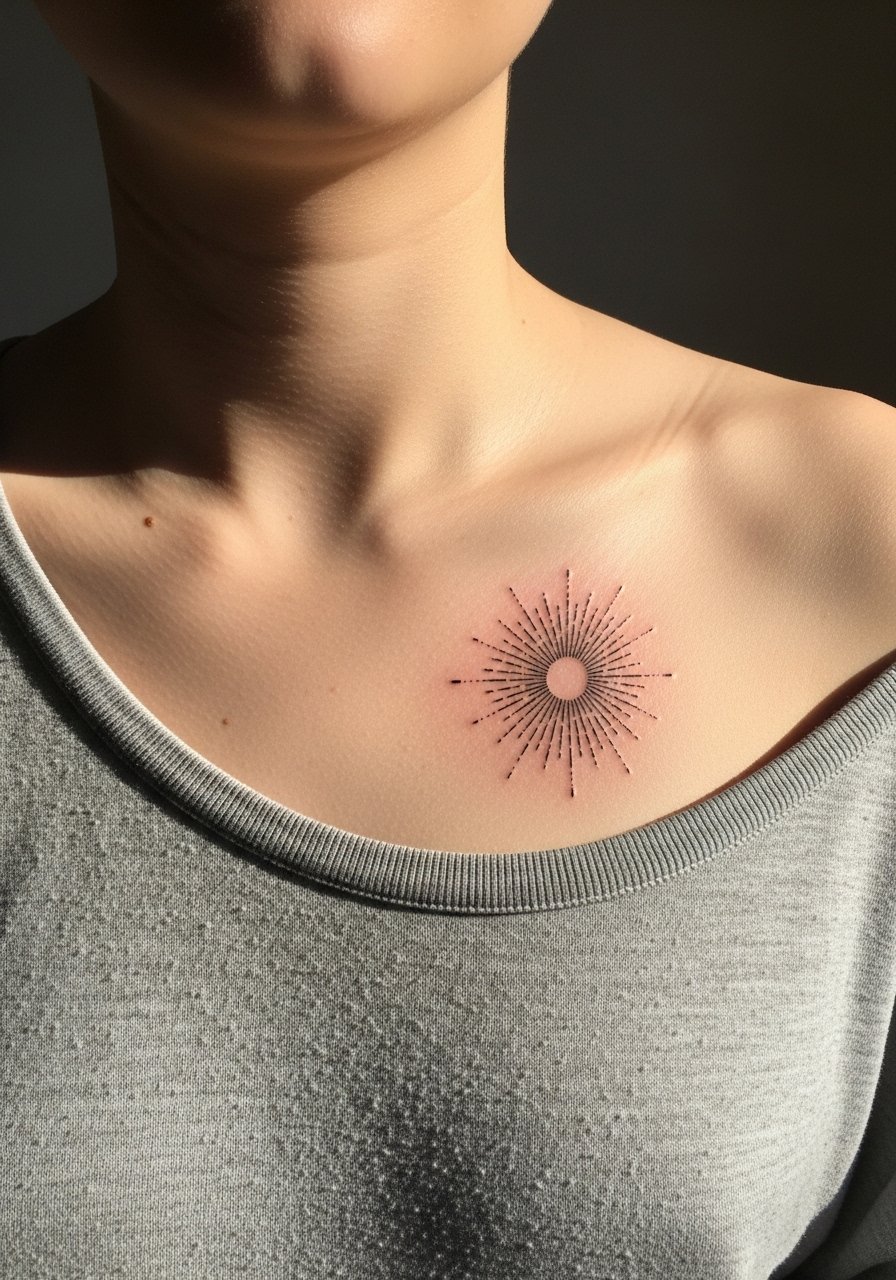
15. Small Geometric Sunburst
A compact sunburst sitting just off the collarbone uses radial linework that reads from a distance. The biggest mistake is making the rays too thin and too close together, which causes merging. Request consistent ray spacing and a slightly stronger anchor dot at the center to preserve the shape. The session feels quick and repetitive but not long. This design looks good with rounded necklines rather than sharp collars. No styling link here so the pattern can stand alone visually.
16. Tiny Animal Silhouette
A tiny animal silhouette, like a fox or bird, perched near the collarbone reads playful and personal. Silhouettes need clean outer edges and no internal shading to hold shape over time. Tell the artist you want a crisp contour with minimal internal detail. The pain is moderate and the session short. For casual showing, a racerback tank keeps the shoulder area open and visible. Consider cultural sensitivity for animal symbols tied to specific traditions.

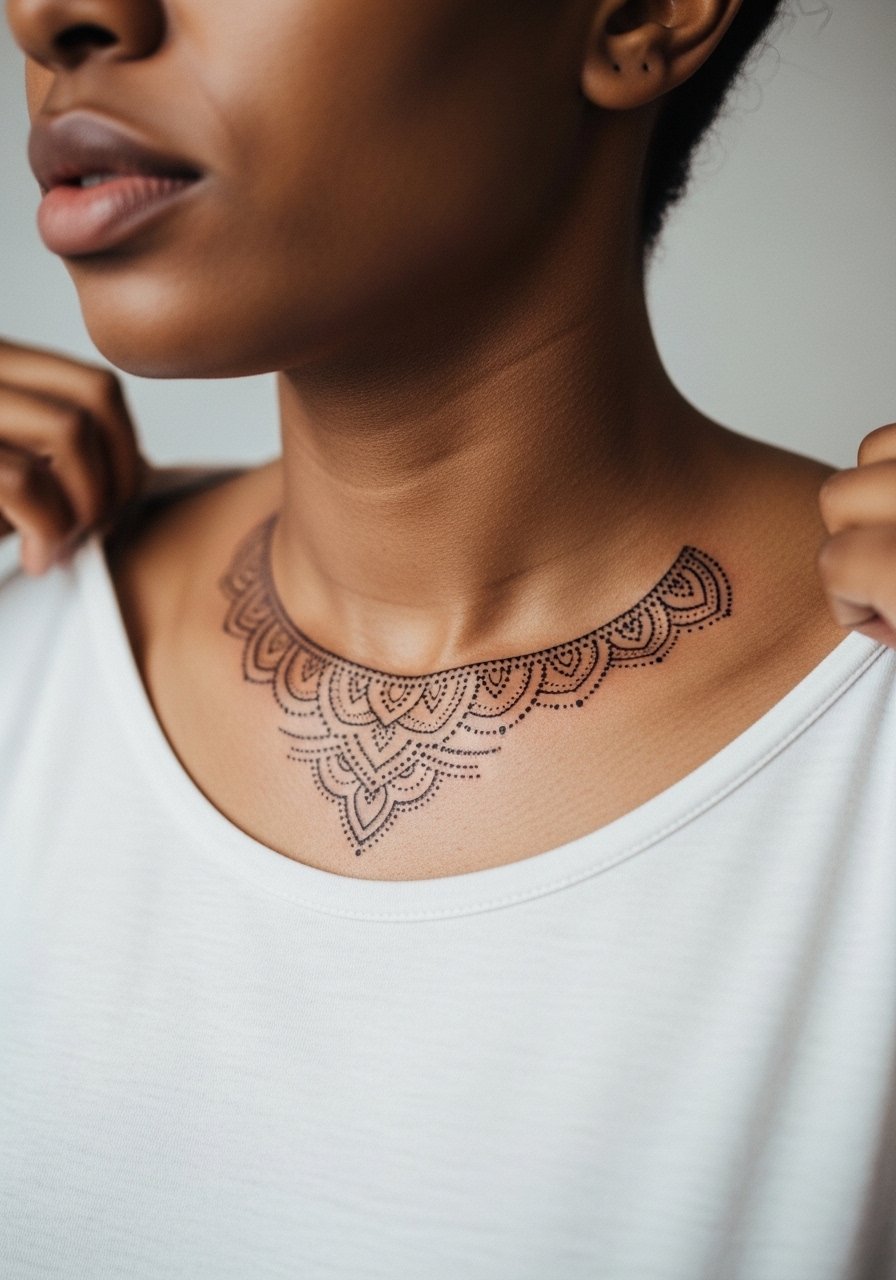
17. Small Mandala Accent
A micro mandala placed over the collarbone uses concentric dot work and small arcs. Cultural origin note: mandalas trace to spiritual traditions, so many people adapt elements rather than replicate whole sacred patterns. The controversy here is authenticity versus decoration. One camp prefers full traditional context and placement, while another adapts motifs respectfully. If you choose a scaled mandala, ask for spacing in the outer rings and expect touch-ups for fine detail at year three. No styling link here.
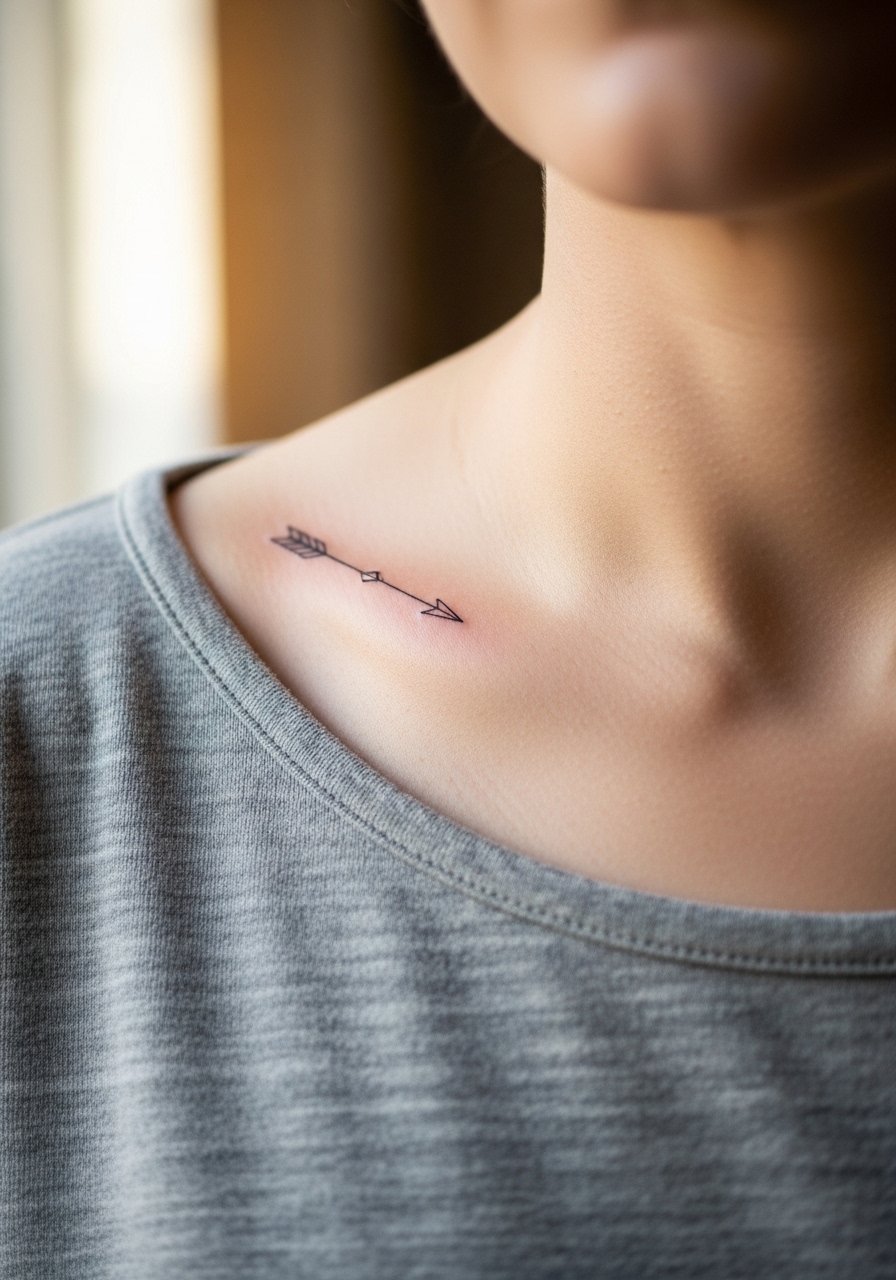
18. Tiny Arrow Along the Collarbone
A tiny arrow that follows the collarbone line reads directional and clean. The common error is angling the arrow against shoulder movement rather than with it, which makes the piece feel off when you move. During consultation ask the artist to position the arrow so it follows your natural shoulder slope. The session is quick and tolerable. For layering, a lightweight scarf can frame or conceal the arrow depending on outfit choice.
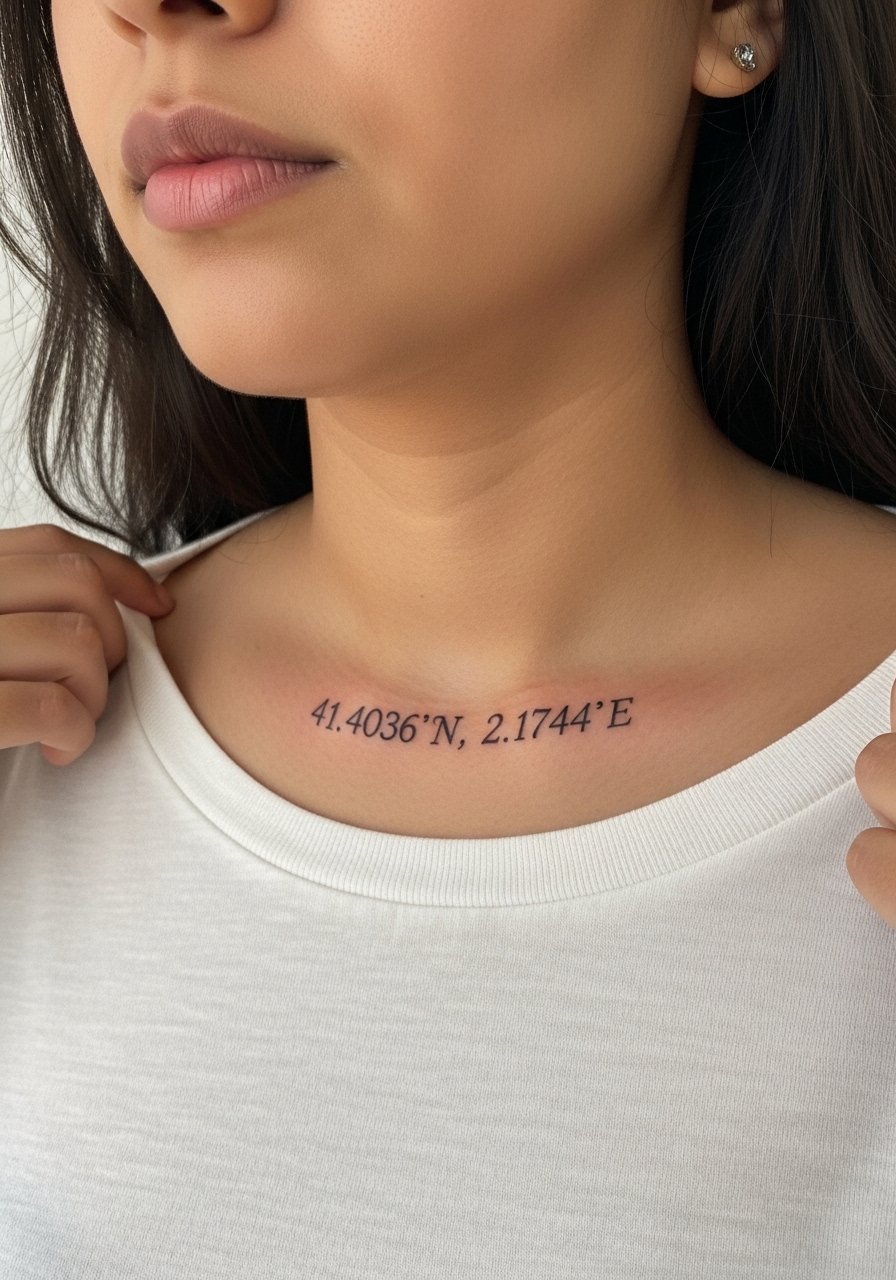
19. Tiny Barcode or Coordinate Script
A small barcode or coordinate tattoo near the collarbone reads modern and personal. When text or numbers are present specify the exact characters in the stencil, because lettering that is too compressed blurs faster than spaced numerals. The session is detail-focused and the pain is moderate. A common mistake is asking for dense micro-font, so choose slightly larger type to keep it legible at distance. No styling link here because minimal details pair with lots of necklines.
20. Tiny Anchor with Rope Detail
A tiny anchor with a single rope curl adds texture without crowding the collarbone. Detail needs breathing room so the rope does not merge with the anchor over time. Ask for a slightly bolder outer line and airy rope loops. The session is precise and quick. For layered jewelry looks, a thin nautical bracelet or a layered necklace combo complements the motif. Consider how the rope detail sits when you move your shoulders.
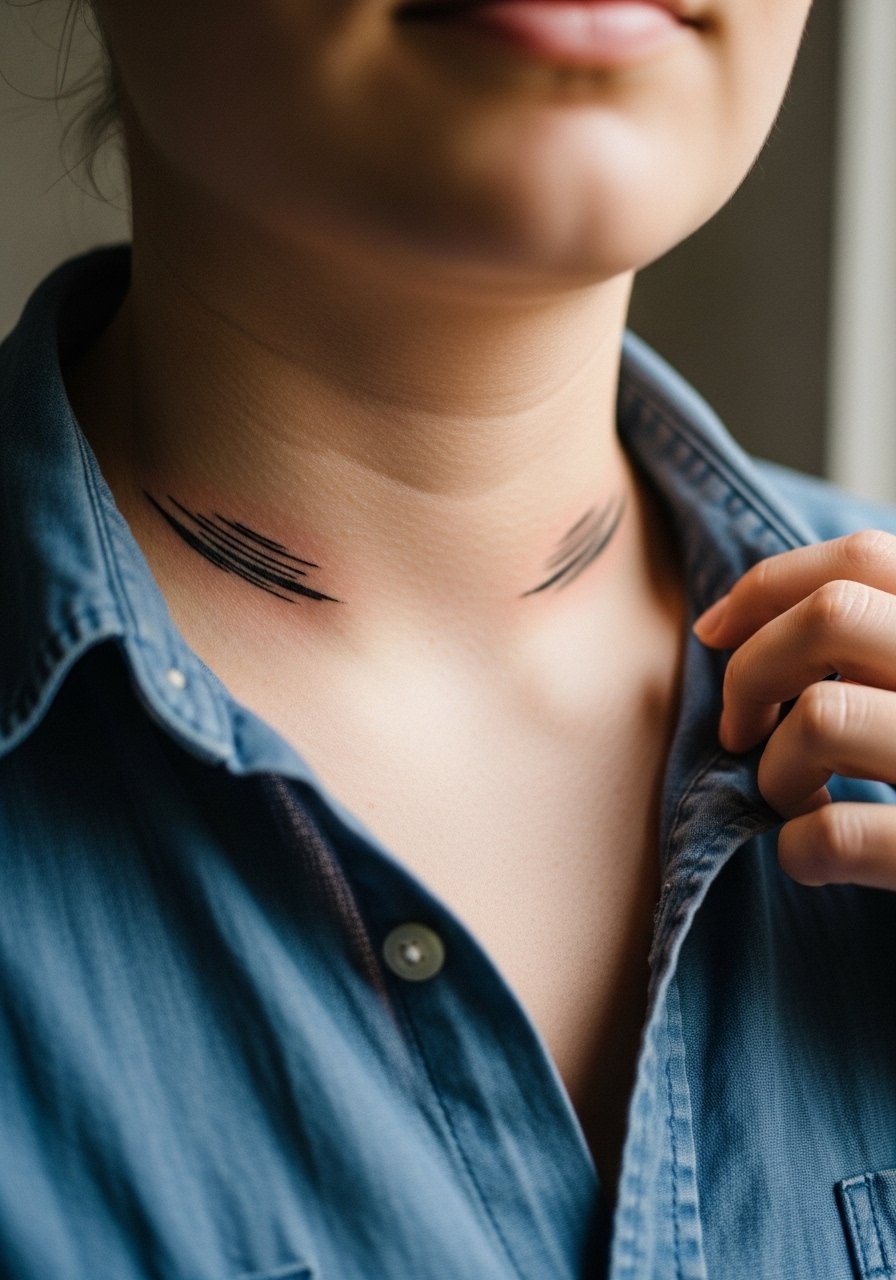
21. Tiny Abstract Brush Stroke
A tiny abstract brush stroke along the collarbone uses irregular linework to mimic a brush mark. The benefit is that intentional irregularity hides minor aging inconsistencies. The risk is over-smoothing the stroke into a blob, so ask for varied thickness that reads at several angles. Sessions are short, and touch-ups at year three keep the texture. For the appointment wear a button-down shirt you can slide aside so the artist has unobstructed access.
Frequently Asked Questions
Q: How painful is a collarbone tattoo compared with forearm or shoulder work?
A: The collarbone tends to be more sensitive because the skin sits directly over bone. I tell people it feels like sharp pin pricks with more sting than a fleshy forearm but less continuous burn than some ribcage pieces. Numbing creams and short breaks during a session help manage the sensation.
Q: Will fine line work on the collarbone blur faster than bold blackwork?
A: From what I have seen, ultra-fine lines on the collarbone can soften quicker than bold blackwork. The two camps are clear. One side recommends avoiding extremely thin lines there. The other side says careful spacing and slightly thicker hairlines will hold. Ask your artist which approach they prefer and check healed photos from that placement.
Q: What should I wear to the appointment for a collarbone tattoo?
A: Wear something with an adjustable neckline so the artist can access one or both collarbones without you getting undressed. A wide-neck shirt or a button-down you can pull to the side is usually best. Comfort and ease of access make the session smoother.
Q: How often will collarbone tattoos need touch-ups?
A: It depends on line weight, sun exposure, and how much friction the area gets from clothing. Fine line pieces often need touch-ups around year three, while bolder blackwork can last longer without intervention. Expect a touch-up window rather than a fixed schedule.
Q: Are there professional or cultural considerations I should think about with collarbone tattoos?
A: Collarbone tattoos are visible with many necklines so think about work dress codes if that matters. For designs borrowed from cultural or spiritual traditions, consider adapting elements and having a conversation with the artist about respectful interpretation. Discovery pathways like local conventions and community forums help you find artists familiar with those contexts.
Q: Can I layer real jewelry over a collarbone tattoo safely during healing?
A: Keep jewelry away while the tattoo is fresh. Once the initial scabbing and peeling are done and the skin feels less raw, light necklaces are usually fine. If you plan to layer jewelry often, design the piece with that in mind so the ink sits where it does not rub constantly and risk fading prematurely.

