
Fine line and tiny matching tattoos behind the ear have gone from private accents to a mainstream way to mark friendship, milestones, and subtle identity. What looks delicate at first often depends on hairline coverage, collar friction, and how the artist spaces the linework. These 17 matching ideas focus on designs and wardrobe choices that age together, so the pair still reads as a pair after years of real life.
1. Tiny Leaf Pair in Fine Line
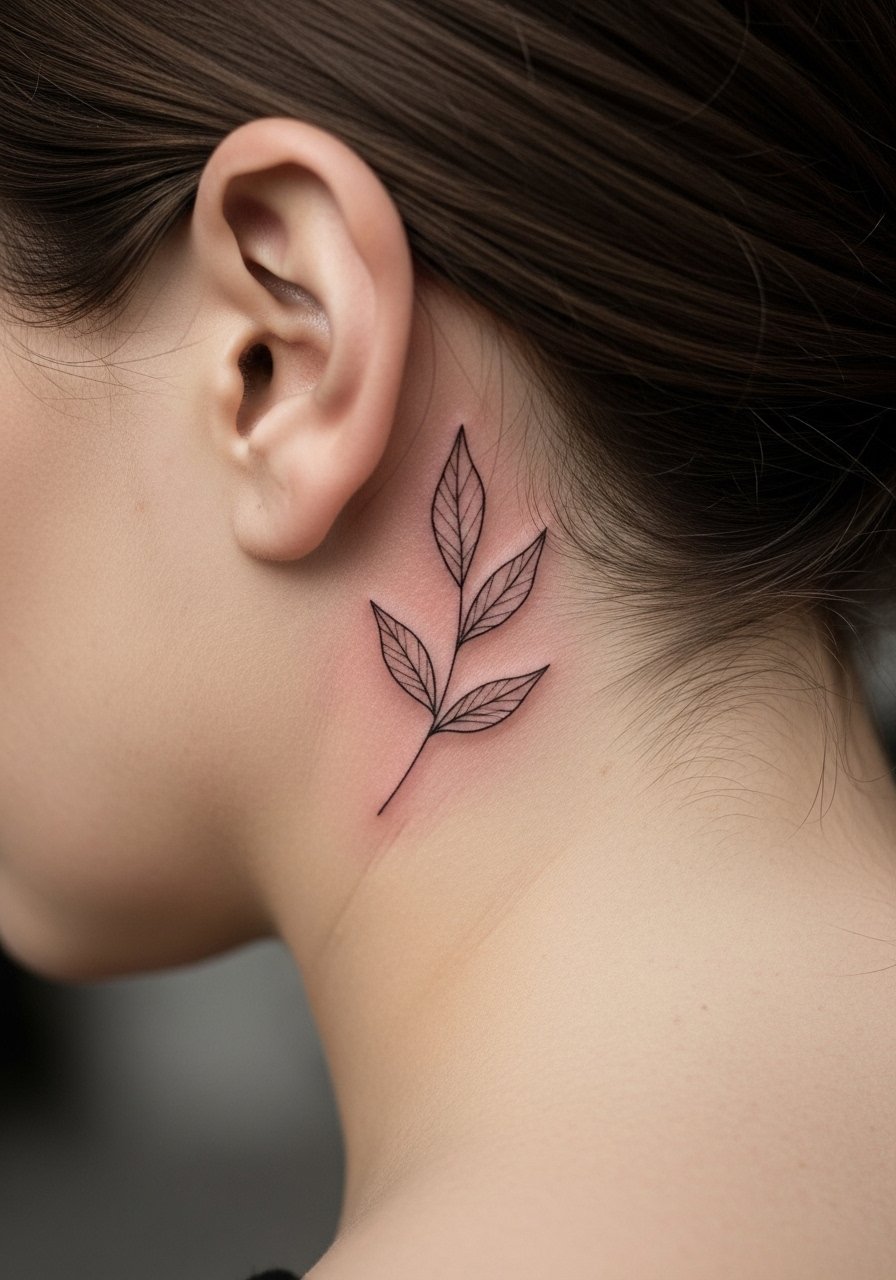
This tiny leaf is a go-to for matching pairs because it reads organic and tiny without crowding the small canvas behind the ear. I recommend asking your artist to space the vein line slightly thicker than the outline so the leaf keeps its shape as the ink settles. Fair warning: hair oil and collars can rub this area, so expect a touch-up around year three for most fine-line placements. For showing it off, a low bun or a claw hair clip keeps the hair out and frames the small leaf without overwhelming it. Note on professional considerations: neck-proximate tattoos can still matter for conservative workplaces, so consider visibility before booking.
2. Mirrored Minimal Script Word
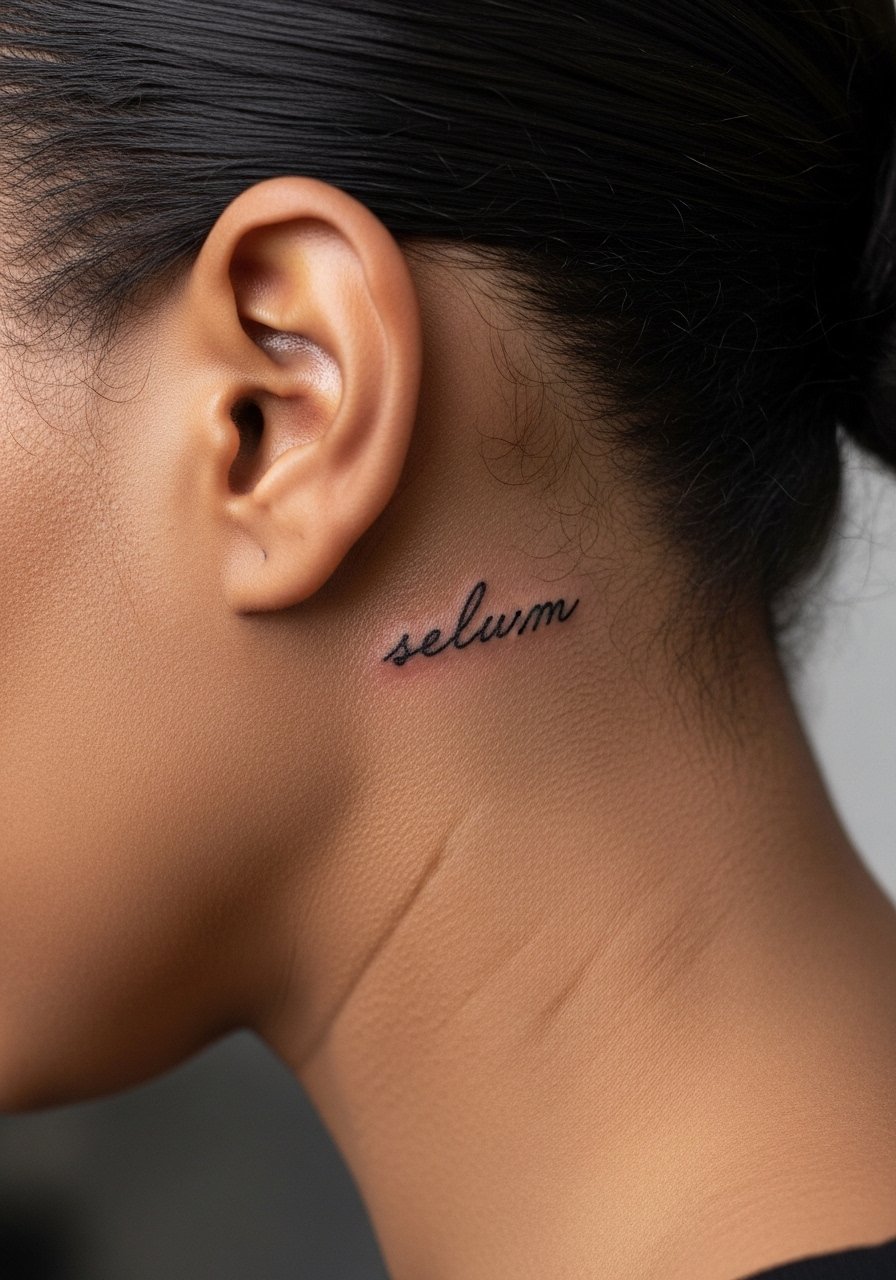
A single word split as a mirror pair behind each ear makes a private phrase that only shows when hair is up. Tell your artist the exact font size and the precise text you want so the generator or stencil matches the intended look. The biggest mistake is shrinking the script until the loops disappear. On this placement the pain is usually low to moderate because the tissue is thin but the session is short, often under 30 minutes. Expect the first year to look crisp and the second to show softer edges. If you plan to wear statement earrings, consider a pair of thin hoop earrings to draw attention without covering the script.
3. Matching Tiny Star Cluster
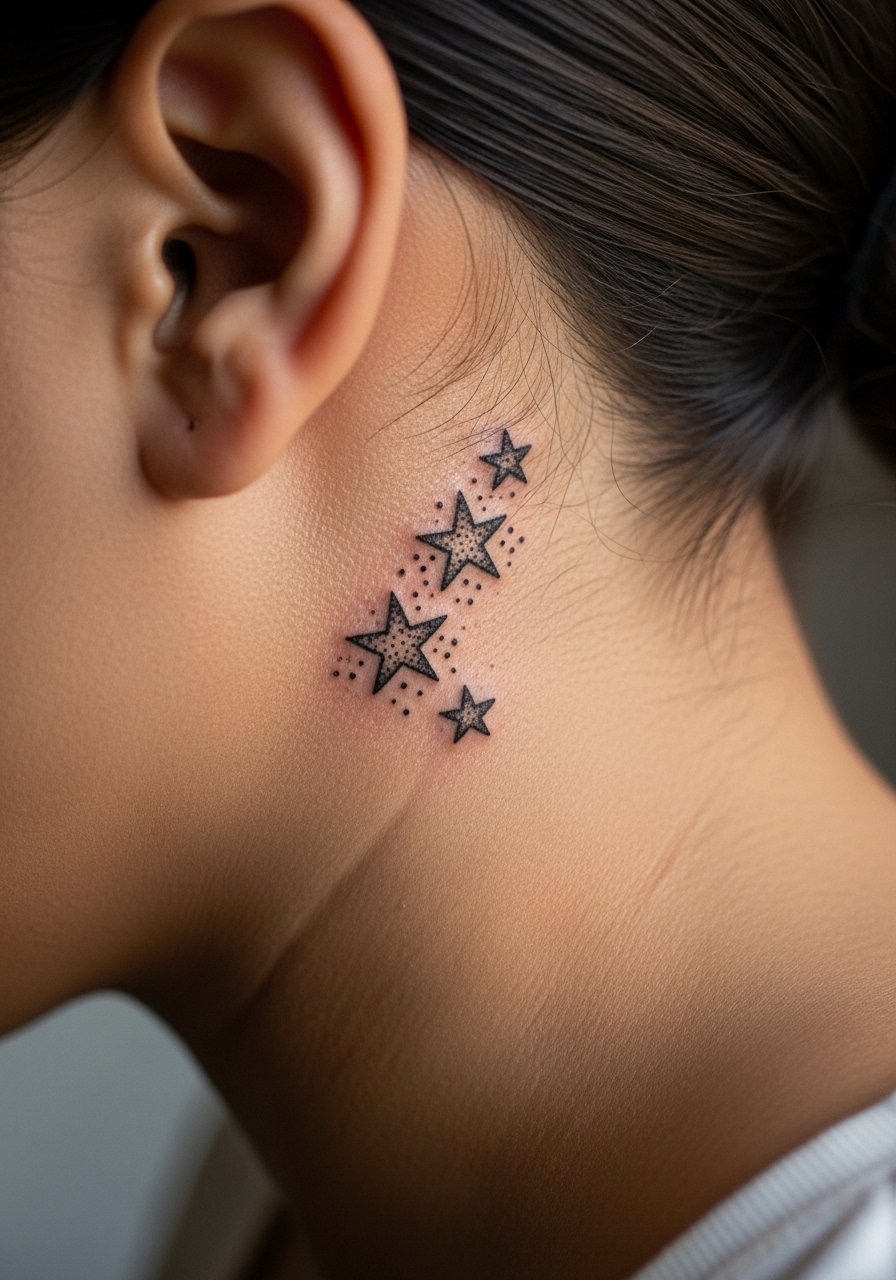
Small star clusters work well as matching marks because they offer variation while staying cohesive. In consultation, ask for slight differences between the two stencils so each ear feels unique while still matching. A common error is packing the dots too close together, which leads to merging as the ink settles. I advise slightly more spacing and a mix of stipple shading rather than solid black dots to maintain texture at year two and five. Session time is minimal, often a quick 15 to 30 minutes, and touch-up needs are usually cosmetic. For evenings out, a delicate ear cuff frames the cluster without covering it.
4. Tiny Geometric Triangle Pair
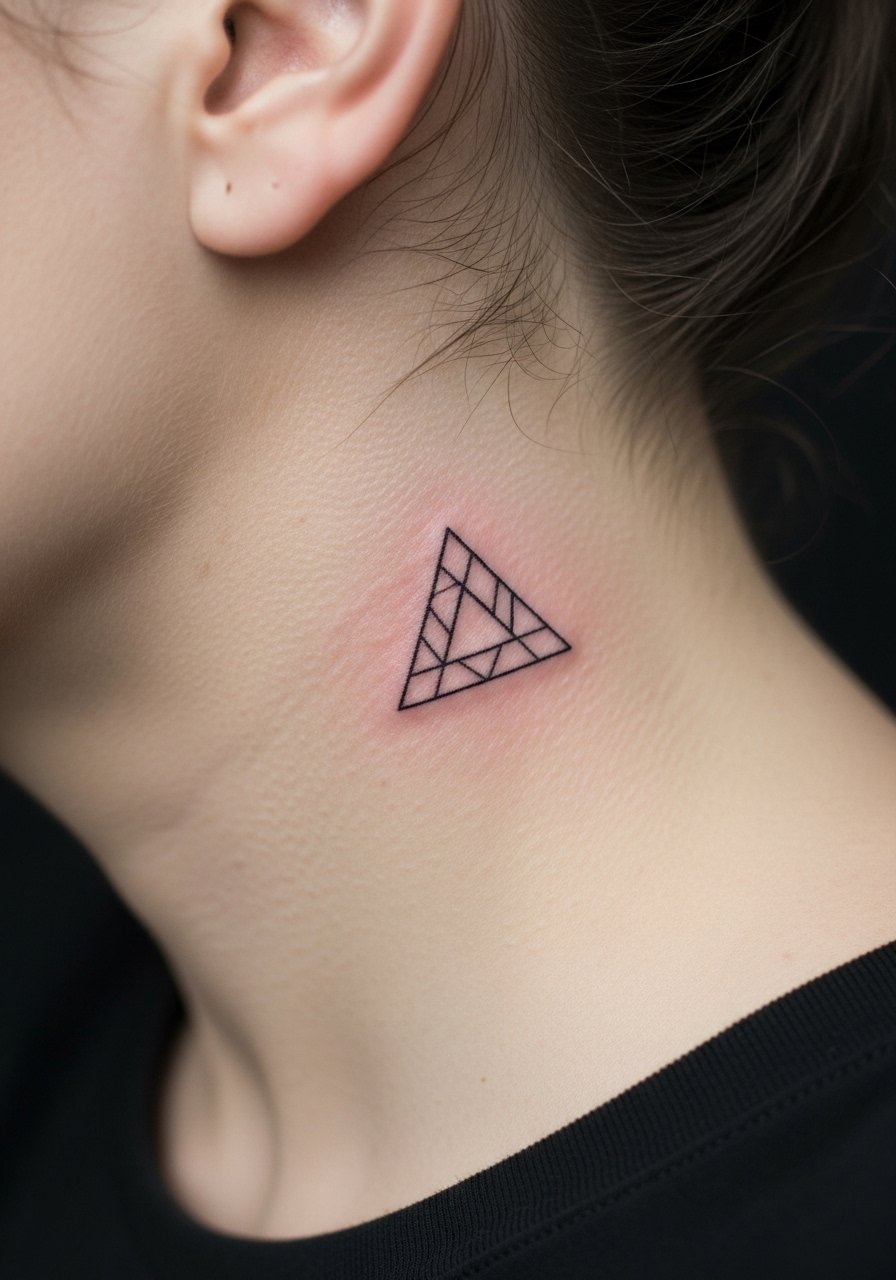
A tiny triangle reads sharp behind the ear when linework is consistent and the angle matches both ears. The key instruction to your artist is exact orientation and consistent line weight, not mirror-freehanding. The most frequent mistake is turning one triangle a hair off on the stencil and calling it symmetrical. The pain is brief and focused, and the session is usually under 20 minutes. Over years, tiny geometric work tends to soften at the points, so ask for slightly thicker tips to preserve the shape long term. For day-to-day wear, a wide-neck top when you want the pair to peek out makes the geometric pair feel intentional.
5. Matching Tiny Crescent Moon
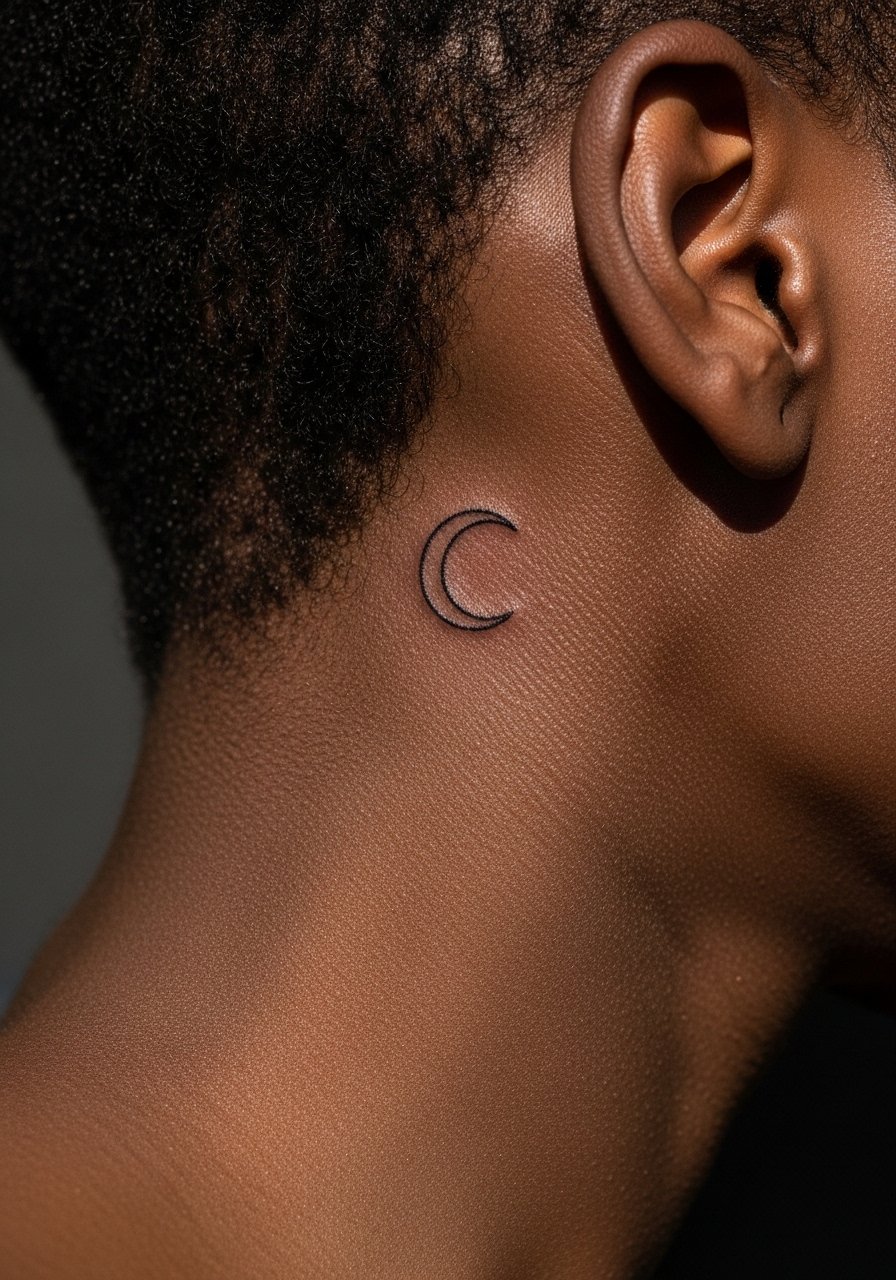
Crescent moons are classic tiny symbols that read well as pairs because they echo each other without mirroring exactly. When you consult, specify whether the crescents should face inward or outward. A common version that ages poorly is a crescent with very thin tips. Those tips blur first, so thicker endpoints or a bit of stipple fill helps the silhouette last. The session feels quick and usually only needs a single pass. If you wear scarves or high collars often, mention that to the artist because repeated friction can require an earlier touch-up. For styling, pair them with a lightweight silk scarf for evenings when you want the tattoo to peek just under the hairline.
6. Tiny Botanical Sprig Twin
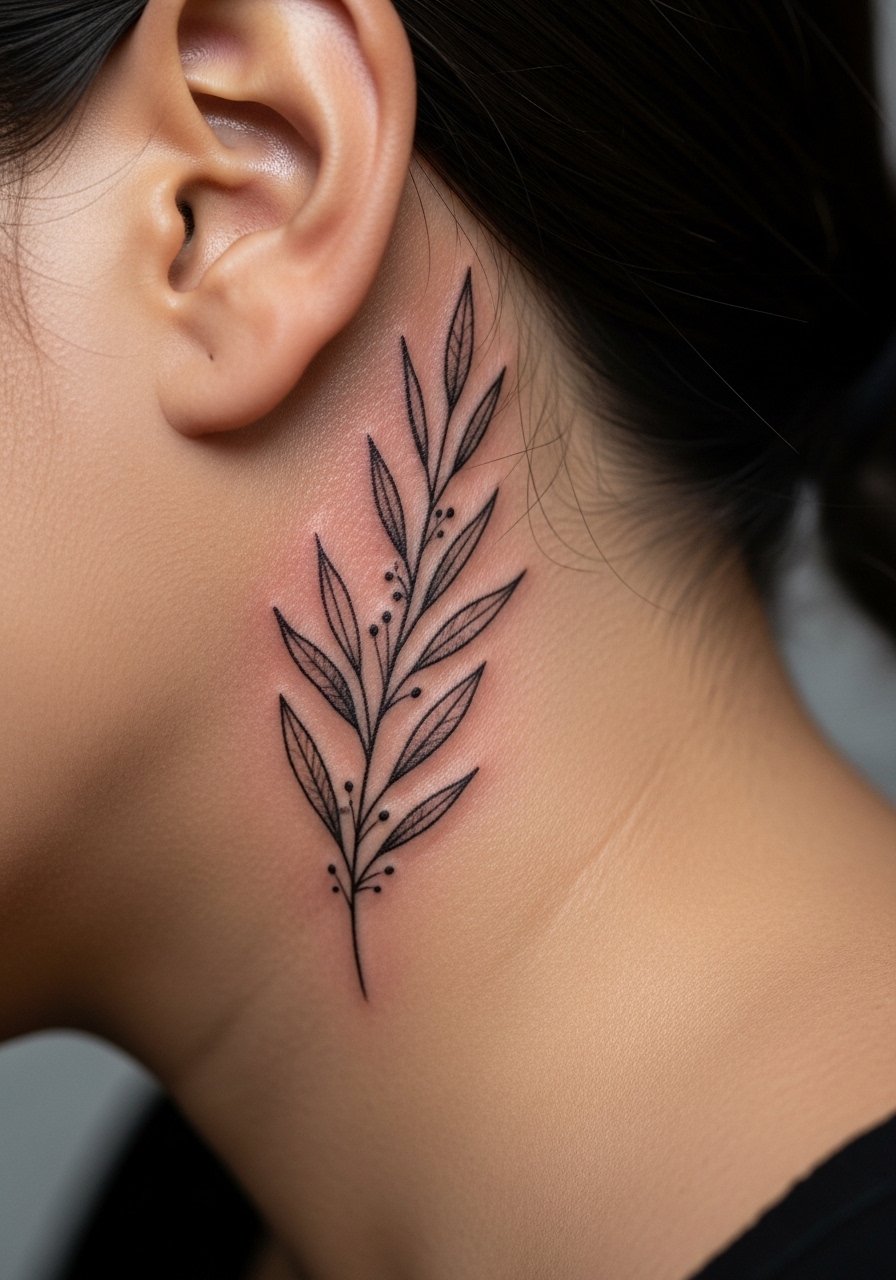
I recommend a small sprig when you want organic matching marks that read well in profile. Tell your artist to lock the main stem line slightly deeper and leave the leaflets airy. One big mistake is over-detaling the leaflets at such a small scale, which creates blotchy healing. Expect a slightly longer session than a single dot since the sprig needs steady linework, often 30 to 45 minutes. There's a debate in the community about fine line on neck-proximate skin. One camp says the thin skin and movement blur fine details in two to three years. The other camp argues that with correct needle depth and spacing the lines hold up. Ask your artist where they stand before booking. For the session, wear your hair up and a button-down shirt you can pull aside so the artist has clear access.
Studio Day Picks
These small neck-adjacent pieces above need different prep than larger arm work, and a few items make the session and first week smoother.
-
Stencil transfer paper kit. Lets you preview exact placement behind the ear before the first pass, which is crucial for mirrored pairs.
-
Hypoallergenic adhesive bandage strips. Small strips keep the area protected if hair rubs the site during the first 48 hours.
-
Thin protective film roll. Helps shield the tiny tattoos from shampoo and friction while they form a surface scab.
-
Fragrance free gentle body wash. Cleans the area without irritating delicate linework in the first week.
-
Aquaphor healing ointment. A thin layer for the initial days reduces tightness and keeps fine lines from drying and flaking excessively.
7. Tiny Anchor Match
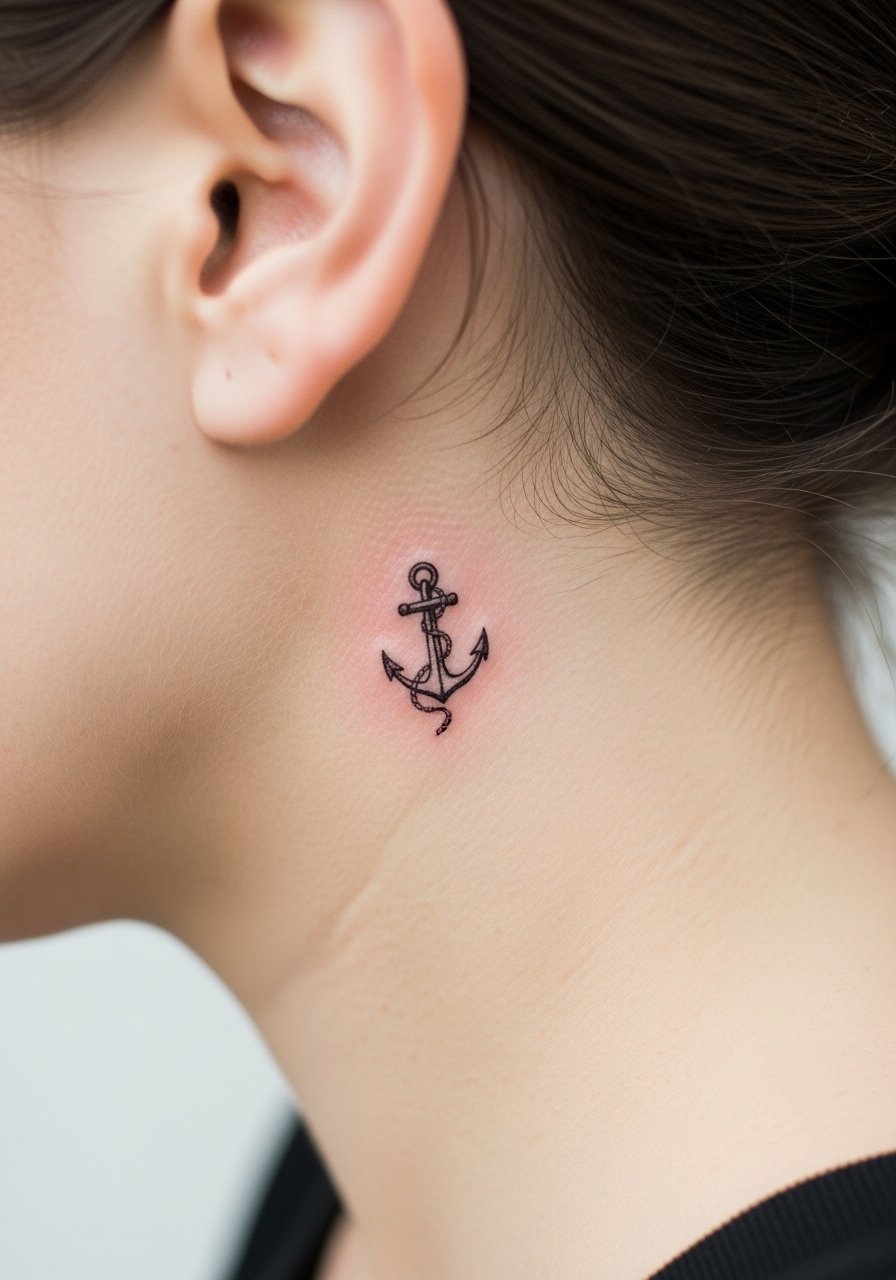
A miniature anchor is unexpected behind the ear and reads like a private emblem when paired. In consultation, specify that the anchor should favor a compact silhouette and not include tiny crossbars that can blur. The common mistake is overworking the shank with tiny detailing that melts into a blob by year three. Expect low to moderate pain and a quick session. If you plan to get the pair as a nautical duo with someone else, consider slight asymmetry so the two anchors feel like partners rather than identical twins. For career-sensitive contexts remember neck-adjacent ink can be visible with short hair or updos.
8. Matching Tiny Wave Line
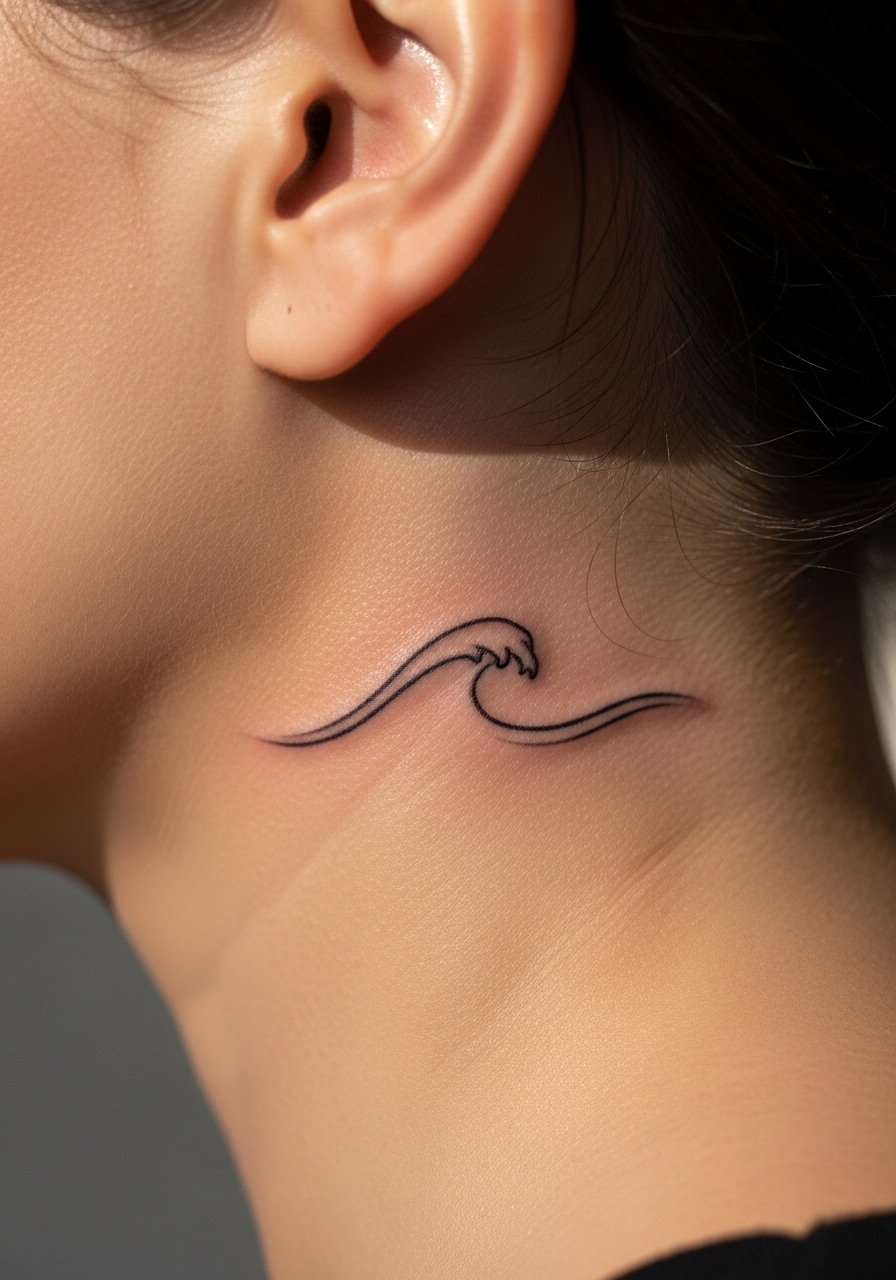
A single flowing wave line is subtle and lends itself to matching because it translates well at small scale. Tell the artist to avoid dense shading and to keep the curve open so it does not fill in. Small continuous lines can show movement as your head turns, which makes the pair dynamic. The session is short and typically involves a single pass, but repeated shampooing can speed fading, so plan touch-ups accordingly. For styling, a silk scrunchie or low pony looks effortless and pulls hair away to show the tiny wave without too much exposure.
9. Mirrored Tiny Arrowheads

Arrowhead tattoos work well as symbolic twins because each side can point toward the other or outward. The crucial instruction is consistent angle and identical tip thickness. A frequent error is thinning the point too much to make it "delicate." Tiny points blur faster than thicker tips. The session is quick but precise. Over five years expect some softening at the arrow points and plan a touch-up if you want identical sharpness. If you like small studs, choose earrings that do not press on the tattoo during sleep or styling.
10. Matching Tiny Lightning Bolt

Lightning bolts translate well to small matched pairs because they have immediate graphic read even at miniature size. Ask for slightly rounded inner corners so the bolt does not form micro-tears in healing that lead to ink loss. The mistake I see often is drawing the bolt too skinny and too tall. That shape tends to break down. The pain is short lived and session time is brief. For evenings when you want the pair to be discreetly visible, a low bun clip keeps hair up and the bolts in view.
11. Tiny Matching Music Notes
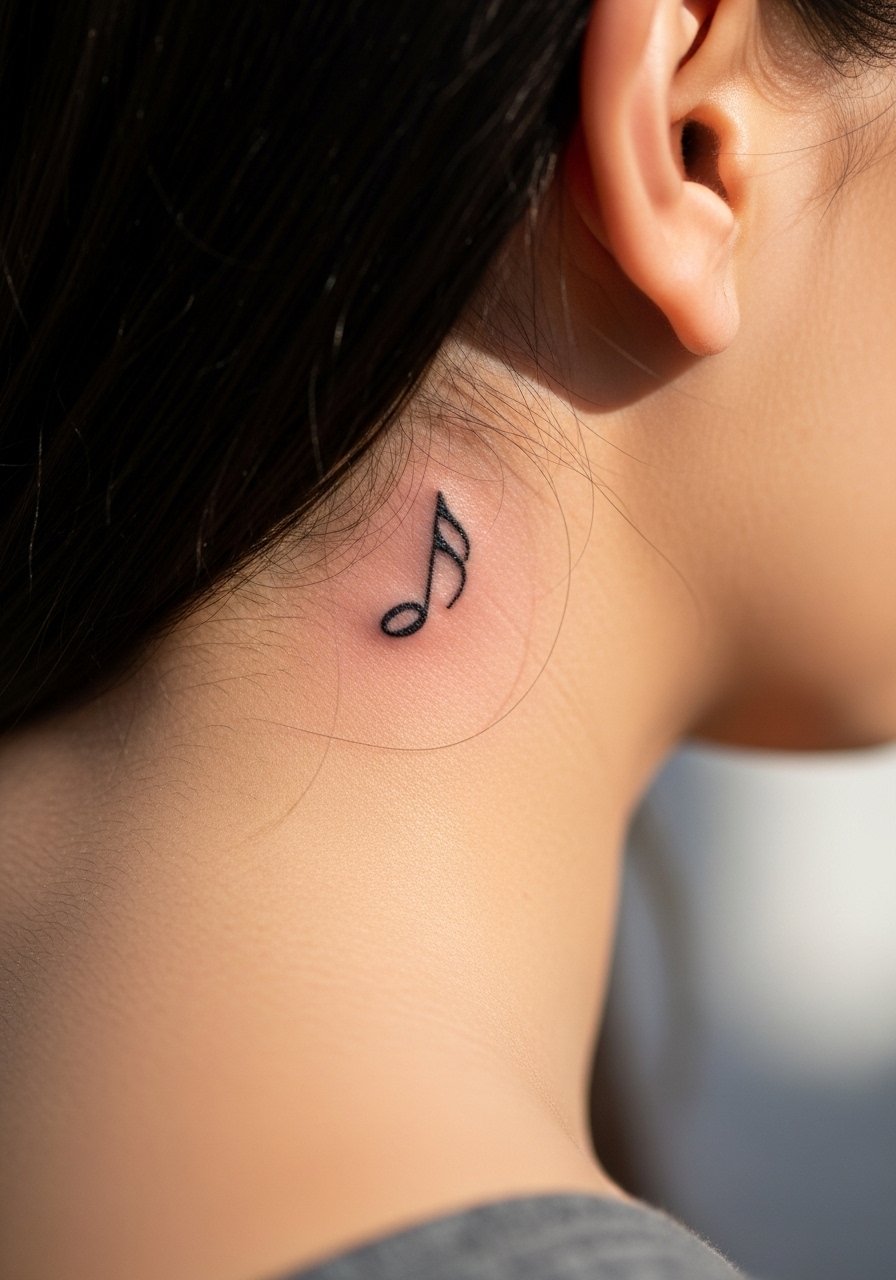
Music note pairs are a playful option for matching tattoos and read well because the symbol is recognizable even tiny. Tell the artist whether you want solid black fill in the note head or a simple outline. Filled note heads at this scale can look like a smudge after a couple of years, so an outline with a small dot of saturation often holds better. Session time is short and pain is minimal. If you perform or teach, think about whether visible neck-proximate marks fit your professional context. For accessorizing, a thin chain pendant necklace sits above without competing.
12. Tiny Paw Print Pair
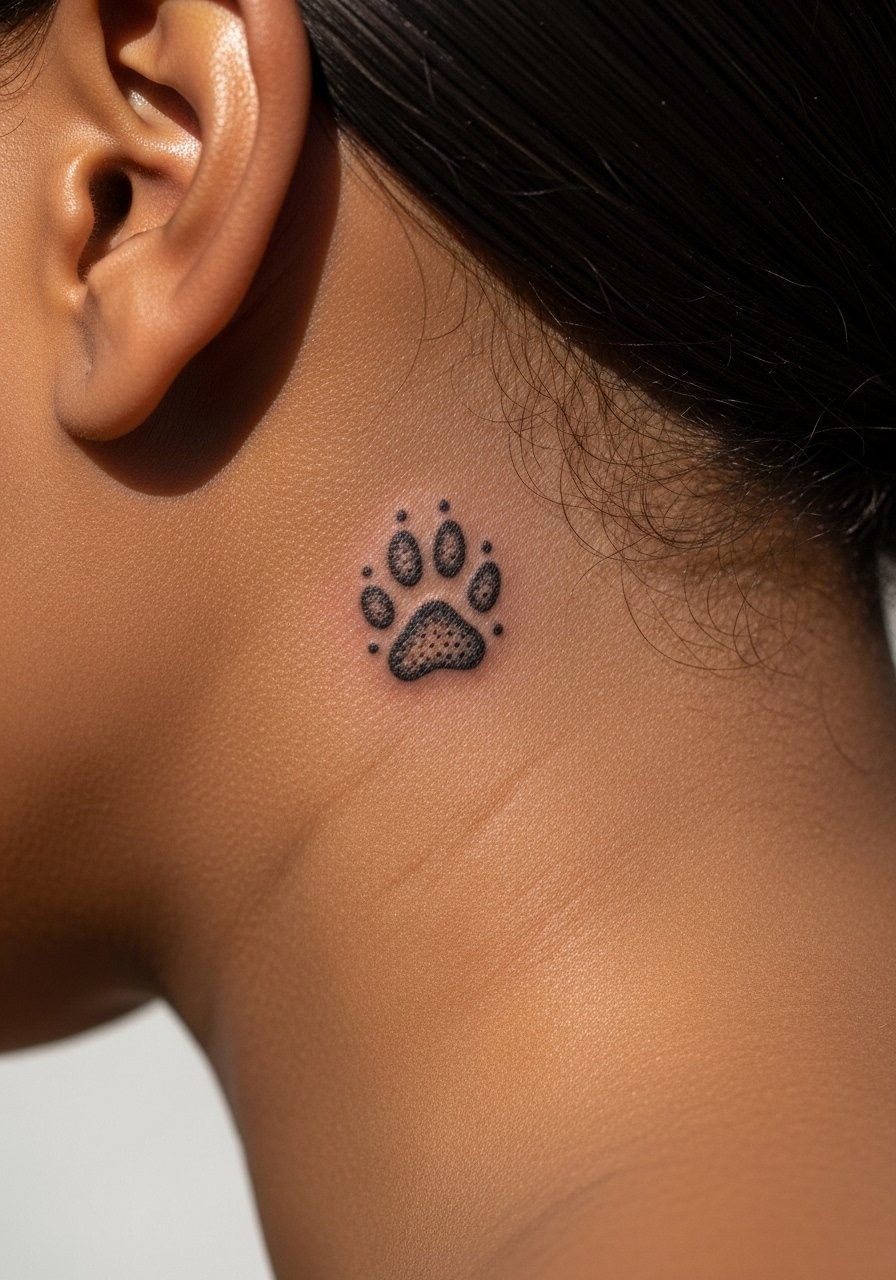
Matching paw prints are a quiet way to honor a shared pet or a mutual love for animals. Ask your artist to simplify the paw pads into bold dots rather than tiny textured pads. Over-detailing makes the print lose definition as the skin settles. Touch-ups are common around year three to bring back crisp dots. The session is brief and the pain is generally low. For show-off moments, sweep your hair into a half-up style rather than a full updo so the small print peeks through naturally.
13. Matching Tiny Compass Points
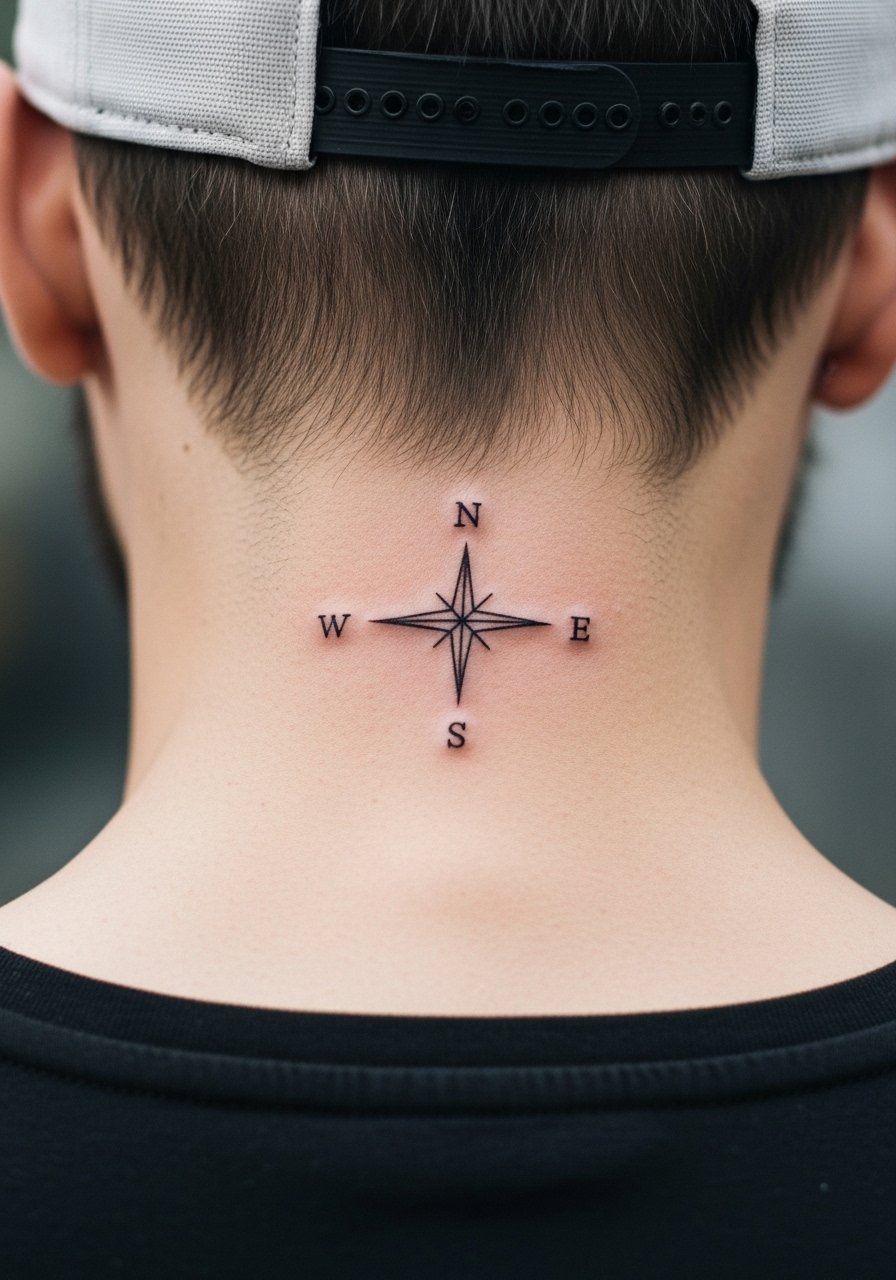
Compass points at this scale are symbolic without being literal and they pair well because each side can represent a different direction. Be explicit about which point faces forward and which faces back during the stencil review. The frequent error is crowding the tiny cardinal markers into a small circle. That collapses into blur after a few years. Sessions are short but precise. If you and a partner are getting matching compass points, consider slight rotation so each ear reads correctly from the side you expect to be photographed from.
14. Matching Tiny Feather
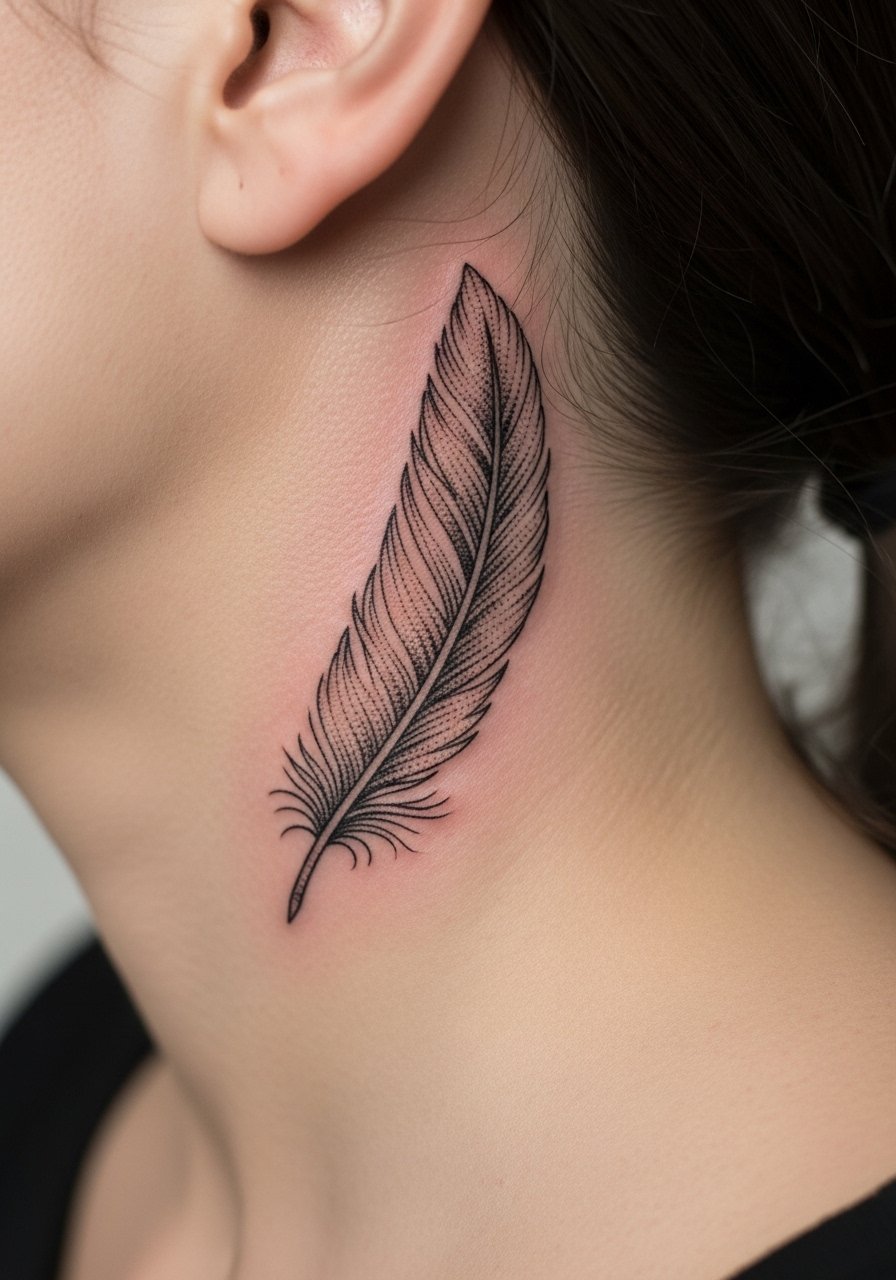
A tiny feather reads delicate and personal when matched, but the temptation is to over-detail the vane. Ask for a simplified spine and a few staggered barbs in the stencil. That approach keeps texture without creating tiny lines that merge. This placement is more forgiving if the feather is slightly thicker in key strokes. Session time is moderate for the small scale, and touch-ups are normal at the two to four year mark. For styling pairings, a lightweight scarf draped behind the ear shows the feather without rubbing it constantly.
15. Mirrored Tiny Planet Glyphs
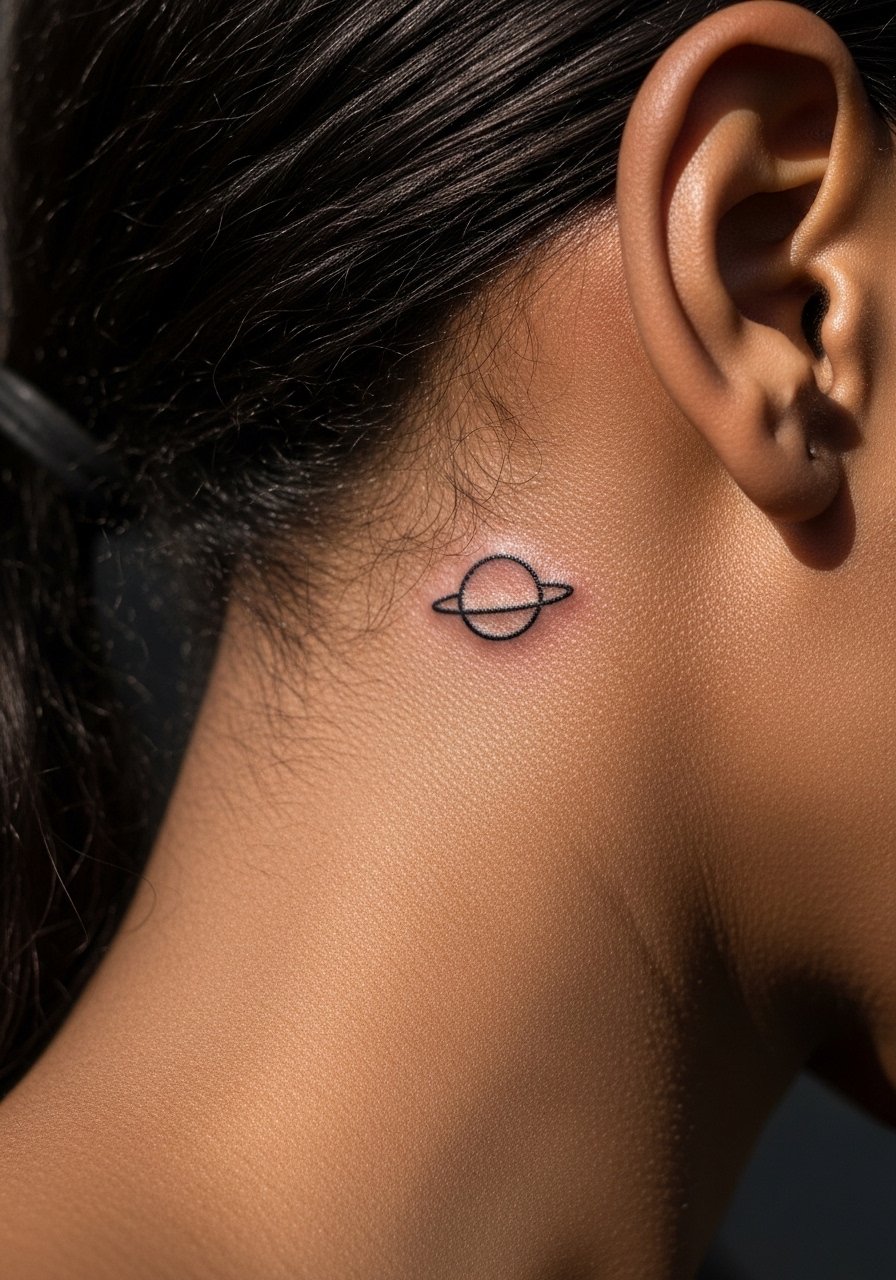
Planet glyphs are whimsical and distinct while still tiny enough to make subtle statements. The trick is to keep circles solid and avoid tiny inner details. Small concentric lines become muddled as the ink spreads. The session is quick and usually requires only one pass. Over years expect the ring to soften slightly, so a slightly bolder ring at the start helps long-term readability. If you wear headphones often, shift placement slightly forward so pressure from earcups does not rub directly on the fresh ink.
16. Matching Tiny Arrow-and-Heart Hybrid
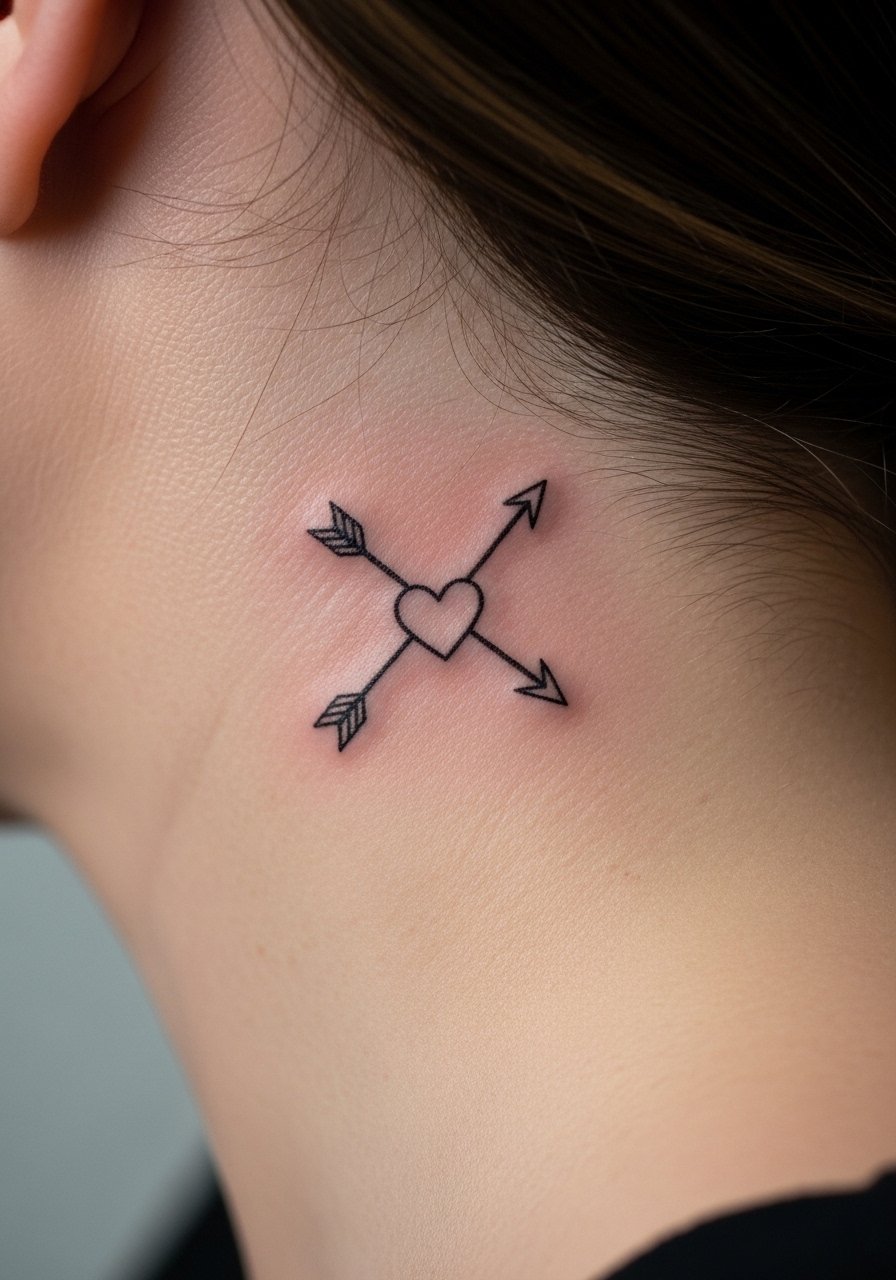
Combining an arrow with a tiny heart makes a compact matched emblem that reads as both directional and affectionate. In the stencil stage, request minimal overlap so the heart does not become a filled blob next to the arrow shaft. The common mistake is layering too much detail into the heart interior. Expect a slightly longer session than a single symbol, and plan for a touch-up window around year three. For showing it off, a delicate ear stud set complements the hybrid without covering the area.
17. Matching Tiny Seedling Sprout
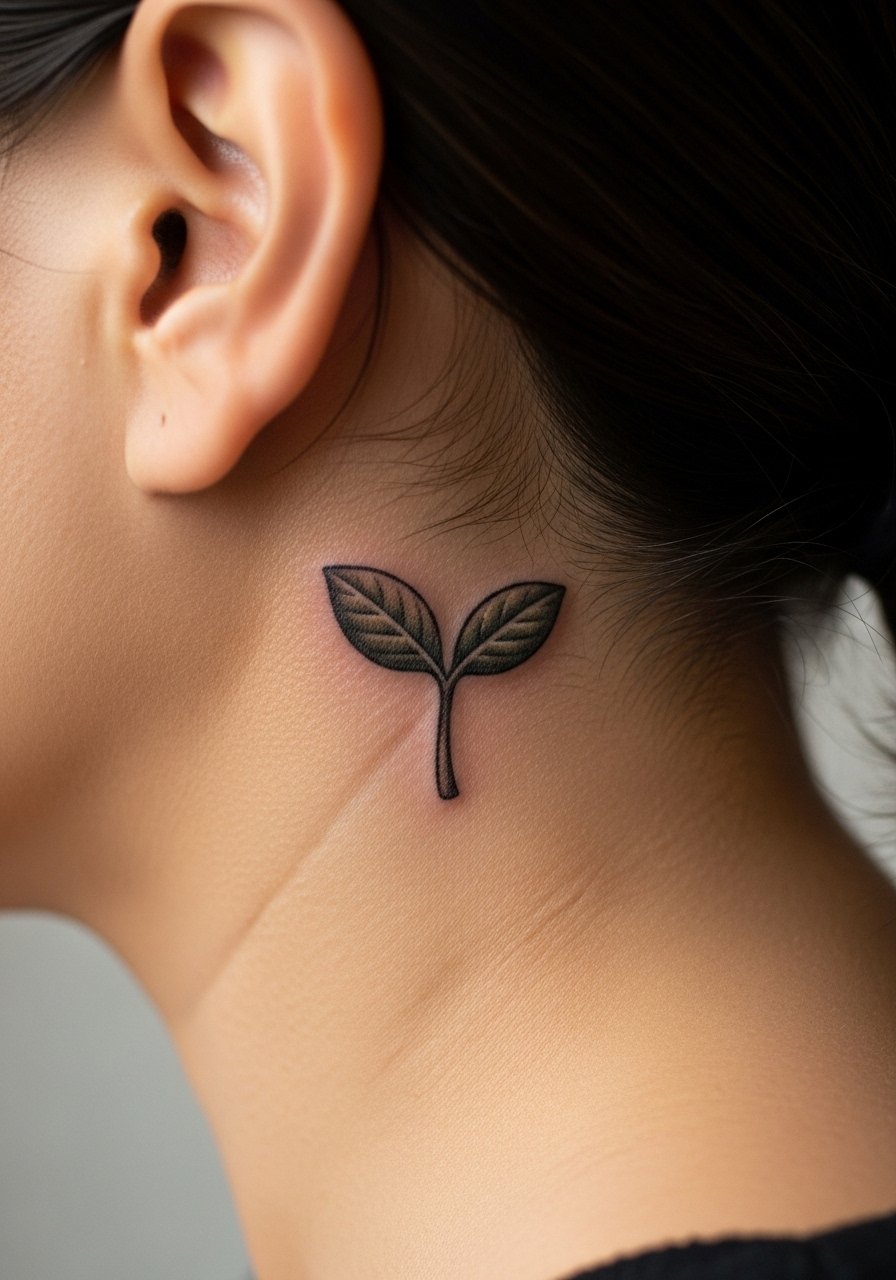
A tiny seedling is a hopeful matching mark that reads clear with minimal lines. Tell your artist to keep the leaves as single curved strokes with a slightly heavier base line. People often over-curve the leaves to mimic realism, which creates crowded strokes at this size. The session is short and relatively low in pain. Expect the softest changes at leaf tips as years pass, which is fixable with a quick touch-up. If cultural symbolism matters for your chosen sprout, mention it in the consultation so the design respects its origins.
Frequently Asked Questions
Q: Will tiny fine-line work behind the ear blur faster than bolder work?
A: Fine line at very small scales usually softens sooner than bolder shapes. From what I've observed, placing the line where hair covers it slightly and asking for slightly thicker terminal strokes helps keep the look longer. Plan for a possible touch-up in two to five years depending on sun exposure and friction.
Q: How should matching behind-the-ear pairs be positioned so they read together in photos?
A: Decide during stencil review whether the motifs should face inward toward one another or outward. Ask the artist to mark a small reference point on both sides so placement is consistent. If photos matter, try a quick mirror check with hair up before the first pass.
Q: Are there special aftercare steps unique to behind-the-ear tattoos I should know?
A: The main issues are hair product contact and friction from collars. Keep hair away for the first few days and avoid oily conditioners near the area. If you sleep on sides, prop your head to avoid direct pressure while the surface is fragile.
Q: Do matching behind-the-ear tattoos require special artist experience?
A: Small, precise linework benefits from an artist who shows consistent micro work in their portfolio. Rather than generic praise, look for healed photos of similar tiny placements and ask about their touch-up policy for small pieces.
Q: Can I hide matching behind-the-ear tattoos for job interviews?
A: Often yes with strategic hair styling like a low bun, a half-up, or a high collar during interviews. If complete concealment is required, consider placement slightly lower on the nape or ask about temporary makeup options for key meetings.

