
The skin on your back is a literal blank page, but the designs that last are the ones that respect movement, wear, and how clothing frames the area. The best back pieces plan for years of wear, not just a viral photo. Below are designs that read clearly fresh and five years later, with notes on what to tell your artist, what to wear to the session, and how the work ages so you book with confidence.
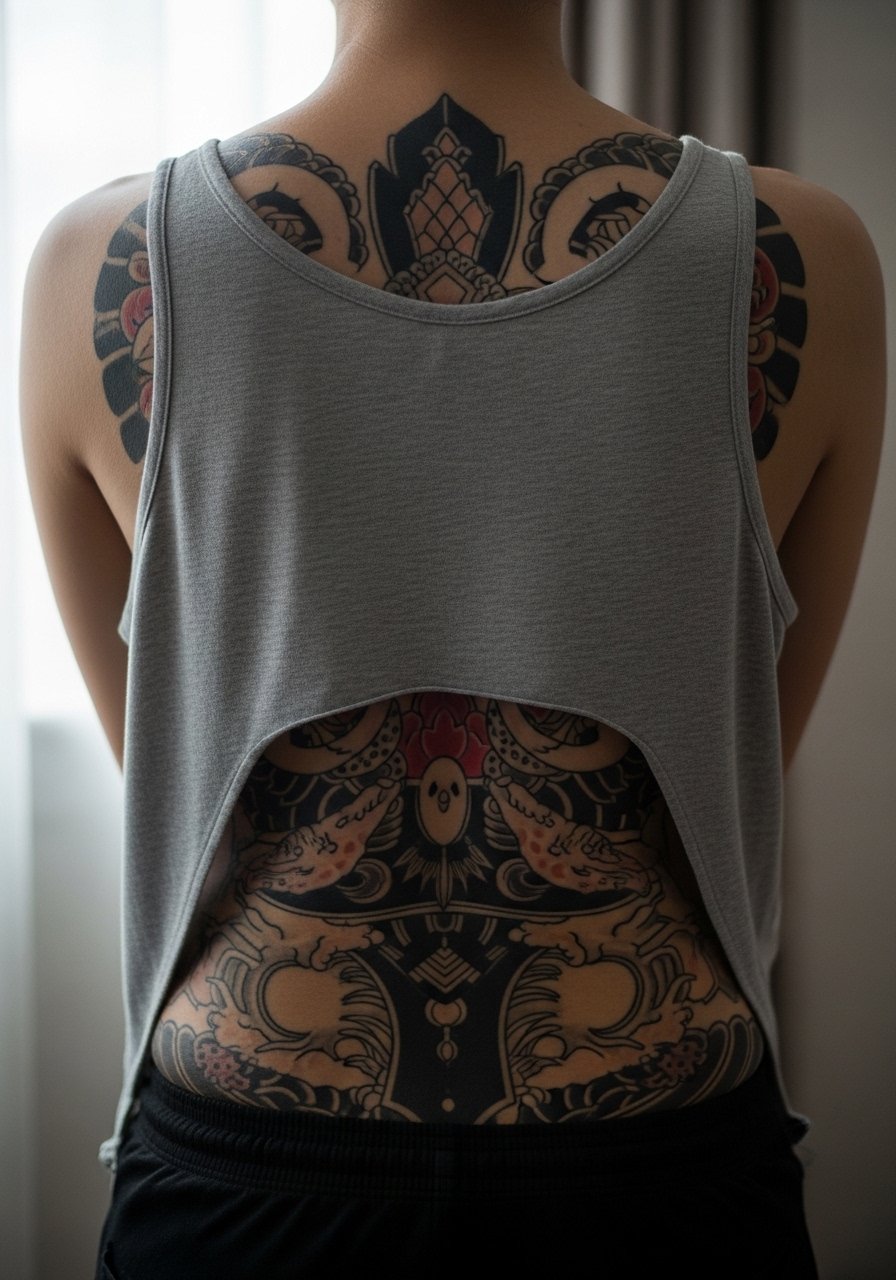
1. Full-Back Irezumi-Style Storypiece
This is for someone who wants a single narrative stretched across the whole back, flowing up toward the shoulders and down over the hips. Expect multiple long sessions and heavy saturation work where bold outlines hold better over time than thousands of micro details. During consultation say you want strong outlines and areas of flat color to anchor the story, rather than infinite tiny details that soften. A real mistake is asking for every element from different references with no unifying palette. Note the historical technique debate. One camp prefers traditional hand-tapped tebori for authenticity. The other camp favors modern machines for consistent saturation and shorter sessions. Ask the studio which approach they lean toward and why.
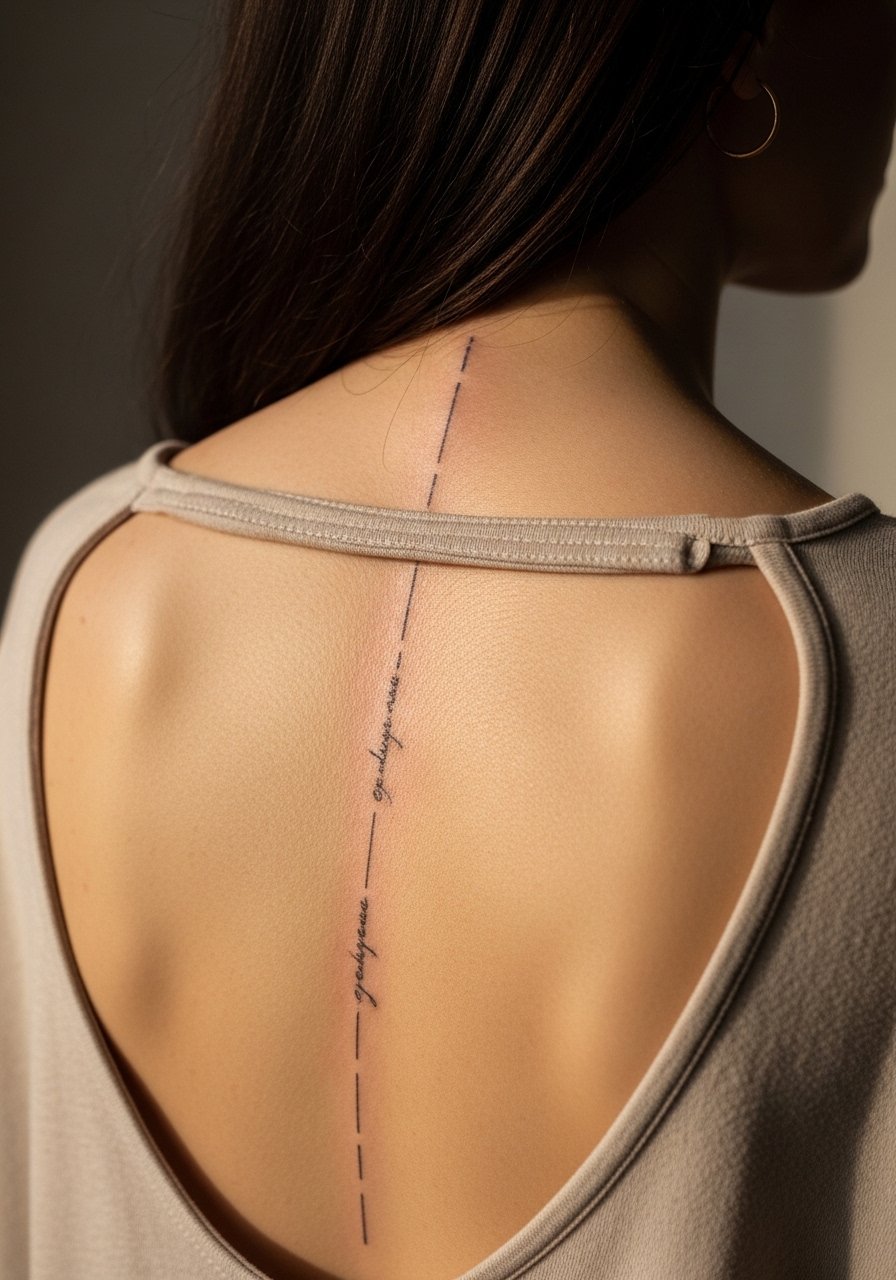
2. Vertical Spine Script or Motif
A slim column along the spine reads very architectural and plays with the body’s centerline. The spine can be tender during the session, so expect higher pain near vertebrae and more patience in shorter passes. Tell your artist you want the linework to sit slightly away from the central vertebrae if you worry about blowout. A common aging mistake is packing too many micro-letters into a narrow column. If you want text, pick a typeface with open counters. For showing off, an open-back midi dress or a racerback tank frames the spine without covering it.
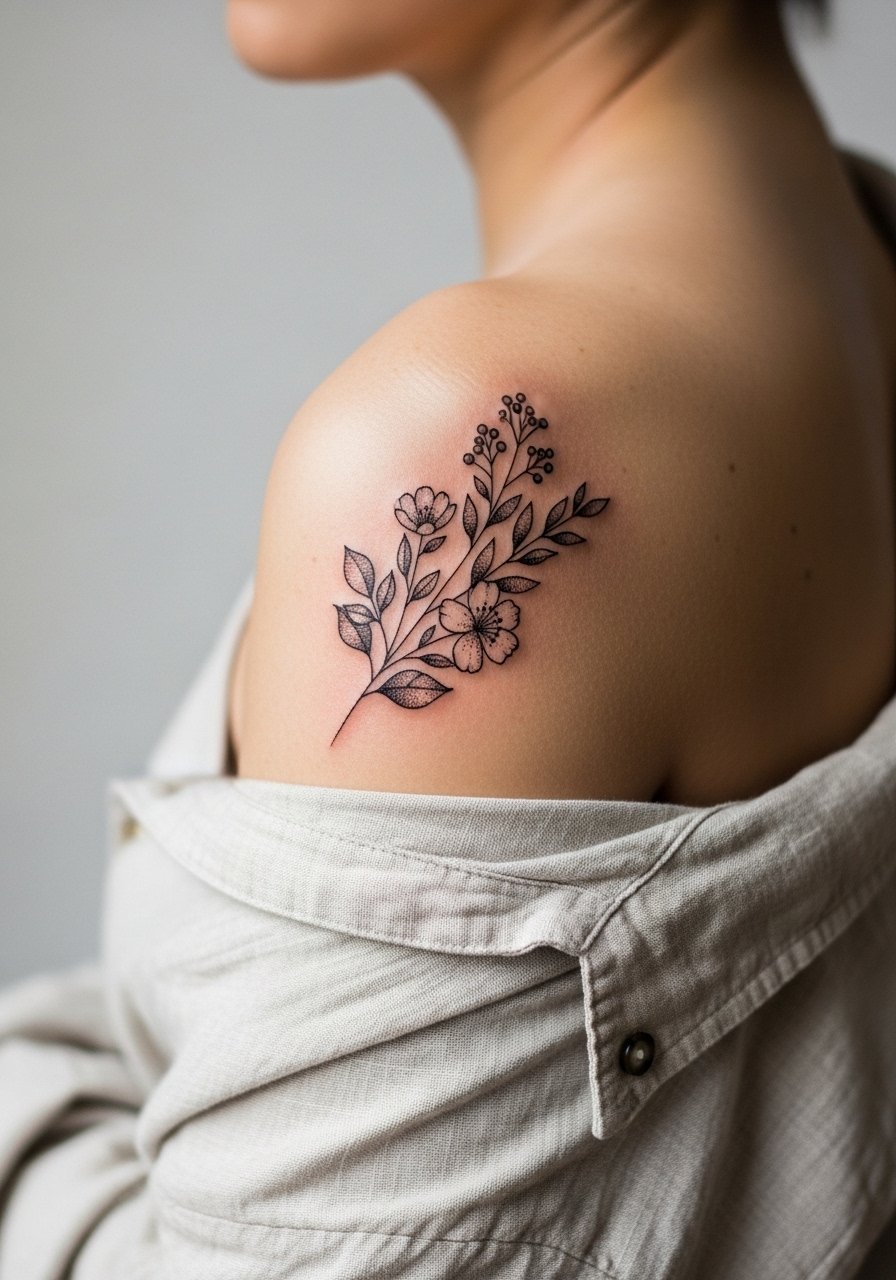
3. Scapula Botanical Cluster
A cluster of leaves, small blooms, or vines along one or both shoulder blades flatters movement and sits under garments easily. The shoulder blade area moves a lot when you reach or shrug, so tell your artist you want the biggest stems placed along muscle planes not across joints. Sessions here are moderate in time but can sting where bone is near the surface. A mistake I see is rushing for minute floral detail too close to bone. For casual wear, pair this with loose linen button-downs you can pull aside when showing the piece.
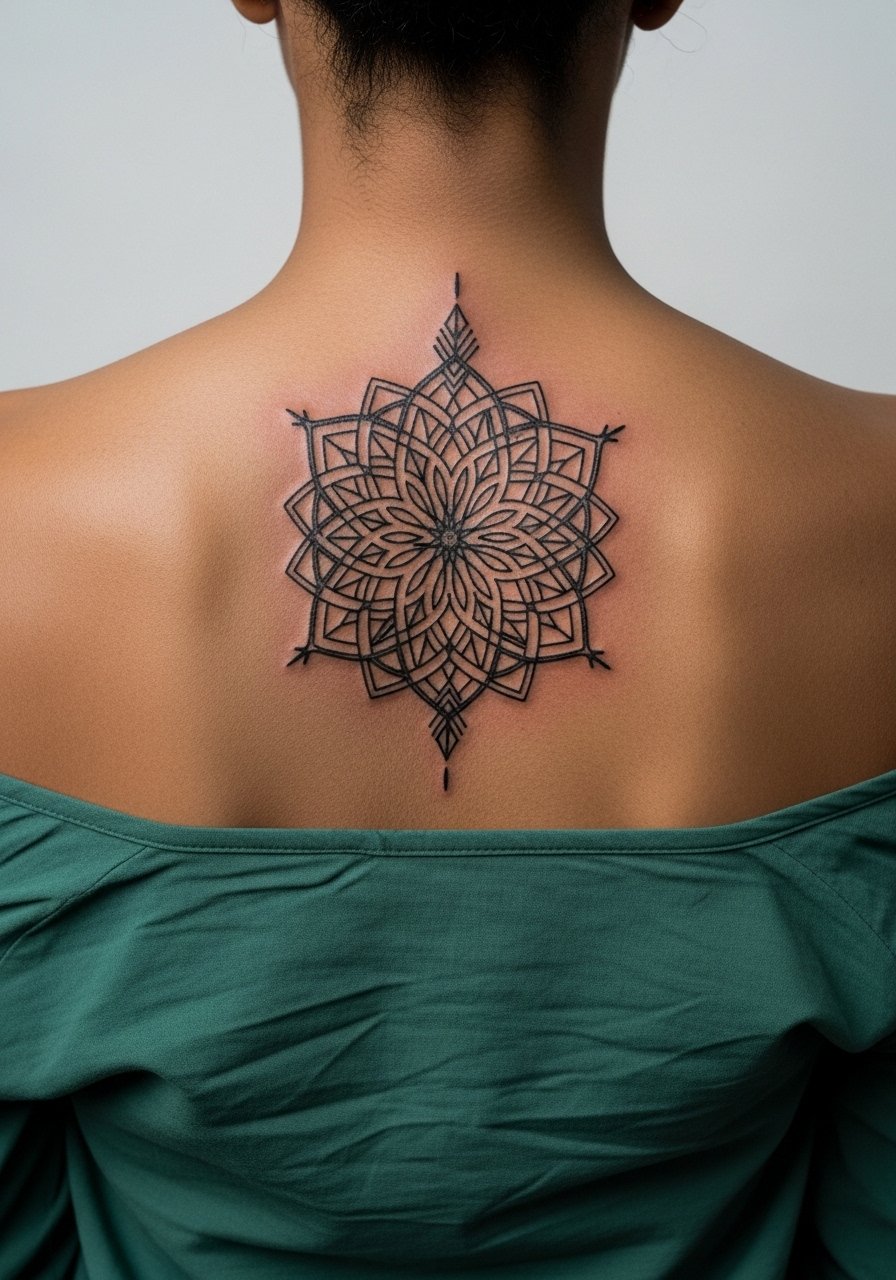
4. Geometric Mandala Centered on Upper Back
A mandala radiating from the mid-upper back balances symmetry and flow. The key consultation point is scale. If it’s too small the dense linework merges over time. Ask for slightly wider line weight and breathing room between rings to preserve the geometry after healing. Expect several hours to block the main rings and a follow-up for fine details. For a night out, pair the mandala with an open-back blouse that places the design center stage. A common mistake is choosing a stencil that looks perfect on paper but sits awkwardly on the shoulder blades when tested on skin.
5. Sculpted Angel Wings Across Shoulder Blades
A classic placement that reads grand without being full coverage. The trick is to calibrate feather density so the wings still read when layered under a jacket. Tell the artist you want negative space between feather groups to avoid muddied texture in years. Session time depends on wingspan and shading style. A common error is packing too many tiny feathers for the initial session. For casual show-off, a halter top or a wide-neck sweater pulls focus to the blades.

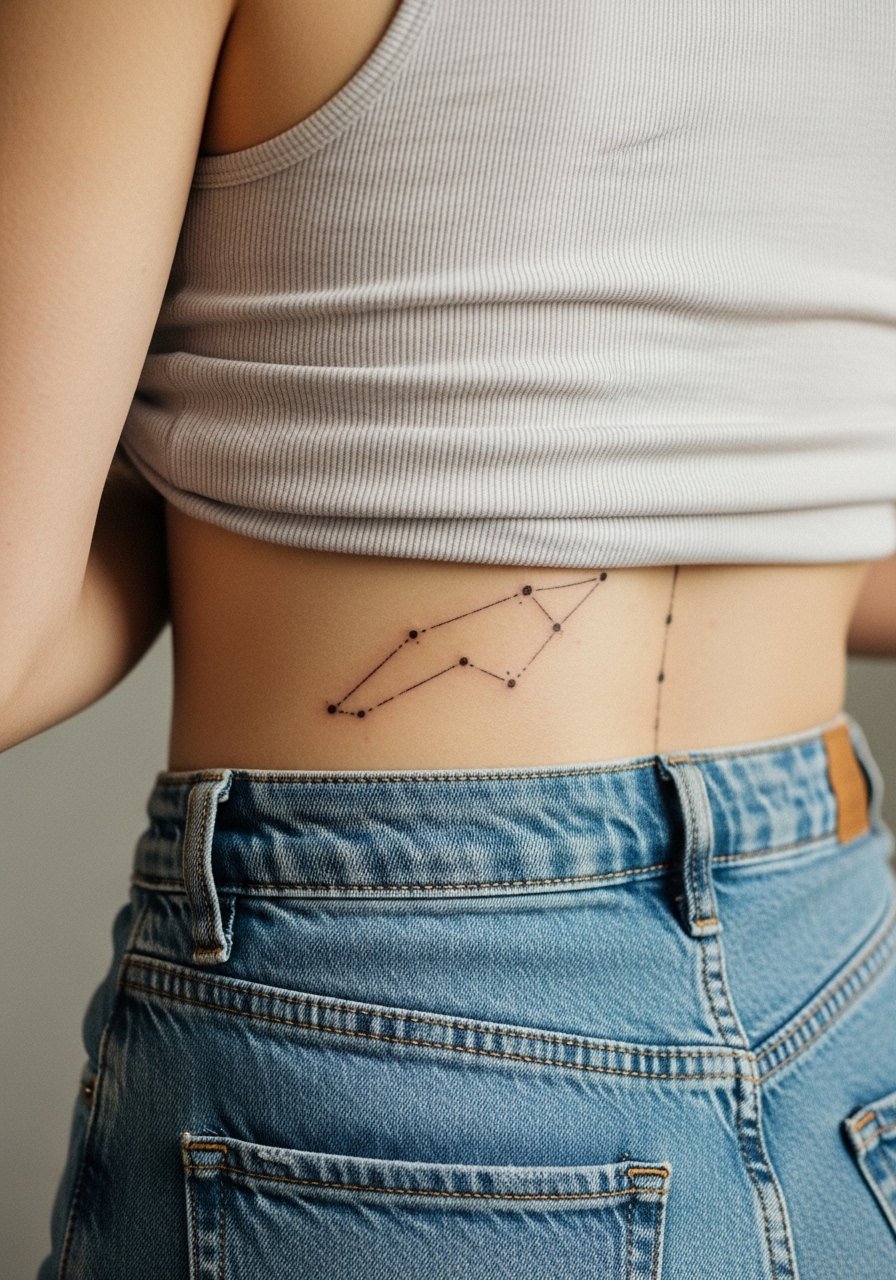
6. Constellation or Celestial Map Across Lower Back
Subtle astronomy work along the lower back looks modern and can double as a personal map. Placement here experiences friction from waistbands, so ask for slightly bolder pinpoints and small connecting lines with generous spacing. Session feels moderate but the first week can be fussy under tight clothing. For sessions, wear high-waisted pants you can slide slightly down so the artist has clear access. Avoid tiny dots too close together because they tend to blur over time.
Studio Day Picks
These six back styles need different prep and a small kit of basics to make the session and first week smoother.
-
Stencil transfer paper kit. Lets you test placement on the skin for sprawling pieces like full-back or mandalas before the needle touches the area.
-
Topical numbing cream. Useful for low-nerve areas or longer blocks when you want to manage the discomfort on the spine and lower back.
-
Thin protective film roll. Helpful for lower back work that rubs against waistbands and for scapula pieces when sleep position is a concern.
-
Fragrance-free gentle body wash. Keeps large healed areas clean without irritating the new linework, especially for full-back sessions.
-
Aquaphor healing ointment. A thin layer in the first days helps protect dense blackwork and fine line edges while skin begins to repair.
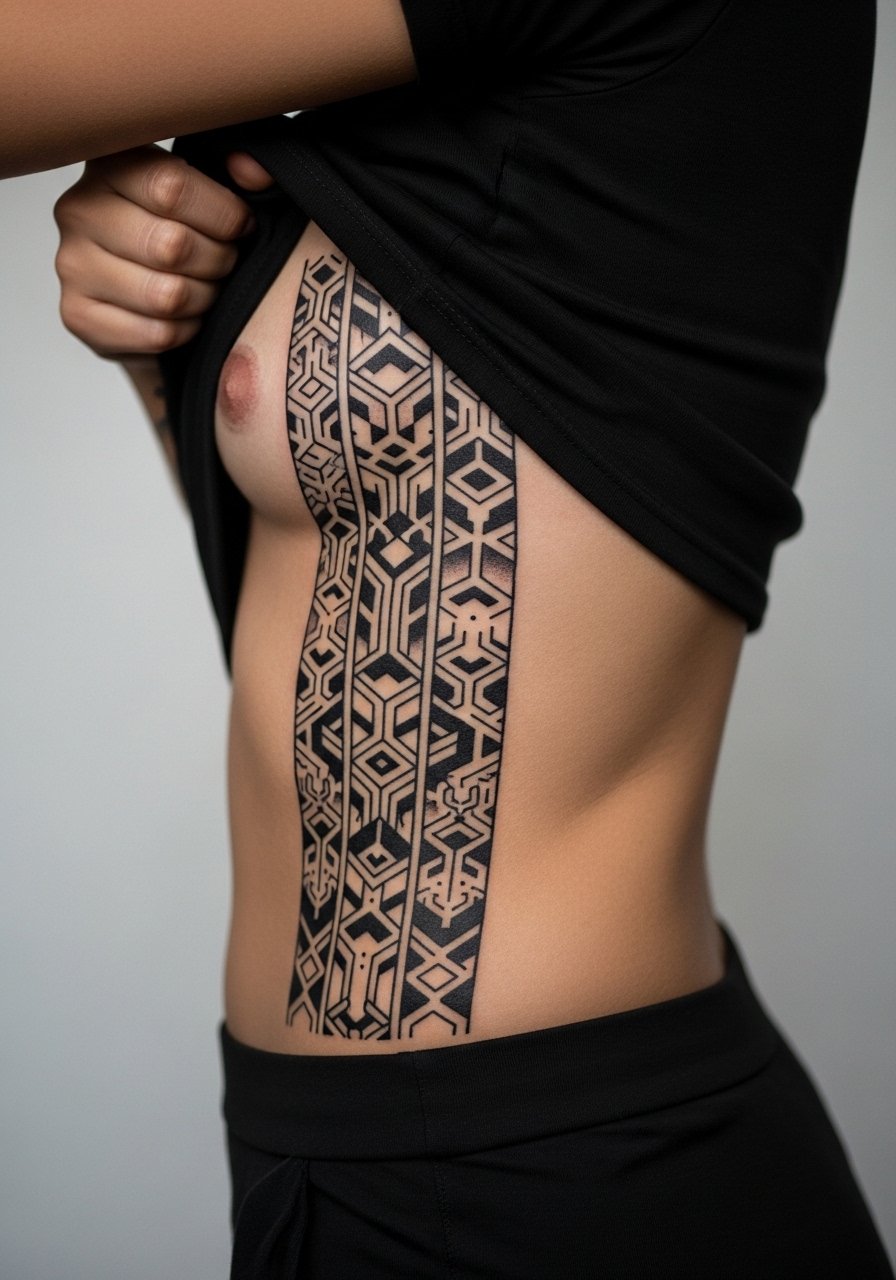
7. Asymmetrical Blackwork Side Panel
An off-center blackwork design that hugs one lat or oblique creates a strong silhouette and leaves the rest of the back open. Artists will map the piece to the muscle flow for best visual effect. Pain varies with how close the work comes to the ribs. Avoid overfilling all negative space, because all-black panels can look heavy if scale is off. For show-off wear a cropped wrap top that draws attention to the asymmetry and keeps the opposite side framed.
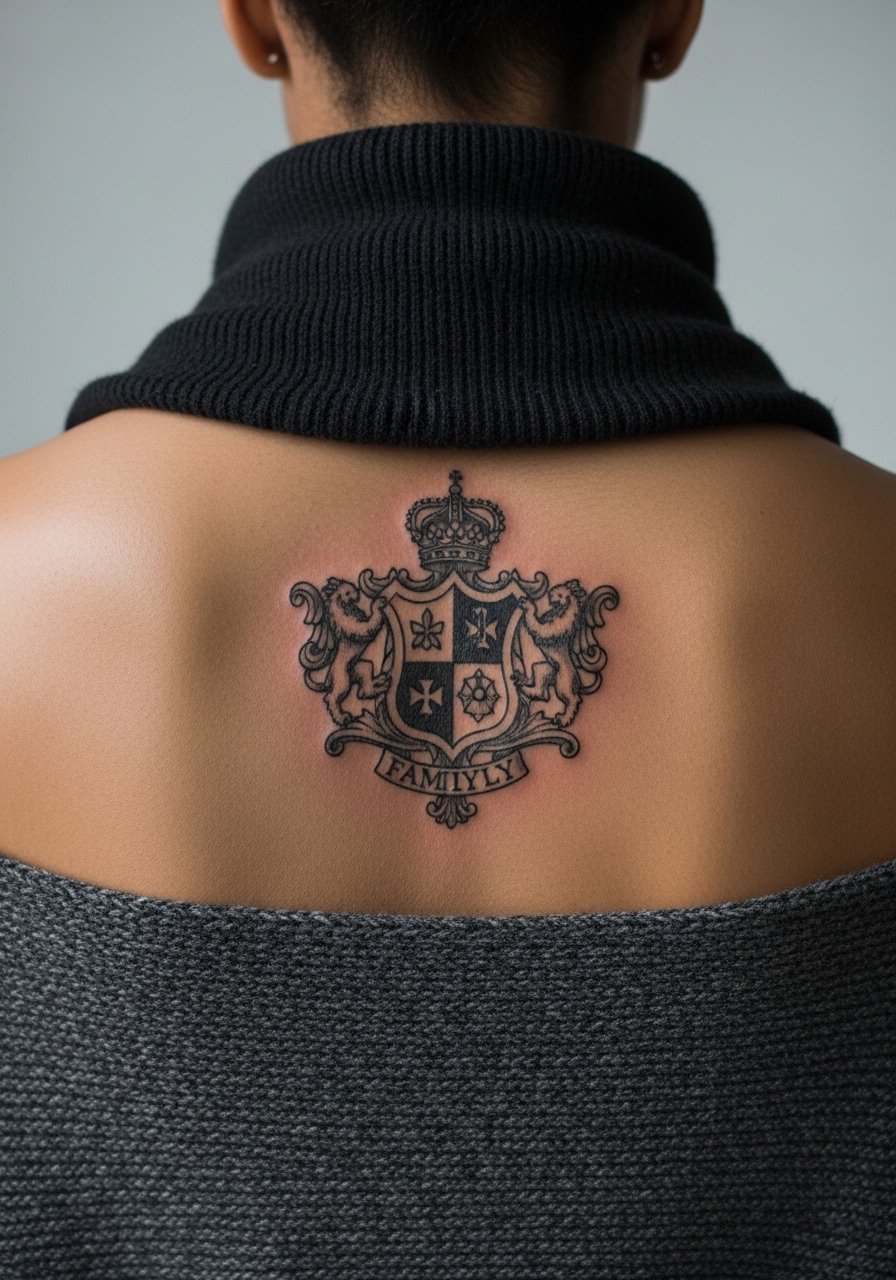
8. Family Crest or Heirloom Emblem
A crest-style emblem tucked between the shoulder blades reads personal and private. Keep lettering and small symbols bold enough to survive stretching and time. In consult, specify which elements are essential and which can be simplified. A mistake is copying tiny coat-of-arms detail verbatim without scaling it for skin. Pair this with a wide-neck sweater when you want to keep the piece semi-private or show it off easily.
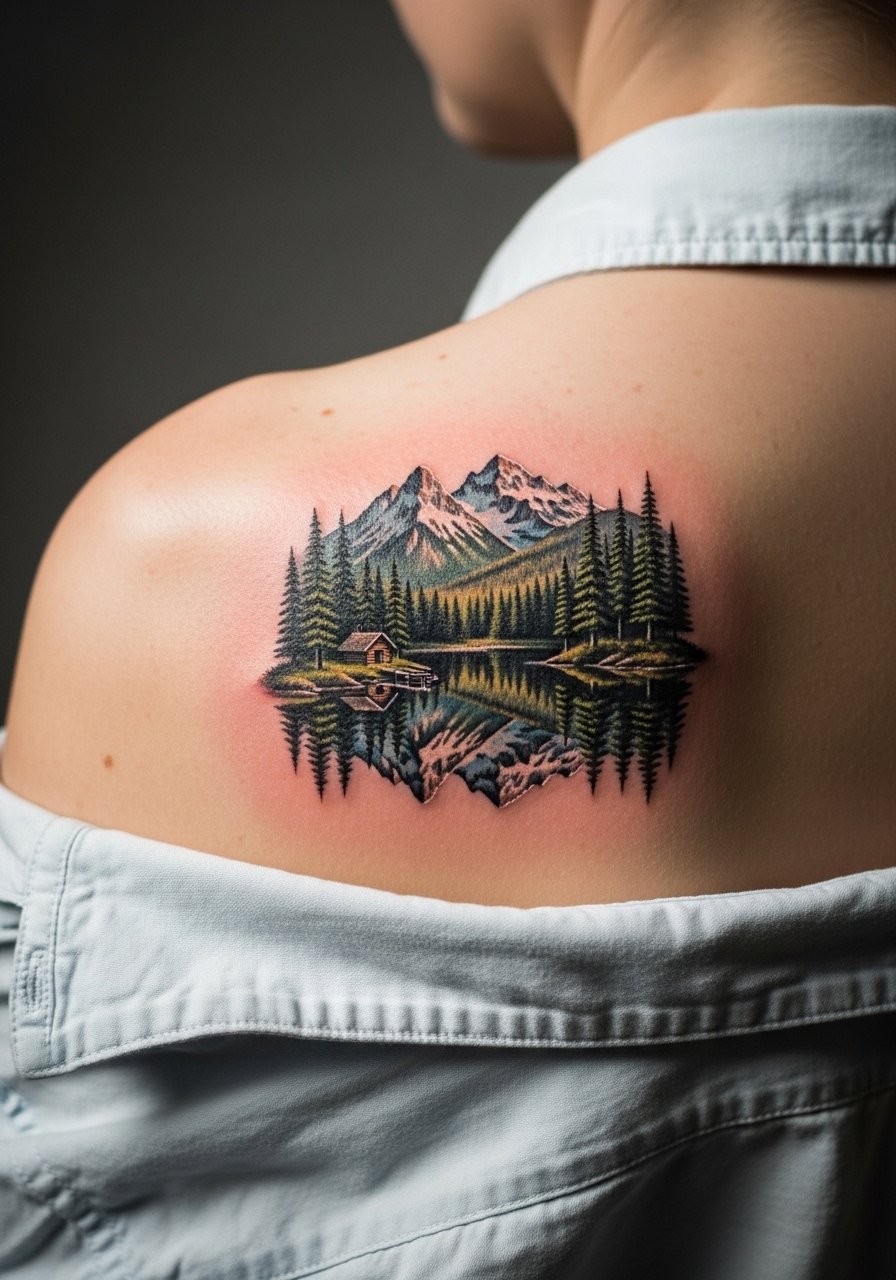
9. Watercolor Mountain Range Across Upper Back
Watercolor-style gradients can be beautiful but fade faster than solid black. If you want this look, ask the artist to layer subtle linework or stipple shading for structure underneath color. That gives the piece visual anchors as pigments soften. Expect follow-up touch-ups sooner than blackwork. For showing it off, an open-back dress makes the horizon read across the shoulders.

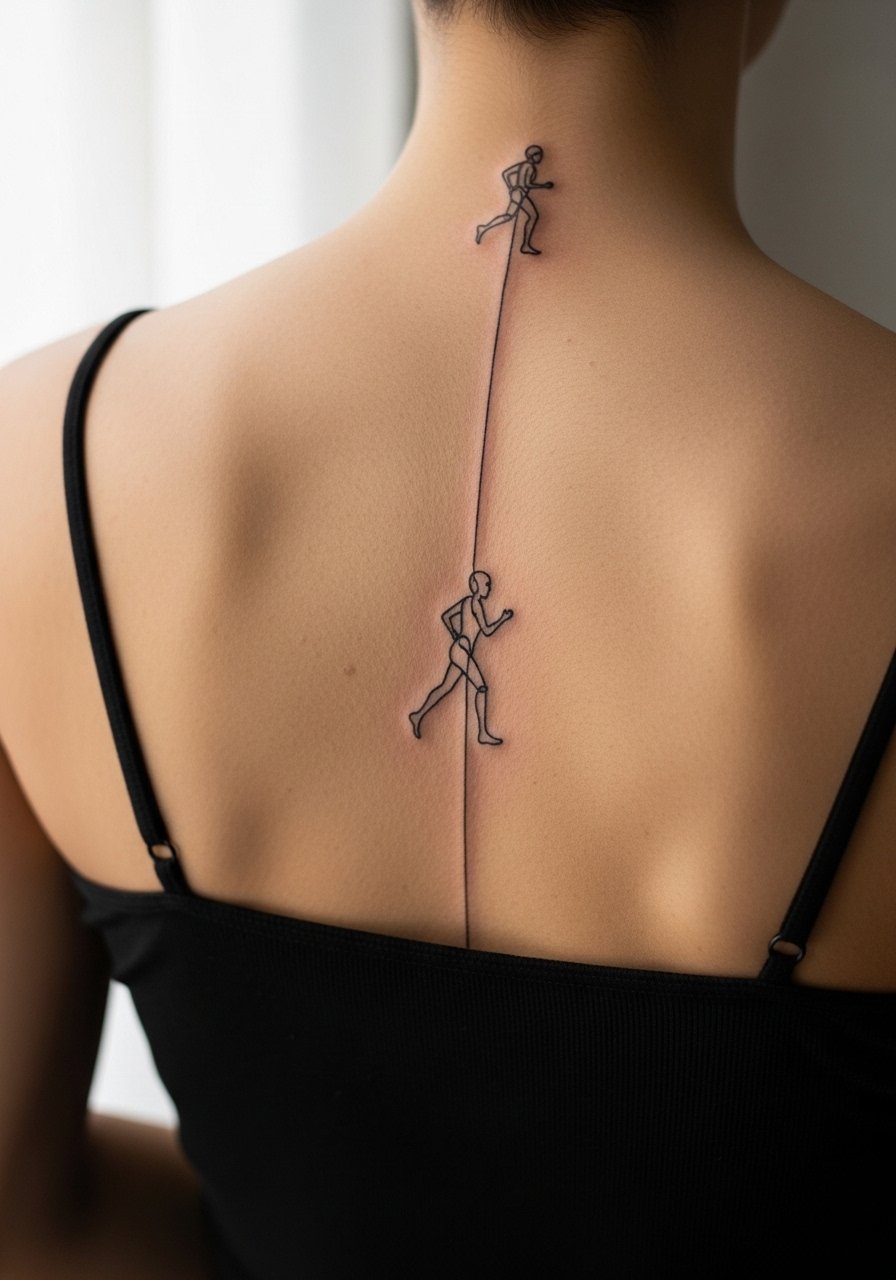
10. Single-Line Continuous Figure Along Spine
A single unbroken line that traces a human form or landscape down the spine feels minimal and modern. The advantage is movement and clarity when done at scale. Ask for slightly thicker single-line weight than the finest micro line to avoid early merging. The session is usually faster than dense pieces but requires precise hand speed. For evening styling, a strappy cami shows the vertical flow without distraction.
11. Tribal Flowing Pattern for Muscle Contour
Tribal patterns designed to follow lat and trapezius muscles emphasize anatomy and feel timeless. The biggest concern is cultural sensitivity. Mention the origin respectfully in your consult, and consider adapting motifs rather than copying sacred imagery exactly. Tell your artist you want lines that follow muscle curves to avoid a stiff look. For daytime wear, pair it with a sleeveless tank that shows the flow along your side.

12. Micro-Realism Landscape on Upper Left Back
Tiny photoreal landscapes look surprising when scaled to the back and given room to breathe. Micro-realism needs crisp contrast and a plan for touch-ups, because tiny tonal transitions can soften. Tell your artist which focal point must remain sharp, for example a tree or peak. These pieces age better when anchored by small areas of heavier black. For sessions wear a button-down shirt you can pull aside so the artist has clean, wide access.
13. Stipple Dot-Work Sunburst Centered Near Lower Thoracic Spine
Dot work or stipple shading can create a glow or sunburst effect that reads well on camera and in person. Because the technique uses many single dots, ask for density maps during the consult so darker zones are intentionally planned. A session here is meticulous and can be long. A common error is asking for too tight a stipple gradient that collapses into gray. For casual layering try a backless top that sits above the burst without covering it.

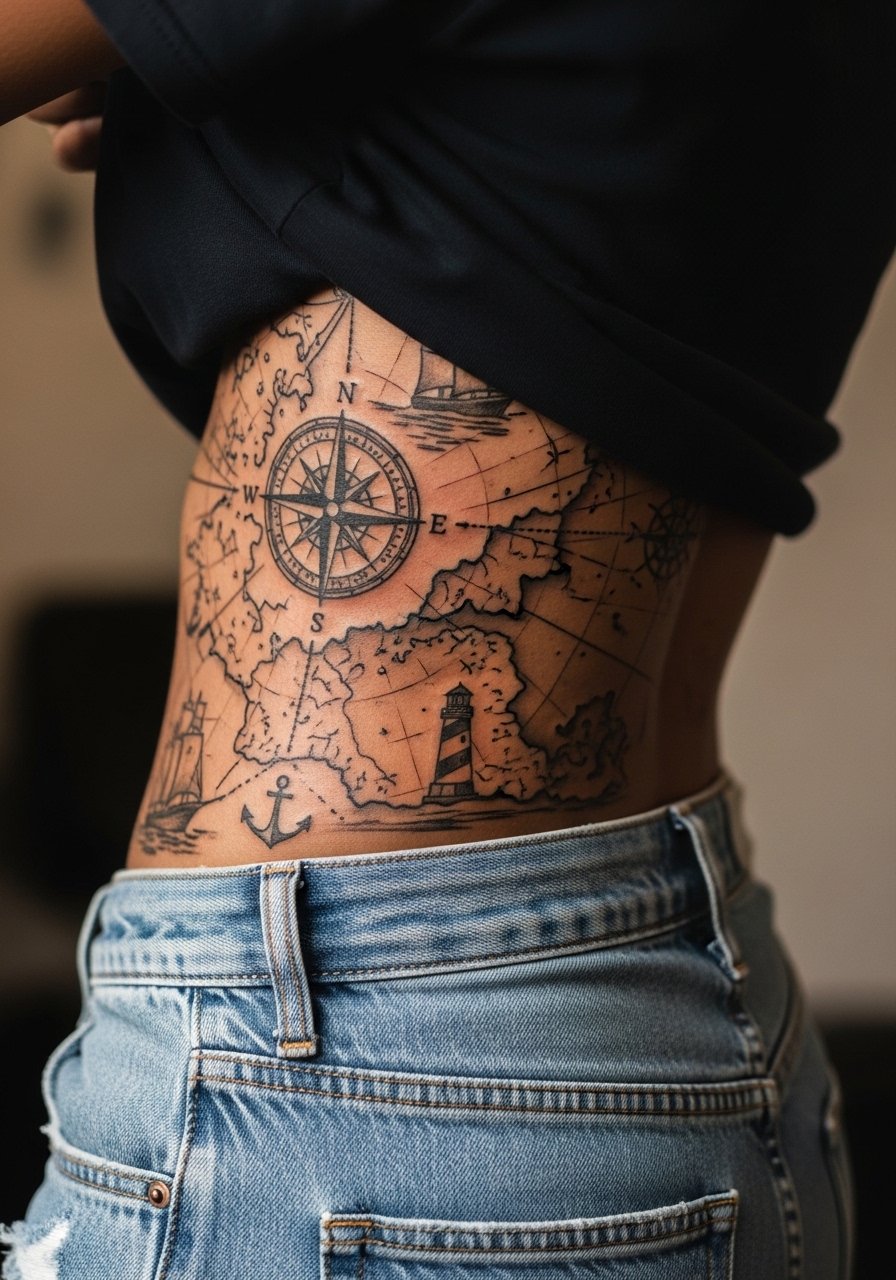
14. Nautical Map and Compass Spanning Mid Back Toward Hip
A map motif that drifts from mid-back toward the hip feels exploratory and personal. Because it crosses friction zones, plan for bolder anchors like a dark compass rose and simplified coastlines. Tell the artist which map line must remain readable at a glance. Sessions may be split over two visits to let lines settle. For weekend wear pair the piece with low-rise denim that reveals the lower sweep without rubbing directly on the tattoo.
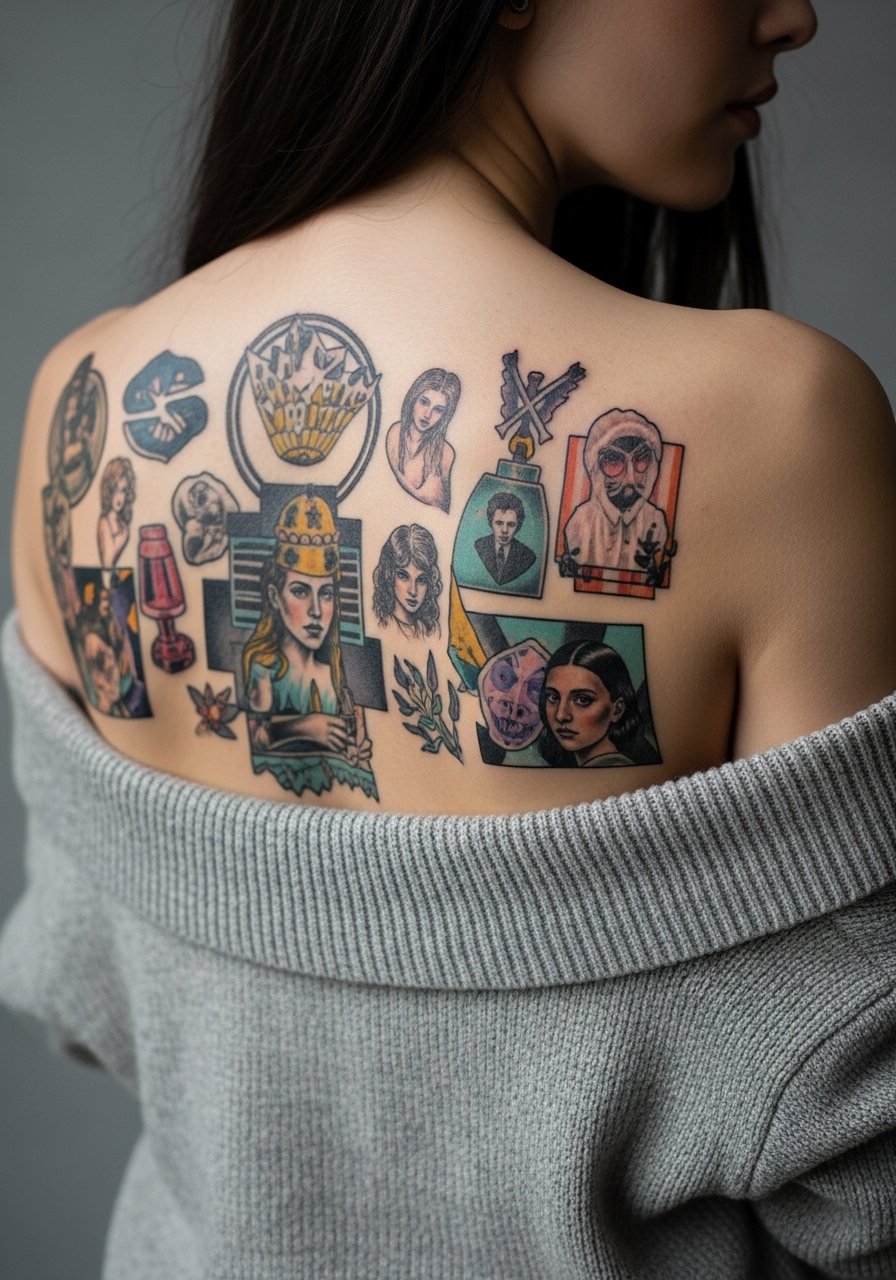
15. Surreal Collage That Mixes Objects and Portraiture
A collage-style back piece pairs contrasting elements for narrative drama. The consultation should prioritize hierarchy so the eye lands on a main figure first. Many people try to cram equal visual weight into every corner and the result looks noisy. For sessions expect mixing techniques like dot work and solid blacks, which increases session time. A practical showing off choice is an off-shoulder sweater that frames the collage’s upper margin.
16. Rib-to-Back Wrap That Curves With Movement
A wrap that starts on the ribs and moves onto the back reads dynamic and intimate. This area stretches and breathes, so artists debate fine line here. One camp warns the skin movement will blur the finest details quickly. The other camp says careful needle depth and spacing preserves fine line when scaled correctly. If you choose this route ask for slightly larger elements and planned negative space. For the session wear a sports bra or zip-up top so the artist can expose the rib-to-back area without full undressing.

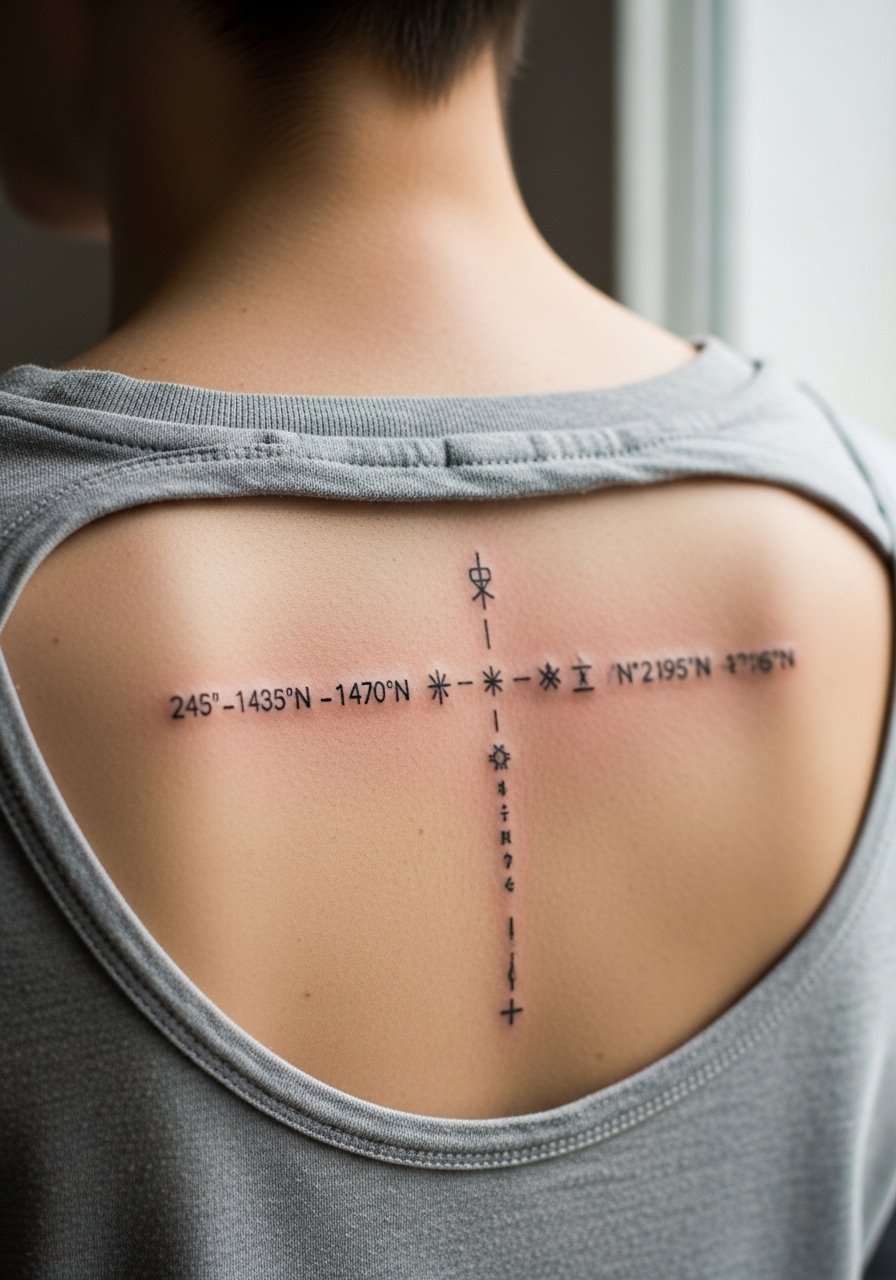
17. Minimal Fine-Line Coordinates or Tiny Symbols Across Upper Back
Tiny, spaced symbols or coordinates across the top of the back offer a low-key route to personalization. The trick is spacing. Give each element room so dot points do not merge over time. The session is short for each symbol but total time depends on how many you stack. A common error is crowding too many small marks into a narrow strip. For everyday wear a crew-neck tee with a low back cut keeps the area visible on warm days without overexposure.
Frequently Asked Questions
Q: How do full-back bodysuits age compared with bold blackwork panels?
A: From what I’ve seen, solid blackwork panels tend to keep their graphic read longer because saturation and contrast survive sun exposure and light wear. Full narrative bodysuits with lots of tiny motifs look rich fresh but some details soften faster. If longevity matters ask for strategic bold anchors and plan touch-ups in the contract.
Q: Is fine line on the ribs a bad idea if I want long-term clarity?
A: It depends on scale and placement. Fine line on ribs can blur faster because the skin stretches with breath and time. One approach is to scale up the line weight slightly and add spacing. Ask your artist where they stand on rib work and request a healed photo from the same placement on similar skin tone.
Q: How should I find an artist who understands back musculature flow without naming people?
A: Look for portfolios that show multiple healed back pieces, not only fresh photos. Use platform searches by hashtag plus location, check convention guest lists, and review shop portfolios for healed shots. Ask the artist to explain how they’ll map the design to your muscle contours before booking.
Q: What should I wear to a long full-back session for comfort and access?
A: Bring a loose button-down or a zip-up hoodie you can pull aside so the area is exposed without full undressing. Layers help during breaks. A pair of drawstring linen pants is handy for lower back or hip work.
Q: Do watercolor back tattoos need different maintenance than blackwork?
A: Yes. Watercolor pigments can fade quicker and require more frequent shielded-sun protection and possibly touch-ups. If you want color that stays vibrant, discuss stronger underlying line anchors or partial black framing to hold the color visually over time.
