
Fine line work rules saved boards and feeds right now, but the traditional pieces that still read clean after a decade rarely mirror the trendiest posts. Thick outlines and solid saturation age into legible shapes, while some delicate approaches need spacing or touch-ups sooner. Below are 21 classic and slightly modernized traditional designs for women, each with what to ask your artist, how they age, and how to wear them so the piece looks deliberate from day one.
1. Fine Line Arrow on Inner Forearm
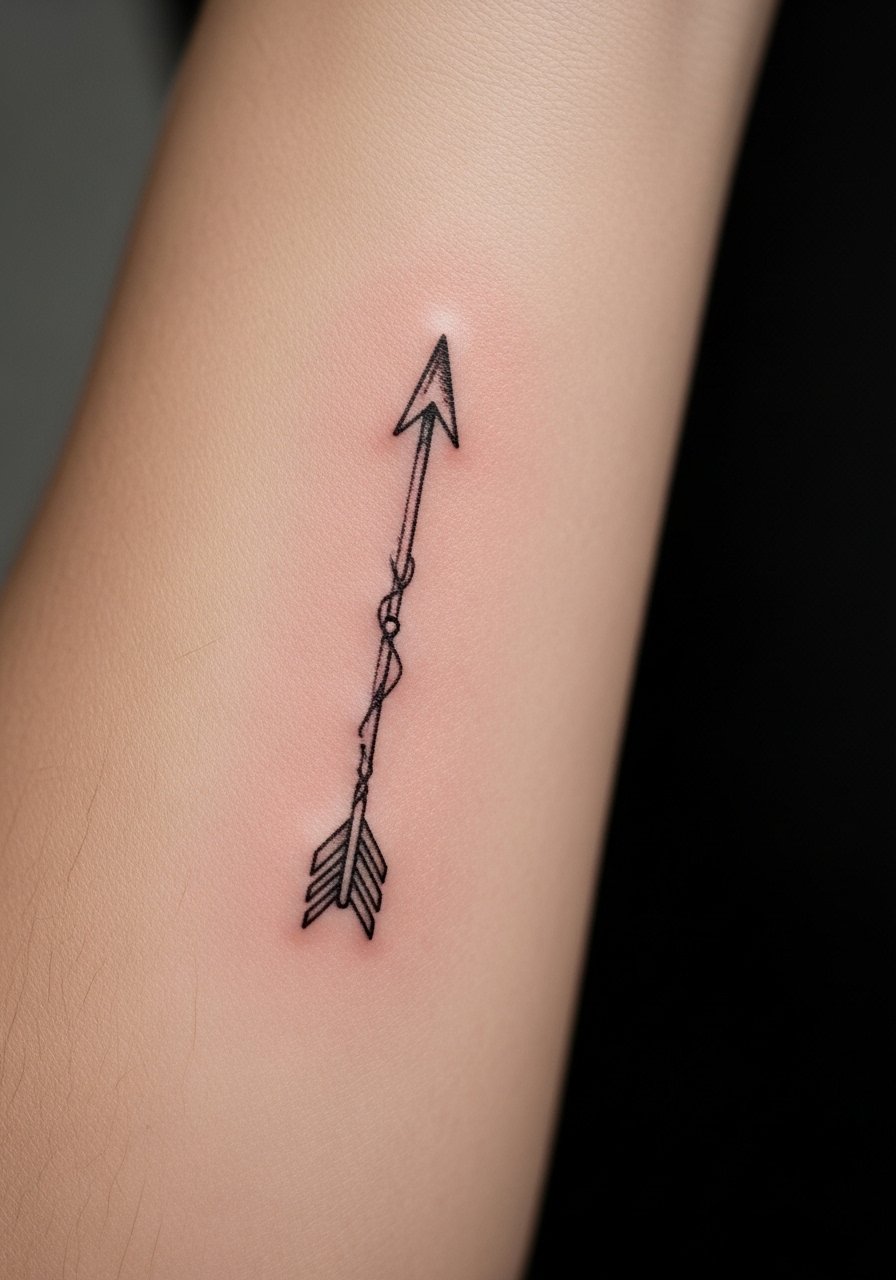
I bring this up first because the inner forearm reads like a small canvas. Fair warning: thin arrows can look delicate at first and then soften into a ghosted line by year three if the artist goes too shallow or the design is too tiny. Tell your artist you want slightly thicker linework at the base and clean negative space around the shaft. Expect low-to-moderate pain and a single quick session. For showing it off, rolled sleeves set the framing. Try pairing with a loose linen button-down that you can roll to the elbow so the piece reads against neutral fabric.
2. Classic Rose on Outer Upper Arm

There is something about bold outlines and saturated color that holds up. I recommend the outer upper arm for this one because the skin there keeps saturation well. Ask for traditional saturation rather than washed shading and request the leaves have room to avoid merging over time. Typical mistake: packing too many tiny leaves into a small area. Session feels manageable and you can expect strong color at six months and steady appearance at five years with sunscreen. If you want to show it off, short sleeves or a cropped tee frame the piece without hiding the silhouette.
3. Anchor with Rope on Calf

The calf is forgiving for bold traditional compositions. I tell clients the rope needs negative space against the anchor so the twist reads after healing. Common mistake is shrinking the motif to fit a sneaker-size area. This piece usually runs moderate pain and can be done in a single longer session. Over two years the black saturates nicely while colored fills may soften. For summer wear, pair the anchor with loose linen shorts or sandals so the tattoo is visible without rubbing against tight fabric.
4. Sternum Heart with Banner
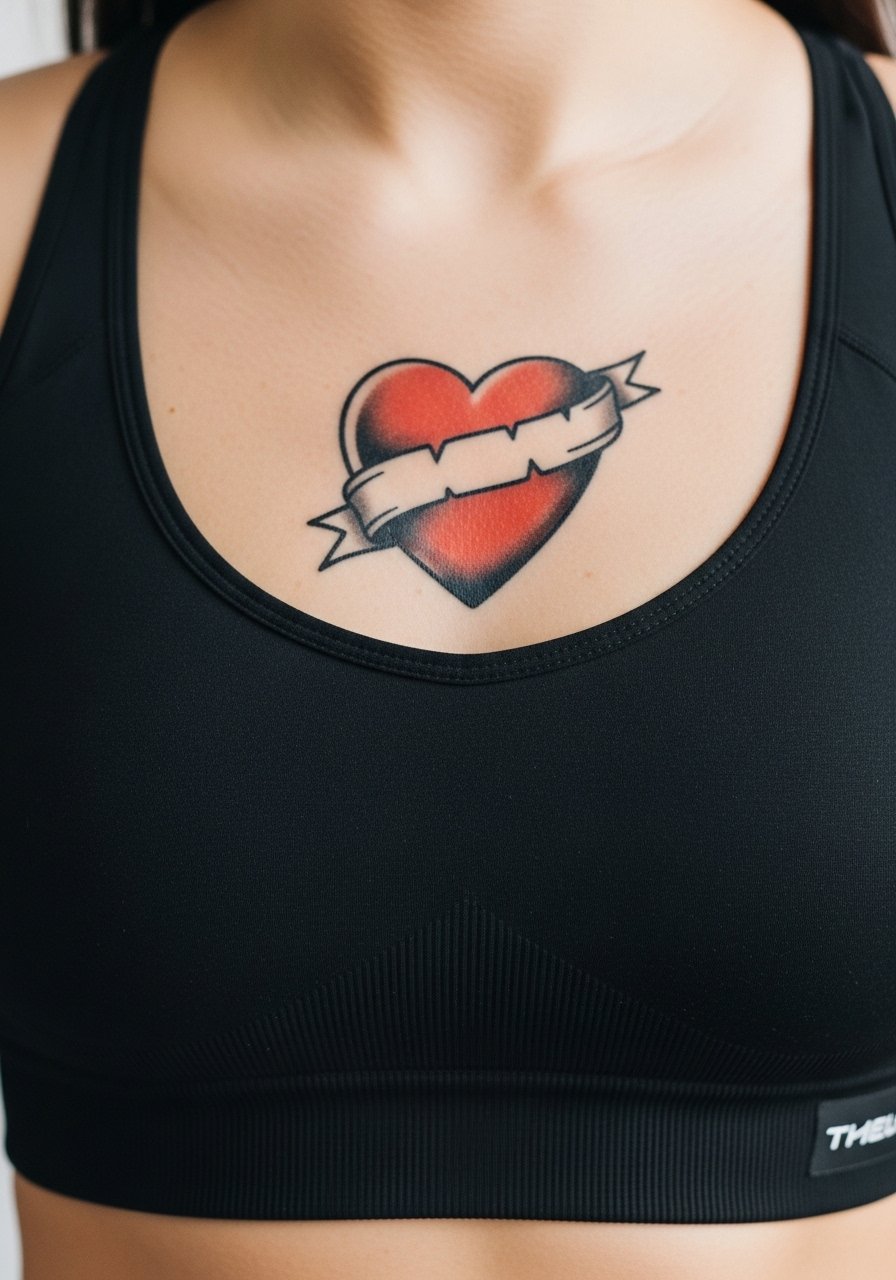
Fair warning: sternum work is one of the more sensitive consultations I see. Artists split on fine detail here. One camp argues the movement and thin skin blur fine lines within two years. The other camp says heavy outlines and planned spacing settle well when the depth is correct. If you choose this design, ask for bold outlines and a slightly simplified banner so the text stays legible. Expect high pain, longer sessions, and a realistic touch-up timeline at year two or three for crispness. Professional considerations and modesty matter because the area can be intimate.
5. Swallow on Collarbone

The collarbone is visible and flat enough for a stylized swallow. During consultation, specify the angle and wing spread so it complements your shoulder line. The biggest mistake is centering it too close to the sternum where the bone creates odd healing. Expect sharpness at six months and a touch-up at year three if you want the beak and wing tips to stay crisp. For evenings out, an open-back dress or wide-neck top frames the bird without competing for attention.
6. Dagger Through Rose on Outer Thigh

Outer thigh pieces tolerate bold contrast well and the space lets the dagger breathe. A common mistake is cramming too many blades or tiny ornamentation into this layout. Tell the artist you want clear separation between the dagger and petals and avoid tiny script inside the banner. Session wear is easy if you come in loose shorts. For showing it off at the beach, a high-waisted swimsuit bottom lets the composition read without exposing more than you want. Expect moderate pain and strong longevity because the area sees low friction.
Studio Day Picks
These first six pieces include visible arm, chest, and thigh placements, so the right prep and a few small items make session day smoother and the first week easier.
-
Stencil transfer paper kit. Lets you preview line placement on skin which is useful for the collarbone and forearm pieces above.
-
Topical numbing cream. Applied per instructions this can reduce the edge for sternum and thigh sessions without impacting the artist's linework.
-
Thin protective film roll. Helpful for ankle or finger pieces that face friction from shoes and daily washing.
-
Fragrance-free gentle body wash. Cleans the healing area without stripping delicate pigment, relevant for the forearm and collarbone pieces.
-
Aquaphor healing ointment. Thin layers during the first few days lock in moisture and help linework settle, especially for fine elements.
7. Nautical Ship on Shoulder Blade

Shoulder blade compositions suit larger, narrative traditional pieces. Bring reference that shows the mast length and silhouette you want. Common mistake: insisting on tiny rigging details that blur as the skin moves. The session usually requires you to lie on your side which can be uncomfortable for some. Expect bold outlines to hold and color to soften slightly over years. For the session wear a loose tank top so the artist can access the blade without you being undressed.
8. Panther Head on Upper Back
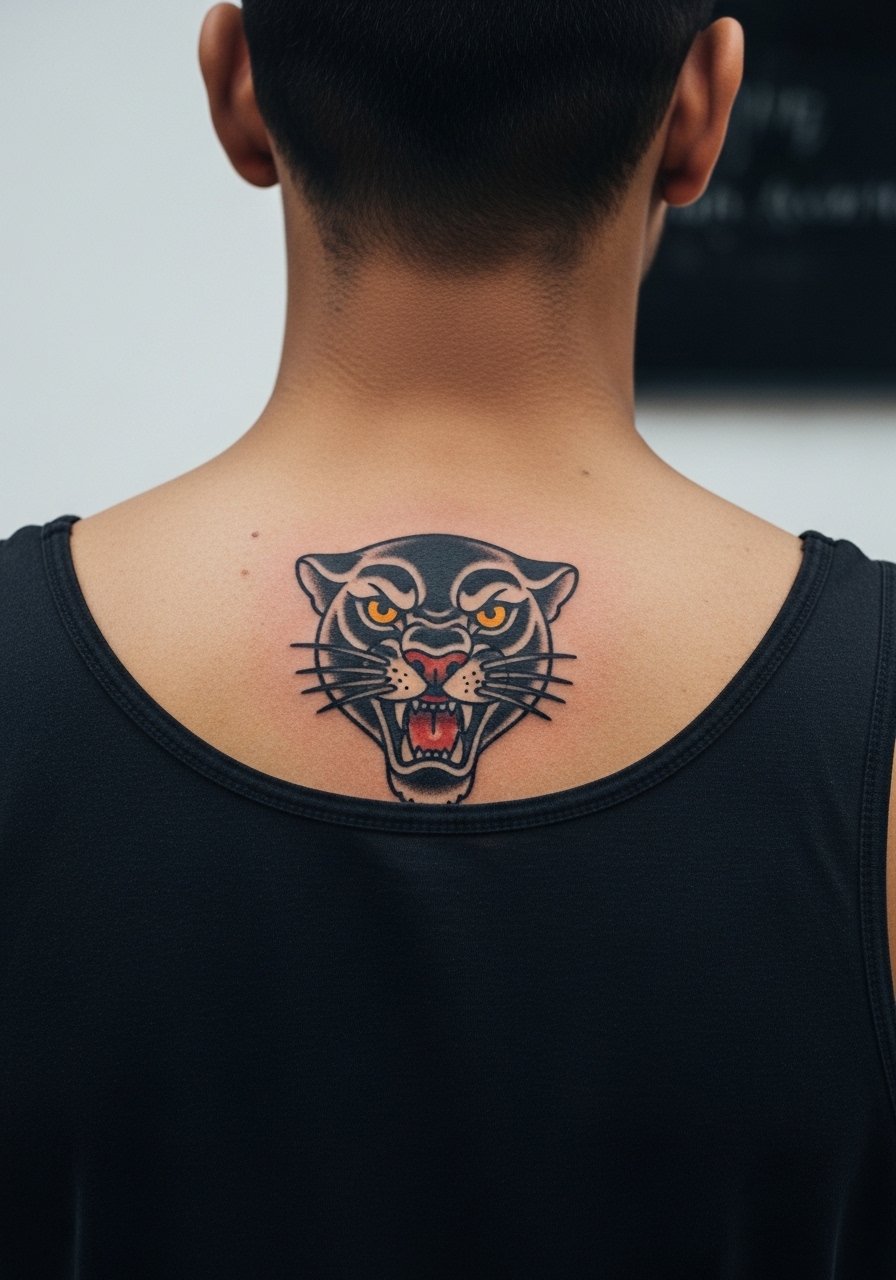
This one reads bold from across a room when done in a traditional palette. I tell clients to ask for open jaws and clear whisker lines rather than tiny stipple texture that can merge. A common aging error is too much tiny dot work in the face. The session may need multiple passes for saturation and can feel like medium-level discomfort. For people who like statement pieces, an open-back top or a button-down worn loosely keeps the focus on the panther without overexposing skin.
9. Compass Rose on Ribcage
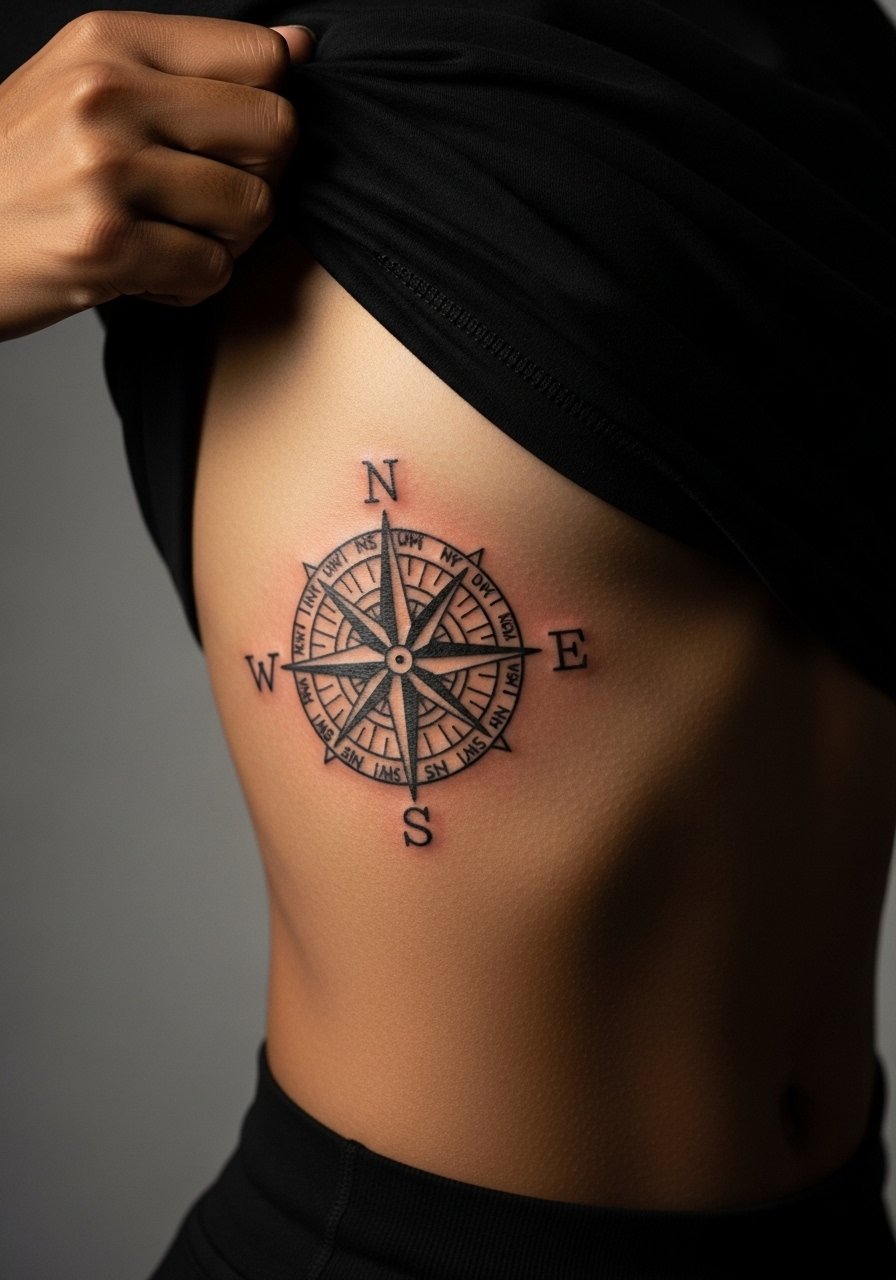
Artists are split on ribcage detail. One camp says the thin skin and constant breathing cause fine points to blur within two to three years. The other camp argues that if the lines are bold and spaced, a compass can settle cleanly. Name both camps aloud in your consultation and ask where your artist stands. Practically, expect high pain and at least one touch-up for tight cardinal points. Keep the design slightly larger than you think so the star points have breathing room.
10. Mermaid on Outer Thigh

The outer thigh lets you go larger with curves and saturated scales. Tell the artist if you want more bold shading instead of tiny color gradients that can fade unevenly. A mistake I see is over-detailing the tail in a narrow space. Sessions here are moderate and usually comfortable. For showing the mermaid, a swimsuit bottom with a high waist or a skirt that sits at the hip keeps the composition visible and flattering.
11. Skull and Roses on Lower Forearm
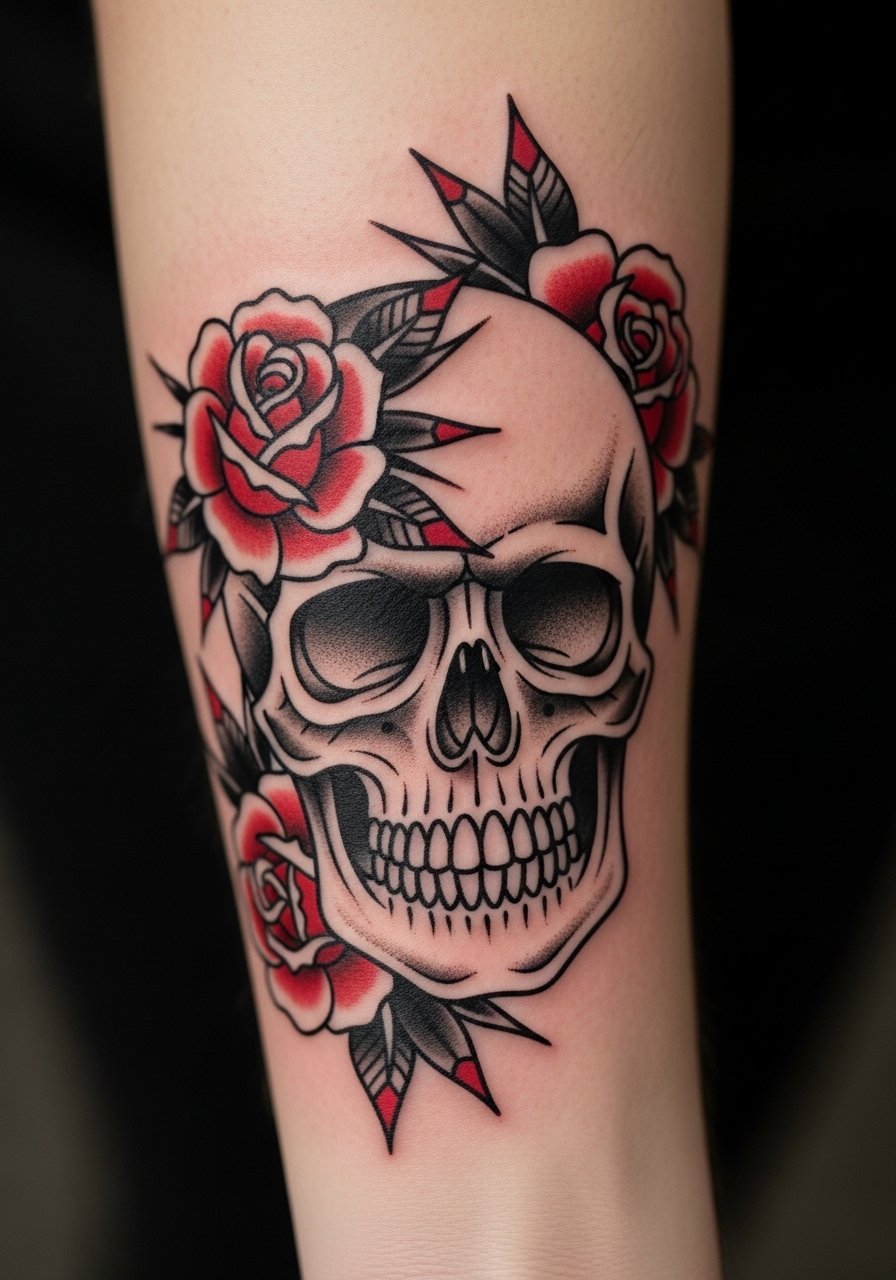
Lower forearm pieces are workhorse placements. Tell your artist you want the skull's jawline to have clear negative space so the roses do not fill inward as pigment settles. A common mistake is shrinking the roses so their petals lose definition. Expect medium pain and steady visual impact at two years. For everyday styling, rolled sleeves and a minimalist bracelet keep attention on the motif without crowding the forearm.
12. Tiny Cherry on Ankle
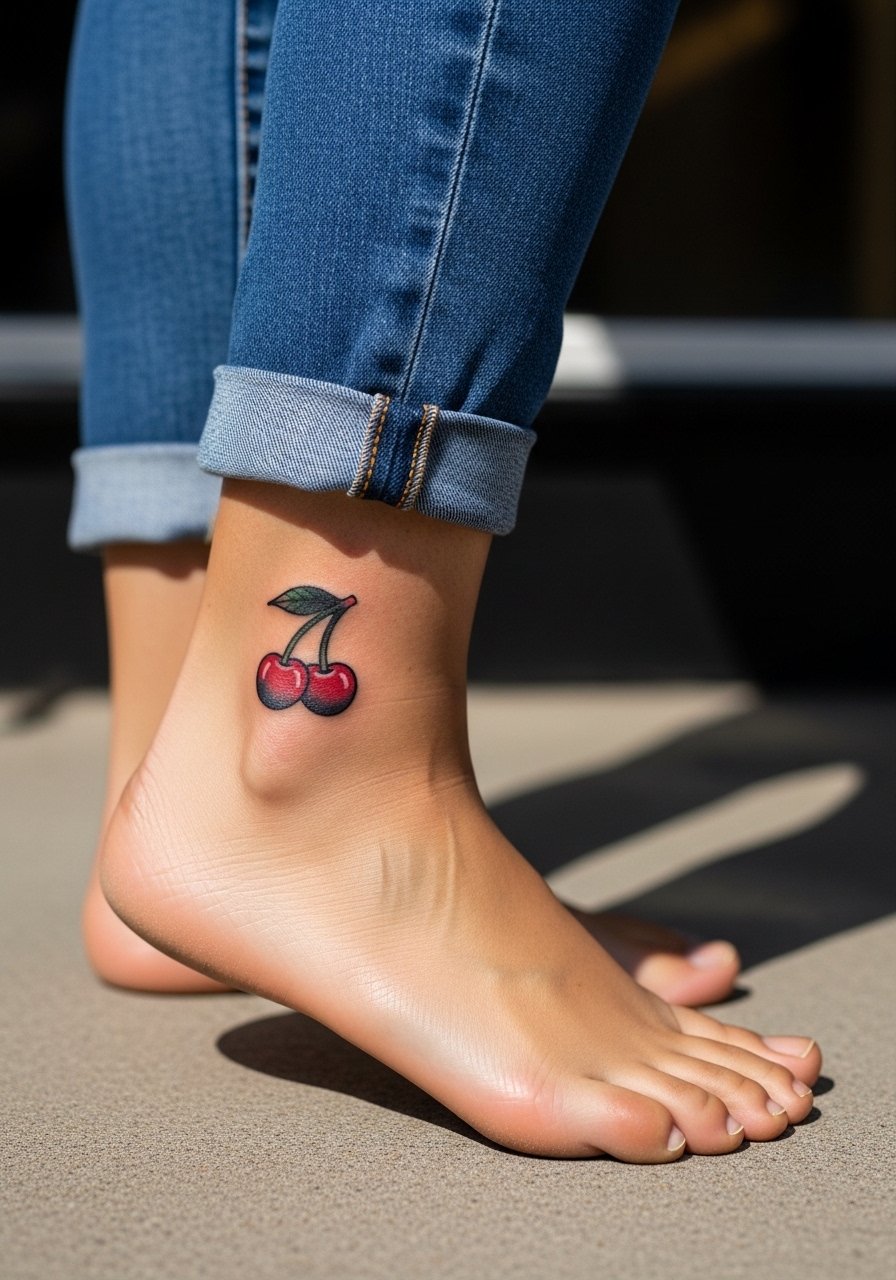
Small ankle motifs face friction from shoes and socks. The biggest practical tip is to position the cherries so they avoid the exact edge where the shoe rubs. Tell your artist you want touch-up-friendly spacing and avoid micro details in the stems. Sessions are short and low pain. For showing it off in warm months, sandals or cropped pants work best. Pair with strappy sandals to frame the tiny motif without rubbing.
13. Script on Side Neck

Neck script comes with a clear professional consideration. I always tell people to think about visible workplace norms before committing. For technique, ask for slightly bolder stroke weight than the reference so the letters survive two to three years. A common mistake is tiny cursive along the hairline that the skin cannot keep crisp. Expect moderate to high pain and plan for a possible touch-up. When discussing placement mention how often you wear collared shirts because clothing contact affects friction.
14. Nautical Star Behind the Ear
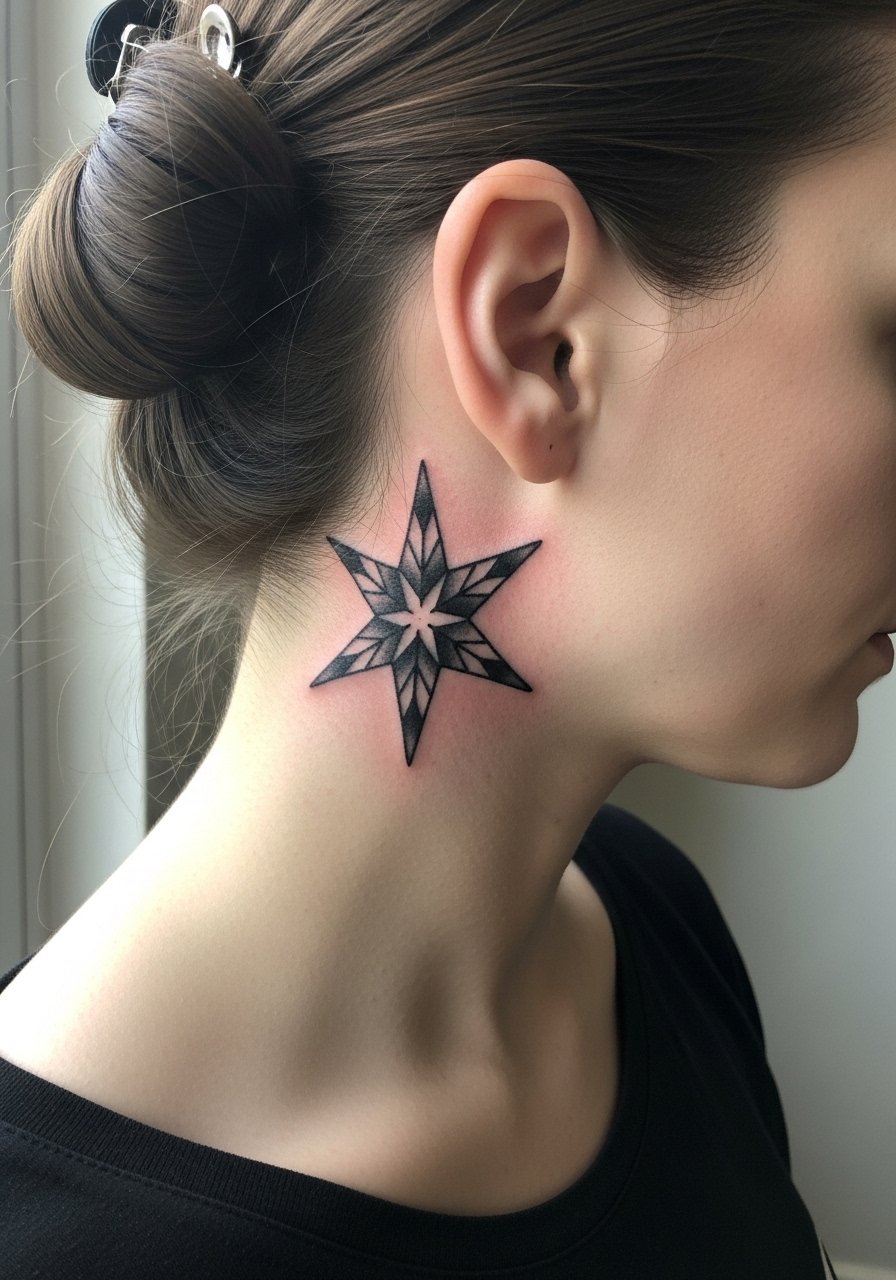
Behind-the-ear placements are discreet and read well when hair is up. Because the area is small, ask for a bold star with clean negative space rather than tiny rays. The session is quick but can feel sharp. An important detail is that fading happens fast with constant shampooing and sun, so expect a touch-up sooner than for larger pieces. For session logistics, wear your hair up and bring a clip so the artist has clear access.
15. Sailor Pinup on Upper Arm

Pinup figures require clear silhouette and minimal tiny facial detail. Ask your artist to simplify facial features and lean into bold outlines for longevity. The most common mistake is insisting on photorealistic eyes in a small area. Sessions can be longer depending on size and color. The upper arm is forgiving and ages well with sunscreen. If you plan to show it, short sleeves or a tank frame the figure, but I suggest avoiding overly tight bands that cut across the design.
16. Coil Snake Wrapped on Upper Arm
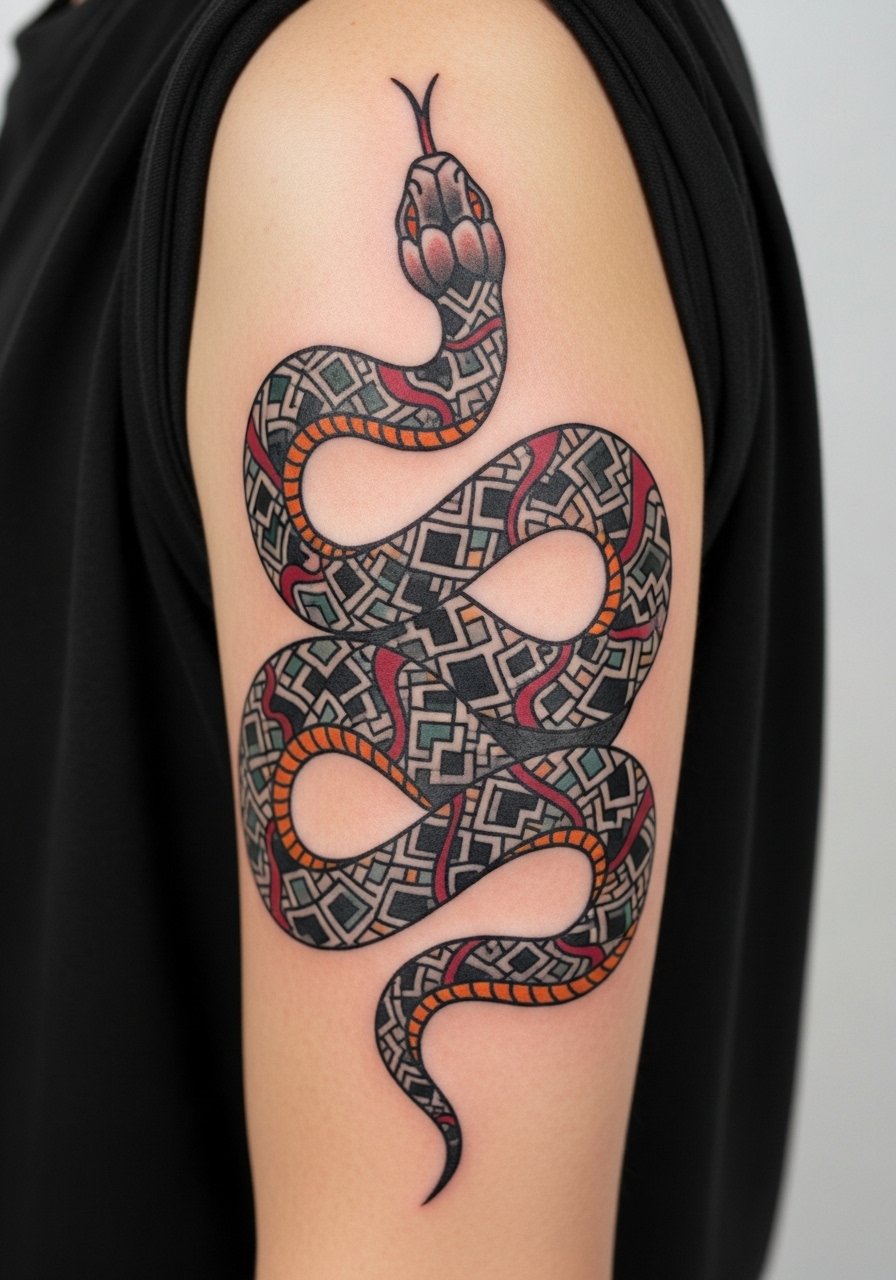
Snake wraps are dynamic and flexible across placements. For the arm, request clear gaps between coils to avoid visual merging over time. A common mistake is trying to cram scale detail into a narrow band. Expect medium pain and a session that may require shading passes for saturation. This design pairs well with neighboring pieces if you plan a sleeve, so mention future plans during consultation so the artist composes with expansion in mind.
17. Pocket Watch on Upper Chest

Upper chest placements show off bold circular motifs well. Ask for a simplified face on the watch with thicker numerals so the timekeeping detail does not blur. A mistake is tiny Roman numerals that lose shape as pigment ages. This spot is moderately painful and benefits from a staged session if you want heavy shading. For visibility, a scoop-neck top frames the watch without making it look crowded against the collarbone.
18. Crescent Moon and Stars on Back of Hand
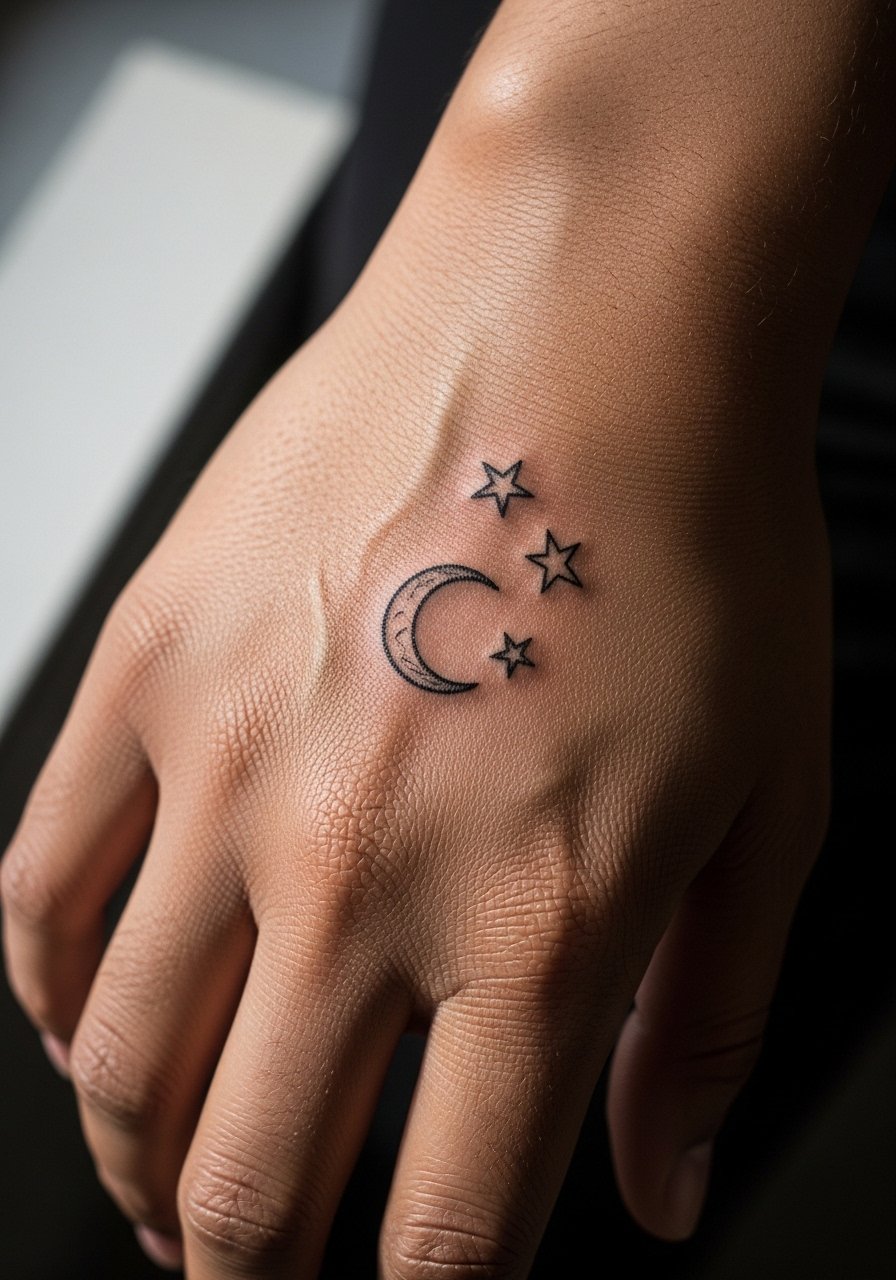
Hand tattoos age differently than arm pieces because of constant washing and sun exposure. Artists are divided on how small detail should be there. One camp avoids tiny filigree on hands and suggests bold icons. The other uses specially spaced linework to keep detail longer. If you want the moon and stars, request slightly bolder outlines and accept touch-ups may be needed at year two. For career implications and longevity consider how often your hands are exposed to sunlight.
19. Tiny Anchor on Finger

Finger tattoos are a known longevity trade-off. One group of artists says fingers blur within a year because of thin skin and constant movement. The other group uses specific needle depth and larger simple shapes to extend life. If you want a finger anchor, make it slightly larger than your first instinct and plan for yearly touch-ups. The session is quick but a bit stingy. Avoid putting initials or tiny script on fingers because they disappear faster than solid icons.
20. Traditional Owl on Lower Back

Lower back placements give room for symmetry and bold blackwork. Tell your artist you want heavy outlines and open eye shapes so detail does not fill in. The common error is overspecifying fine feathers in a compact space. Sessions are medium in discomfort and the piece benefits from occasional sunscreen if you plan to wear low-rise clothing. For nights out, an open-back dress highlights the owl without exposing the whole torso.
21. Hourglass with Roses on Outer Calf

The outer calf is a good place for vertical compositions that need room. Ask for a clear separation between the hourglass glass and the rose petals so the silhouette stays readable. A rookie mistake is tiny sand grains in a narrow hourglass that wash out. Expect moderate pain and good longevity because the calf sees low abrasion. For footwear seasons, calf tattoos pair well with mid-calf boots or cropped pants so the hourglass can be glimpsed without being crowded.
Frequently Asked Questions
Q: Will a fine line arrow on the inner forearm need touch-ups sooner than a traditional rose?
A: Generally yes. Fine line pieces tend to lose crispness faster because they rely on thin single-pass lines. A traditional rose with bold outlines holds saturation longer. Ask your artist about line weight and plan for a possible touch-up around year two for delicate forearm work.
Q: Are sternum and ribcage tattoos worth the pain and touch-up risk?
A: Sternum and ribcage placements show beautifully but come with higher pain and a higher likelihood of future touch-ups, especially for fine detail. Two camps exist: one favors simplified, bold work for those sites and the other accepts delicate lines with the expectation of revisits. Decide based on how visible you want the piece and the artist's track record for that placement.
Q: Do finger and hand tattoos affect hiring and longevity differently than arm tattoos?
A: Yes and yes. Hands and fingers face constant washing, sunlight, and friction which accelerates fading. They are also more visible in many workplaces. If you need discretion or long-term crispness, choose bold simple icons and expect more frequent touch-ups.
Q: How should I dress to the studio for a sternum or collarbone session?
A: Wear a fitted sports bra or a wide-neck top you can easily pull aside. For collarbone work a wide-neck shirt gives access without feeling exposed. Comfort and easy access help the artist work without extra fabric adjustments.
Q: When should I plan a touch-up for a traditional piece with saturated color?
A: For solid traditional saturation, many people go three to five years before a touch-up, depending on sun exposure. Areas with more friction like ankles or hands often need touch-ups sooner. Discuss a realistic timeline at your consultation.
Q: How do I find an artist who understands traditional work without naming names?
A: Use local shop portfolios, convention guest lists, tattoo directories, and hashtag discovery to find artists who post healed photos of traditional pieces. Look for healed images that show sustained saturation and clear linework rather than only fresh photos.
