
Fine line looks great on a feed, but behind-the-ear skin tells a different story. I've noticed tiny script and delicate petals tend to itch when hair brushes them, that hair products can make a fresh tattoo sticky, and that thin, bony ear skin often makes pain feel sharper than people expect. These 21 ideas favor the strong linework and placement tweaks that age best while still fitting into short sessions.
1. Traditional Anchor with Rope
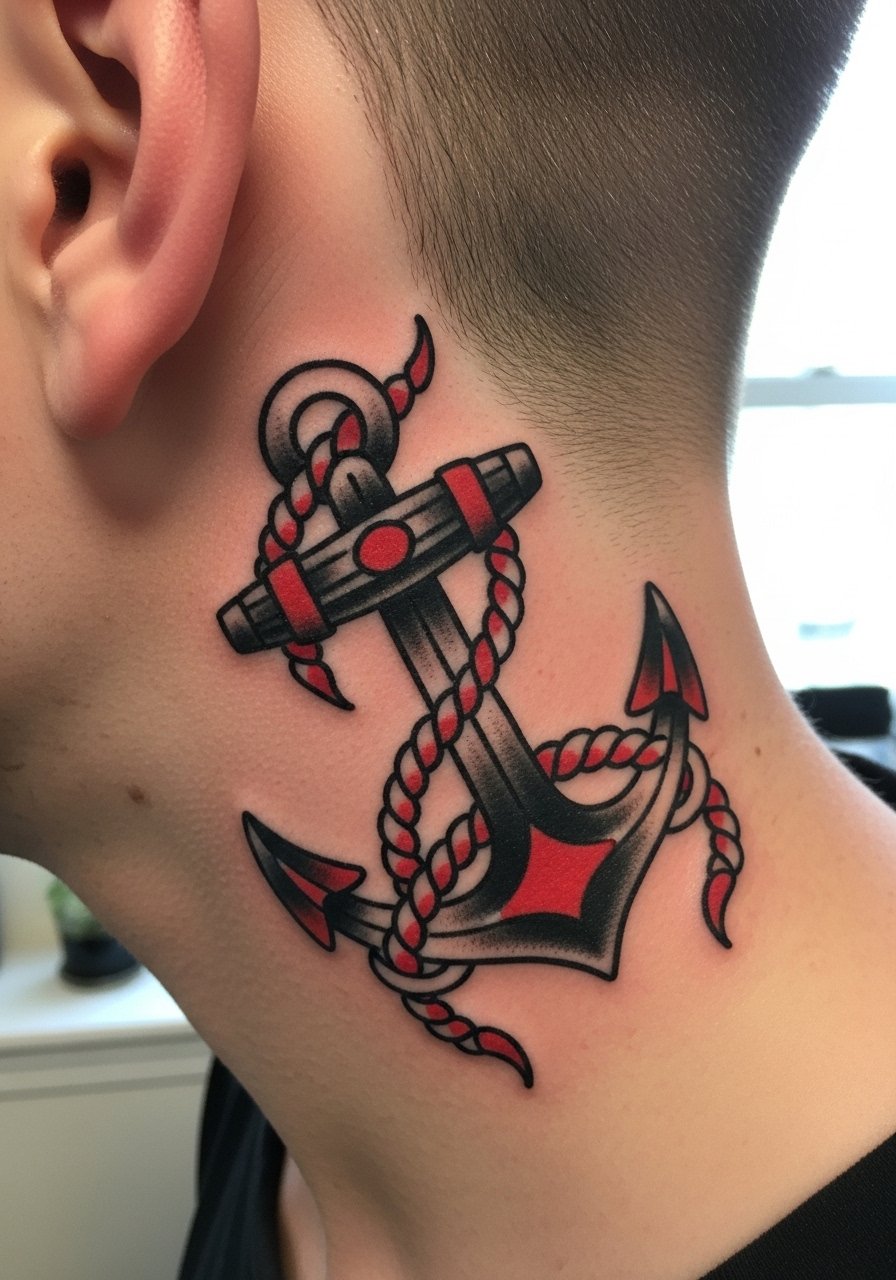
The anchor is classic for a reason. For behind-the-ear work pick a compact 1–1.5 inch version and ask your artist to prioritize bold outlines and solid saturation so the shape holds on that thin skin. Fair warning on pain: the area is bony, so expect sharp, short stings and plan for a session under 30 minutes. I tell people to avoid hair products for two weeks and to tie hair back while it scabs. For show-off outfits try a vintage cotton bandana or a high ponytail scrunchie set to frame the neck without rubbing the fresh ink.
2. Rose Outline with Stem
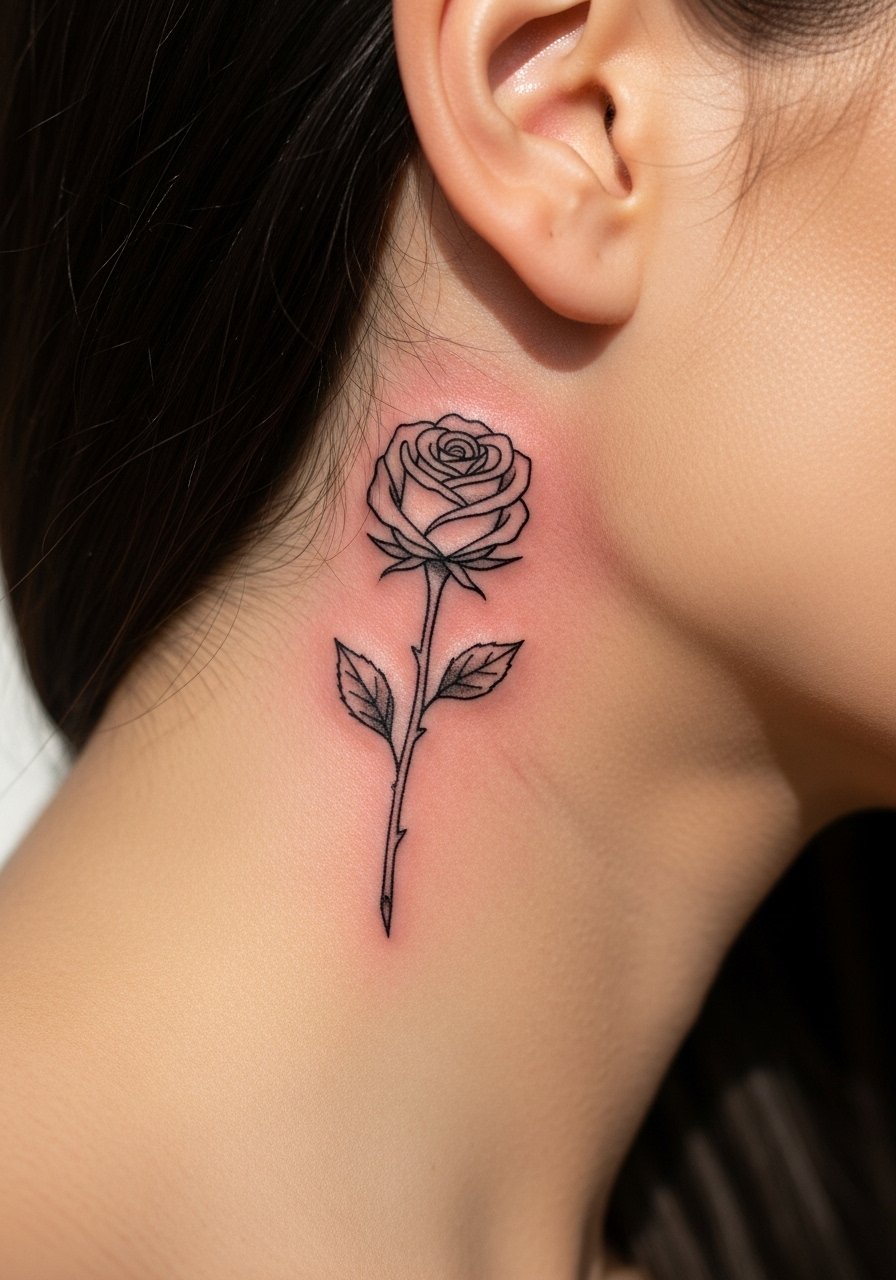
A one-inch rose outline follows the ear curve nicely and hides under hair until you part it. Tell your artist to use a slightly thicker outline than a typical fine-line rose so the petals do not blur into one another after a year. The common mistake is asking for ultra-thin shading that fades into a gray smudge. Expect tenderness from the first day and a need for a touch-up around year two on medium-toned skin unless saturation is strong. For the session wear a loose button-up you can pull aside, not a tight collar.
3. Swallow Bird in Flight

A tiny swallow is a natural fit for the upper behind-ear curve because the wings can follow the ear contour. Ask for heavy black outlines and modest color patches instead of watercolor fills. That way the silhouette reads at six months and still reads clean at two years. The usual error is packing too much feather detail into a tiny scale. Session time is short but the sting is sharp near bone. Pair the reveal with an asymmetrical pixie or half-up style that draws attention to the wing shape.
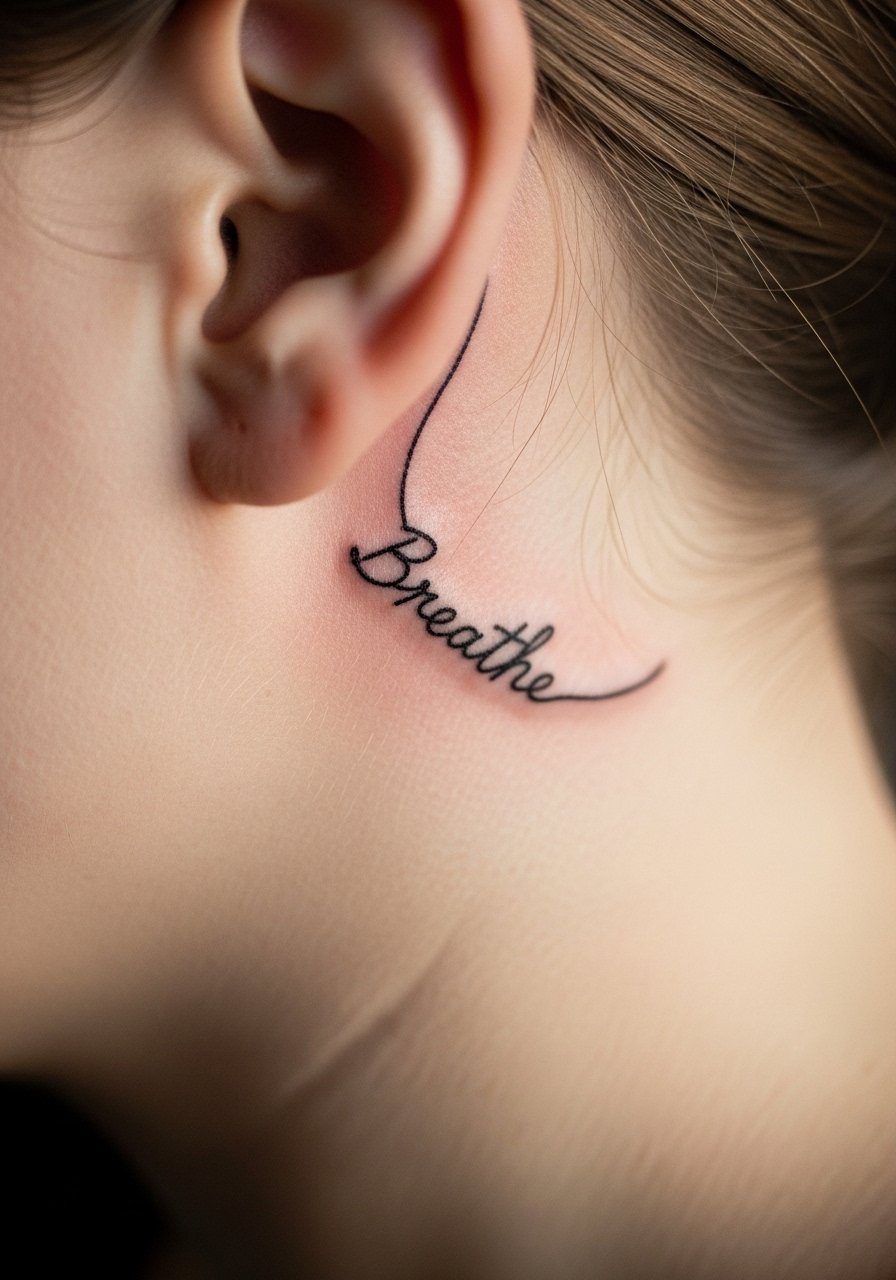
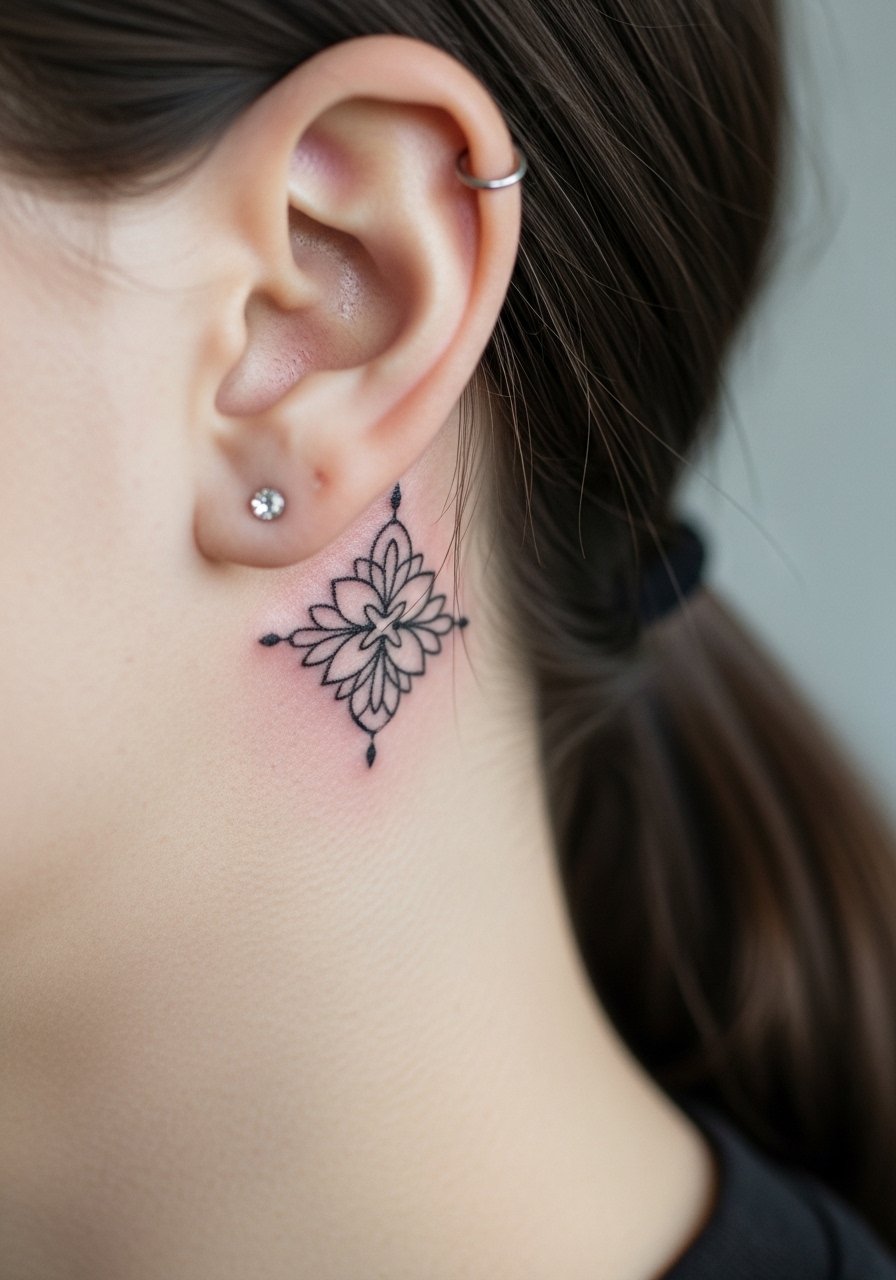
4. Heart with Banner

A heart with a tiny curved banner can carry initials or one short word and it looks intentional when it follows the ear curve. During the consult say exactly how the banner should sit with jaw movement so the text reads when you turn your head. The slip-up I see is requesting script that is too small to remain legible as it settles. Expect two short needle passes and a brief sting. For a casual reveal, messy bun styles work well, and a chunky chain necklace gold draws the eye lower without competing.
5. Minimal Arrow Symbol
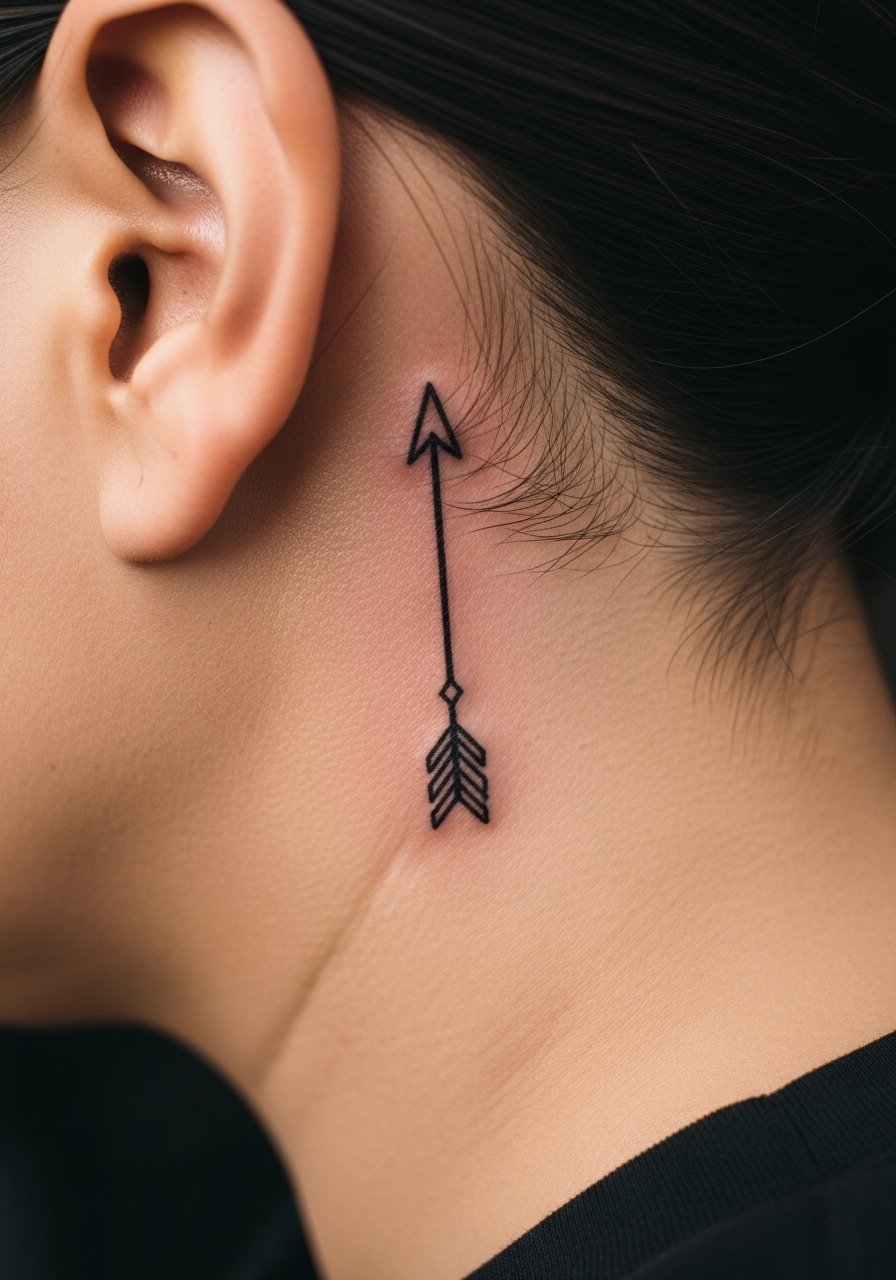
An arrow is the go-to first behind-the-ear piece because it is tiny and inexpensive while still meaningful. Tell the artist you want a bold one-line shaft rather than ultra-fine, and to keep the arrowhead simple. The most common long-term issue is a micro arrow done with hairline weight that blurs into a gray streak. Pain is short and sharp, and most of these are one-session jobs under 20 minutes. For showing it off, sweep hair into a bob or pin one side and add a thin gold hoop earrings look on the opposite ear for balance.
6. Small Daisy Flower
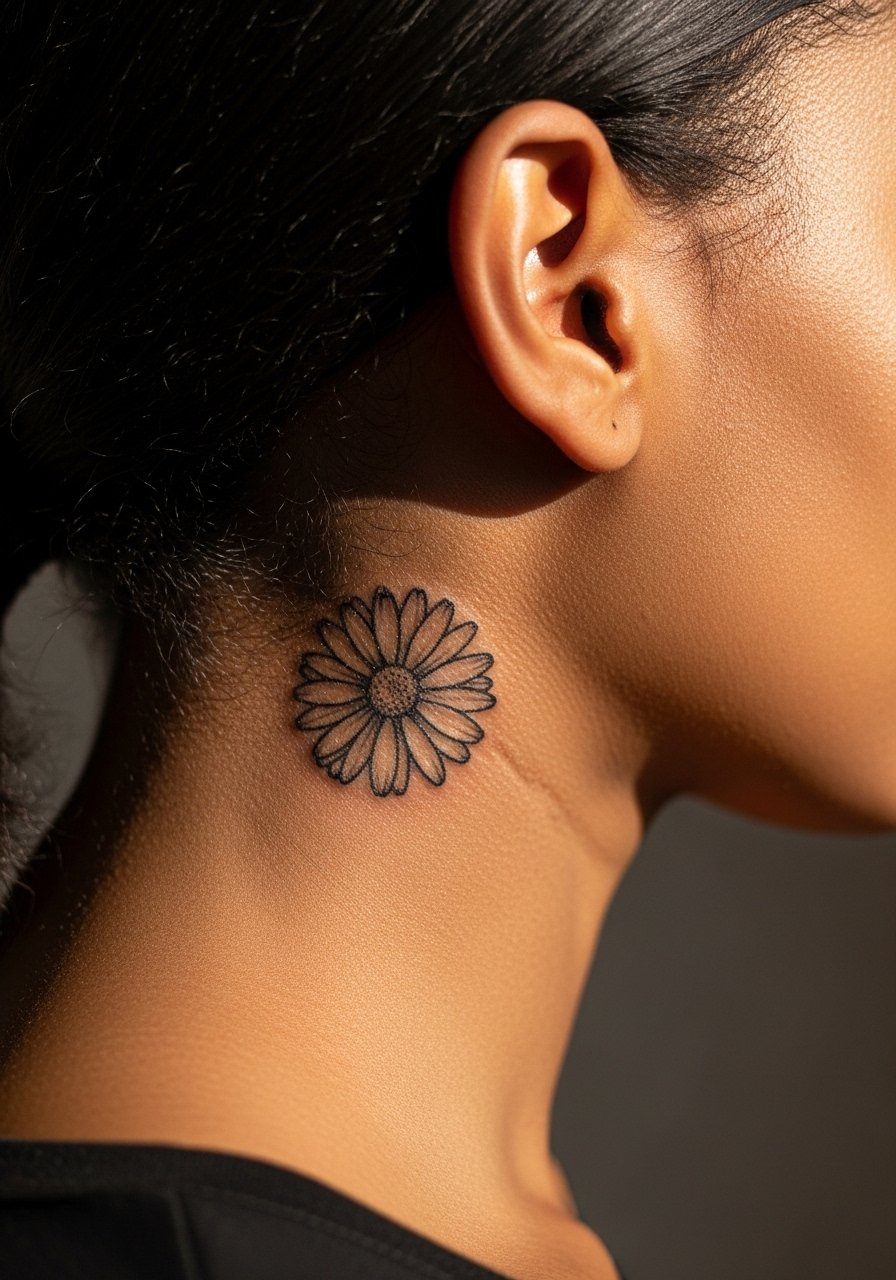
A micro daisy reads feminine without being fussy. Ask for slightly stronger petal outlines and stipple shading so the center doesn't collapse into a dark dot as it ages. Expect a quick, stingy session and a touch-up at 12–24 months depending on sunscreen use. The usual mistake is crowding several small petals into a half-inch area. For a cute reveal pair this with a messy bun creator tool and a strapless or V-neck tee that keeps hair off the area during healing.
Before You Book
These behind-ear pieces above are small and friction-prone, so a few tailored products smooth the session and the first week.
-
CeraVe Healing Ointment. A lightweight healing option that users report clogs less on scalp-adjacent spots, helpful for the anchor and daisy pieces above.
-
Shear Butter tattoo balm. A lighter balm many prefer for neck-adjacent tattoos because it absorbs faster and attracts less hair.
-
Hada Labo lotion. Hydrating, non-oily lotion that can help thin ear skin stay supple without the greasy feel that drags in hair products.
-
Green Sheep balm. An organic option for dry climates that keeps delicate linework from cracking as it scabs.
-
Tattoo Goo. A classic thin ointment to use in the very first days on small traditional pieces when you want a barrier without excess residue.
7. Script Word Placement Curved to Jaw
A curved one-word script can read like a private mantra when placed along the jawline behind the ear. Ask for slightly larger letterforms than you think you need because tiny script blurs faster than block letters. Expect a sting that lasts a bit longer near bone, and plan for a touch-up at year two if you like crisp edges. The big mistake is asking for cursive at micro scale. For session wear use a loose tank or a racerback tank so the collar does not press against the area.
8. Geometric Crescent Moon
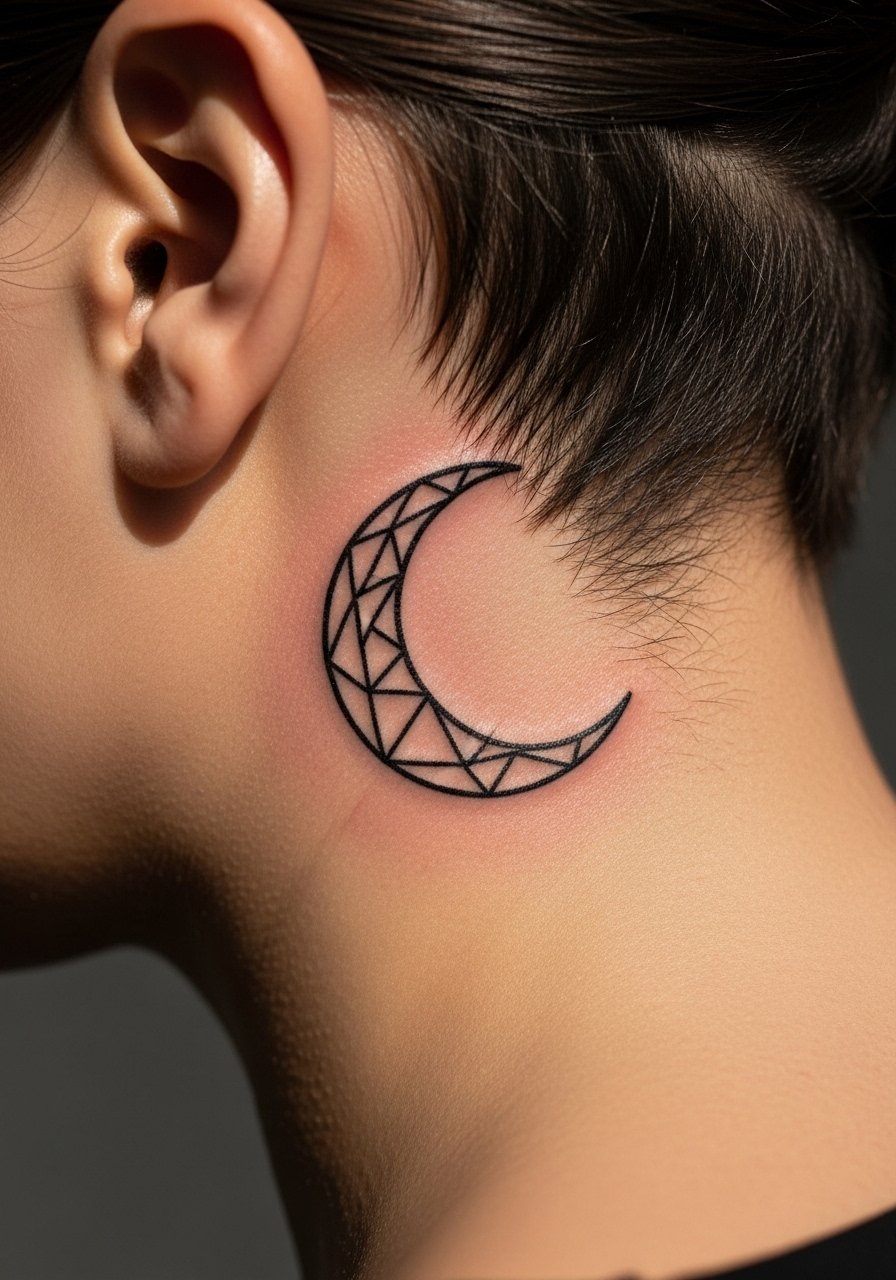
A small crescent moon in solid blackwork takes advantage of the ear curve. Tell your artist you want open negative space inside the crescent to keep contrast over time. The debate here splits two camps: one says fine geometric dots hold fine with precise spacing, the other insists bold solid fills perform better on thin skin. Ask where your artist stands and look at healed photos from their portfolio. This design usually needs one brief session and tolerates sun exposure poorly, so wear sunscreen once healed.
9. Neo-Traditional Fox Head

If you want a bit more personality, a compact neo-traditional fox head brings color without needing a large canvas. Tell the artist to keep heavy outlines and limit intricate fur detail at this scale. Watercolor-style fills here are tempting but they can bleed into folds; prefer solid color blocks for longevity. Expect a two-part session if you want saturated color versus just linework. For summer reveals, an off shoulder blouse pairs well because it keeps attention up near the neck.
10. Watercolor Butterfly
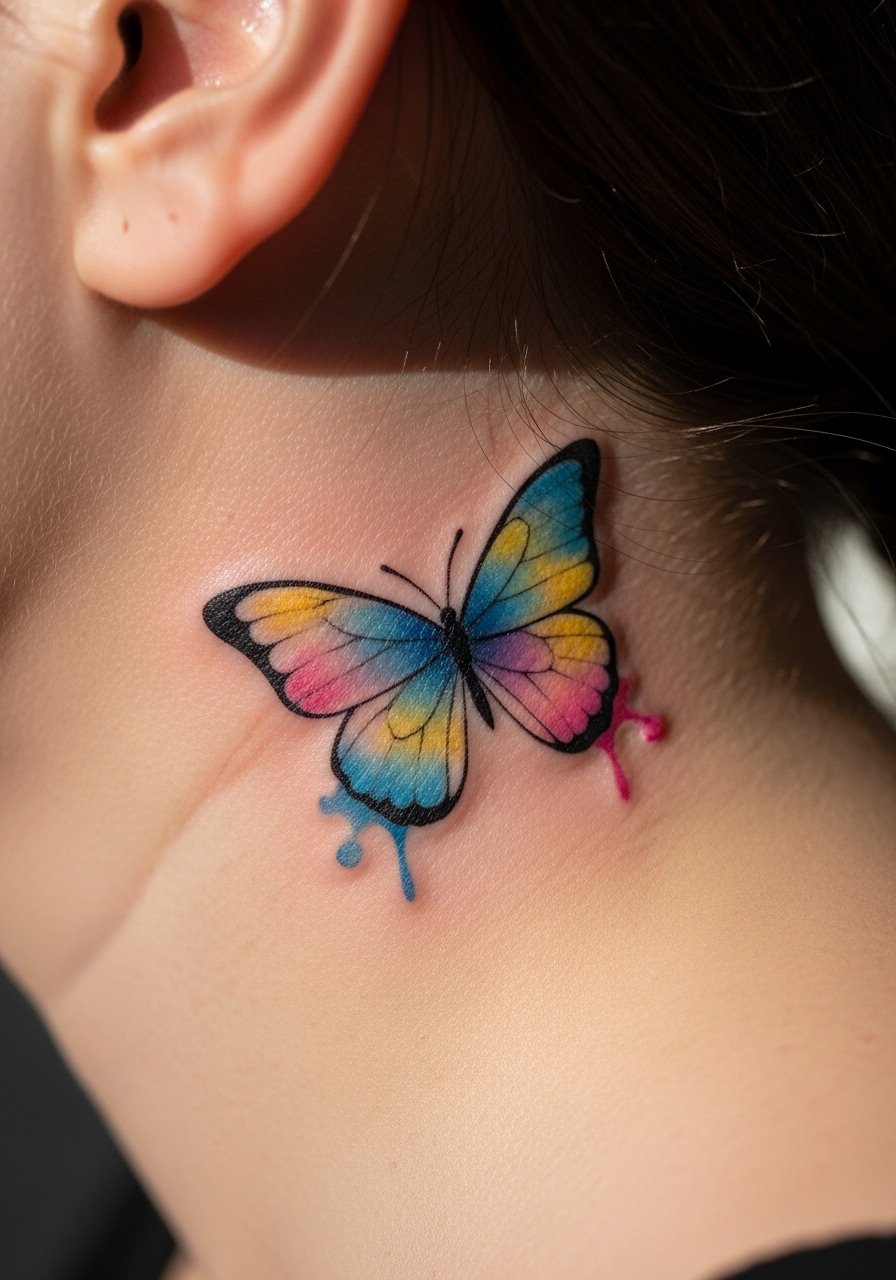
Butterflies show well when hair moves, but watercolor techniques on folds can migrate. Ask for a light black outline around key areas to anchor pigment and avoid all-over wash. At six months you should see vivid color spots and at two years some softening that can be beautiful. The common mistake is asking for broad washes too close to the ear fold, which leads to feathering. For session wear a button-front shirt you can pull aside easily.
11. Dainty Feather Quill
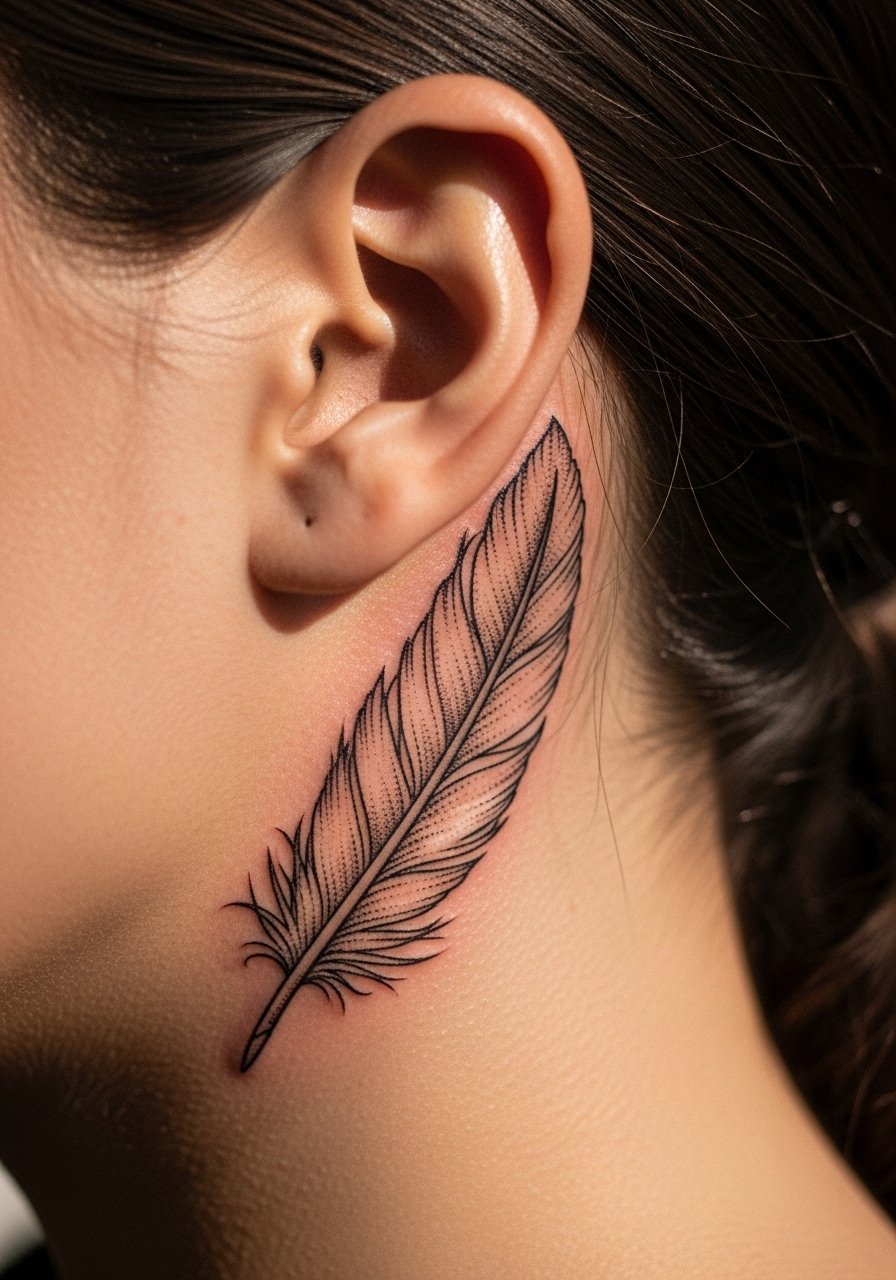
A quill works with the ear's natural slope and reads delicate without being fragile if you request stipple shading rather than solid fill. The session feels like sharp, targeted needles for a short stretch. Aging is gentle when the lines have room, but dense hatching at micro scale will blur. Keep hair tied and use dry shampoo alternatives during healing. Pair with a dainty stud on the opposite ear for asymmetric balance.
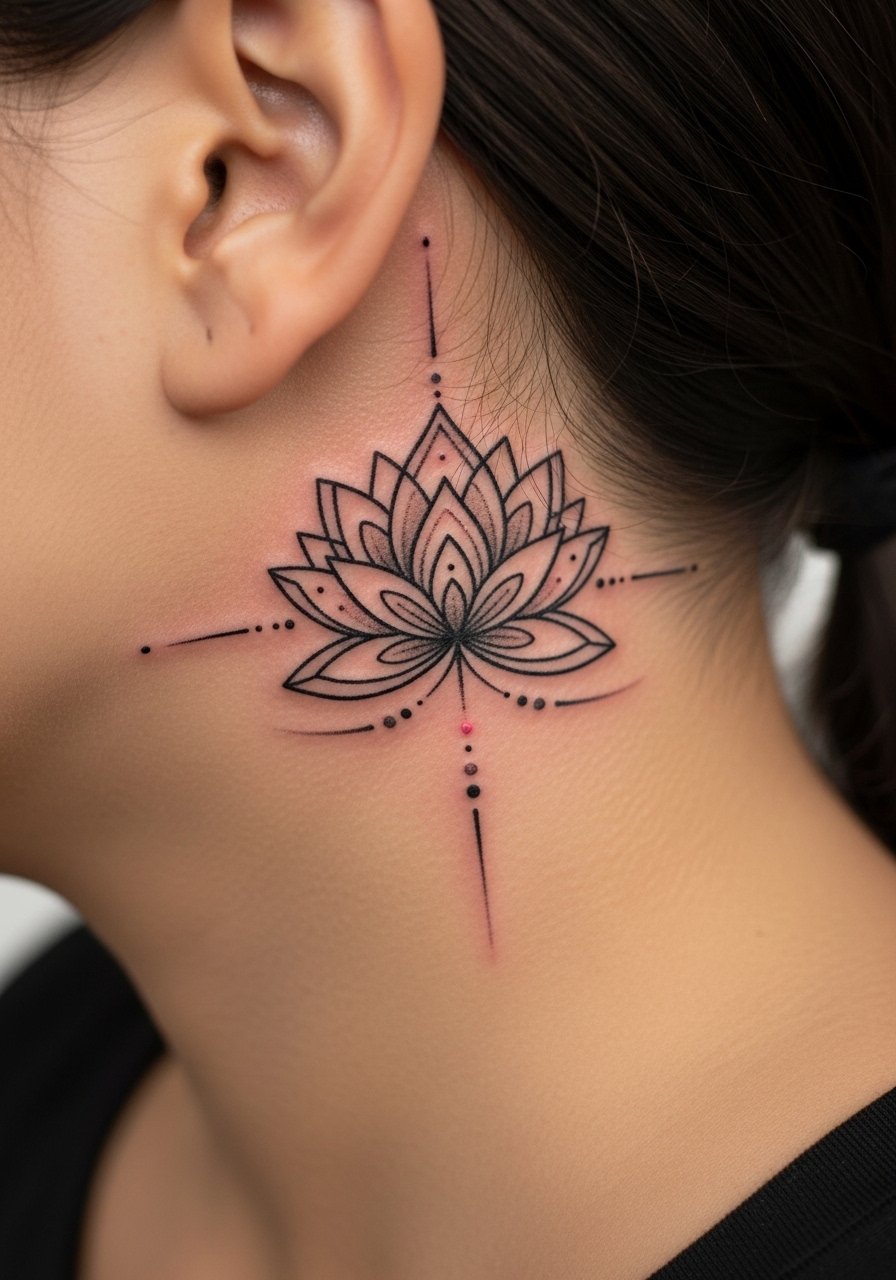
12. Lotus Outline
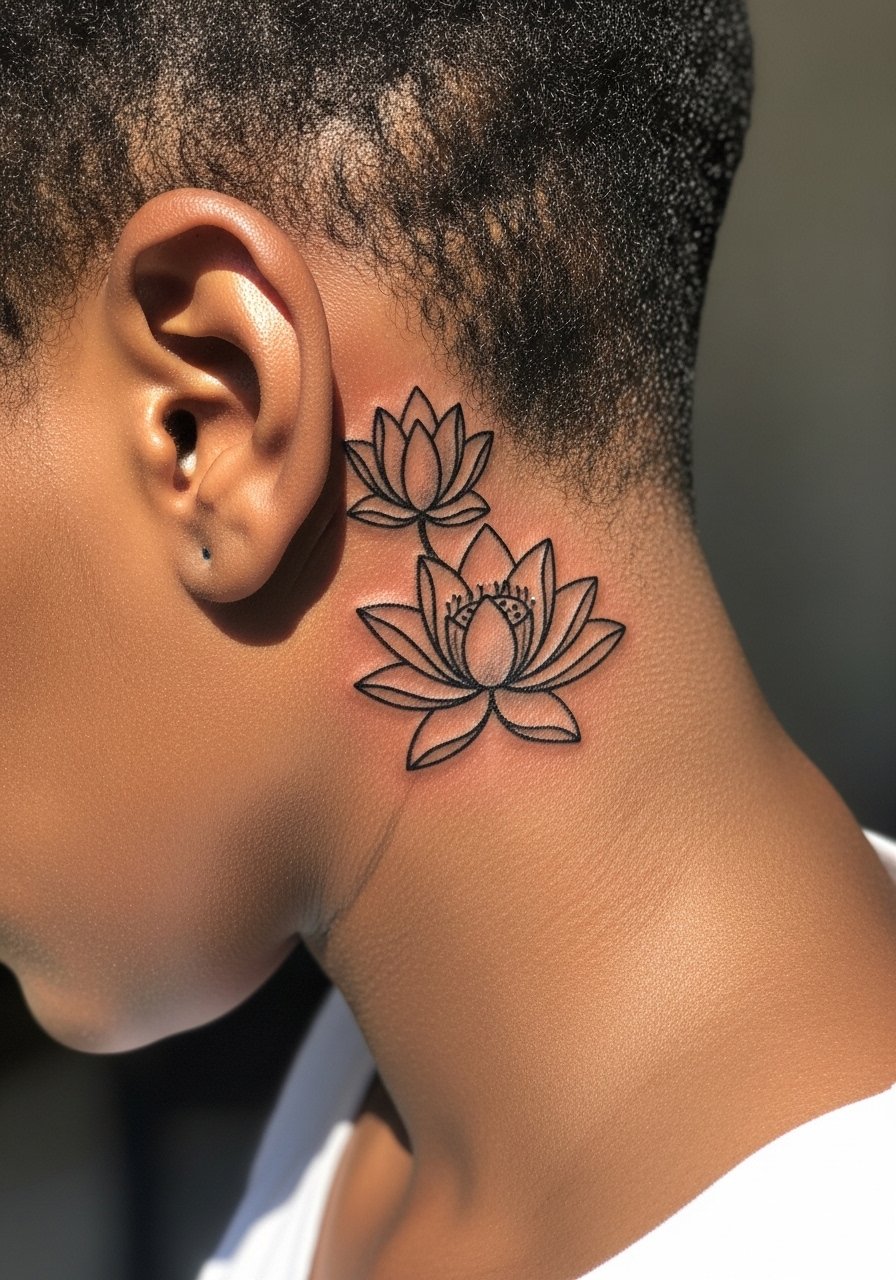
A small lotus cluster brings meditative symbolism and translates well to the ear curve when the petals follow the jaw. Ask your artist to space petals and avoid heavy inner shading. One-session jobs heal quickly but expect touch-ups depending on your skin tone and sun exposure. This pattern has cultural roots, so consider slight stylistic changes rather than direct religious iconography if cultural sensitivity matters. For showing off, an open-neck linen shirt helps frame the area.
13. Star Constellation Cluster
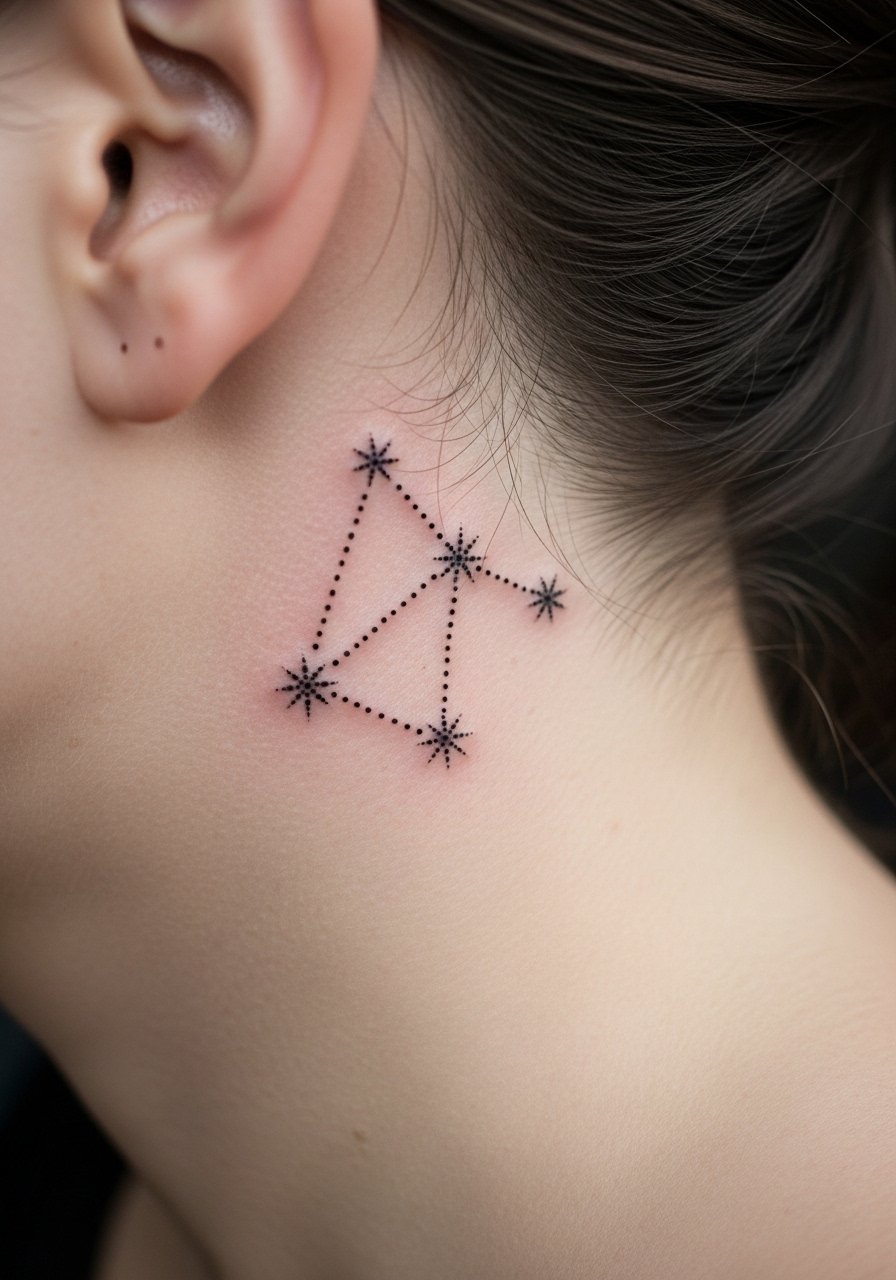
A scatter of tiny dots and minimal connecting lines makes a subtle personal map. Tell your artist you want spacing between dots to prevent merging, and pick one focal star with a heavier dot for contrast. The hardest part is keeping the connecting lines thin yet deep enough so they do not vanish in a year. Sessions are short. For an editorial reveal pin one side of your hair and wear a minimalist choker necklace to direct the eye upward.
14. Tiny Nautical Wheel
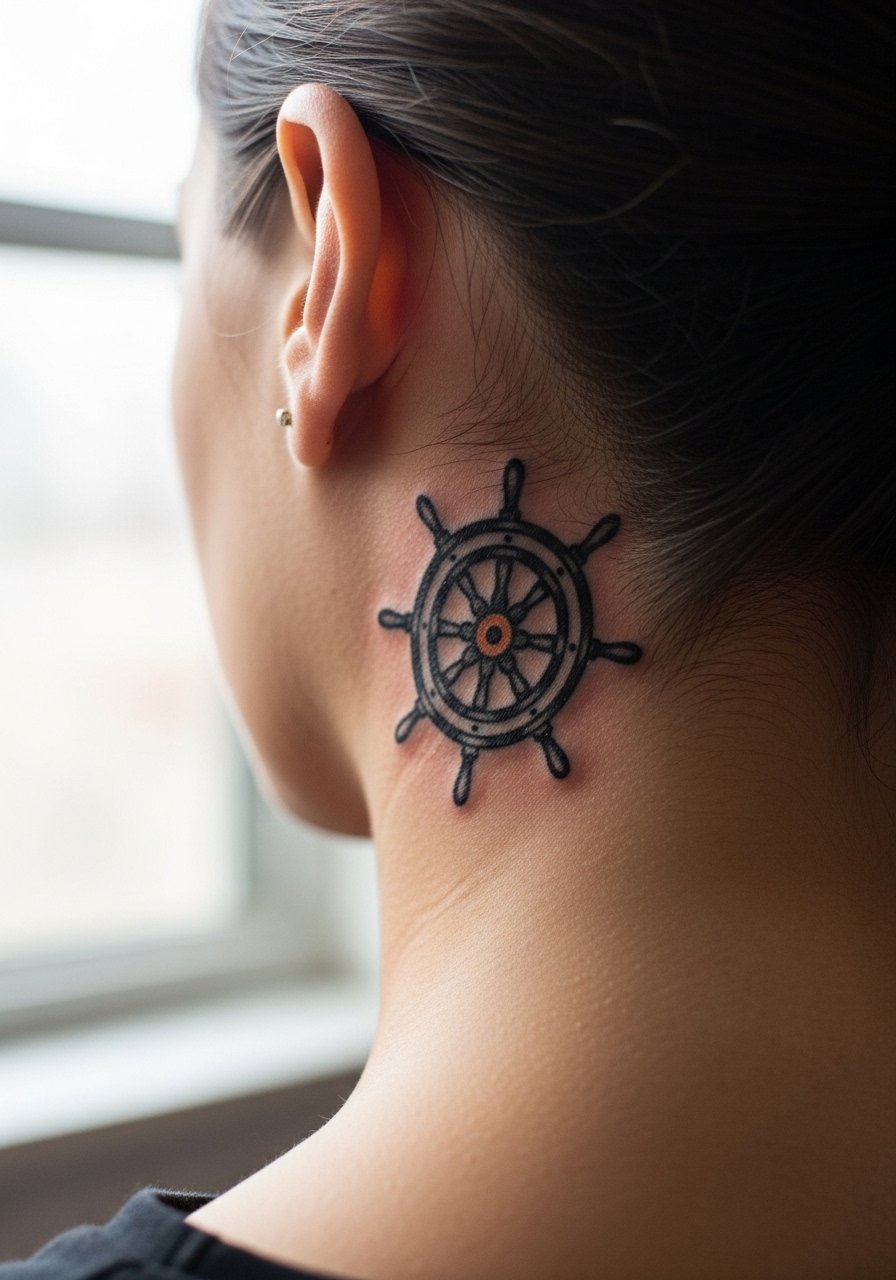
A tiny ship wheel echoes the anchor idea but reads differently because of the spokes. Ask for thicker spoke edges and fewer internal details so spokes do not blur together. The common error is attempting an overly detailed wheel at micro scale. Expect a brief, sharp session and a touch-up at the 18–24 month mark for line clarity. Pair with a side-parted slicked-back look or a vintage cotton bandana for a nautical nod.
15. Wrapped Anchor Illusion Using Ear Curve
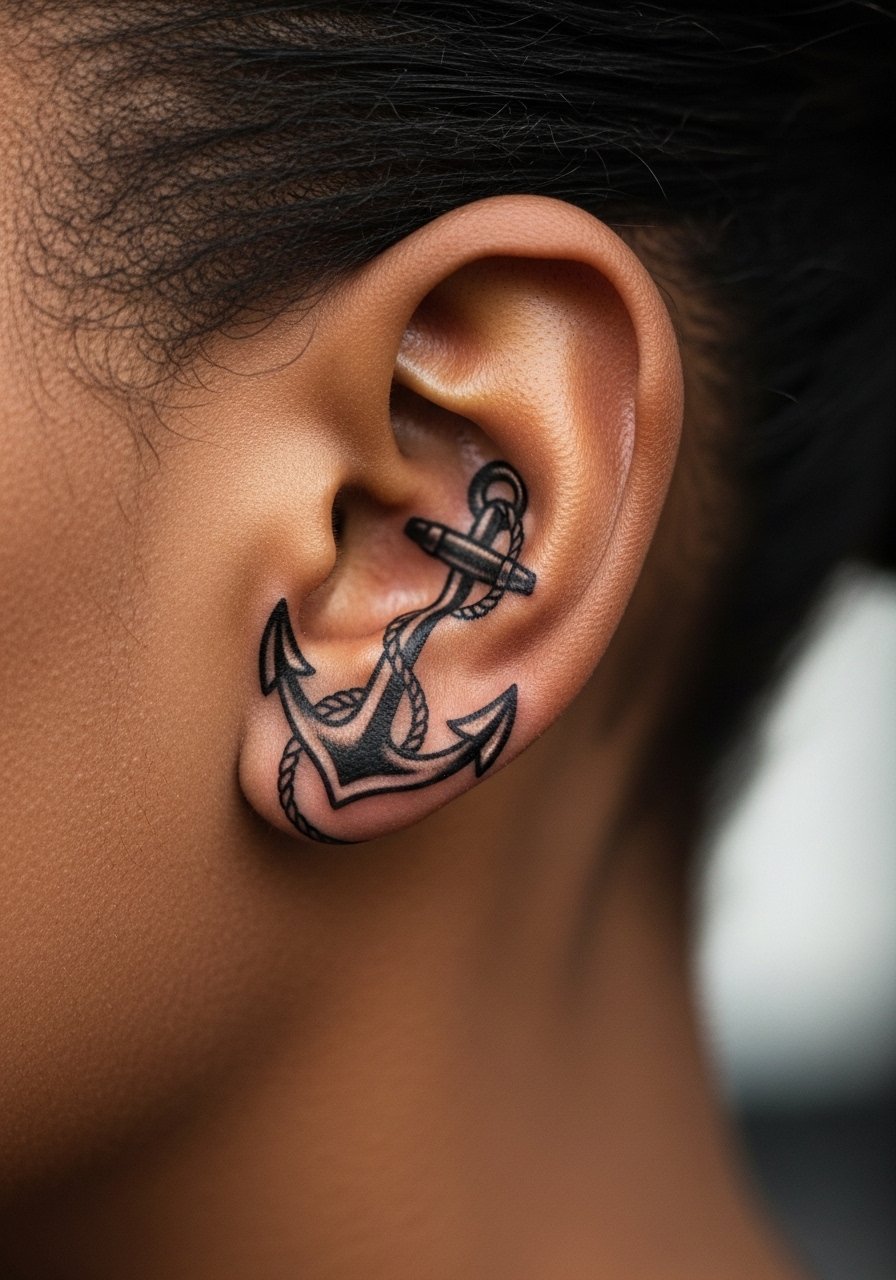
This is one of the under-covered ideas I keep seeing recommended by experienced trad collectors. The design uses the ear curve to create a subtle 3D wrap so the rope appears around the lobe. In consult say you want the rope to follow the ear fold rather than sit flat. The risk is overcomplicating the rope on tiny scale. Session time is short but requires an artist confident in small-scale traditional work. For session wear remove earrings and bring hair ties.
16. Pairing with Helix Piercing Hybrid Look
Pairing a tiny design with a helix piercing is a modern hybrid I rarely see in mainstream round-ups. Tell your piercer and artist you want placement coordinated so the piercing and tattoo balance. The session for the tattoo is short but account for extra time if you coordinate both procedures. Keep in mind healing timelines differ for metal and ink. Style reveals with a high pony and small studs, or try a half-up hairstyle and a dainty stud earring set.
17. Curved Banner Script Tuned to Jaw Movement
This is a slightly technical but under-used trick. Ask for the banner to follow how your jaw moves so the text reads differently when you talk or smile. It takes a thoughtful stencil placement and a steady hand. The usual request that goes wrong is fitting too many letters into the curve. Sessions are short and slightly more painful near the mastoid. For the appointment wear a loose V-neck or a loose button-down shirt that gives the artist access without pressing on the neck.
18. Tiny Compass Rose
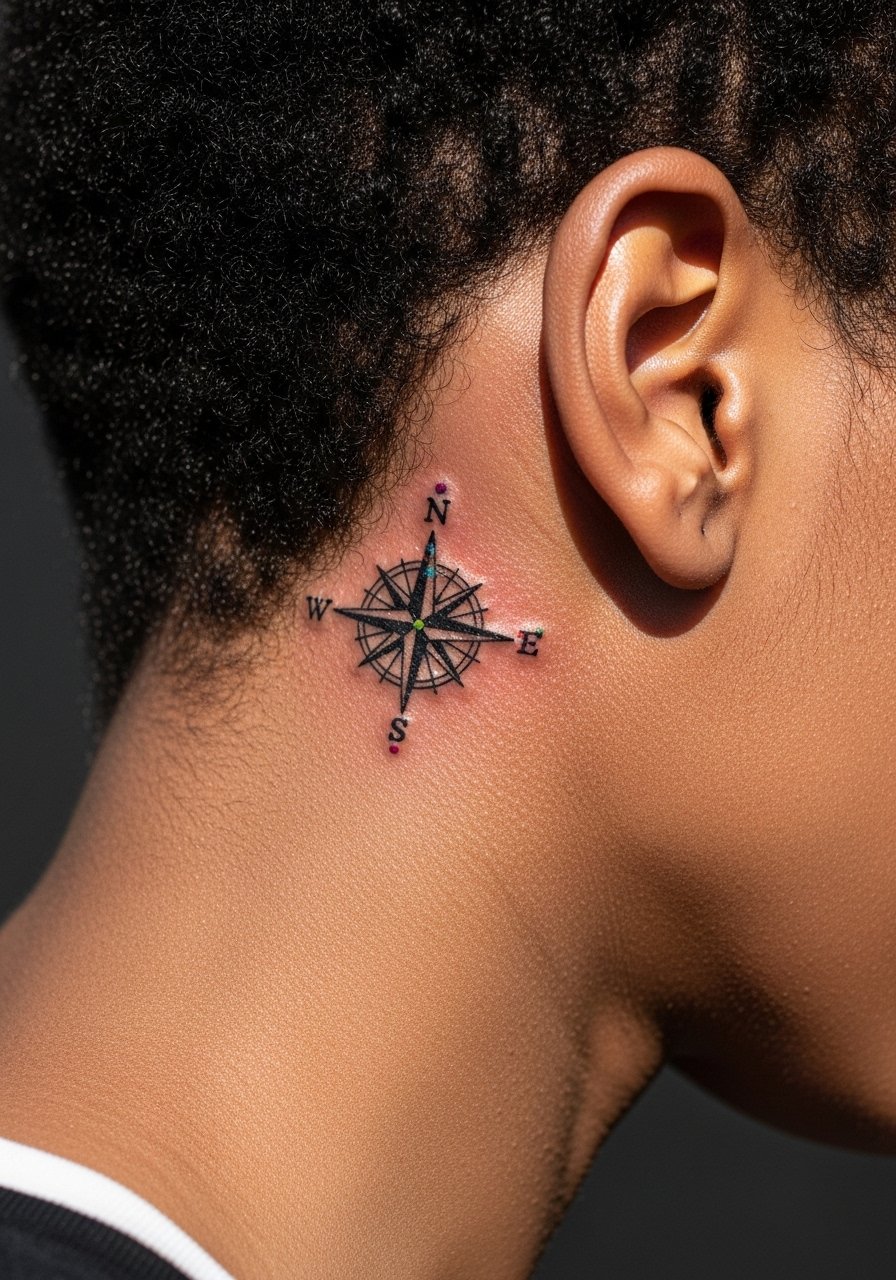
A compact compass rose reads like a miniature emblem and ages well if the cardinal points are simplified. Tell your artist to avoid intricate filigree and to keep color dots small and saturated. Expect a short, sting-heavy session and a probable touch-up after a year for color brightness. The design pairs nicely with side-parted hair or a simple chain necklace for an understated look.
19. Dotwork Three-Moon Sequence
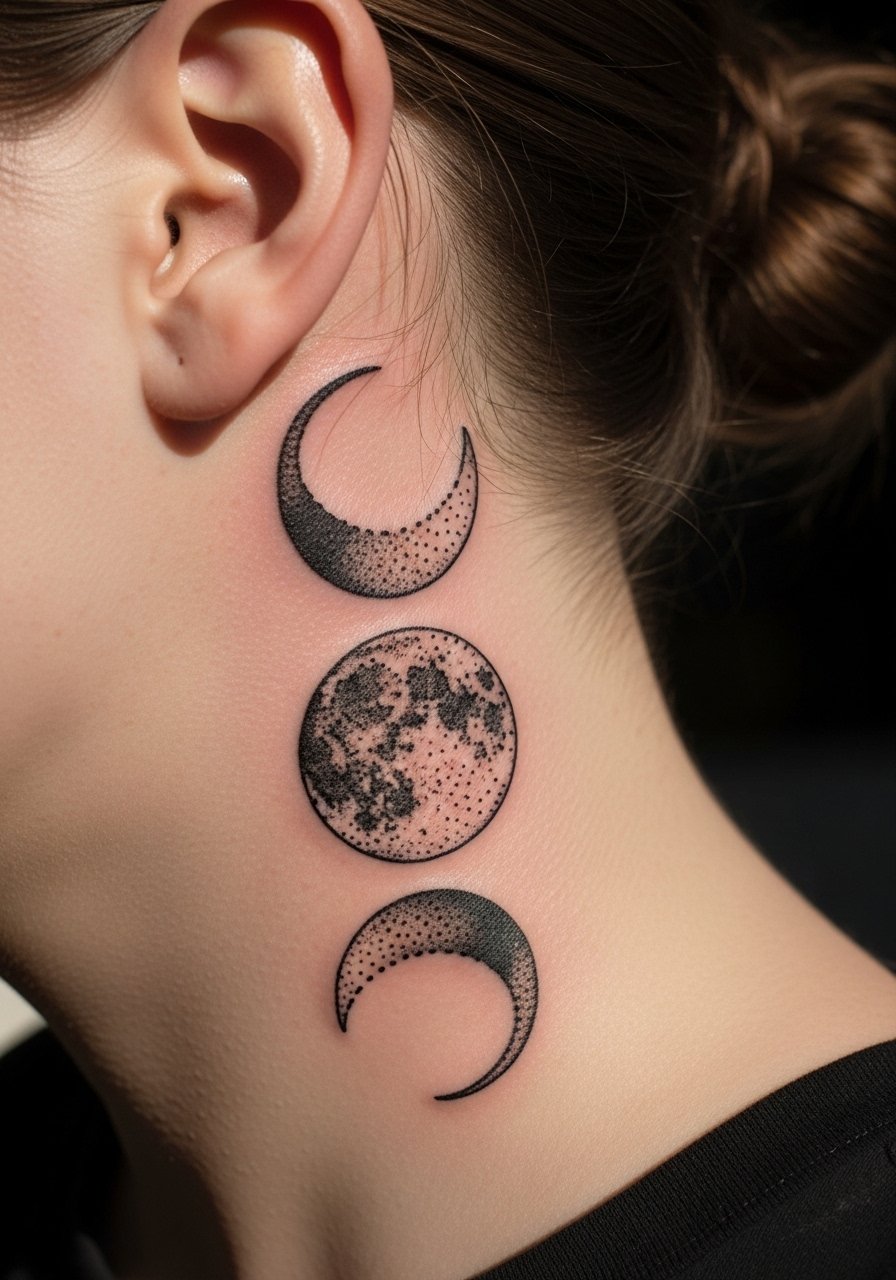
A phased moon sequence uses dotwork to create gradient without heavy fill. Ask for a stipple density plan so dots have room to settle. A common mistake is overpacking dots close together which can look muddy later. Sessions are short but precise, and you may need a light touch-up at two years. For a low-effort reveal try a straight bob that tucks behind one ear, or a straight bob wig cap if you are experimenting with styles.
20. Neo-Oriental Mini Lotus with Linework Accent
This nod to oriental motifs keeps the lotus small and stylized to avoid cultural missteps. Mention to your artist that you prefer adaptation rather than direct replica of sacred motifs. Ask for open petal spacing so the design does not compress over time. Sessions are quick and the main risk is over-shading the center. Pair with lightweight layered pendants to draw the eye down from the neck without cluttering the area.
21. Tiny Memorial Star or Date
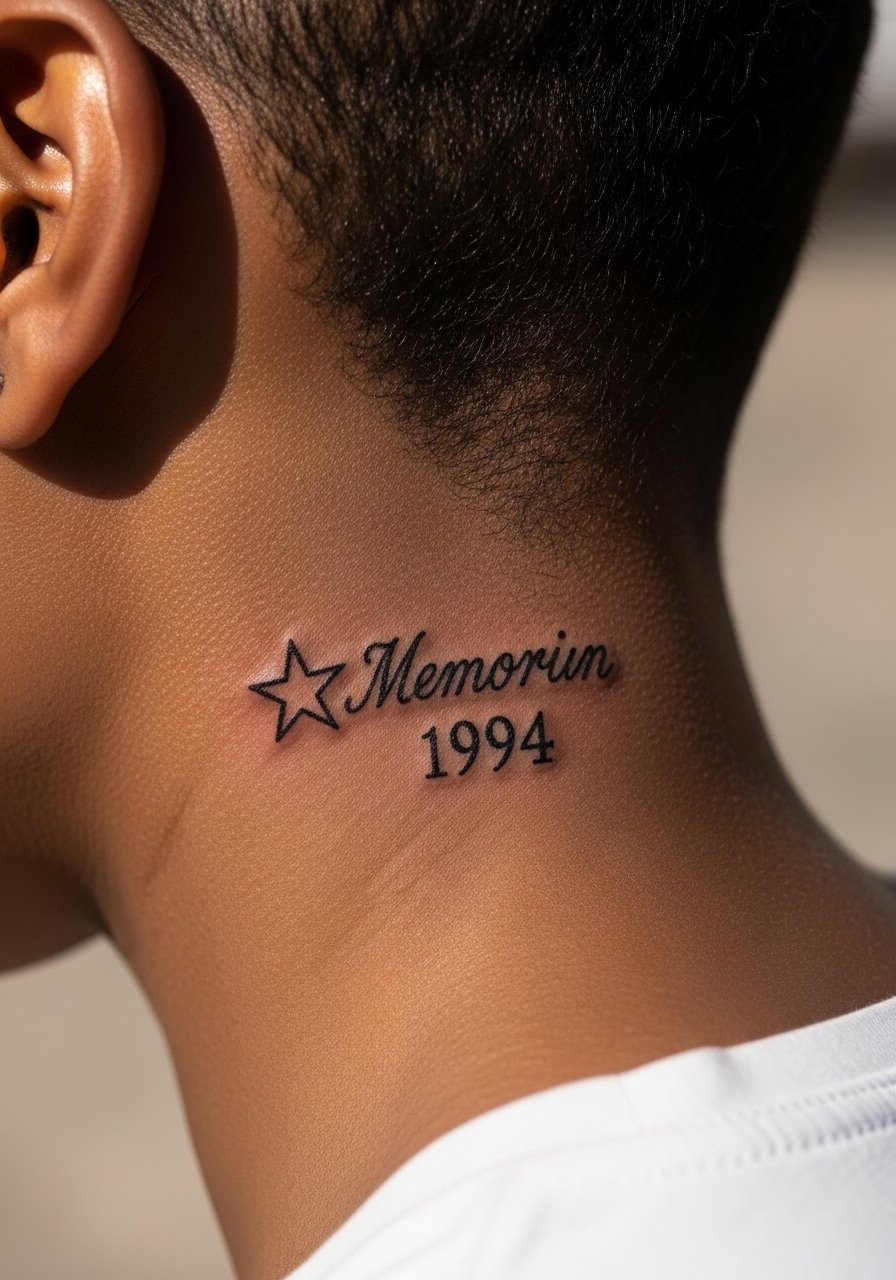
Memorial marks work well behind the ear because they are intimate by design. If you choose a date, specify exact lettering or numerals and ask for slightly larger type than you think to preserve legibility. The common error is tiny numerals that blur into a line. Expect the session to be short, and plan for a touch-up if the ink sits over a fold. For reveals wear an open collar or a layered pendant necklace that trails just below the jawline.
Frequently Asked Questions
Q: Will fine line traditional pieces behind the ear fade faster than bold traditional work?
A: Yes, fine line tends to fade or blur faster on the thin, mobile skin behind the ear than bold traditional saturation. One camp prefers fine line for the look and schedules touch-ups. The other camp recommends thicker outlines up front for longevity. Ask your artist which approach they favor and review healed photos from their portfolio before booking.
Q: How should I manage hair products during healing to avoid itch and stickiness?
A: Keep hair away from the fresh tattoo for at least the first week and avoid oils or heavy styling sprays. Many people use no-rinse dry shampoo alternatives and wash the area gently once a day. If you must use a styling product, pause for two weeks and tie hair back when sleeping to reduce friction.
Q: What do I say to an artist to prevent blowout on behind-ear micro traditional designs?
A: Ask for bold outlines, shallow but consistent needle depth, and a stencil positioned with the ear curve in mind. Show healed close-up photos of similar sized work and ask if they have examples of small traditional pieces on neck-adjacent skin. If an artist hesitates, that is informative.
Q: Can I get a helix piercing and a tattoo in the same session around the ear?
A: You can but consider staggered appointments because metal and ink heal differently and both can increase local swelling. If you coordinate same-day work, confirm both professionals agree on placement and aftercare sequences so one does not interfere with the other.
Q: Are there clothing tips for the first 48 hours after a behind-ear tattoo?
A: Wear loose collars or a button-front shirt you can pull aside and avoid backpacks or tight straps that press the neck. For quick access bring hair ties and consider a high ponytail scrunchie set so you can keep hair up without tugging at the healing area.
