
Fine line angel-warrior pieces are everywhere online, but what holds up over time is not always what gets the most saves. I've seen tiny, detailed wings blur into gray patches when placed on high-movement zones, and I have seen compact, bold micro-warriors keep their shape for years. This list focuses on compact designs that balance detail with placement so your tiny angel warrior still reads as a warrior after the first touch-up.
1. Fine Line Angel Sword on Inner Forearm

I prefer this as a thin, linear composition that runs with the arm rather than across it. Say in consultation that you want slightly heavier outlines on the sword and wings so the silhouette reads at a distance. Common mistakes include packing tiny feather details into cramped space, which leads to merging by year two. Pain is moderate on the inner forearm and sessions run short for a tiny piece. For showing it off, cuffed linen shirts work well, try an open cuff linen shirt so the tattoo sits cleanly when you roll the sleeve.
2. Little Shielded Cherub on the Shoulder Blade

This placement gives the artist room to include negative space around the figure so the tiny features do not compress. The shoulder blade moves a bit with posture but not as much as the ribcage, so linework tends to last. A common mistake is insisting on photo-real detail in a very small area. Tell your artist you want simplified feather shapes and a clean shield silhouette. Session comfort is high. Pair it with a loose tank top for both the appointment and outfits afterward.
3. Micro-Realism Halo over the Wrist
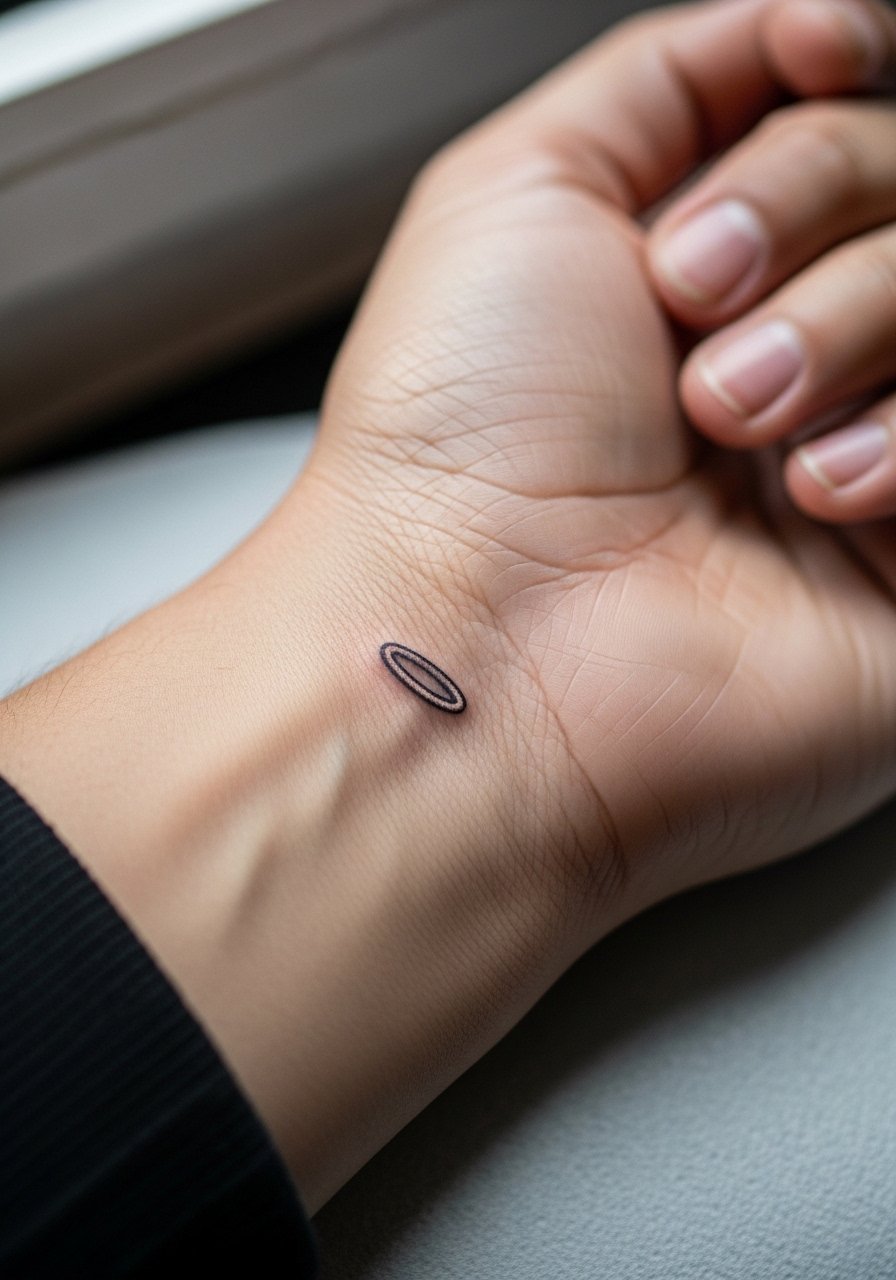
Fair warning, the wrist sees constant movement and washing. Many tiny halos done too thin will fade unevenly and need touch-ups around year two. Ask for slightly heavier linework or a faint stippled shadow under the halo to keep its roundness as it heals. Sessions are quick but stingier here than the forearm. For styling, stacked dainty bracelets frame wrist tattoos without crowding them, try a thin chain bracelet to keep attention on the piece.
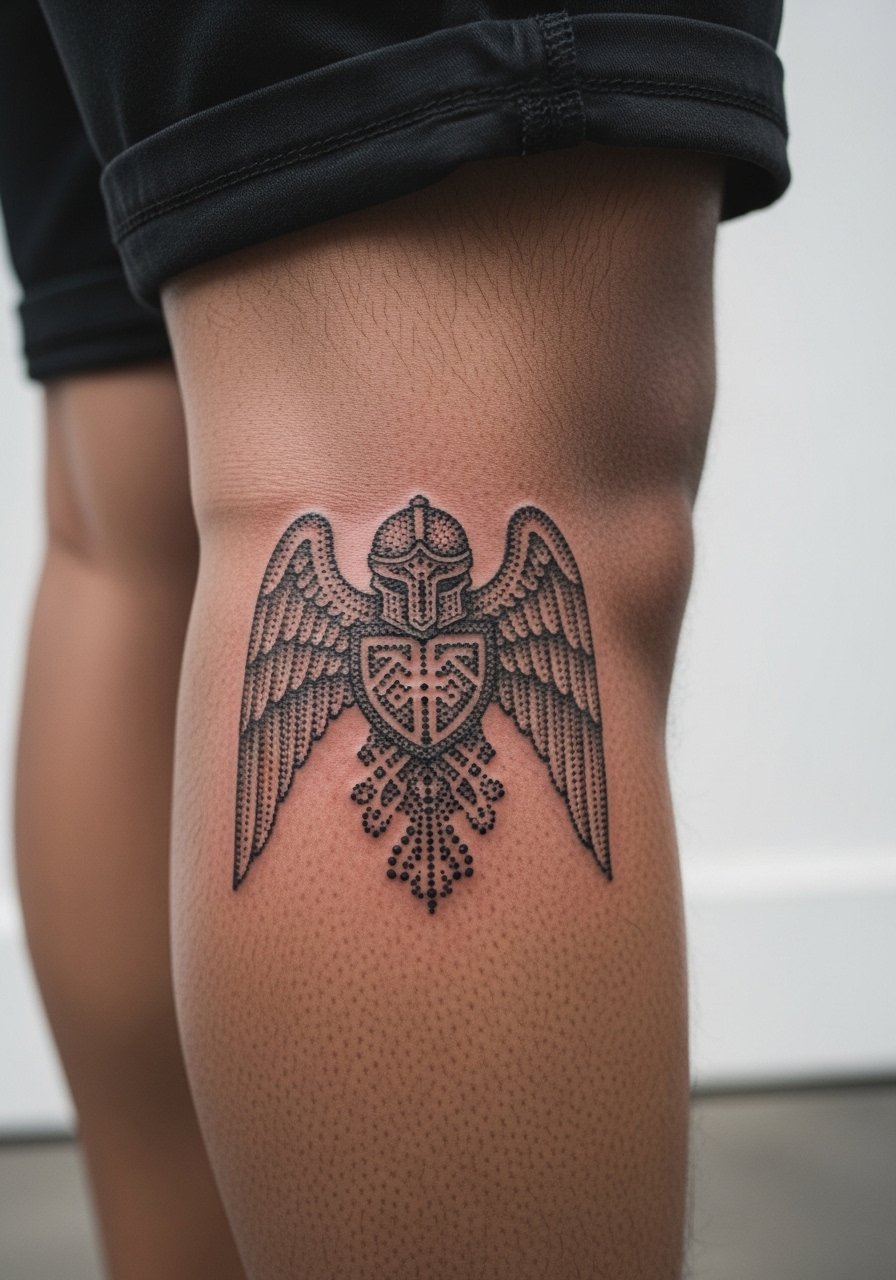
4. Tiny Winged Icon Behind the Ear

Behind the ear is discrete and playful, but it requires an artist confident with small-scale work. The biggest mistake is asking for dense detail in a spot that needs open forms to age well. Expect a short, sharp session and higher chance of a light touch-up because of the thin skin. If career considerations matter, remember this spot is easier to conceal by hair. For the appointment, wear a hairstyle you can sweep aside so the artist has unobstructed access.
5. Minimalist Angel Crest on the Ankle
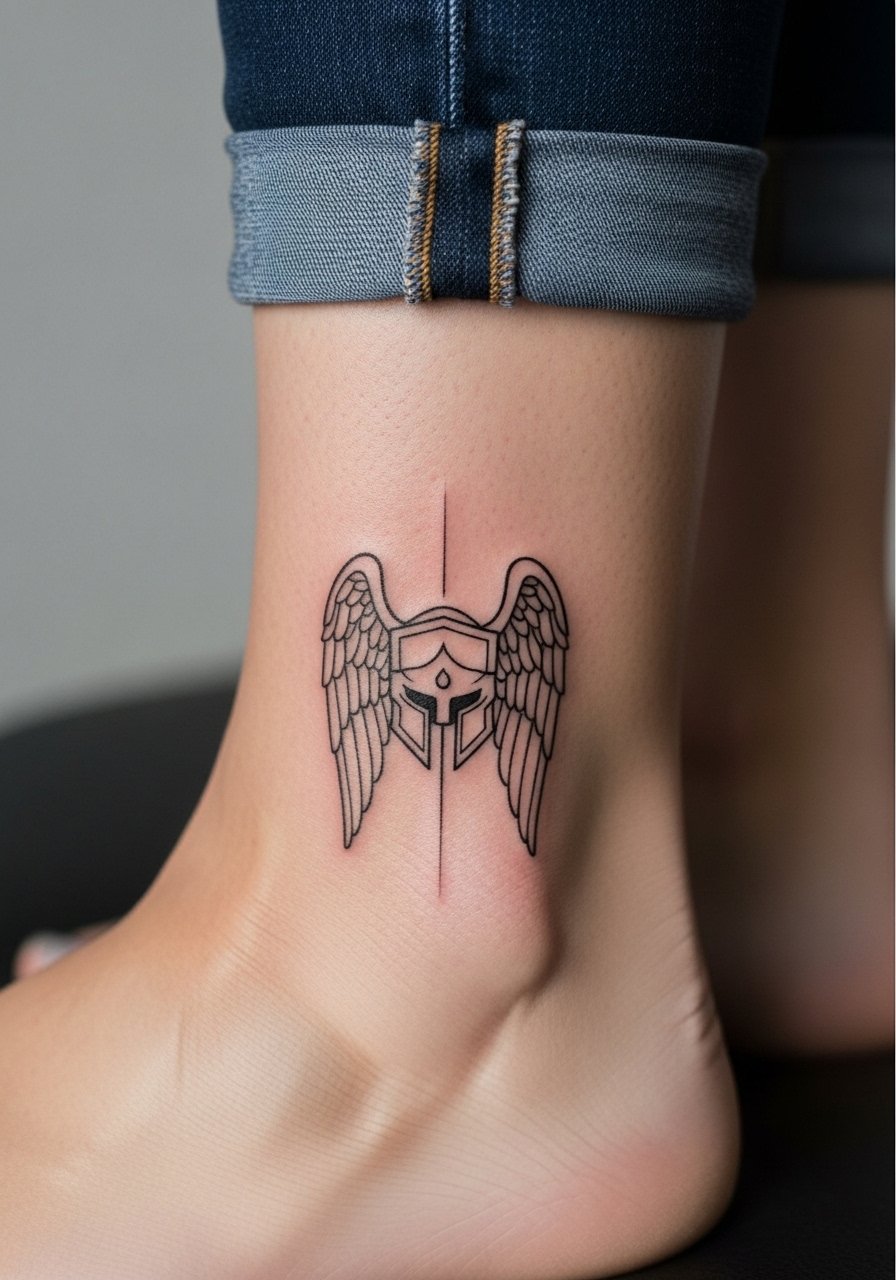
Ankle pieces live in a high-friction zone from shoes and socks. The usual error is making lines too close together. Ask for clear spacing and slightly bolder outer contours so the crest keeps its shape through washing and movement. Pain on the ankle can be sharp but sessions are short. For showing it off, sandals or rolled jeans work well. A pair of neutral leather sandals keeps the ankle visible without rubbing the fresh ink.
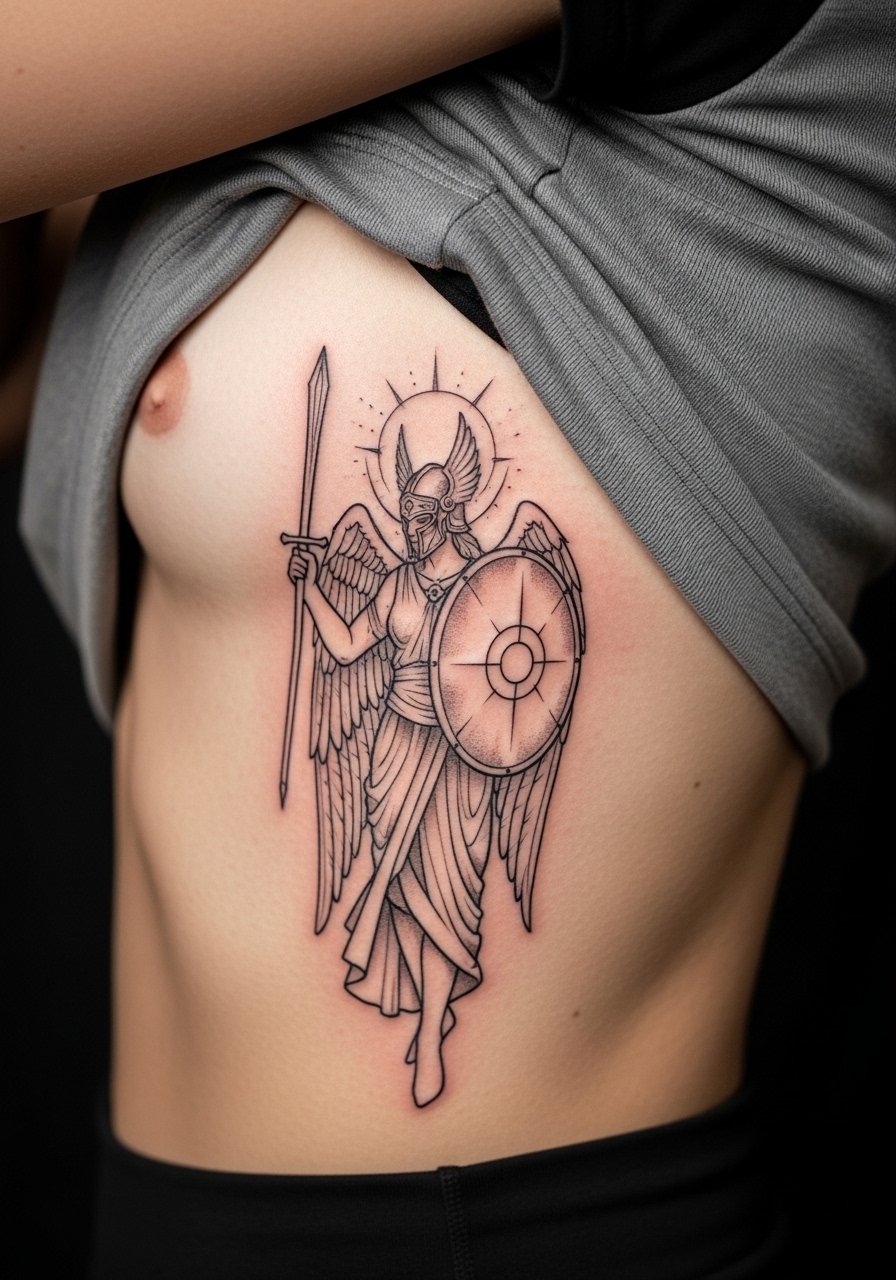
6. Tiny Sternum Warrior with Symmetric Wings

Sternum tattoos split artists into two camps. One camp warns that ribs and sternum stretch and shift too much for ultra-fine detail. The other camp says proper spacing and depth let fine line settle well. Name both camps during your consult and ask where the artist stands. This area is sensitive so expect a longer session and more soreness afterward. For the appointment wear a zip or button front so you can keep movement minimal and provide easy access without removing too much clothing.
Pre-Session Essentials
The wrist and ankle pieces above need different prep than chest work, and a few small items smooth the session and the first week.
-
Stencil transfer paper kit. Lets you preview the linework on skin before committing, especially helpful for the wing shapes and tiny sword details in ideas above.
-
Topical numbing cream. Applied as directed 30 to 45 minutes before the session reduces sharpness on sensitive spots like the sternum and ankle without changing the artist's linework.
-
Thin protective film roll. Keeps wrist and finger tattoos cleaner during the first week of frequent hand washing and friction.
-
Fragrance-free gentle body wash. Cleanses healing areas without stripping the tiny linework that fine line pieces depend on.
-
Aquaphor healing ointment. A thin layer for the first few days seals in moisture for delicate details without clogging the channels that need to shed.
7. Micro Script Angel Banner on the Collarbone
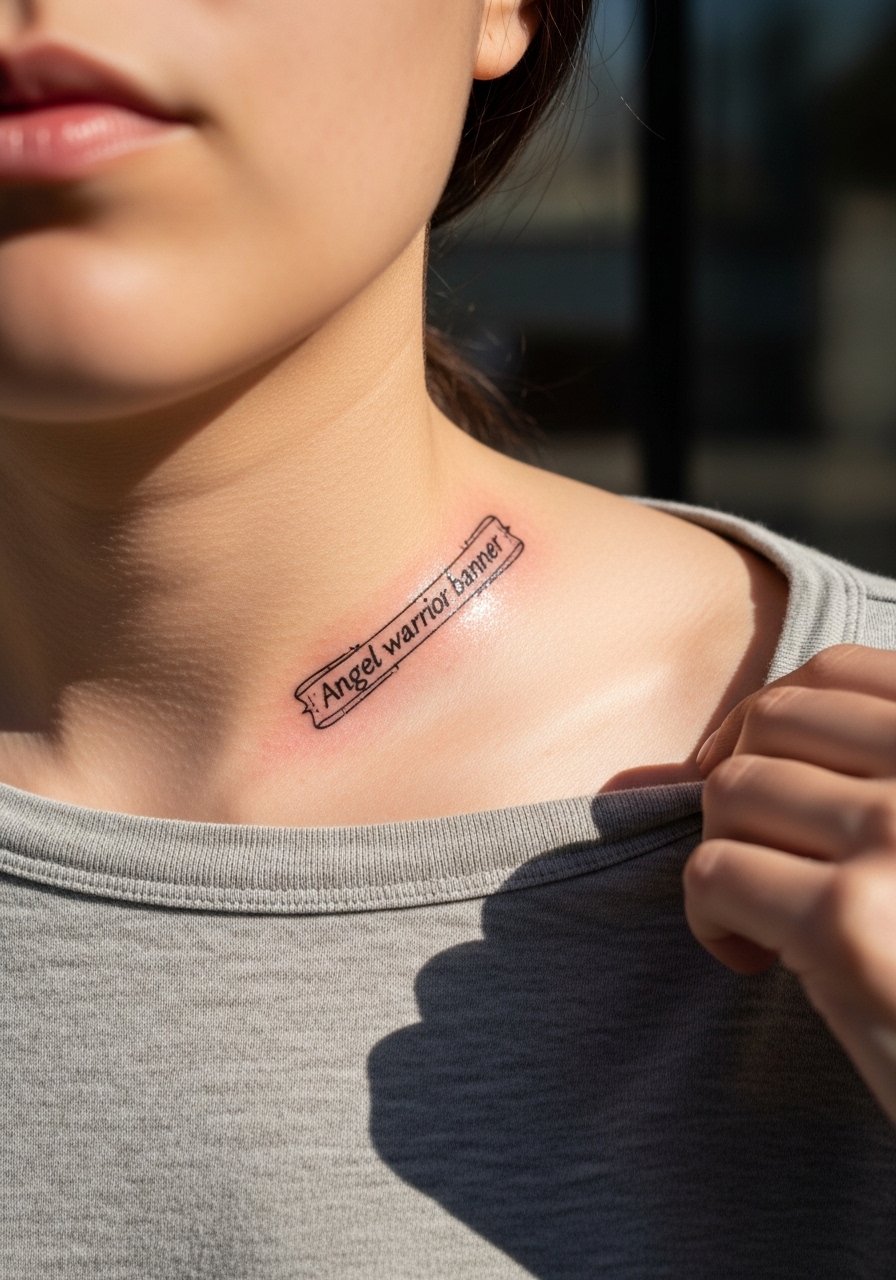
Collarbones let you place a horizontal banner that follows the bone for a flattering visual. A common mistake is setting the script too small within the banner which makes the text illegible as it softens. Tell your artist you want slightly larger script and airy wings at the ends. The collarbone can be sensitive but looks great with open necklines. For showing off try an open-back midi dress or a wide-neck top that keeps the area visible without irritating the skin during healing.
8. Petite Back-of-Neck Guardian

The back of neck is discreet and ages fairly well because it is not sun-exposed as much. A mistake is requesting excessive fine detail in a tiny area. Ask for a bold silhouette or simple glyph-like shapes that read from a distance. Sessions are quick and healing is straightforward. When you need to hide it for work, a collared shirt covers easily. For styling, a lightweight scarf frames the area while protecting it from sun.
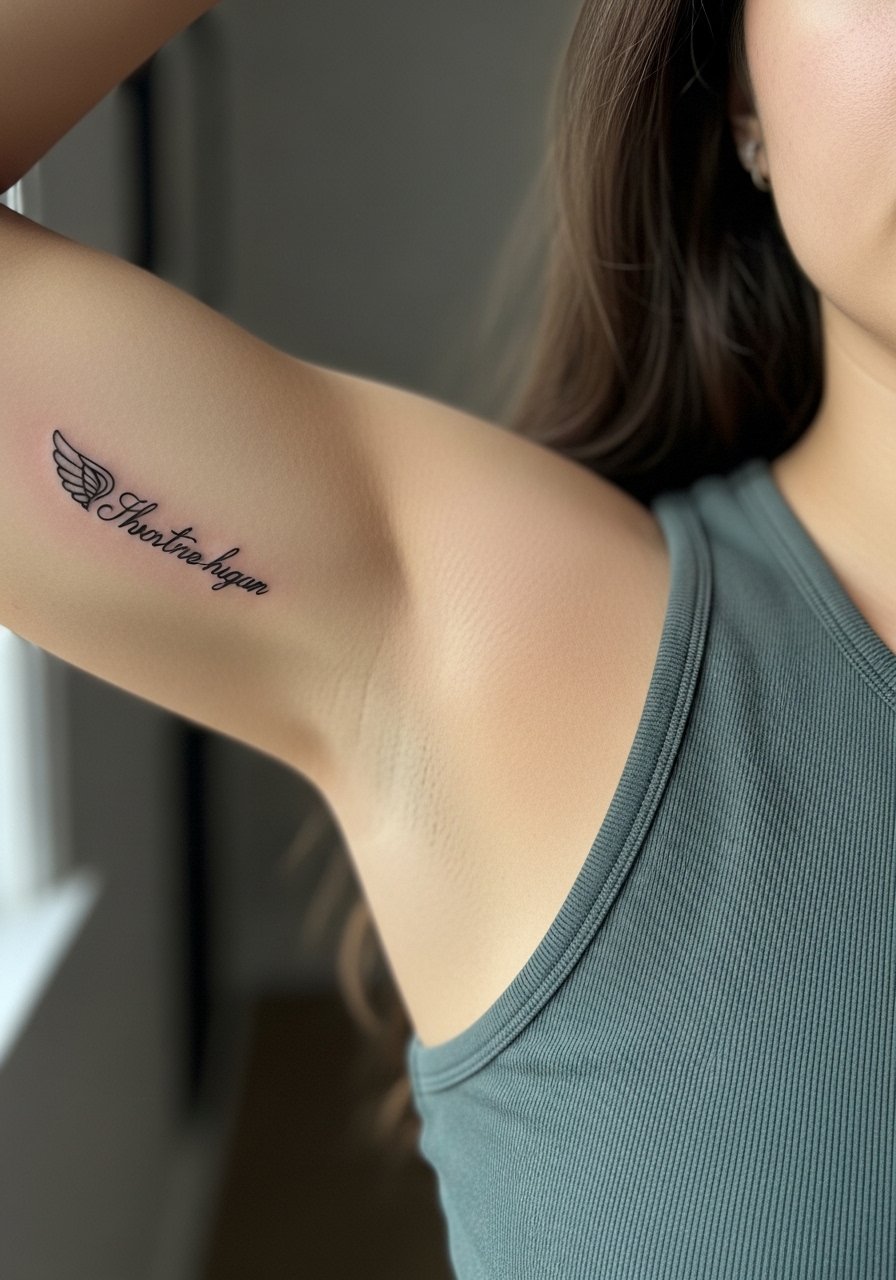
9. Tiny Arm Band with Angel Motif on the Bicep
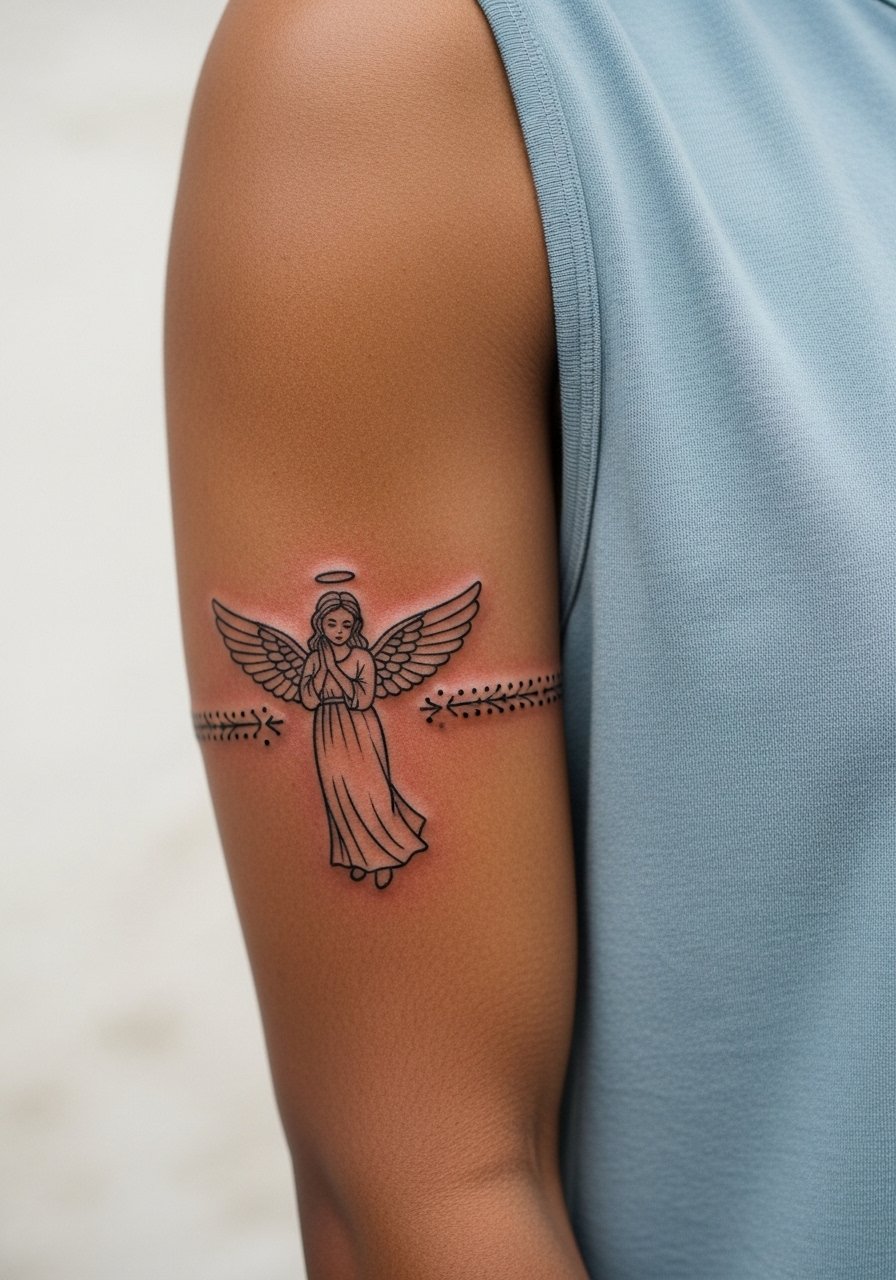
An arm band gives the artist room to space elements so small motifs do not touch. The common error is wrapping too tightly, which makes the band blur as skin moves. Ask for breathing room between motifs and a slightly thicker outer line. Bicep pain is low to moderate and sessions are comfortable. For the appointment wear a loose button-down shirt you can pull aside easily so the artist can work without fabric rubbing the site.
10. Tiny Celestial Warrior on the Side Rib
Ribcage placements bring the controversy about fine line aging into focus. One group of artists insists dense detail will blur with breathing and weight changes. The other group argues that careful spacing and slightly deeper needle placement can keep fine forms crisp. Be explicit about this in consultation. The ribcage is high on the pain scale and sessions may be broken into shorter sittings. For the appointment choose a breathable cropped top so you can adjust access without removing too much clothing.
11. Tiny Haloed Figure on the Thumb Side of the Hand

Hand tattoos are exposed and receive lots of washing and friction. The usual mistake is asking for intricate shading in a small zone. Recommend solid black or minimal linework and accept that touch-ups are more likely. The session is short but can feel prickly. This placement affects some industries, so think about visibility and career implications before booking. For showing off, a thin ring or stacking band complements the base-of-thumb placement.
12. Micro Dot-Work Angel Crest on the Calf
Calves are forgiving for micro dot work because they get less constant abrasion. A common error is over-detailing a crest that looks muddy from afar. Ask for clear focal points and unfilled negative space to keep the motif readable. Sessions are comfortable and healing is simple. Pair the design with mid-calf boots or cropped trousers to show it off. Try a pair of cropped linen trousers so the tattoo shows when you want it to.
13. Tiny Scripted Slogan with Wing Accent on the Inner Bicep
Inner bicep skin stretches differently and some artists warn about fine script here. The mistake is requesting hairline script without allowance for the skin to shift. Ask for slightly larger lettering and airy wings so the composition keeps its legibility. This area can be tender during the session. For comfort wear a loose tank so the artist has clear access and you stay cool during the sitting.
14. Tiny Shield Medallion near the Hip
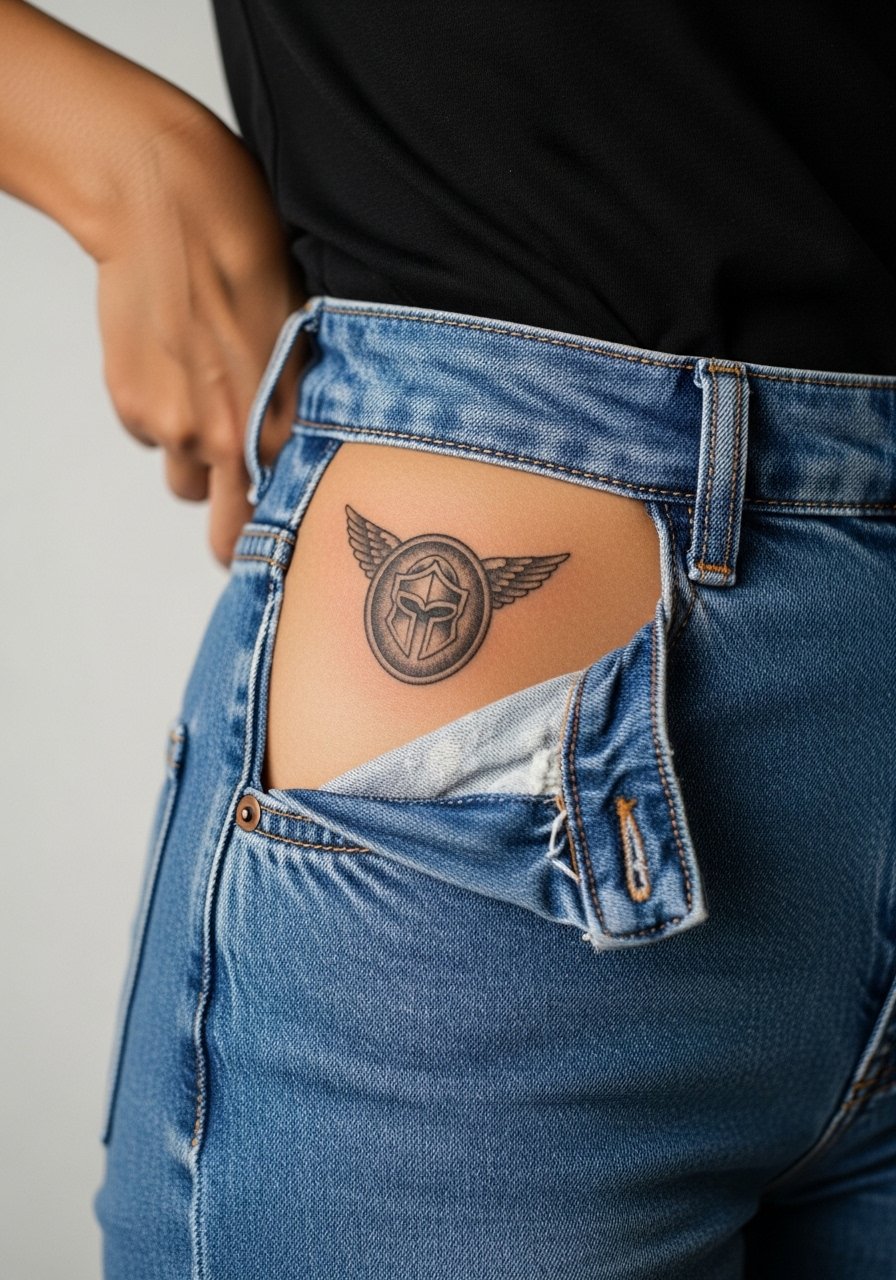
Hip pieces can be intimate and age well if placed across stable tissue. The common mistake is asking for tiny concentric details that vanish with movement. Keep the medallion simple with a clear outer ring and one central motif. Sessions are moderate in discomfort and healing requires loose waistlines. For the appointment choose high-waisted bottoms you can lower slightly without full undressing, such as high-waisted denim.
15. Miniature Back Spine Guardian between the Shoulder Blades

A vertical spine motif benefits from symmetry and negative space. A frequent error is compressing elements too tightly, which looks cluttered as the skin settles. Tell the artist you want a clean silhouette and modest spacing between the halo, figure, and wings. Session comfort is moderate and you may feel pressure when lying on the table. For outfits, open-back tops and halter dresses highlight this placement well.
16. Tiny Crossed Swords on the Thigh
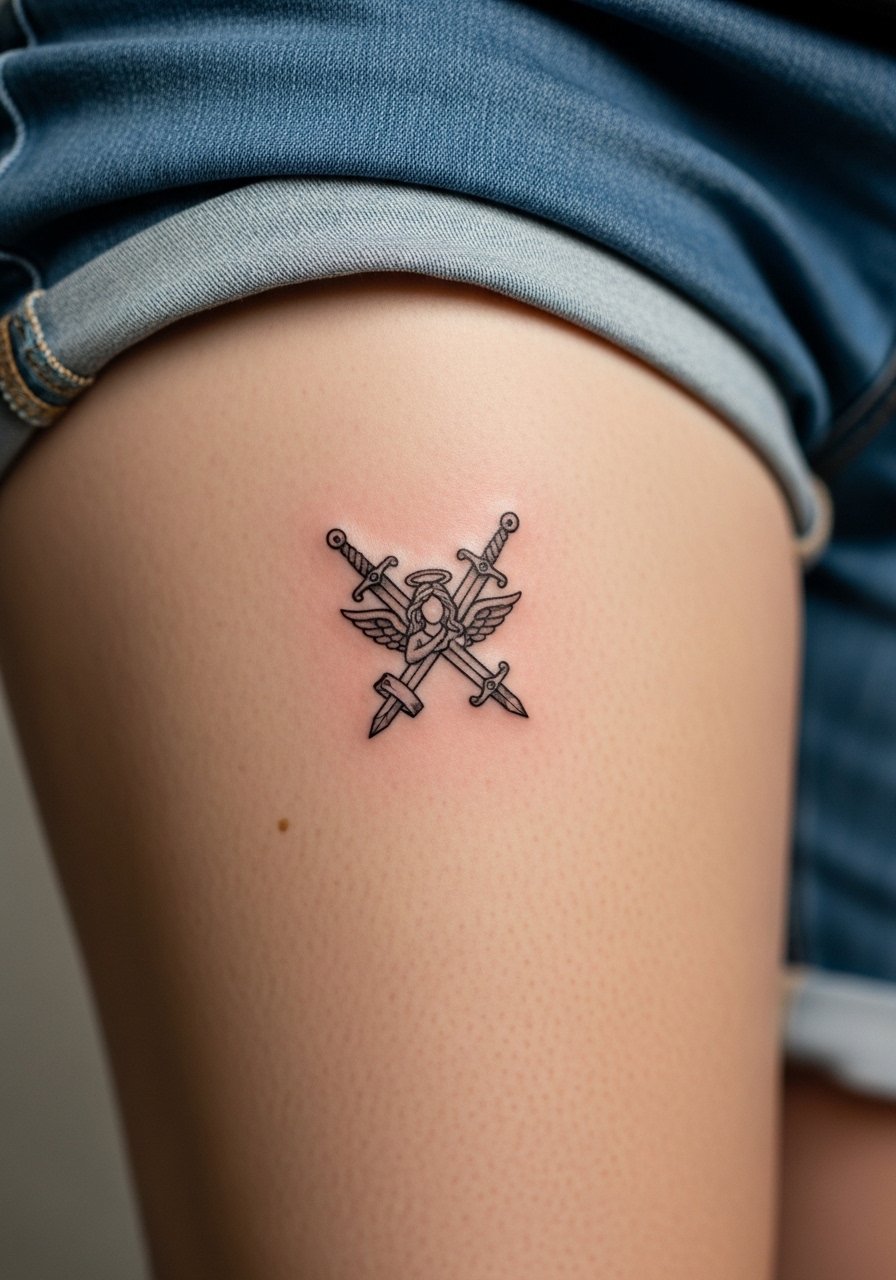
Thighs offer generous canvas and less friction than lower leg placements. The mistake is making tiny intersecting lines without giving them room, which can muddy on healing. Ask for slightly bolder intersecting lines and crisp negative space between blades. Pain is usually lower than the ribcage and session time is flexible. For the appointment wear loose shorts or a wrap skirt so the artist can access the area without discomfort. A loose drawstring linen pant also makes post-session dressing comfortable.
17. Tiny Heart-Shield Angel Near the Collarbone Center

Center collarbone placements read as delicate and intentional. The common mistake is placing too many tiny internal details in a small heart-shield, which washes out over time. Ask for a clear external contour and one or two internal accents rather than clutter. Pain is moderate and sessions are short. For showing off, a thin pendant necklace sits above the piece without competing. Try a thin chain pendant necklace to frame the area subtly.
Frequently Asked Questions
Q: How small is too small for a tiny angel warrior if I want it to last?
A: As a rule of thumb, avoid cramming complex details into a space smaller than two to three centimeters across. Tiny silhouettes and bold outer lines age far better than micro-detail in a pinhead. If you want script or facial detail, plan for a slightly larger size or accept touch-ups at year two to three.
Q: Will a tiny angel warrior on the ribs need more touch-ups than one on the forearm?
A: It depends on your skin and lifestyle. Ribs move with breathing and sit near thinner skin, so fine detail can soften faster. Forearms usually stay more stable. Ask the artist about their touch-up rate and whether they prefer to space elements wider for rib placements.
Q: Are there wardrobe choices that help protect a new tiny wrist or ankle tattoo?
A: Yes. For wrists consider thin, breathable bands or cuffs that do not rub the fresh ink. For ankles, sandals or rolled-down socks reduce friction during the first two weeks. A lightweight scarf or loose sleeve also helps keep sun off delicate pieces.
Q: If I want a tiny warrior with shaded wings, what should I ask in the consult?
A: Ask for stipple shading or subtle whip shading rather than dense smooth fills in very small wings. That approach keeps texture without creating a solid mass that can melt into surrounding lines as it heals.
Q: How do I find an artist who specializes in tiny, high-precision work without relying on Instagram handles?
A: Use discovery pathways like local tattoo directories, convention listings, and shop portfolio pages. Search hashtags that describe the technique plus your city, read recent client reviews, and look for healed photos rather than only fresh ones to judge longevity of tiny work.
