
Fine line shoulder work is everywhere online, but what people forget is how placement, skin tone, and everyday movement change the outcome. Lines that look perfect on an iPhone photo can blur after months of gym sweat, and thin single-needle details may vanish faster on darker skin. Expect some bone-area pain, possible scheduling headaches, and choices that affect how long a piece still reads sharp. The first entry shows a version that avoids those common traps.
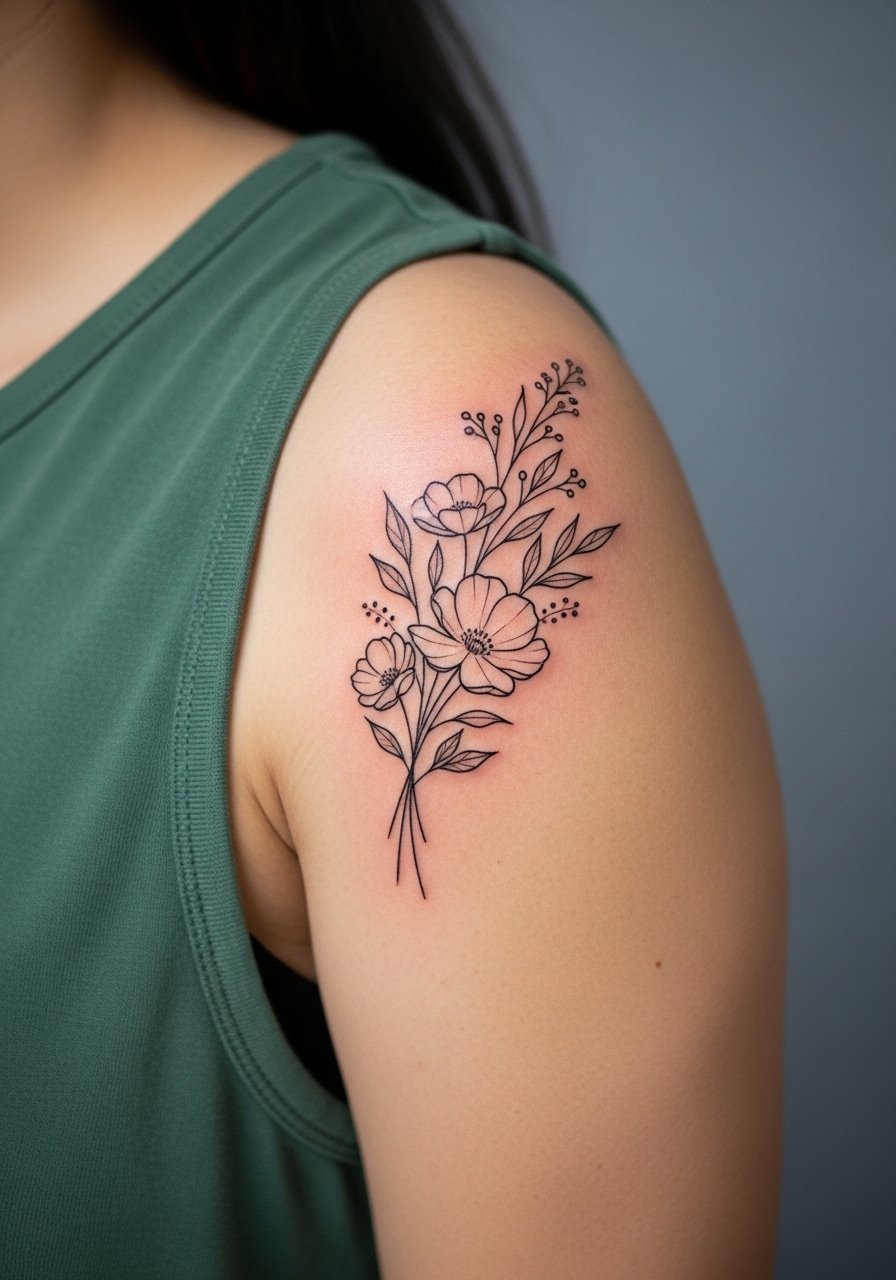
1. Fine line floral bouquet on upper shoulder
I've seen upper-shoulder florals that read like delicate jewelry for a year, then fade into faint gray the next. The trick is slightly heavier linework around petal edges and a mix of tiny stipple shading so the bouquet keeps shape when you lift your arm at the gym. In consultation ask your artist to space stems so they do not compress when the deltoid flexes, and request a realistic healed mockup on the actual skin. Fair warning about the fine-line debate. One camp says single-needle florals can last two to three years with careful placement. The other says shoulders are notorious for early fade and that thicker line weights win. Expect a moderate pain over the bone and a likely touch-up window at year two. For showing it off, pair the piece with an off-shoulder linen blouse that frames the collarbone and lets the bouquet sit like a pendant.
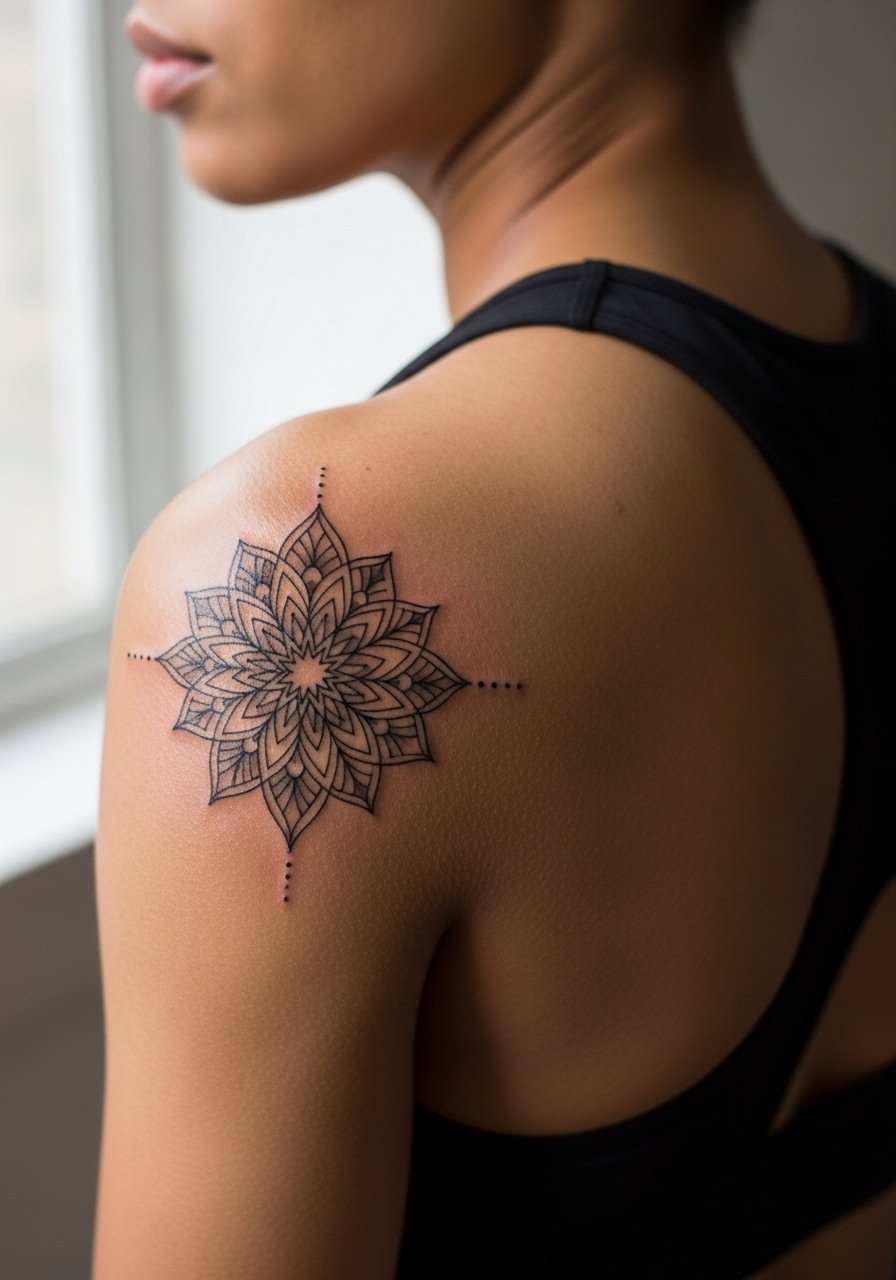
2. Minimalist mandala on the shoulder cap
Fair warning, the shoulder cap is a place where symmetry needs breathing room to age well. The biggest mistake is shrinking a mandala too small to fit under straps. Ask for radial spacing that keeps dots and whip shading separate at 4 inches or larger. Pain is mild to moderate since the muscle pads soften the needle, and a single session usually does the job. Artists split on single-needle mandalas on shoulders. Some recommend the thin approach for the look, while others push for slightly bolder linework for longevity. For outfit pairing, this design sits neatly under a racerback tank on warm days so the circular silhouette reads clean from the back.
3. Watercolor rose cascading from shoulder to upper arm
Most watercolor shoulder pieces age differently than solid black work. Fresh photos show painterly gradients and soft edges. At six months the color will soften, and by year two expect loss in lighter washes unless saturation is strong near shadow planes. A common mistake is using too many pale pastels without a dark anchor color, which makes the rose look patchy after summer sun exposure. The session feels long but not brutal for this placement since the muscle accepts color well. For the appointment, bring a short-sleeve button-up so the artist can roll the sleeve without tugging the area. The result reads romantic in motion and pairs nicely with rolled sleeves when you want to reveal the cascade.
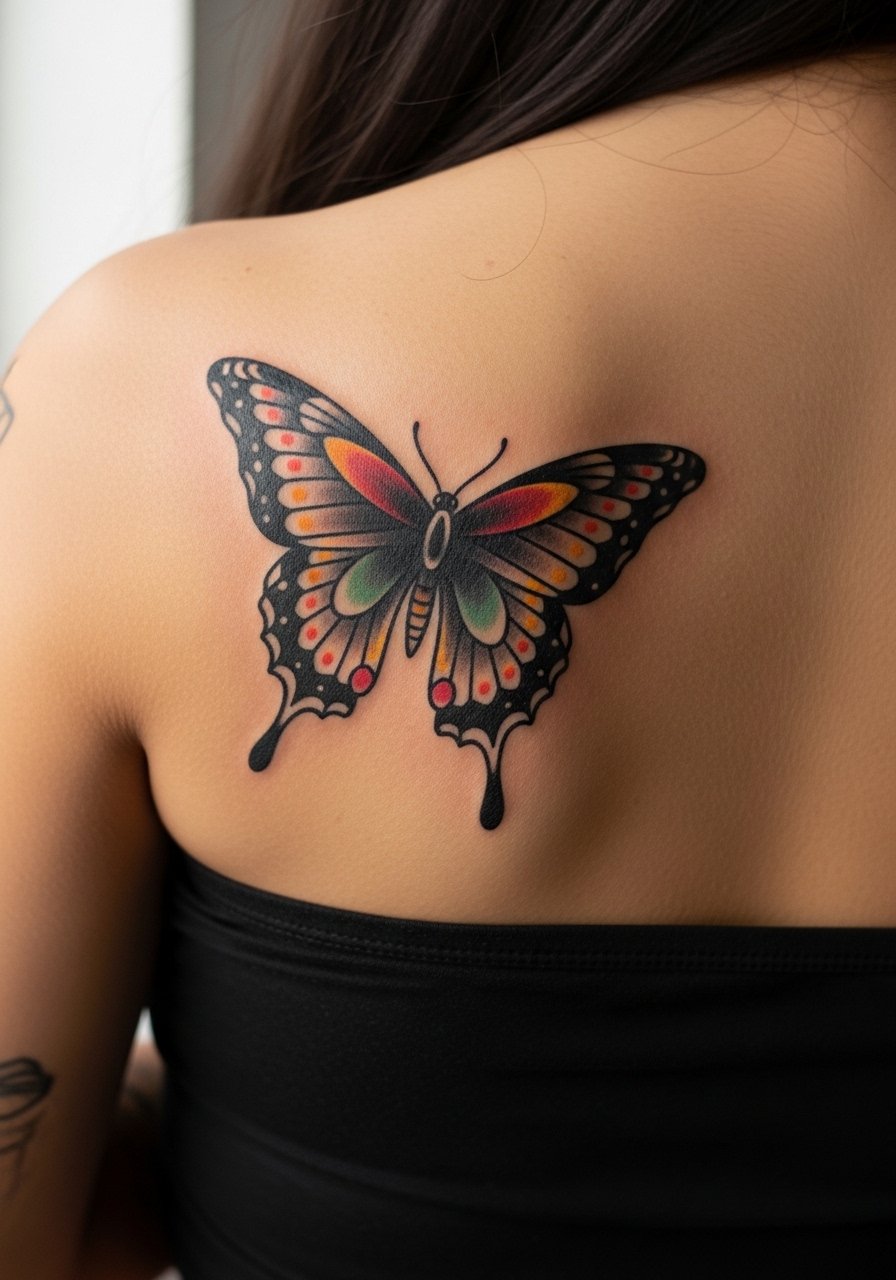
4. Neo-traditional butterfly on the back shoulder
There is a visceral visual impact to bold neo-traditional wings on the shoulder blade. I've noticed these hold up because the thicker outlines resist early blur, and the color blocks survive sun exposure better than watercolor washes. When you meet your artist bring wing references that show both profile and spread, and ask them to anchor the lower wing to a fixed bone point so the design keeps proportion as you move. The pain while lying prone is a steady eight out of ten near the spine edge, but many people say the vibration and time are tolerable for the payoff. Pair this with a strapless tube top for summer nights so the wings can be visible without bra straps interfering.
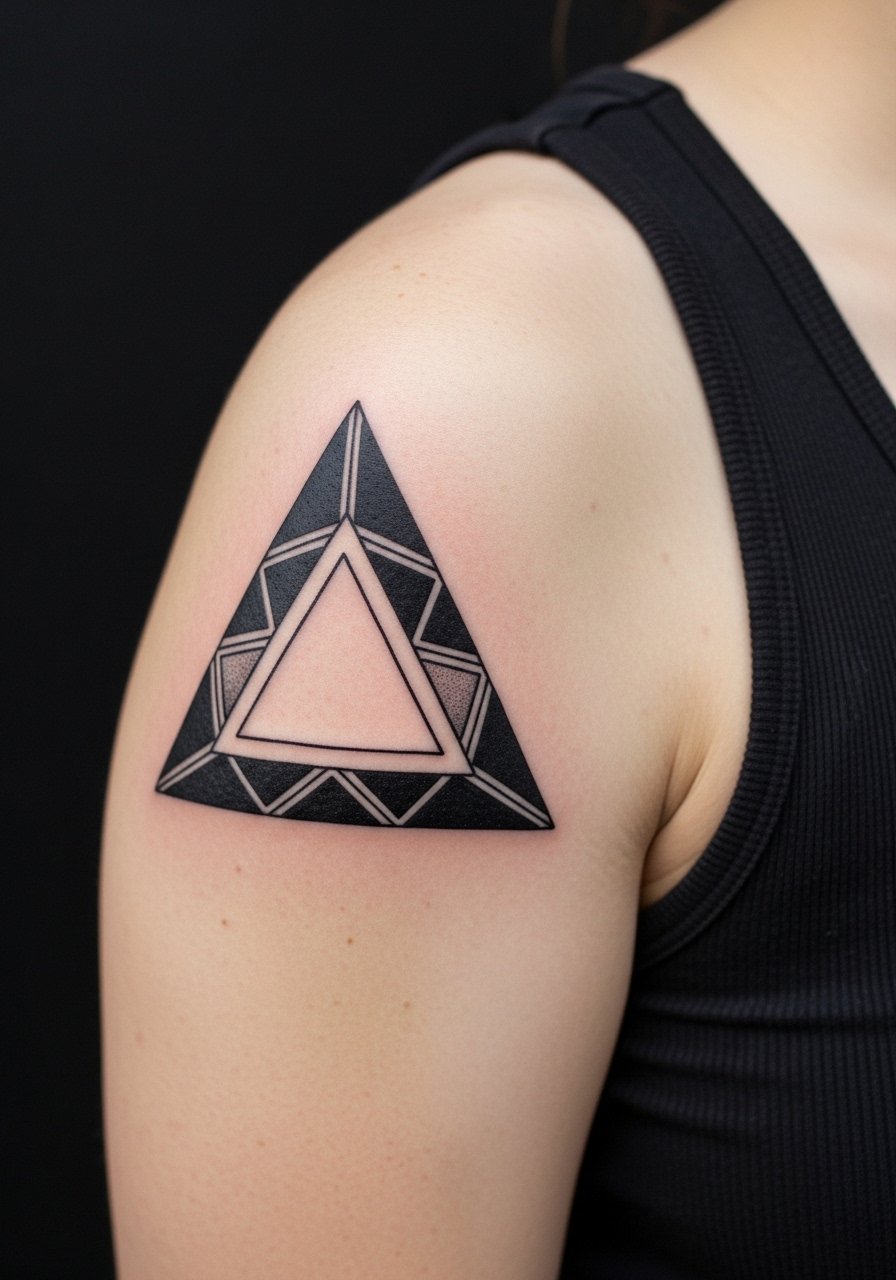
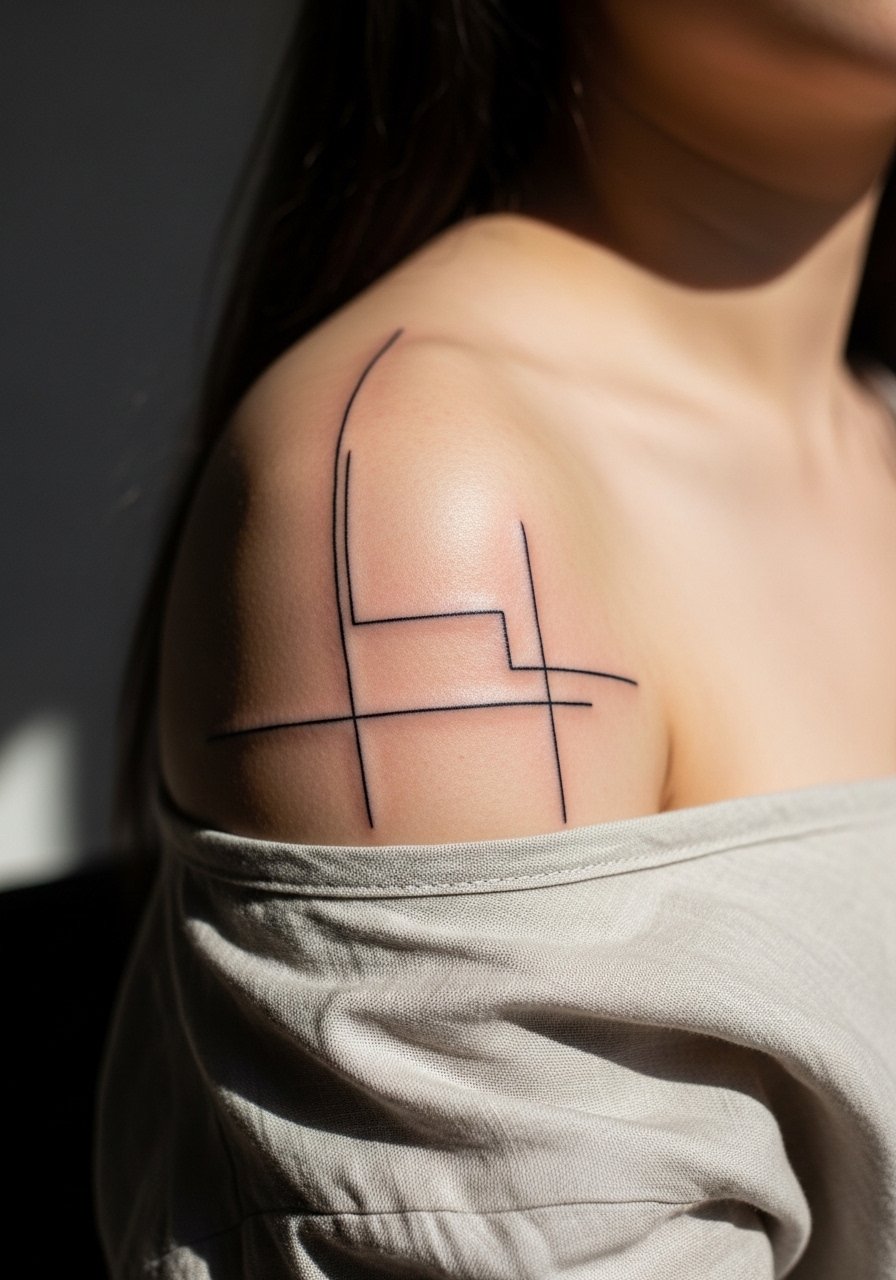
5. Blackwork geometric triangle on the deltoid
There is something about clean solid blacks on an athletic deltoid that reads graphic from across a room. The critical error is making triangles with lines too thin or too close together. For longevity insist on clear spacing between edges and full saturation in one session. Pain is low to moderate on the meat of the deltoid, and blowout risk increases if the needle is shoved too deep. This style pairs best with fitted racerback tanks in dark hues so the geometry pops. Try a navy fitted tank for casual wear and keep patterns away so the tattoo reads as a statement.
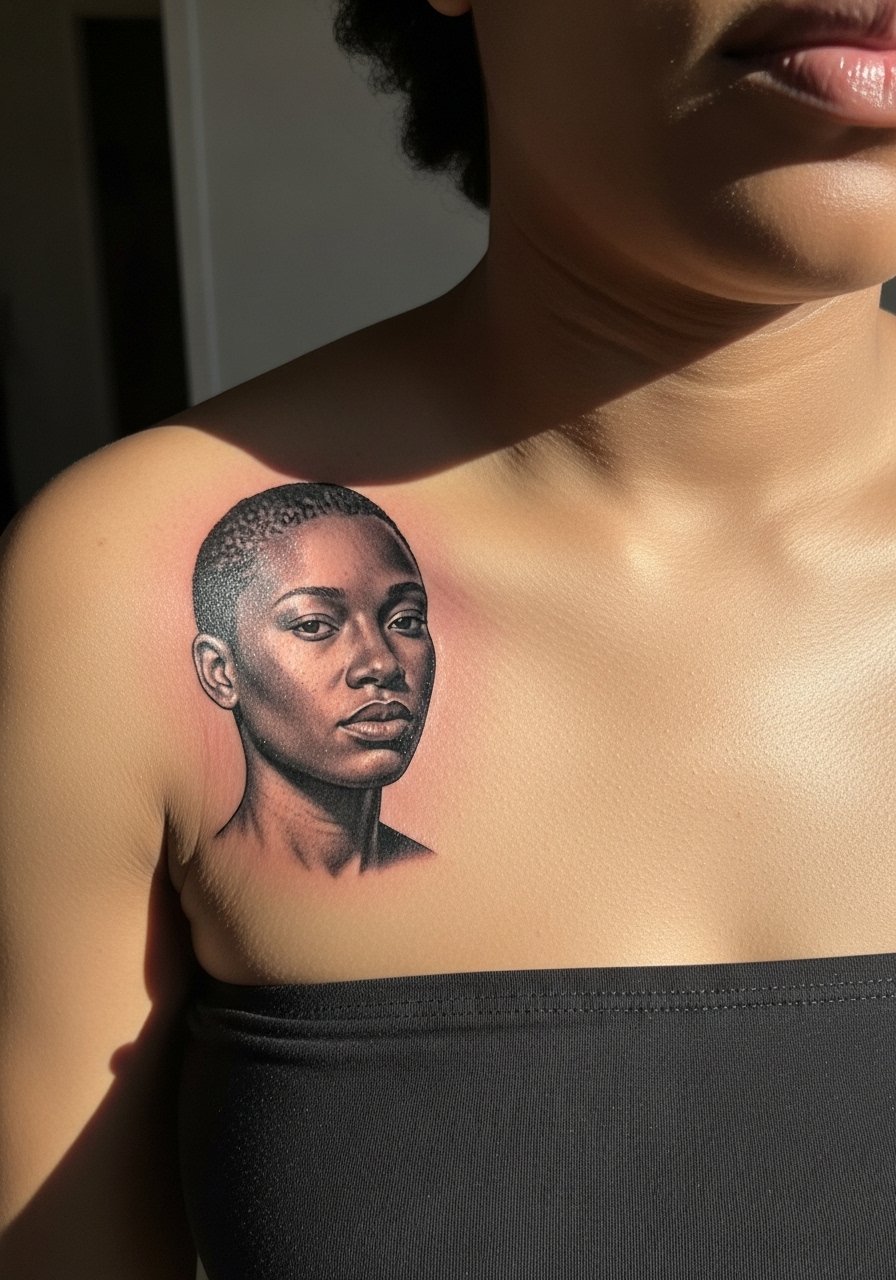
6. Micro-realism portrait on the inner shoulder
When you choose micro-realism for an inner shoulder portrait, the intimacy of placement is the point. The inner shoulder hides well under most shirts and becomes a private memorial or keepsake. A real mistake is demanding too small a portrait; three inches gives the artist room to render facial planes without turning features into blobs after healing. Expect higher touch-up likelihood, and consider scheduling multiple short sessions for shading accuracy. The area is tender near the bone so numbing conversations are valid before booking. For the session, wear a halter top or strapless piece so the clavicle and inner shoulder are accessible without bra straps under the stencil.
Studio Day Picks
Those first six shoulder pieces include both exposed caps and inner shoulder zones, so a few targeted items smooth the session and the first week.
- Tea tree balm seasonal salve. Lighter than petroleum ointments and favored in humid climates when you want moisture without heavy residue during the initial healing of upper-shoulder florals.
- Australian aftercare spray. A fast-drying spray helps showers stay less messy for shoulder-to-arm cascades and limits rubbing on banded clothing.
- Japanese rice-based ointment. Absorbs quickly and can be gentler on fine-line shoulder pieces where heavy balms cause ink to soften.
- Indie mushroom extract salve. Anti-inflammatory properties can reduce swelling after bone-adjacent sessions like inner-shoulder portraits.
- Hustle Butter. A mainstream thinner balm option that many people prefer over heavier ointments for shoulder areas prone to sweating.
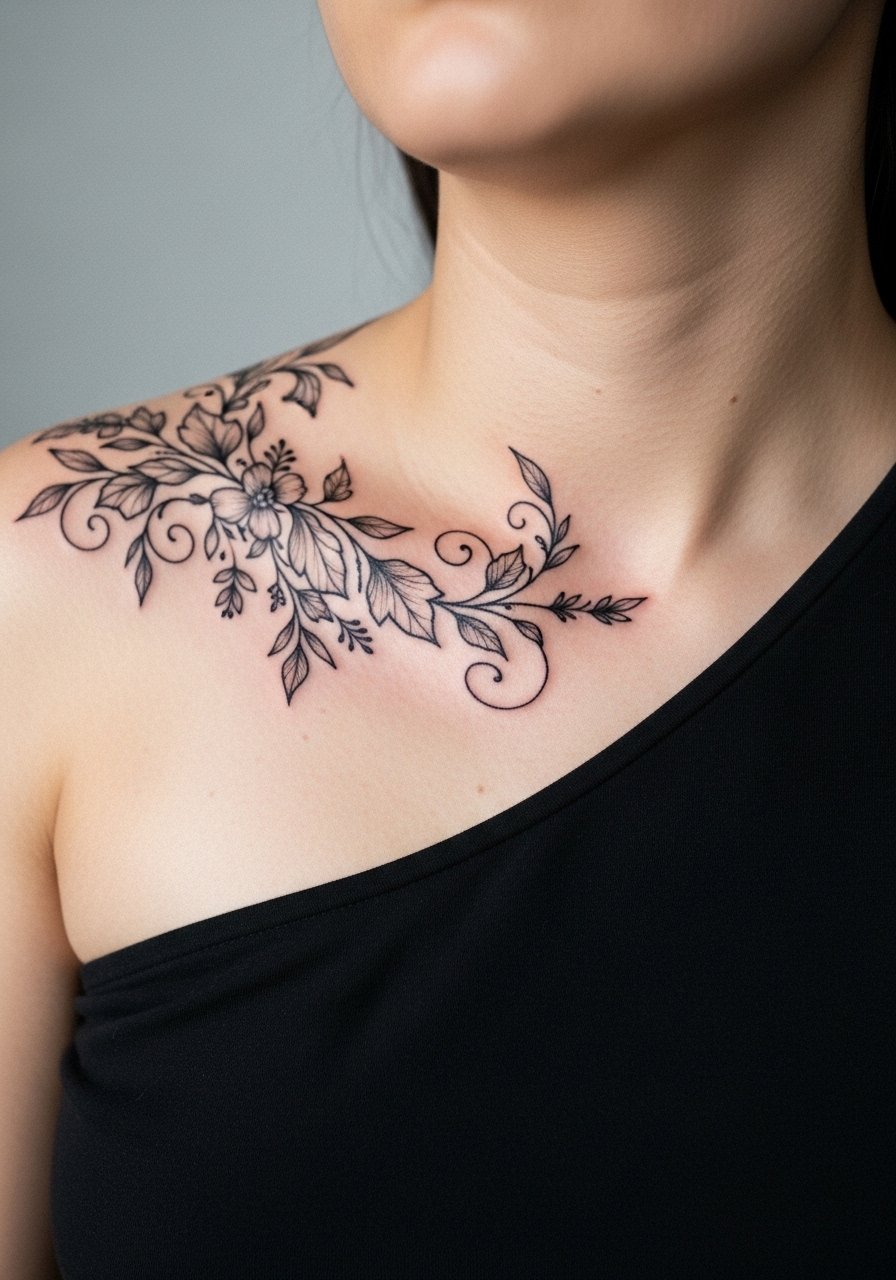
7. Ornamental vine wrapping shoulder to neckline
This is one of those designs that benefits from thinking about the whole silhouette. The vine elongates the neck visually when placed from shoulder toward the clavicle, and spacing the leaves lets you add length later if you want a collarbone wrap. Avoid tight, repetitive loops that will compress with shoulder movement. The session usually takes two sittings for a seven-inch run and the pain is mild where muscle covers the area. For showing it off choose an asymmetric neck top in olive that follows the vine line and keeps attention on the sweep of leaves. Ask during the consult if the design can be started as a patchwork piece to integrate future additions.
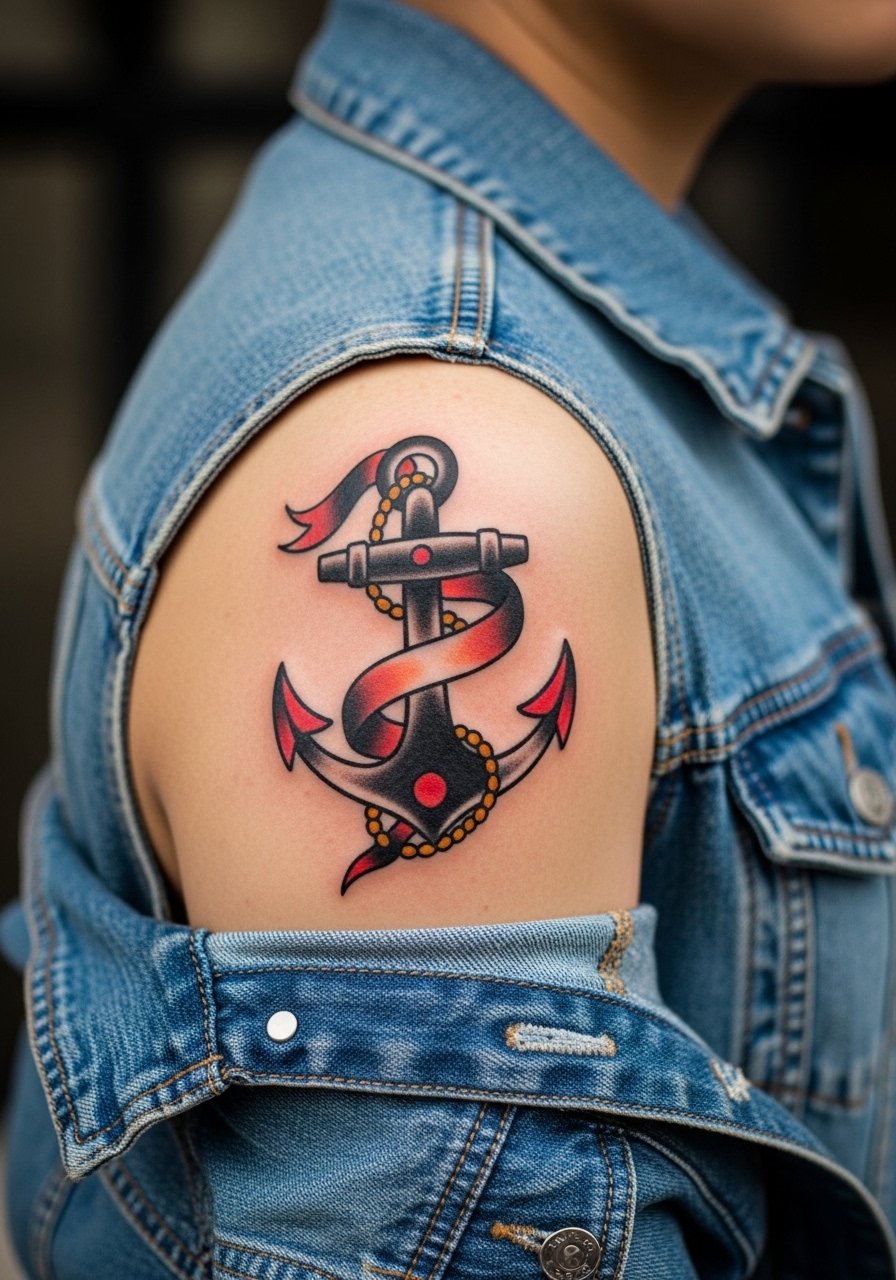
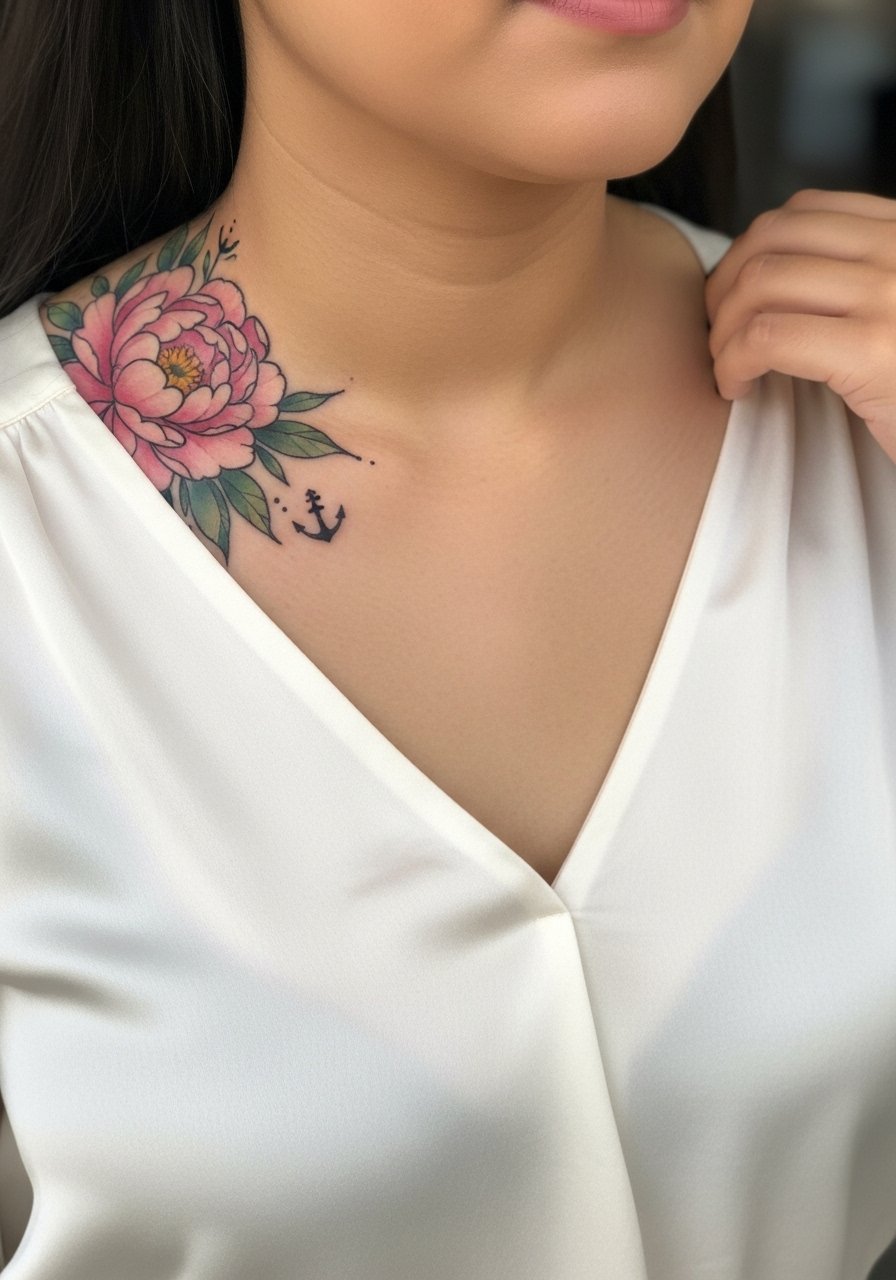
8. Traditional anchor with ribbon on front shoulder
I've noticed anchors age into a strong classic look because their bold outlines and saturated fills resist early fading. The ribbon gives you room for a name or short word, but avoid overly tiny script; broad, legible lettering holds better here. Expect a one to two session timeline and moderate soreness over the bone edge. For an easy reveal, pair the anchor with a sleeveless denim jacket or a vintage wash tee that frames the front deltoid. During consultation confirm how the artist handles edge saturation so the anchor keeps its crisp silhouette after healing.
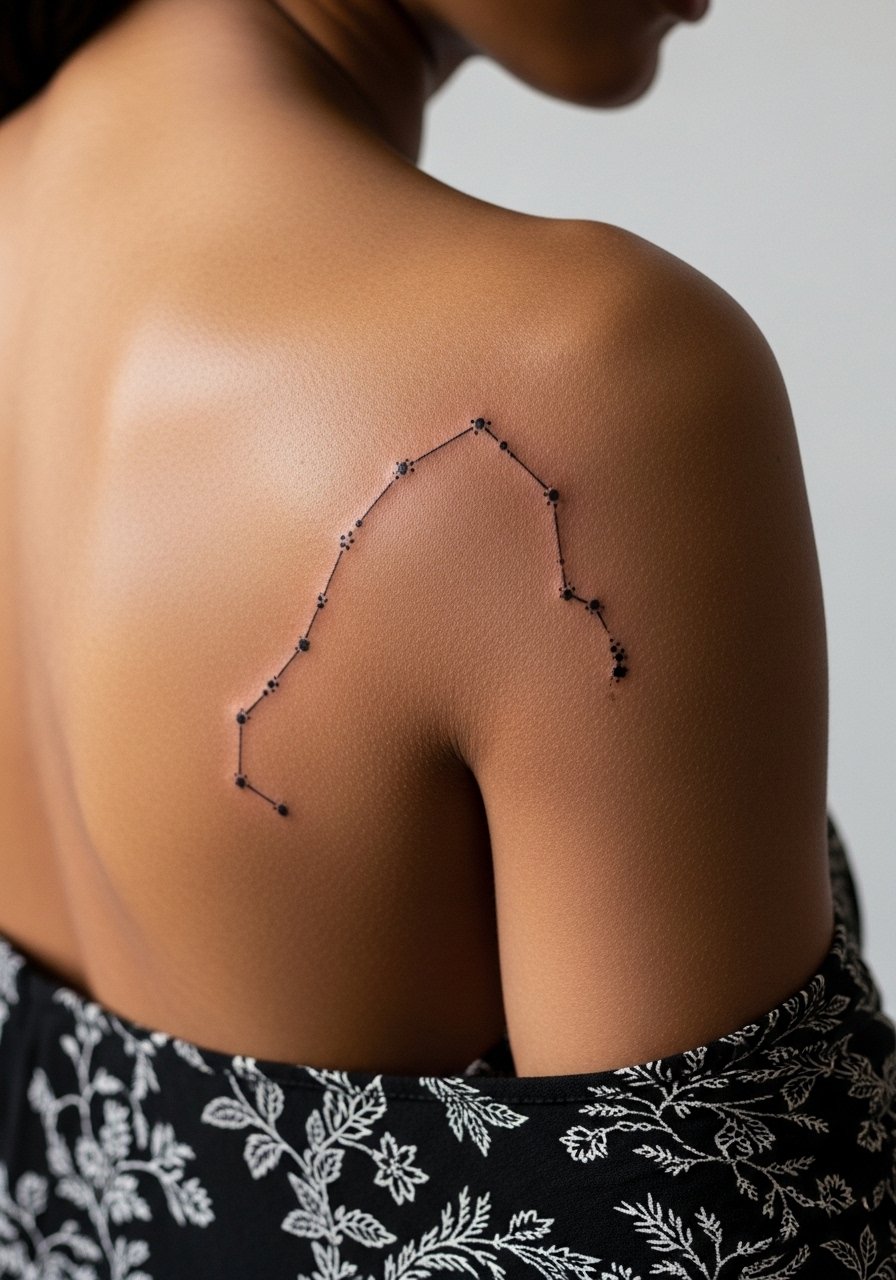
9. Fine line constellation on shoulder blade
Visual impact is subtle with constellations, and that is the point. Dots and fine connector lines need spacing so stars do not merge as they age. The main mistake I see is pressing for glow-in-the-dark ink without considering everyday washing and sun exposure. For durability choose slightly larger dots and confirm touch-up policy in writing. The shoulder blade is forgiving for placement and pain is low when you lie face down. If you want a discreet reveal, a backless dress or low-strap top will make the constellation peek through without competing accessories.
10. Ignorant style abstract shape on the outer arm
The ignorant style embraces rough, imperfect marks that deliberately reject precision. The danger is asking for "authentic" chaos without specifying scale. Smaller mash-ups can quickly read as ink blobs when they sit on the taper of the outer arm. When you ask for this style, bring a few raw sketches so the artist knows the degree of looseness you want. Expect the session to be fast and the healing straightforward since solid black fills handle friction well. This design pairs well with casual tees and rolled sleeves, and it keeps personality high without needing constant display.
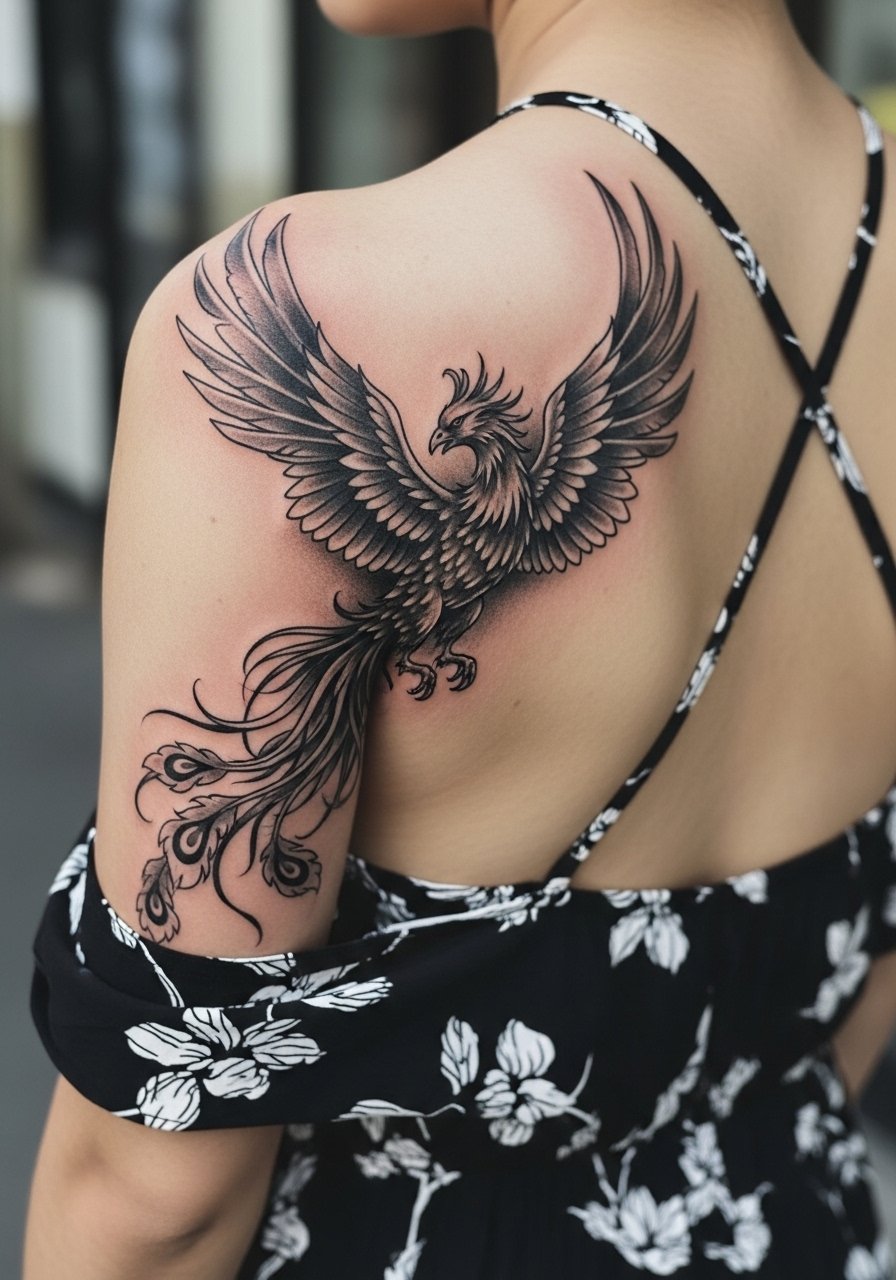
11. Black and gray phoenix rising from the shoulder
Most people pick phoenixes for the symbolism of resilience, and a full black-and-gray approach ages with more dignity than garish color that fades. The strong shading gives the illusion of movement across the back and shoulder. For a six-inch composition expect multiple sessions and honest talk about how much coverage you want. Pain near the top of the shoulder blade is higher because of bone proximity, so pacing matters. For nights out, the wings look dramatic under a backless summer dress that reveals the upper back without straps cutting across the art. Consider touch-ups at year three for heavy shaded regions.
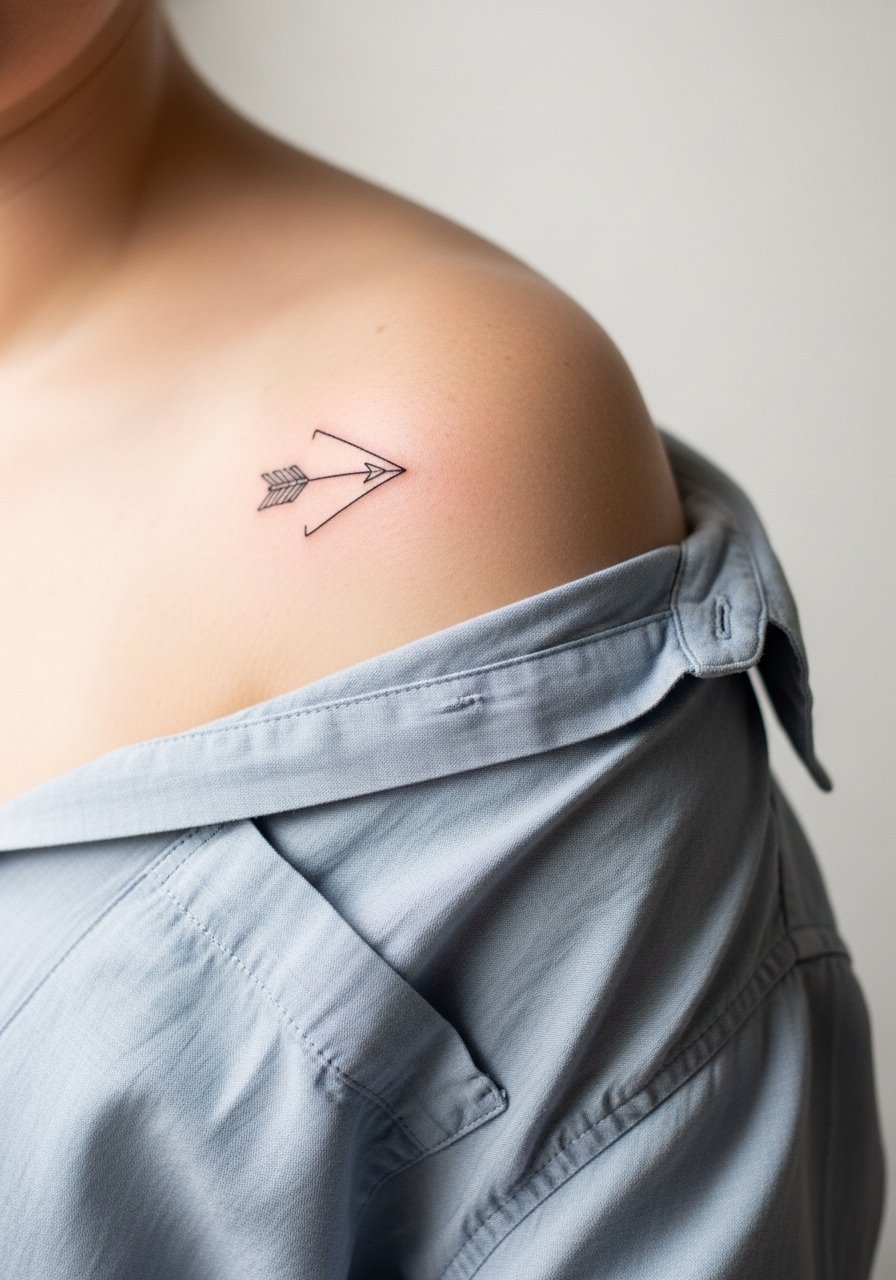
12. Minimalist arrowhead on the acromion
This tiny marker reads as a compact decision symbol and stays easy to conceal. The common mistake is over-detailing such a small piece. Keep a single bold line and consider a slightly thicker profile than you might choose on the wrist. Pain is sharp over the acromion but short-lived, and most sessions are under an hour. Ask your artist about how they end the point of the arrow to avoid a hairline that can disappear. Wear a loose tank or button-down to the appointment so the shoulder is accessible without tugging.
13. Watercolor peony burst on the clavicle edge
Most peony bursts are chosen for summer reveals and soft color palettes. The trick for the clavicle edge is to anchor petals with darker tones close to the bone so the lighter washes do not vanish under sun exposure. Common mistakes include ignoring how necklace chains sit on the area and creating scuff points during healing. Sessions take two sittings for reliable saturation. For evening looks, a v-neck silk blouse in ivory complements the peony without competing with the soft pinks. Ask about a healed mockup because the clavicle angle changes how petals sit when you move.
14. Shoulder-to-neck "power line" extension for curvy builds
There is a subtle body-adaptation move that elongates curves by extending shoulder linework up toward the neck. I've seen it balance proportions when placed carefully and avoid the over-crowded look by using open negative space between motifs. The consultation should include photos in your favorite tops so the artist can map where the line will travel with your movement. Pain increases as you approach the neck but the visual payoff is strong. For showing the flow, an olive high-neck crop or asymmetric neckline keeps the extended line visible and flattering while preserving modesty.
15. Dark-skin tested blackwork patch for lasting pop
A lot of portfolios skip dark-skin examples, and the truth is that line weight and saturation need adjustment to read similarly across tones. For darker skin, favor stronger blackwork and simplified silhouettes rather than ultra-fine detail. I've seen test patches done on similar skin tones during consultations, and they help set realistic expectations for how the ink photographs. The session is similar in timeline but talk explicitly about contrast and touch-up timing. For careers where visibility matters, place this work on the shoulder cap so it peeks under sleeveless tops while remaining concealable under shirts.
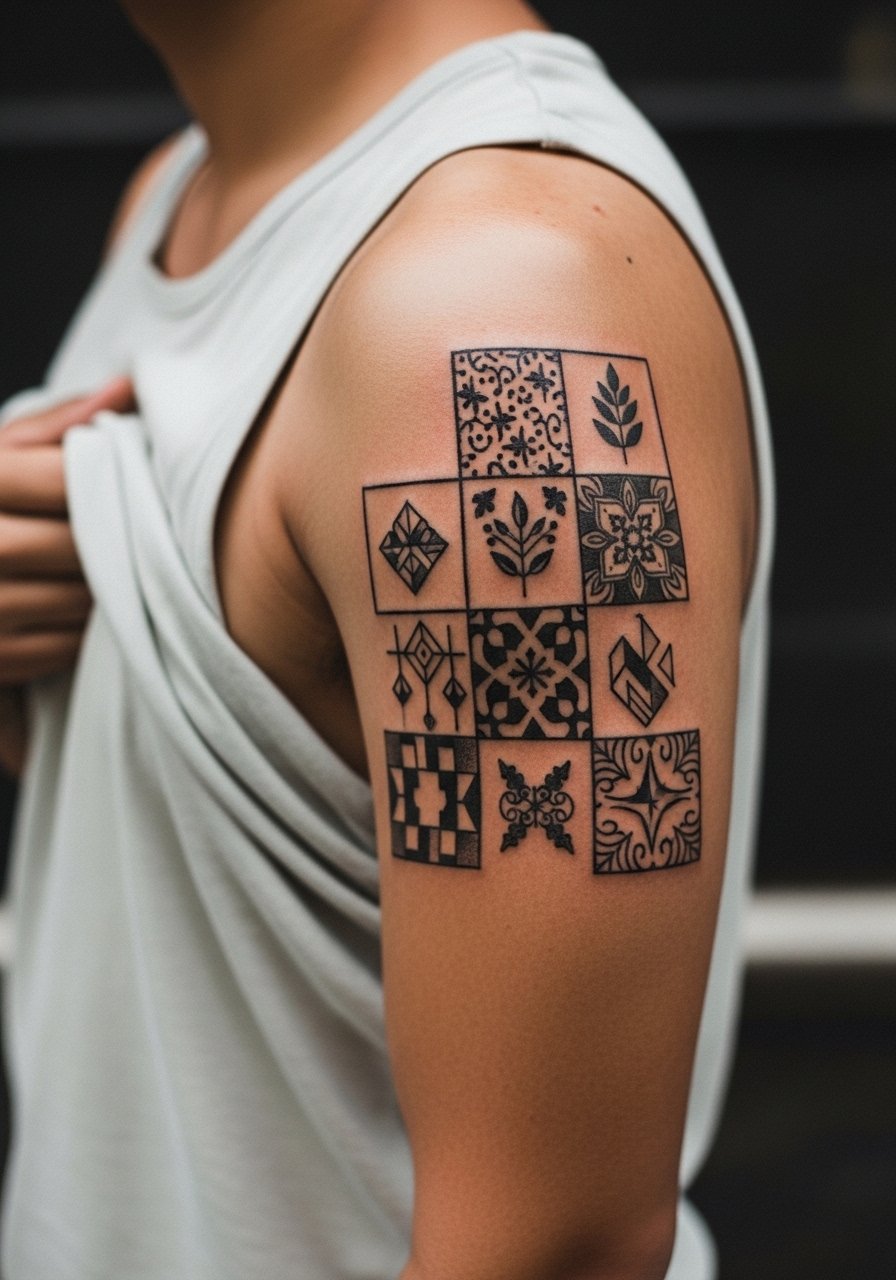
16. Patchwork shoulder starter that connects to a sleeve later
When you want a future sleeve but are not ready for the commitment, a patchwork starter approach spaces pieces with planned negative areas for later linking. The key mistake is not marking future join points during the first session. Ask your artist to map the future connection lines on the skin with a temporary stencil so additions sit naturally. Pain and session times vary by piece, but starting small gives you time to adapt style choices. For the session, wear a loose tank top that allows the artist to reach the shoulder and upper arm without fabric interference.
17. Humid-summer healing plan for exposed shoulder tattoos
Most aftercare guides omit climate specifics and shoulders are especially vulnerable in humid seasons. Expect increased sweat, more friction from tank straps, and longer drying times. I advise lighter balms and frequent gentle blotting rather than thick ointments on sweaty days to reduce pore clogging. The common mistake is covering fresh shoulder work with tight clothing that rubs the scabbed area. Schedule sessions for mornings when you can air-dry at home and plan for a week of minimal shoulder straps. If you work outdoors, move sun exposure precautions forward and consider a protective top during peak hours to protect new color.
Frequently Asked Questions
Q: Do fine line shoulder florals really fade faster on darker skin tones?
A: From what I've seen, ultra-thin single-needle work can appear less visible sooner on darker skin tones unless the artist adjusts line weight. Many people choose slightly bolder outlines or solid black anchors so the motif keeps definition without losing the delicate look.
Q: How should I plan sessions if I want a shoulder piece that connects to a sleeve later?
A: Ask your artist to map future join points during the first appointment and photo-document the layout. Start with 2-3 small, spaced pieces and leave negative corridors for later linking so the final sleeve reads cohesive rather than crowded.
Q: Which aftercare method should I pick for shoulder tattoos, Saniderm or dry healing?
A: Artists and forum users split into two camps. One group prefers barrier films like Saniderm for faster, less messy recovery. The other prefers dry healing, saying it can reduce ink loss under some conditions. Decide based on your skin type, activity level, and how much you sweat, and confirm the shop's follow-up policy.
Q: Will a tattoo on the acromion hurt more than one on the deltoid?
A: Yes, the acromion sits close to bone and most people describe it as sharper and shorter in duration. The deltoid meatier area is usually less intense. Consider numbing options if you are anxious about bone-adjacent pain.
Q: What should I wear to a shoulder tattoo session for easy access and comfort?
A: Pick clothing that exposes the area without tight straps rubbing the fresh ink. A loose tank, a button-down you can pull aside, or a strapless top depending on placement makes the artist's job easier and keeps your clothing from contacting the stencil during work.
