
Fine line is everywhere online right now, and the gap between what looks perfect on a phone and what survives on skin is wider than most people expect. Cost pressures, seasonal healing issues, and the fine-line fade debate are the trade-offs worth knowing before you sit down. Read on for 27 sun ideas that balance how they look fresh with how they hold up over time.
1. Minimal single-line sun on the wrist
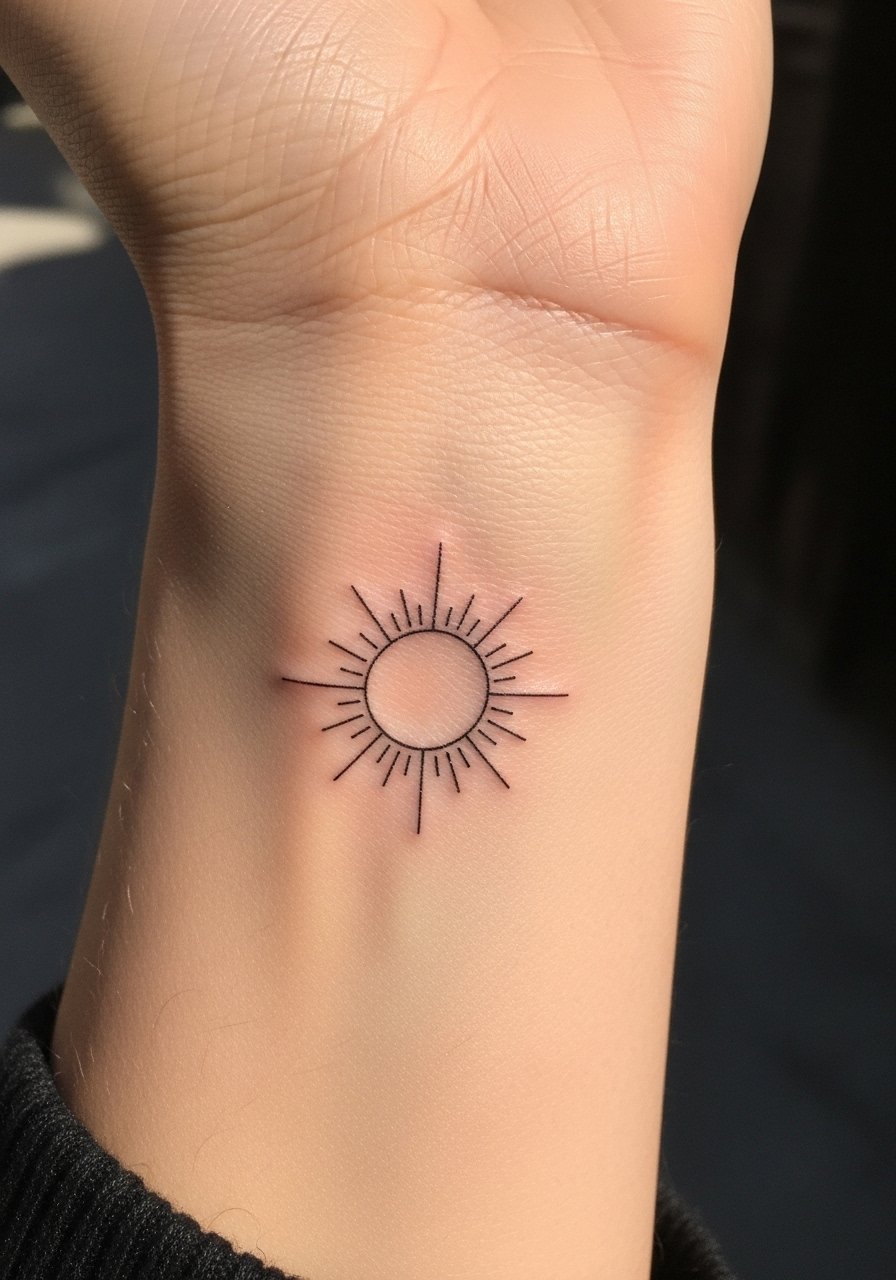
I’ve seen single-line suns live on wrists for years and still read clean when the artist keeps the circle open and the rays spaced. Ask your artist to keep the diameter at least one inch and to use slightly heavier linework than a hairline so it survives daily washing. Expect a one-hour session, low pain, and a touch-up around year two if your skin fades faster. For showing this off, pair it with a thin chain bracelet on the opposite wrist so the tattoo peeks without competing.
2. Geometric sun with subtle rays for the inner forearm
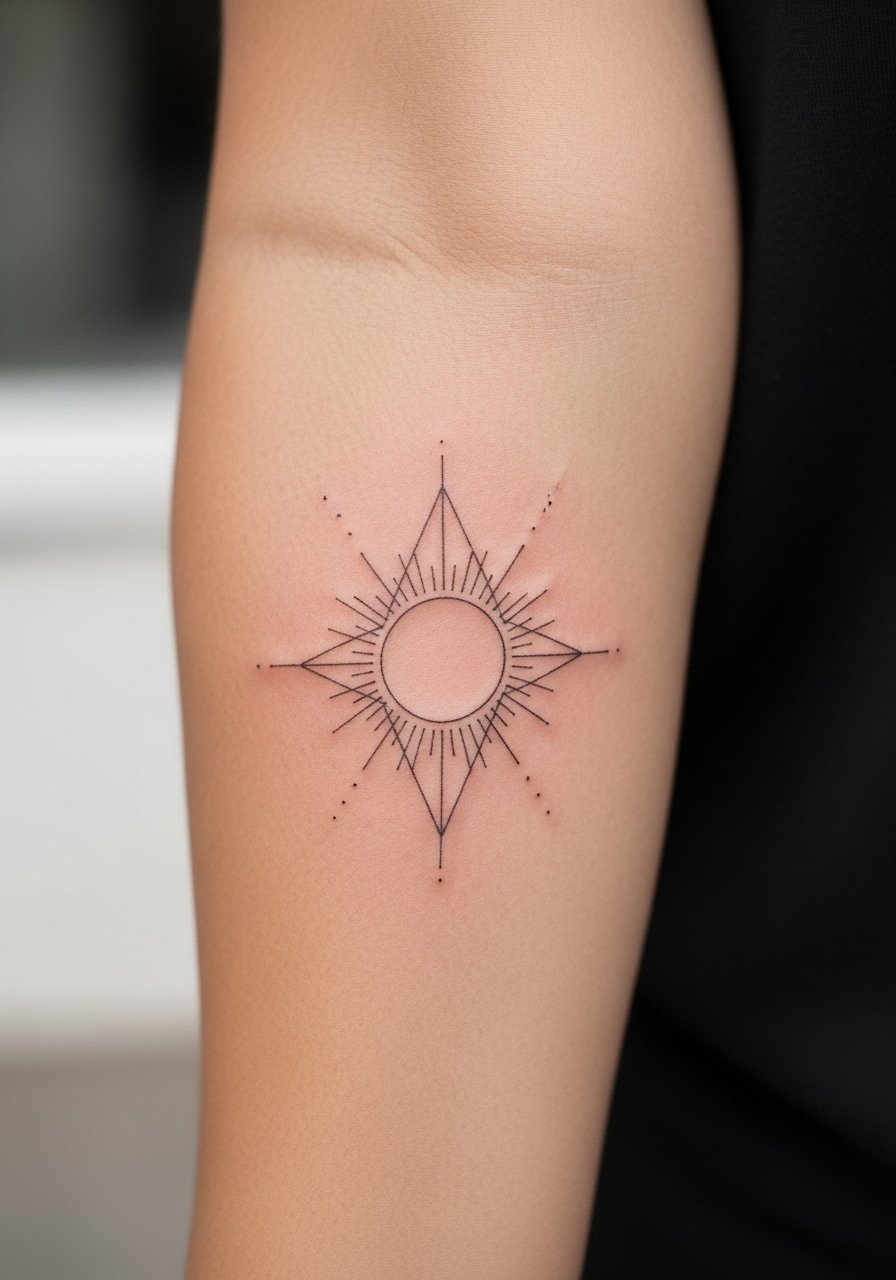
Most geometric suns need spacing or the rays start to merge as they age. I tell people to scale this to at least two inches and to request distinct ray gaps during the consultation so stipple shading has room to breathe. Inner forearm pain is moderate and the session is usually under two hours. If you want the tattoo to pop in sleeve season, wear a linen button down with the sleeves rolled so the piece sits against skin instead of fabric.
3. Dotted mandala sun at the collarbone
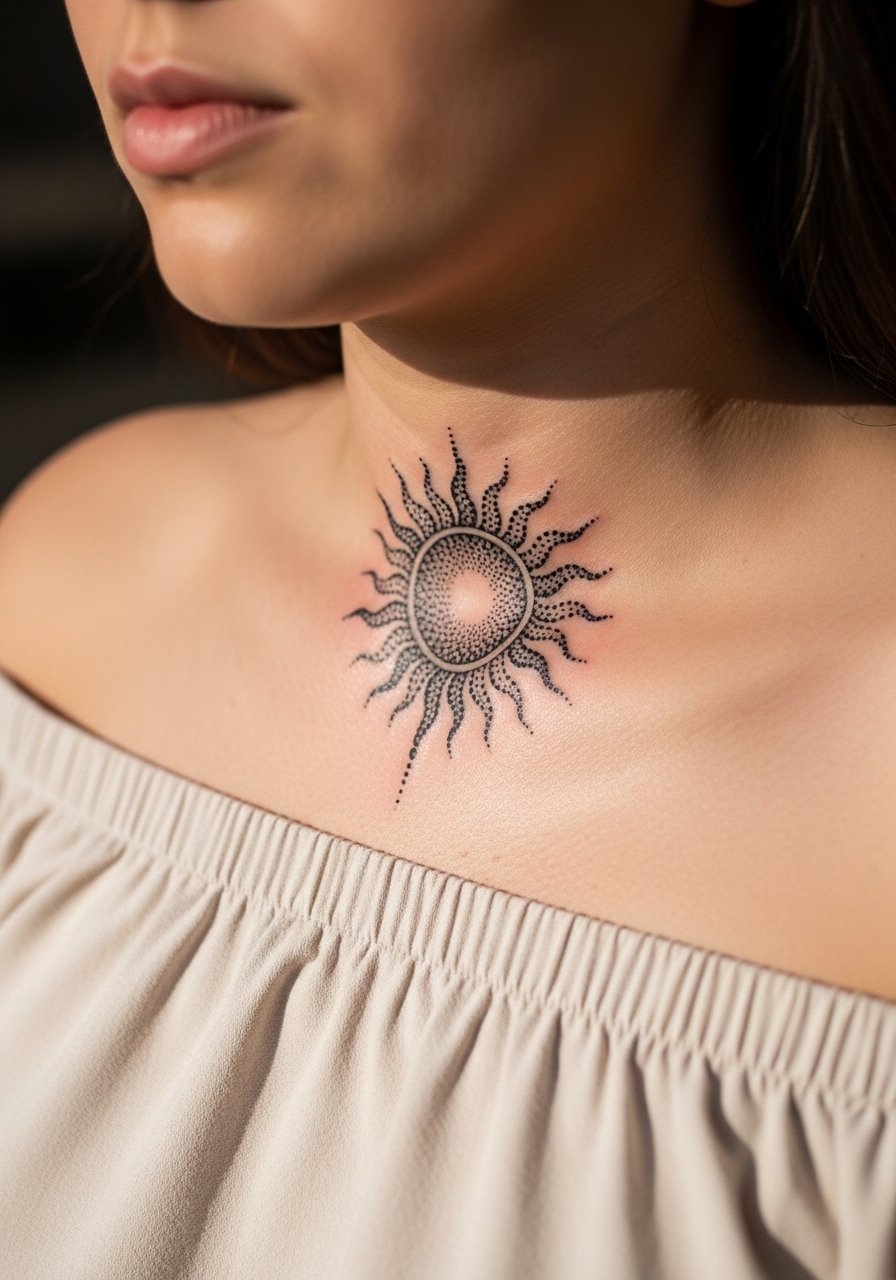
The collarbone is forgiving for micro mandalas if you avoid cramming too many concentric rings into a tiny space. Tell your artist you want stipple shading and leave a half-inch margin between dense dots. Expect a one-session piece that feels like a five out of ten on the pain scale. For evenings out, pair it with an off shoulder blouse and a layered delicate necklace worn below the design to frame it.
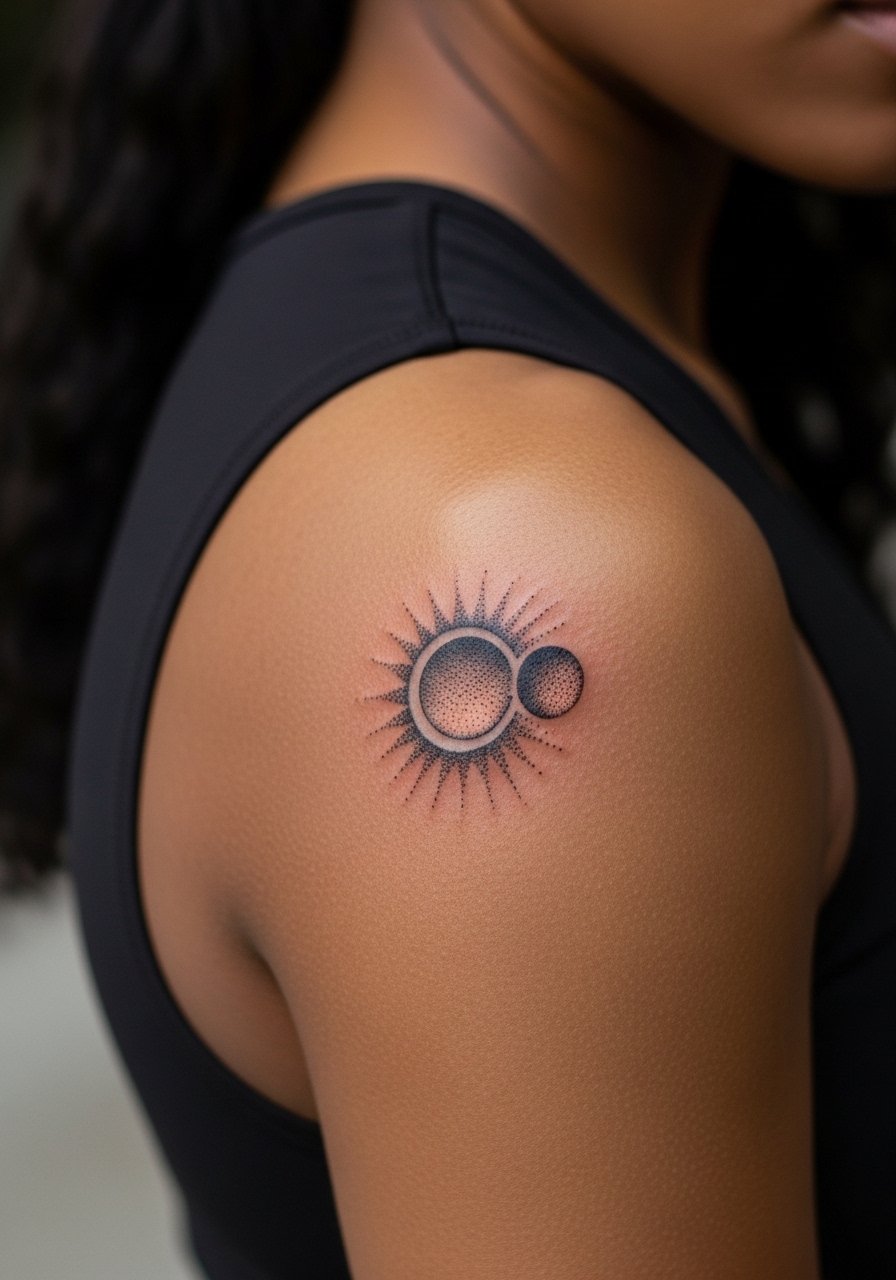
4. Neo-traditional sun with watercolor rays on the shoulder
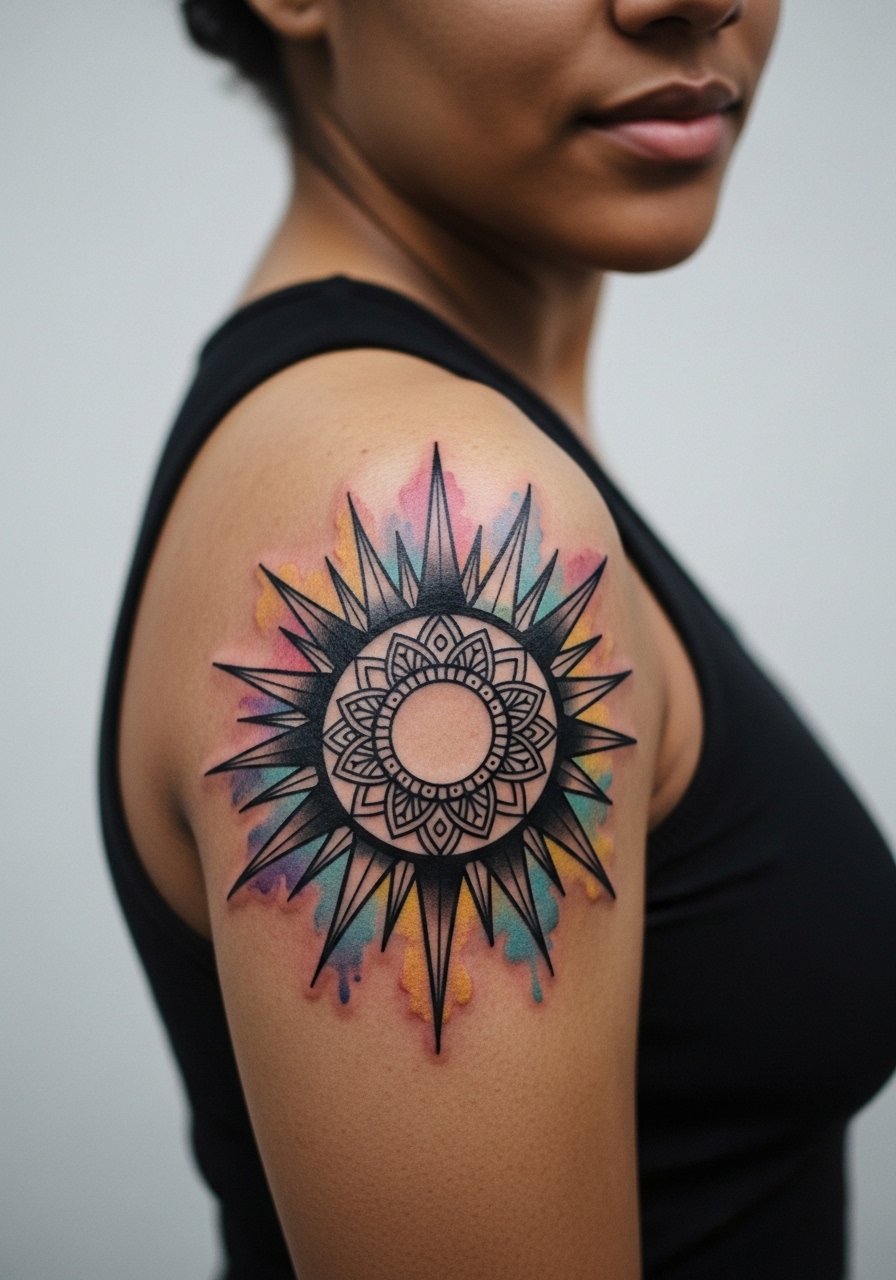
Visual impact is high here, but watercolor techniques can look like a bruise if placed too close to bony areas. For the shoulder, ask for color accents layered over a bold black base so saturation holds. Sessions take longer and the shoulder is a three out of ten on most pain charts. Wear a sleeveless tank top to the appointment so the artist has clear access and you don’t drag fabric over the fresh ink.
5. Blackwork sunburst with negative space on outer forearm

There’s a common mistake of making the negative rays too thin, which ends up filling in with age. Have your artist block out the black in large planes and carve the rays as deliberate empty shapes. Outer forearm sessions run one to two hours and hurt less than inner forearm work. Roll your sleeves up to show it off after healing and keep it paired with a rolled sleeve shirt for casual visibility.
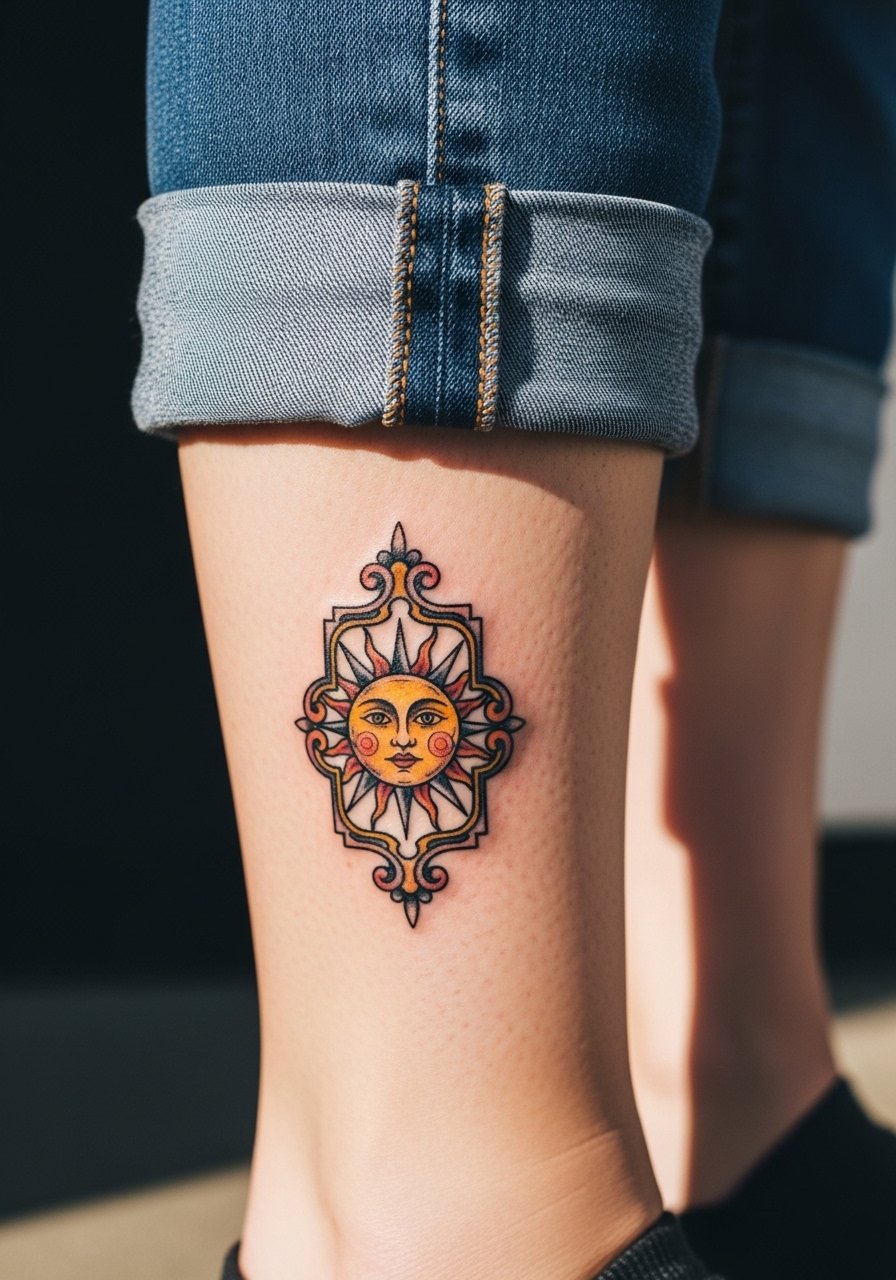
6. Ornamental sun frame with floral accents at the ankle
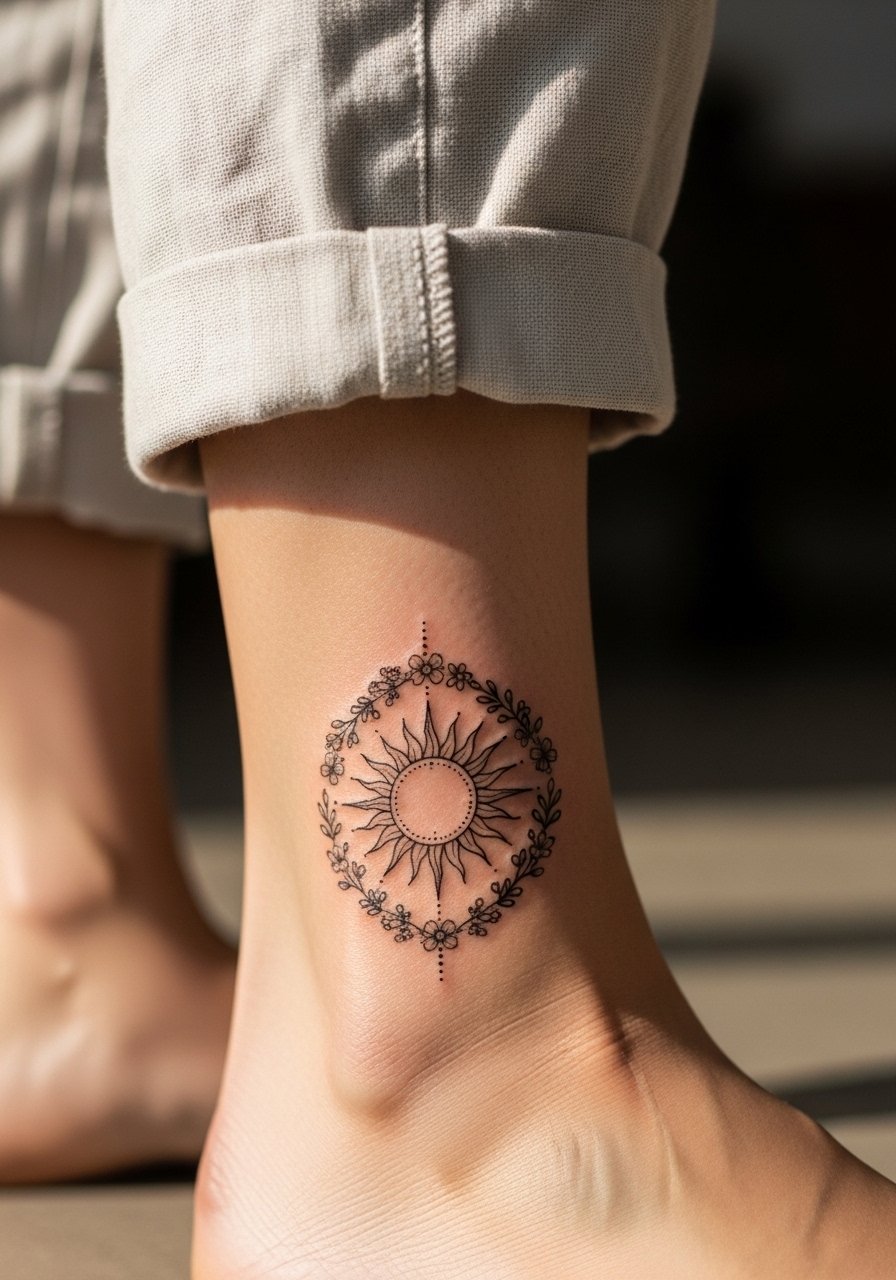
Ankle tattoos face constant friction from socks and shoes, so ask your artist to raise the lines slightly and keep the piece around two inches so the florals don’t blur. Sessions are short but the ankle is a four out of ten on pain. For summer styling, match the piece with strappy ankle sandals and cropped linen pants so the tattoo gets just the right exposure without rubbing against footwear.
Studio Day Picks
The wrist, forearm, and ankle designs above all deserve different prep than chest work, and a few small items make the session smoother and the first week easier.
-
Stencil transfer paper kit. Lets you test placement on skin before the needle touches you, which helps for small wrist and collarbone suns.
-
Topical numbing cream. Use 30 to 45 minutes before for ankle or ribcage sensitivity so the session is more comfortable.
-
Thin protective film roll. Keeps fine-line work on the wrist and forearm clean through the first few showers and reduces friction-related scabbing.
-
Fragrance free gentle body wash. Cleanses the area without stripping oils, which is helpful for dotwork and stipple pieces near the collarbone.
-
Aquaphor healing ointment. A thin layer in the first 48 hours helps keep small lines hydrated without suffocating the channel, especially on wrist and ankle pieces.
7. Micro-realism sun setting behind waves on the ribcage
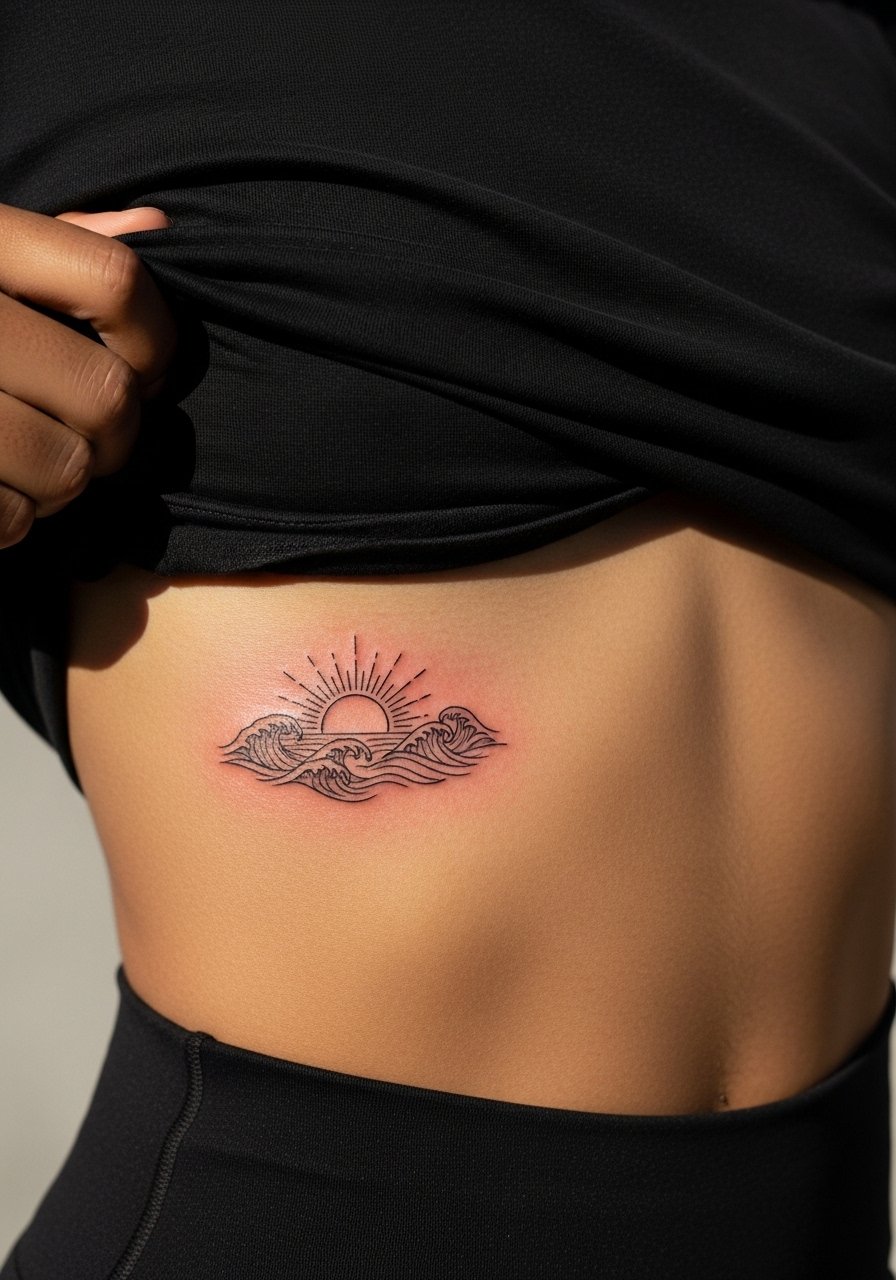
Fair warning, the ribcage is often an eight out of ten on pain scales but it offers a flattering curve for tiny horizon scenes. For micro-realism keep the sun small but clear, and ask for strong contrast between wave shadows and the sun to prevent early blur. Healed results at six months show crisp detail, at two years the fine gradients may soften, and a touch-up at year three is common. Because this is a sensitive area, look for artists who specialize in micro realism and mention ribcage experience in your consultation.
8. Playful ignorant-style sun scribble on the inner bicep
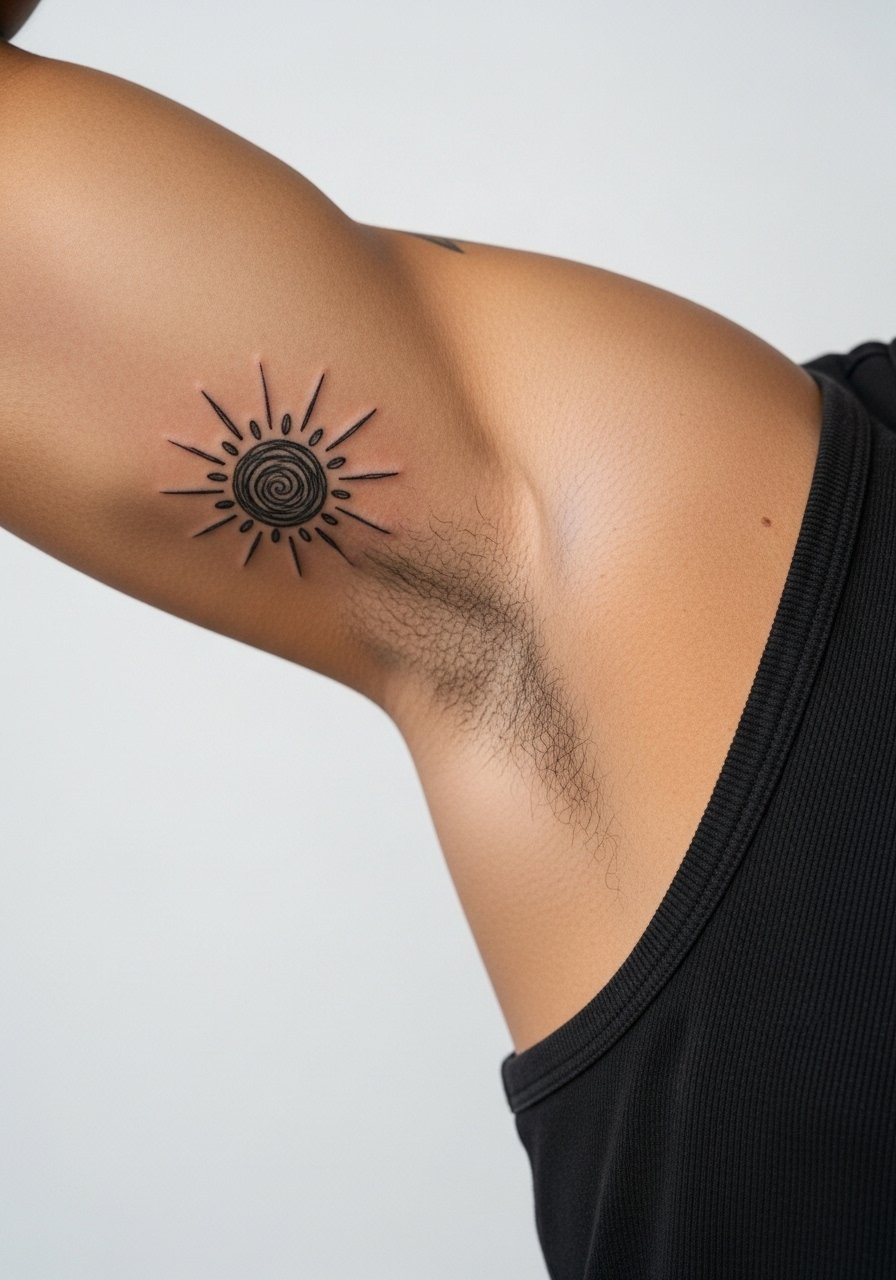
The inner bicep hides playful, hand-drawn suns nicely and the informal linework suits the area’s softer skin. Tell the artist you want visible wobble in the strokes and leave the sizing at around two inches so the scribble reads as intentional. Inner bicep sessions feel like a five to six on most pain scales and last under two hours. Wear a sleeveless tank top to the appointment so the arm can move freely without tugging.
9. Pastel watercolor sun on the upper thigh
Upper thigh sessions are forgiving for color gradients, but watercolor fades faster than blackwork. If you love pastels, plan for a top-up at year three and ask for slightly stronger pigment saturation in the first session. Pain is moderate and the session usually runs two hours when color layering is involved. For appointments, wear shorts or a skirt so the artist can access the area without you exposing more skin than necessary.
10. Traditional sun face on the calf
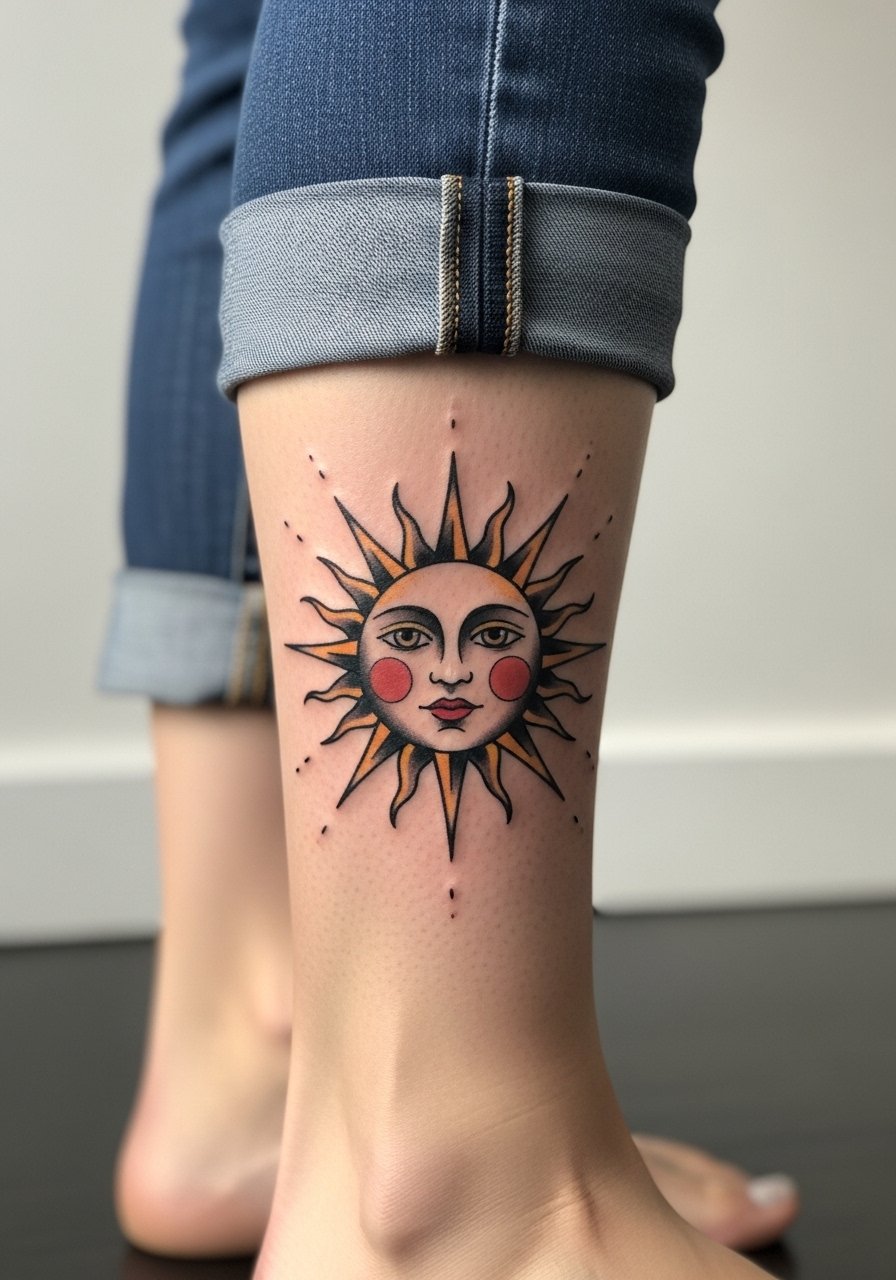
There’s a visual charm to a small traditional sun face on the calf that still reads from a distance. Ask for solid black outlines and saturated color fills so the image keeps contrast as it ages. Calf sessions have low to moderate pain and usually finish in one to two hours. Style it with bootcut jeans or cuffed pants so the piece is revealed when you want it to be.
11. Fine line eclipse with moon overlay at the side neck

The side neck is a bold spot for a tiny eclipse and it magnifies line weight decisions. Artists split on whether fine line holds here; one camp says neck skin shifts and blurs lines quickly, the other says proper depth and spacing settle fine. Ask where your artist stands and look for healed neck examples. Sessions are short but the area is sensitive, and for showing it off choose a dainty choker necklace or an open collar blouse that frames rather than covers the design.
12. Black and gray sun ray gradient across the upper back

Most people love how gradients simulate light without committing to color, but gradients can soften over a few years if the rays are too tightly packed. Ask your artist for gradual whip shading and leave two to three inches of spacing for the rays to age cleanly. Back sessions often need two sittings for larger pieces and pain is moderate. For the appointment wear a button down shirt you can slip off without tugging the back.
13. Negative space ray collarbone optical illusion
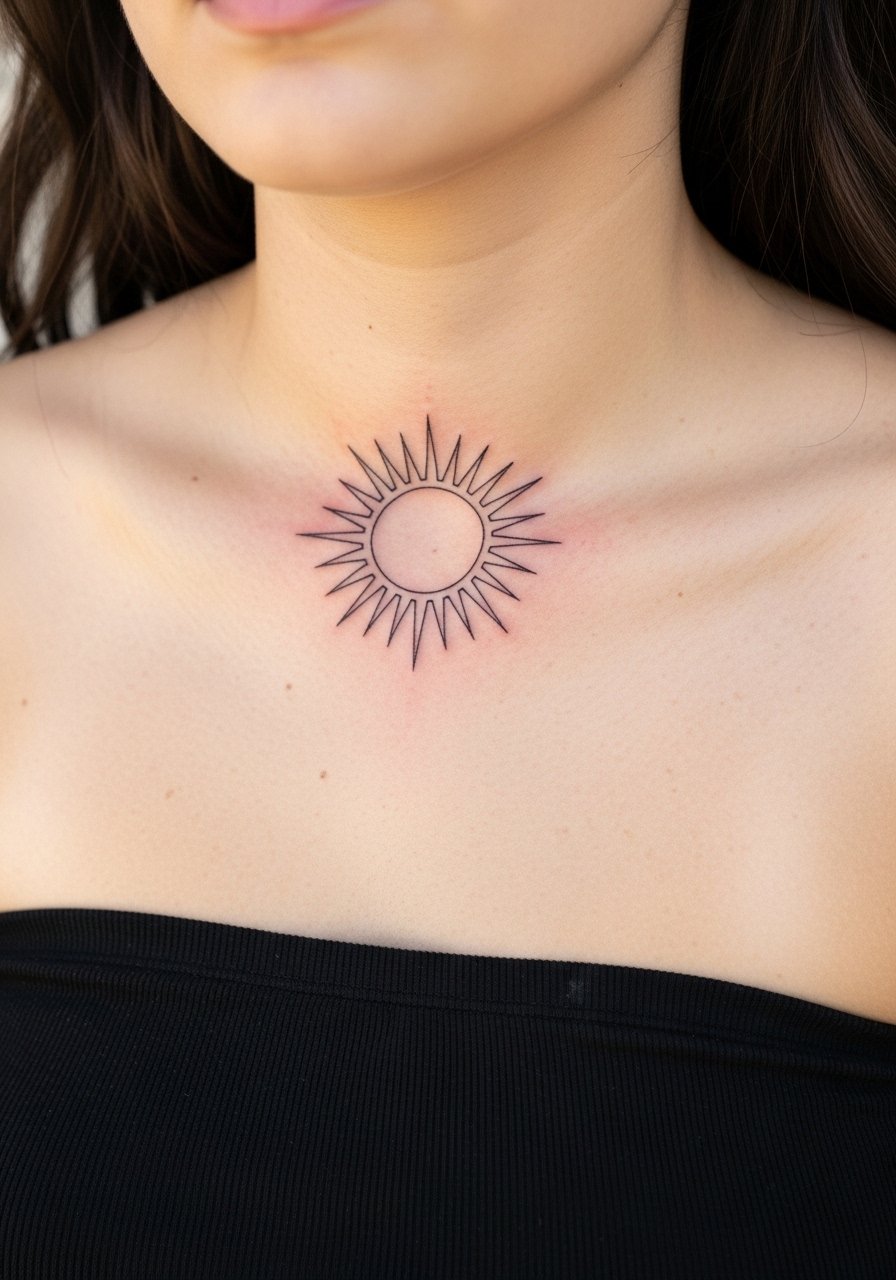
The optical illusion works on curved collarbones when you plan rays to follow the bone’s sweep and leave negative skin wedges. A common mistake is symmetric rays that fight the natural curve. Tell your artist to sketch the rays over the clavicle so you can test the curve before inking. Pain is fairly low and the piece is session-friendly. Wear a strapless top or a wide-neck shirt to the appointment so the area is accessible without excess exposure.
14. Tiny sun cluster paired with birth flowers on the inner forearm
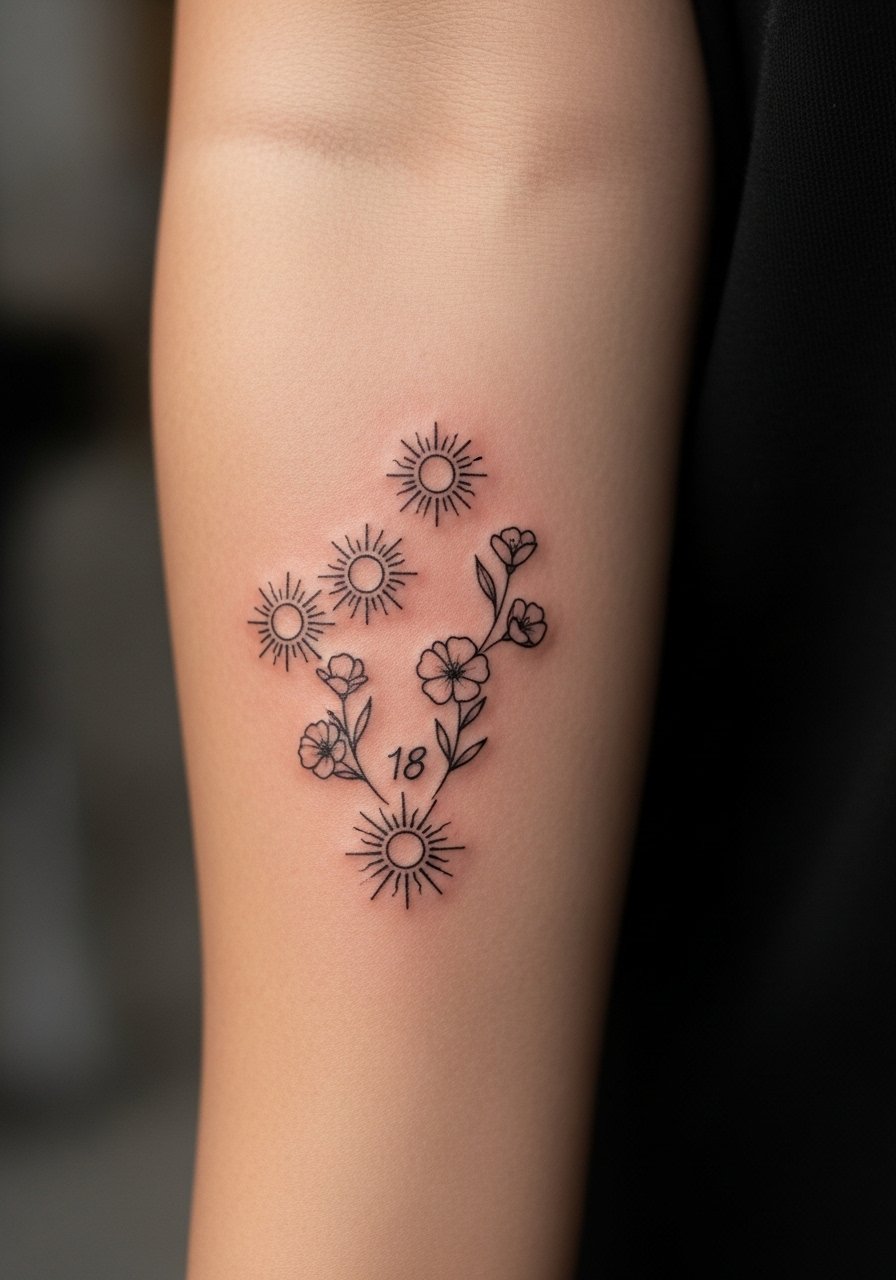
Pairing suns with tiny botanicals makes the design feel personal without adding large scale. The risk is over-detailing each flower; keep each element at least one centimeter apart so dotwork stays crisp. Inner forearm is a moderately painful but very visible spot. For a relaxed consultation bring exact flower references and ask for simple silhouettes. Roll your sleeves and pair the healed arrangement with a dainty arm band when you want the piece framed.
15. Dotwork eclipse for darker skin tones on the upper chest
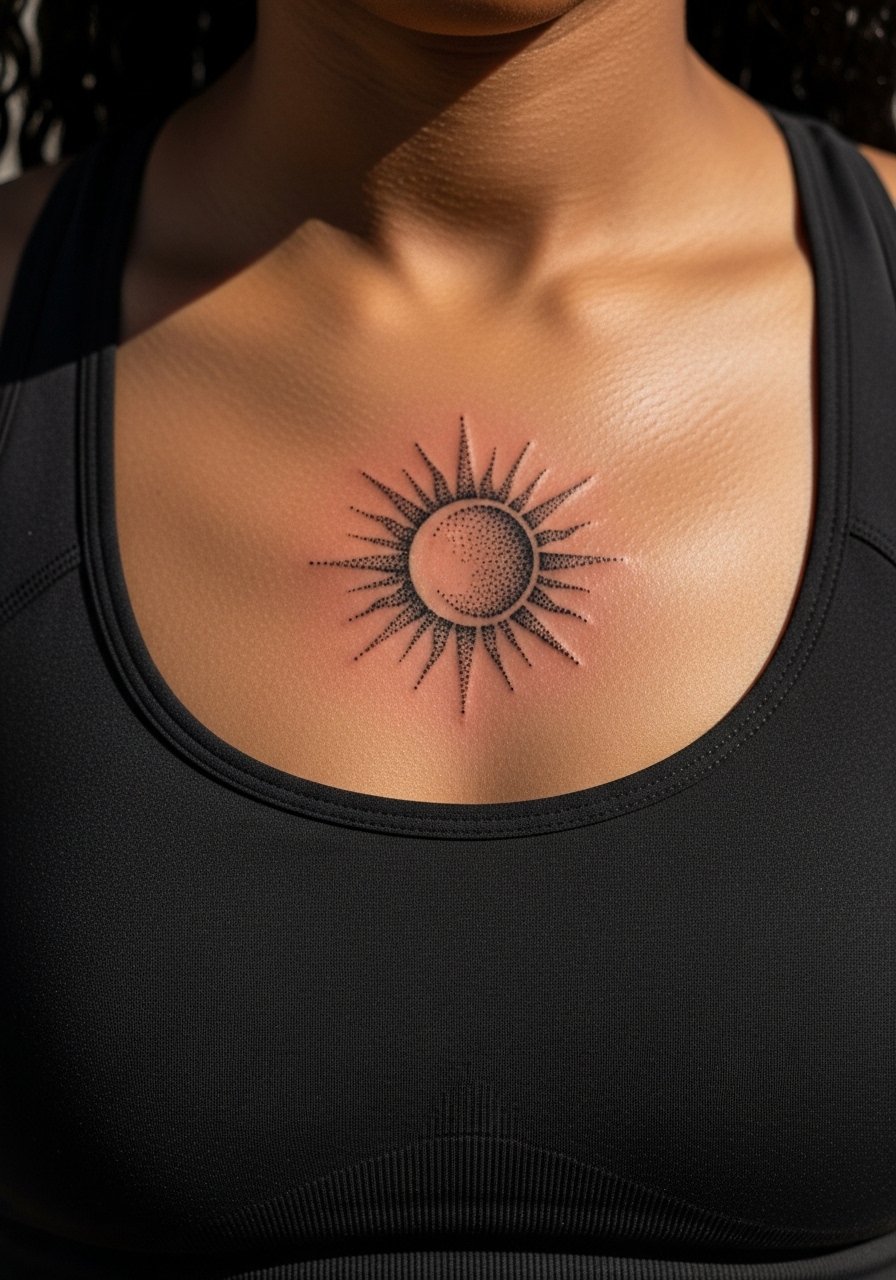
Dotwork can create texture that reads well on darker skin when the dots are bold and spaced intentionally. The controversy about fine line versus bold line matters here because thin lines may wash out in photos; one camp recommends thicker line weight, the other prefers micro dots for texture. Tell your artist you want strong contrast and a denser stipple core. Sternum and upper chest sessions are more sensitive and you should expect a touch-up timeline in the first two years while color and dots settle.
16. Symmetrical sunburst down the spine
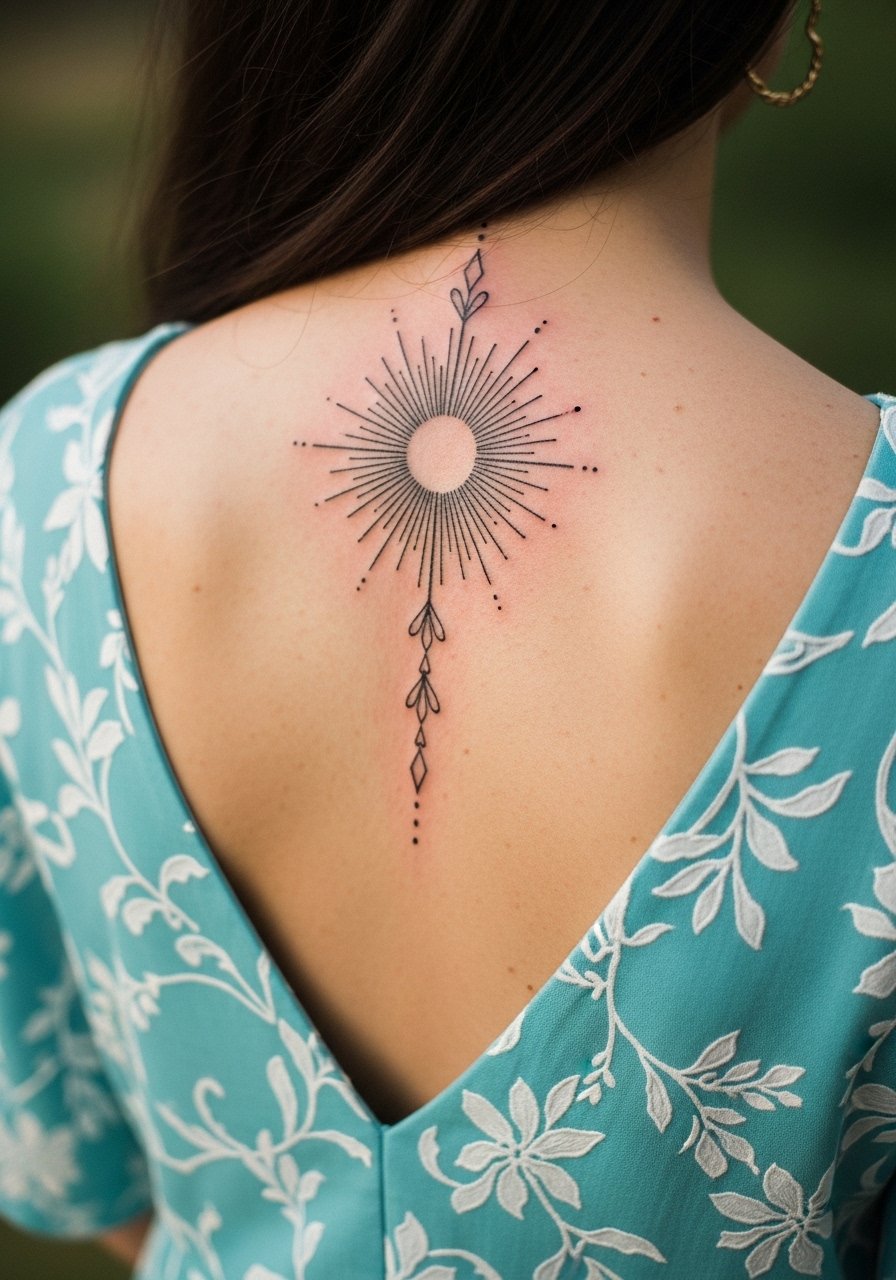
A vertical sunburst along the spine gives subtle symmetry when executed with spaced rays and a strong central circle. Spine work is higher on the pain scale, often a seven out of ten, so plan for breaks and schedule longer sessions. The main mistake is forcing detail into narrow bands; keep shapes broader so the lines do not merge. For reveal moments, an [open-back dress] (https://www.amazon.com/s?k=open+back+midi+dress&tag=inkjolie-20) or a halter top lets the piece speak without competing straps.
17. Micro mandala sun on the shoulder blade
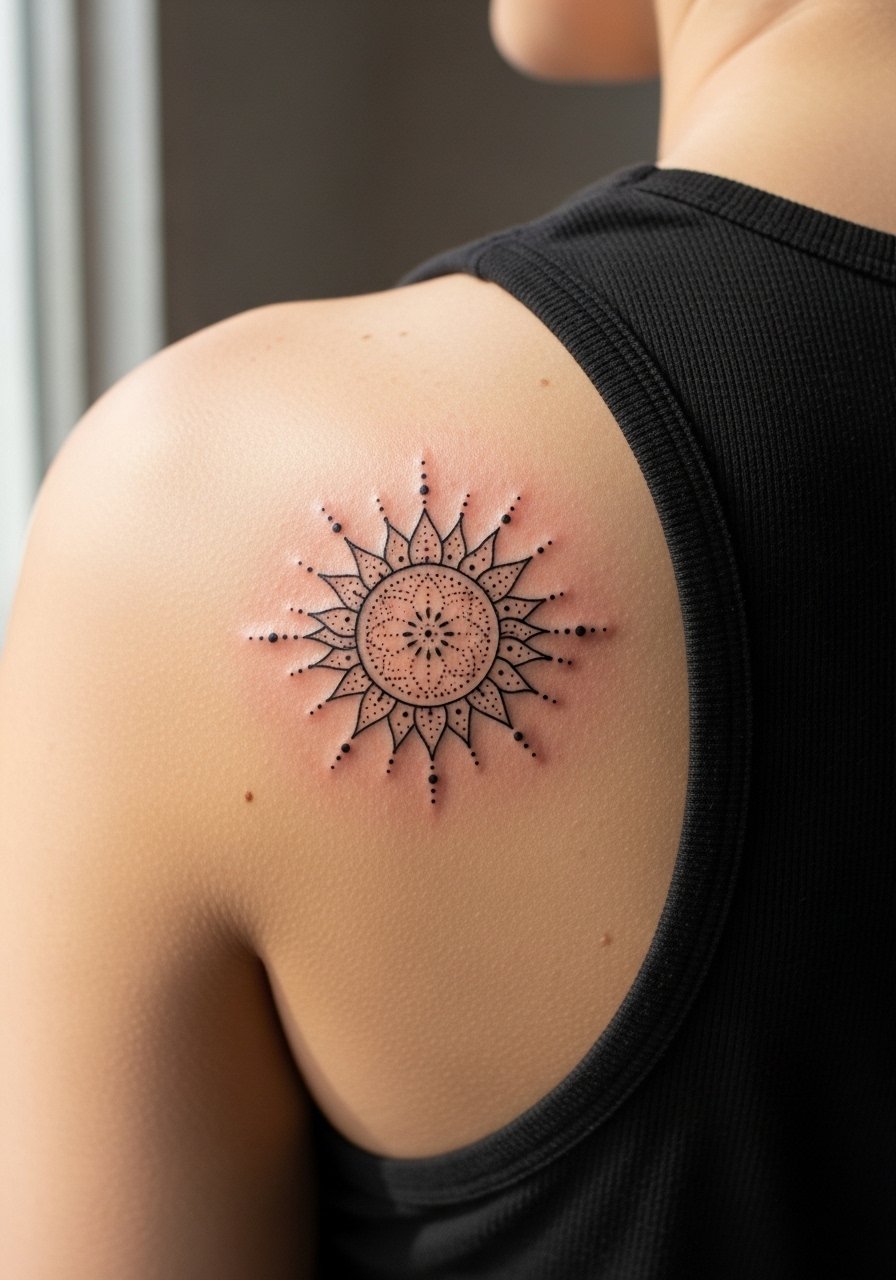
Shoulder blades hold detail well because the skin does not stretch much. Ask for alternating dot and line rings so the center keeps definition as it ages. Sessions are comfortable and often finish in under two hours. For casual shows pair it with a sleeveless tank or a loose tank that exposes the upper back.
18. Tiny sun tucked behind the ear

Behind-the-ear placements hide well and peek out only when you pull hair back. They are sensitive and require precise small work; ask for a simple open circle and one to three rays so the area does not look crowded. The session is quick but the artist needs steady hands. For discretion, keep hair down on the day of healing and try a hair tie set you can use to show or hide the tattoo.
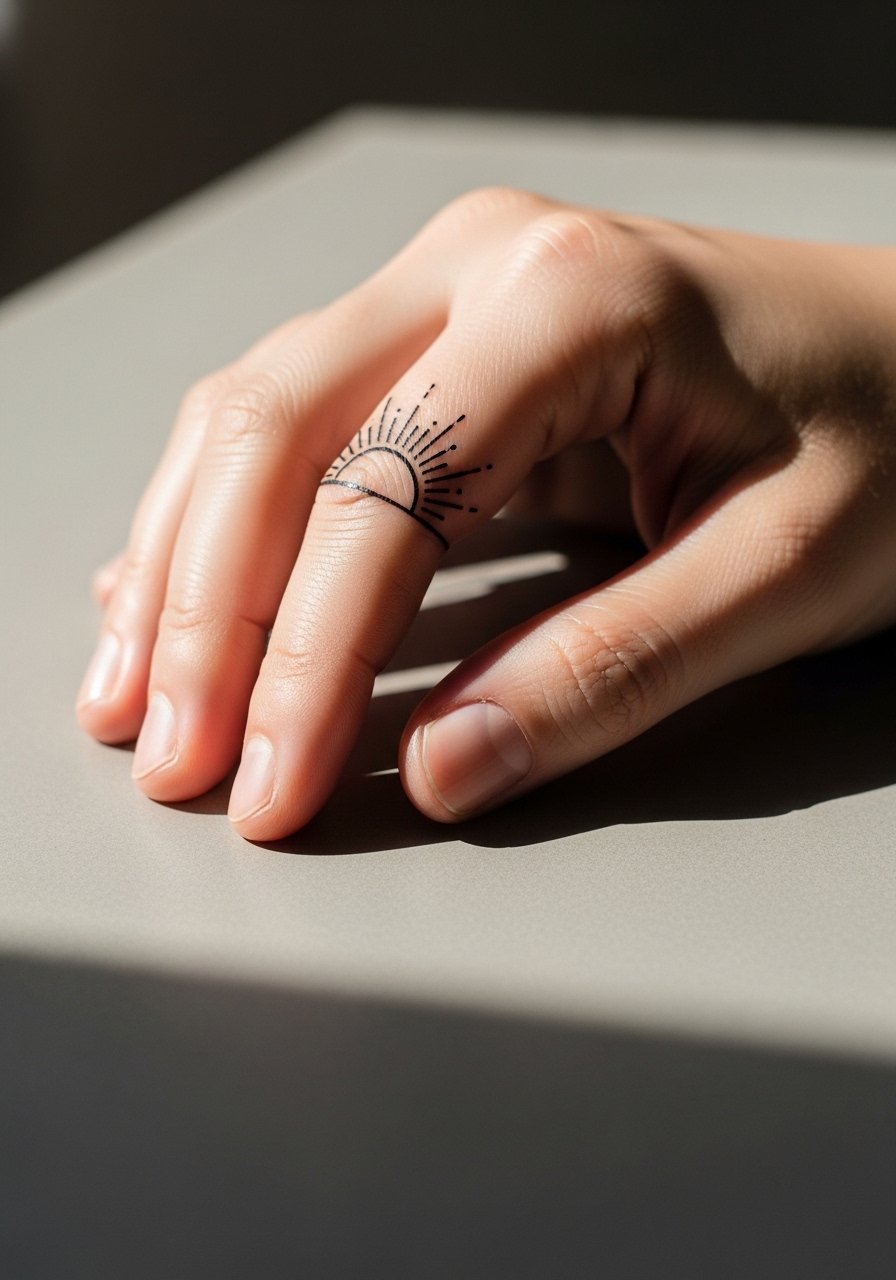
19. Micro sun on the finger with ring-friendly negative space

Finger tattoos face heavy wash friction, so the trick is to use bolder line weight and leave negative space so the ring you wear does not conflict with the ink. Expect faster fade and possible need for touch-ups at year one. Sessions are short and the area is sensitive. Pair the healed piece with thin bands rather than wide rings so the tattoo remains visible and uncompressed.
20. Micro-realism sun horizon on the ribcage with a wave accent
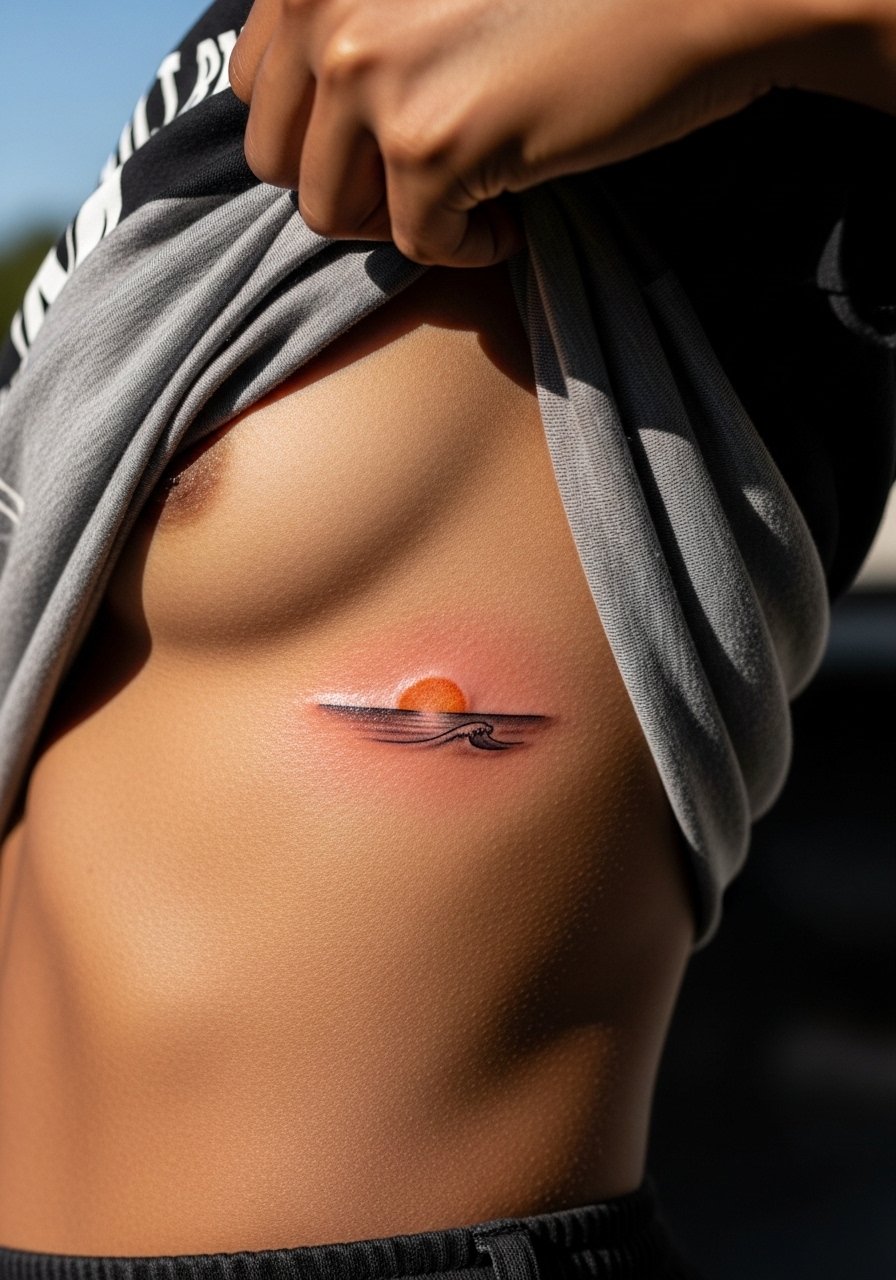
Ribcage micro realism gives a cinematic tiny scene but demands high contrast to survive. The most common mistake is too-small highlights that disappear after healing. Request defined darks and bright highlights to keep the sun readable. Pain is high and the session can take longer than you expect. Since the area shifts with breathing, bring a realistic stance photo so the artist maps the piece to your body shape.
21. Sunburst ankle wrap in blackwork
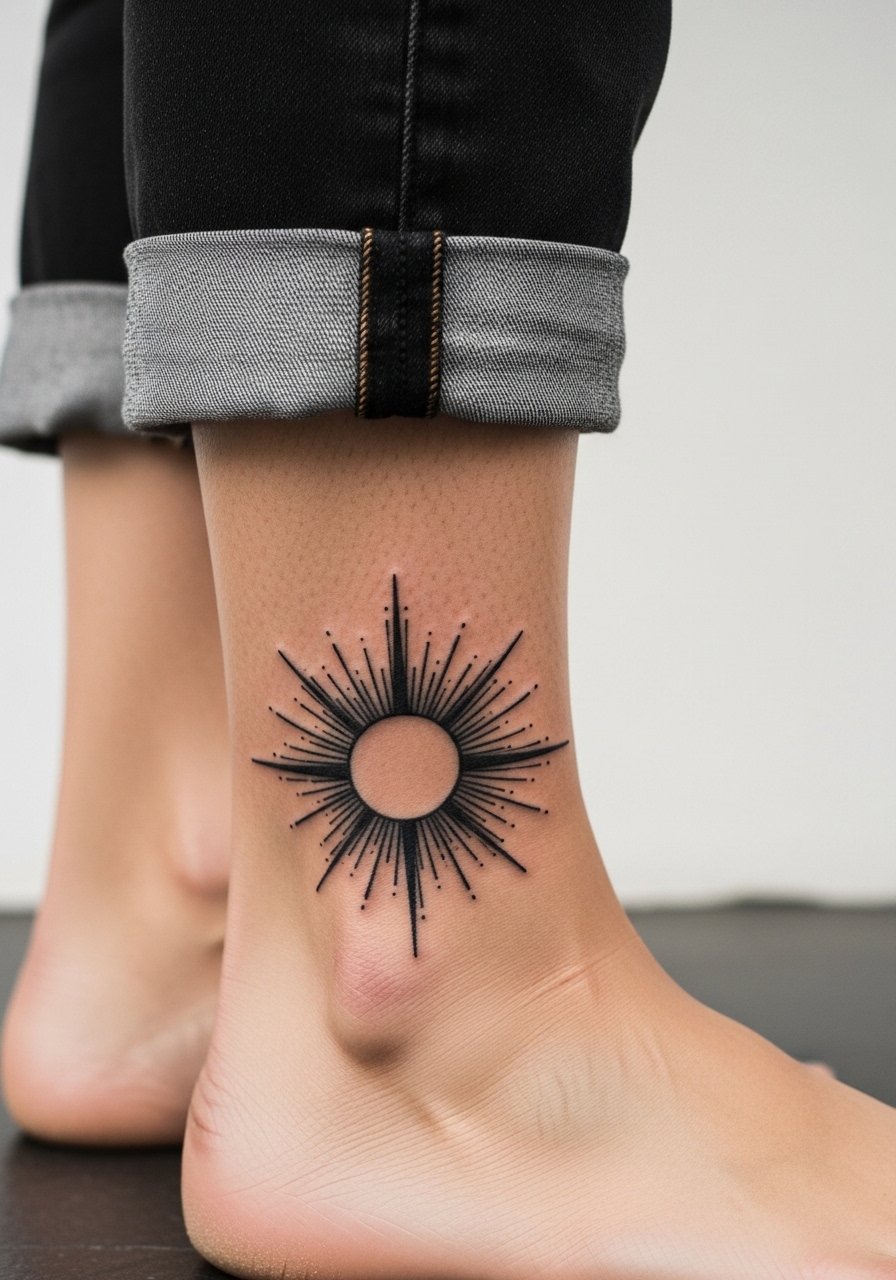
Wrap designs near the ankle need clear negative space where the bone meets the calf, otherwise edges blur from sock friction. Tell your artist to keep the wrap asymmetric and avoid ultra-fine rays. Ankle sessions are brief but notably sensitive. Style the healed piece with cropped linen pants or sandals for summer reveals.
22. Sun face inside a small ornamental frame on the calf
Calf placements let you use imagery that reads both up close and from a distance. The typical mistake is overloading the frame with tiny detail; scale the face features deliberately larger to retain character as it heals. Pain is moderate and the session usually finishes in an hour. Pair the healed piece with canvas low sneakers and rolled jeans when you want a casual reveal.
23. Tiny sun with birth flower halo on the ankle
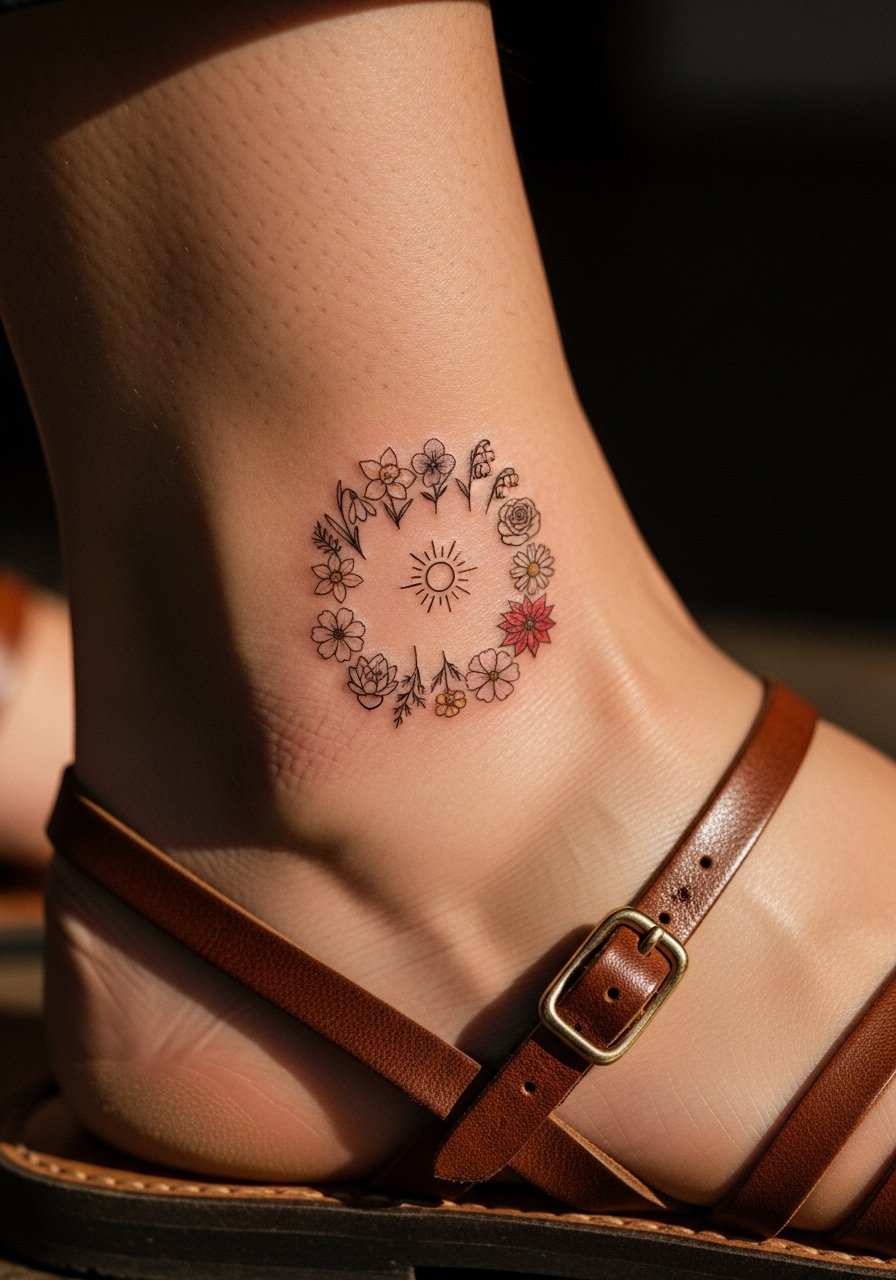
Pairing birth flowers is an underused personalization trick that keeps the central sun tiny while adding meaning. The key is to keep the halo airy so each flower reads. Ankle friction again means slightly bolder lines. For showing it off, choose strappy ankle sandals and avoid tight socks during the first two weeks of healing.
24. Tiny sun perched on the clavicular notch
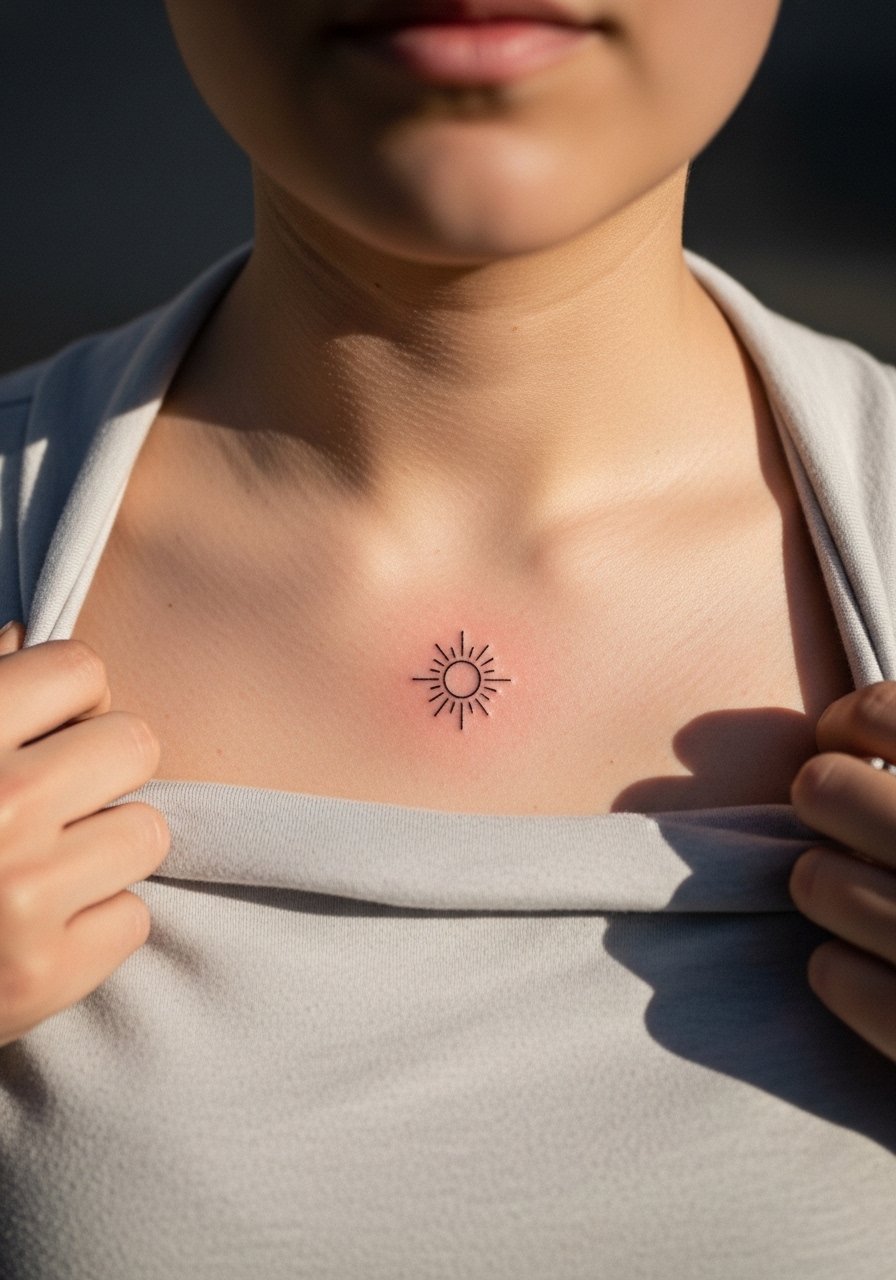
A centered sun at the clavicular notch feels balanced and reads like jewelry when kept no larger than an inch. The mistake is going too small with hairline strokes; ask for slightly stronger line weight and simple rays. Pain is low and the session is quick. For session-day comfort wear a wide-neck shirt you can shift without exposing more skin than needed.
25. Sunburst finger stack across two fingers
Stacked finger tattoos need special care because the skin on fingers loses ink faster. The right approach is bold, simple shapes and leaving space where joints fold. Expect a touch-up sooner than other spots. Sessions are short but the area is sensitive. Wear minimal hand lotion in the weeks after healing to reduce friction and let rings sit loose for the first month.
26. Eclipse micro-dot on the shoulder cap
Shoulder cap dotwork keeps texture without crowding. Tell the artist you want a denser dot center with softer outer stippling to retain shape as the skin moves. Sessions are comfortable and typically complete in one sitting. Pair the healed piece with a sleeveless tank top for a casual reveal that keeps attention on the dotwork.
27. Tiny solar glyph behind the ear with a hairline halo

Behind-the-ear glyphs function as discreet marks that peek out only when you tuck hair behind your ear. Keep the halo minimal and the glyph simple so the small area does not become a blotch. Pain is mild and sessions are quick. Because of the placement, mention behind-the-ear experience in the consultation and plan short breaks if the area feels sensitive.
Frequently Asked Questions
Q: Will fine line sun tattoos fade faster on tan or dark skin?
A: From what I’ve seen, ultra-thin hairline work can lose contrast sooner on medium and dark tones. The safer bet is slightly heavier linework or dotwork texture, which keeps definition in photos and in person. Ask for healed examples on similar skin tones during your consult.
Q: How much should I expect to touch up a wrist or ankle sun design?
A: Expect a touch-up within one to three years for fine line wrist and ankle pieces, especially if you wear bracelets or socks that rub the area. Planning a small touch-up at year two is realistic and keeps the piece looking crisp without overpromising permanence.
Q: Artists argue about Saniderm versus dry healing. Which camp should I follow?
A: Artists split into two camps. One group likes adhesive protective film for convenience and reduced scabbing, the other prefers dry healing to let the skin form its natural barrier. It depends on your lifestyle and the piece. If you work in a high-contact job, protective film can reduce infection risk. If you sweat a lot, talk to your artist about which approach suits the placement.
Q: Are there wardrobe tips for showing off or hiding collarbone and neck sun pieces?
A: Yes. Off-shoulder tops, strapless tops, and wide-neck shirts showcase collarbone work. For neck pieces, open collar blouses and dainty chokers frame without covering the area. Pack a hair tie set for sessions so you can secure your hair and give the artist clear access.
Q: Where do people usually search for artists who specialize in subtle sun designs?
A: Try discovery pathways like searching tags such as #subtle suntattoo or #finelinesun on social platforms, browsing Etsy custom shops filtered for "small sun," and checking tattoo directories that let you filter by style. Also look through local tattoo forums and r/tattoodesigns for posted healed photos.
Q: Do watercolor sun tattoos need special aftercare compared with blackwork?
A: Watercolor pieces often rely on softer saturation and multiple color passes, so they can need more gentle sun protection and earlier touch-ups. The immediate healing is similar, but plan to avoid strong UV exposure and consider a yearly check if the colors begin to fade.
Q: How do I prepare mentally for a ribcage or sternum sun tattoo that might be painful?
A: Expect those placements to be more intense. Schedule breaks, hydrate, and discuss pacing with your artist in the consultation. Topical numbing can help, and bringing a calm playlist and breathing techniques makes the session manageable.
