
Fine line tattoos are everywhere on inspiration boards right now, and the gap between what looks great on a phone screen and what still reads clean after a few years is bigger than most people expect. Some favorites age predictably, others need spacing, proper depth, or strategic placement to avoid early blurring. Read the first idea next for a wrist-ready option that keeps its shape without calling for weekly touch-ups.
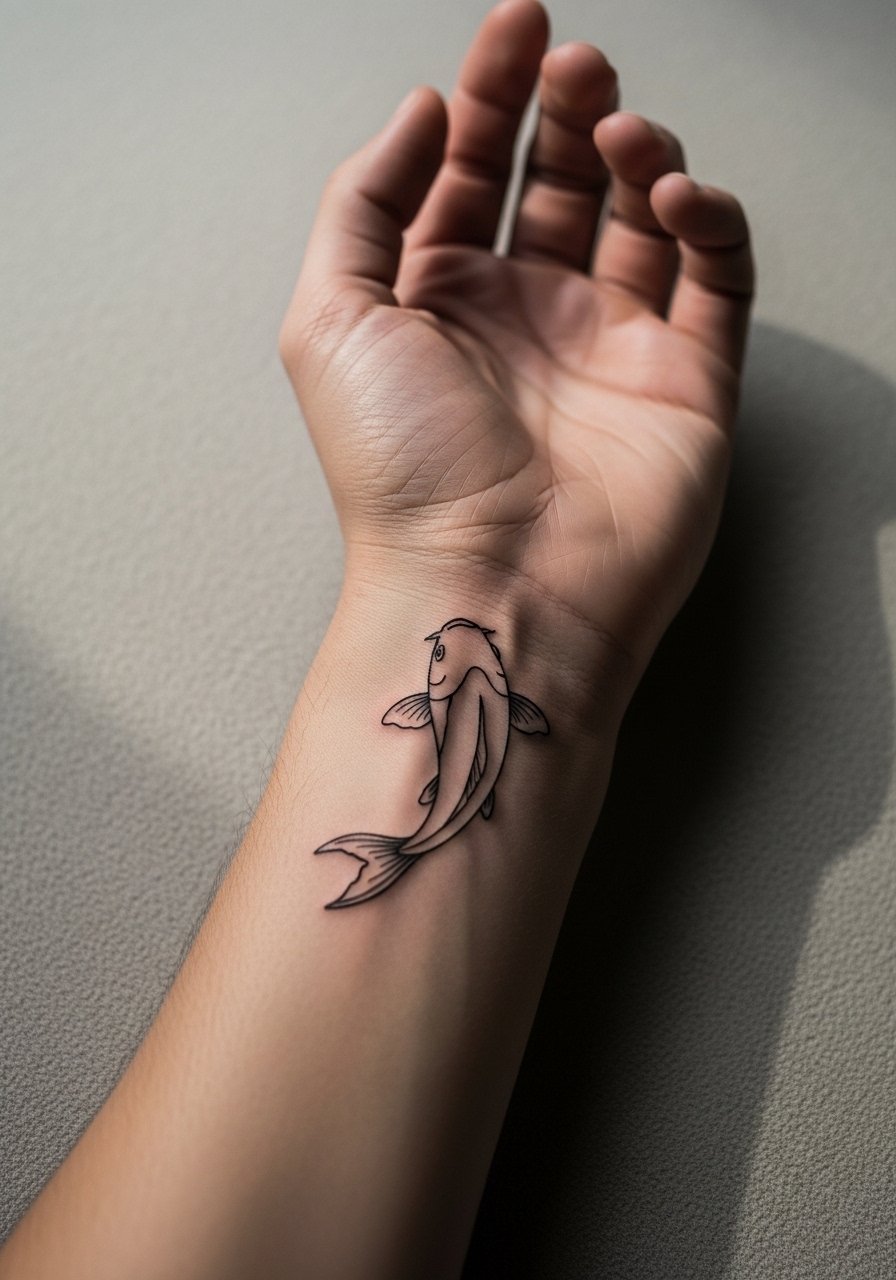
1. Minimalist Koi Fish Outline on the Wrist
I've seen this tiny koi on wrists that still reads like a clear silhouette after two years because the lines were given breathing room from the start. Fair warning, the wrist is sensitive, usually a 5 out of 10 for pain, but a single short session often does the trick. Ask your artist for a slightly thicker outline than you think you need and a single-needle interior only if you want a whisper of texture. The common mistake is packing too many internal details into a one-inch design, which blurs faster than a bold contour. For showing it off, stack a few thin bangles opposite the wrist so the tattoo reads without competition. Wear a sleeveless top to the session so the artist has clear access.
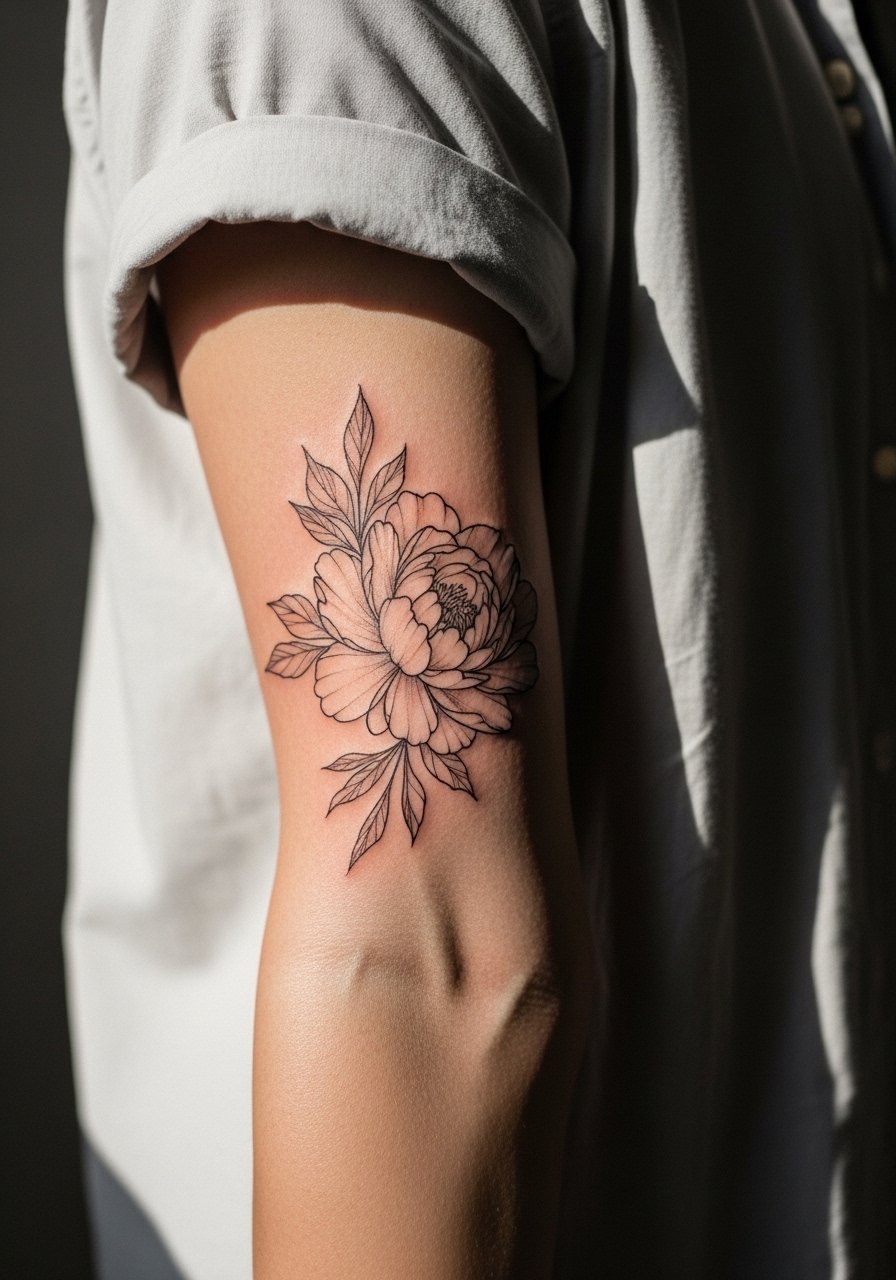
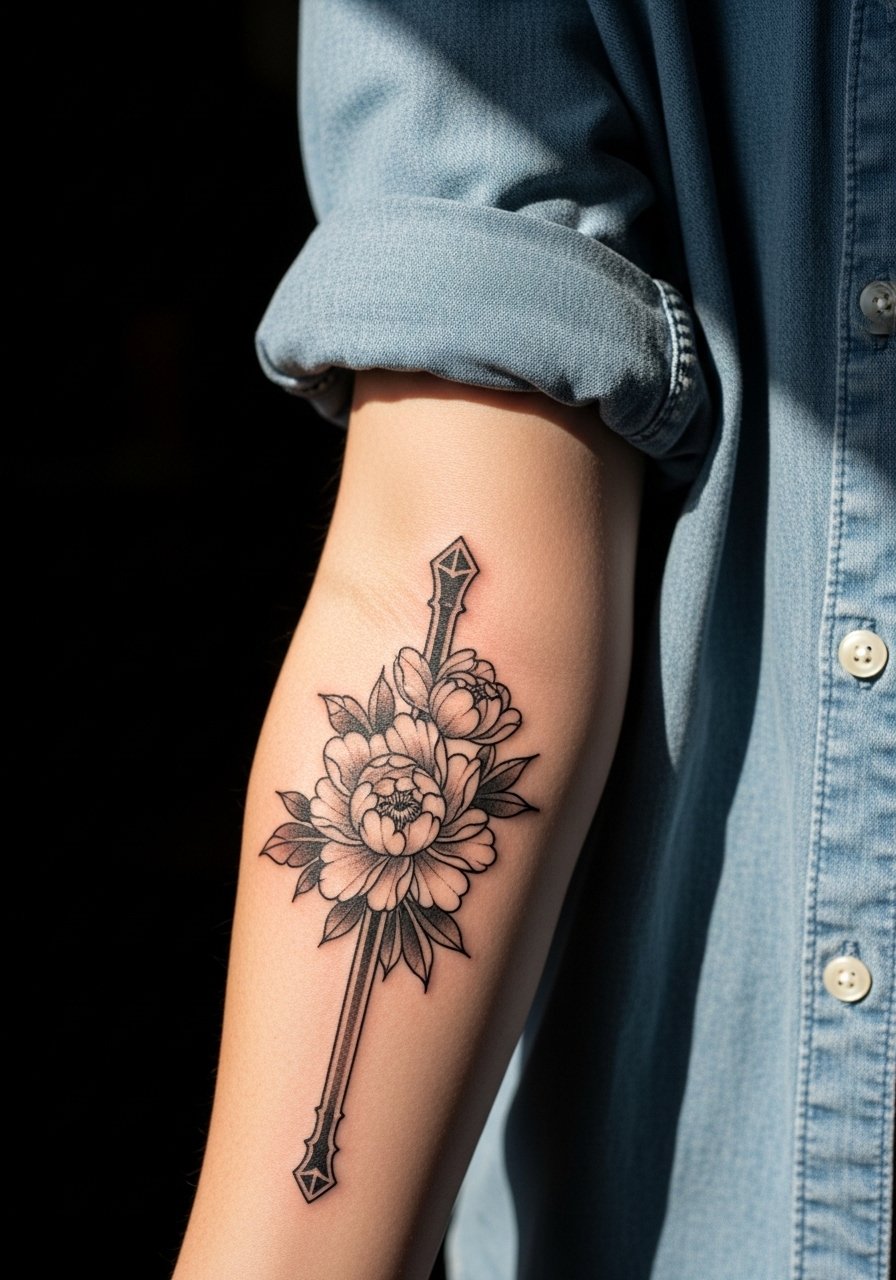
2. Fine Line Peony Blossom on the Inner Forearm
I've noticed people choose peonies on the inner forearm when they want a floral piece that ages with predictable softening rather than splatter. The forearm is low on the pain chart, about a 3 out of 10, and a 1-2 hour session covers a 3 to 4 inch piece. Tell your artist you want single-needle linework and very light gray washes instead of saturated fills. A common version that ages poorly uses dense stipple too close to the outline so the petals merge at year two. Expect a gentle fade by year three and a touch-up then if you want crisp edges. For daytime looks, roll up a silk blouse short sleeve and let the floral shape peek out. For the appointment, wear a loose short-sleeve button-up so the artist can lay the arm flat.
3. Neo-Japanese Lotus on the Collarbone
Most people underestimate collarbone placement until the stencil is on. The area takes a steady hand because the skin curves and the bone sits shallow. Plan for two shorter sessions for a 4 to 6 inch neo-Japanese lotus with soft color washes. Ask for color washes that sit more like watercolor rather than packed saturation to keep the petals readable over time. One camp says collarbone pieces blur faster because of constant movement. The other camp argues careful spacing and controlled saturation avoid that fate. Bring references showing the exact line weight you want and ask which camp your artist follows. Pair this with an off shoulder pastel top when you want to show the curve of the design. For the session, wear a strapless bra or button-front top for easy access.

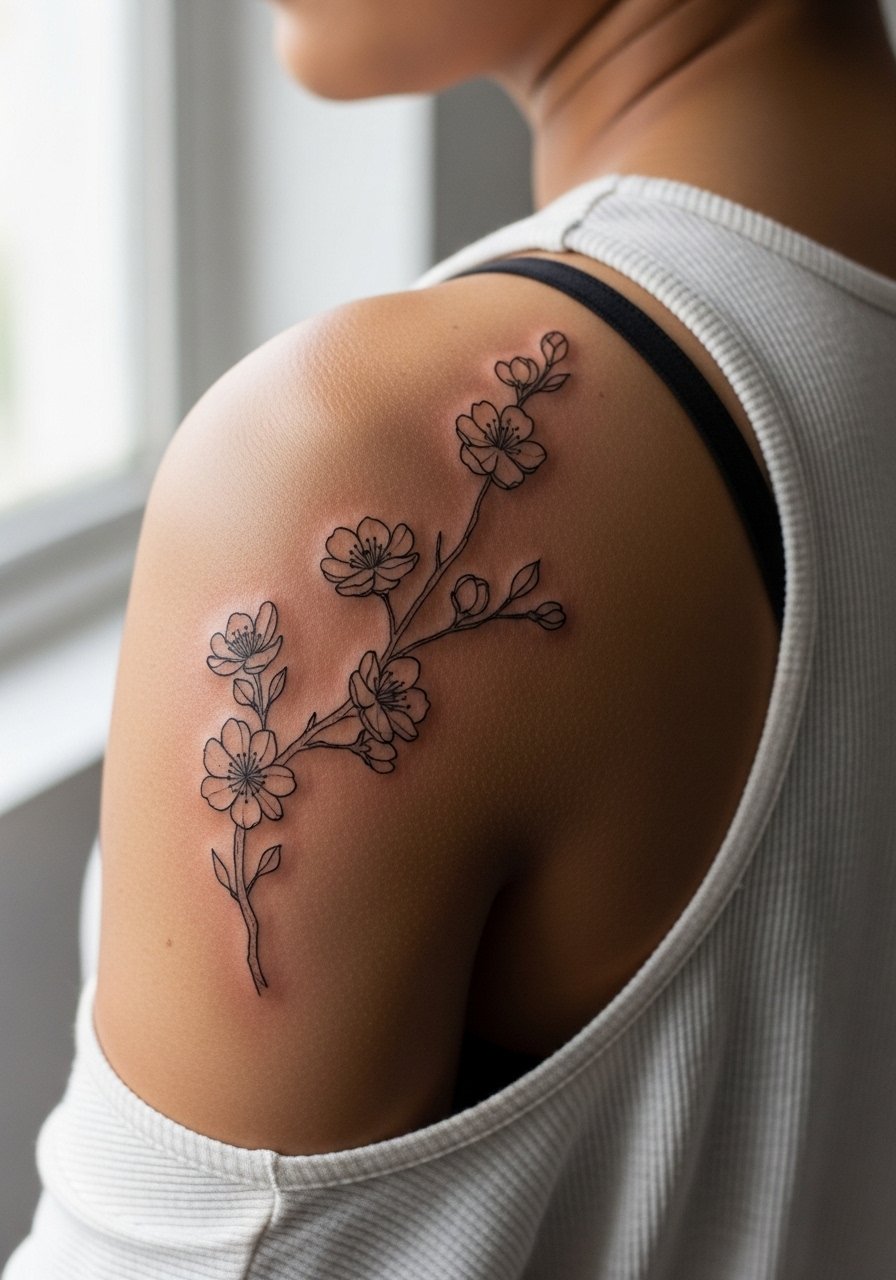
4. Subtle Cherry Blossom Branch on the Shoulder Blade
There is a satisfying way to place a branch so it reads across the shoulder blade without needing a full sleeve. The shoulder blade averages a low to moderate pain level and a single session usually suffices for a 2 to 5 inch linear design. During consultation, point out where you want the branch to fall with the artist holding a printed stencil while you move your arm. The mistake I see often is asking for too many tiny petals that sit on top of each other in a small area. That version merges into fuzzy patches at year two. For days you want to show it off, pair the placement with a sleeveless halter top or a backless sundress. Wear a loose tank to the appointment so the artist can easily access and reposition your shoulder.
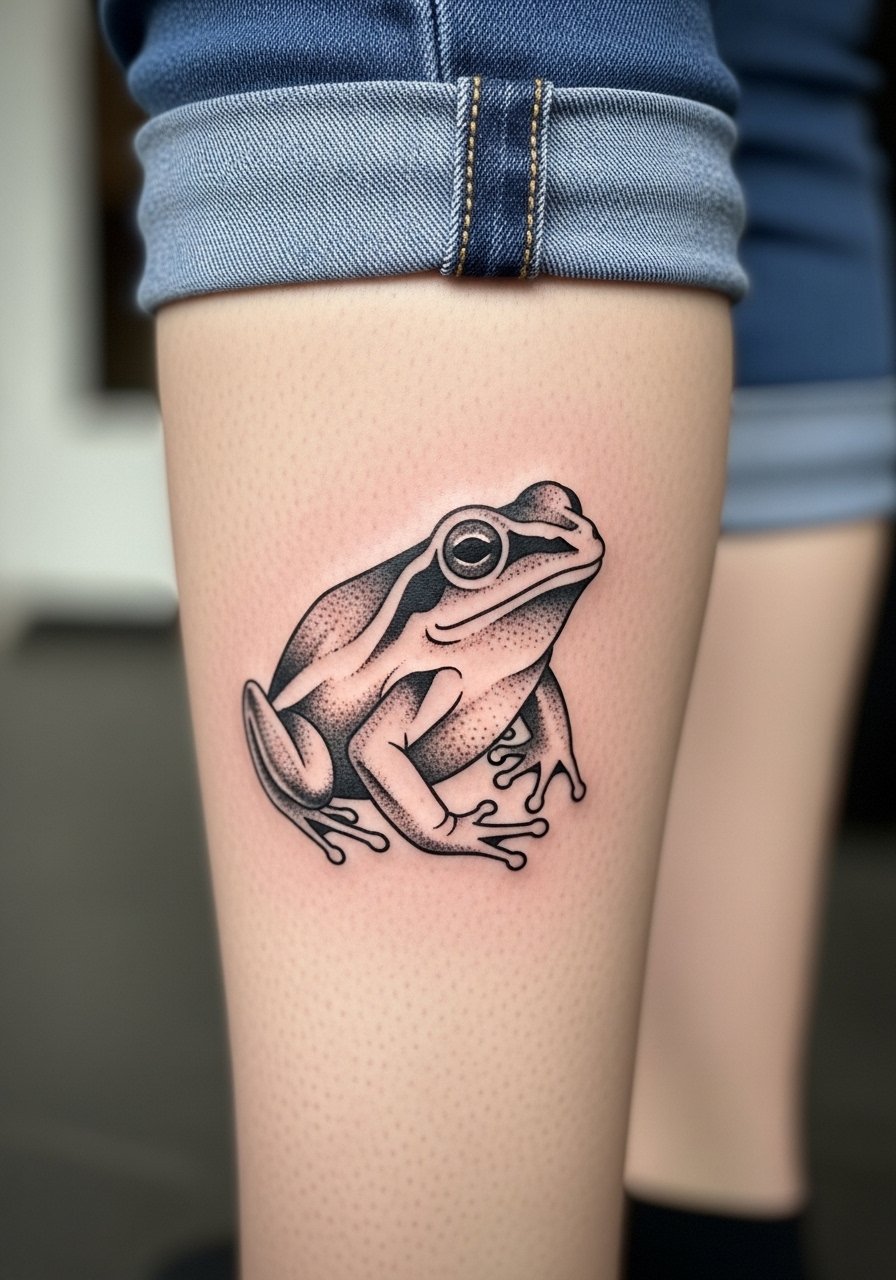
5. Blackwork Japanese Frog on the Calf
There is an underrated charm to a small blackwork frog on the calf for people who want a symbol that reads from a distance. Calf sessions are usually comfortable, a 3 out of 10, and a 1 to 2 inch solid-black fill finishes in one session. Tell the artist you want crisp outer linework and slightly reduced saturation in the interior so the block tone ages without looking like a heavy blob. Common mistakes include packing black ink too densely without enough edge definition, which can look flat after healing. Show-off pairing works well with rolled bootcut jeans or a midi skirt in solid tones. For the day of the session, wear shorts or pull pants up so the artist can position your leg without constriction.
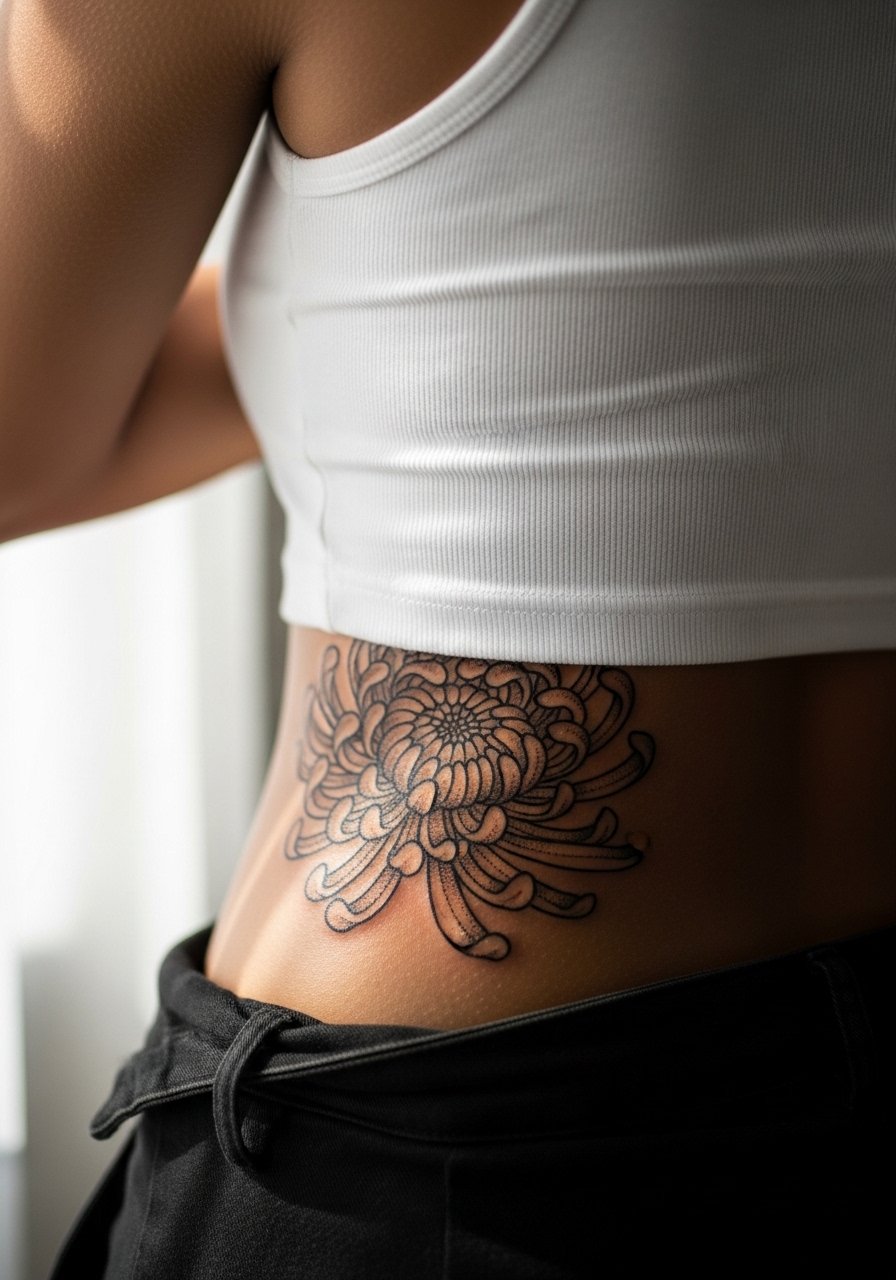
6. Watercolor Chrysanthemum for the Thigh
Thighs are forgiving for painterly work because the canvas is broad and less exposed to sunlight. Expect 2 to 3 sessions for a five-inch watercolor chrysanthemum that uses muted gradients rather than saturated blobs. One common failure is heavy outlines added to watercolor pieces, which contradicts the wash effect and makes touch-ups awkward. Ask your artist for soft color layering and a controlled wash that leaves some skin breaks. For summer shows, pair the tattoo with high waist shorts or an asymmetrical skirt to let the hues appear without direct sun exposure. Wear loose shorts to the session so the artist can position your thigh comfortably while you sit.

Studio Day Picks
Those first six ideas include small wrist and forearm pieces plus collarbone and thigh work, so a few carefully chosen items smooth the session and the first week of healing.
- Stencil transfer paper kit. Lets you preview the linework on skin before committing, especially helpful for precise wrist and collarbone placements.
- Topical numbing cream. Applied before the session eases the edge for sensitive areas like the collarbone without changing the artist's technique when used as directed.
- Thin protective film roll. Keeps ankle and wrist tattoos clean during the first days of high friction and frequent washing.
- Fragrance-free body wash. Cleanses healing areas gently, which matters for fine line forearm and chrysanthemum washes that need minimal irritation.
- Aquaphor healing ointment. A thin layer for the first 48 to 72 hours helps protect small blackwork and fine line pieces without suffocating the skin.
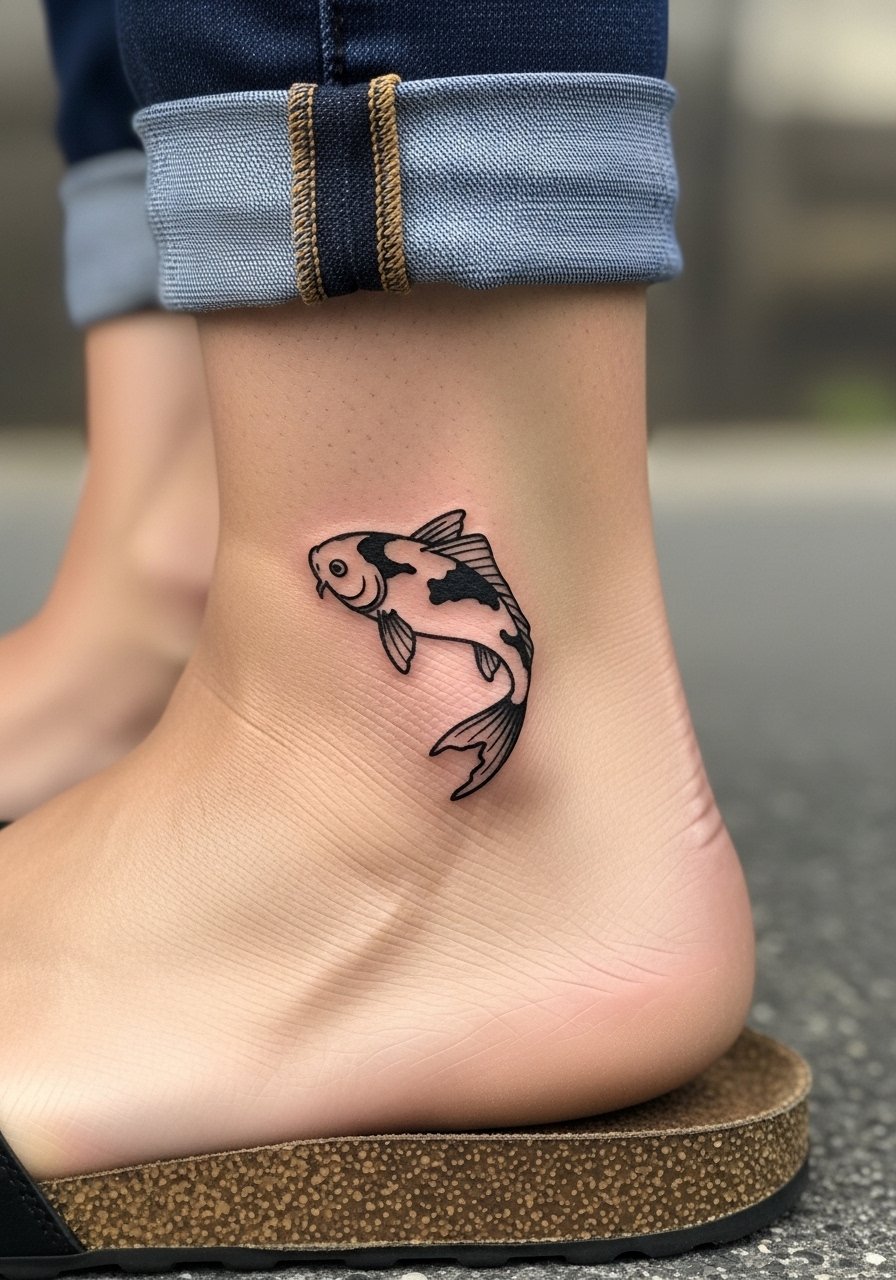
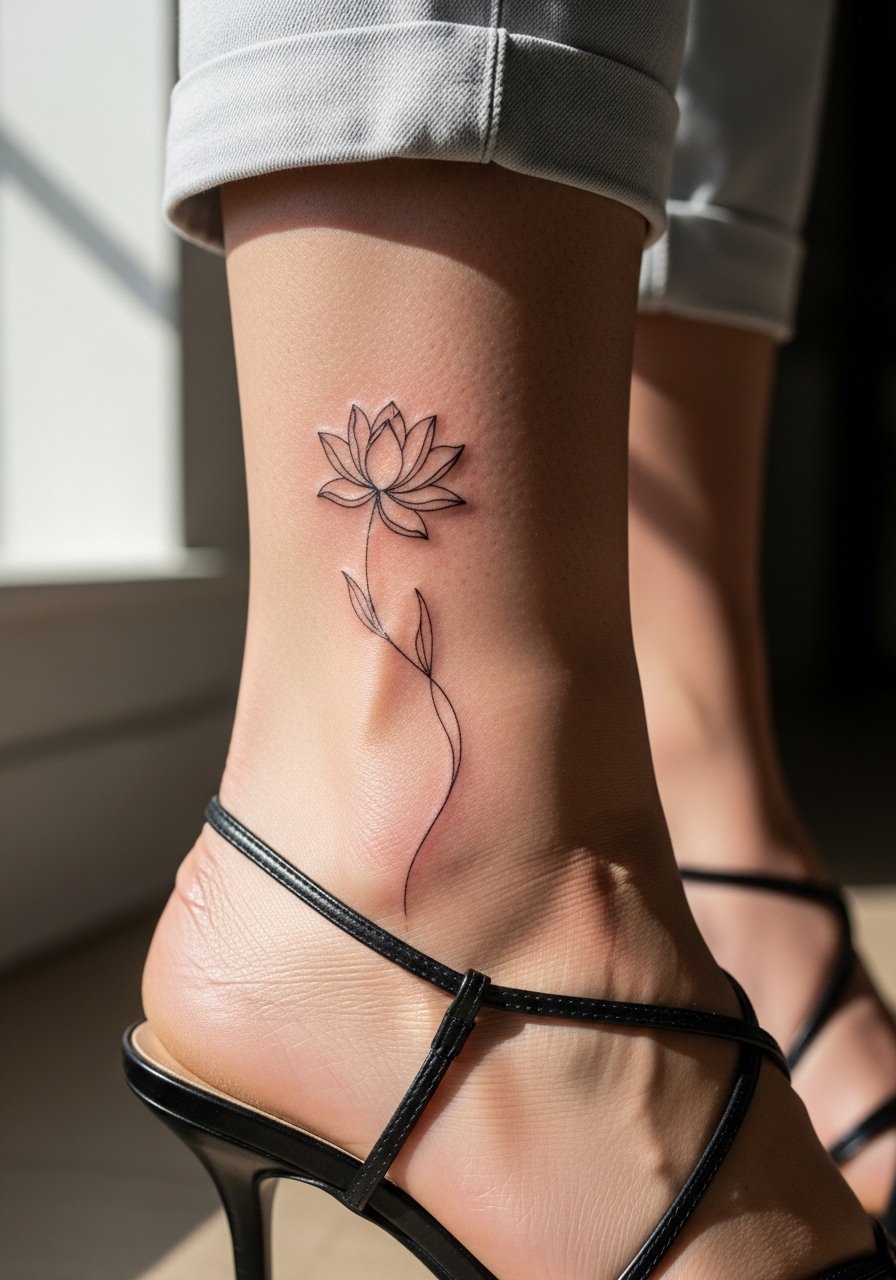
7. Micro Koi Carp Silhouette at the Ankle
A micro koi on the ankle is a compact choice for someone who wants symbolism without a large commitment. The ankle can be a 4 to 6 on the pain scale depending on proximity to bone, and a one-inch piece is typically a single quick session. Ask for high-contrast black linework and avoid soft shading inside the silhouette, because tiny shaded fills tend to go patchy as the skin settles. A frequent mistake is adding too many fin details to a one-inch silhouette. That shrinks the visual clarity over time. Show it off in summer sandals and cropped trousers. For sessions, wear loose joggers or shorts so the artist can position your ankle easily.
8. Ornamental Wind Bar with Peony on the Outer Forearm
Visual impact drives this choice for people building sleeves gradually because wind bars give motion without committing to full color. The outer forearm is forgiving and polishes up in a single two-hour session for a six-inch ornamental piece. Tell your artist you want the wind bar to direct the eye toward existing or future sleeve elements and to keep the peony shading soft in gray tone. A common pitfall is crowding ornamental lines too closely, which causes busy areas that age into muddled gray. For everyday wear, roll sleeves and let the forearm show with a beige kimono sleeve top or simple short sleeves to keep focus on the flow. During the appointment, a loose button-up makes arm placement easy.
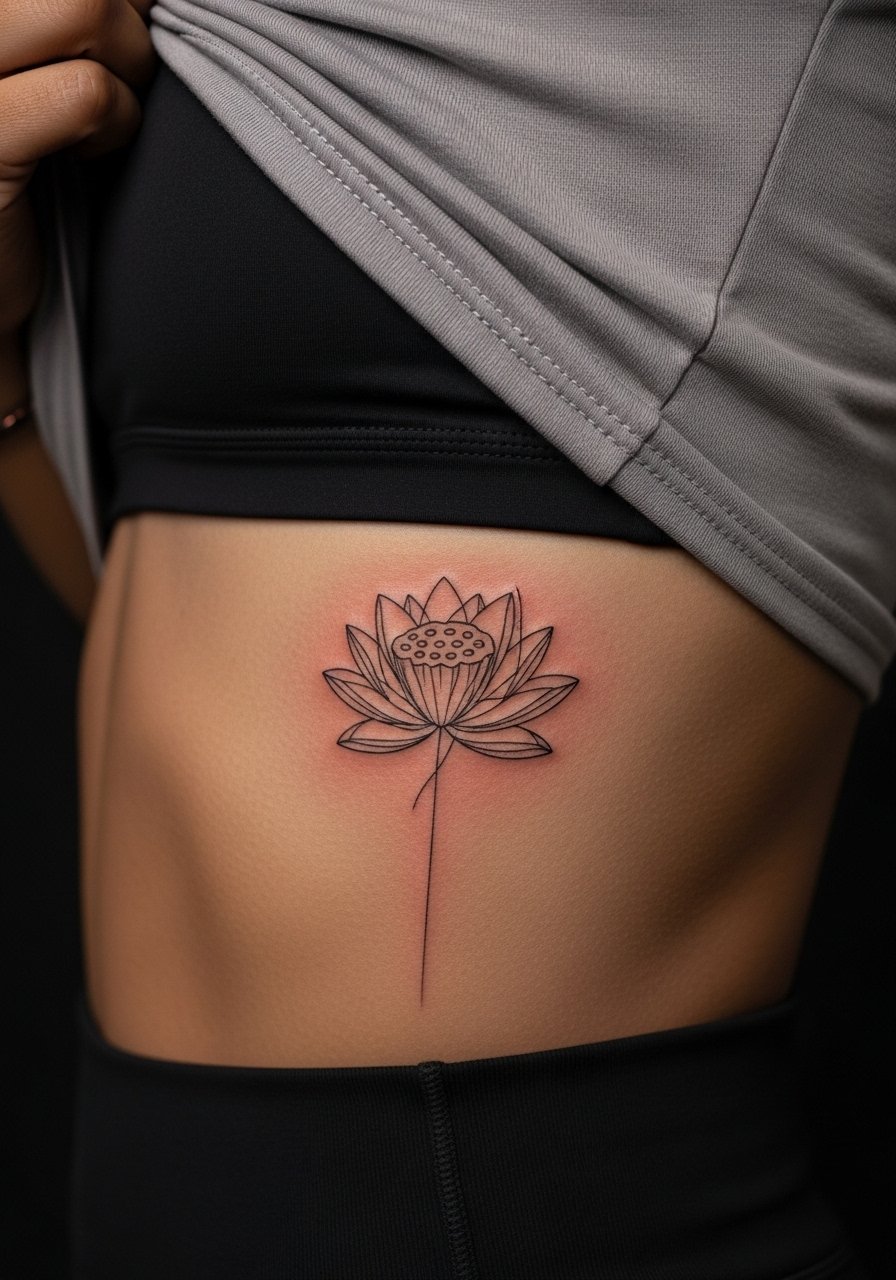
9. Delicate Lotus Pod Outline on the Ribcage
Fair warning, the ribcage rates a 7 to 9 on most pain scales, but for many people the trade-off is worth it for a three-inch spiritual motif. This outline style works best with sparse single-needle lines and minimal shading so it breathes as the skin moves. There is an active split in opinion about fine line on ribs. One camp says the stretch and movement blur lines within two years. The other camp insists controlled depth and spacing make ribs hold fine. Ask your artist how their rib work has healed after two years and request healed photos of similar placements. Wear a cropped top or lift your shirt slightly for the session to keep the tattoo zone isolated.
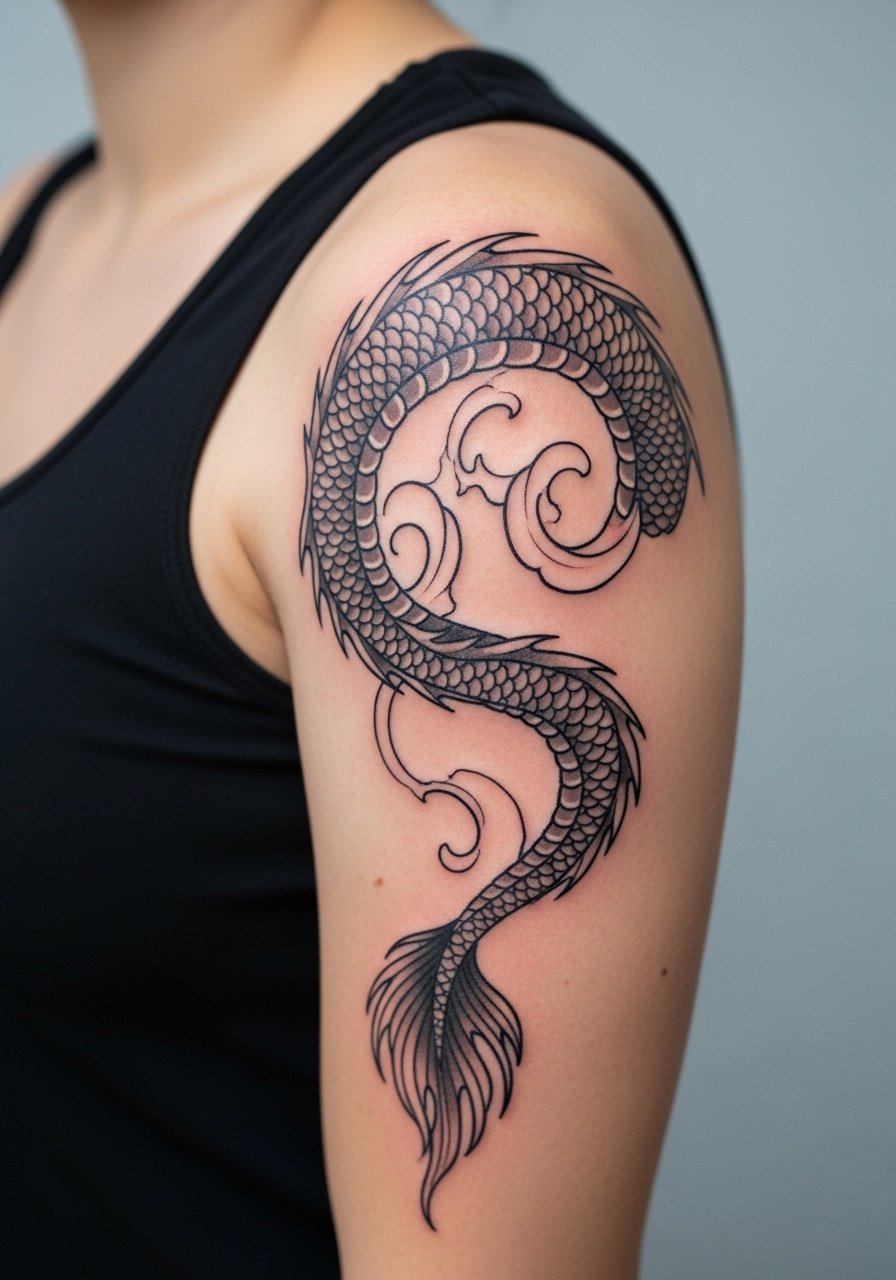
10. Soft Neo-Dragon Tail Segment on the Upper Arm
A tail segment is perfect for someone building a modular sleeve over time because you can add segments without reworking previous pieces. The upper arm sits at about a 3 for pain and an eight-inch segment may require multiple short sessions depending on detail. Tell the artist you want clear spacing between scales and subtle gray washes rather than heavy color. A common mistake is trying to cram a full dragon head detail into a segment sized for a tail. That causes proportion issues later when you connect pieces. The upper arm handles saturation well so this can stay crisp for years with occasional touch-ups around year five. Wear a loose tank for the appointment and consider a fitted cuff shirt for evenings to show off the curve.
11. Minimalist Maneki-neko Paw on the Wrist
If you want a charm-like spot of luck, the maneki-neko paw in a two-inch minimalist outline works well on the wrist. The wrist needs careful spacing because the skin and movement can blur tiny details. Plan for a short single session and ask for the icon to read at one glance from a small distance. The mistake is adding micro-patterns inside the paw that vanish in year one. For showing this off, pair with a thin silver bangle set on the opposite wrist rather than stacking on the tattooed side. For the appointment, go bracelet-free and wear a sleeveless or short-sleeve tank.

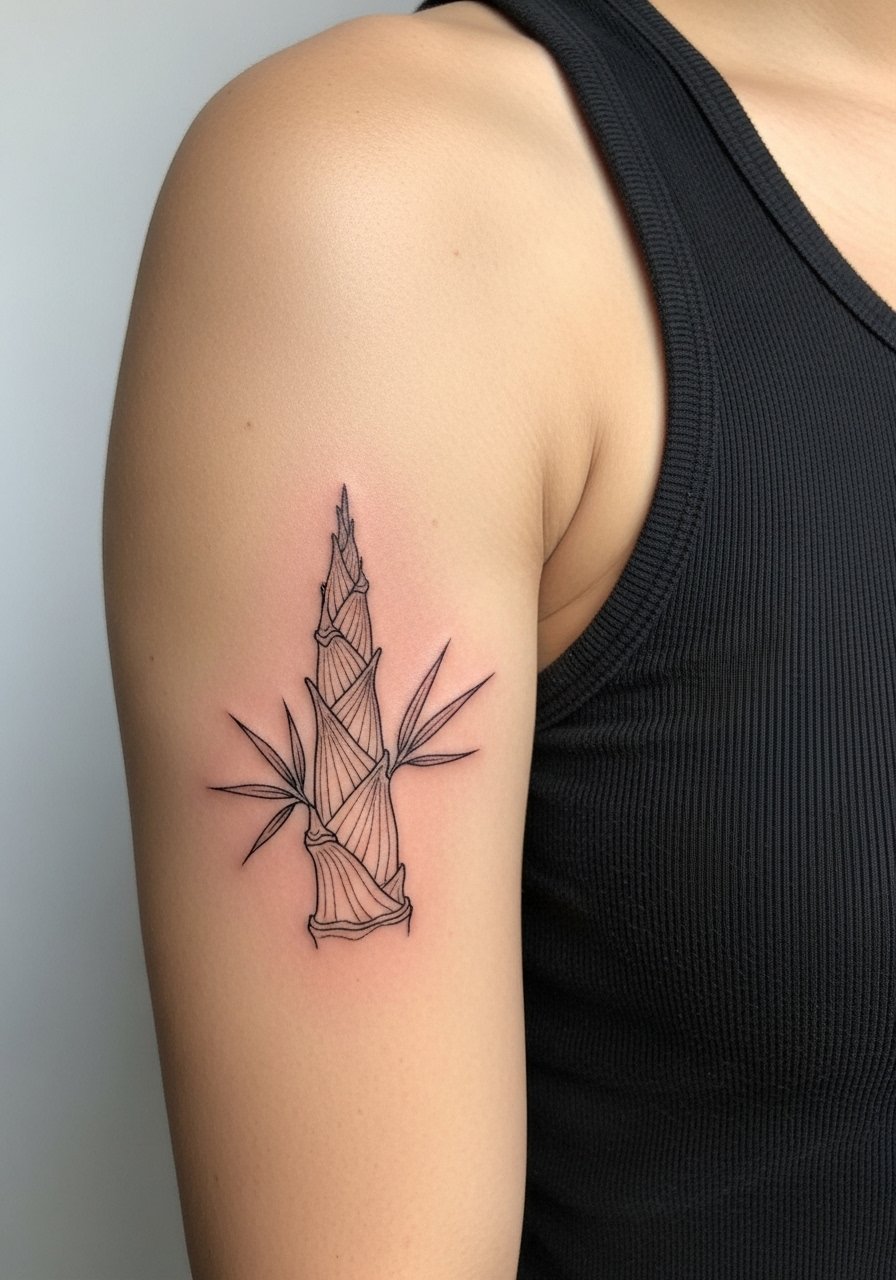
12. Fine Line Bamboo Shoot on the Inner Bicep
Inner bicep placement sits somewhere between discreet and sensual, and it can be a mid-range pain near the armpit. Expect a single short session for a four-inch bamboo shoot in clean vertical linework. In consultation, emphasize long uninterrupted stems and ask for slightly wider spacing between nodes so the stalks do not merge over time. A common error is asking for dense leaves with stipple shading close to the stem. That version blurs into a smudged block after a few years. Inner bicep work can be touchy about blowout if the needle is overloaded, so probe about the artist's line depth strategy. Wear a tank with the arm raised for easy access.
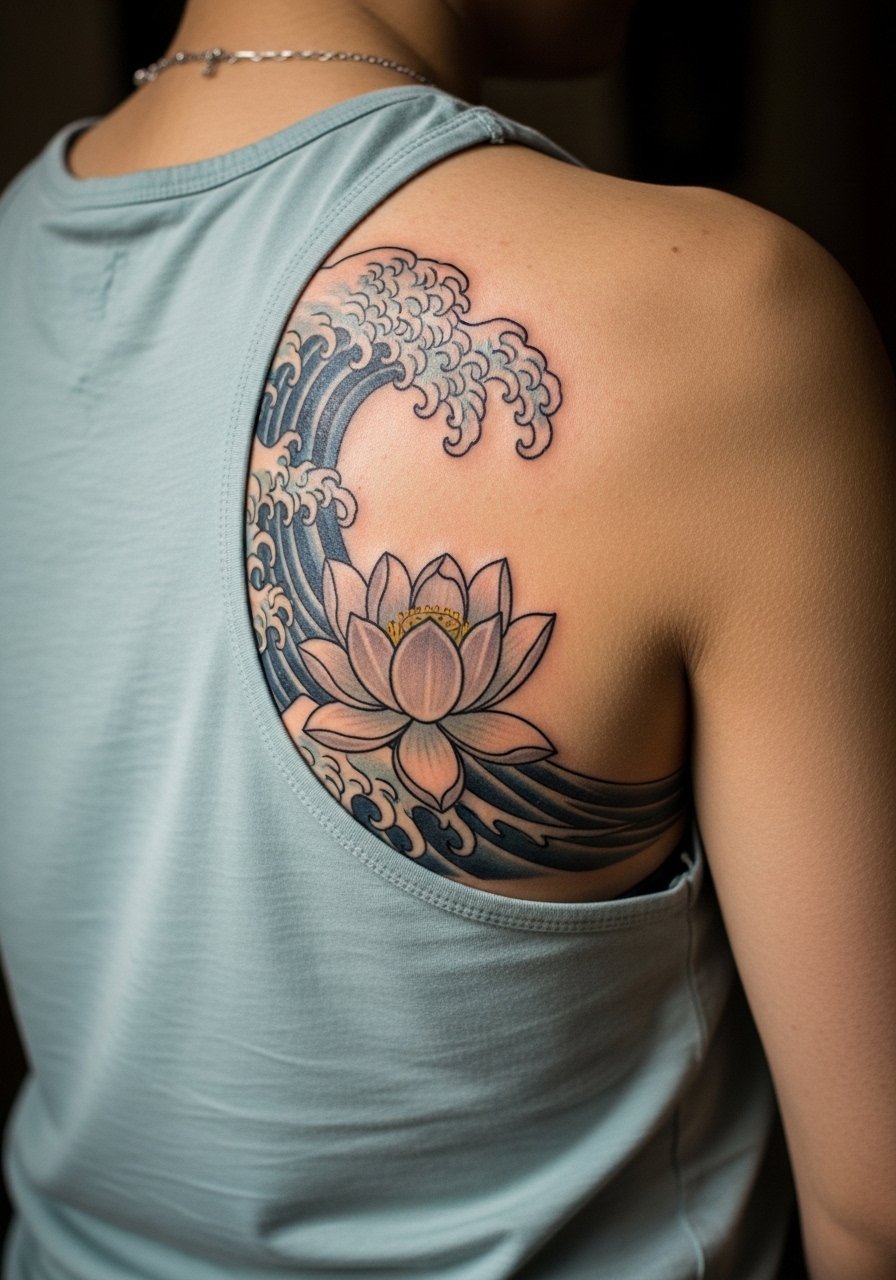
13. Neo-Japanese Wave with Lotus Across the Back
Back pieces let neo-Japanese waves breathe, with room for flow and soft blue-gray washes that do not fight the skin. A 5 to 7 inch composition usually needs two sessions. When you consult, explain that you want the wave energy to guide the eye toward the spine or shoulder blade depending on future additions. The aging risk is UV exposure rather than technique, so plan sunscreen on healed work. A mistake I see is over-detailing tiny wave curls in a small area, which reads messy after healing. For session day, wear a button-down you can pull aside or a loose tank for easy access to the back.
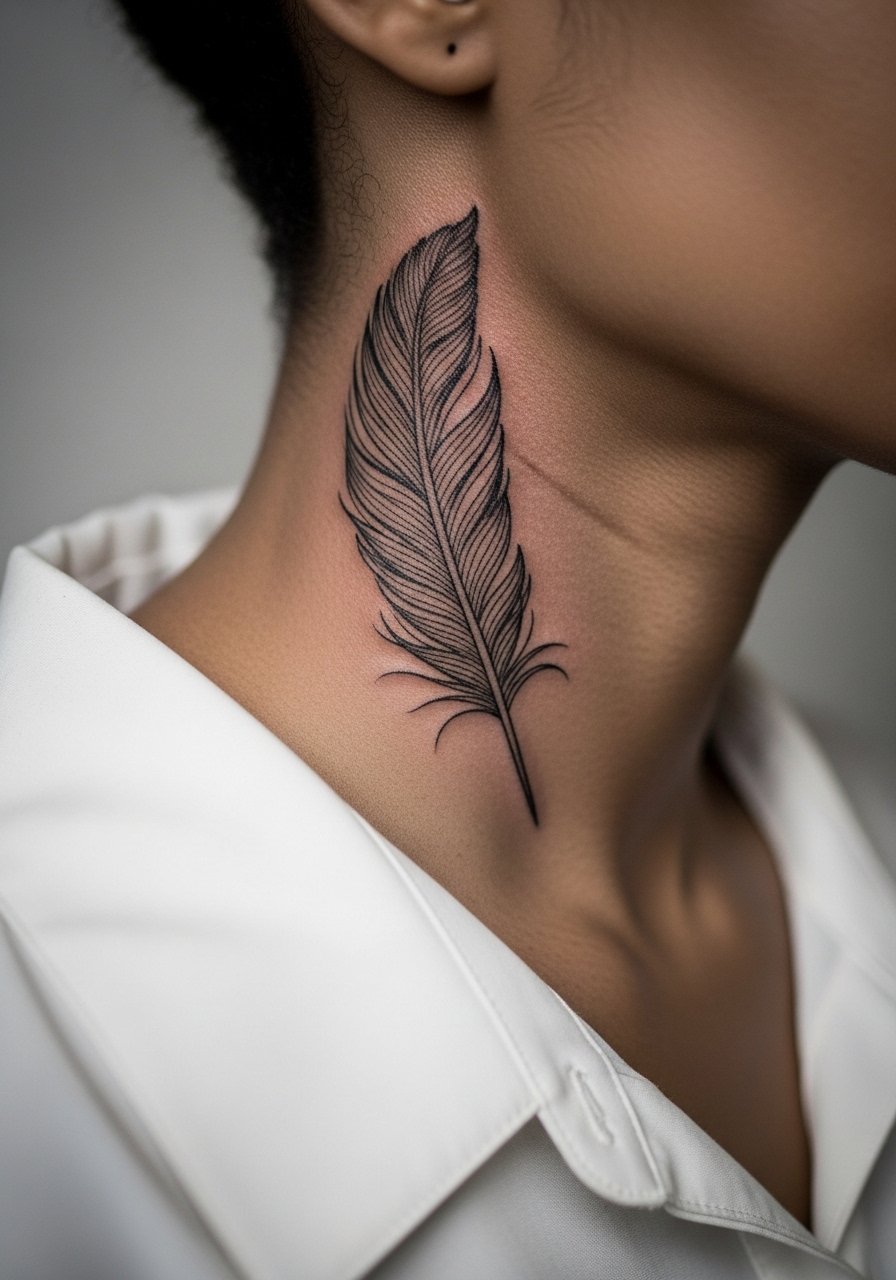
14. Micro-Realism Crane Feather on the Side Neck
The side neck can be sensitive for many people, but a single small feather in micro-realism sits nicely with a wide-neck shirt. Plan a short session and ask for crisp barbs with tiny gaps so the feather reads as texture rather than a block of ink. The common mistake is compressing too many realistic strokes into a tiny space which clumps as the skin heals. Professionals often recommend a slightly larger size than the reference so the feather keeps its detail. For showing the piece, a wide-neck shirt with the collar pulled slightly to one side frames it elegantly.
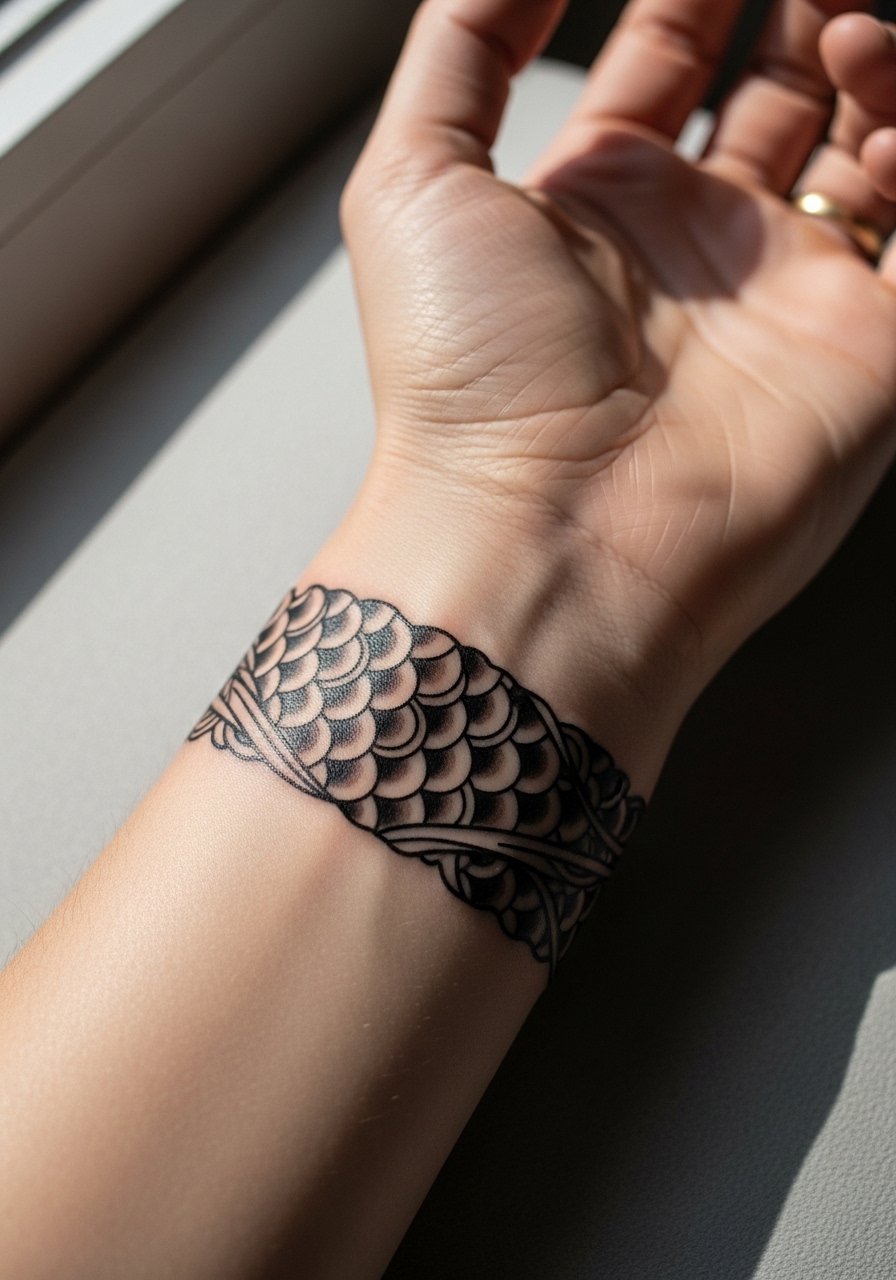
15. Ornamental Koi Scale Band Around the Wrist
A band of ornamental koi scales wraps the wrist with rhythmic patterning that can be stacked or left alone. The wrist needs a careful band width so scales do not compress when you flex. Expect a one to two hour session. Tell your artist you want negative space between each scale and to avoid heavy fills in the troughs. The mistake is asking for too tight a repeat pattern. That causes the scales to bleed into each other after two years. For showing off, keep accessories minimal and let the band peek from under a rolled sleeve or a flowy neutral blouse. Go bracelet-free to the session.
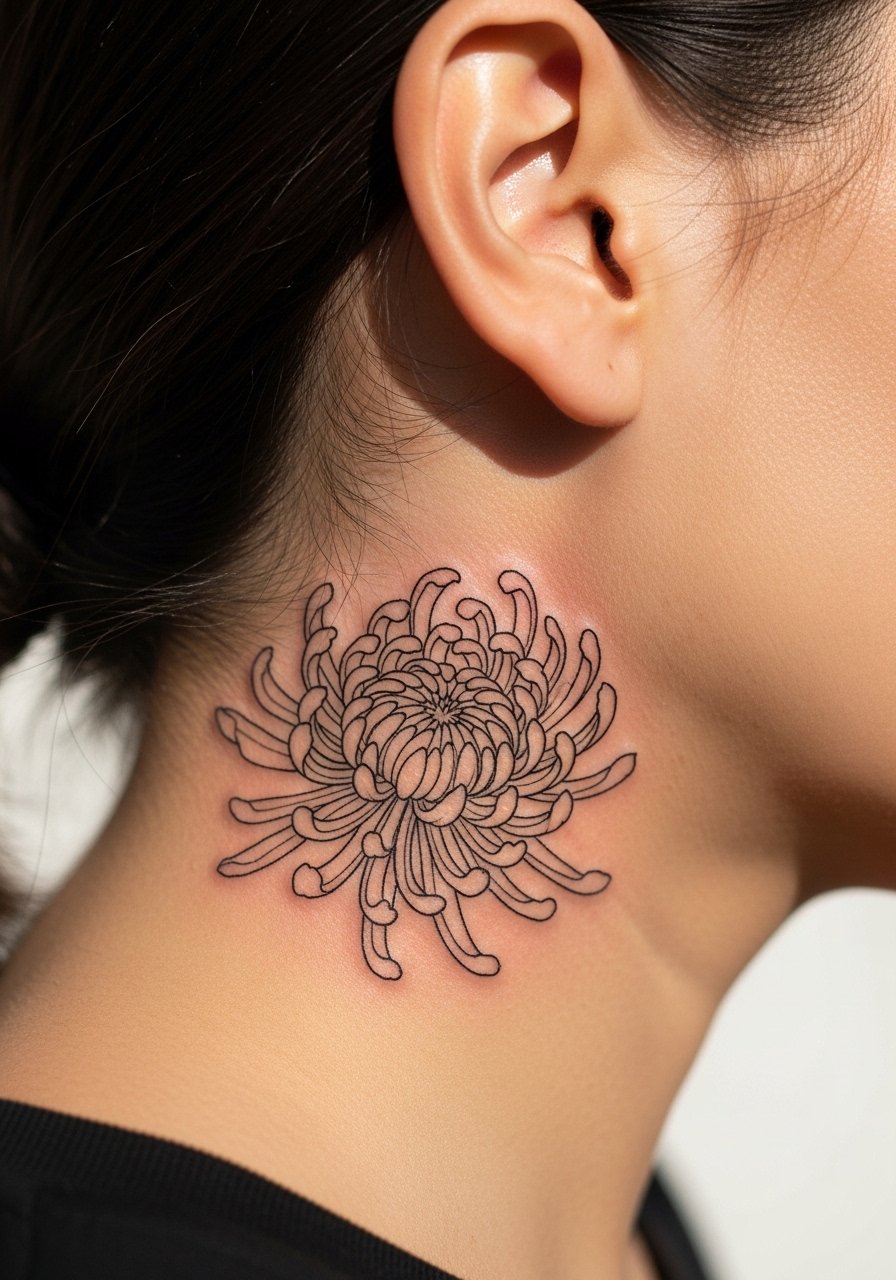
16. Small Chrysanthemum Behind the Ear Area
Behind-the-ear placements require careful wording because the area is right under the hairline. This small floral can be done with a tiny single-needle outline and sparse dot shading to avoid density. The area is low on visibility and mild to moderate on pain. Ask the artist to place the blossom on the skin just behind the ear, below the hairline on the neck so it peeks through hair. A common mistake is cramming shaded petals into a tiny footprint which becomes a gray patch after hair grows back. For sessions, plan a quick shampoo after as directed and note that some artists recommend an experienced hand for that zone.
17. Modular Wind Bar Segment for Sleeve Building
If you are planning a sleeve built over time, modular wind bar segments offer movement and join into a larger narrative without forcing a single appointment commitment. These segments age well because they are defined and spaced to accept future work. Expect 1 to 2 hour sessions per segment depending on size. When you talk to your artist, specify the direction you want the wind to travel and whether future motifs will slot into the negative spaces. A mistake is trusting a single tiny segment to carry too much visual weight. Keep segments slightly larger so they connect cleanly later. Wear a loose button-down so the forearm or upper arm is easy to work on.
18. Dot-Work Chrysanthemum on the Lower Back
Lower back pieces give space for stipple and dot-work without constant sun exposure. The area is moderate on pain and a 5-inch composition commonly needs two sessions for layered dot shading. Tell the artist you want open negative space to allow breathing room in the stipple fields, which prevents a muddy look later. A frequent mistake is over-packing dots too densely early on, which makes the area look heavy when healed. For showing the piece, a tank top with high-waisted pants pulled slightly low gives the right reveal. Wear a tank for the session and ask how they handle lower back positioning.
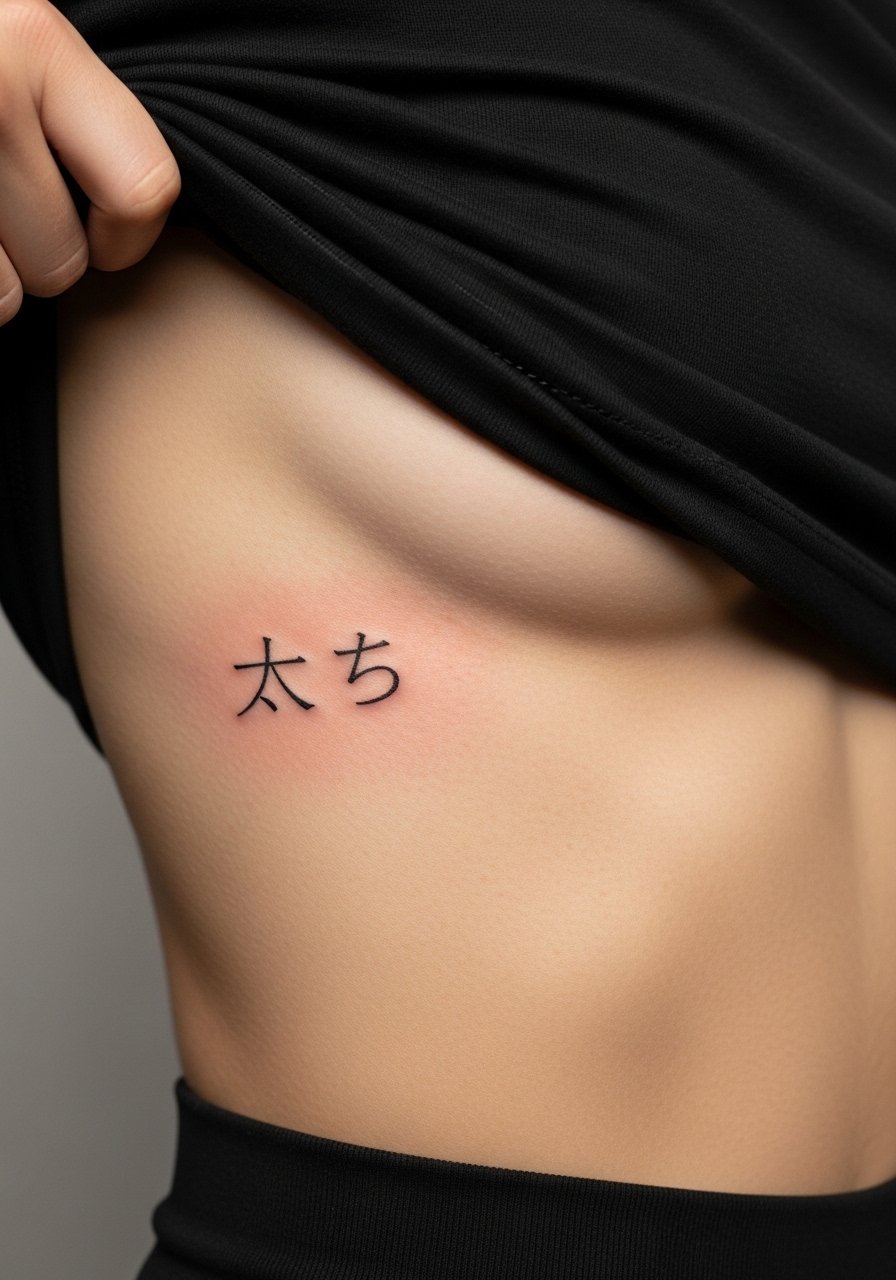
19. Minimal Scripted Kana on the Side Rib
Script on the ribs can be beautiful when spaced correctly, but ribs are one of the higher pain placements. Expect a single session for a simple phrase in thin kana or small script. Tell the artist the exact characters you want and request they stencil it multiple times to ensure perfect placement on your curve. A common pitfall is asking for extremely thin script with no breathing room between characters. That version tends to smudge into a gray line over time. For the appointment, wear a button-front top or sports bra so the area can be exposed only as needed.
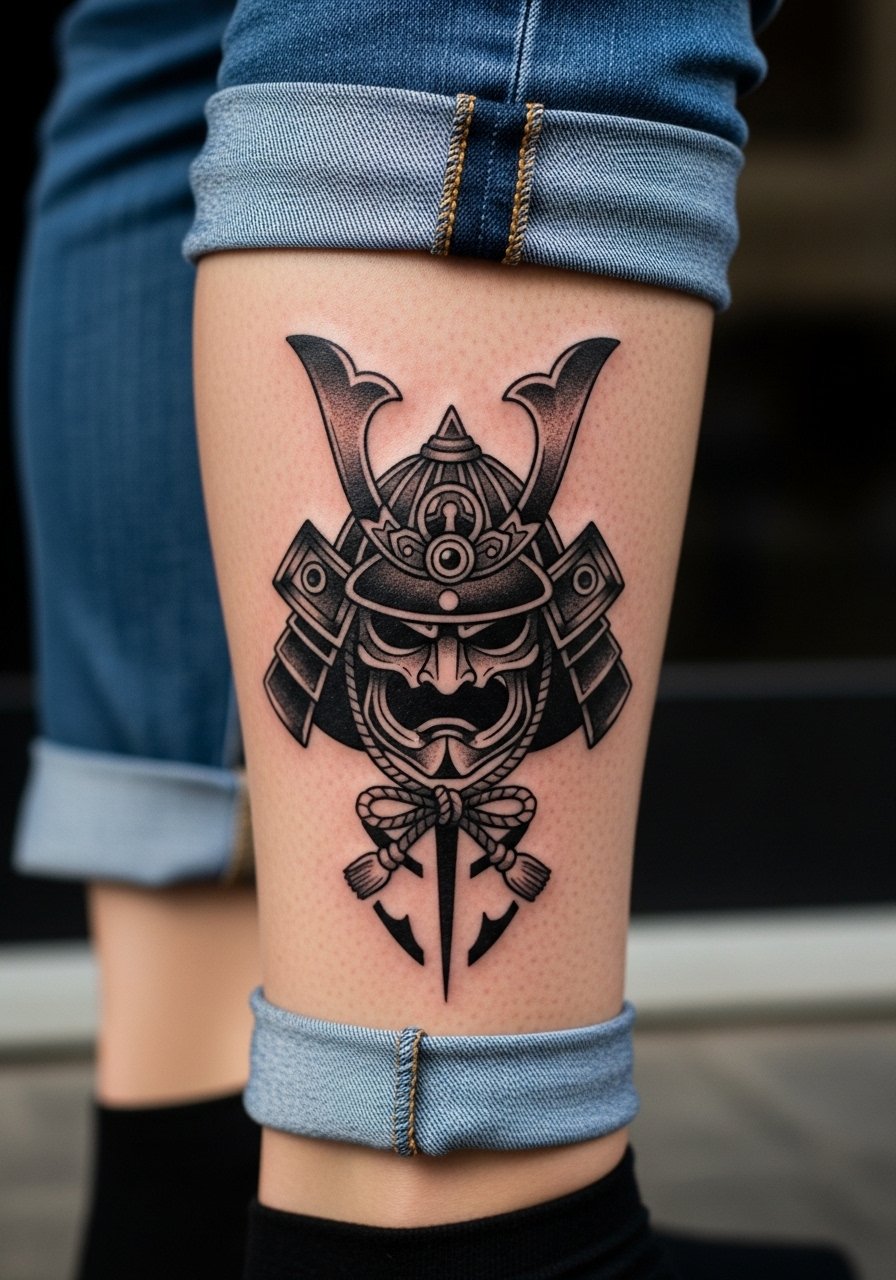
20. Blackwork Samurai Helmet Motif on the Calf
A small blackwork helmet motif pairs cultural form with bold linework that stands up to time if the artist keeps clean edges. Calf placement is easy for sessions and usually completes in a single appointment. When you consult, specify that you want crisp negative space inside the helmet so the silhouette reads from a distance. The mistake is packing micro-detail into an area meant for bold shapes, which becomes indistinct after healing. For session comfort, pull pants up or wear shorts so the calf sits flat for the artist. Show-off pairing includes fitted jeans rolled at the ankle.
21. Lotus Stem Around the Ankle as a Seasonal Piece
An ankle lotus stem can be a seasonal show-off piece that works with summer footwear. The ankle has higher friction from shoes and socks, so keep the stem minimal and avoid heavy fills. One session usually handles a small wrap that reads well. Tell your artist to stagger leaves so the stem does not form a continuous dark line that rubs against footwear. Many people make the mistake of choosing dense shading on ankle work and then grip about early fading. For the session, wear loose joggers or shorts and plan to show the healed piece in strappy sandals or cropped pants.
Frequently Asked Questions
Q: Will fine line peonies on the forearm need touch-ups sooner than blackwork pieces?
A: From what I have seen, fine line pieces generally need touch-ups sooner because the single-needle lines thin over time, especially with frequent sun exposure. Blackwork holds denser saturation longer, but any piece kept out of direct UV and moisturized properly will last longer. Consider a minor touch-up around year three for fine line forearm work.
Q: Is a ribcage lotus a bad idea if I worry about pain and healing?
A: The ribs are one of the more painful placements and they can be sensitive while healing because of movement and clothing friction. If pain is a major concern, try a similar design on the collarbone or upper arm first. If you prefer ribs, plan for a short session window, have a cropped top to wear, and ask the artist about their rib healing experience.
Q: Which small Japanese tattoo works best for a visible but professional setting, like the forearm or wrist?
A: A minimalist koi outline or a small peony on the inner forearm reads discreet yet intentional in most workplaces. For wrists, keep the scale modest and pair it visually with minimal instruments like a thin watch or a single bangle so it looks styled rather than accidental. If you need full discretion, choose placements you can cover with sleeves.
Q: Do watercolor-style chrysanthemums require different care than blackwork pieces during healing?
A: Watercolor washes are often softer and rely on subtle gradients, so they benefit from sun avoidance and a gentle, fragrance-free cleanser while healing. Blackwork can handle slightly more robust aftercare early on but still needs protection from excessive rubbing. For both types, follow your artist's guidance and avoid heavy friction until settled.
Q: How do I find artists who specialize in soft Japanese styles without naming anyone directly?
A: Use style-specific hashtags and local searches, like city plus the term "neo-Japanese" or "fine line koi" on social platforms. Tattoo directories with style filters help narrow options. Also check community forums for portfolio photos and ask for healed images showing the exact placement you want.
