
Fine line realism looks gorgeous when fresh, but it behaves differently on the outside forearm than people expect. The skin there sits between stretched inner-arm tissue and the knuckled wrist zone, so line weight, spacing, and contrast determine whether a piece still reads clearly at year three. Below are 21 realistic outside forearm ideas with what to ask for, how they age, and how to show them off.
1. Portrait Strip Along the Outer Forearm

I recommend this for someone who wants a discreet sequence of faces rather than a full sleeve. Ask your artist for staggered negative space between portraits so each face gets breathing room. A common mistake is packing too many tiny portraits in a row, which leads to merging after a few years. Expect moderate pain at the mid-forearm and a two- to four-hour session per portrait depending on size. For the session, wear a loose button-down shirt you can roll up without tugging the skin. Heals best with crisp contrast and occasional touch-ups at year three.
2. Realistic Wolf Head Facing Out

This version uses stipple and whip shading to keep fur texture readable over time. Tell your artist to favor slightly heavier outer linework and softer interior marks so the silhouette remains strong as saturation softens. People often ask for ultra-fine fur lines that vanish into blowout or blur. Expect a three- to four-hour session and medium pain where the bone sits under the skin. Over five years the interior texture will soften more than the outline, so budget for a single touch-up if you want decade-long crispness.
3. Botanical Branch with Micro-Realism Leaves

I've seen these age well when the leaves get subtle vein work and open space between clusters. Ask for slightly larger leaf scales than what looks fine on a phone screen. A common mistake is requesting ultra-detailed veins that become muddy at two years. Session time is usually two hours. For showing it off, wear a rolled-up linen shirt in cream or olive which frames the branch without competing. Pain is low to medium and touch-ups are rare unless you live in strong sun.
4. Nautical Anchor with Realistic Rope

This holds up because the rope uses broader strokes and shadow rather than micro-lines. In consultations, specify you want rope texture suggested by shading, not drawn hairline curls. The common aging problem is tiny rope loops that collapse into a gray smear. Expect two hours for a medium anchor and moderate pain near the wrist. Pair it with a minimalist leather bracelet when you want to balance the forearm without covering the art. A touch-up at year four keeps the rope crisp.
5. Pocket Watch in Micro-Realism

A pocket watch reads as small mechanical detail when shaded for contrast instead of fine engraving. Tell your artist which time or numeral style you want, since exact text renders better than ambiguous script. The mistake is asking for high-density gears in too small a space. Expect three to four hours and medium pain. Over the first two years the metallic sheen will soften, but the hands and rim remain legible if the rim line is slightly bolder. This piece ages into a subtle heirloom look.
6. Micro-Realistic Sparrow in Flight
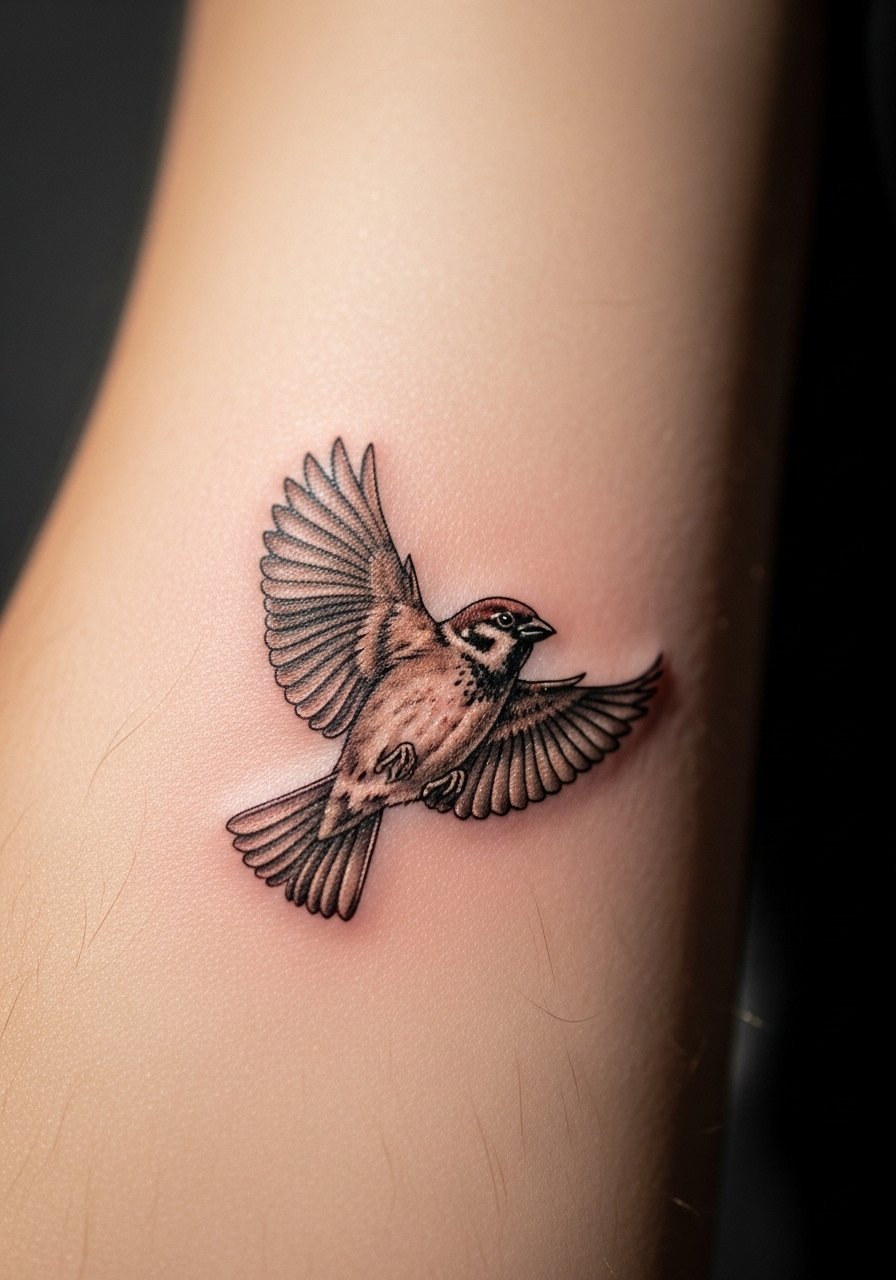
Consultation tip, bring photos that show feather edges clearly. The biggest mistake is squeezing wing detail too fine against the forearm curve. Sessions run one to two hours and pain is generally low. For the session, wear a loose short sleeve tee you can pull up comfortably. Over five years the feather tips fade more than the body, so request a slightly darker outer wingline if longevity is important.
Pre-Session Essentials
The forearm designs above cover a range from tiny sparrows to multi-hour portraits, so a few small items smooth the session and the first week.
-
Stencil transfer paper kit. Lets you preview placement directly on skin so a portrait strip or watch sits exactly where you expect.
-
Topical numbing cream. Applied as directed takes the edge off near-wrist sensitivity for longer sessions without altering ink saturation.
-
Thin protective film roll. Useful for small pieces that face friction from sleeves or wristbands during the first days.
-
Fragrance-free gentle body wash. Cleans the area after showers without stripping sensitive new linework on the forearm.
-
Aquaphor healing ointment. A thin layer during the initial healing phase locks in moisture for fine line pieces while allowing the skin to breathe.
7. Realistic Rose with Stipple Shading

Roses can read beautifully if the petals use a mix of stipple and soft gray wash. Tell the artist you want petal separation maintained by shadow rather than hairline edges. The common mistake is compressing petal detail into a small footprint, which blurs into a flat gray mass. Sessions typically take two to three hours and pain is moderate near the bone. For show-off pairing, a rolled-up cuff shirt in neutral tones keeps attention on the petals. Expect subtle softening at year three and a possible light touch-up.
8. Mechanical Compass With Micro-Detail

Compasses age best when the metallic areas are rendered with broad shifts in value instead of tiny cross-hatching. During consultation, confirm you want the needle and markers to stay bold relative to decorative fills. A frequent error is asking for ornate filigree that loses clarity after a year. Plan for three hours and medium pain. For casual wear, pair it with a minimalist wristwatch which complements the theme without crowding the forearm. Touch-ups at year four preserve the crisp markers.
9. Sea Lion or Seal Micro-Realism

This marine piece benefits from glossy highlight work rather than ultra-fine whisker lines. Tell your artist to prioritize contrast points so the face reads from a short distance. People sometimes request every whisker etched, which becomes fuzzy as saturation spreads. Sessions vary two to three hours and pain is moderate. Over two years highlights mellow, but the strong contrast areas endure. If you work outdoors, plan for more frequent sunscreen to protect the highlights.
10. Scripted Quote Overlaid With Realistic Ink Wash

When pairing realism with script, request the quote be spaced wider than the style sample on your phone. Tight script next to washed background often blurs into the wash. The mistake is using a tiny, ornate script font that loses counters. Sessions are usually one to two hours and pain is low to medium. For showing it off, a classic crew tee with sleeves rolled frames the quote without obscuring the wash. Expect the background to soften more than the lettering at year three.
11. Lion’s Eye Close-Up

An eye reads strongly because the pupil and iris provide natural contrast anchors. Ask your artist to reserve a small area of skin for highlights so the eye keeps depth as saturation fades. A common request that ages poorly is too many microscopic reflections which vanish quickly. Sessions take three to four hours and pain is moderate. Over time the iris texture loses some pop while the pupil remains. This piece benefits from occasional touch-ups to maintain the highlight point.
12. Realistic Koi Swimming Down the Forearm

Koi work requires readably sized scales and broad washes for motion. Tell the artist you want scale suggestions rather than micro-scale detail which will flatten. People make the mistake of compressing the fish into a thin strip that looks lost from a distance. Sessions are three to five hours depending on color. For showing it off, lightweight sleeves or a rolled short sleeve linen shirt lets the movement show while keeping the forearm accessible. Color saturation will fade faster than black linework, so plan on sun protection.
13. Realistic Skull With Subtle Floral Fill
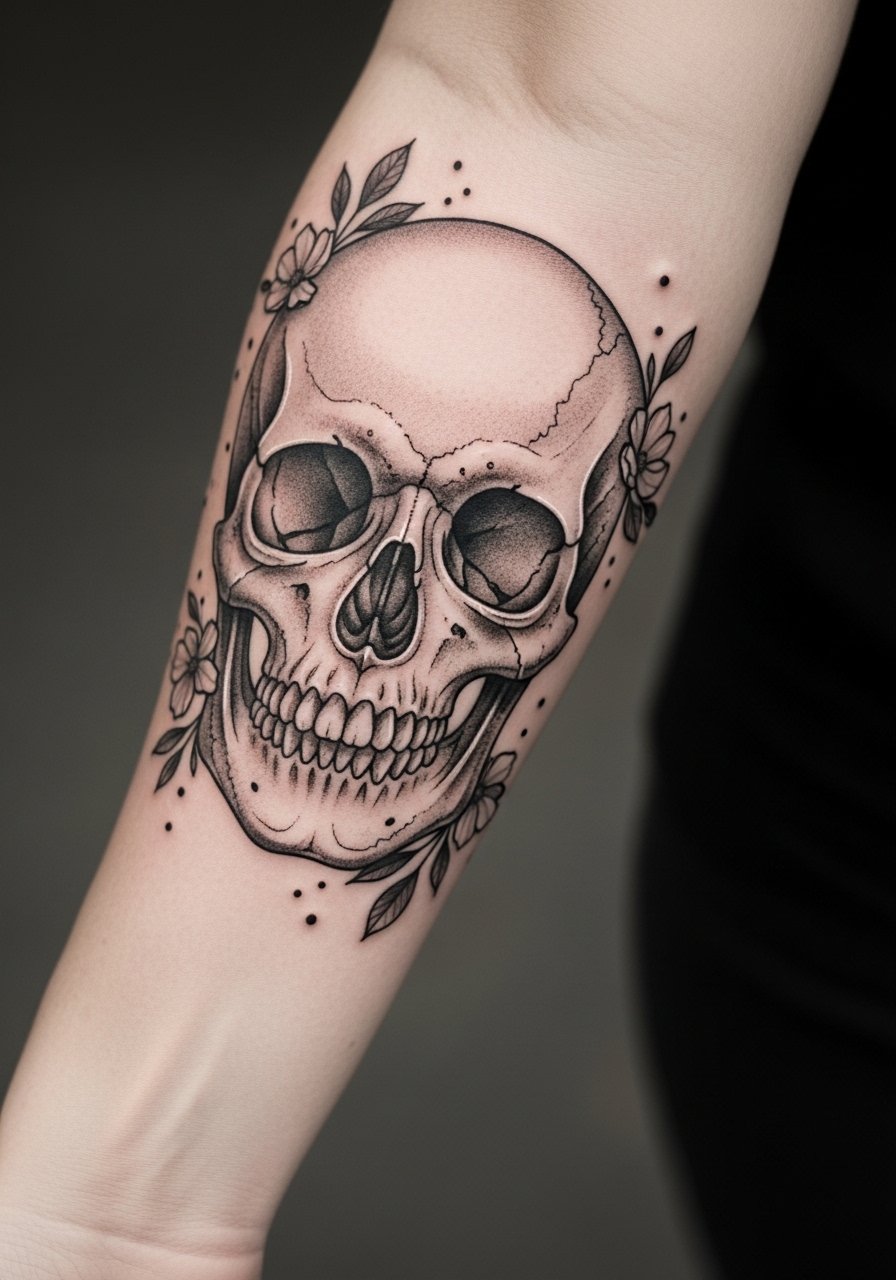
Skulls benefit from clear planes and contrast between jawline and background blooms. A mistake is packing dense petals into shadow zones which collapse into a single tone. Sessions range three to four hours and pain is medium near the wrist. Over two years shaded zones may blur, so ask for clear edge definition on the skull rim. If your style leans classic, consider pairing this with a slim leather cuff bracelet for evenings out. Touch-up every few years keeps the jawline crisp.
14. Micro-Realism Feather Falling Along the Arm
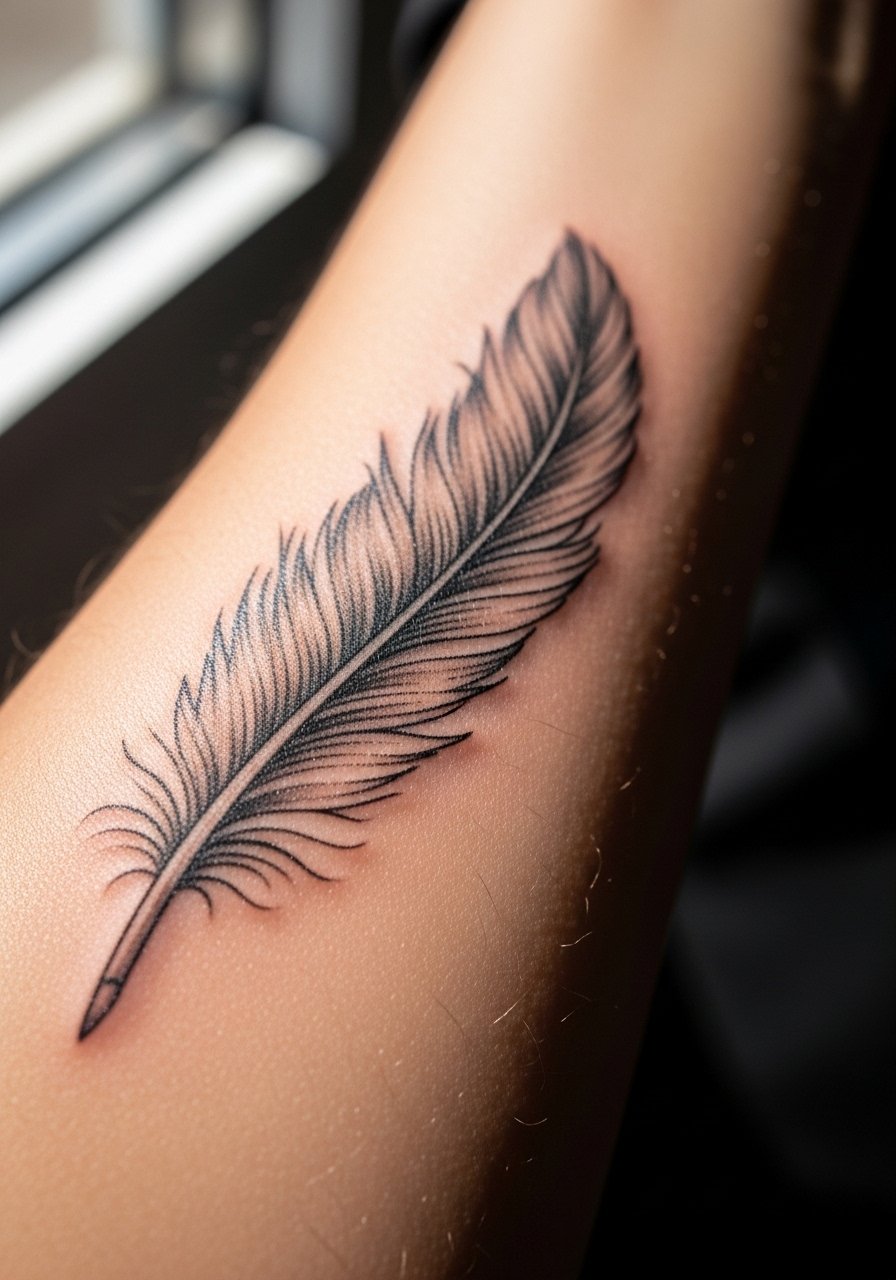
Feathers age by losing the tiny barb details first. I advise asking for a slightly bolder shaft and softer barbs so the feather keeps its shape when the barbs soften. The mistake is insisting on hairline barbs that disappear under normal wear. Sessions are one to two hours and pain is low. For show-off pairing, a simple chain bracelet sits above the feather without hiding it. Expect a subtle blend at year three but a recognizable silhouette long term.
15. Realistic Hand Holding a Flower

Hands with realistic flowers can look like a miniature scene when planned with negative space. Tell your artist you want clean contour lines on the hand and softer washes on the petals. A common error is requesting ultra-fine skin texture that becomes muddied as the ink settles. Sessions are three hours and pain is moderate near the wrist. Over five years the flower edges soften more than the hand outline. Pair with a casual rolled sleeve shirt for a balanced look.
16. Realistic Mountain Range With Foreground Detail

Mountains hold up when foreground elements get the most detail and distant ridges stay suggestive. The frequent mistake is equalizing detail across the whole piece which flattens with time. Sessions vary two to four hours depending on length. For session comfort, wear a loose button-down shirt you can adjust easily. Over the first two years the distant ridges will soften, but the foreground rocks remain legible if edged slightly darker.
17. Hyper-Realistic Eye With Water Droplet

This one splits artists into two camps. One camp says hyper-detail on the forearm is risky because the skin shifts and microscopic highlights blur within a year. The other camp argues that careful depth and reserved highlights preserve the effect. Ask your artist which approach they use before booking. Sessions run long, often three to five hours, and pain is moderate. The water droplet highlight is the part most likely to fade, so request a reserved skin spot for a lasting gleam.
18. Realistic Octopus Arm Wrapping the Forearm

Complex organic forms like tentacles need readable suction cups sized for visibility. People often request tiny cup details that merge into shadows. Plan on multiple sessions totaling three to five hours for a wrapped piece and expect medium pain. For casual display, pairing with a rolled short sleeve tee keeps the wrap visible. Over time the suction highlights fade first, so ask for a few darker anchor points to retain depth.
19. Realistic Book and Quill Motif

Textures like page grain read best when suggested by broader tonal shifts rather than micro-hatching. Tell your artist you want the title area of the page to have legible negative space so text stands out. The mistake is squeezing words into tiny margins which blur fast. Sessions two to three hours and pain medium. For wearing it, a casual cuff bracelet can sit nearby without covering the page. Touch-ups maintain the tiny title area if you plan to keep legible lettering.
20. Realistic Folded Map With Coordinates

When a design includes text or coordinates, specify the exact characters you want so the artist can render them cleanly. Tiny coordinates often become unreadable if the font is too thin. Sessions take two to three hours and pain is low to medium. For show-off styling, a minimalist watch strap frames the map without hiding the coordinates. Expect the tiny numbers to need a touch-up sooner than the map art.
21. Hyper-Realistic Handheld Camera
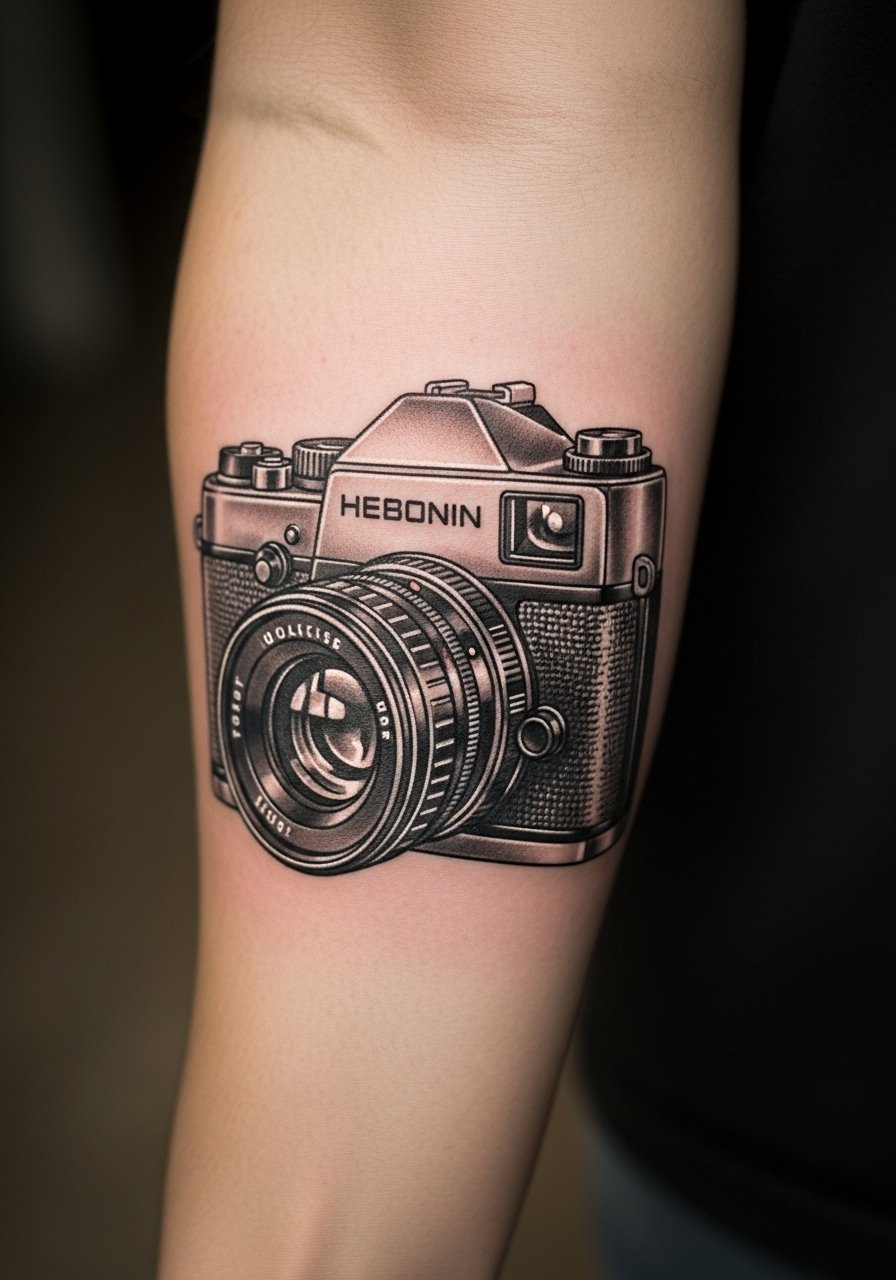
Cameras work when reflective surfaces get bold contrast points rather than micro-reflections that vanish. Tell your artist which model and which features you want emphasized. A common error is packing lens reflections into tiny dots that vanish under normal wear. Sessions are three to four hours and pain is moderate. For the session wear a loose short sleeve tee so the artist has clear access. Over time the reflective sheen softens but the camera silhouette remains.
Frequently Asked Questions
Q: Will a realistic outside forearm tattoo blur into a gray mass after a few years?
A: It depends on scale, line weight, and sun exposure. Realistic work with clear contrast points and slightly bolder outer lines generally holds up better than ultra-fine filigree. I advise asking your artist about spacing and touch-up timelines during the consultation.
Q: How should I prepare clothing-wise for a long forearm session?
A: Wear something with sleeves that pull up easily without tugging, like a loose button-down shirt or a short sleeve tee. Bring a light sweater in case the shop is cool. Comfortable positioning matters more than style during multi-hour sessions.
Q: Do portraits need a different aftercare approach than floral realism?
A: The care steps are similar, but portraits rely more on crisp contrast, so avoid heavy rubbing during showers and protect the area from sun once healed. If a portrait sits near the wrist where friction is constant, expect to plan a touch-up earlier than for an inner-forearm floral.
Q: Are there realistic styles to avoid if I work outdoors a lot?
A: High-contrast black and gray with reserved highlights fares better than subtle color gradations in strong sun. If your job keeps you outside, ask for deeper saturation and discuss a sunscreen routine for healed work.
Q: How soon will fine feathering or micro-detail need a touch-up?
A: From what I have seen, micro-barbs and tiny highlights often need attention by year two to four depending on placement and sun exposure. The forearm sits in a middle zone for longevity, so plan for a possible light touch-up in that window.
Q: Can the same realistic design change if placed on the inner forearm instead?
A: Yes. The inner forearm has softer skin and less direct sun exposure which preserves finer detail longer. If you want ultra-fine realism with minimal touch-ups, discuss inner placement as an alternative during your consultation.
