
Fine detail and saturated color often fight the same enemy: time, sun, and placement choices. When people come in asking for a hyper-realistic coi fish tattoo they usually want the same thing they see on feeds, but the result depends on skin type, placement, and how much movement the area gets. Think through sizing, ask about touch-up timelines, and plan outfits for the first week. The designs below start with small, long-lasting ideas and move toward larger pieces that make a scene.
1. Micro-Realism Koi on the Inner Forearm
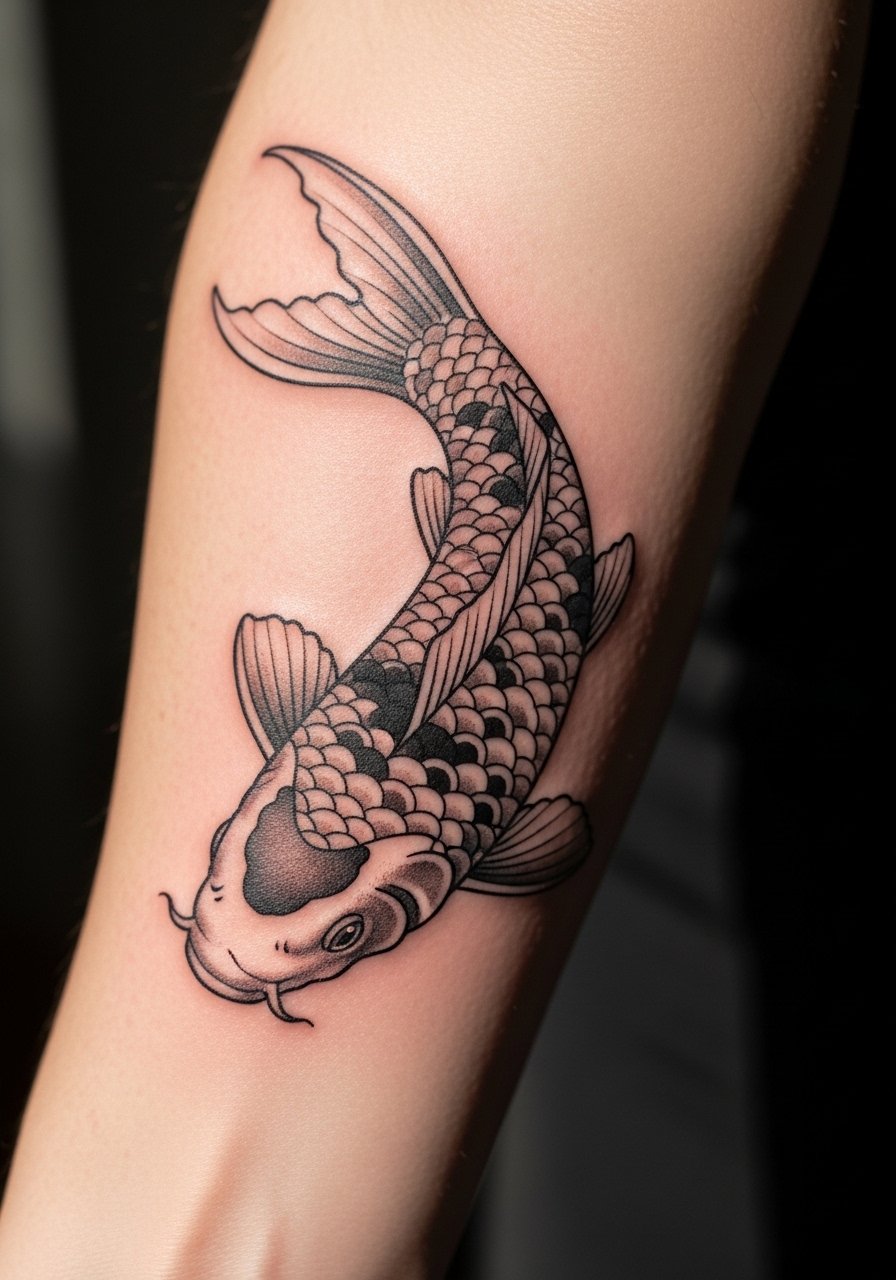
I recommend this for someone who wants a realistic effect without a full sleeve. Fair warning, the inner forearm is visible and gets sun, so expect some softening of fine detail by year three. Tell your artist you want slightly heavier linework in the shadowed areas and tighter stipple shading to preserve contrast as it heals. Session time is usually one to two hours, and pain is moderate. A common mistake is asking for tiny scales with ultra-fine lines, which can blur into a gray patch later. For showing it off, rolled-up sleeves work best, try a loose button-down shirt you can pull aside at the chair to give the artist access.
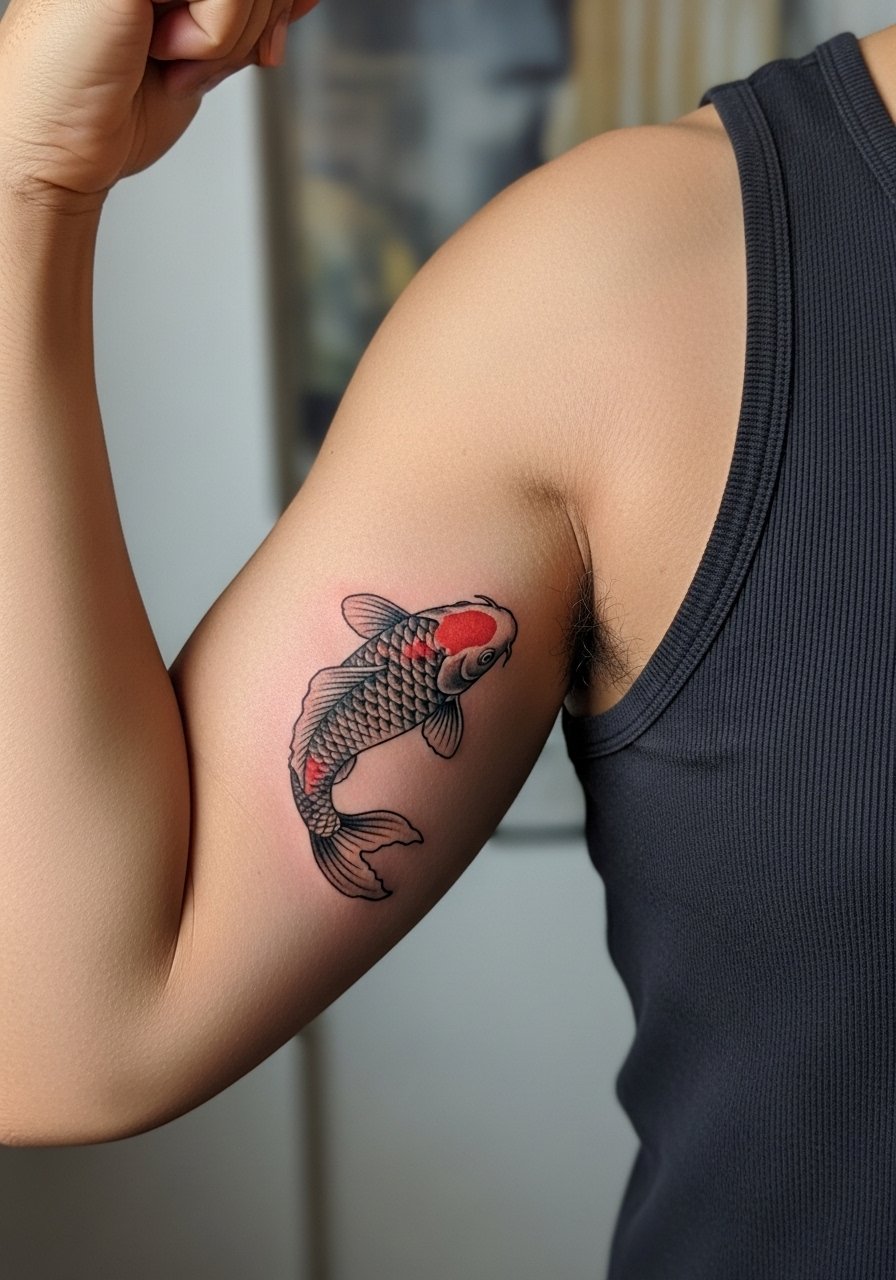
2. Color-Pop Koi on the Outer Bicep
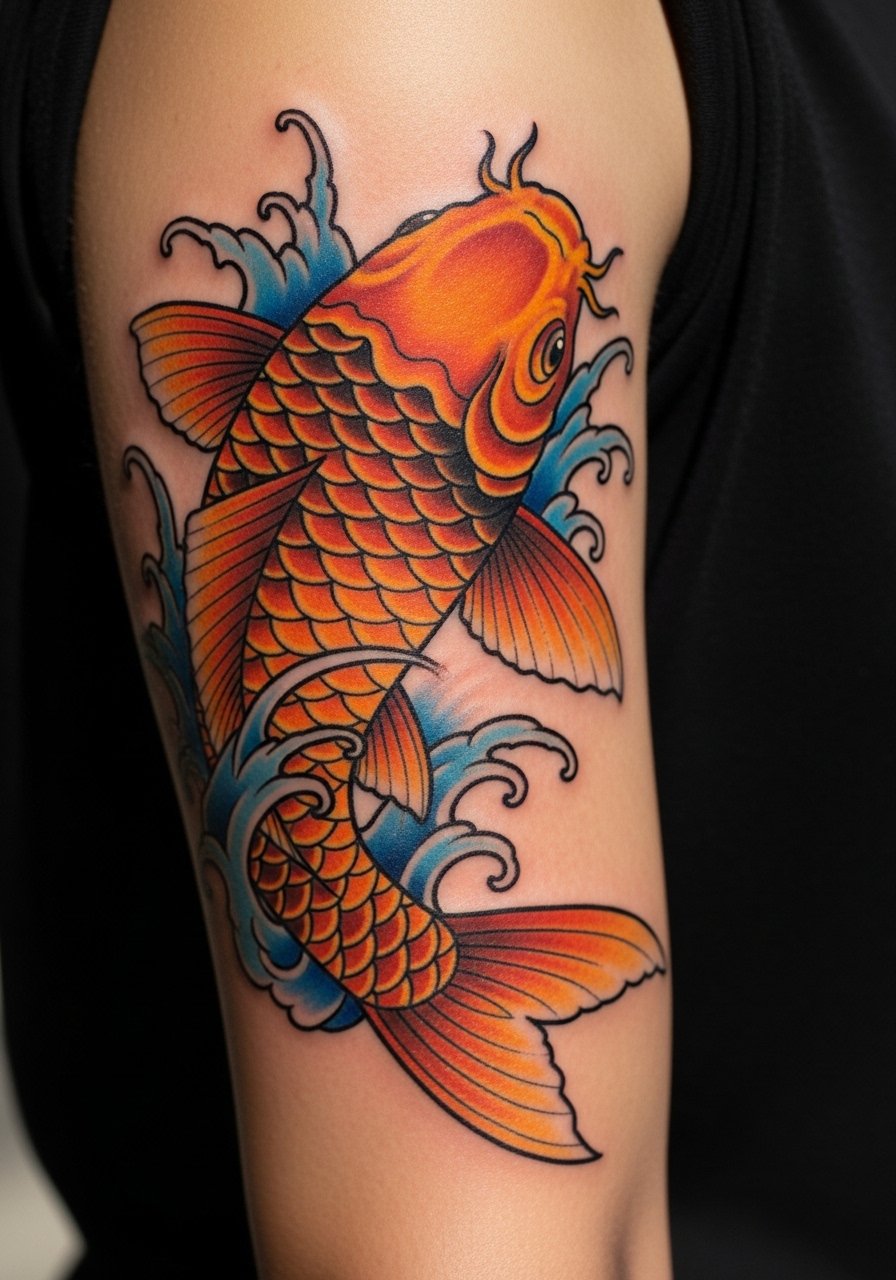
This placement gives room for the tail to curve naturally with muscle movement. Pain is lower here, and typical sessions run two to four hours depending on color saturation. Ask for color layering and a plan for touch-up at year two to keep the orange hues vibrant. One common mistake is packing too many tiny color transitions which can muddle after healing. During the session wear a loose tank top so the artist has clear access to the shoulder and bicep.
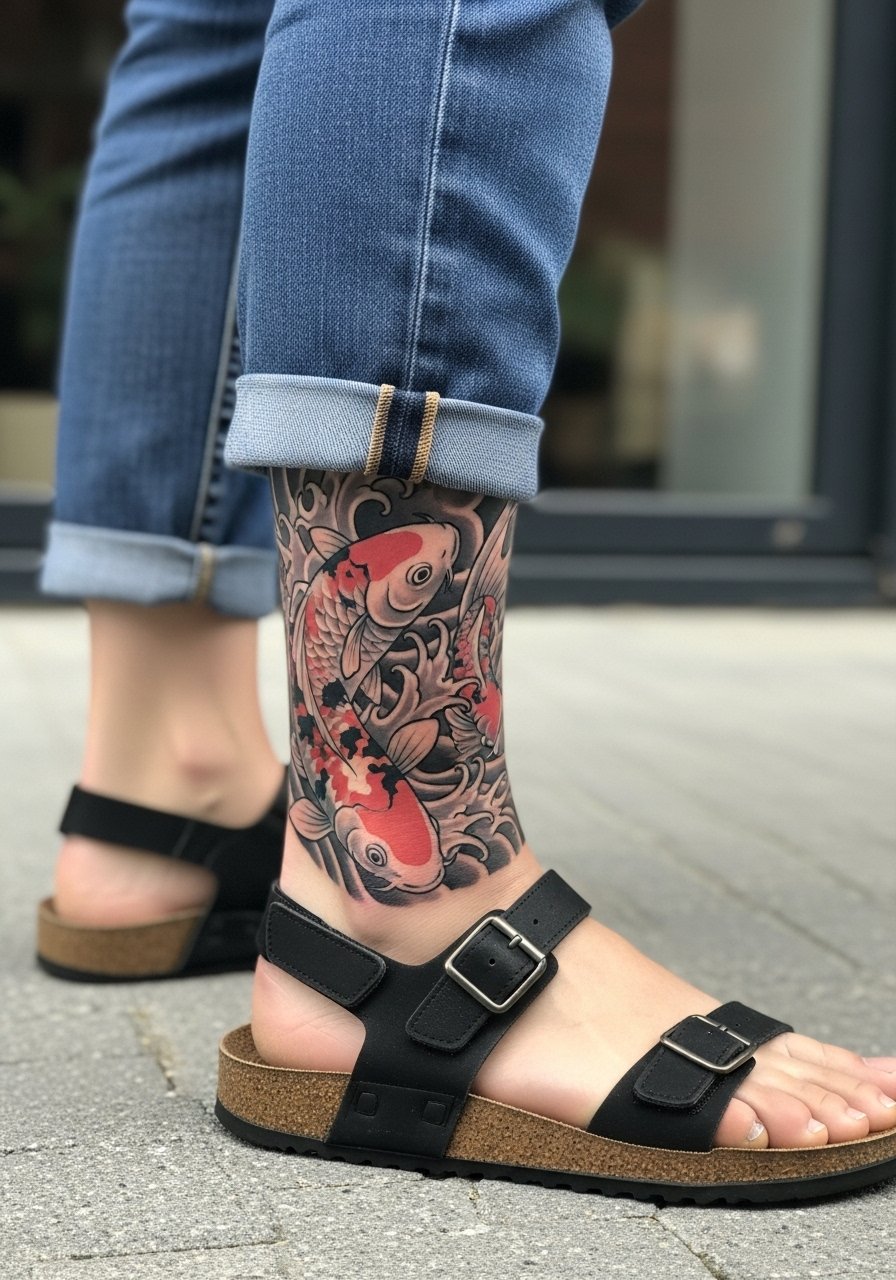
3. Full Calf Scene with Koi and Water
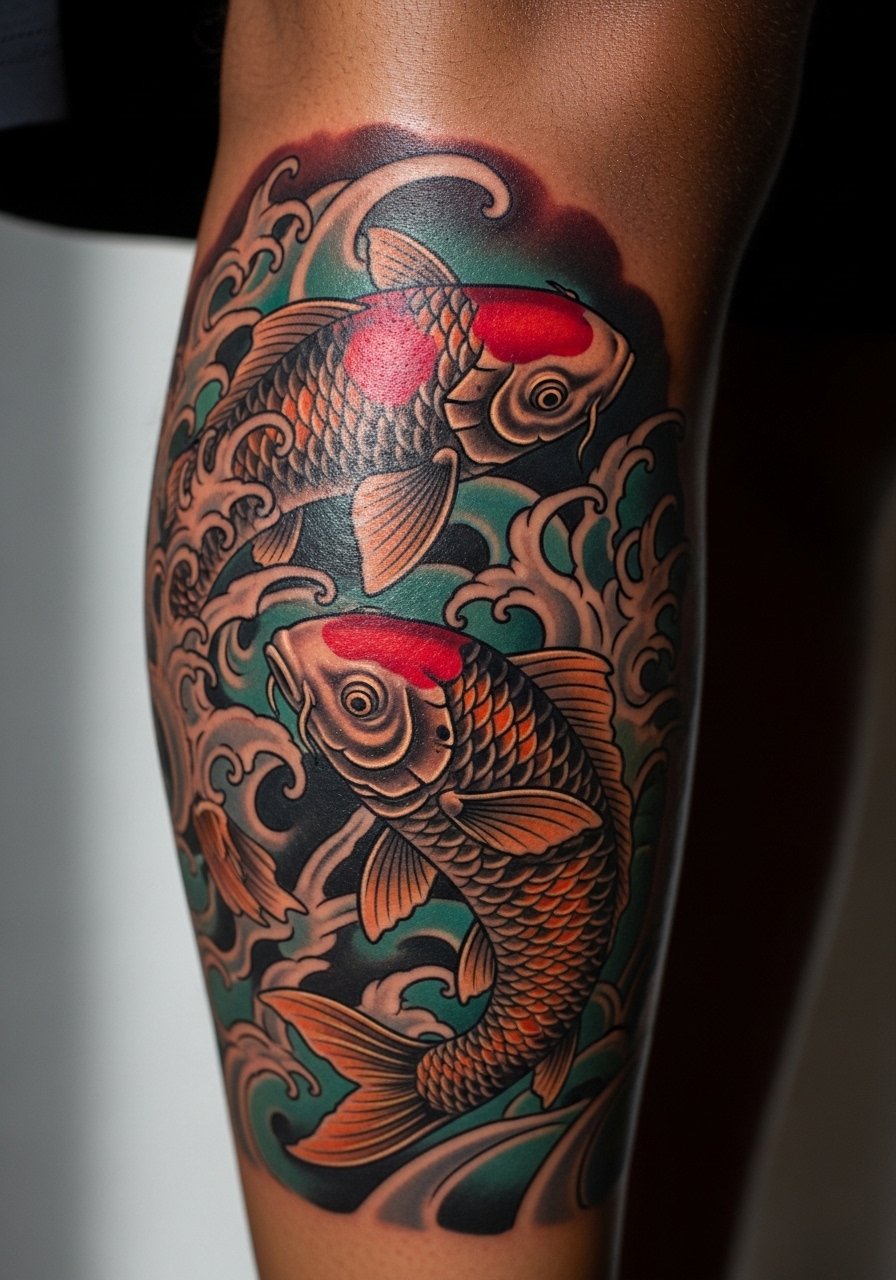
A full calf piece lets the koi read like it's moving. Expect multiple sessions and a higher pain tolerance than the bicep. In my experience, heavy saturation holds well on the calf so long as the artist spaces dark areas and leaves highlights. Tell the artist you want layered backgrounds that read at distance rather than tiny details only legible up close. People often cram in decorative elements that compete with the fish, which reduces focal clarity over time. For outings, mid-calf boots and rolled trousers draw attention; consider a denim skirt for summer.
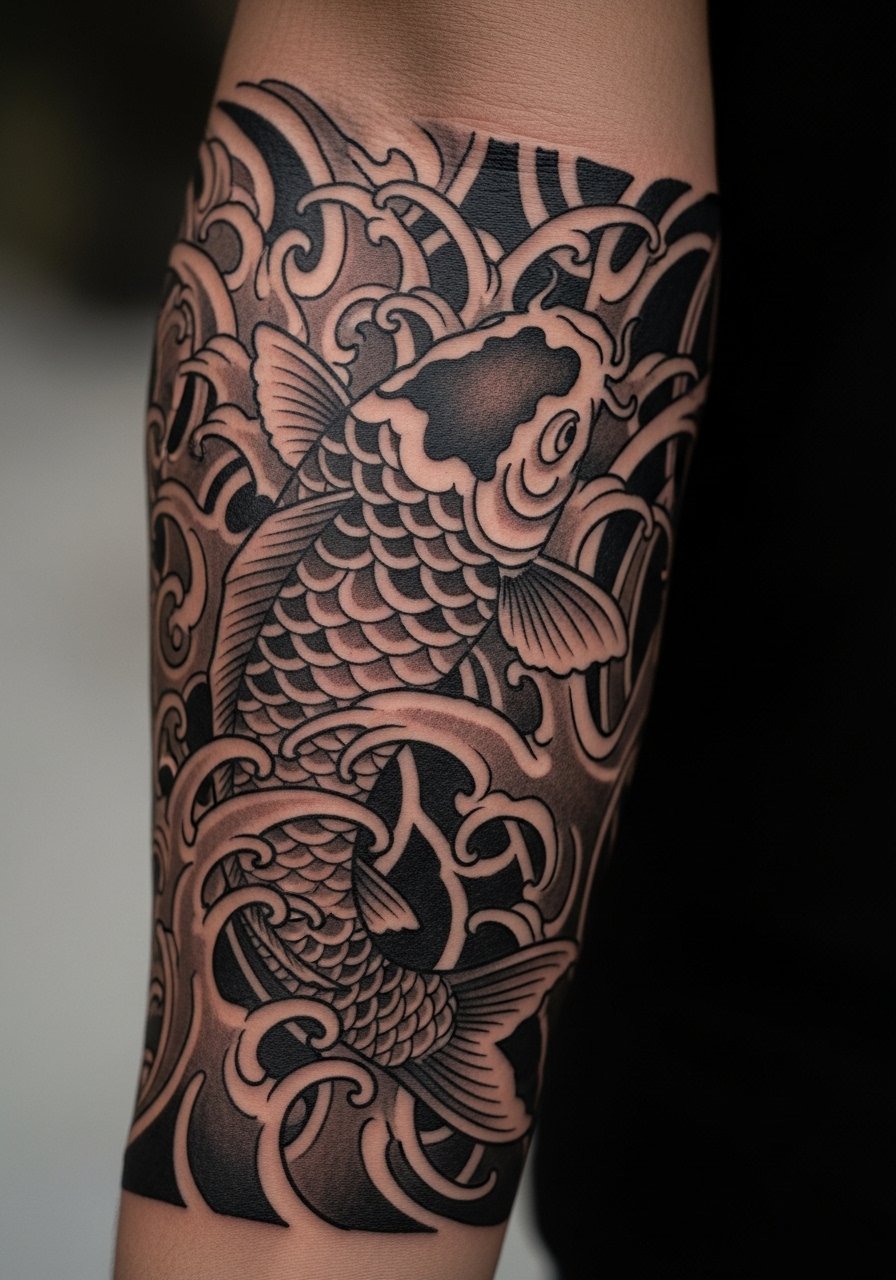
4. Ribcage Koi in Black and Grey

Fair warning: ribs are a high-pain area and a high-movement zone, which affects how fine detail settles. Artists are split on fine line here. One camp argues the stretch and breath make lines blur within two years. The other camp says with correct needle depth and spacing the detail can hold. Ask for more spacing between scale details and a planned touch-up if you want fine realism. Sessions are longer and you should wear a shirt that lifts easily. This placement also carries career visibility considerations for some jobs, so think about timing.
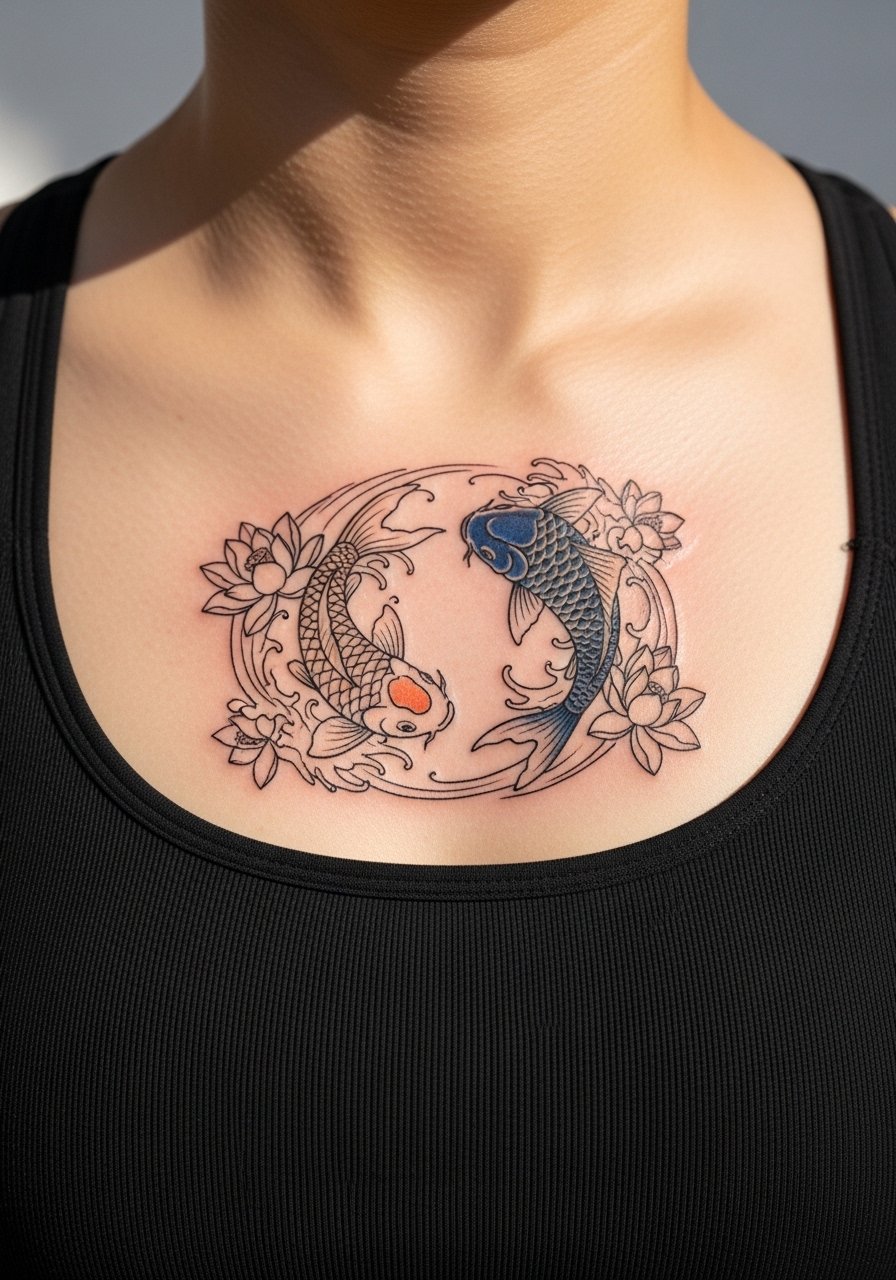
5. Collarbonescape: Koi Swimming Toward the Sternum

This design reads like a directional piece, flowing toward the center of the chest. Pain at the collarbone is moderate to high and sessions are broken into shorter fills for comfort. A typical aging pattern shows color loss in the highlights first, so ask the artist to plan for deeper initial saturation in shaded regions. For the session wear a wide-neck shirt you can pull aside without exposing the rest of the chest. Cultural sensitivity note: koi motifs draw from Japanese visual language, so discuss respectful adaptation rather than direct copying of traditional Irezumi panels.
6. Tiny Koi on the Ankle
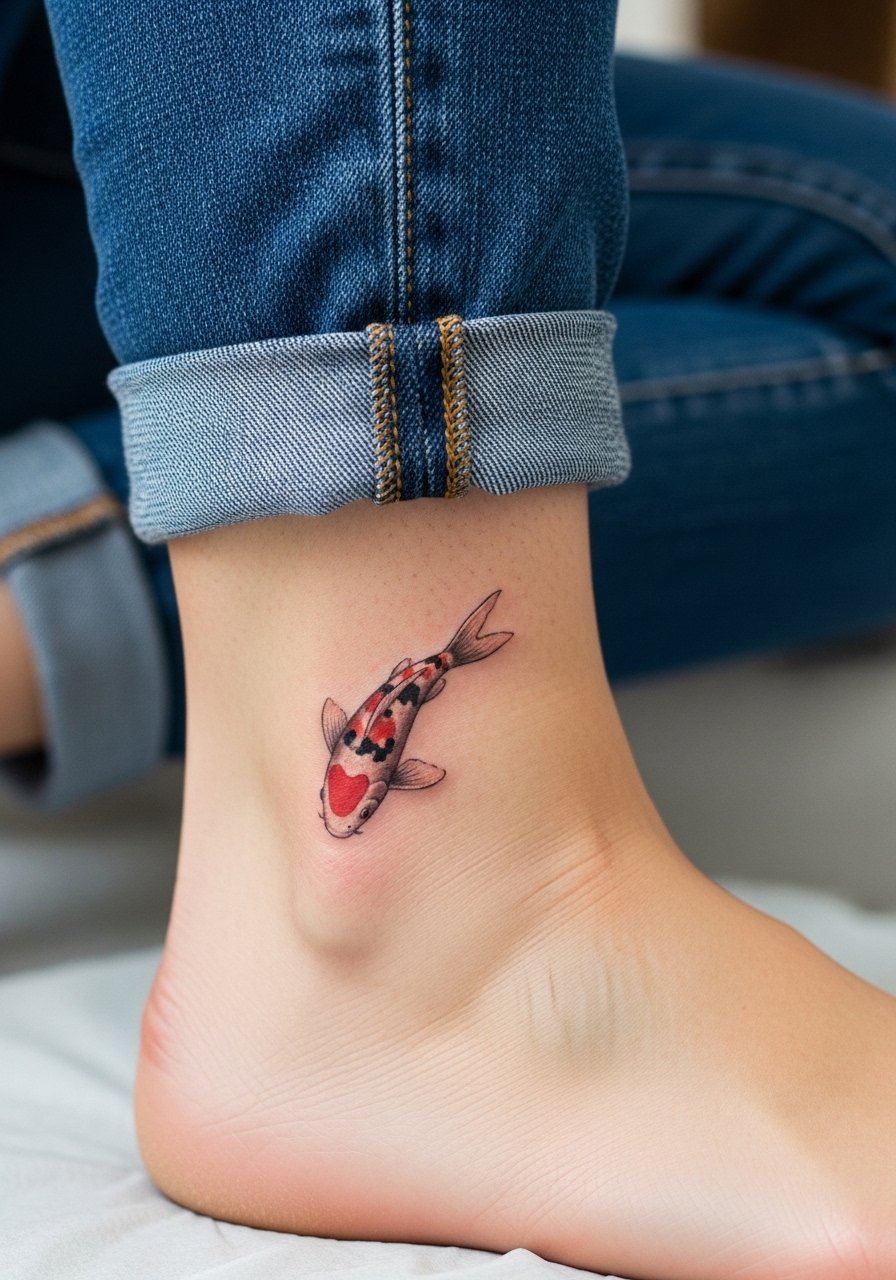
Ankle tattoos are charming but face friction from shoes and socks during healing. Pain is lower than ribs but expect irritation from footwear for two weeks. Tell your artist you want a slightly bolder outline than you think you need, because small outlines fade faster on the ankle. A frequent mistake is sizing too small for the natural wear there. For showing it off, try sandals or rolled jeans and a minimalist anklet to frame the design.
Studio Day Picks
The collarbone, outer bicep, and ankle pieces above each demand different prep, so pack a few things to keep the session smooth.
-
Tattoo stencil transfer paper kit. Lets you test placement on skin before the needle touches it, especially useful for asymmetrical collarbone work.
-
Topical numbing cream. Applied about 45 minutes before can reduce ribcage and inner arm discomfort for longer sessions.
-
Thin protective film roll. Helps ankle and hand tattoos stay clean under friction during the first few days.
-
Fragrance-free gentle body wash. Cleans healing tattoos without stripping color, ideal for calf and forearm pieces.
-
Aquaphor healing ointment. Thin layers in the first 48 hours keep fine line work from drying into flakes that pull pigment away.
7. Sleeve Accent: Koi Wrapped with Blackwork Waves
This hybrid lets the koi retain realism while the surrounding waves use blackwork to anchor contrast. Pain on the forearm is moderate and sessions can be split into 90-minute fills. Tell the artist you want the fish rendered with stipple shading and the water in saturated black to keep the focal point clear as the sleeve ages. A common mistake is crowding the fish with too many background motifs, which reduces depth. Pair this with rolled sleeves or a linen shirt with cuffed sleeves to show the transition between realism and blackwork.
8. Hand-Edge Koi, Single-Scale Realism
Hand tattoos face heavy fading from washing and daily use. Artists debate whether realistic detail belongs on the hand. One camp says hands are fine for bold, simplified motifs. The other camp warns that tiny realism on hands breaks down fast. If you want this, ask for simplified scale work and accept a likely touch-up at year one. Sessions are short but healing is tricky. Hand tattoos can affect hiring in some fields, so weigh visibility before booking.
9. Back-Shoulder Koi with Floral Frame
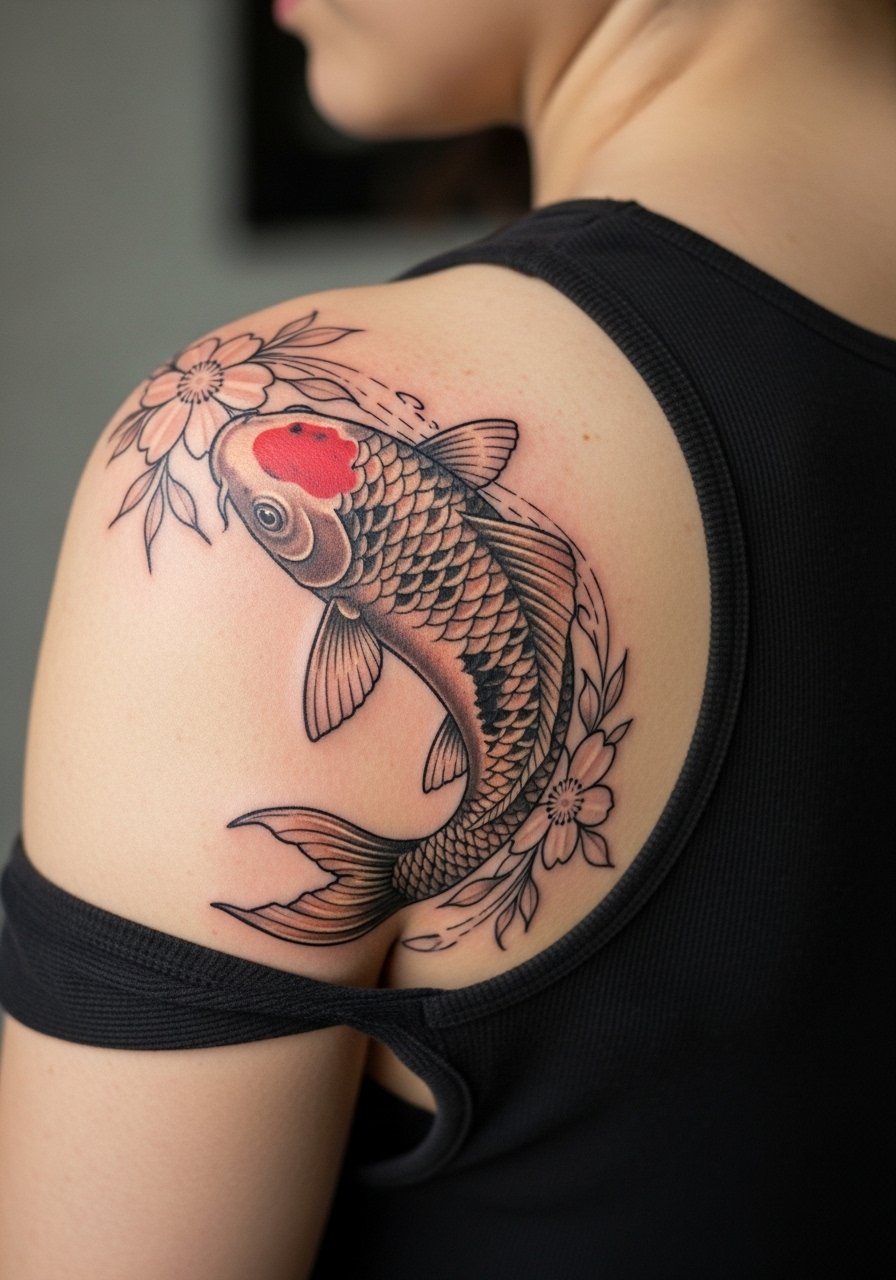
Shoulder blade pieces tolerate detail and color well because the skin is stable. Pain is low to moderate, and sessions are comfortable enough for larger fills. Tell your artist you want the flowers to be secondary, with muted saturation so the koi remains the focal point at distance. A common error is putting heavy black behind both fish and flowers, which can flatten the image. For the studio, wear a loose tank top you can shift without full removal.
10. Thigh Panel: Koi Breaking Surface
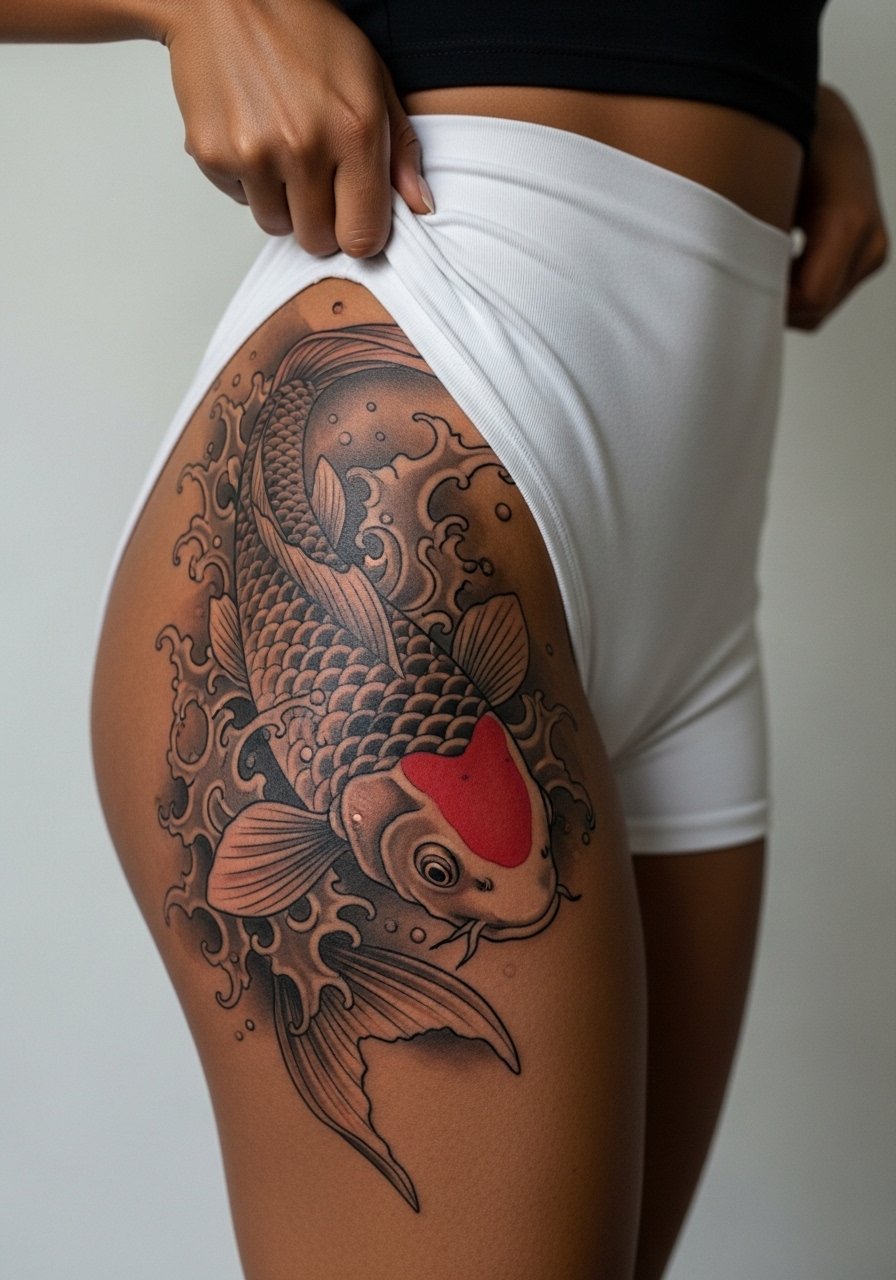
Thighs are forgiving for realism because the canvas is broad and less sun-exposed. Pain varies but is often lower than ribs. Sessions can be long and broken into two-day appointments. Ask for deeper contrast in the lower fin to hold shape over time. A mistake is packing too much tiny dot work near the edge where fabric rubs; that detail can disappear. For recovery and showing off, consider flowy skirts or high-waisted shorts so you can reveal just the panel.
11. Sternum Koi with Subtle Color Accents
Sternum work is intimate and sensitive, and it takes discipline to sit through the session. Pain levels are high and breathing control helps. Fine realism here risks blurring because of chest movement. One practical tip is to request slightly larger scale patterns so the contrast survives stretch and compress cycles. For the session wear a fitted sports bra that gives the artist access without exposing more than needed. This placement may require a specialized artist comfortable with chest anatomy.
12. Calf-to-Ankle Flowing Koi Band
Bands wrapping the lower leg read well in motion because the koi follows muscle lines. Expect multiple sessions and noticeable soreness the next day. Tell your artist to keep negative space in the band so the design reads when standing and when walking. A typical mistake is losing the tail detail where the band narrows. For daily wear choose shoes and socks that reduce rubbing during the first two weeks and try a soft linen pant for travel days.
13. Inner Bicep Micro-Realistic Koi
The inner bicep heals differently because the skin is softer and rubs against the torso. Pain is higher toward the armpit and sessions are shorter to limit sweat. Ask for a slightly coarser shadow technique like whip shading to keep the fish readable over time. People often ask for extreme tiny detail there, which tends to blur through regular arm movement. For the appointment wear a sleeveless button-down you can open to provide access without overheating.
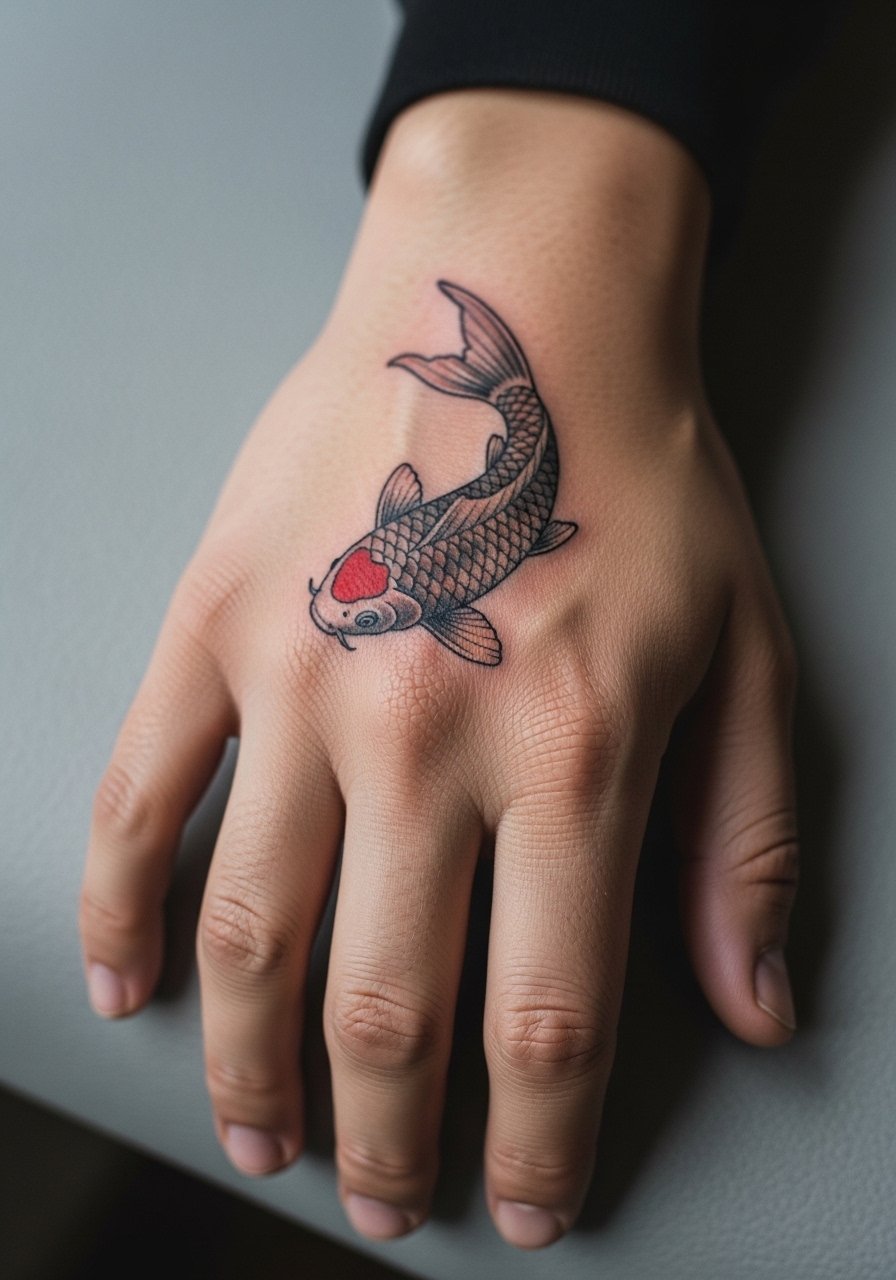
14. Small Finger Koi Accent
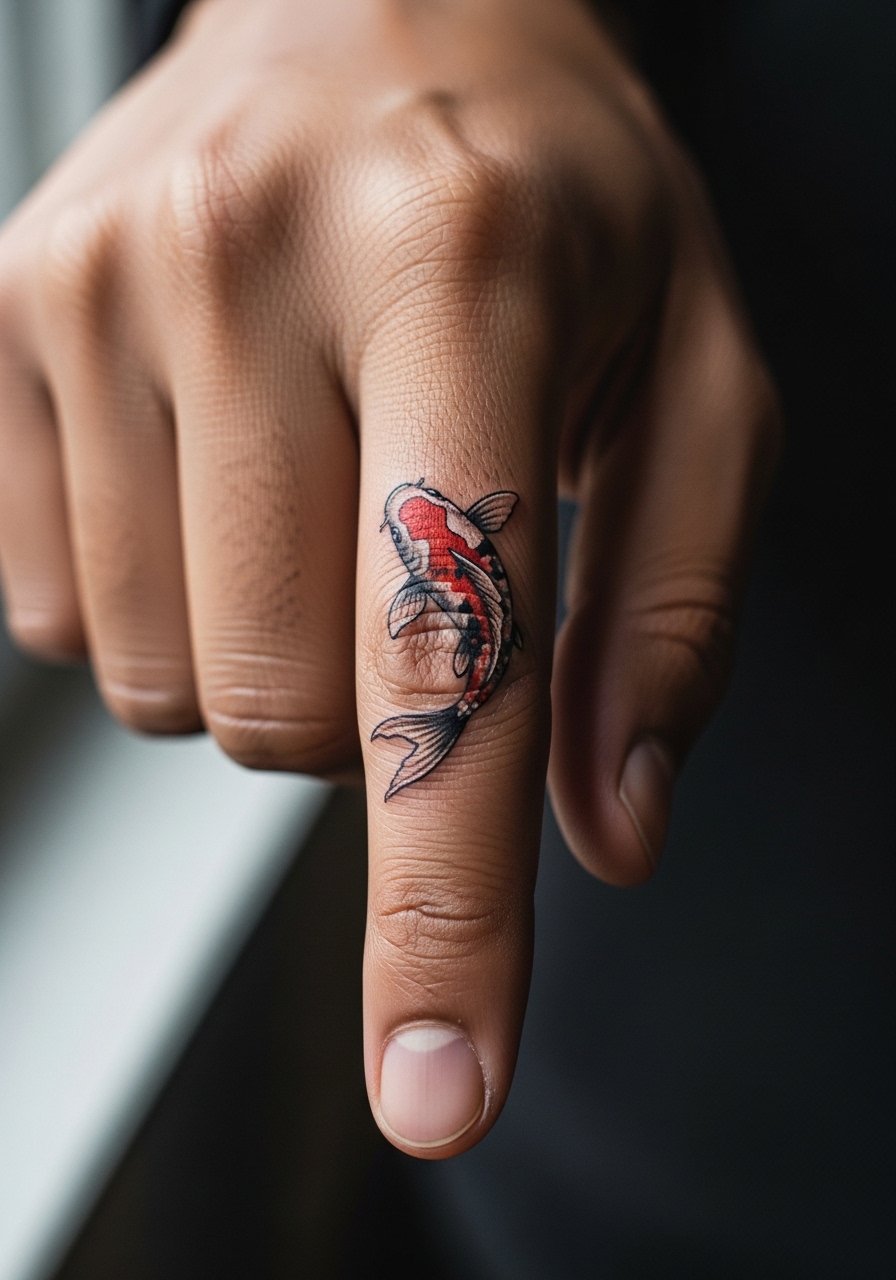
Finger tattoos see heavy wear and washing, which is hard on realism. Expect touch-ups and faster fading. If you want a finger koi, discuss simplified shapes and bolder outlines to retain the form. A common mistake is choosing multi-color detail that quickly becomes patchy. For a polished look pair with delicate rings rather than heavy bands so the ring metal does not rub the tattoo while it heals.
15. Full Back Scene: Multiple Koi in Motion
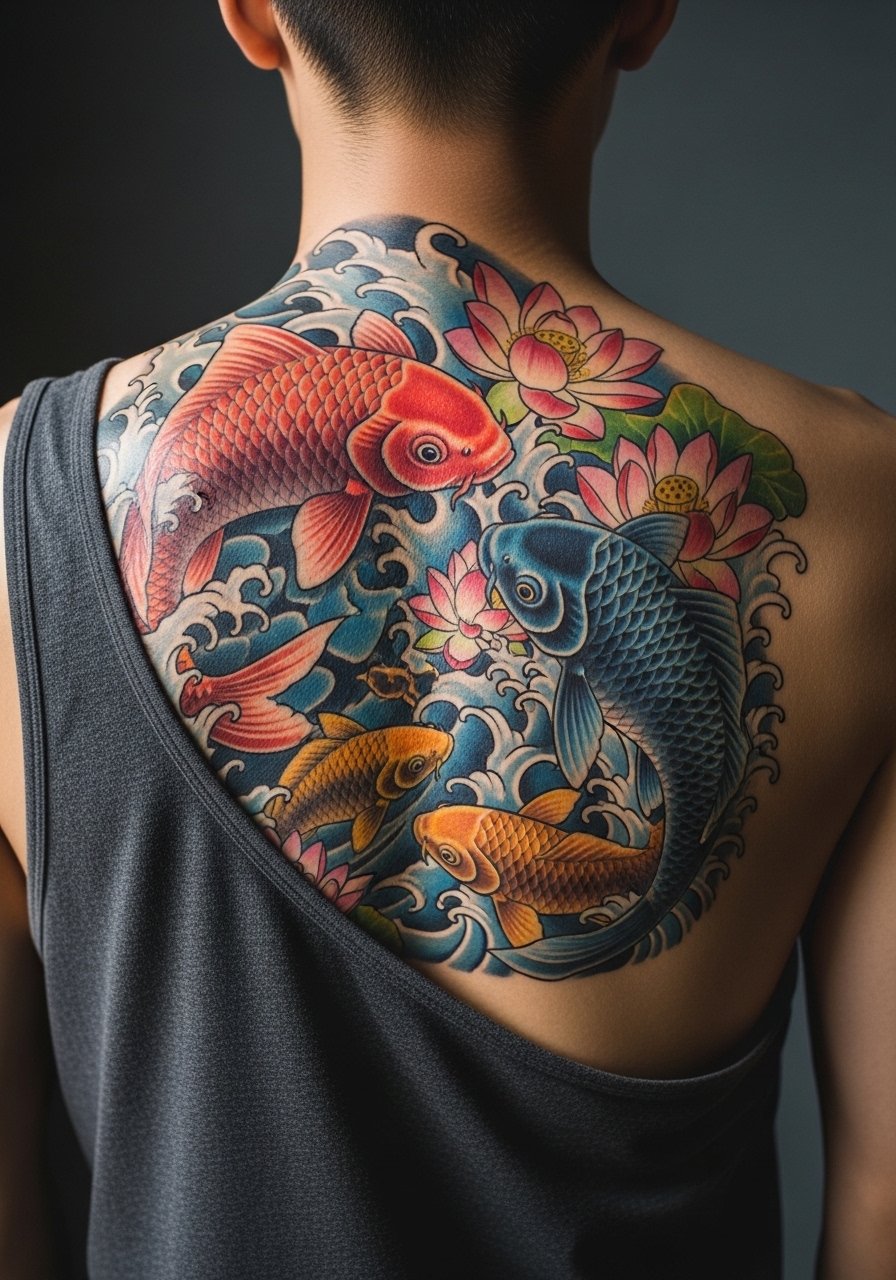
A back piece allows storytelling across multiple koi and landscape elements. Sessions will span months and require stamina. Tell the artist you want a long-term plan with staged contrast and not to overwork highlights too early. The mistake here is crowding too many elements in the first session, which flattens depth. For the chair, wear a top that you can remove without chill, and plan loose fitting clothing for the ride home.
16. Hip-Side Koi with Minimalist Scales
Hip tattoos are partly hidden by clothing and age well because of limited sun exposure. Pain varies but the hip edge can be sharp. A smart request is to space scale detail and favor larger gradients that keep the fish readable under stretch. People sometimes choose dense dot work at the hip crease which wears unevenly. For the session wear high-waisted bottoms you can lower slightly without full undressing.
17. Neck-Side Micro Koi Near the Hairline
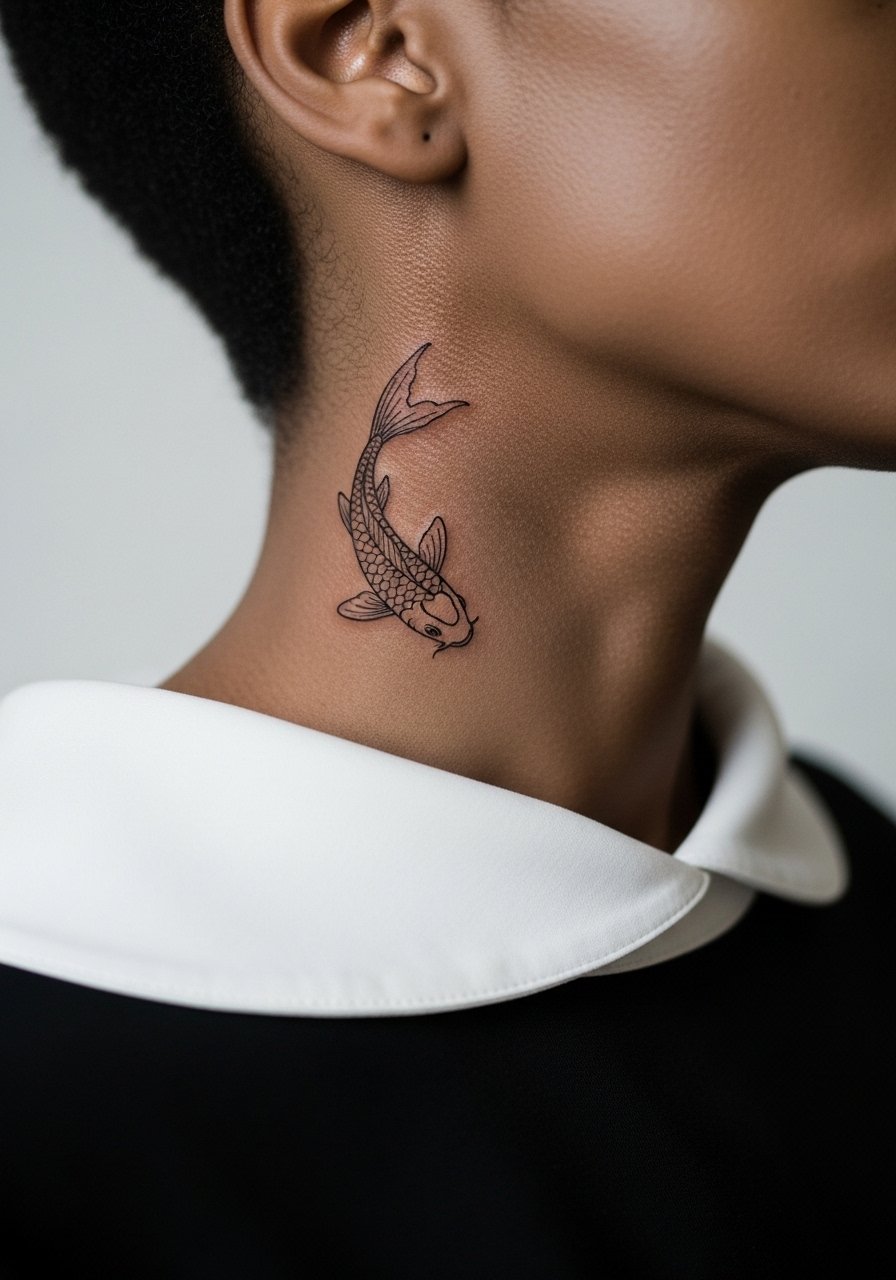
Neck placements are very visible and the skin there moves a lot. Expect higher touch-up rates and social visibility consequences. Artists split on micro realism for necks. One camp says keep it bold and graphic. The other suggests small realistic pieces can work with expert depth control. If you pursue this, make the design slightly larger than you think for long-term clarity. For the appointment wear a wide-neck shirt you can shift without exposing the chest.
Frequently Asked Questions
Q: How long does a realistic koi tattoo keep its detail on the ribs and sternum areas?
A: It depends on size, your skin, and sun exposure. Ribs and sternum see more stretch and movement so fine detail often needs touch-ups within two to three years. Asking for slightly larger contrasts and planning a touch-up timeline with your artist helps keep the detail readable.
Q: Can I get a realistic koi as a small hand or finger tattoo and expect it to last?
A: Small hand and finger realism fades faster because of frequent washing and friction. If you want longevity, ask for simplified shapes and bolder outlines, and budget for a likely touch-up within a year.
Q: Should I expect color to hold better on the calf or forearm for a realistic koi?
A: Calf skin typically holds saturation better due to less sun and abrasion. Forearms get more sun exposure, so color may need re-saturation sooner. Planning placements with clothing habits in mind makes a difference.
Q: Are there special wardrobe tips for the first week after a thigh or hip koi session?
A: Yes. Loose, breathable clothing that does not rub the tattoo is key. For thigh and hip pieces try high-waisted shorts or flowy skirts to avoid friction on the fresh ink.
Q: How do I find an artist who can handle realistic koi without relying on influencer portfolios?
A: Use discovery pathways: look through local shop portfolios, check convention guest lists, and browse community threads for recent healed photos. Ask to see healed shots at multiple time points and a staged plan for touch-ups.
Q: Is it cultural appropriation to get a koi drawn in a traditional Irezumi style?
A: Koi motifs come from Japanese visual history and many people adapt them respectfully. Consider discussing intent with your artist and opting for a personal interpretation rather than replicating sacred or ceremonial panels.
