
Micro-realism looks like a secret at first glance. Tiny portraits, a single rose petal, an animal eye that reads like a photograph on a fingertip. The catch is that what photographs well fresh does not always age well on the body. Pick the right subject, the right placement, and the right prep and you get a piece that still reads in five years. Start with a design that already has clear contrast and the rest of this list will show you why certain small ideas hold up better than others.
1. Miniature Portrait of a Loved One on the Inner Forearm

A three to five inch portrait works best here because the inner forearm gives a flat canvas and steady healing. Tell your artist to focus on the eyes and nose and to simplify background tones so the face does not become a gray blob. Common mistake is requesting a one-inch full-face portrait which compresses tonal range and blurs into mush by year three. Expect a moderate session time and rubbing during clothes changes the first week. For the appointment wear a linen button down shirt you can roll up so the artist has full forearm access.
2. Pet Portrait Focused on Nose and Eyes, Ankle or Outer Calf

Micro pet portraits read best when the design isolates a defining feature like the snout or an eye reflection. If you want a two-inch piece keep the background empty and ask for strong contrast around the focal point. The ankle or outer calf works because they are low-friction when covered carefully. A frequent error is requesting full-body pet scenes that cram too much detail into a small space. For summer show-off moments, cropped pants or minimalist sandals frame ankle work without hiding it.
3. Micro Rose with Layered Petals on the Upper Arm
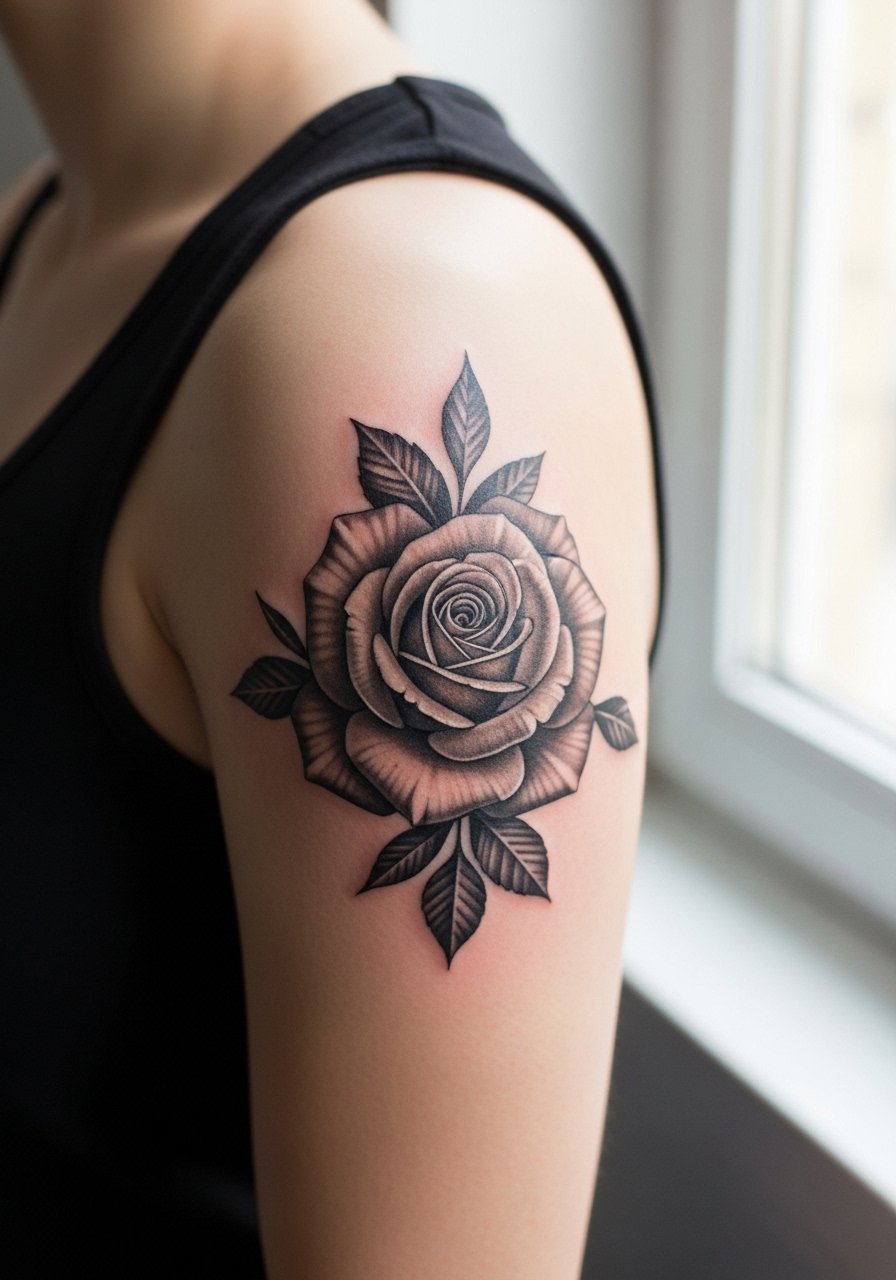
Roses work because petal edges create natural tonal contrast. Ask for layered petal shading with a clear darkest value in the center so each petal separates as it heals. The typical age-fail is too many midtones that collapse into one patch. Expect a short session and moderate pain on the upper arm. Pair the piece with sleeveless tops to show it off and bring a loose shirt for the ride home.
4. Fine Line Botanical with Micro-Realism Shading at the Collarbone
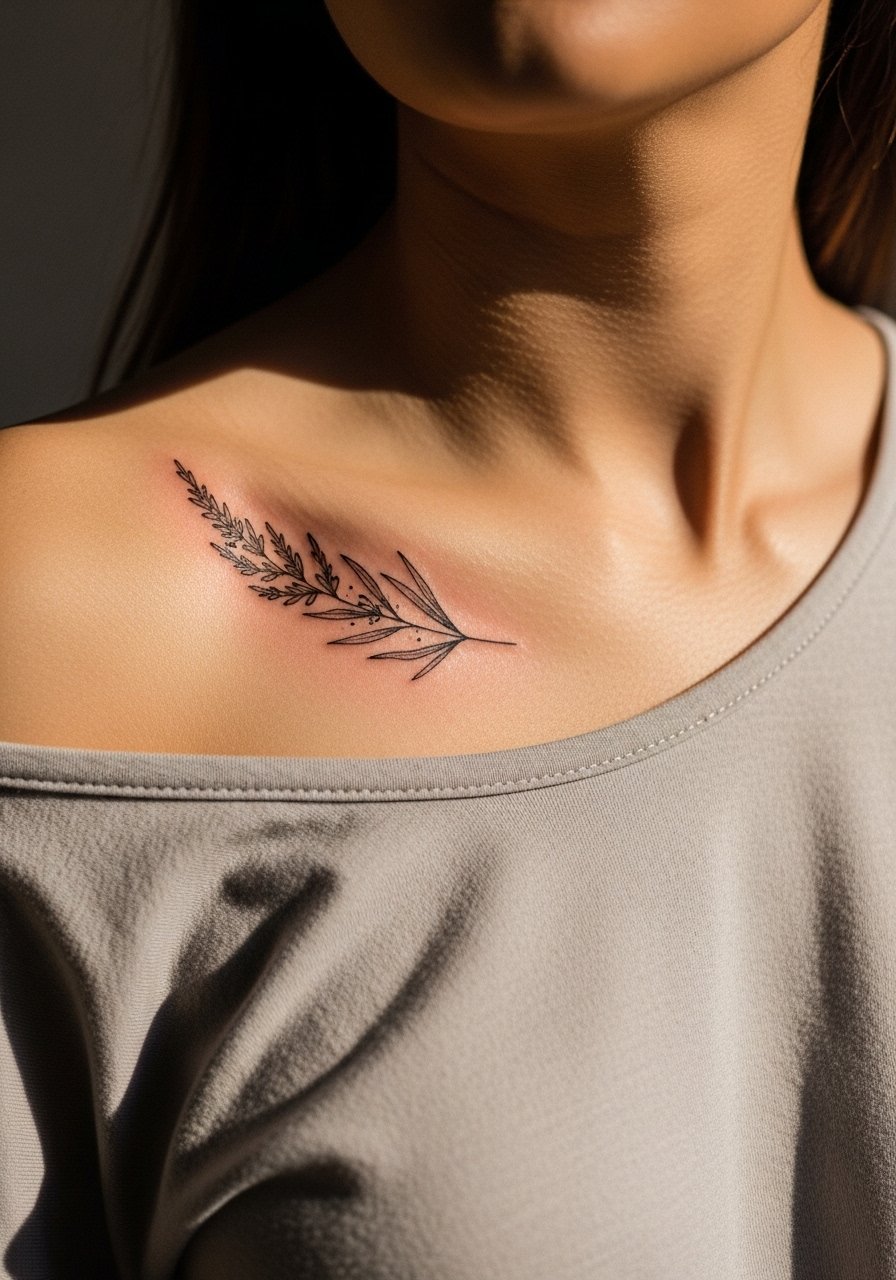
The collarbone offers a visible, low-motion spot that flatters fine line micro-realism. Request single-needle linework for stems and stipple shading for depth so the piece keeps texture without heavy saturation. A common mistake is dense shading that sits too close to the bone and scars; spacing matters. For evenings out layer a thin chain or wear a v-neck top that frames the design without covering it.
5. Micro Orchid Bloom with Smooth Gradients on the Ribcage

Ribcage pieces can be gorgeous but expect higher pain and more movement while breathing. Artists split on whether the ribs are ideal for fine line micro-realism. One camp says the skin stretch and motion blur hairlines in two to three years. The other camp argues that with slightly bolder spacing and proper needle depth the work settles fine. Ask your artist how they handle breathing areas and consider slightly larger scale so tonal compression has room to read. For the session wear a cropped top you can shift aside for access.
6. Realistic Mushroom Pair with Defined Light and Shadow on the Calf
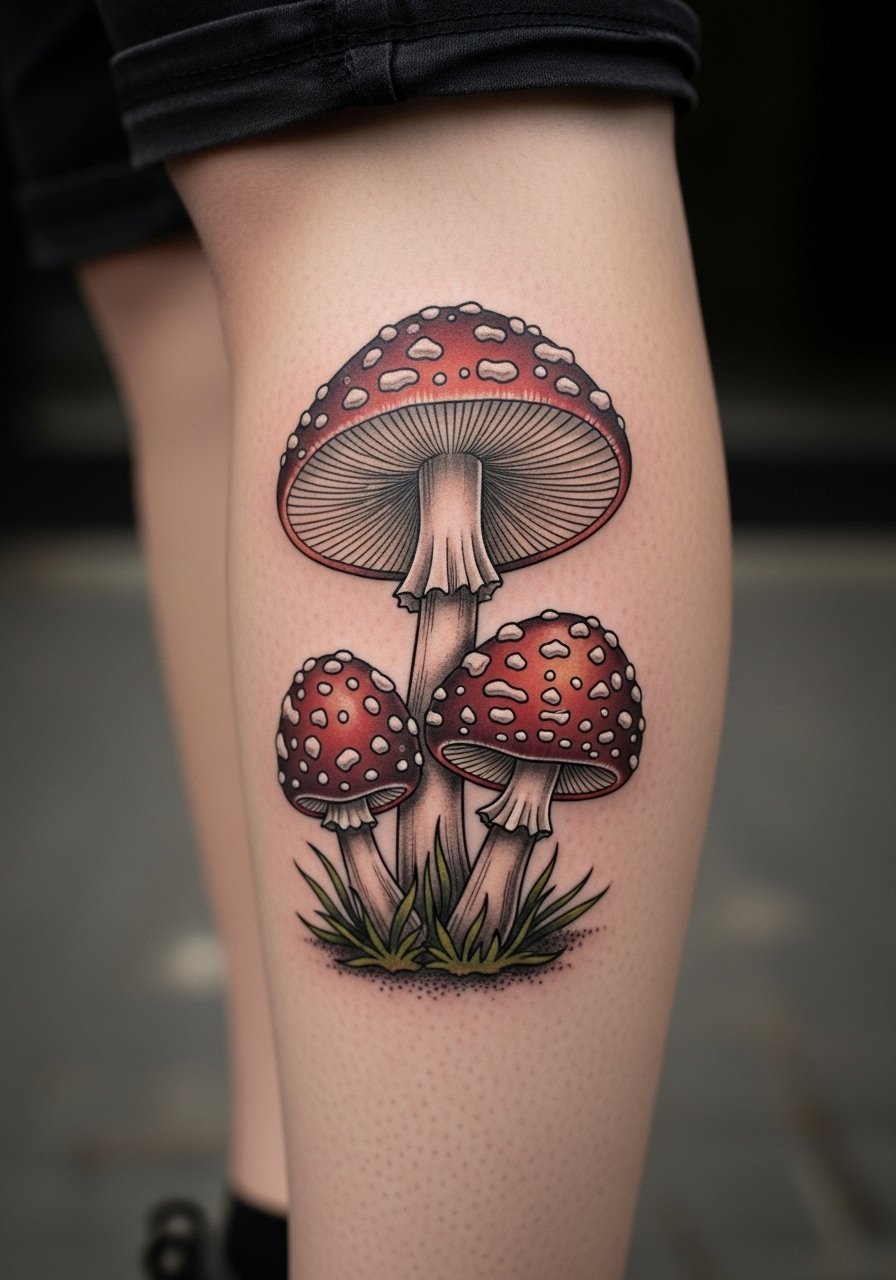
Small natural scenes with a clear single light source do very well at micro scale because light and shadow create instant legibility. Tell the artist to lock down a single directional light when they draw the stencil. The calf is a safe placement for this because it sees little friction from clothing. Avoid crowding multiple mushrooms into a postage-stamp circle. For the session wear loose shorts so the artist can roll the pant leg without pressure on the area.
Pre-Session Essentials
The wrist and ankle pieces above ask for different prep than chest and rib work, so these picks focus on smoothing the session and first week.
- Stencil transfer paper kit. Lets you preview the line placement on skin before the needle starts, which is useful for portrait and botanical stencils in the sections above.
- Topical numbing cream. Applied about 30 to 45 minutes before can ease ankle and rib sensitivity when your artist approves its use.
- Thin protective film roll. Helps keep low-friction spots like the wrist and outer calf clean during the first few days.
- Fragrance-free gentle body wash. Cleanses without stripping the delicate shading that micro-realism depends on.
- Aquaphor healing ointment. Thin layers in the first 48 hours lock in moisture while letting lines settle.
7. Tiny Sunflower Head with Crisp Center on the Wrist

Sunflower centers are texture-rich which makes them legible at micro scale. For a wrist piece make sure the center contrast is strong so the tiny seeds separate as they heal. Common mistake is asking for multiple petals with no solid center which becomes a blurred ring over time. Wrist work sees a lot of washing so expect a possible touch-up at year two. Pair with a minimalist watch or thin bracelet stacked on the opposite wrist to avoid crowding the tattoo.
8. Bird Head Detail with Feather Texture on the Shoulder Cap

Feathers compress well because each barb has inherent contrast. Ask your artist for tight feather strokes with clear highlights so individual quill textures survive. A bad version packs too many feather layers into a tiny space and reads like blotchy gray later. Shoulder cap placement is forgiving and moves less than the upper arm. For the session wear a loose tank top that the artist can work around easily.
9. Old Photo Style Portrait in Grayscale on the Upper Back

A vintage photo vibe in black and gray reduces color-fade concerns and reads clean when scaled to two to four inches. The upper back provides a flat surface and typically heals with minimal friction, which helps micro tonal work hold. A common mistake is over-texturing the hair in a very small piece which creates noise rather than focus. For beach or evening wear choose a low back dress to show off spine-adjacent pieces.
10. Sprig of Lavender with Delicate Shading on the Inner Bicep
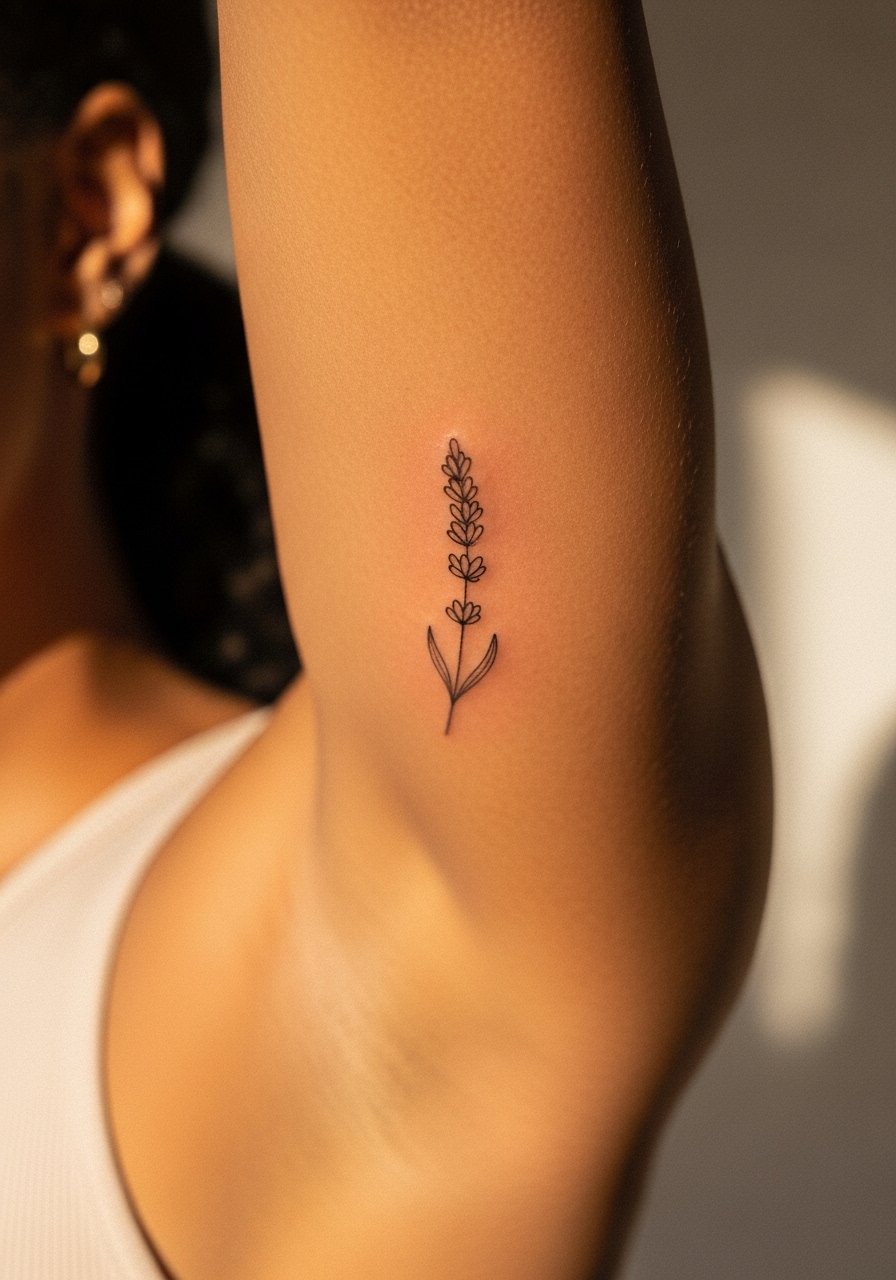
Inner bicep skin moves and sweats more than the outer arm, so ask for slightly bolder spacing between florets and light stipple shading that will not merge. Artists sometimes disagree about inner arm micro-realism because of motion and sweat. One group says the area is too dynamic for hairline work. The other says careful depth and spacing make it fine. If you prefer less risk, scale up modestly. Wear a breathable tank top for the appointment so the artist can access the area without pulling fabric tight.
11. Micro Leaf with Dew-Drop Highlight on the Finger
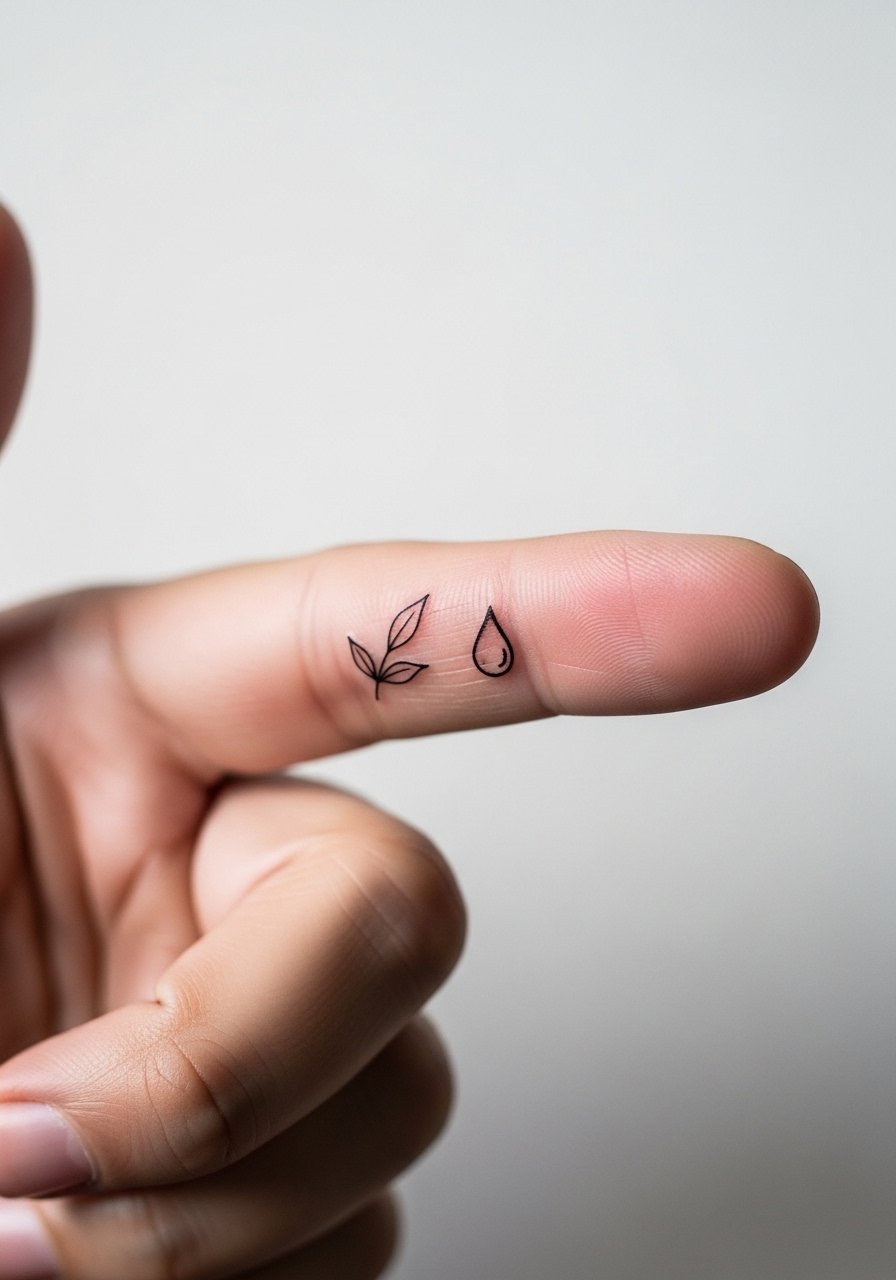
Finger tattoos face friction and frequent washing which accelerates blur. A single leaf with a clear dew-drop highlight reads better than a complex vine. Tell the artist to leave negative space around the drop so it keeps contrast. The mistake is adding thin shading around the finger that fades into gray. For jewelry pairing choose a dainty ring set that complements the scale without covering the art.
12. Landscape Wave with Foam Texture on the Outer Thigh
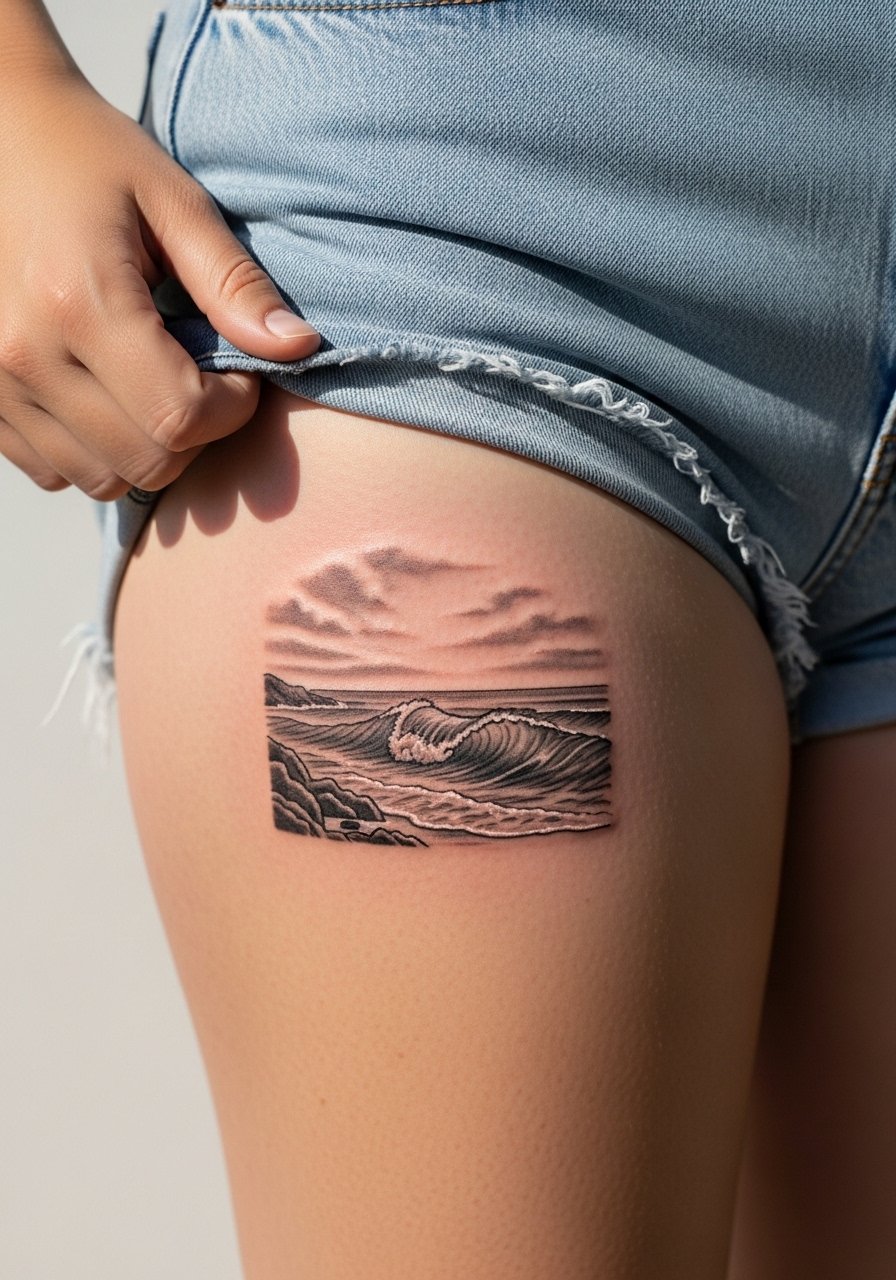
Outer thigh gives room for a two to four inch scene while staying relatively low-friction from clothing. Tonal compression is key here so the foam texture reads as white space and darks anchor the wave. A common error is trying to compress a wide horizon into a square patch which collapses horizontal detail. For summer-ready outfits pick a mini skirt that frames the thigh without squashing the art under tight seams.
13. Fine Line Micro-Realism Hybrid: Botanical Band on the Forearm
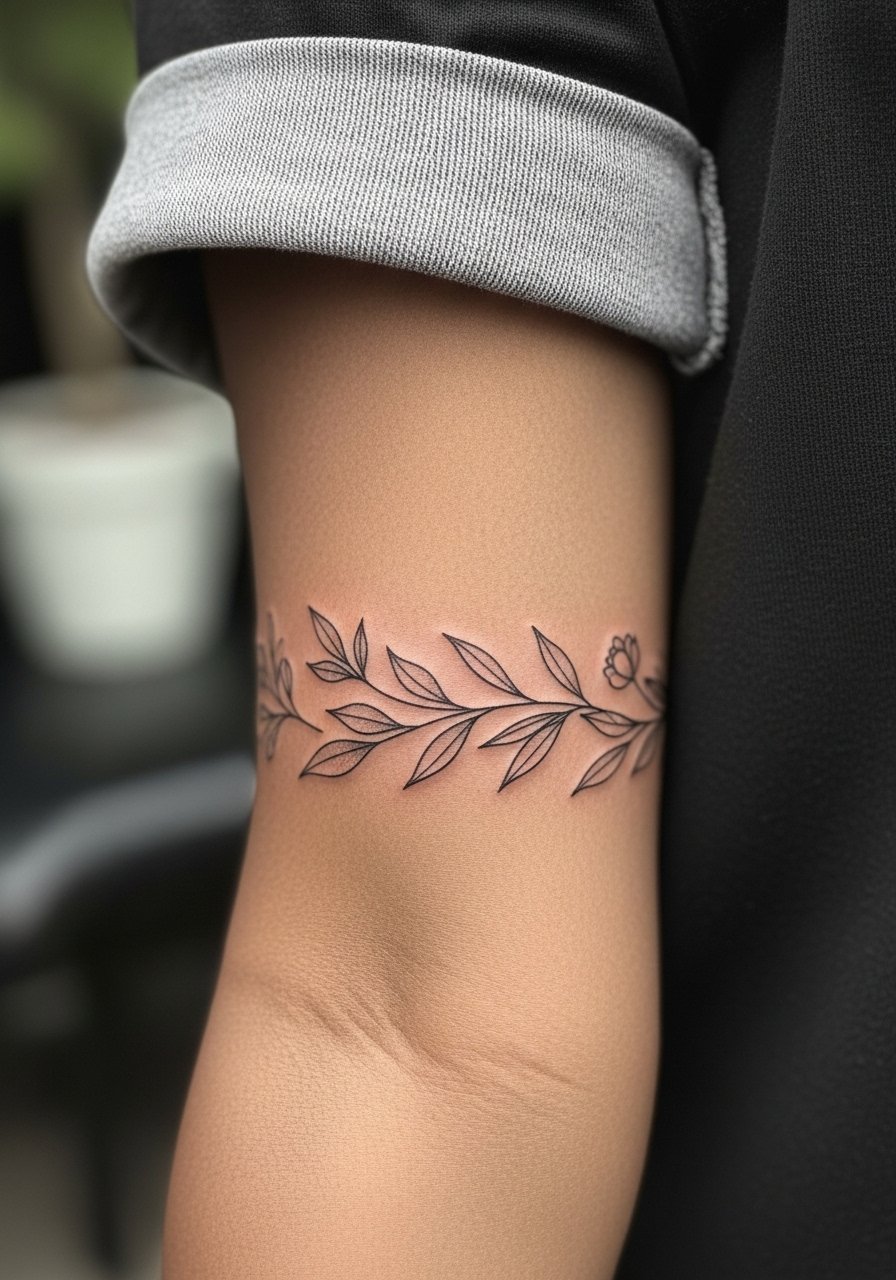
This hybrid uses hairline outlines with micro-realism shading tucked inside. It reads like jewelry and ages better if the lines get a touch of room to breathe. Common mistake is making the band too tight or too thin which invites early merging. When you consult, ask for spacing and small breaks in the band to prevent a visual "blur ring." For a neat daytime look wear a rolled sleeve linen shirt so the forearm sits visible without tight cuffs.
14. Tiny Moon Crater Study Behind the Ear

Behind-the-ear tattoos are intimate and subtle. They work for micro-realism subjects that have strong contrast like moon craters because the proximity to hair and noise helps hide minor blur. Make sure the stencil sits just below the hairline on the neck so the artist can place it precisely. Session time is short but the area can be slightly tender. This placement needs an artist who shows healed photos of similar spots because texture and hair interact differently after healing.
15. Sternum Starburst with Fine Shading

Sternum pieces are private and they move with breathing which affects how thin shading reads after a year. Request slightly bolder spacing for the rays so they do not merge. One mistake is demanding hairline rays across the whole chest which often loses shape as the skin shifts. Expect more pain and longer session times than limb work. For styling pick strap-friendly tops so you can show the piece safely without irritation.
16. Delicate Botanical Hip Tattoo with Single Bloom

Hip placements let artists breathe on scale without crowding. A single bloom or sprig with a small highlight reads clearly and avoids tonal compression pitfalls. Avoid complex backgrounds which create blur as the area moves with sitting and walking. For the session pick high-waisted shorts so you can lower the waistband a touch without exposing the rest of your midriff.
17. Fine-Grain Feather Fragment on the Lower Back
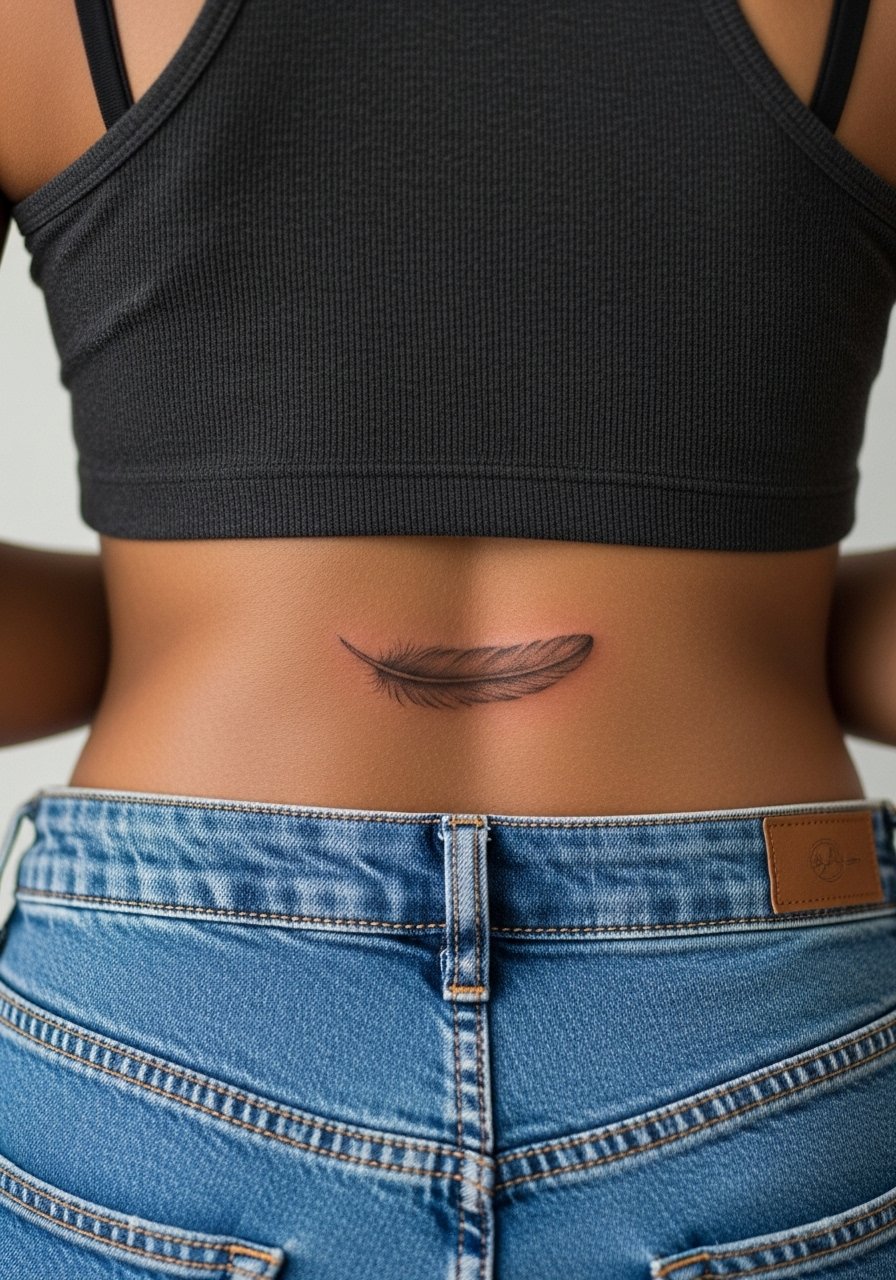
Lower back pieces age well if kept small and aligned with body contours so the feather follows muscle lines. Ask for a single light source in the design to keep barbs distinct. The biggest mistake is packing too many tiny strokes into a narrow band which invites blowout after a few years. When dressing for show-off moments a backless top frames the lower back without pulling at the skin.
Frequently Asked Questions
Q: Will a micro-realism portrait on my forearm need touch-ups sooner than a bold traditional piece?
A: It often does because subtle gray tones and hairline shading depend on crisp saturation that can soften under friction. Expect a touch-up around year two to three for portraits on commonly used areas. Choosing a slightly larger scale and asking the artist to lock in the darkest values helps the piece keep its structure longer.
Q: Is a pet portrait size of two inches realistic for an ankle placement?
A: Yes, if the artist isolates one strong feature like the eye or nose and avoids busy backgrounds. The ankle tolerates small work but remember it sees shoe friction and frequent washing. Prep with good moisturizing before the session and keep the first week free of tight socks.
Q: How does skin tone affect micro-realism choices, especially for grayscale pieces?
A: Darker tones can still carry micro-realism but the artist may use higher contrast and slightly bolder spacing so highlights read. From what I have seen, artists adapt by increasing the darkest values and preserving negative space. Always ask to see healed photos on similar skin tones before booking.
Q: I want a fine line collarbone piece. What should I wear to the appointment?
A: Bring a wide-neck shirt that you can pull aside or a button-down you can open. The goal is easy access without fabric rubbing the site while it heals.
Q: Are numbing creams recommended for micro-realism sessions on sensitive placements?
A: Artists are split on numbing. Some prefer no topical so they can feel skin feedback and control depth. Others approve light numbing to ease client comfort for chest or rib sessions. Ask your artist where they stand and follow their timing rules if you plan to use one.
Q: How do I find a reliable micro-realism artist near me without following an influencer?
A: Search tags like #microrealismtattoo and #finelinemicrorealism with your city name, review portfolios for multiple healed pieces rather than only fresh photos, and post in local subreddit threads for peer referrals. Platforms that let you filter by style and show reviews also help narrow the list.
Q: What is the most common mistake people make when choosing a micro-realism design?
A: Squeezing a complex subject into too small a space. Tonal compression matters more than aesthetics. Pick subjects with inherent contrast and give the design room to breathe so it survives the first years without looking like a gray smudge.
