
Fine line tattoos are everywhere on feeds right now, but the pieces that still look sharp after a few years are rarely the tiniest ones done without thought. I see three recurring problems in consultations: ultra-fine lines that fade fast, tiny scripts that blur, and surprise costs that push people to pick smaller designs than they really want. Below are 21 flowy, minimalist ideas that balance style with real-world wear so you can choose something that looks great day one and holds up over time.
1. Single-Line Mountain Silhouette on Inner Forearm
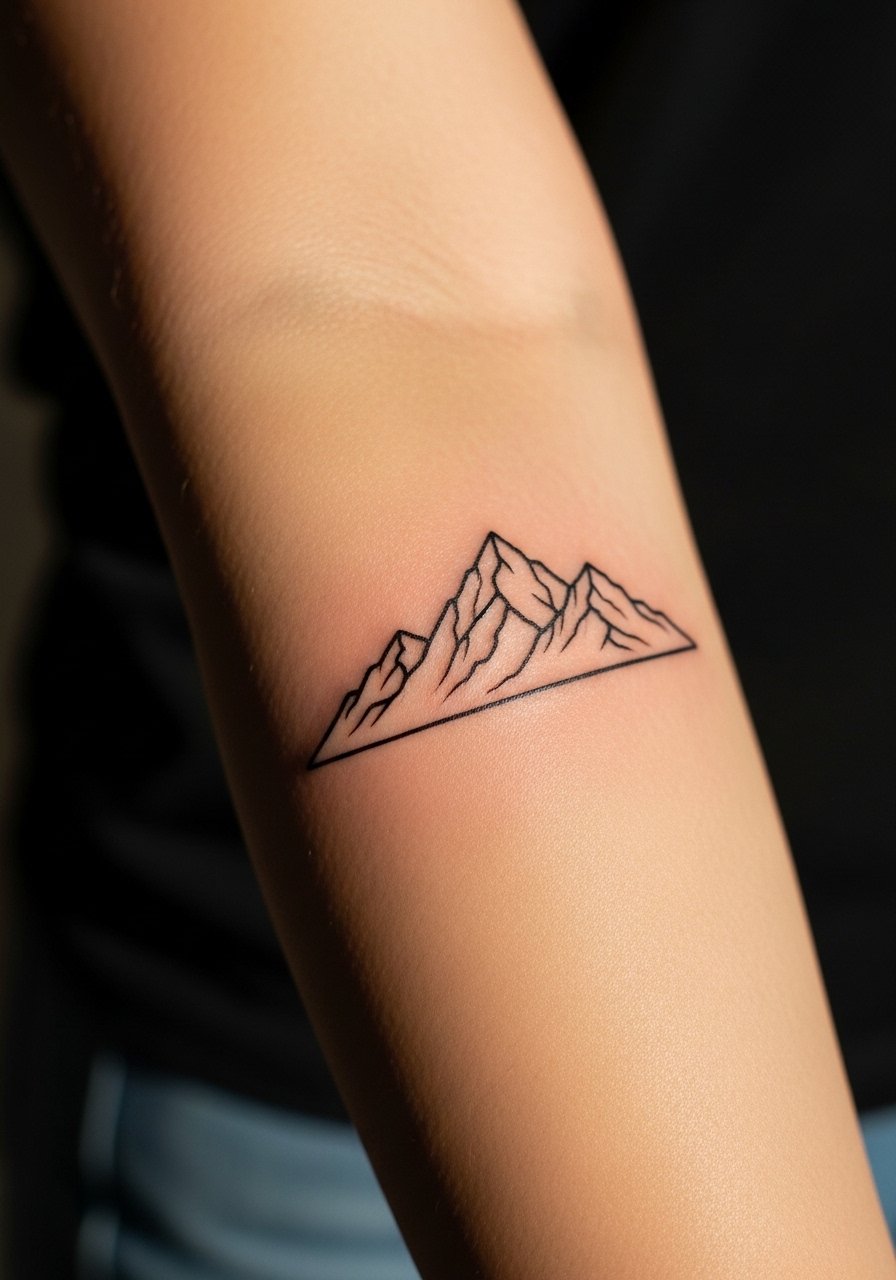
I often recommend the single-line mountain when someone wants an icon that reads at a glance and keeps its shape. For inner forearm placement expect a session that is mild to moderate on pain and usually done in one focused sitting. Tell your artist you want a slightly heavier single needle weight so the peaks hold for years and ask for 2-3mm of negative space at crossing points. A common mistake is asking for hairline strokes that vanish after a year. For showing it off, roll up a linen rolled cuff shirt so the silhouette sits against neutral fabric without competing with bracelets.
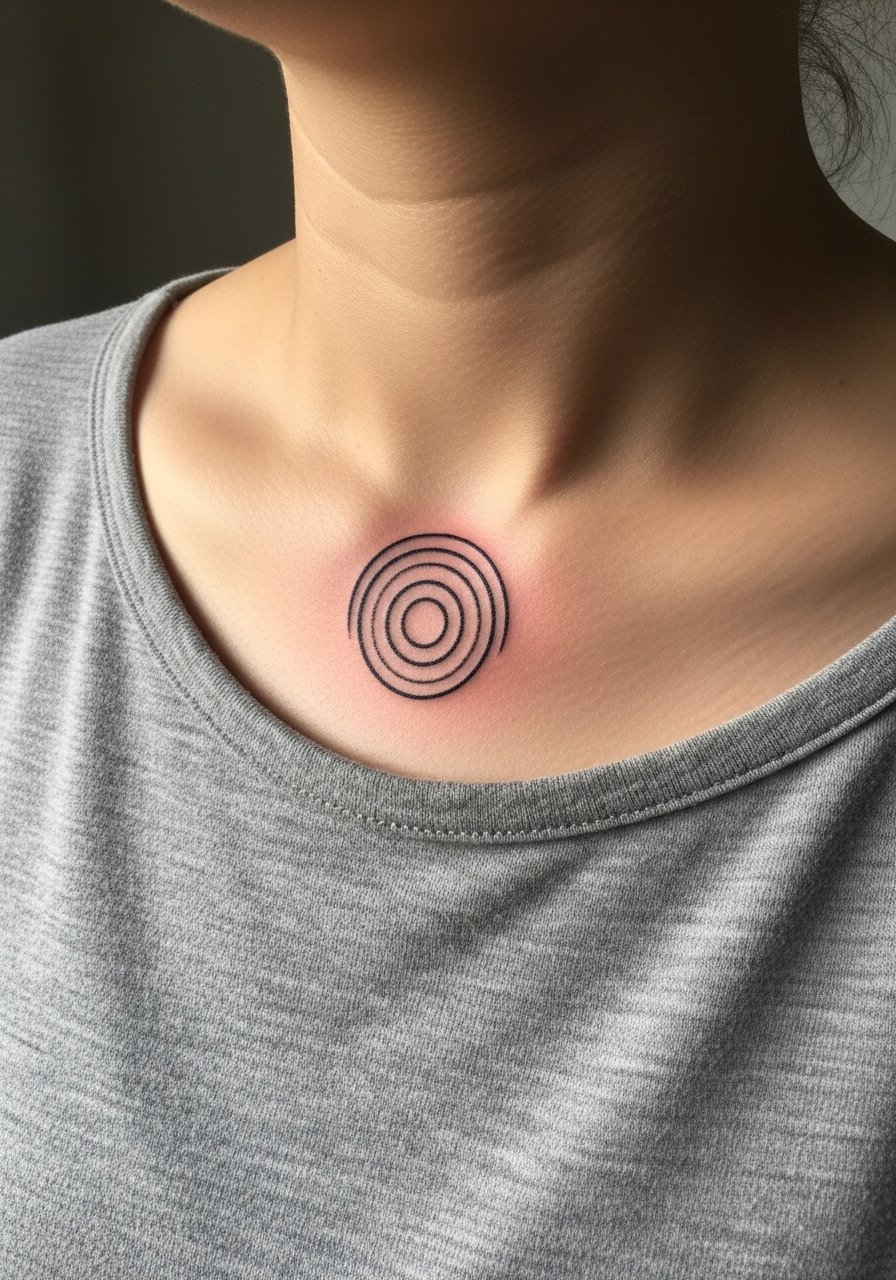
2. Fine Line Single-Stem Flower on the Collarbone
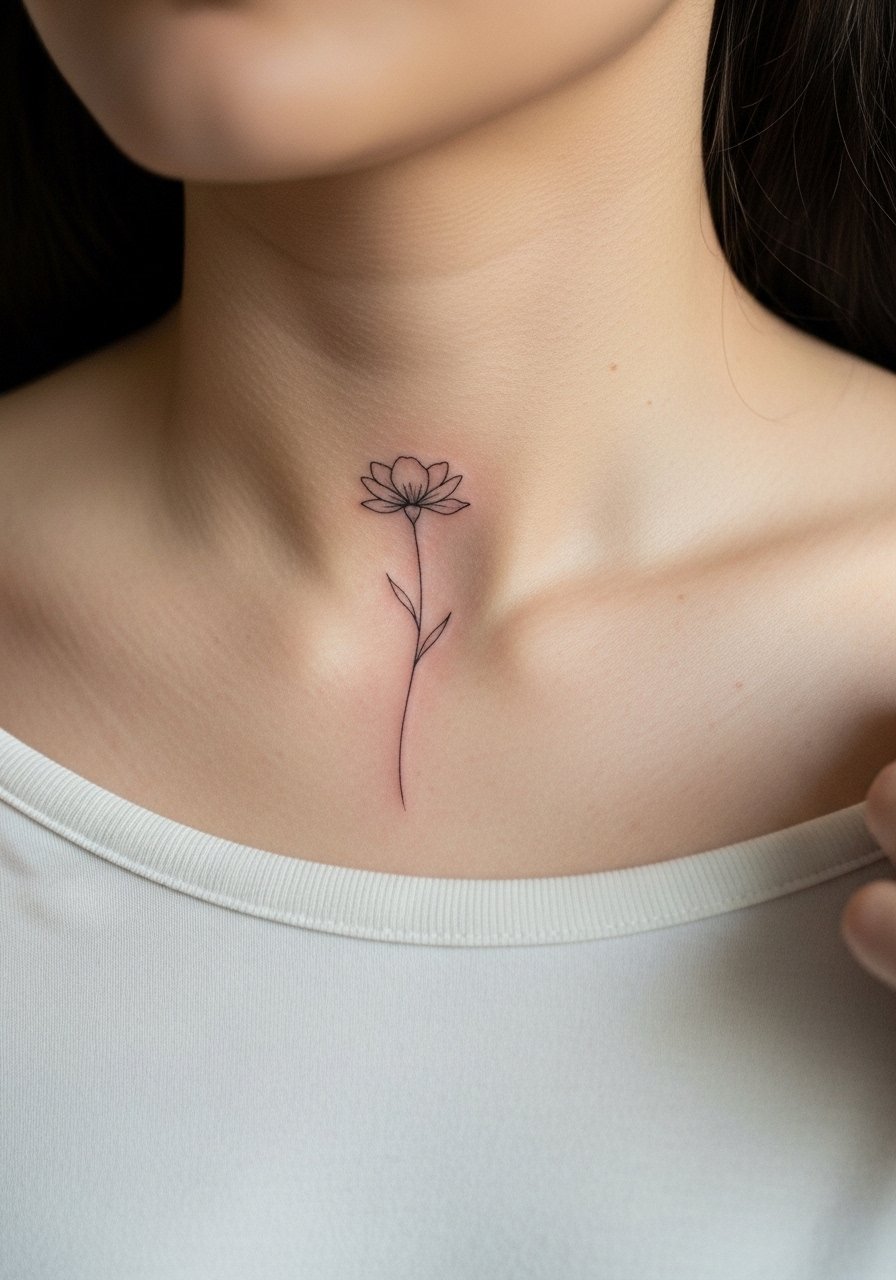
This collarbone botanical is a go-to for people who want feminine flow without heavy detail. Expect a sensitive session near bone and a quick single session for a 1-3 inch stem. Ask your artist to keep line spacing at least 2mm between petals so the small negative areas age cleanly. The version that ages poorly packs tiny overlapping detail into a 1-inch space, which blurs within a few years. For evenings out pair the design with an off shoulder linen blouse so the flower peeks from one shoulder.
3. Perfect Single Circle Behind the Ear
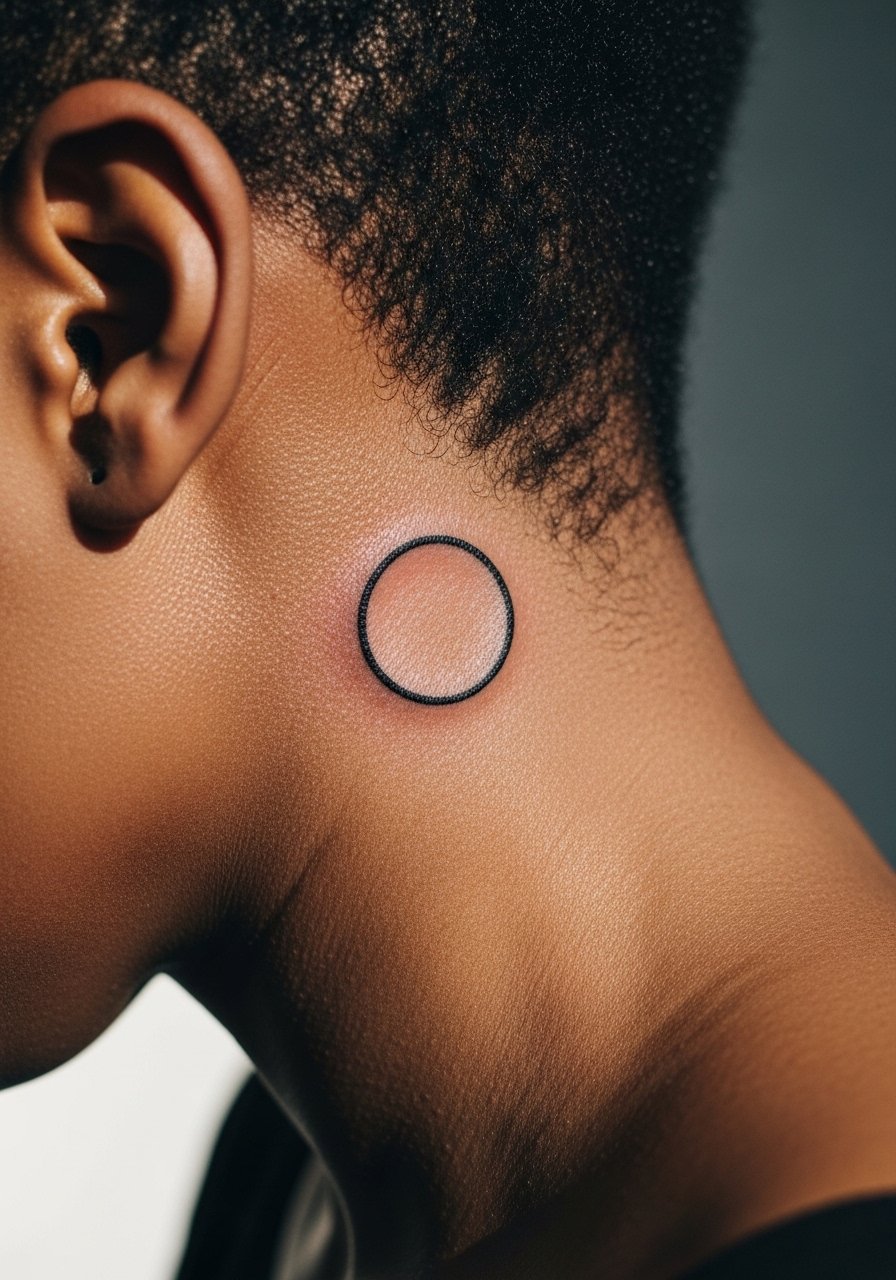
Micro circles behind the ear are subtle and very low commitment. The skin there is thin so the biggest error is making the ring too skinny. When you consult, ask for a slightly bolder stroke so the circle reads after healing. Pain is low for most people and session time is under 30 minutes. For a neat finish wear a sleek updo and small studs on the opposite ear, for example a minimal stud earrings set. Behind-ear work needs a tidy stencil and an artist comfortable with micro placements.
4. Clean Triangle Composition on the Ankle

Ankle triangles pair geometric strength with a flowy attitude when lines are slightly curved. The ankle can feel like a seven for pain for some people. The most common mistake is shrinking the triangle past its readable limit. Ask for at least 1.2 inches on each side so symmetry reads while still being compact. For summer visibility cuff your pants with cuffed ankle pants or wear simple sandals. Expect touch-ups earlier than forearm pieces because the ankle sees more friction.
5. Ultra-Delicate Pencil-Sketch Wave on the Forearm

I recommend the pencil-sketch wave to people who want movement without heavy ink. This is a single-needle look, so ask the artist to aim for a "sweet spot" line weight that reads delicate but still sinks into the dermis. At six months the sketch has a soft edge, and by year two it can start to fade if lines were too thin. Avoid asking for micro crosshatching in a one-inch space because that creates future blowout risk. For session comfort choose a short-sleeve loose top and show it off with a rolled cuff in an olive button down so the flow reads with your arm movement.
6. Graphic Continuous Line Abstract on Upper Arm
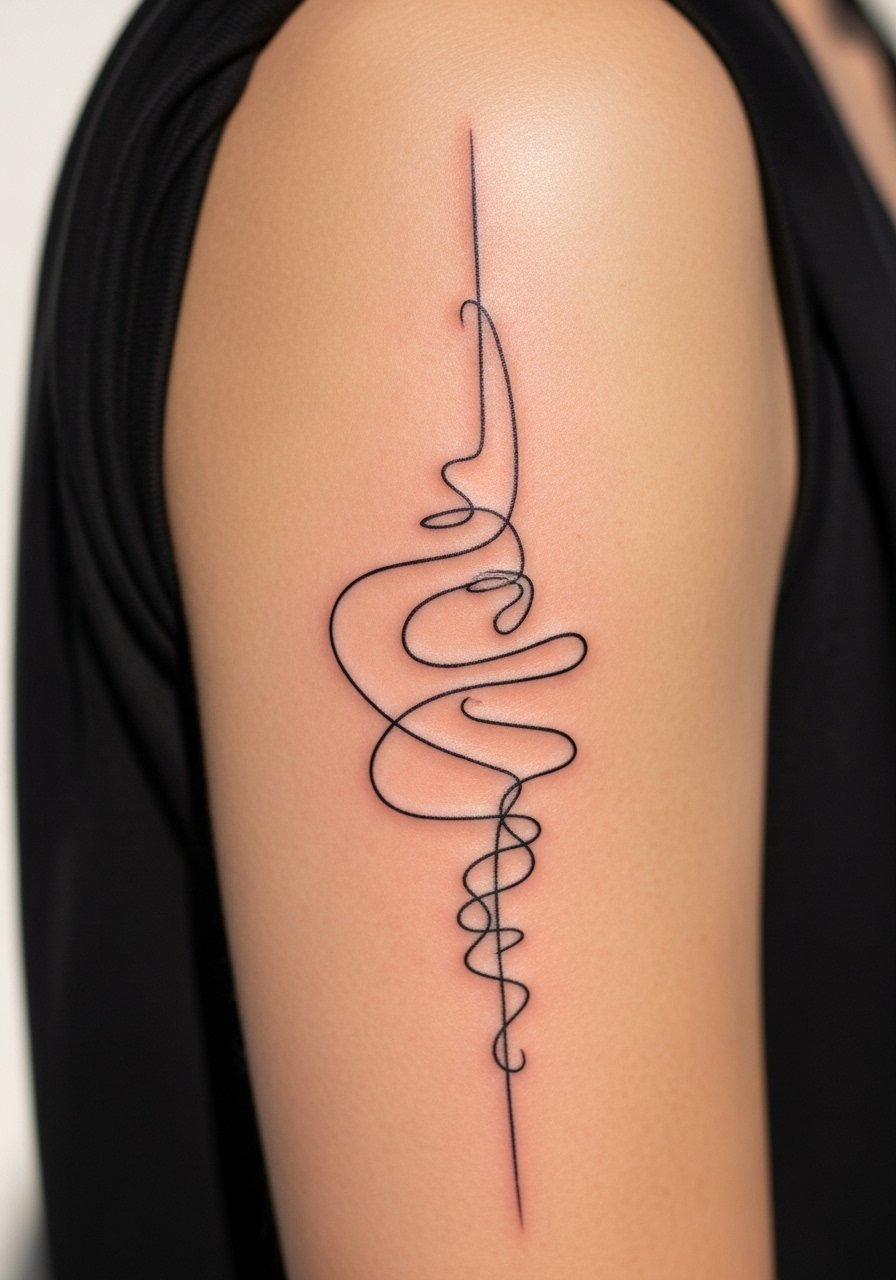
Continuous-line abstracts are a good choice if you want bold composition without dense filling. They age well when negative space is planned into the sketch. During the consultation bring photos that show the exact continuous path you like and ask for 2-3mm spacing where lines cross to prevent merging. Upper arm flesh is forgiving so session pain is lower and touch-ups are often minimal. Pair this style with short-sleeve shirts or a loose fit short sleeve shirt so the shape reads as you move.
Pre-Session Essentials
The wrist, ankle, and collarbone pieces above have different prep needs, and a few small items make sessions smoother and the first week less fussy.
- Stencil transfer paper kit. Lets you preview placement directly on skin, helpful for wrist and collarbone designs above.
- Topical numbing cream. Applied per instructions eases discomfort on sensitive spots like the ankle and ribcage.
- Thin protective film roll. Keeps small areas like fingers and wrists clean during early healing when friction is highest.
- Fragrance free gentle body wash. Gentle cleansing prevents irritation around fine line work on the forearm.
- Aquaphor healing ointment. Thin application for the first few days helps fine lines retain contrast without clogging the surface.
7. Micro Rose Silhouette on the Wrist

Wrist roses read like tiny icons when done as silhouettes. The wrist is high-motion so the biggest mistake is packing too many tiny petals into a small area. Ask for bold silhouette edges and a 1-2mm inner space to prevent merging. Sessions are short but expect regular hand movement to test healing. For showing off and keeping the area visible without crowding try a thin gold chain bracelet on the opposite wrist, which frames the rose without competing. Plan a realistic touch-up around year two for micro florals.
8. Symmetric Three-Circle Geometric on the Collarbone
Three-circle motifs are gender-neutral and work well on the collarbone when each circle keeps space between it. The consultation should include a stencil check so the symmetry aligns with bone landmarks. A common error is shrinking the circles so proportions fall apart on curved collarbone flesh. Pain is moderate and session time is quick for sub two-inch work. For styling, an off shoulder cream camisole shows the motif without tugging fabric over the ink.
9. Simple Leaf with Stem on the Ribcage
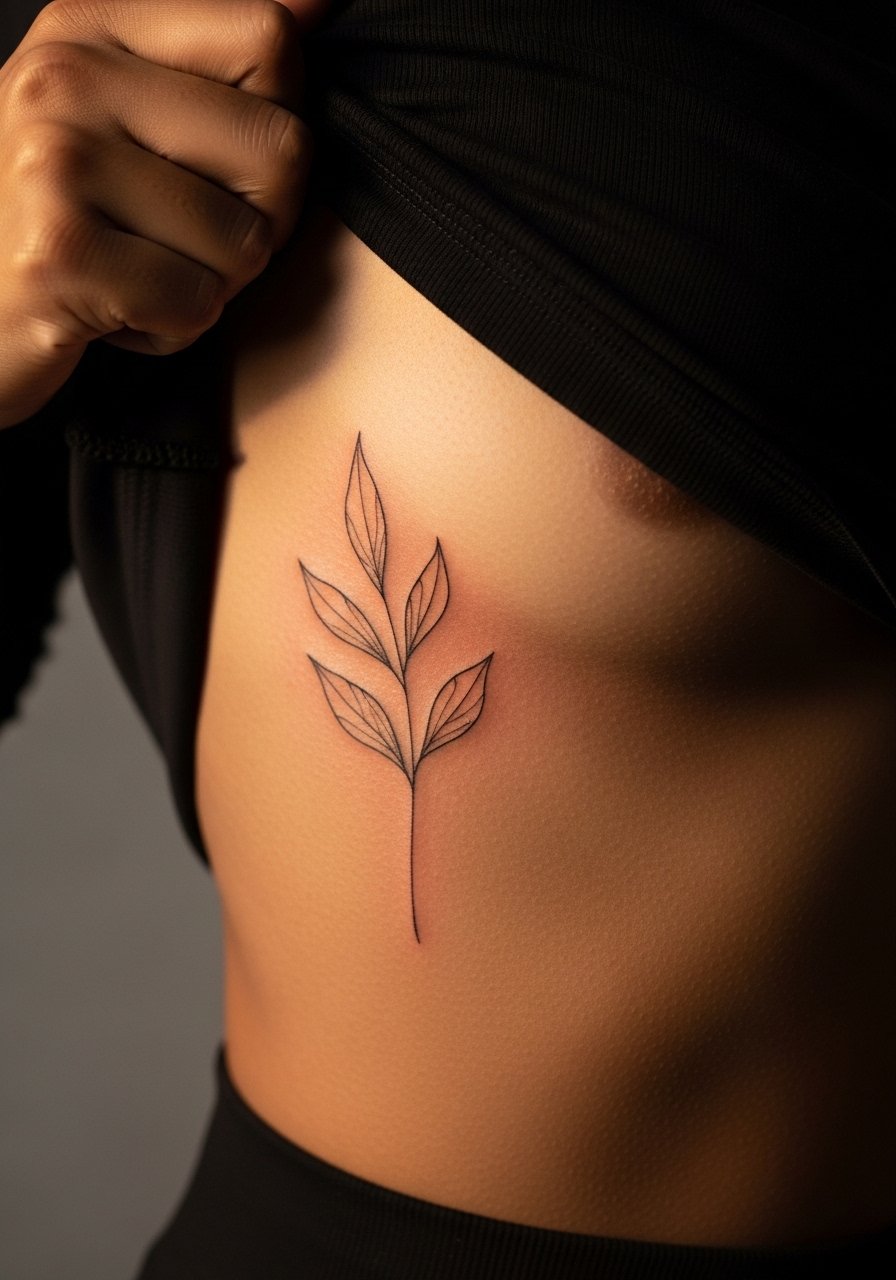
Fair warning: the ribcage is a sensitive area. Pain can be high and the skin stretches with weight fluctuation, which is why some designs warp over time. The leaf silhouette works because it uses long, single strokes that move with the body. Tell your artist to avoid tiny interior veins and to give 2-3mm negative gaps where lines run parallel. For the session wear a cropped tank top you can lift without unbuttoning. If you plan weight changes, consider the forearm alternative to keep the shape stable.
10. Single-Line Celestial Moon Phase Behind Ear
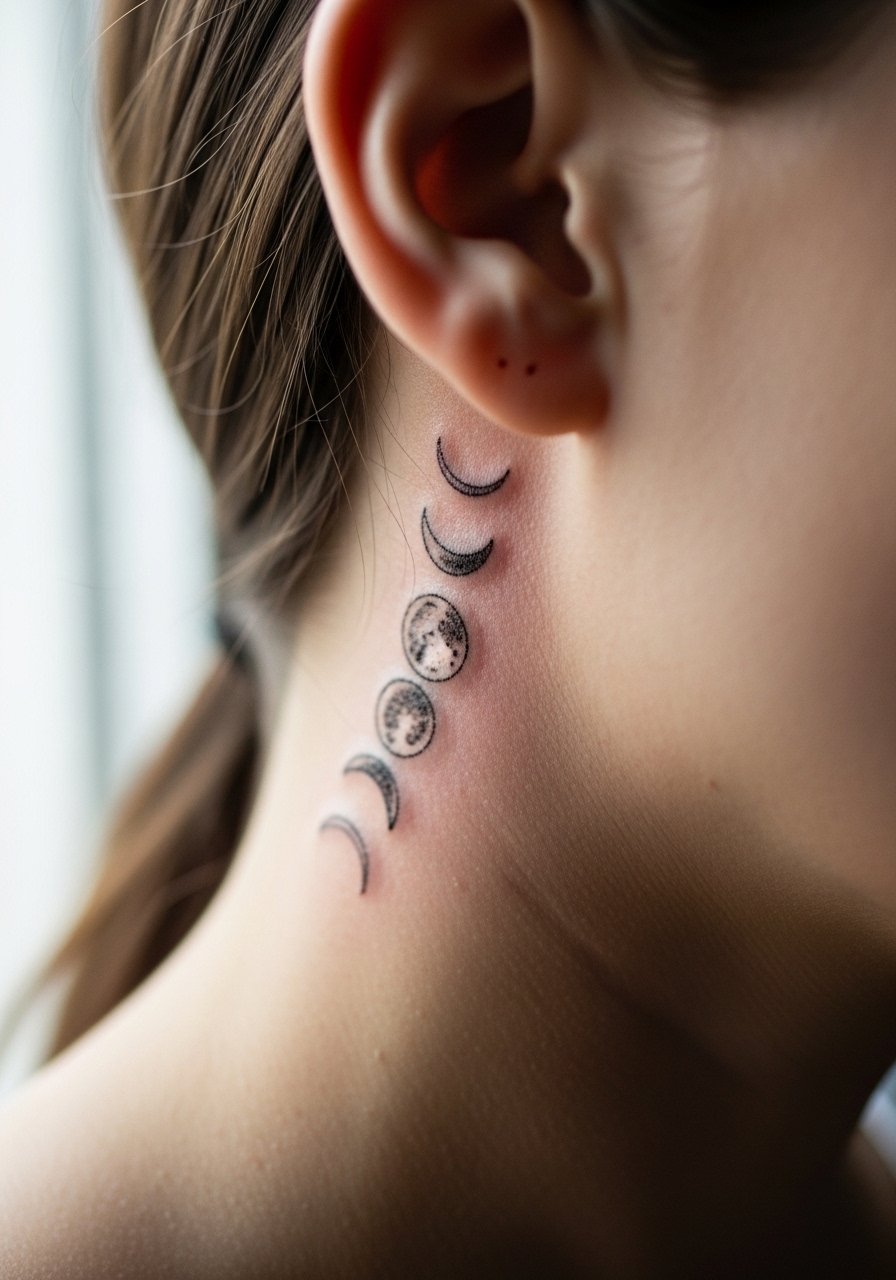
Micro moon phases behind the ear are subtle and feel mystical without being explicit. Ask for a slightly thicker crescent outline so tiny crescents do not disappear. The placement is low pain but high visibility when hair is up. Artists split on single-needle micro work here; one camp says the thin skin keeps micro detail crisp, the other warns that tiny crescents can blur with time. Name both views in your consult and ask your artist which approach they prefer. For showing it off wear a side part hair clip so the tattoo peeks beneath your hair.
11. Dotwork Subtle Wave on the Forearm

Dotwork adds texture to flowy designs without heavy line saturation. For forearm placement dot density matters. If dots sit too close they can merge during healing, so request spaced stippling and ask the artist for a healed mock in stencil form. Expect a comfortable session length and gentle soreness afterward. For casual outfits pair this with a loose fit short sleeve shirt rolled up to frame the wave. Dotwork ages beautifully when given room to breathe.
12. Negative Space Triangle on the Shoulder

Negative space pieces are clever because they rely on skin as part of the composition. On the shoulder the key is crisp outer linework and deliberate gaps. A common mistake is adding too many adjacent filled lines that narrow the negative field. Ask for a clean silhouette with measured spacing and bring photos that show the exact shape you want. Shoulder flesh is forgiving, so healing is usually predictable. For the session wear a loose button-down shirt you can pull off one shoulder if needed.
13. Fine Line Script Initial with Flourish on the Ankle

Initials with a small flourish feel personal but fragile. The error is choosing cursive under 12pt equivalent, which blurs quickly. Ask for a sans-serif inspired script at a readable size and a slightly heavier start and end stroke. Expect the ankle to need more frequent touch-ups because of friction from socks and shoes. Show-off pairing includes minimalist leather sandals so the initial sits visible without being crowded by rings or anklets.
14. Flowing Ribbon Line on Inner Wrist

Ribbon-style lines curve with the wrist and suggest motion when you move your hand. The inner wrist is very mobile so ask for a slightly bolder ribbon edge where the line crosses wrist tendons. The most common mistake is trying to cram text or tiny shapes into the ribbon, which disrupts the flow. Session time is short and aftercare should avoid tight bracelets. For the appointment wear a sleeveless top so the artist has unobstructed access.
15. Feather Outline Along the Shoulder Blade

Shoulder blade placement lets a feather breathe with larger, sweeping strokes that resist blur. The mistake is over-detailing the quill in too small a space. Ask for elongated strokes and spare inner barbs to preserve negative space. Sessions are moderate in time and the area tolerates touch-ups well. For the session wear a tank top that you can pull aside without stretching the skin. This placement is forgiving if you later want a slightly larger piece.
16. Continuous-Line Dancer Silhouette on Upper Arm
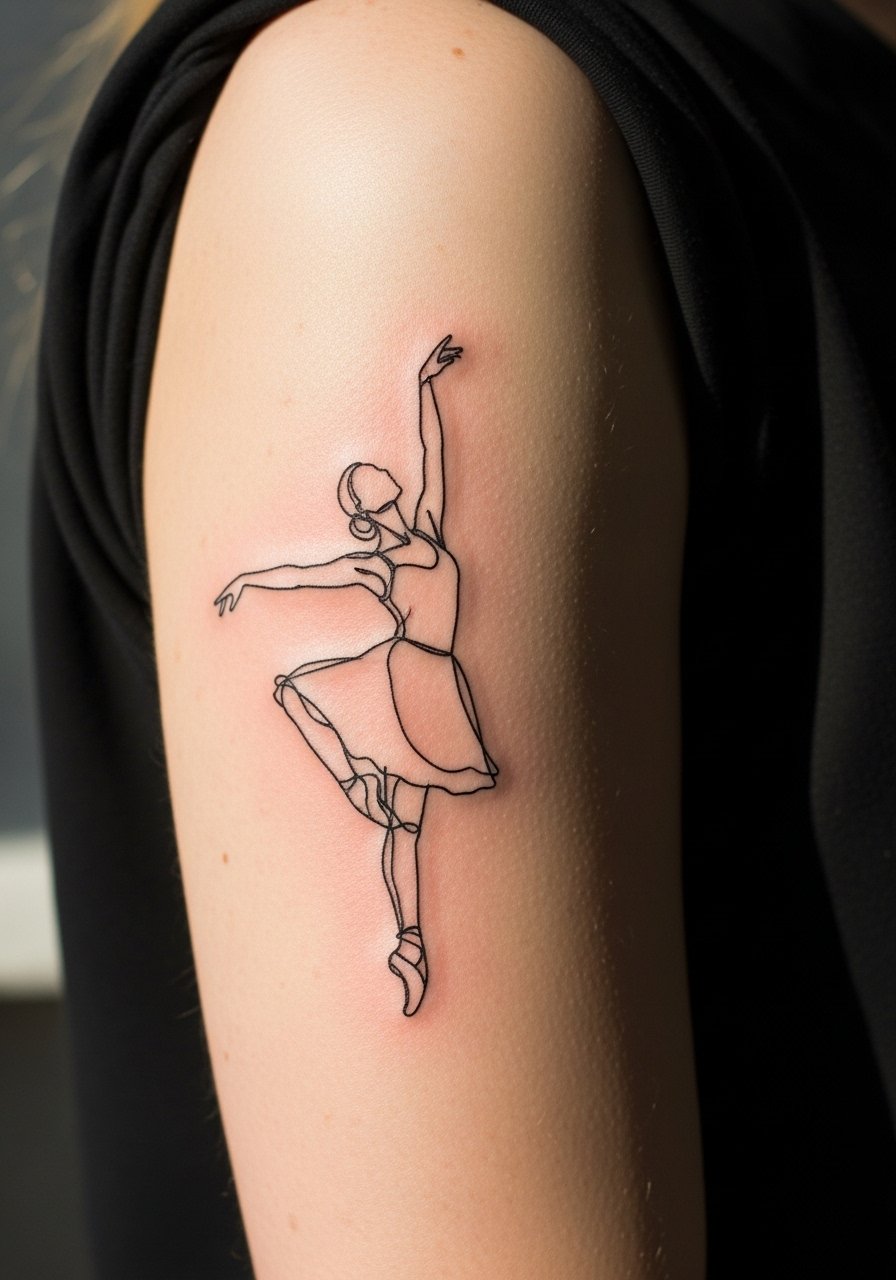
A dancer silhouette captures motion with minimal ink. Upper arm tissue holds single-line work nicely, so request a longer, flowing path rather than compressed shapes. A common misstep is making the silhouette too small so the limbs lose definition. The session is comfortable and often under an hour. Pair with short sleeves or a loose fit short sleeve shirt to let the figure read while you move.
17. Minimalist Koi Outline on the Ankle

Koi motifs trace back to Japanese imagery, so consider a simplified outline that honors the form without copying cultural specifics. The ankle suits a small fish outline if you keep fins and body long rather than compact. Ask your artist to keep the eye and tail open rather than clogged with micro detail. Pain is brisk but brief and the ankle requires careful aftercare due to shoes. Pair with minimalist leather sandals to show the flow when weather allows.
18. Wisp Wind Swirl Behind the Ear and Neck
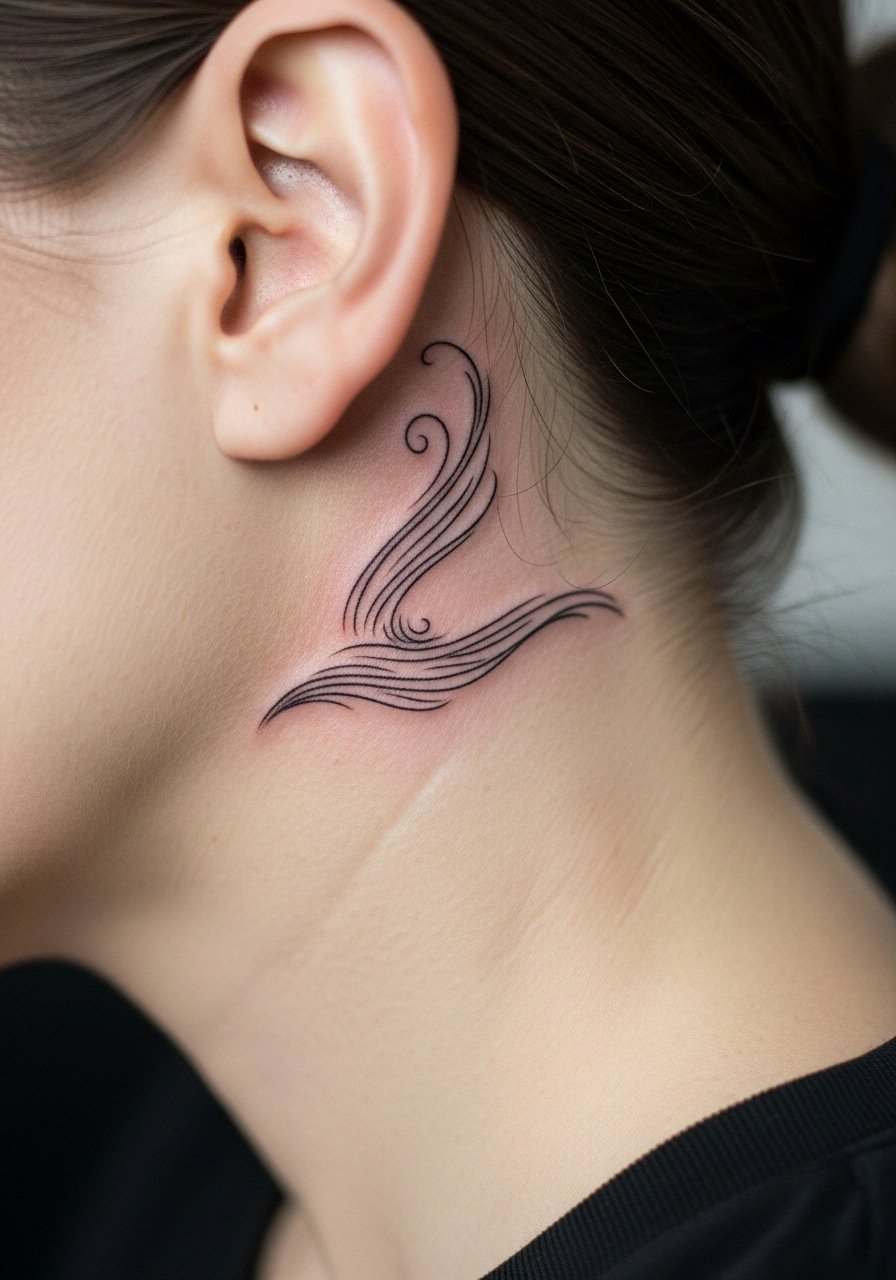
A wisp that wraps slightly behind the ear and onto the neck reads organic and light. Because the area crosses thin skin, ask for slightly heavier outer strokes to prevent blurring. The debate among artists here is real: one camp trusts single-needle micro detail on the neck, another prefers bolder single strokes. Ask where your artist stands and which technique they recommend for your skin type. Wear hair tied back and a hair ties silk set for the session so the area stays clean.
19. Thin Wave Band Around the Ankle

A wave band reads continuous and flowy while still being simple. The ankle sees friction so the mistake is wrapping too tightly with micro detail. Ask for a modest band width and avoid tiny dot fills that can merge. Session time is short but plan sockless hours for the first few days. Show it off with barefoot sandals or cuffed pants so the band stays visible without pressure from shoes.
20. Flowing Constellation Along the Forearm

Constellation work is great for flow because stars and connecting lines direct the eye. The error is clustering tiny stars too close together. Ask your artist to space dots and use slightly larger connection points so the pattern survives daily washing and time. Forearm placements are forgiving and the session is usually under an hour for a two-inch design. For evenings pair the piece with a linen rolled cuff shirt that frames the constellation when you move.
21. Single-Needle Fern Frond on Inner Bicep

Inner bicep flesh moves a lot when the arm flexes so ferns with long fronds work best. Single-needle gives an organic, sketch-like finish, but the mistake is placing tiny serrations too close together. Ask for a few wider gaps and a subtle taper rather than heavy barbs. Sessions can be ticklish and moderately sensitive. For the appointment wear a tank top so the artist can lift your arm easily without shifting fabric.
Frequently Asked Questions
Q: Will a fine line wrist tattoo blur faster than the same design on the forearm?
A: Yes, wrists see more movement and friction, which accelerates softening. If you want a wrist piece, request slightly heavier line weight and at least 2mm spacing in the design. Consider the forearm if you want a similar look with less touch-up later.
Q: Are single-needle waves better than multi-needle versions for longevity?
A: Artists divide into two camps. One group says single-needle gives that pencil-sketch delicacy and can last if the line weight is in the "sweet spot." The other group argues multi-needle holds pigment under the skin longer. Ask the artist which approach they prefer and why, and request a healed-stencil check.
Q: How should I dress for a ribcage or sternum session?
A: Wear a fitted sports bra or a cropped tank you can lift slightly so the artist has clean access without exposing more than the area being worked on. A strapless bralette is handy if you need modest coverage after the session.
Q: I have darker skin. Do fine line tattoos blur more quickly for me?
A: Fine lines can appear softer sooner on darker skin if they are ultra-thin. The fix is to test a slightly bolder line weight in a small patch or pick iconography with thicker silhouette edges. Bring this up before booking and ask for healed examples on similar skin tones.
Q: How often will I need touch-ups for tiny floral or script pieces?
A: Expect micro florals and fine script to need touch-ups sooner than larger blackwork. Realistic schedules range from two to five years depending on placement, sun exposure, and initial line weight. Plan touch-ups as normal maintenance rather than failure.
