
Fine line under-butt tattoos keep popping up in saved boards, but what looks crisp on day one is not always what lasts. Some of these tiny pieces are designed to peek only in certain poses while others sit along the crease and get daily friction. I’ll walk through 17 mini under buttcheek ideas, what to ask for in consults, how they heal on and off darker skin, and which wardrobe pieces make each design sing.
1. Delicate Butterfly Outline Just Below the Cheek
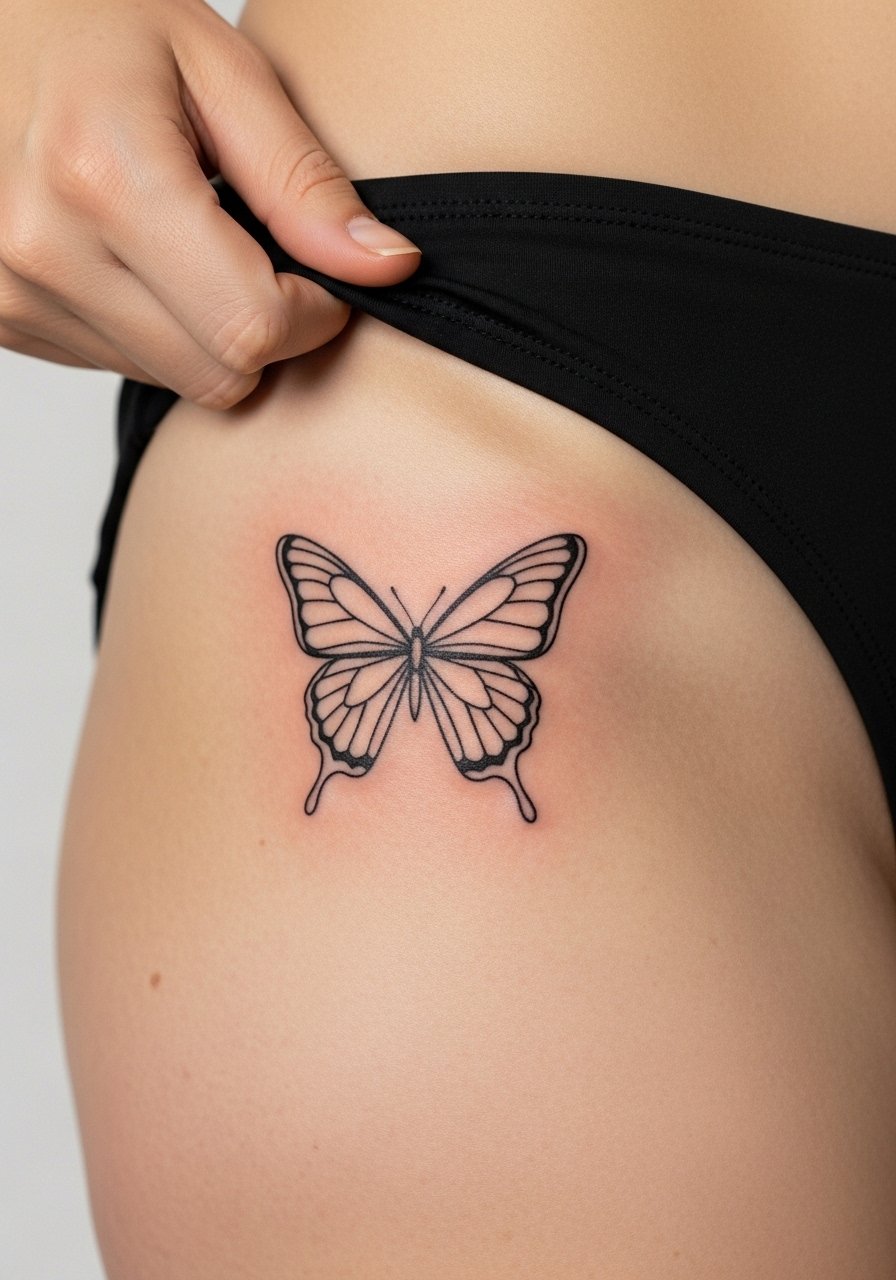
A small fine line butterfly reads like a secret that shows up when you move. I recommend this when you want minimal linework that follows the cheek curve, not a full shaded wing that can smudge. Tell your artist you want single-needle fine line with slightly increased line weight on the outer edge so the wings age without evaporating. The main mistake is asking for ultra-thin antennae across high-friction skin. Expect a two-week sitting discomfort window and a likely touch-up at year two if you squat a lot. For showing it off, try cheeky bikini bottoms in neutral tones to let the outline peek without competing with prints.
2. Sun and Star Cluster Peeking Under the Crease

This cluster works for someone who wants color accents that pop when visible. Ask the artist for bold outlines around any red or yellow fills so the tiny stars do not blur into the skin over time. The session feels quick but the crease placement means more movement during healing. A common error is packing too much tiny detail into a one- to two-inch cluster. If you plan to wear short denim or booties, lace boyshort-style panties frame the area nicely for photos while providing coverage during healing.
3. Playful Cupcake with Sprinkles Centered Under the Cheek
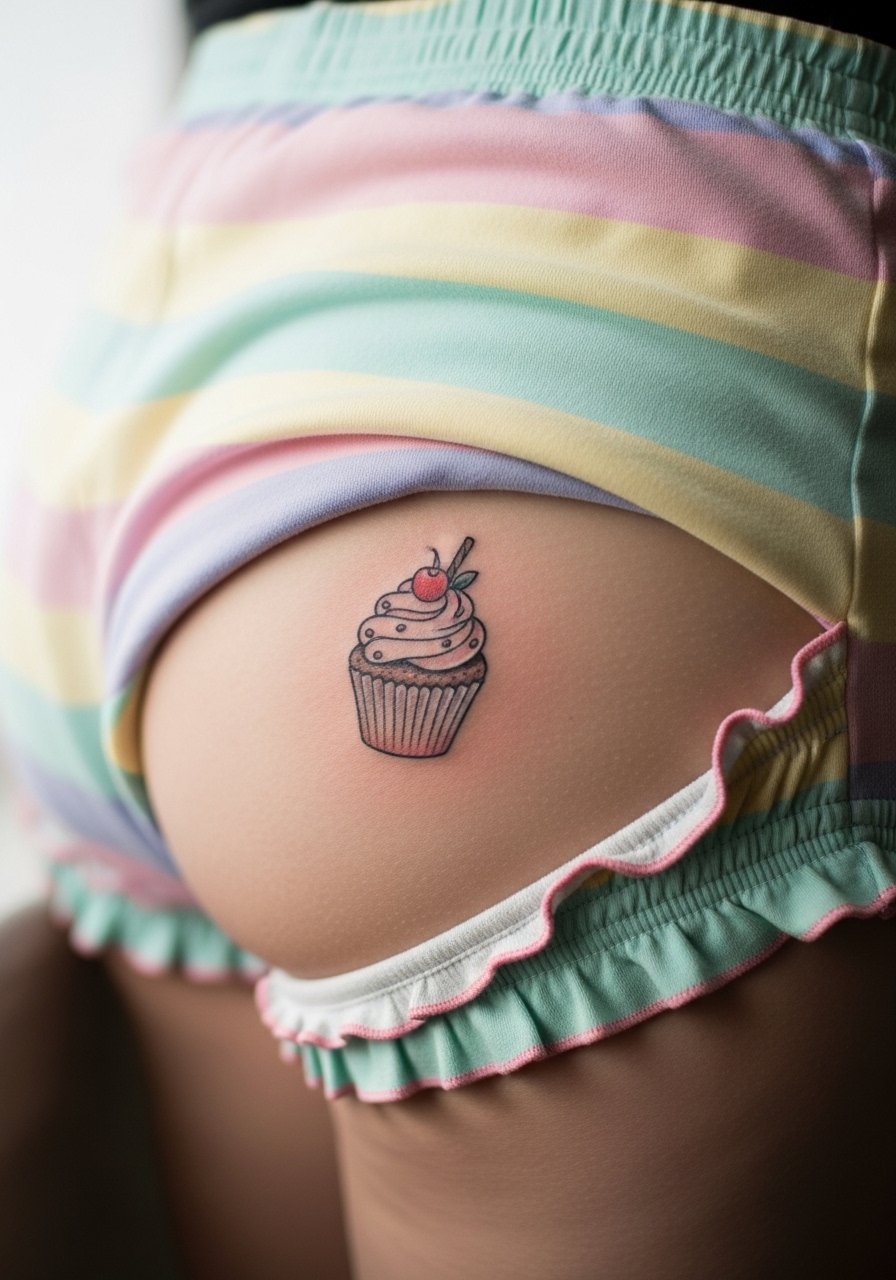
A tiny illustrative cupcake is a photo-forward choice that wins in cheeky poses. Use a bold outline for the frosting and keep sprinkles as single dots so the details survive squats and gym sessions. Tell the artist you want full color with a one-session plan and ask how they handle color saturation near creases. Many people make the mistake of asking for micro-shading in too-tight a space, which fades into a blur. For show-off pairing, pastel ruffle booty shorts or cheeky panties work well and reduce fabric rubbing during the first week.
4. Moon Phases Arc Curving with the Glute Fold

Moon phases are excellent for flow because the arc can mirror the cheek crease. For longevity, request solid black silhouettes rather than washed watercolor fills. The controversy here shows up often. One camp says fine line moons fade quickly on curves because of constant skin movement. The other camp argues that with proper depth and spacing the moons stay crisp for years. Ask the artist which side they fall on and why before booking. Expect one to two sessions and plan for a touch-up around year three if you are active. Pair this with seamless yoga shorts for clean lines in photos.
5. Upside-Down Heart Motif Hidden Under the Cheek
The upside-down heart is minimal and quickly executed, which is ideal if you want something discrete. Pain is low to moderate but the main issue is placement precision. Tell the artist you want the point aligned with the cheek crease so the shape reads correctly when standing and when wearing a thong. A common mistake is asking for a one-millimeter line that cannot hold on moving skin. Expect a short session under thirty minutes and a possible touch-up at the one-year mark if the outline thins. For the appointment, wear loose joggers you can pull down without pressure on the area.
6. Feminine Bow Tie Silhouette Below the Cheek
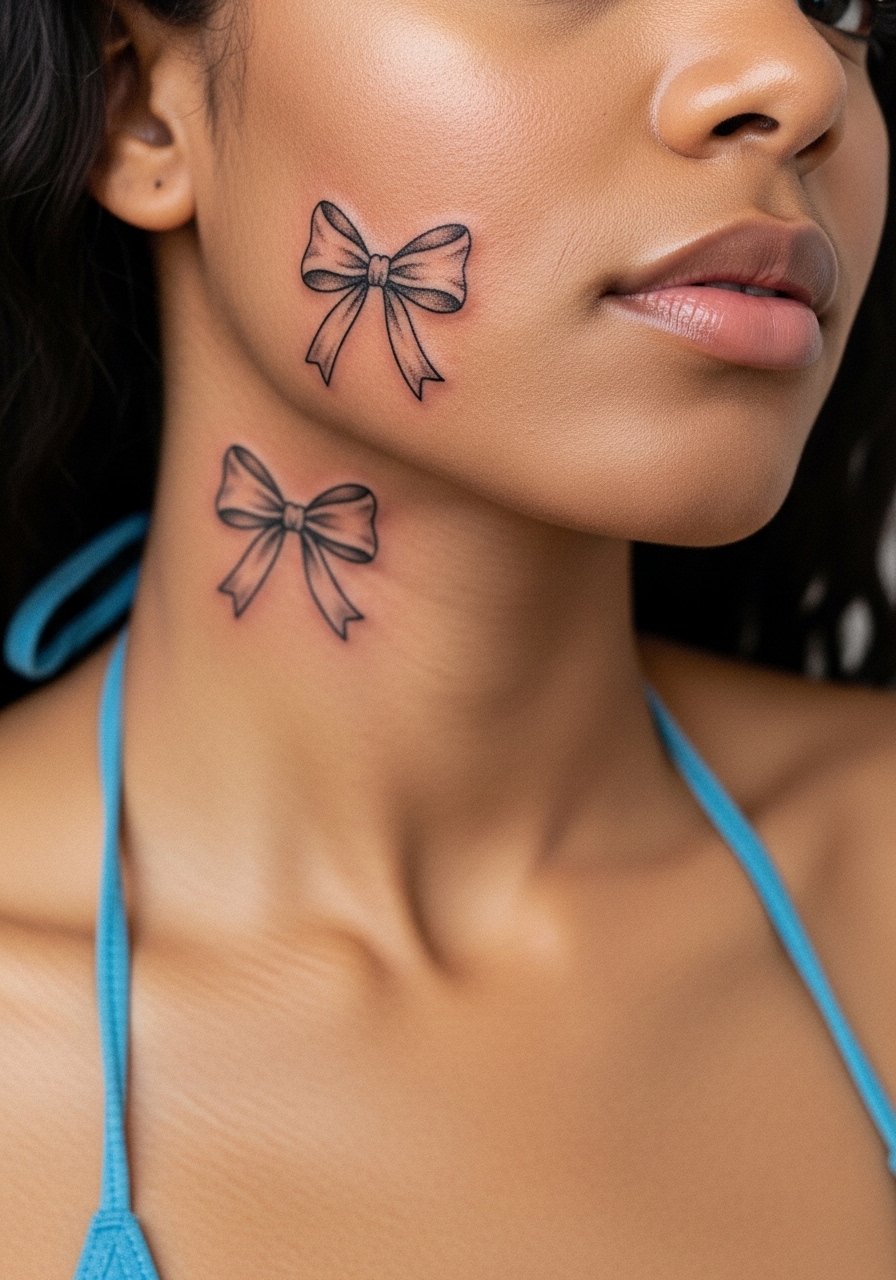
A bow silhouette that sits along the lower cheeks reads like lingerie ink. Because this is bilateral, discuss symmetry carefully in consults and ask for mirrored stencils before the first pass. Artists split on line weight for these pieces. One group favors ultra-fine lines for delicacy. The other suggests slightly thicker lines so the bow reads after a year of movement. Tell your artist which result you prefer and ask about touch-up expectations. Session time is usually under an hour. If you plan to flash this with swimwear, try a string bikini that sits low on the hip line.
7. Tiny Floral Vine Draping Along the Crease

A curved vine is one of the most forgiving designs when you gain or lose some weight. I recommend flowing stems rather than compact bouquets so the pattern flexes with the muscle. Tell your artist to space leaves and dots a bit further apart to prevent merging. Common mistakes include over-detailing leaves at micro scale. The session feels like a few precise passes, and touch-ups in year two are normal if you sit a lot. For showing off, pastel cheeky underwear or high-waisted denim pulled low work well. I like pairing this with soft pastel cheeky panties for casual shoots.
8. Starburst with Radiating Rays for a Dynamic Fit
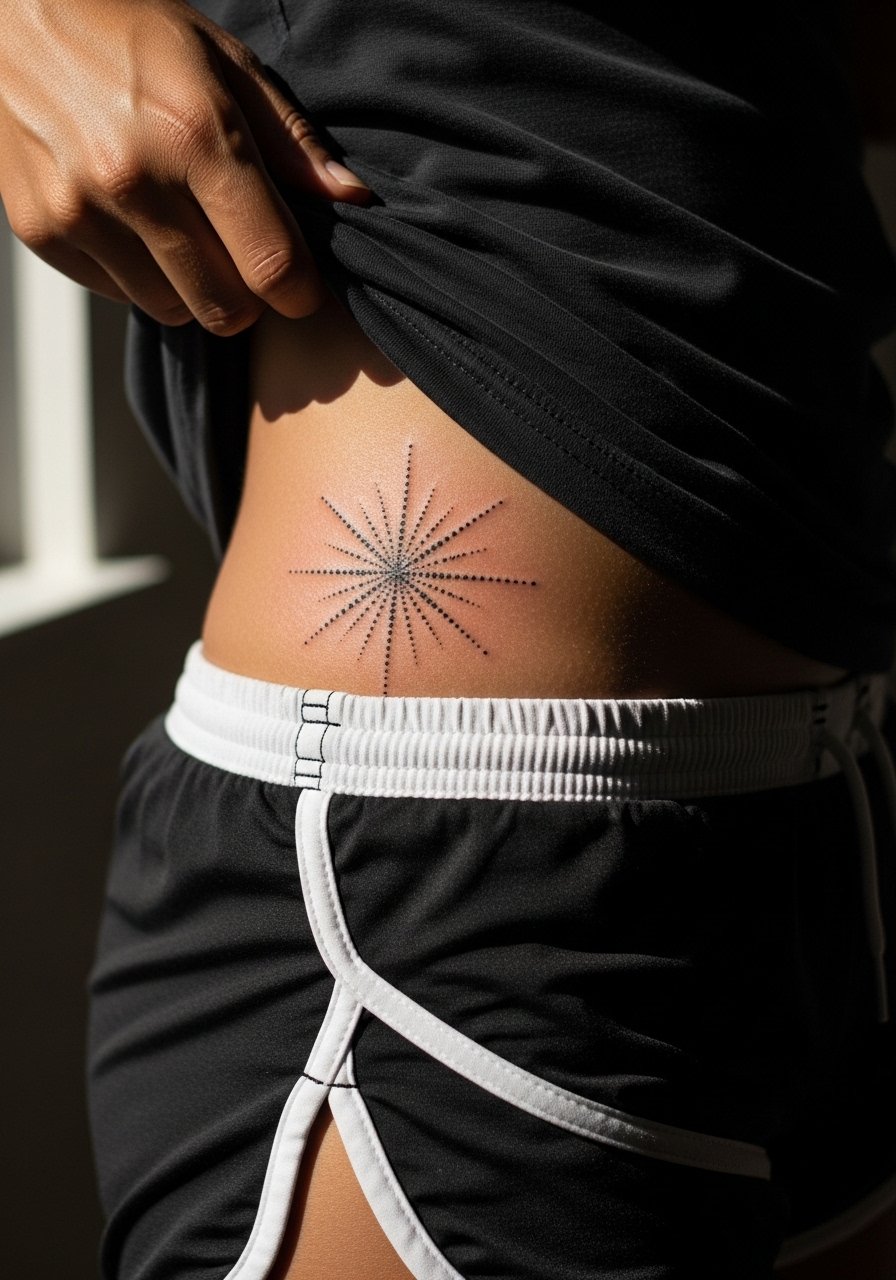
A starburst uses dotwork to create energy that complements the curve. Ask for stipple shading and for the rays to terminate before the highest-motion zones. The main mistake is requesting too many thin rays that vanish into lines after a year. Pain is moderate because the dot work requires repeated passes. Expect one session with potential follow-up retouching if a few rays soften. For sessions, wear loose athletic shorts you can slide aside and bring a towel for draping.
9. Heart Lock and Key Pair Split Across Both Cheeks
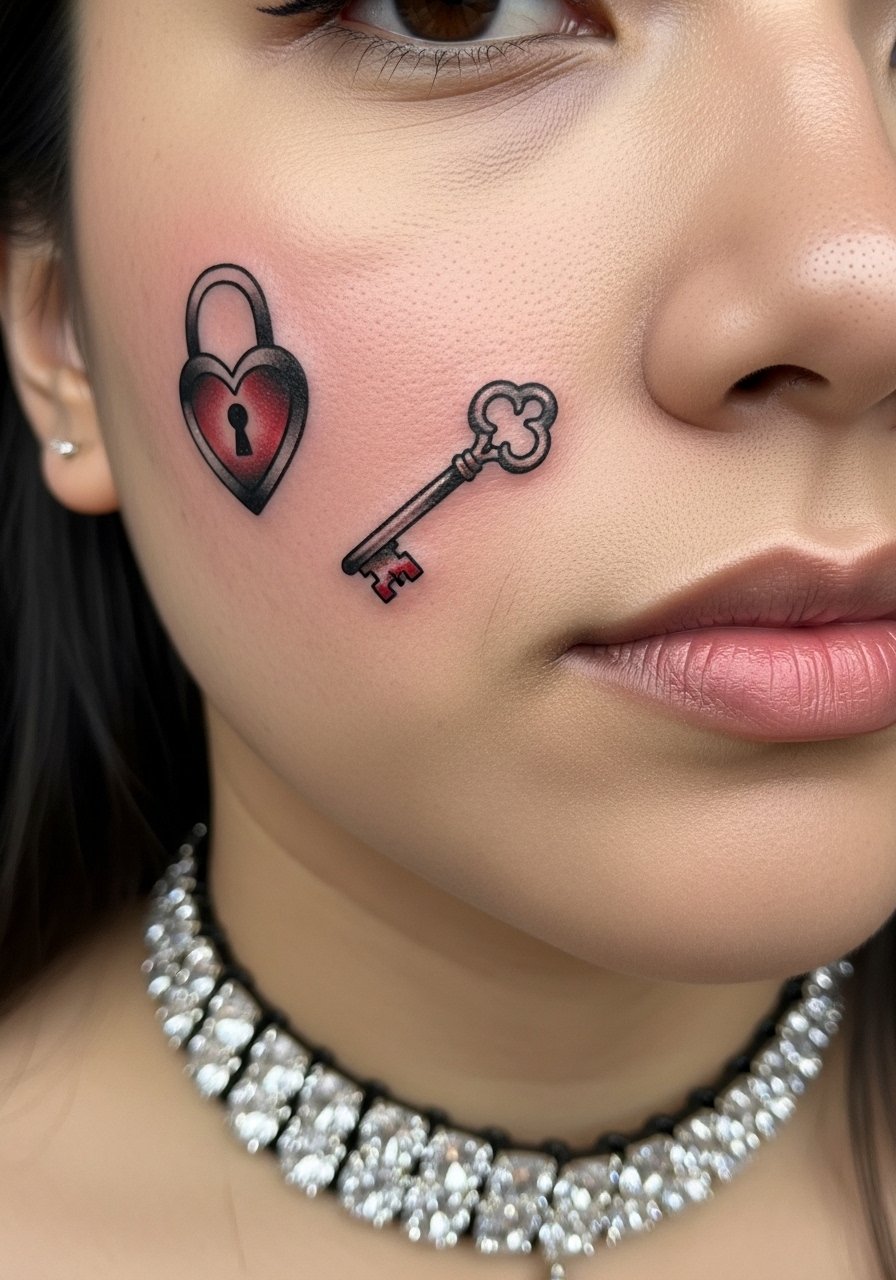
Split-symbol tattoos are intimate and play with reveal mechanics. When you book, request a matching scale mock so the lock and key read as a set when cheeks meet. A common error is making one piece larger than the other, which unbalances the concept. Expect a single session for both, and plan on light redness and sensitivity when sitting for the first week. For evening photos, a low-rise g-string or a crystal-accented string can frame both pieces without covering them. A delicate crystal g-string complements the romantic theme while avoiding excess friction.
10. Crescent Moon with Tiny Stars Under the Glute Fold

A crescent with stars reads soft and ethereal, but watercolor fades faster in high-friction spots. If longevity is the goal, ask for a darker wash at the crescent edge so the shape holds while the softer interior blurs beautifully. The session is gentle but plan for possible touch-ups at year two. Avoid tiny star dots that are too close to the fold. For show-off looks, a high cut thong bikini displays the arc without smothering it under fabric.
11. Dainty Lace Pattern Edging the Crease Like Lingerie

Lace filigree is meant to mimic lingerie lines, so precision matters. Bring reference photos of actual lace that matches the scale you want and ask the artist to test a stencil curve that follows your crease. The most common mistake is requesting extremely dense filigree in a tiny band, which leads to loss of negative space and a muddy look. Expect about an hour session and possible minor touch-up if any lines settle unevenly. For outfits, pair this with a minimalist g-string so the lace reads as intended.
12. Single Dripping Rose Centered Under a Cheek

A dripping rose gives an edge to classic floral work. Ask for heavier contrast in the petals so the micro-realism holds against the skin’s movement. The session can run a bit longer because realism needs careful shading. People often request tiny veins and then find they blur into tone. Expect some tenderness when sitting for the first five days and a likely touch-up in year two to restore crisp petal edges. For photo emphasis, nude seamless underwear or a micro thong helps keep attention on the realism. A nude seamless thong is a practical choice.
13. Tiny Script or Single Word Nestled Under the Cheek
A short word or single small script can be powerful, but lettering on moving skin needs room to breathe. Request slightly larger letter spacing than you would on a flat area and avoid ornate flourishes that collapse with motion. The usual mistake is choosing an ultra-tight cursive that looks unreadable after a year. Pain is low. Session time is minimal, but prepare for a touch-up if any letters thin. For the appointment, wear loose joggers so the skin is clean and accessible.
14. Minimal Geometric Dot Work Accent Near the Crease

A tiny geometric cluster is low-maintenance if planned with spacing in mind. Ask for dot spacing and for the outer dots to be slightly larger so the shape survives stretching. A common error is packing dots too close, which become a single tone over time. The dot work session is quick but repetitive, which can feel like a mild vibration. For pairing, seamless leggings or yoga shorts keep the aesthetic clean. A simple outfit change before photos helps the geometry show without fabric lines.
15. Micro Sunburst with Tiny Rays That Peek Out

The sunburst is a compact design that benefits from solid central saturation and short rays. Tell the artist to avoid extended hairline rays that are prone to blowout on curves. The main mistake is trying to create a large halo in a tight space. Expect one short session and a touch-up if any rays soften at six to twelve months. For showing off, a low-rise swim bottom that exposes the lower cheek works best. If you want extra comfort while sitting the first week, consider a donut cushion in soft foam.
16. Tiny Constellation Curve That Follows Movement
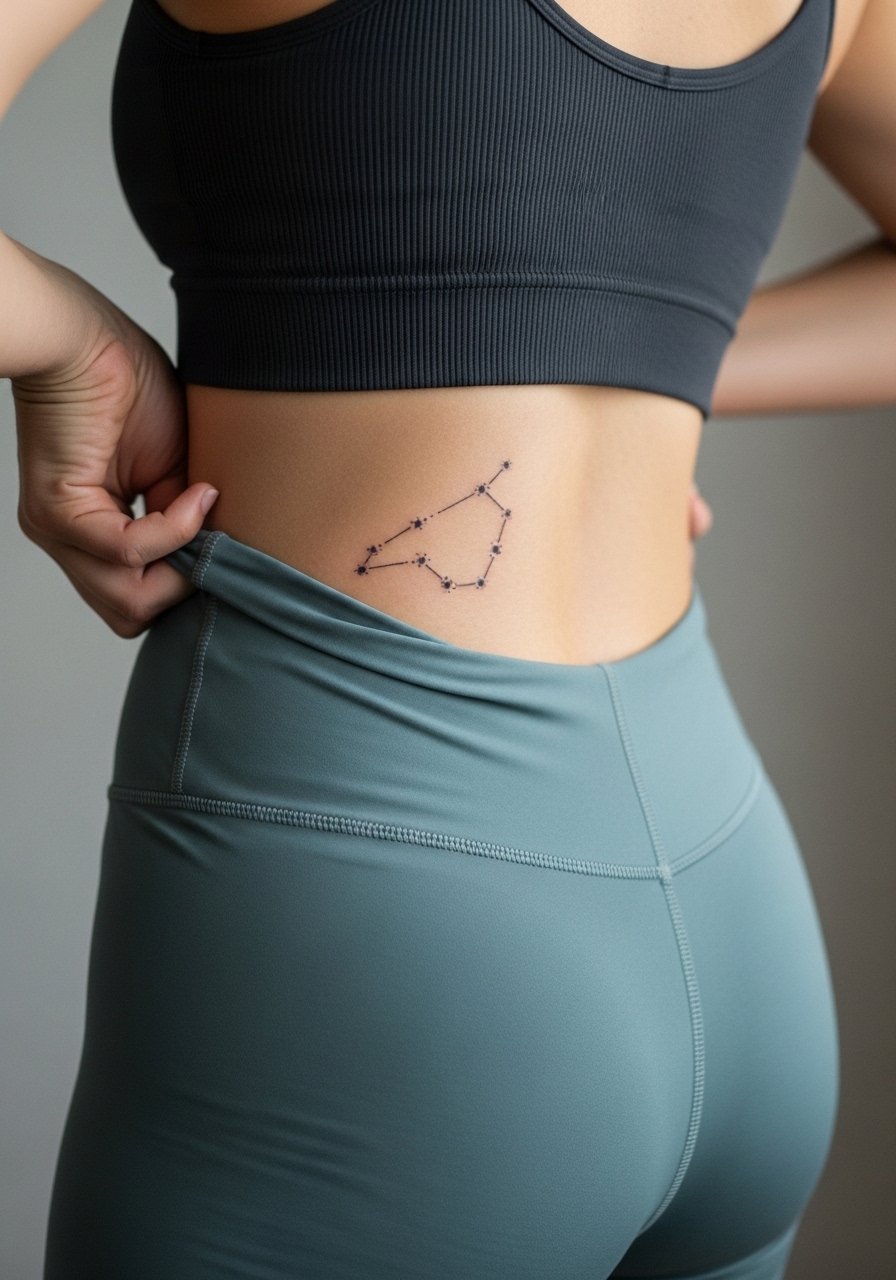
A tiny constellation looks deliberate and clean when the dots are spaced. Ask for slightly bolder node dots and for the connecting line to be a hair thicker than your usual fine line. The session is brief, but the placement near the fold means more rubbing during workouts. Many people forget to plan clothing around sweat and end up with irritation. Wear breathable high-waisted shorts to your appointment and for the first week. The piece pairs well with visible high-waisted swimwear when you want it to peek.
17. Tiny Anchor or Nautical Motif Tucked Low
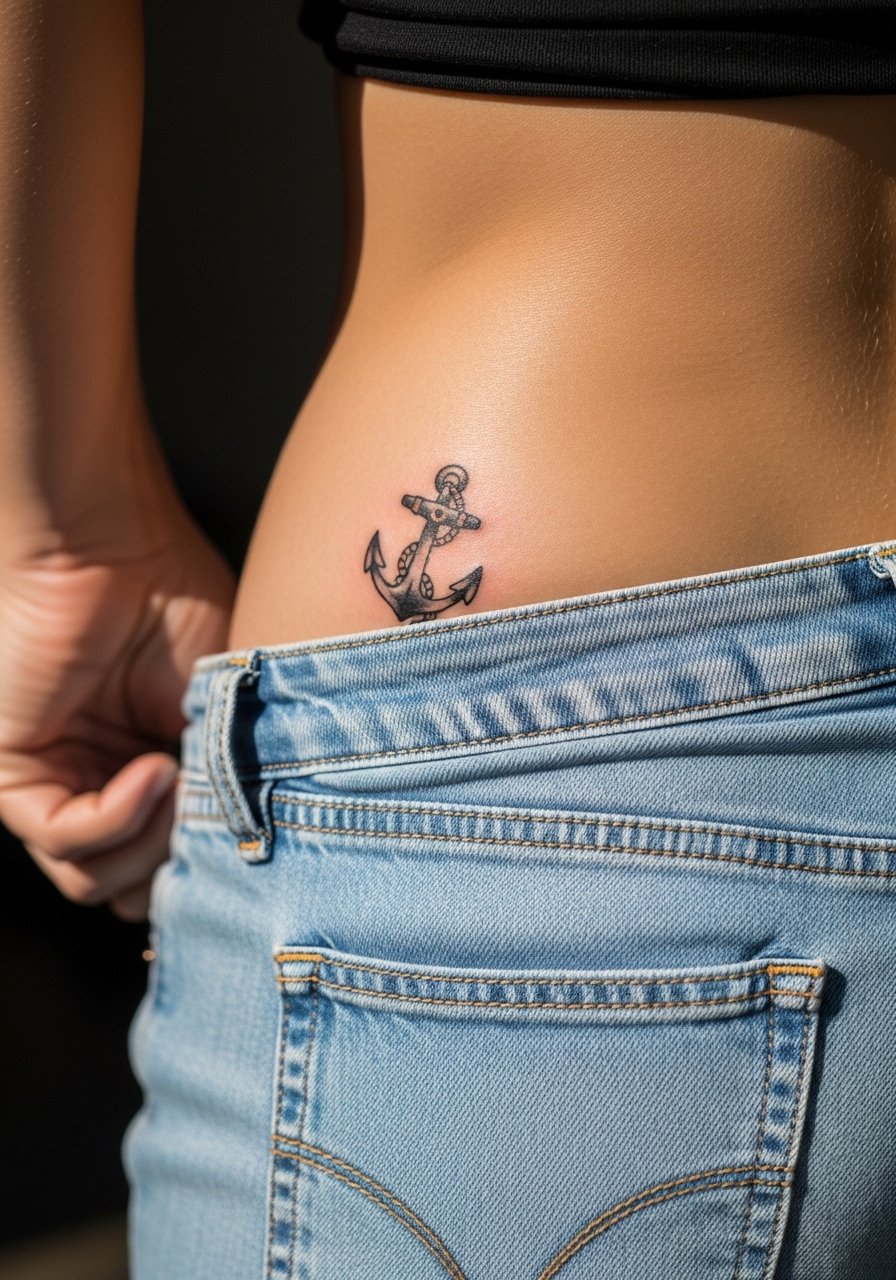
A classic tiny anchor is a straightforward old-school option that ages predictably when the lines are properly weighted. Tell your artist you want slightly thicker outer lines to hold up under stretch instead of whisper-thin strokes. The session is short and most clients report moderate discomfort for a few days when sitting. A common mistake is asking for extra shading in a space that gets constant friction. For the appointment, loose denim or a wrap skirt makes access easy and reduces irritation during the first week.
Studio Day Picks
All of the under-butt ideas above share three challenges in early healing: sweat, friction, and the need for a protective barrier that breathes along the crease. The picks below address those concerns for the designs in ideas 1 through 6.
-
Breathable tattoo film roll. A thinner, more breathable film helps manage sweat along the crease without trapping moisture in a way that causes irritation for pieces like the butterfly and moon arc.
-
Australian tea tree balm. An anti-fungal, low-odor balm can reduce risk in the moist glute area once the initial scab phase has passed, especially for colorful cluster pieces.
-
Hypoallergenic powder for friction zones. Light powdering can reduce rubbing from underwear while a delicate bow or lace edge heals across the cheek fold.
-
Thin protective film roll. Use this to cover the area for short periods during heavy activity for the first week, which helps protect neo-traditional work and tiny color fills.
-
Aquaphor healing ointment. A thin layer applied per your artist’s guidance can lock in moisture on fine line pieces without clogging, making first-week care more comfortable.
Frequently Asked Questions
Q: Will fine line butterfly or script under the cheek fade faster on darker skin tones?
A: In my experience, fine line pieces can read less stark on darker skin unless the artist increases line weight slightly. Request a stronger outer line or a small fill to give the motif longevity. Discuss touch-up plans up front so you know when to return.
Q: Should I use a protective film like Saniderm or dry heal for an under-butt tattoo?
A: Artists and shop communities split into two camps. One camp prefers protective film because it keeps the area clean and reduces infection risk where sweat pools. The other camp favors dry healing to encourage a stable scab for very crisp black lines. It depends on your sweat habits and the style you choose. Talk this through with your artist and pick the method they are experienced with.
Q: How long should I avoid tight underwear or vigorous workouts after a glute crease tattoo?
A: Plan for two weeks of avoiding tight underwear and heavy leg workouts that cause friction. Daily walks are fine. If you must sit a lot, bring a soft donut cushion for the first several days to reduce pressure on fresh ink.
Q: Are touch-ups common for these mini under-butt designs and when should I plan one?
A: Yes, touch-ups are common, especially for fine line and watercolor styles. Expect a possible touch-up at around one to three years depending on your activity level and how well the design was planned for the crease. Ask for touch-up policies and likely timing during the consult.
Q: How visible are these tattoos in photos and what clothing works best to highlight them?
A: Most of these motifs peek with cheeky swimwear or low-rise bottoms. For a subtle reveal, choose high-cut thongs for moons or cheeky bikinis for butterflies. If you want a practical option during healing, swap to seamless underwear and bring a loose skirt for sessions. A simple accessory like a thin hip chain can also frame bilateral pieces without covering the ink.
Q: Can I use a donut pillow for sitting after an under-butt tattoo and is there a recommended one?
A: Yes, a soft donut cushion reduces direct pressure and can make the first week much more comfortable. Bring one to the studio for the ride home and use it at work for the initial days. For a portable option search for travel donut pillows that fit your chair profile.
