
Fine line clovers are everywhere on saved boards, and the reality is they look gorgeous fresh but some of them need touch-ups sooner than people expect. Wrist and finger pieces can distort when you move or wear bracelets, and shops that upsell after the stencil often leave first-timers frustrated. Read on for 17 trevo de 4 folhas directions that balance elegance with how tattoos actually age, plus practical session and wardrobe notes to get the result you want.
1. Minimalist four-leaf clover outline on the wrist
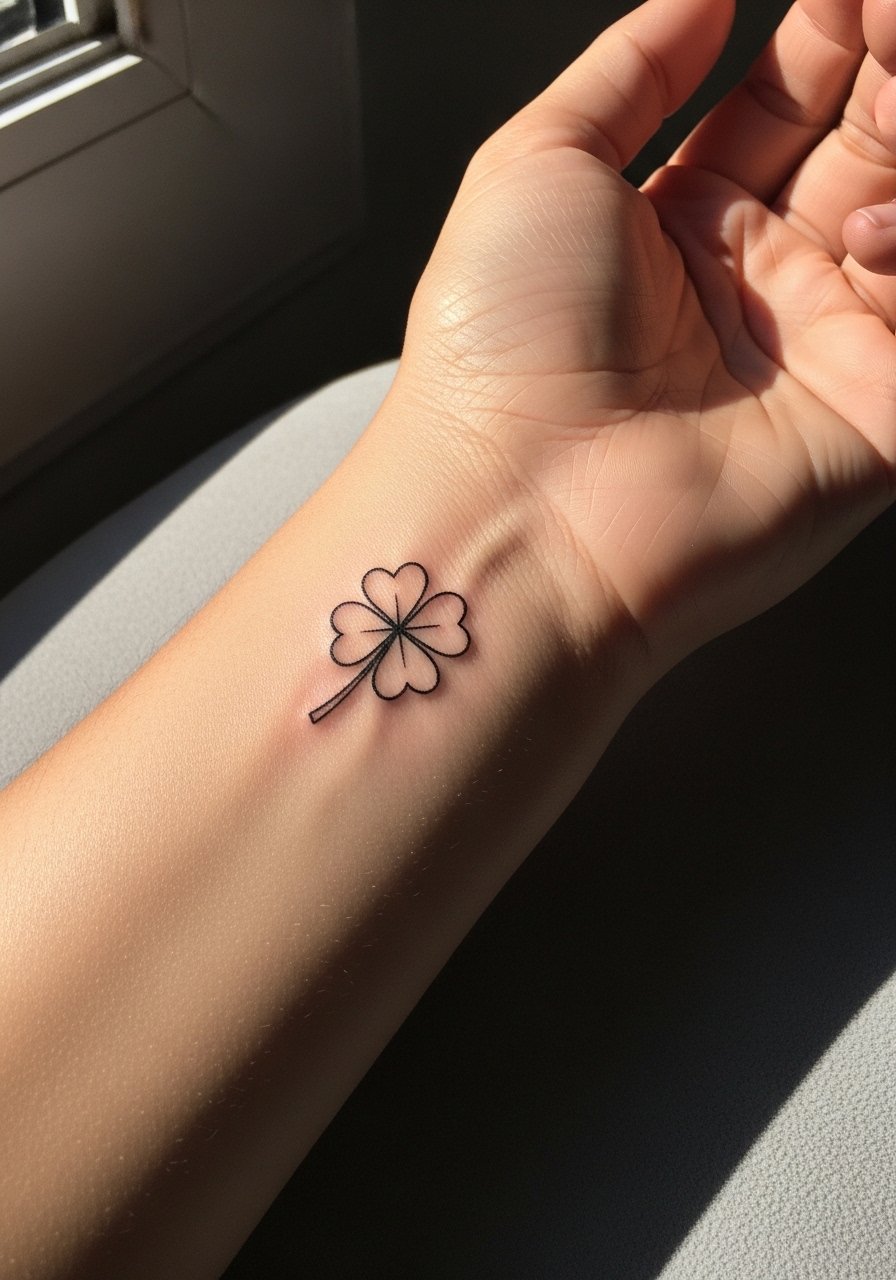
I've seen tiny wrist clovers last beautifully when the line weight is deliberate instead of hairline thin. Ask your artist for a slightly heavier single needle line rather than the faint trace that vanishes at year one. Pain is mild for most people and a session usually takes under 30 minutes. A common mistake is requesting a 0.5-inch design; scale it to 1 to 1.5 inches so the leaves have breathing room and the negative space holds. For showing it off, layer a thin silver chain bracelet on the opposite wrist so the tattoo reads without being crowded during summer outfits.
2. Neo-traditional trevo with watercolor leaves on the inner forearm
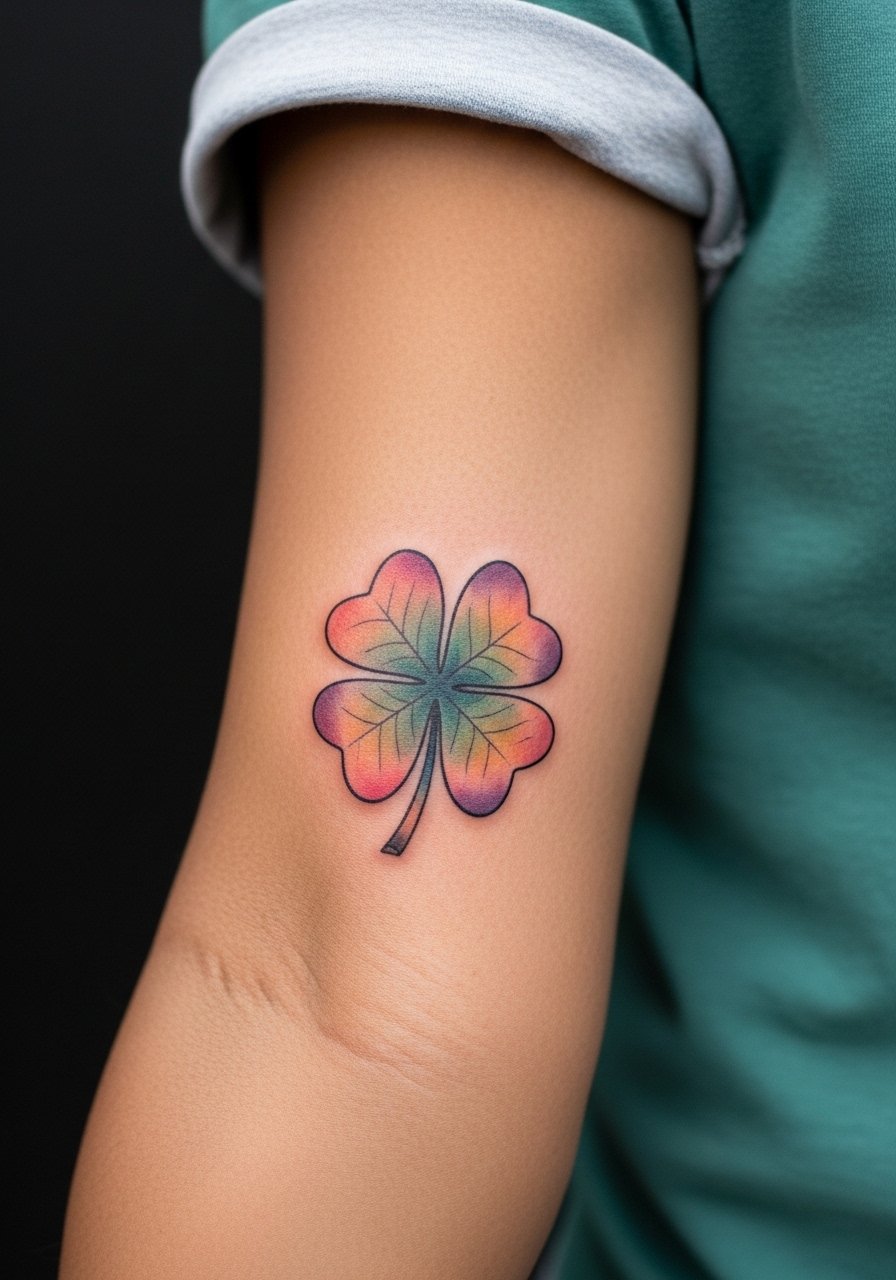
If you want color nods to Portuguese heritage, pick a neo-traditional clover with soft green and gold washes but ask for stronger outlines so the colors do not "melt" as they age. Inner forearm sessions feel like a sustained hum more than needle zap, and expect about an hour to 90 minutes. Bring reference images that show the exact color intensity you want and tell the artist which greens to avoid on darker tones. For a polished reveal, roll your sleeve and pair the piece with a linen chambray shirt and a slim cuff on the opposite arm so the watercolor reads like a soft accent.
3. Fine line geometric trevo rotated across the collarbone

Rotate the trevo 45 degrees so it follows the collarbone curve for a dynamic, elegant placement that avoids looking stiff. The collarbone takes a careful hand for even spacing, and I recommend asking for simple geometric negative space inside each leaf to keep it readable at year three. The session is brisk and the pain is moderate where bone is close, but the result photographs beautifully under layered jewelry. For show-off outfits, try an off shoulder sweater with layered pearls so the watercolor or fine line stays the focal point without competing with neckline hardware.
4. Blackwork ornamental trevo with dotwork texture on the shoulder
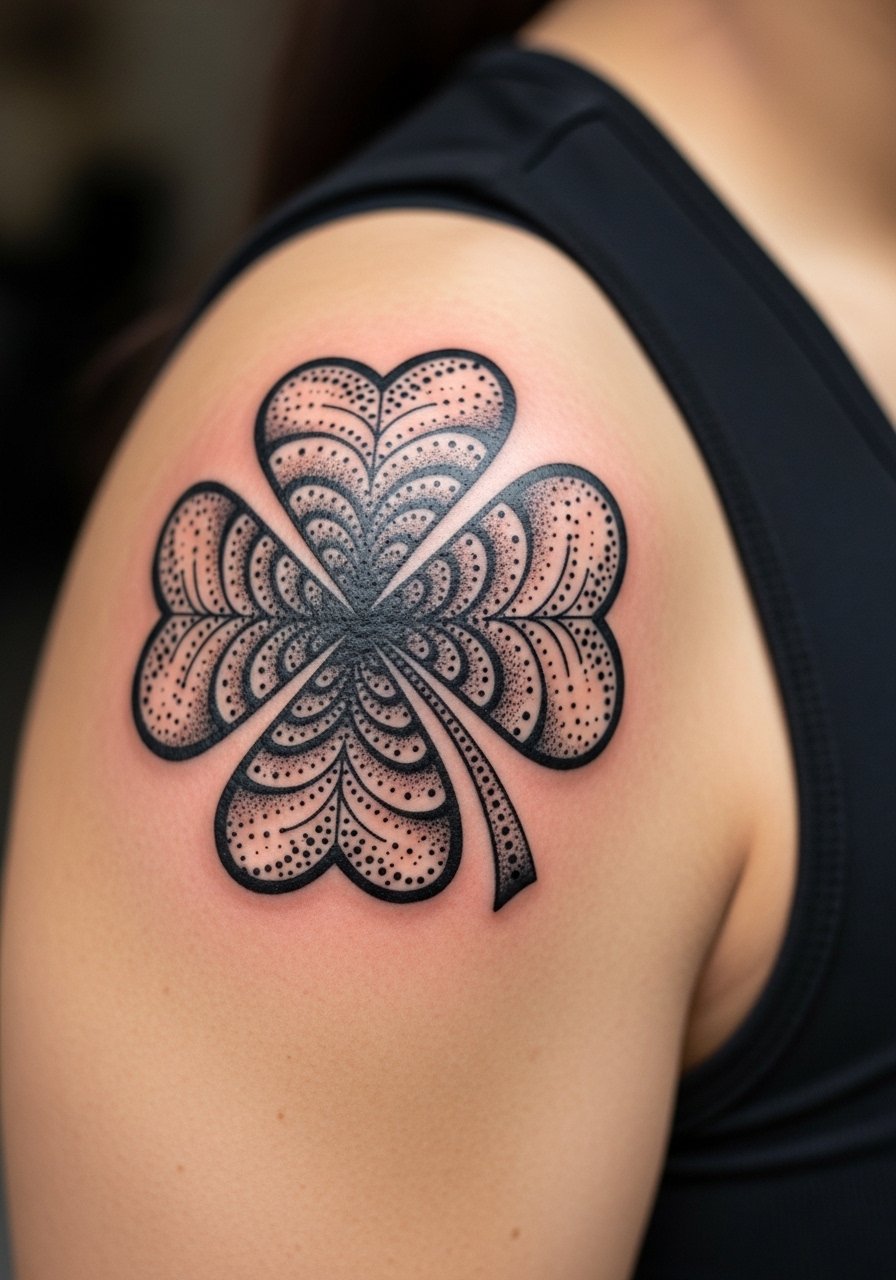
Collectors love blackwork because it holds contrast over time. This shoulder piece uses bold solid fills and stipple shading to create a jewel-like filigree trevo that still reads from a distance. Sessions are longer and can be split across two appointments for saturation and comfort. The biggest advantage here is longevity, and a touch-up at year two often keeps the blacks deep. For outfits, wear a sleeveless linen tank so solid tones let the high-contrast design pop during warm months.
5. Micro-realism leaf cluster on the ribcage

Ribcage micro-realism looks fragile and stunning, but be ready for a higher pain level. On the ribs the session feels sharp with shallow rhythms, and small designs need precise depth to prevent blowout. The advantage of micro-realism is that dew-drop shading and vein detail make the clover read as botanical rather than symbolic. Mistakes happen when artists go too shallow or too dense in tight areas, so ask for a follow-up touch-up at six to eight weeks. Keep in mind that body changes like weight fluctuation affect how these fine textures age.
6. Ornamental trevo framed in filigree on the ankle

Ankle pieces suit ornamental linework because the bold filigree resists the rubbing and friction ankles face. Expect a quick session and moderate pain from proximity to bone. The common failure is tiny, overly delicate filigree that softens after healing; ask your artist to preserve weight in key outlines so the ornament reads at six months. For summer visibility, pair the ankle tattoo with strappy heeled sandals or cropped jeans to let the black lines breathe without being hidden under socks.
Pre-Session Essentials
The wrist, collarbone, ankle, and ribcage pieces above each demand different prep and first-week care, so a few targeted items smooth the session and healing.
-
Bepanthen Plus cream. A thinner ointment many people use for small clovers that avoids greasy shine in photos, useful for the wrist and behind-ear pieces in ideas above.
-
Inksafe moisturizing balm. Breathable for humid summers and helps prevent white cast on darker skin tones, which helps neo-traditional green stay clearer.
-
Green Sheep Organics unscented lotion. Gentle, fragrance-free hydration that works well for fine line and geometric pieces that prefer lighter, dry-aftercare methods.
-
Hada Labo no-touch aftercare spray. Handy for hard-to-reach neck and ribcage spots so you can hydrate without touching delicate ink.
-
Fragrance-free CeraVe Healing Ointment. A non-greasy option for the first few days that many people use on ankle and forearm work to avoid clogging fine channels.
7. Watercolor clover with dripping petals on the thigh

Thigh tattoos handle saturation well and are forgiving when it comes to size, which makes them ideal for watercolor experiments. Sessions are comfortable because you can lie back and relax, and larger scale lets the drips and blends read without muddying. The risk is choosing pigments that age muddy on darker tones, so discuss color choices frankly and ask for contrast in linework to anchor the wash. For summer styling, pair the piece with high waisted shorts or a slit midi skirt to reveal the artwork without excess compression.
8. Ignorant style chunky trevo on the calf

The ignorant style is intentionally crude and playful, which is great for someone who wants a design that does not try to be delicate. Calf placement gives the piece room and the muscle keeps bold blackwork readable. Sessions feel like steady vibration and usually finish in one go. The main mistake is over-refining the naive lines; tell the artist to retain the hand-drawn imperfections. For casual wear, roll up bootcut jeans or sport sneakers with crew socks to show off the chunky silhouette.
9. Fine line trevo with "sorte" script on the inner bicep

An inner bicep placement lets the script feel intimate and the skin there takes fine line well if the artist spaces the letters. The inner arm can be a tender area during the session but it is discreet for daily life. A frequent error is cramming text too close to the clover; ask for breathing room so both elements age cleanly. This pairing reads as cultural nod rather than a phrase stuck to the design. For session comfort, wear a sleeveless tank so the artist has easy access without constant shifting.
10. Neo-traditional trevo with ribbon banner on the upper arm

This is a classic look that brings readable text options and color pop without sacrificing longevity if you keep outlines strong. Upper arm muscle takes color well and sessions are usually comfortable with moderate vibration. The common misstep is making the banner too thin so letters blur with time; ask for slightly bolder banner edges and give the artist the exact lettering weight you want. If you plan on future sleeves, this piece integrates well as a mid-arm anchor without crowding the area.
11. Minimalist dotted trevo negative-space piece behind the ear
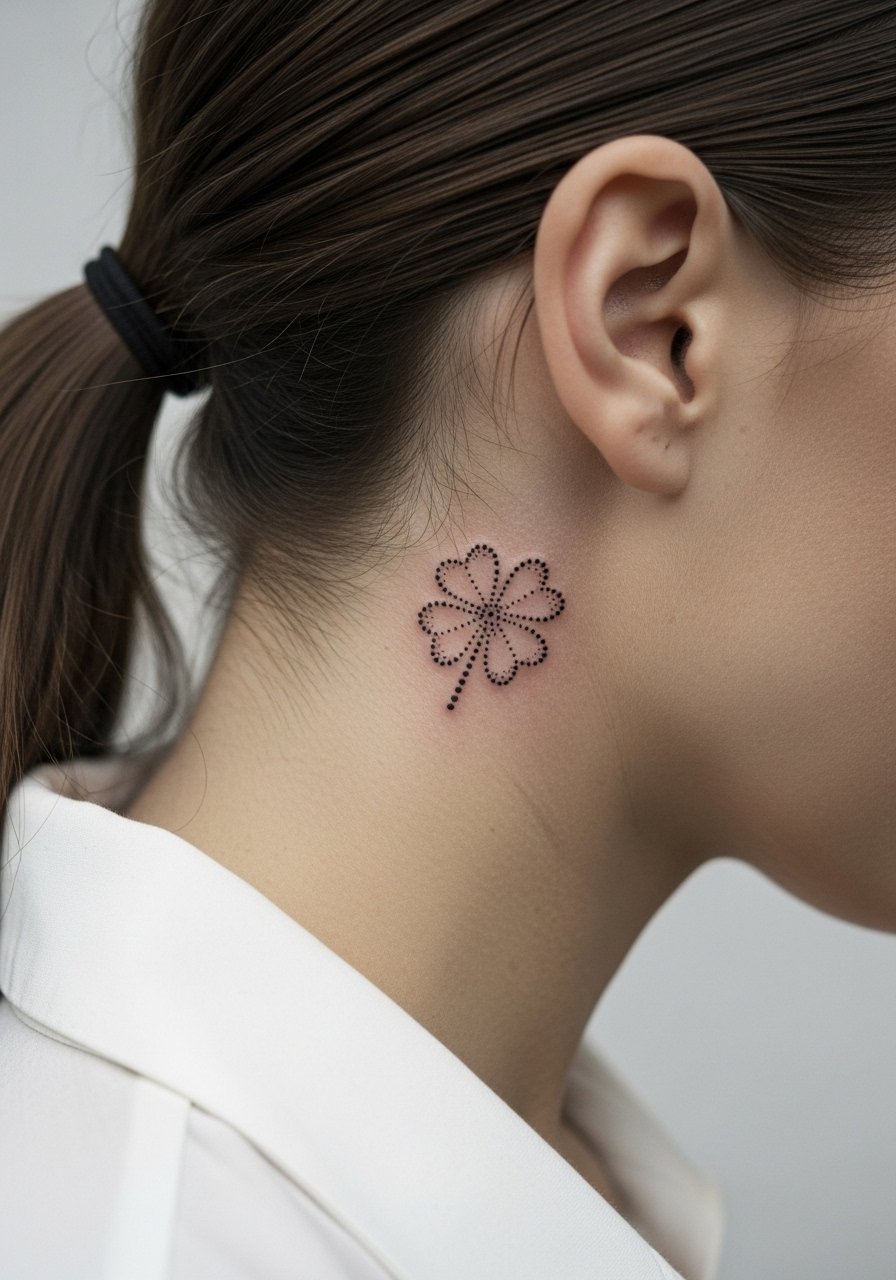
Behind-ear placements are tiny and subtle, and dotwork negative-space clovers make a soft surprise when hair is up. The artist must place dots with restraint to prevent merging, and Saniderm or no-touch sprays are often suggested by folks who want minimal scabbing. Sessions are quick but the area is delicate so ask about aftercare specifics. For styling, keep hair in a half up hair clip or low bun to show the small design when you want it visible.
12. Black and gray realism clover patch at the nape of the neck
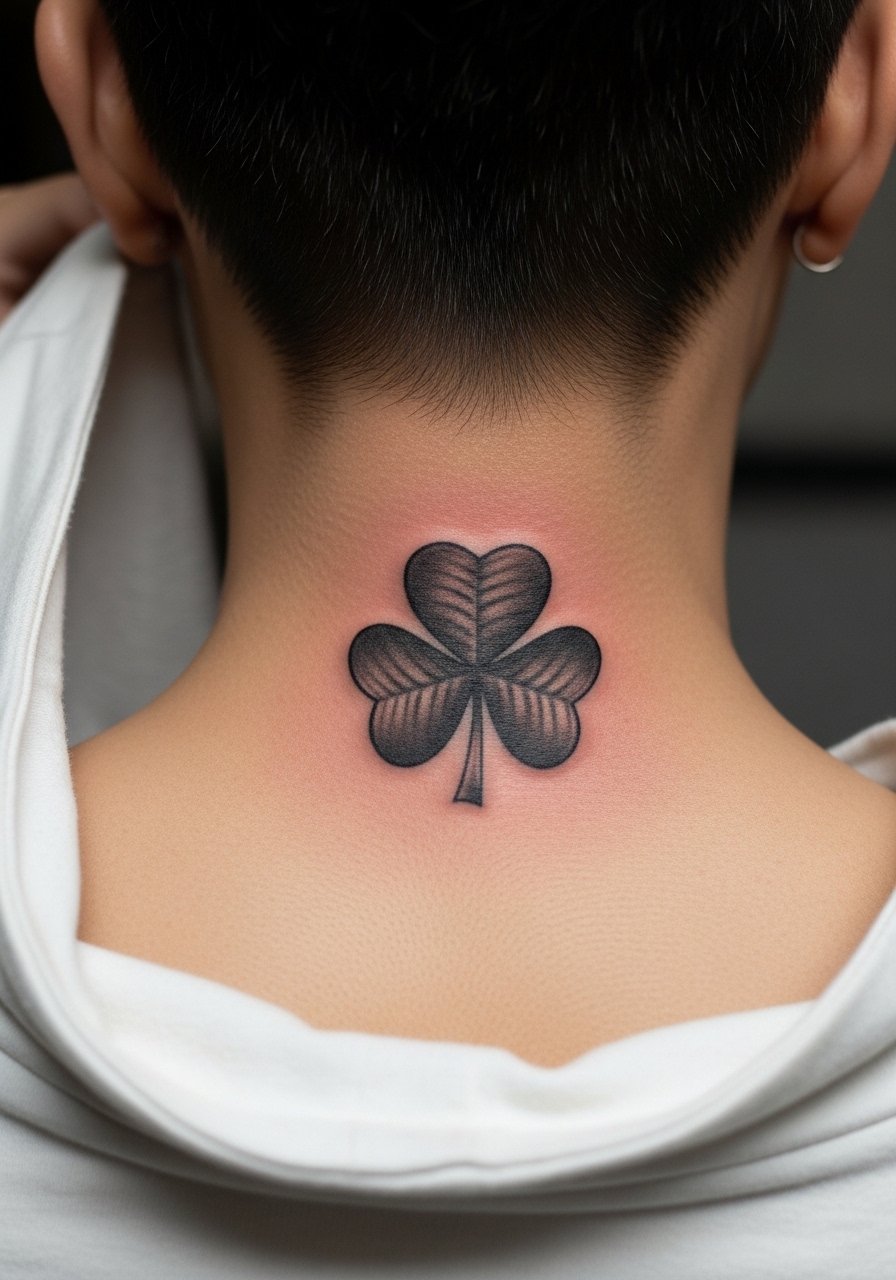
A back-of-neck realism patch reads as an elegant statement and benefits from strong contrast to keep dew drops and texture visible. Neck sessions require a calm artist and precise needle depth to avoid overworking the tissue. If career considerations matter, remember that neck tattoos are still more visible than arm work and sometimes affect hiring. Ask your artist about how detailed you should go given potential workplace policies and plan clothing options accordingly.
13. Micro clover cluster for a small wrist stack

Gen Z favors micro clusters that can sit in a bracelet-like row around the wrist. Keep each clover around one centimeter so the cluster reads as intentional rather than cramped. The wrist is a high-movement area, so expect fading faster than forearm work and plan on touch-ups at year two. The session is brief and sensations are low to moderate. For a cohesive look, pair the cluster with a dainty bracelet stack on the opposite wrist so the tiny motifs feel like part of a curated set.
14. Scattered clover seeds for sleeve filler

Using tiny clover "seeds" as filler lets you expand a sleeve organically and gives collectible collectors an option to grow a patchwork over time. The dots and micro leaves are forgiving when spaced properly, and they guide future pieces so a sleeve does not feel disjointed. A common mistake is making seeds too dense which reads messy after a year; ask for measured spacing and vary the sizes slightly for depth. These elements are low-pain and fast to ink, which makes them great for walk-ins at conventions or guest spots.
15. Trevo inside a locket outline on the sternum

A locket outline frames the trevo and creates a feeling of hidden luck that reads well under clothing. Sternum placements are tender and need an artist experienced with chest curves, so look for portfolios showing similar work. Sessions can be uncomfortable because the area flexes when breathing, and you should expect a two-hour window for careful placement. The design needs slightly more weight in the outline to age without softening. This placement benefits from a fitted top during the reveal, and the artist should discuss how body changes could affect line continuity.
16. Constellation clover pairing on the forearm

Pairing clovers with tiny star dots gives the motif a narrative edge while keeping scale small. The inner forearm is forgiving and shows off negative space well, but tiny dot connections require spacing so they do not merge over time. Sessions are pleasant and often done in a single appointment for compact layouts. Tell your artist if you want the dots to mimic a real constellation or stay purely decorative. For an editorial minimal look, roll your sleeve and show the piece with a slim gold arm cuff instead of heavy bracelets.
17. Dotwork clover that mimics embroidery on the calf

Dotwork can recreate textile textures which makes this clover feel stitched rather than inked. The calf is ideal because it offers surface area and muscle to keep dots distinct, and sessions can be longer without uncomfortable positions. The main error is clustering dots too tightly, which flattens the textile illusion when healed. Ask for varied dot density to simulate thread highlights and lowlights. For a casual reveal, cuff jeans or wear athletic socks with sneakers to make the patch feel like an intentional design accent.
Frequently Asked Questions
Q: How do I prevent a fine line wrist clover from fading into a blur?
A: Start by asking for slightly bolder linework instead of hairline strokes and size the clover to at least one inch. Avoid friction from tight bracelets in the first week and schedule a touch-up consult at six to eight weeks if any lines look soft. If you work with water or cleaners a lot, expect faster fade and plan for periodic refreshes.
Q: Will watercolor greens look muddy on darker skin tones and what should I ask my artist?
A: Color can appear different depending on skin tone, so ask for contrast in outline and consider muted green tones rather than neon washes. Some artists recommend strong outlines or opting for black-and-gray accents so the shape reads clearly over time. Request healed examples on similar skin tones before booking.
Q: Is the ankle a bad spot for ornamental filigree because of rubbing from shoes?
A: Ankles face daily friction from socks and shoes which can affect delicate linework. Choosing slightly heavier outlines and leaving a bit of space from the shoe line helps. Wear loose footwear the first week and avoid tight socks to reduce scabbing and abrasion.
Q: The ribcage hurts a lot, should I use numbing cream for a micro-realism trevo?
A: Numbing creams are common for anxious first-timers and many people find them helpful for ribs. Ask the shop in advance because policies vary, and follow application timing so it does not interfere with stencil adhesion. Numbing reduces perceived pain but not healing needs.
Q: How can I avoid being upsold on the day of my appointment for a small clover?
A: Get a full written quote including deposit and setup fees from at least two shops when you book. Bring clear reference images and tell the artist the exact size you want. If the shop pressures you into a bigger piece at the chair, it is okay to pause and reschedule.
Q: Should I choose Saniderm or dry healing for a tiny four-leaf clover?
A: Artists split into two camps. One group favors protective film for fewer scabs and faster visible healing. The other group prefers dry healing arguing it lets ink settle without trapped moisture. The right choice depends on your skin type and the artist's method so ask which they use most and why before you go.
