
Fine line tattoos dominate saved boards and trend reels, but what holds up on the upper arm is not always what looks best fresh. I keep seeing tiny mandalas and delicate scripts blur at year three because they were placed too close to the shoulder cap or picked too small. This list focuses on upper arm ideas that read bold now and still read intentional after a few summers in the sun.
1. Bold Blackwork Arm Band
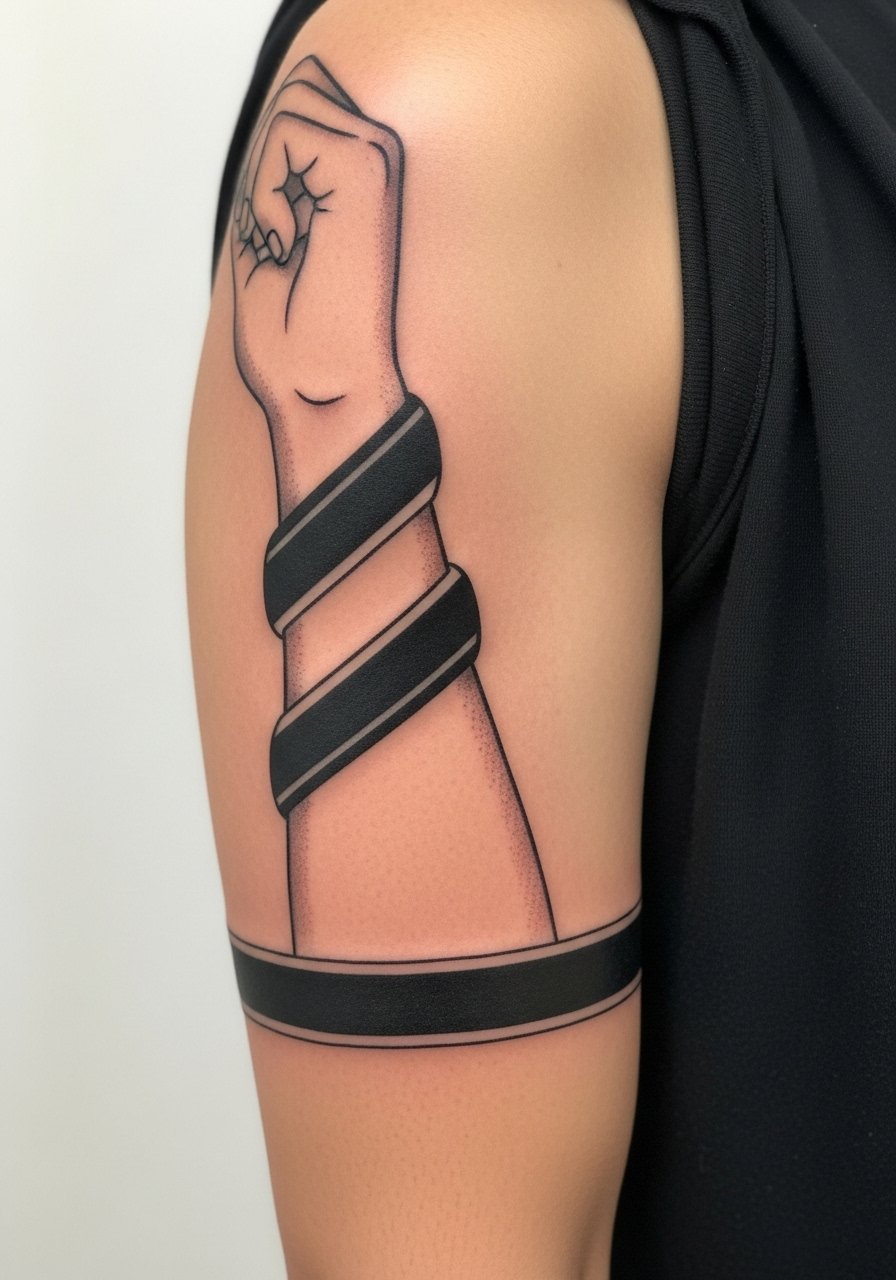
This classic reads bold from a distance and ages predictably because the saturation is intentional. Tell your artist you want dense, even saturation with slightly softened edges so the band does not look too harsh as skin moves. Pain on the outer upper arm is usually low to moderate, and a clean band often takes one session of 30 to 90 minutes depending on width. Common mistakes are gaps in saturation and bands placed too close to the elbow where skin folds distort the line over time. For showing it off, wear a loose button-down shirt with sleeves rolled to mid-bicep to frame the band.
2. Micro-Realism Portrait on Outer Bicep
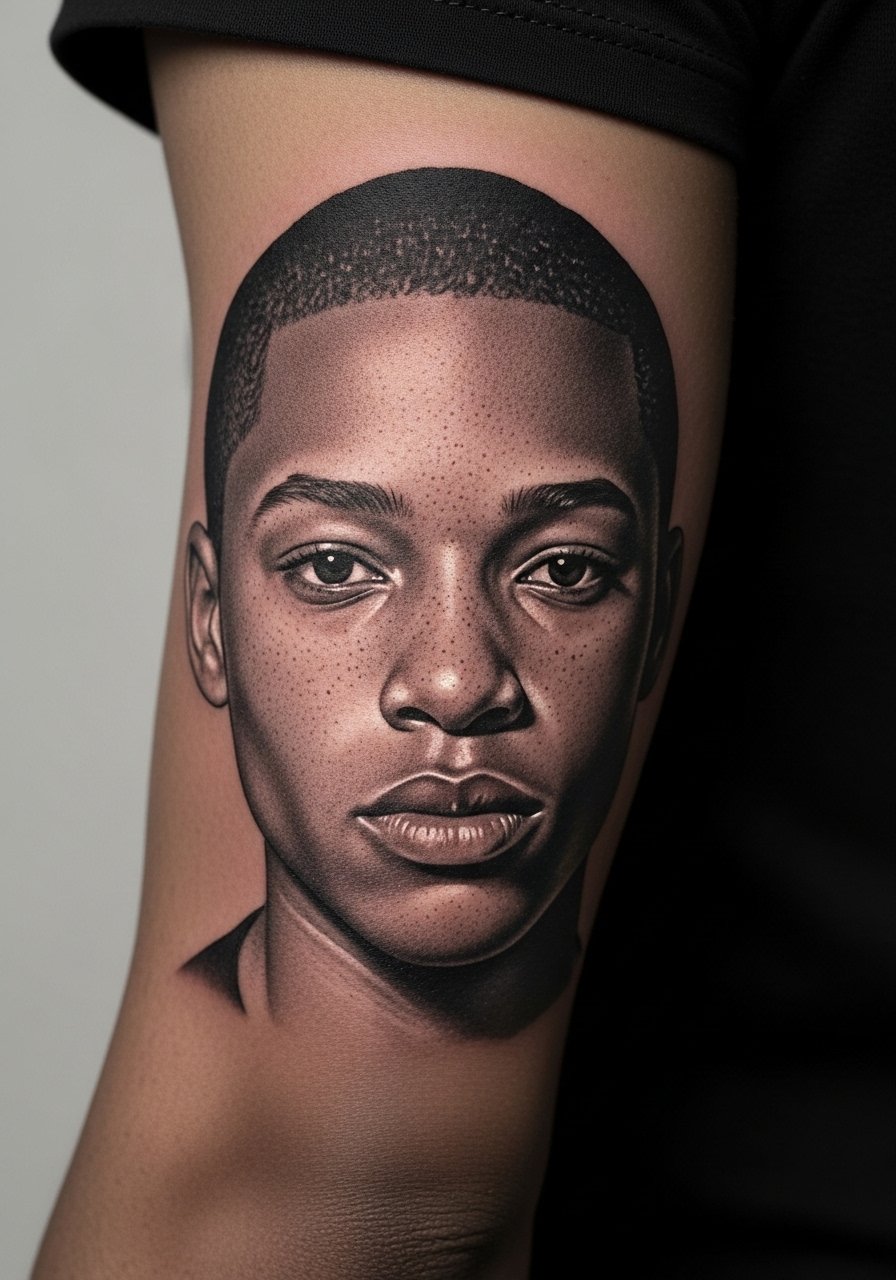
Micro-realism works on the outer bicep when scaled for the skin there. I recommend bringing high-contrast reference photos and discussing how the piece will sit when your arm relaxes. Expect a moderate pain level and a session of two to four hours for a small portrait. A frequent error is insisting on tiny detail that the skin cannot hold long term. Over the first two years the soft shading will settle and lose a fraction of its crispness, so plan touch-ups around year three if you want to keep it sharp. For appointments, choose breathable sleeveless tops so the artist has clear access.
3. Fine Line Botanical on Inner Bicep

The inner bicep gives a private canvas that still peeks in short sleeves. Fine line botanicals look delicate here, but the skin is thin and elastic so ask for slightly bolder lineweight than you might choose for the forearm. Expect higher sensitivity with the arm raised and a one to two hour session for a modest sprig. A common mistake is asking for ultra-tiny veins and stems that merge during healing. Plan a touch-up by year two or three if you love the delicate look. For showing or hiding, a racerback tank makes access easy for the session and frames the tattoo when you want to show it.
4. Neo-Traditional Rose on Shoulder Cap
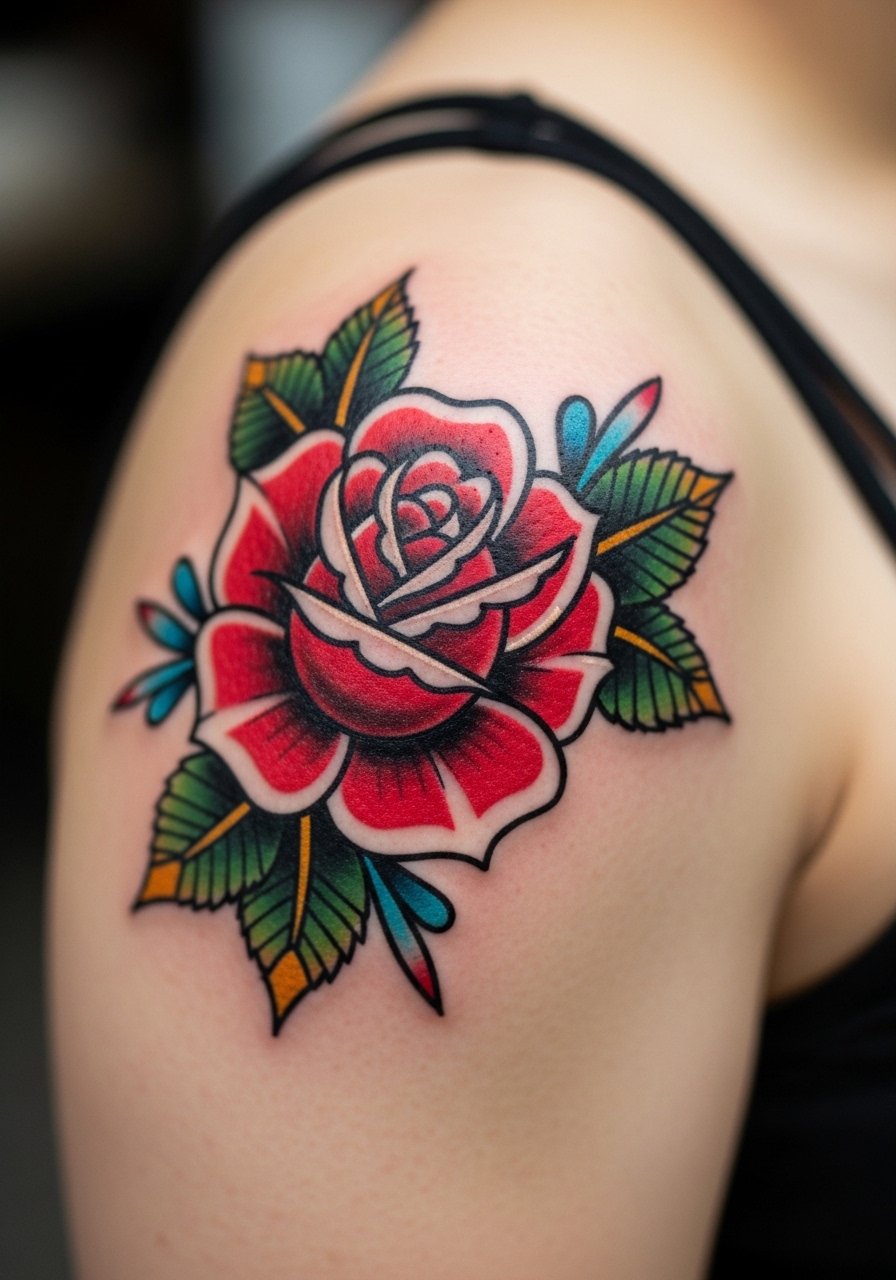
Shoulder caps take color well and the round shape flatters floral compositions. Ask your artist for stronger outlines and solid saturation so the petals hold definition as color fades. Pain on the shoulder cap is usually mild and a typical session is one to three hours based on color complexity. A common aging issue is placing intricate highlights too close to the edge of petals. Over five years the color will soften but the bold outlines help the rose stay readable. Pair this design with open-back midi dresses for nights out, the shoulder cap looks intentional when paired with exposed-shoulder silhouettes.
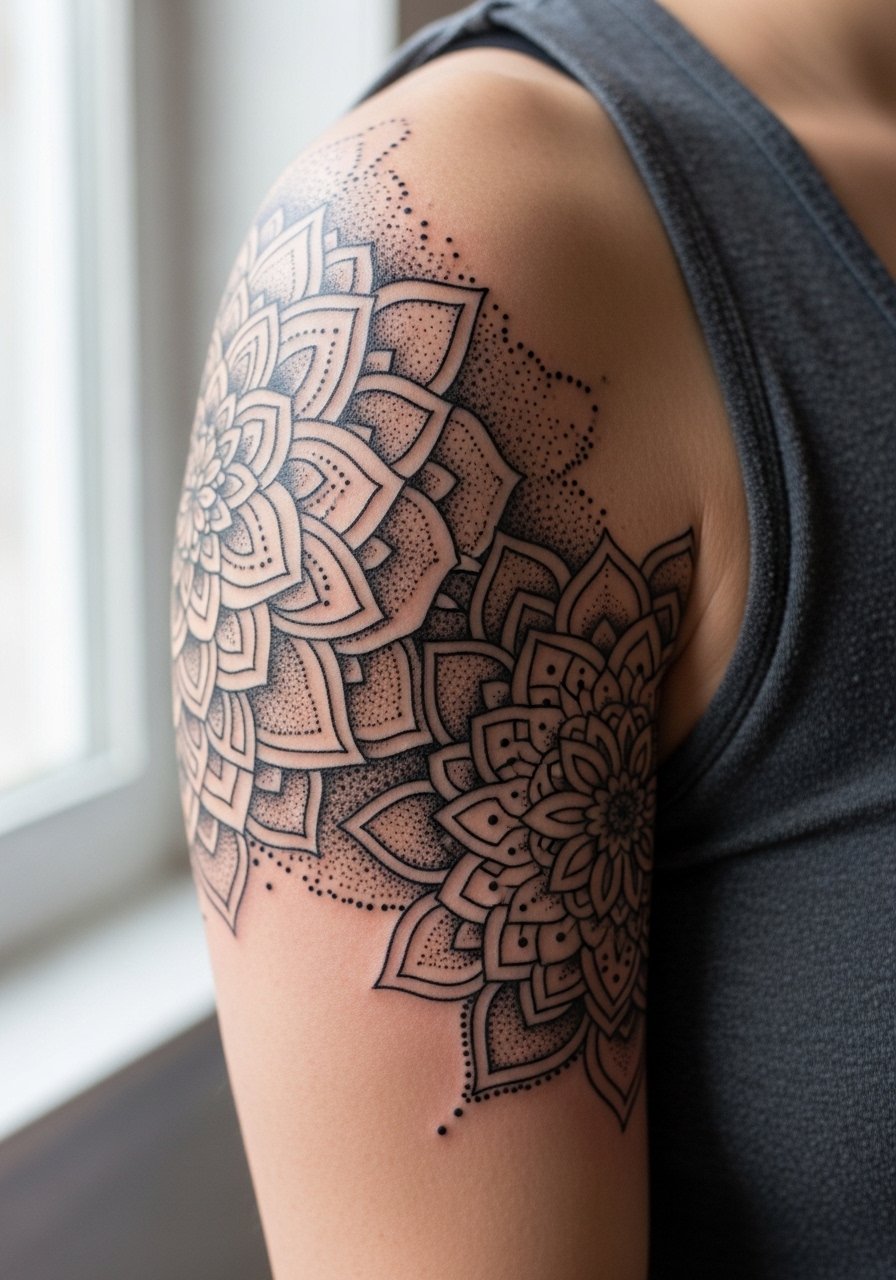
5. Geometric Mandala Around the Upper Arm
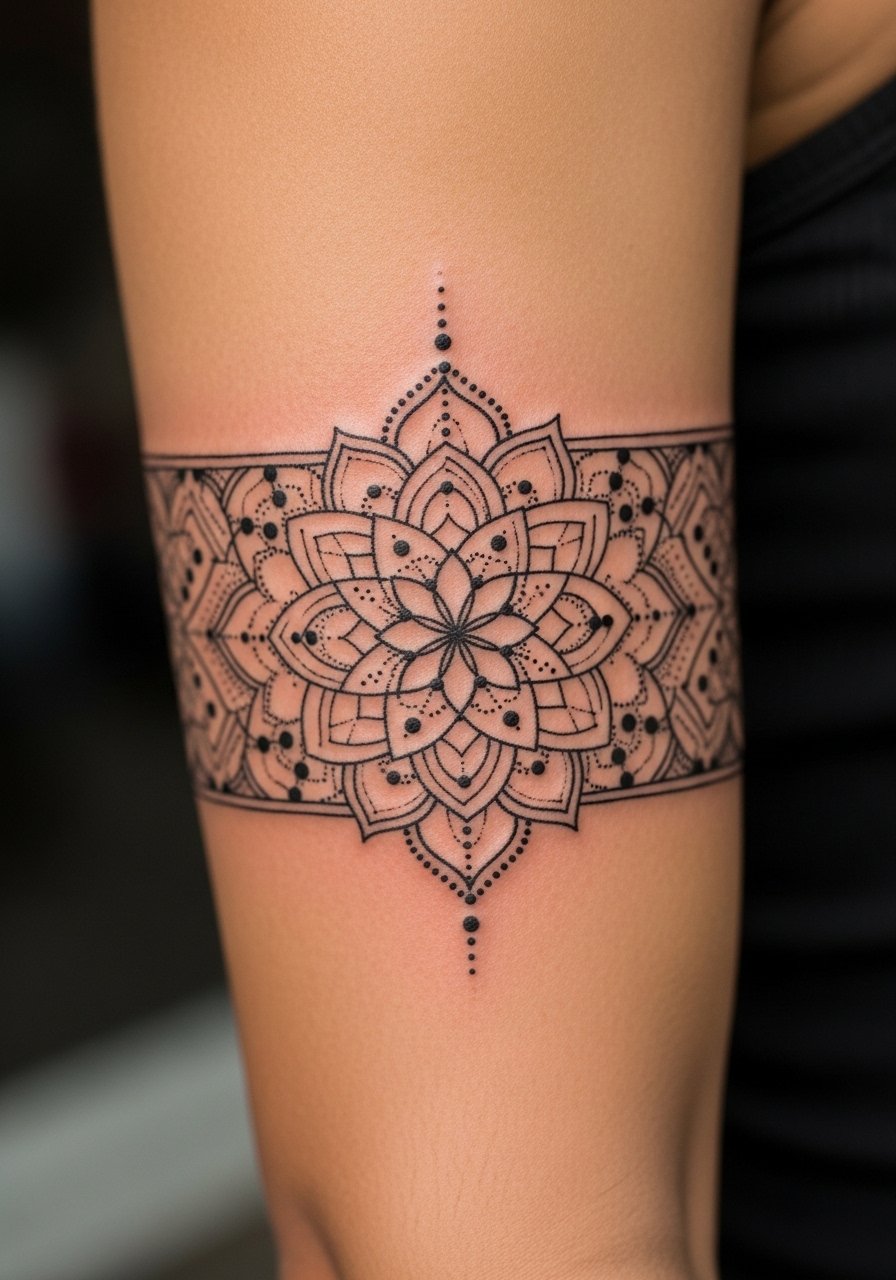
Mandala bands risk blurring if packed too tightly. I tell people to give each spoke breathing room and to avoid ultra-fine concentric circles that touch each other. Expect a session of two to four hours with moderate pain, especially where the needle runs across the muscle. The mistake is picking a diameter too small for the pattern. At six months the dot work reads crisp. At two to five years the close dots may merge if spacing was insufficient. For a refined look, pair the band with short-sleeve knit tops so the mandala peeks without being crowded by patterns.
6. Tribal-Inspired Cuff With Negative Space

Tribal-inspired cuffs rely on contrast and negative space more than micro detail. Tell your artist you want clean blocks of black and deliberate open areas. Pain is lower on the outer band of the upper arm and most cuffs finish in a single long session. The common error is asking for too many thin lines inside the black blocks which can muddy as the skin ages. This style can hide small imperfections and read bold at year five. For the session, wear a loose drawstring linen pant if the cuff tapers toward the triceps so you can sit comfortably without fabric pressing on the area.
Studio Day Picks
The outer and inner arm pieces above vary in sensitivity, so a few targeted items make the chair day and the first week easier.
-
Stencil transfer paper kit. Lets you preview placement on the rounded upper arm, which is especially helpful for bands and mandalas.
-
Topical numbing cream. Applied about 45 minutes before reduces edge pain on inner bicep sessions without changing the artist's shading.
-
Thin protective film roll. Keeps saturated color pieces like neo-traditional roses safe from tight clothing during the first day.
-
Fragrance-free body wash. Gentle cleansing prevents irritation around fine line work as it heals.
-
Aquaphor healing ointment. Light layers for the first few days lock in moisture for blackwork bands and color pieces without suffocating the needle channels.
7. Script Wrap That Follows Muscle Lines
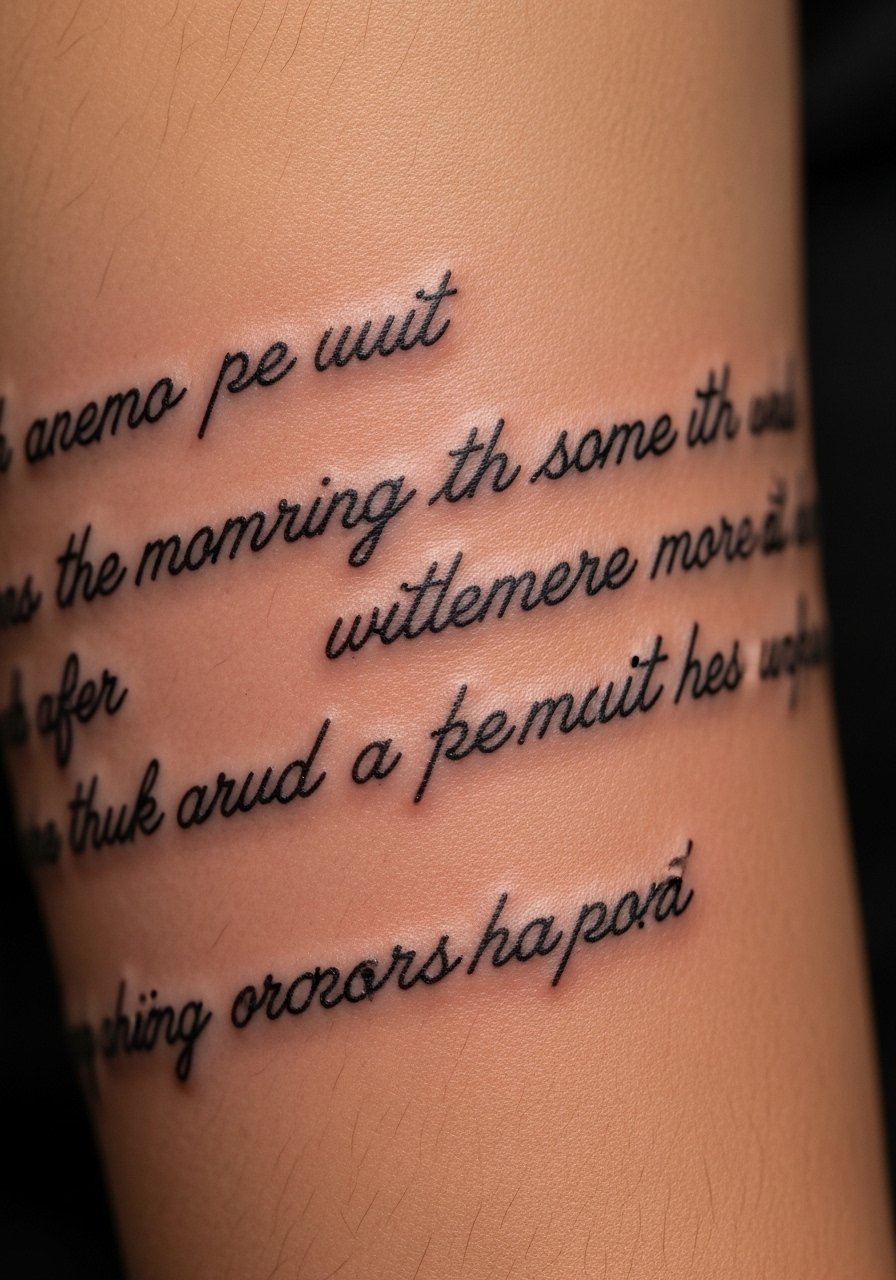
A script that curves with the bicep reads organic when placed along muscle lines. During consultation mention the arm position you want it read from, such as relaxed at side or flexed. Expect a 30 to 90 minute session with low to moderate pain. The main mistake is insisting on ultra-tiny lettering. Letters too thin or close together will blur into one another by year three. If you want to showcase it on casual days, roll sleeve cuffs or pick short-sleeve shirts that sit above the script. Consider a thin chain pendant necklace to balance upper-body jewelry without crowding the arm.
8. Minimalist Arrow Along the Outer Arm

An arrow is a low-commitment graphic that still reads bold if sized correctly. I advise asking for a medium lineweight and a slightly larger shaft than you think you need. Pain is mild on the outer arm and a small arrow takes under an hour. Tiny arrows often go wrong during healing because the pointwork blunts. At two years a properly scaled arrow keeps its silhouette with minimal touch-up. For showing it off, sleeve-rolled shirts keep attention on the arm. Bring a loose button-down shirt you can roll without creasing the fresh tattoo.
9. Surreal Eye and Crescent Combo

Surreal eye motifs read as edgy when combined with geometric elements like a crescent. Tell your artist whether you want realistic shading or stylized linework so they can choose appropriate needle grouping. Expect moderate pain and one long session if shading is dense. A common mistake is mixing two competing scales where a tiny eye sits beside oversized geometric elements. Over time the shaded eye softens and the linework in the crescent holds the composition. For evenings out, short sleeves or rolled cuffs highlight the piece without overcomplicating your outfit.
10. Horror-Inspired Micro-Realism Skull
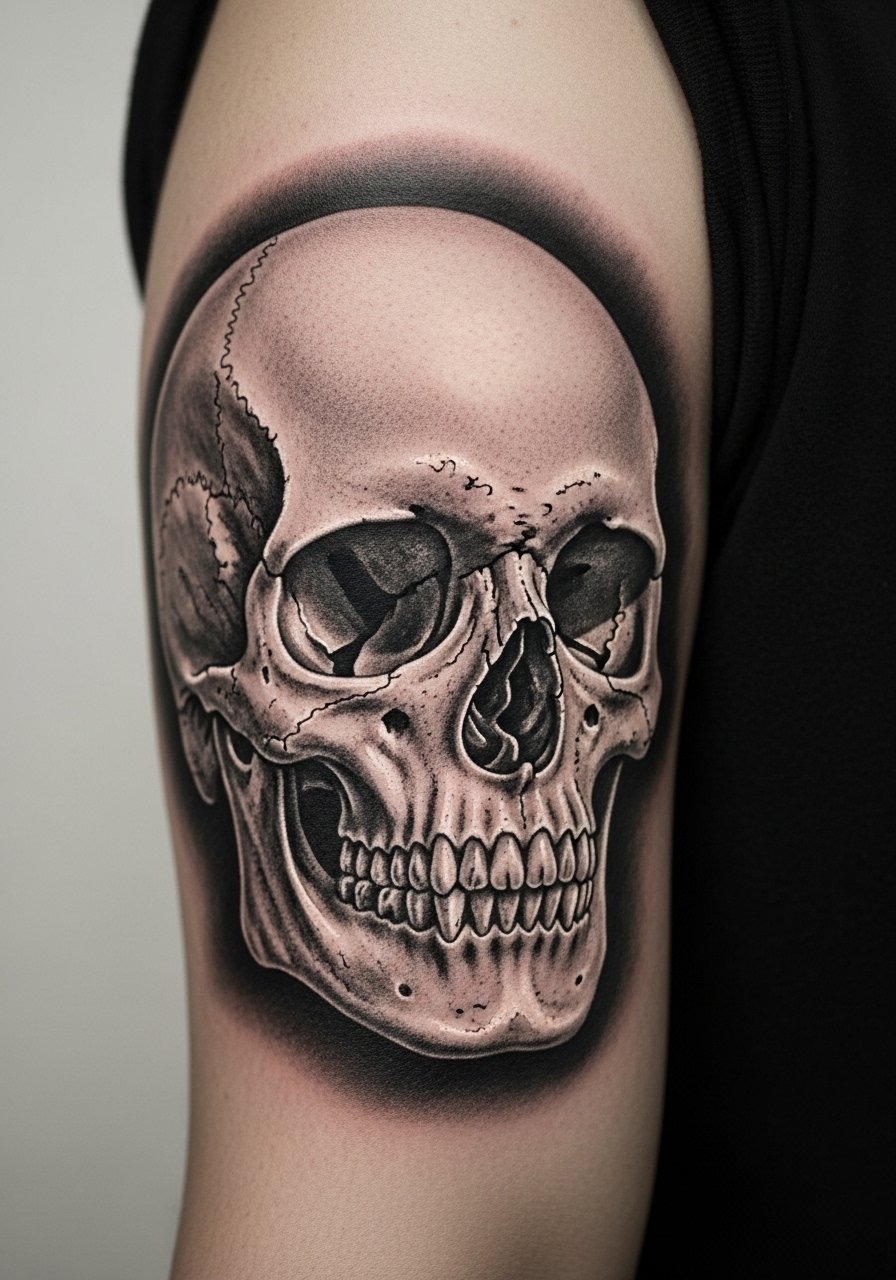
Micro-realism skulls on the upper arm have visual weight and can be scaled to read from across a room. Bring high-contrast reference photos and ask the artist to map out the darkest anchor points. The session can be taxing for a few hours, and the inner edges of the bicep may feel sensitive. A recurring mistake is compressing too much detail into a small area which flattens the form during healing. By year three the highlights may need a refresh if you want the crisp contrast to remain. For session comfort, wear a loose drawstring linen pant and a sleeveless top so movement is easy.
11. Dot Work Half-Sleeve Panel
Dot work relies on spacing and gradual density rather than lines. Tell your artist the grain you want and ask for a test patch of stippling to check how it settles. Sessions for dot-heavy panels are long and may come across as low pain but require endurance. The mistake is asking for dots too close together to mimic shading you see in photos. At two years properly spaced dots still read as texture while overly dense dots can darken into blocks. For showing this off, short-sleeve linen shirts let the panel breathe without modern prints competing for attention.
12. Abstract Brushstroke Blackwork
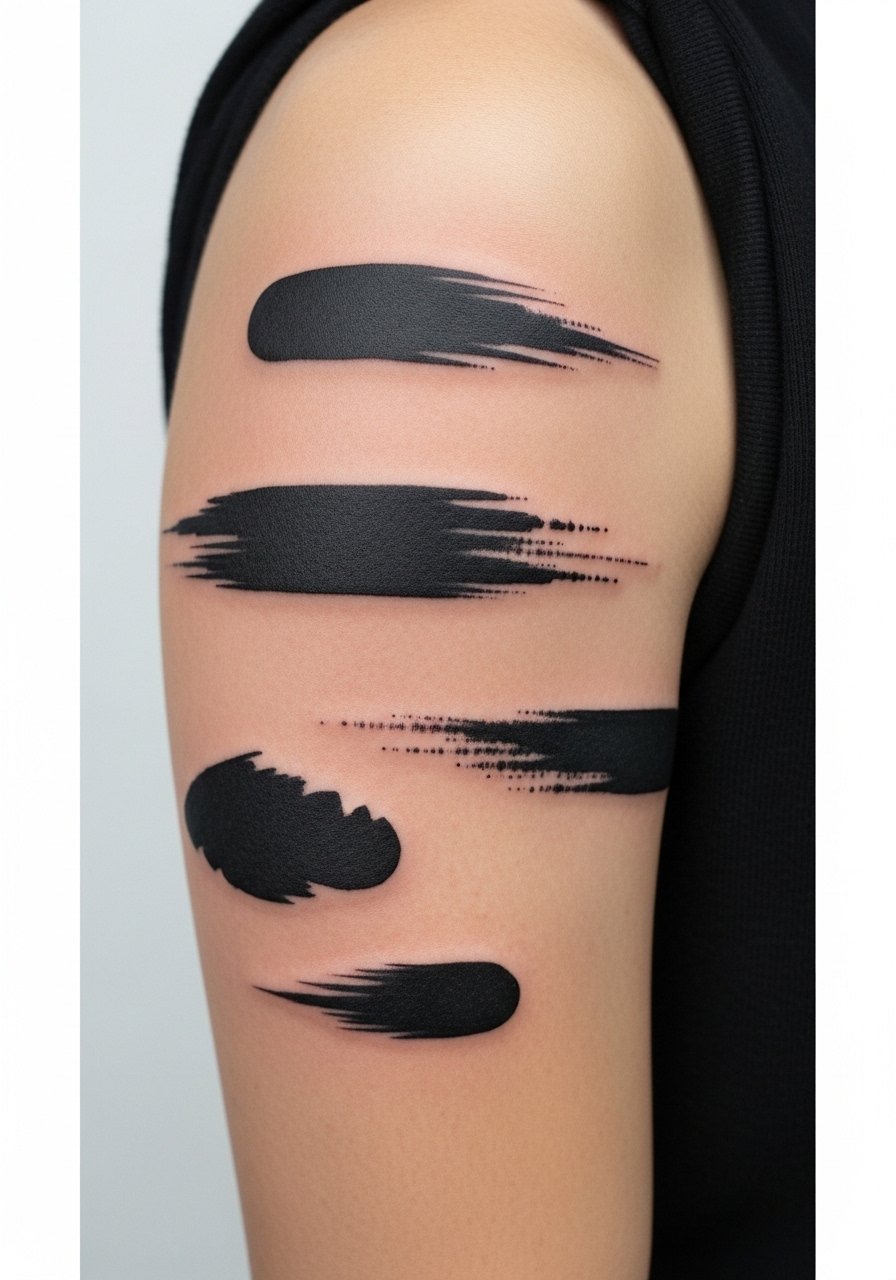
Brushstroke blackwork translates painterly gestures into tattoo form. During consultation bring images of the strokes you like and discuss edge softness. Outlines are minimal so artist placement matters. Sessions vary but a single brushstroke panel often finishes in one to two hours. A common error is requesting too many overlapping strokes which can turn muddy as the skin ages. Over time, the strong black anchors hold the composition while edges soften. Pair the look with sleeveless tops or a loose button-down shirt to highlight the sweeping motion.
13. Armor Plate Blackwork Along the Triceps
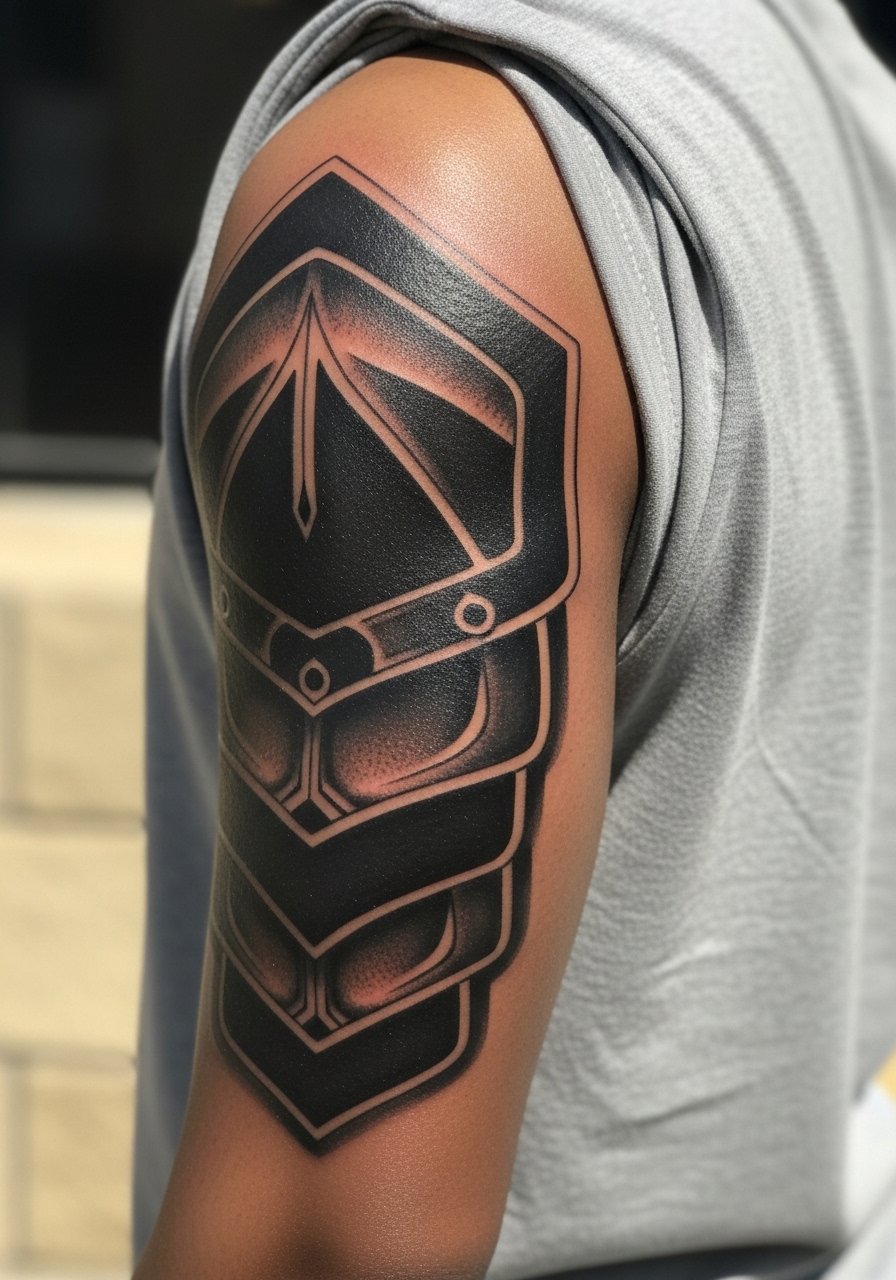
Armor plate designs create a protective visual that wraps the triceps. Tell your artist how much of the arm you want covered and where plates should break to follow muscle contours. Pain is moderate on the back of the arm and sessions are medium length. The mistake people make is placing rigid edges across muscle movement areas which can distort when flexed. A well-planned plate looks intentional at rest and in motion. For appointments, wear a loose button-down shirt you can pull aside to expose the back of the arm without tugging at the skin.
14. Single-Needle Constellation Cluster
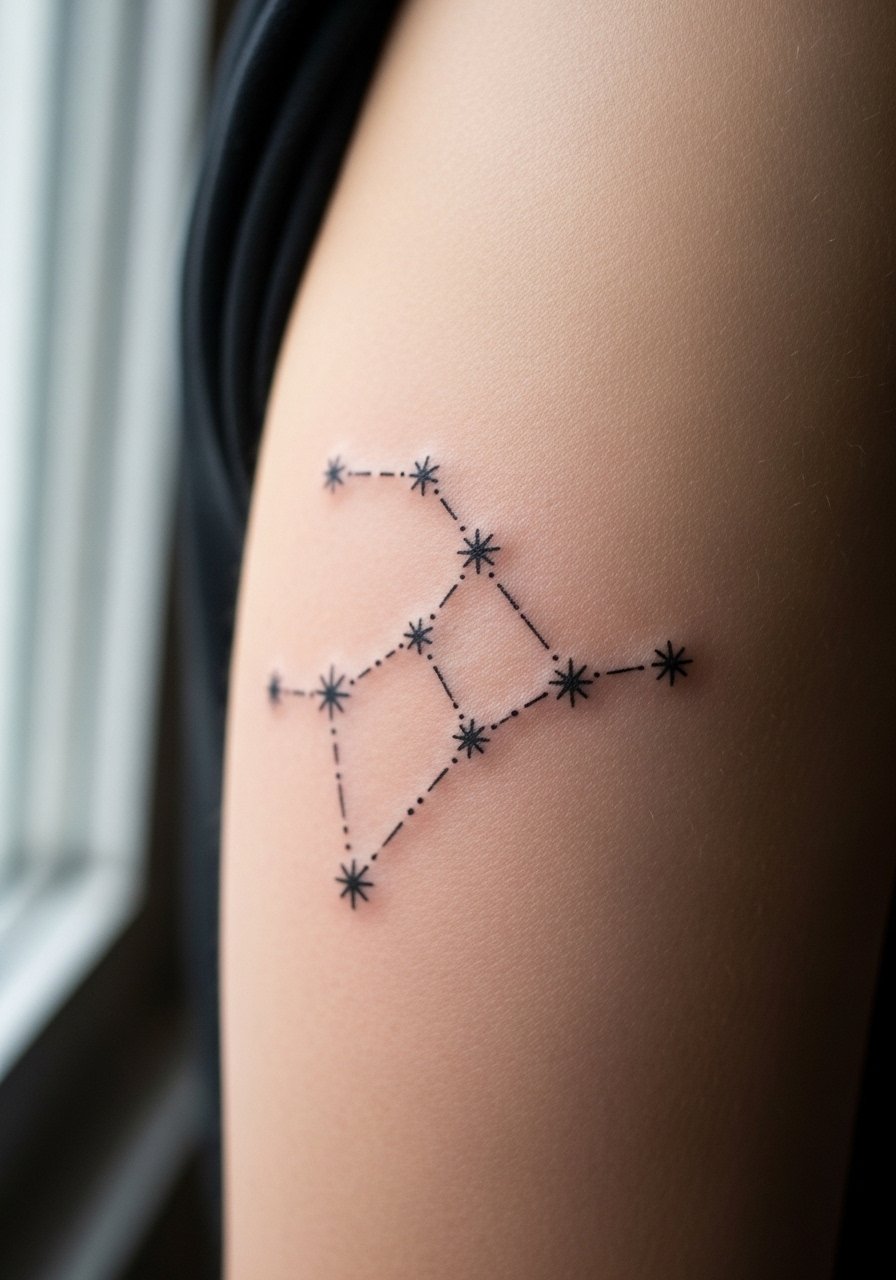
Tiny single-needle stars read delicate but the upper arm demands slightly larger spacing than the wrist. Ask your artist to space stars so negative space carries the design. Pain is mild and a small cluster takes under an hour. A common mistake is compressing constellations into too small an area which leads to merging. Expect some softening by year two and consider a light touch-up if you want the points restored. For showing it off, short sleeves and rolled cuffs keep attention on the cluster without crowding the composition.
15. Color-Saturated Traditional Anchor
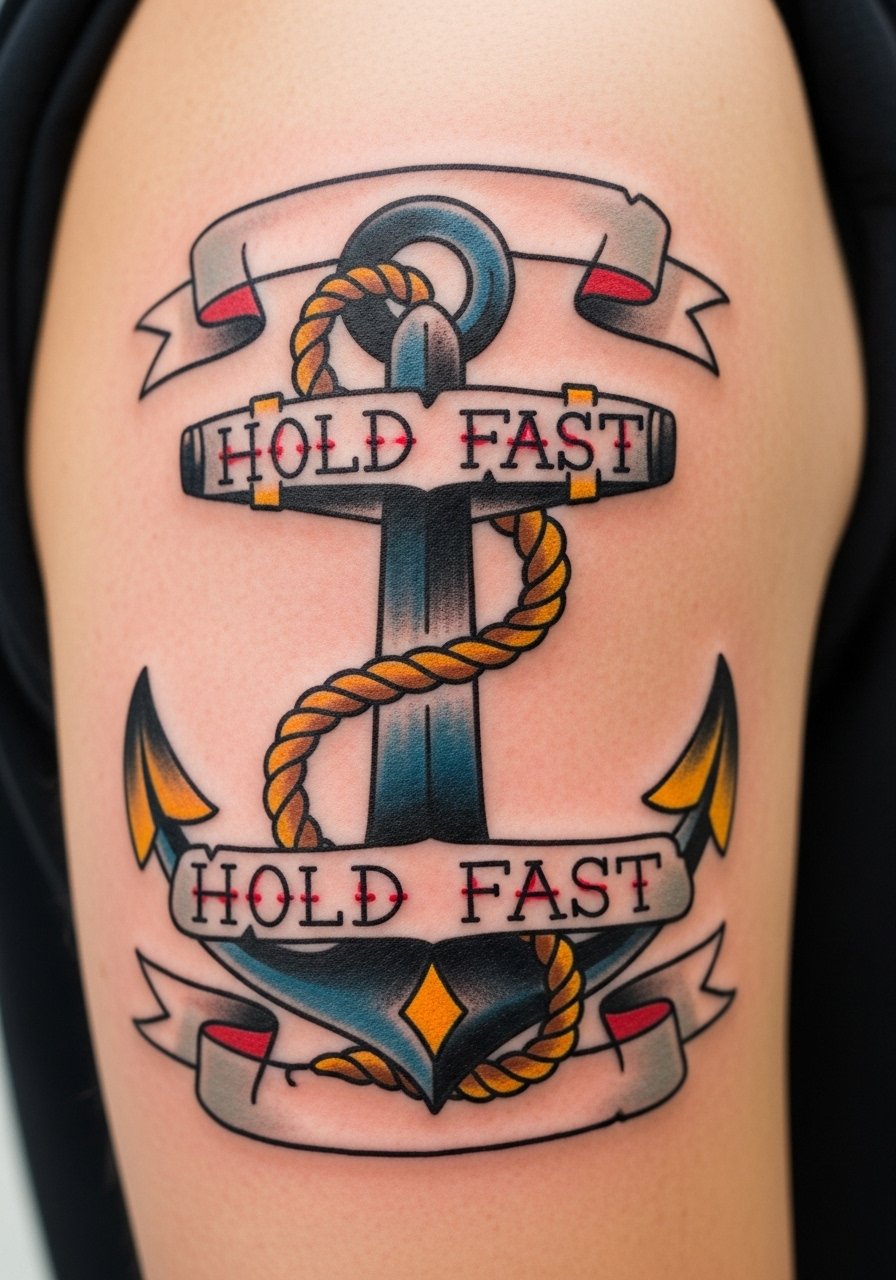
Traditional pieces age well because of their strong outlines and saturated fills. Tell the artist you want solid saturation and crisp borders. Pain is usually low to moderate and the piece often finishes in a single afternoon. A mistake is requesting too many small color transitions inside the anchor which complicates touch-ups later. Over five years the anchors keep their silhouette whereas small color layers may need a refresh. Pair this classic with rolled-up sleeves or a loose button-down shirt to let the crisp palette show.
16. Stipple Shaded Geometric Sleeve Segment
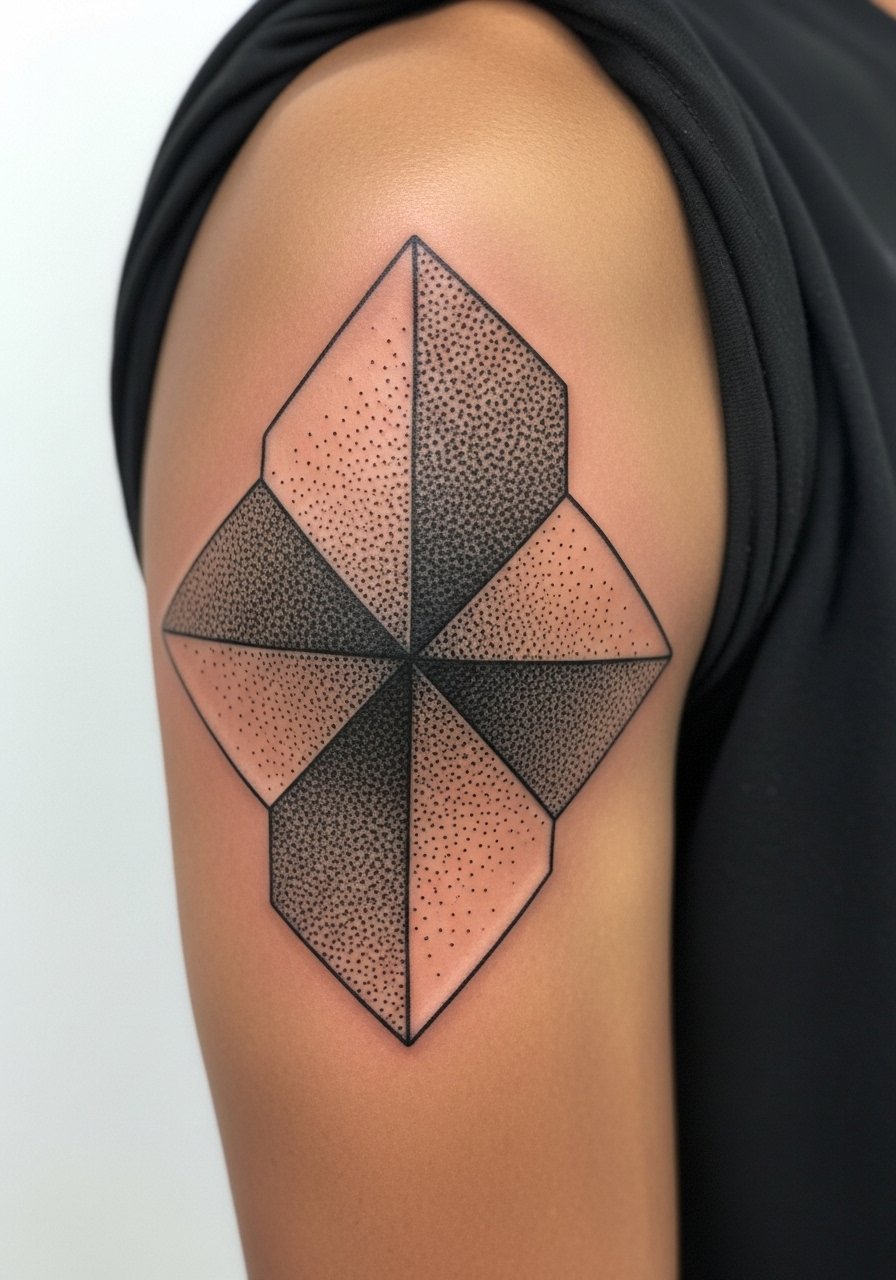
Geometric segments built from stipple shading rely on gradual density. During consult show examples of spacing and ask the artist to mark how the shapes will sit when your arm rests. Sessions are longer because stippling takes time and patience. An error is asking for near-solid fills with stippling which can all read similarly after a few years. With good spacing the pattern keeps readable and the negative areas remain airy. For the session, wear a loose drawstring linen pant and a tank so the artist has comfortable access.
17. Baroque Lace Motif Along the Upper Arm
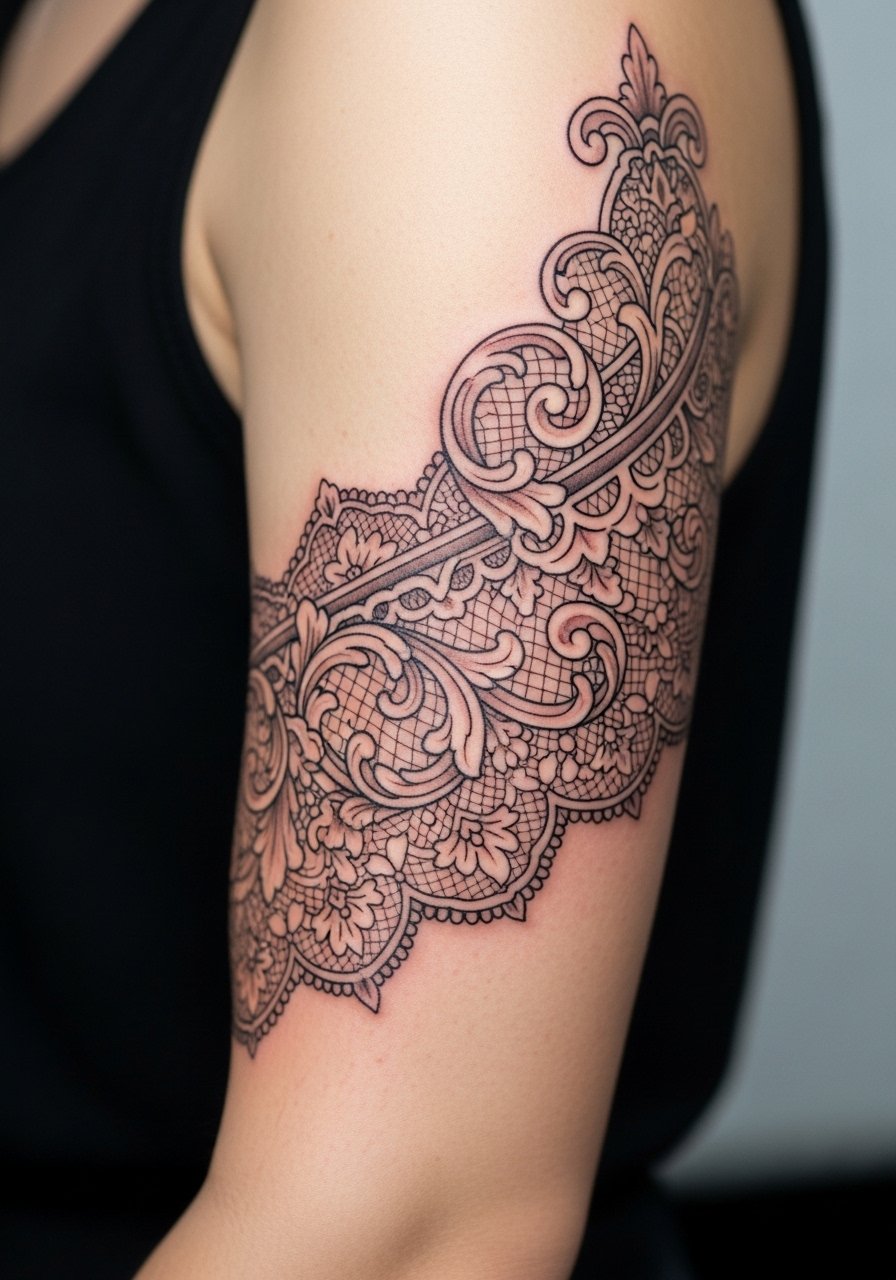
Lace motifs look refined when the negative space breathes. I advise mapping the filigree so large openings balance dense ornamentation. Pain is moderate and the session time depends on complexity. The main mistake is asking for too tiny loops and dots which can collapse into indistinct shading. Over years the larger openings keep the pattern legible while tiny details soften. Show it off with short-sleeve blouses or a loose button-down shirt that sits just above the lace line.
18. Japanese-Inspired Upper Arm Panel, Respectful Variant
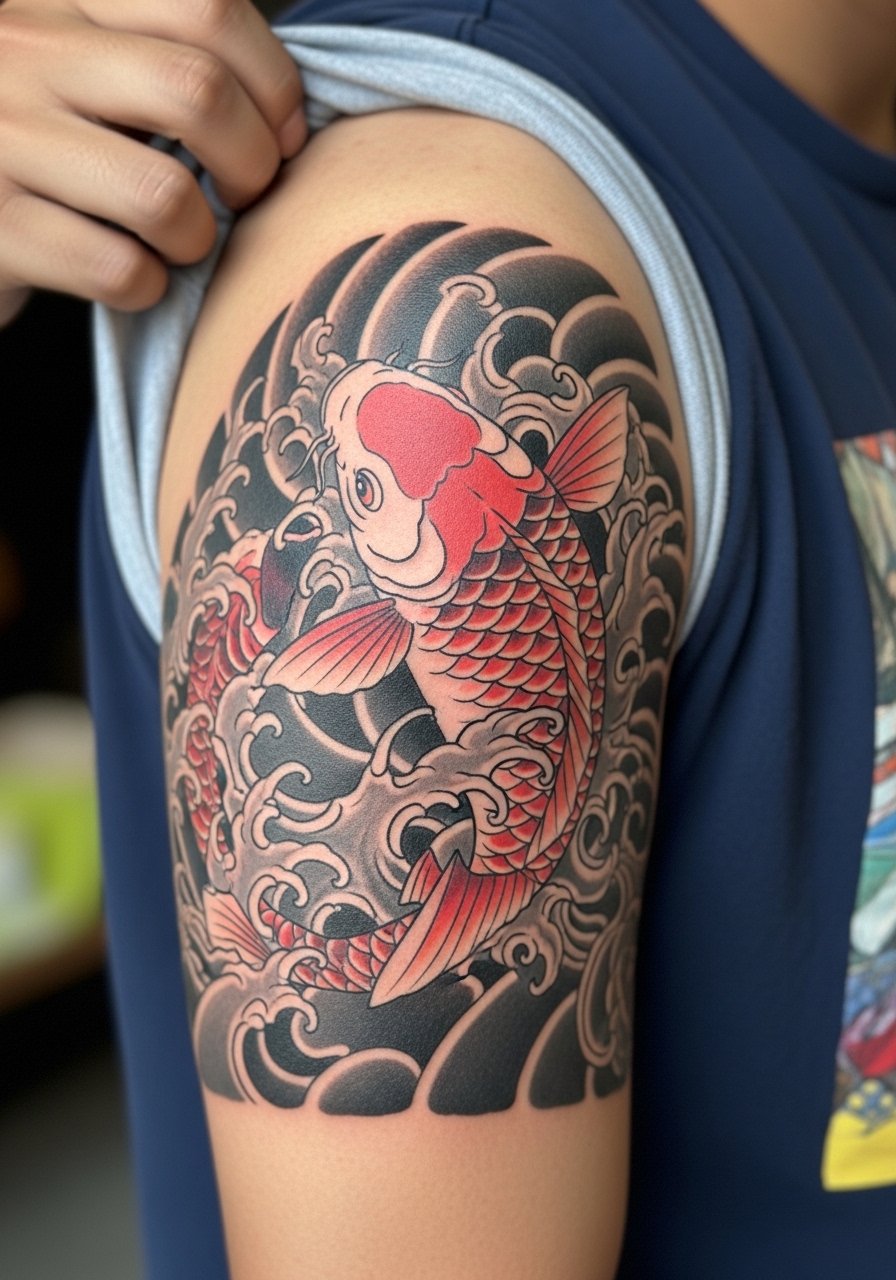
Traditional Japanese imagery can be powerful on the upper arm, but origins matter. One camp prefers direct cultural replication and ritual accuracy. The other camp advises stylized, homage-based work that avoids sacred symbols without permission. I suggest discussing intent with your artist and choosing motifs that honor the style without appropriating ritual elements. Expect moderate pain and multi-hour sessions. A mistake is combining too many narrative elements that compete for space. For the session, a short-sleeve shirt you can pull aside keeps exposure minimal and controlled.
19. Collage Flash Patchwork
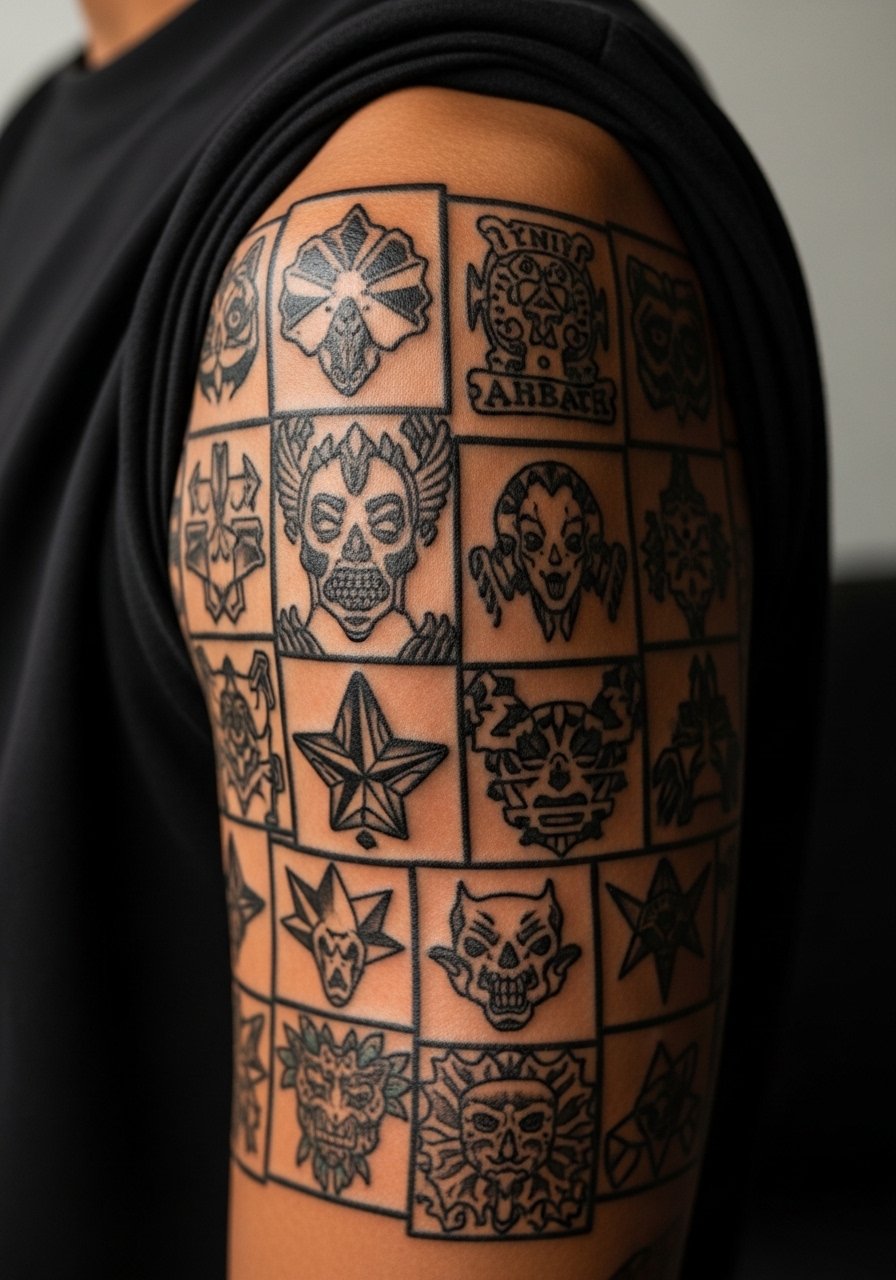
Patchwork collects small flash pieces into a cohesive map across the upper arm. Tell the artist which pieces you want to prioritize and where seams should sit to avoid awkward gaps. Sessions vary since you can build slowly. The frequent mistake is mixing heavy black pieces next to fine-line motifs without transitional elements. That mismatch reads uneven as pieces age differently. Plan to harmonize with filler pieces or background shading later. For showing off the collage, short sleeves or rolled cuffs keep the map visible without clutter.
20. Negative Space Script Band

Using negative space to form lettering creates a bold band that still reads text. During consult ask the artist to stencil and check legibility against your skin tone because contrast matters. Pain is similar to a blackwork band and session time depends on width. A common error is asking for extremely thin letters inside the black which can blur. Over time the black fills hold and the negative letters remain legible if spacing was respected from the start. Pair this with sleeveless shirts to let the band read uninterrupted.
21. Minimalist Needle-Point Portrait on Inner Upper Arm

A minimalist needle-point portrait on the inner upper arm is intimate and precise. Ask the artist to test a slightly heavier lineweight for the inner arm so the subtle features do not dissolve during healing. Sensitivity here is higher and sessions are shorter but more intense. The mistake is demanding micro detail that skin cannot support. Expect some softening by year two and plan on a light touch-up if you want the portrait to remain crisp. For the appointment, a racerback or tank top keeps the area accessible without exposing other skin.
Frequently Asked Questions
Q: Will fine line tattoos on the upper arm blur faster than bold blackwork?
A: From what I've seen, fine line pieces blur sooner than bold blackwork because thin lines have less margin for the natural spreading of ink. Placement matters more than style alone. On the upper arm outer face, fine line holds better than on the inner bicep where the skin is softer. If longevity is a priority, ask your artist to slightly increase lineweight and space details out.
Q: How should I dress for an upper arm session that includes both inner and outer arm work?
A: Wear a tank top or a loose button-down you can pull aside so the artist has clear access to both inner and outer areas. Bring a light layer to stay warm between passes. A loose button-down shirt is usually the easiest option because you can adjust coverage without moving the fresh stencil.
Q: Do geometric mandalas on the upper arm require special touch-ups?
A: They can if the spacing was too tight. Mandalas that give each spoke breathing room often need fewer touch-ups. Expect to reassess at year two or three. If you want the pattern to remain crisp longer, discuss slightly larger scale and stronger initial linework during consultation.
Q: Are upper arm tattoos a good choice if I want a visible but professional look?
A: Yes. The upper arm offers a balance between visibility and concealability. Short sleeves show work easily. If you need to hide a piece for formal settings you can use long sleeves. Placement towards the outer bicep reads less aggressive than hand or neck tattoos and often has fewer career-related considerations.
Q: If I want color-saturated traditional work, what should I ask the artist during consultation?
A: Ask about saturation strategy and how they plan to layer color without overworking the skin. Request to see healed photos of similar pieces on similar skin tones. Talk about expected session count and follow-up touch-up timing so you and the artist share the same maintenance expectations.
