
Fine line old school flash is having a moment, and not every delicate piece that looks perfect in a saved photo lives up to that look on skin over time. I've seen tiny traditional anchors and roses that read crisp for years, and others that blurred into a soft wash by year three. What separates them is placement, spacing, and the version of the flash you pick, so start with pieces that have room to breathe and tell your artist the aging you want.
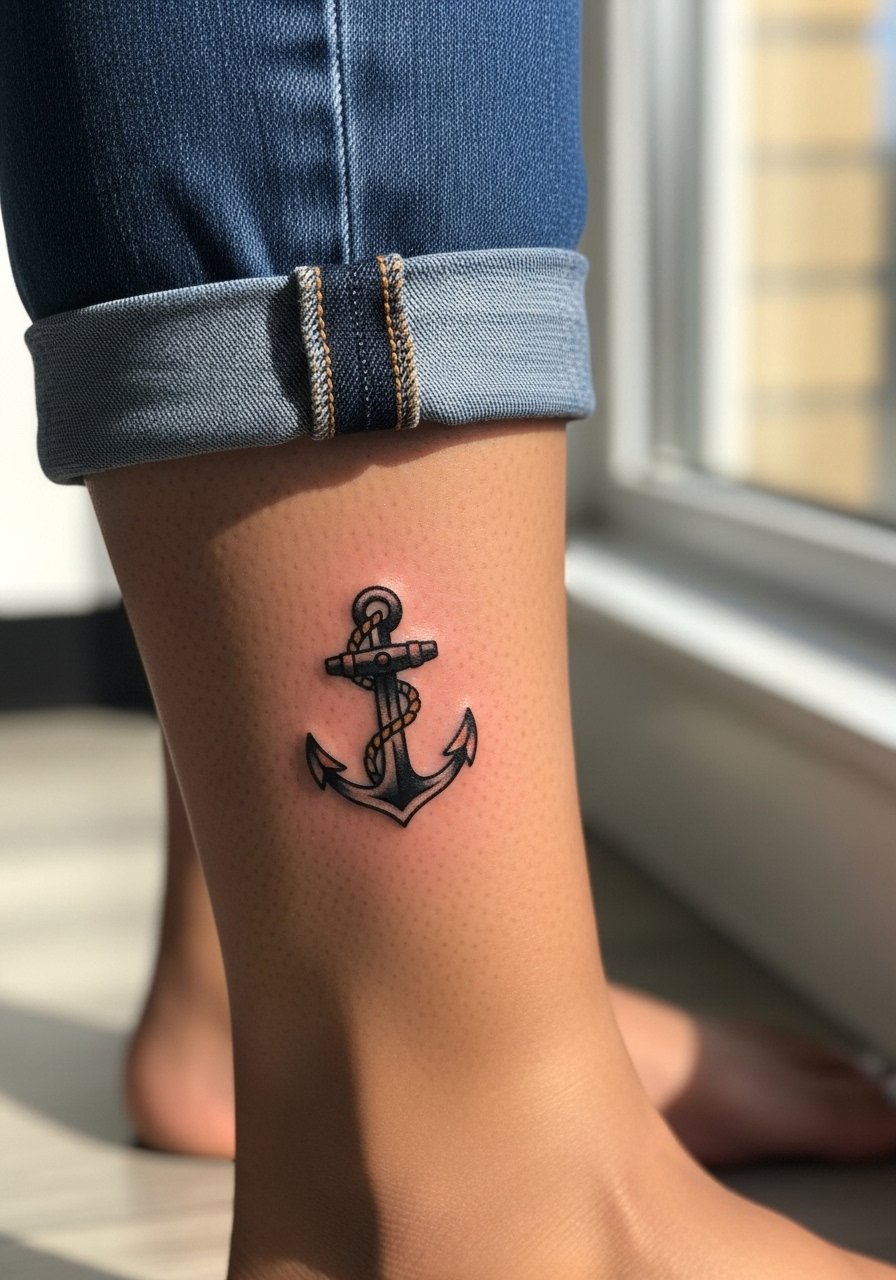
1. Delicate Anchor on Inner Wrist

This tiny anchor reads old school but scaled down with slightly thicker anchor lines so the silhouette holds. If you want a long-lasting wrist piece, ask the artist to increase line weight subtly while keeping the classic flash silhouette. Fair warning, the wrist is exposed to sun and frequent washing, so expect softer edges at year two versus crisp lines at six months. Sessions are short, often under an hour, and pain sits around a 4 of 10 for most people. A common mistake is asking for ultra-fine single-needle outlines on the wrist, which can blur into the skin pocket. For showing this one off, pair it with a thin chain bracelet that frames the tattoo without covering it.
2. Mini Sailor Rose on Upper Forearm
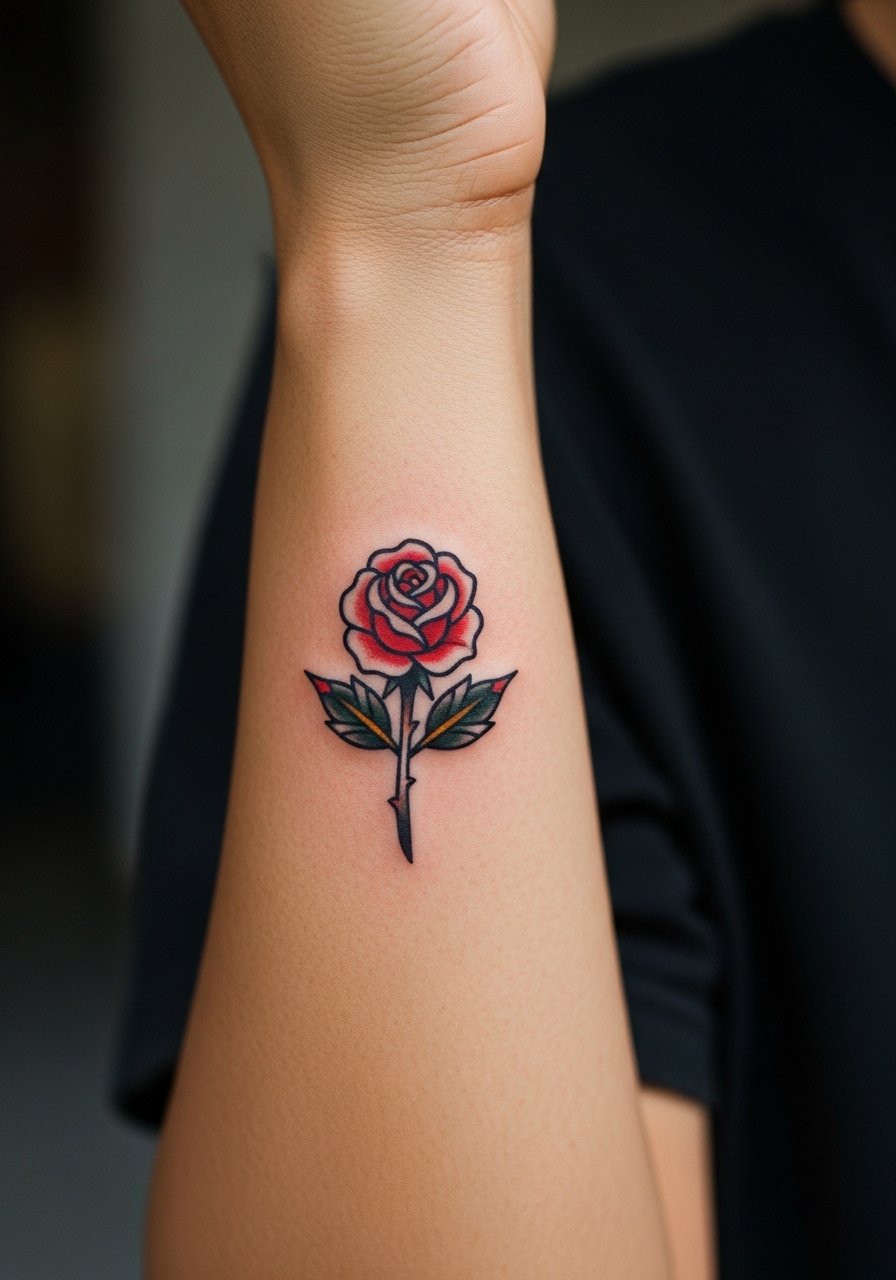
I've seen this version hold well because the outer forearm offers flat skin and less stretch. Ask for saturated outlines and modest color fills so the petals keep shape as the ink settles. The session usually runs 45 to 90 minutes depending on color. A common mistake is packing too many tiny flourishes into the petal negative space. That detail looks great fresh but merges by year three. If you want a slightly softer look without losing the flash feel, ask for stipple shading in the petal centers. This placement is visible with rolled sleeves, and it pairs nicely with a linen short-sleeve shirt you can roll to show the rose when you want to.
3. Tiny Swallow Across Collarbone

Collarbone pieces age differently than arm work because of movement and fabric friction. Choose a swallow with bold outlines and simplified wings so the silhouette survives years of shifting skin. In consultation, ask for the wing tips to breathe away from dense shading. Expect a session under an hour and a pain level around a 5. One common error is requesting ultra-fine feather lines that look delicate in photos but break down into fuzzy texture after a couple of years. For showing this piece off, a wide-neck sweater or open-collar top frames it without rubbing the tattoo flat against fabric.
4. Micro Nautical Star on Ankle
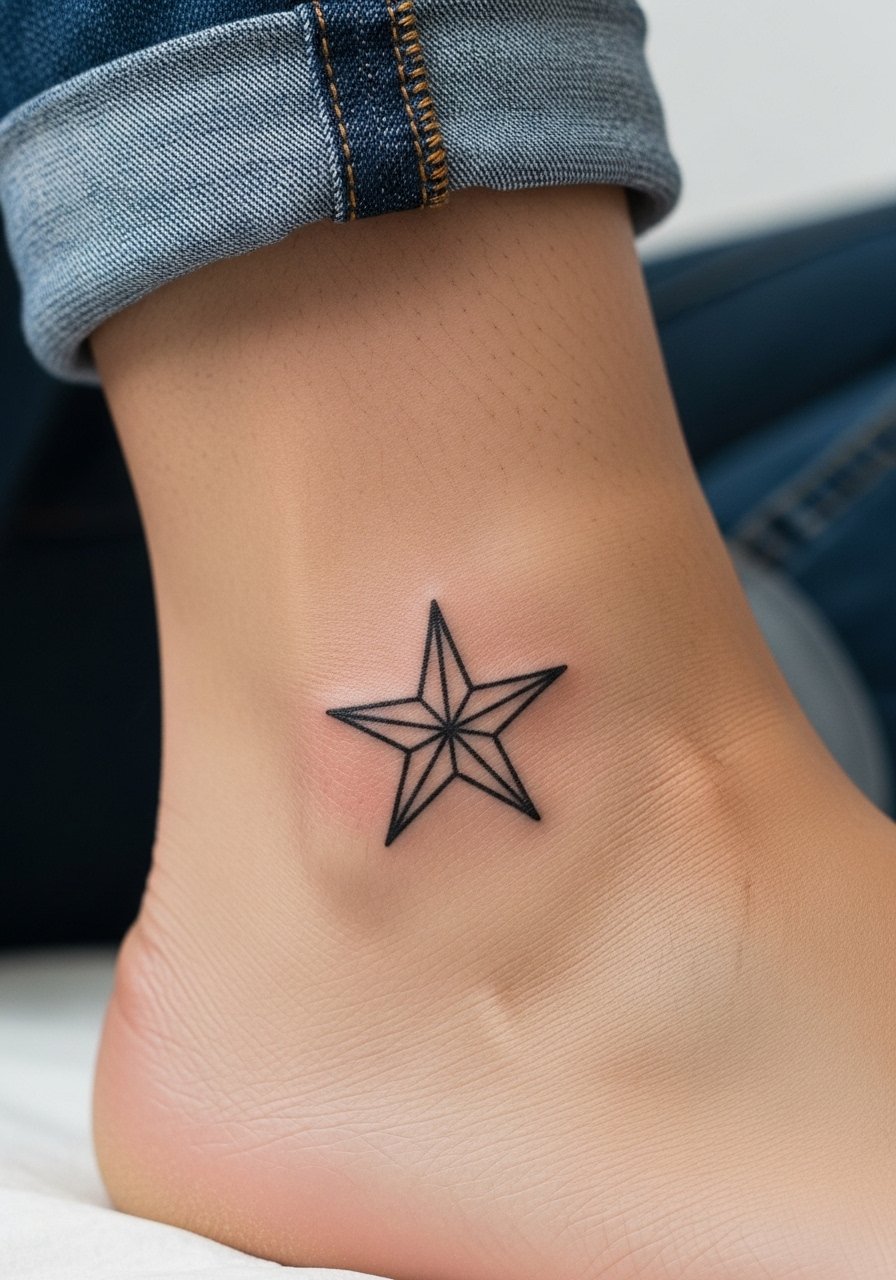
Ankle tattoos face a lot of friction from shoes and socks, so this tiny nautical star is best done with slightly bolder points to prevent early softening. Tell your artist you want the star's negative space to be generous, and avoid hairline inner strokes. Sessions are short, often thirty to forty-five minutes, and pain ranges from a 5 to a 6 depending on bone proximity. A common mistake is requesting a micro star with ultra-thin fill, which fades fast with shoe contact. When planning the session wear, bring shoes you can slip on easily and consider low-cut ankle socks to limit rubbing during the first week.
5. Petite Compass on Outer Forearm
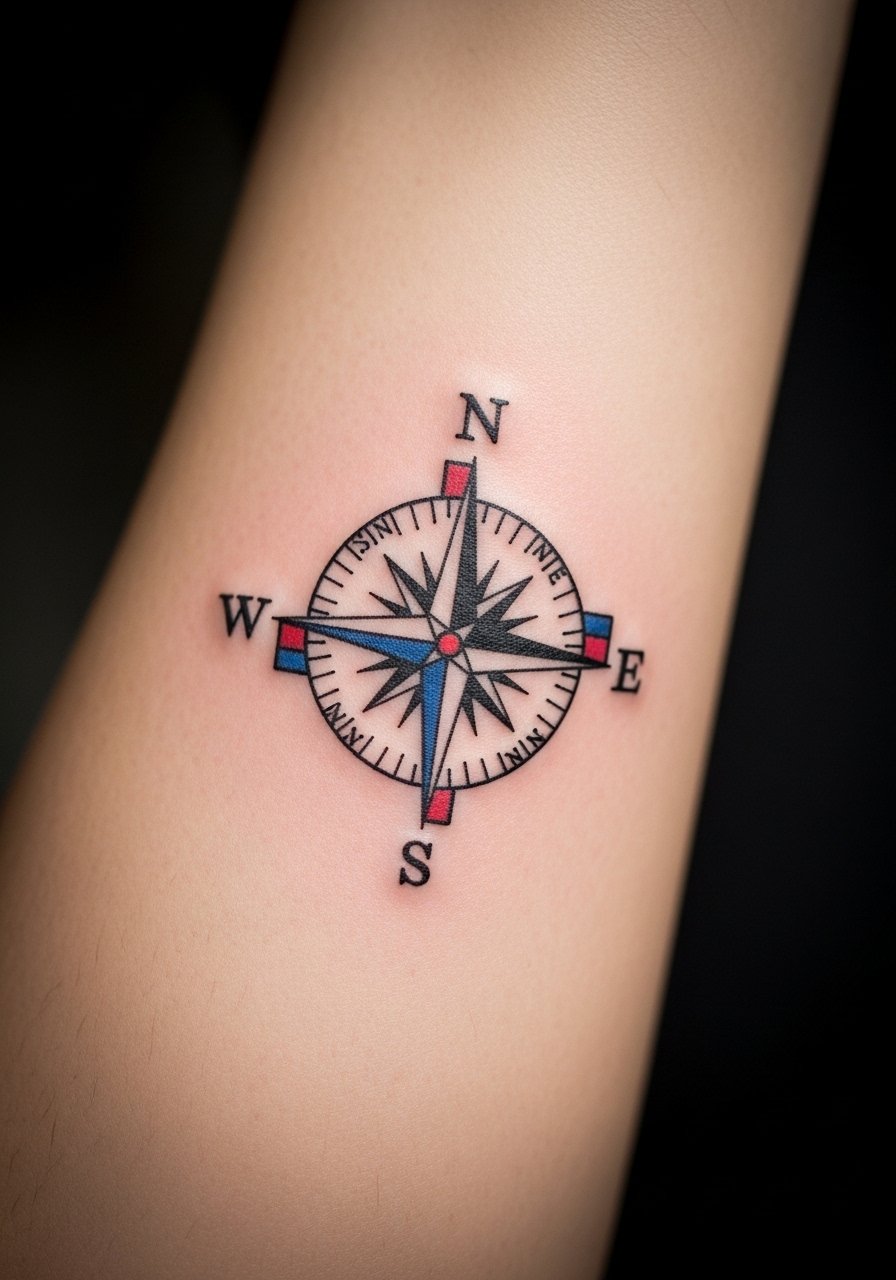
This compass version keeps the classic flash geometry but opens the center so the cardinal points do not sit tight together. I recommend telling the artist you want spacing between the points and not a densely packed center. That spacing is the main reason a compass holds its form at year five. Session time is usually around an hour and a half. Expect a common mistake to be over-detailing the center compass rose. Too much detail can compress when the skin moves. On casual days show it off with rolled sleeves, or stack a simple minimalist watch that keeps attention on the forearm without competing.
6. Ribbon Banner Script on Side Ribcage
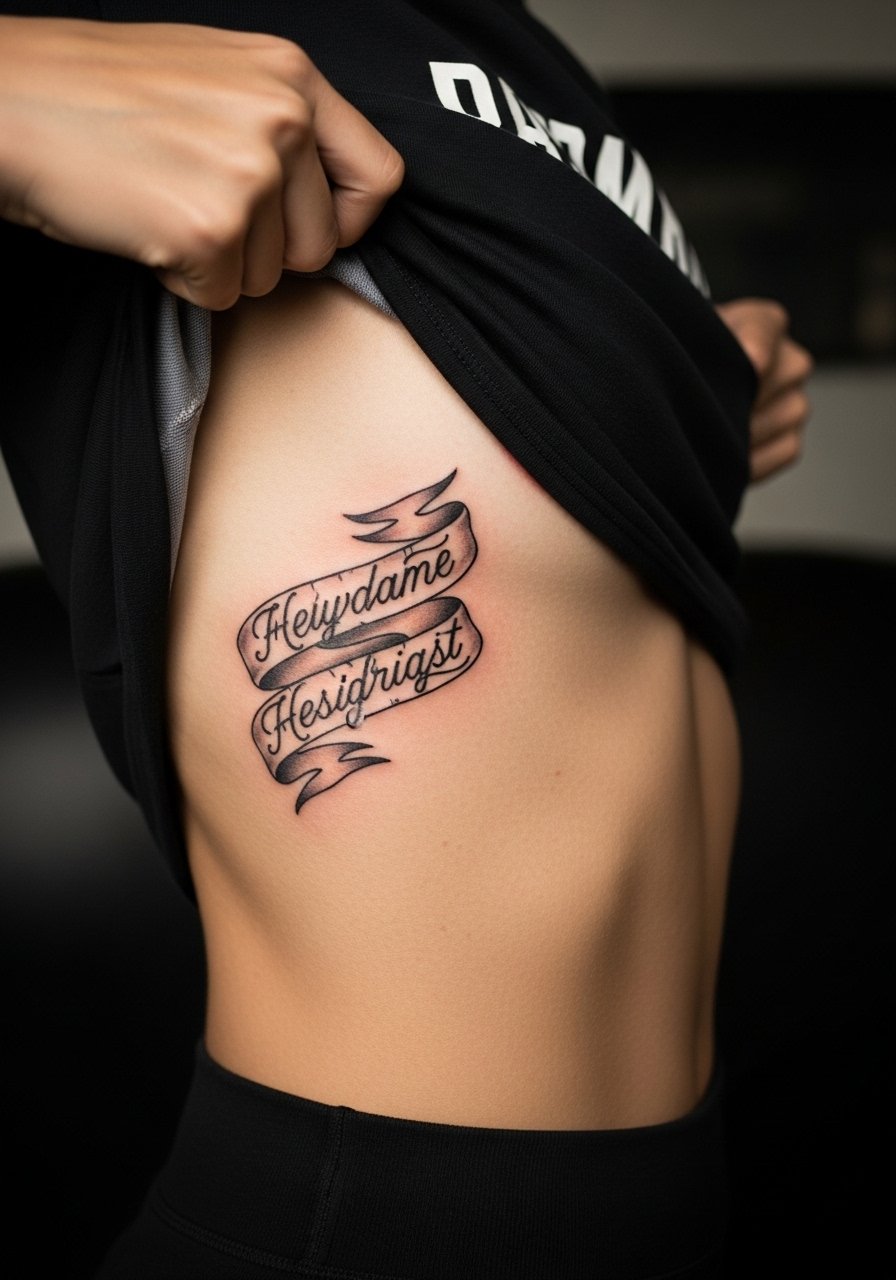
Fair warning, the ribs are split among artists when it comes to fine script. One camp says the thin skin and constant breathing blur fine lines within two years. The other camp says careful depth and slightly bolder lettering makes a script survive. If you want this exact banner, ask the artist which approach they prefer and why. Sessions can be longer and more painful, generally a 7 to 8 on most scales, and you will need to plan breathing and breaks. A common mistake is choosing a very thin, crowded script that reads unreadable after healing. For the appointment wear, bring a cropped athletic top you can lift slightly so the artist has clean access to the side only.
Studio Day Picks
That ribcage banner and the forearm compasses all ask for different prep. These five items keep the first 72 hours smoother for small-old-school pieces in visible or friction-prone spots.
-
Stencil transfer paper kit. Lets you preview exact placement on wrists and collarbones before the needle meets skin, useful for the compass and swallow above.
-
Topical numbing cream. Applied as directed before a rib or inner-thigh session reduces the sharp edge of pain without affecting linework.
-
Thin protective film roll. Helpful for ankle and finger pieces that face constant friction during the first few days.
-
Fragrance-free body wash. Cleanses healing tattoos without stripping moisture, which matters for delicate lines.
-
Aquaphor healing ointment. A thin layer early in the healing window helps with scabbing on fine line work without clogging.
7. Mini Pin-Up Silhouette on Upper Thigh
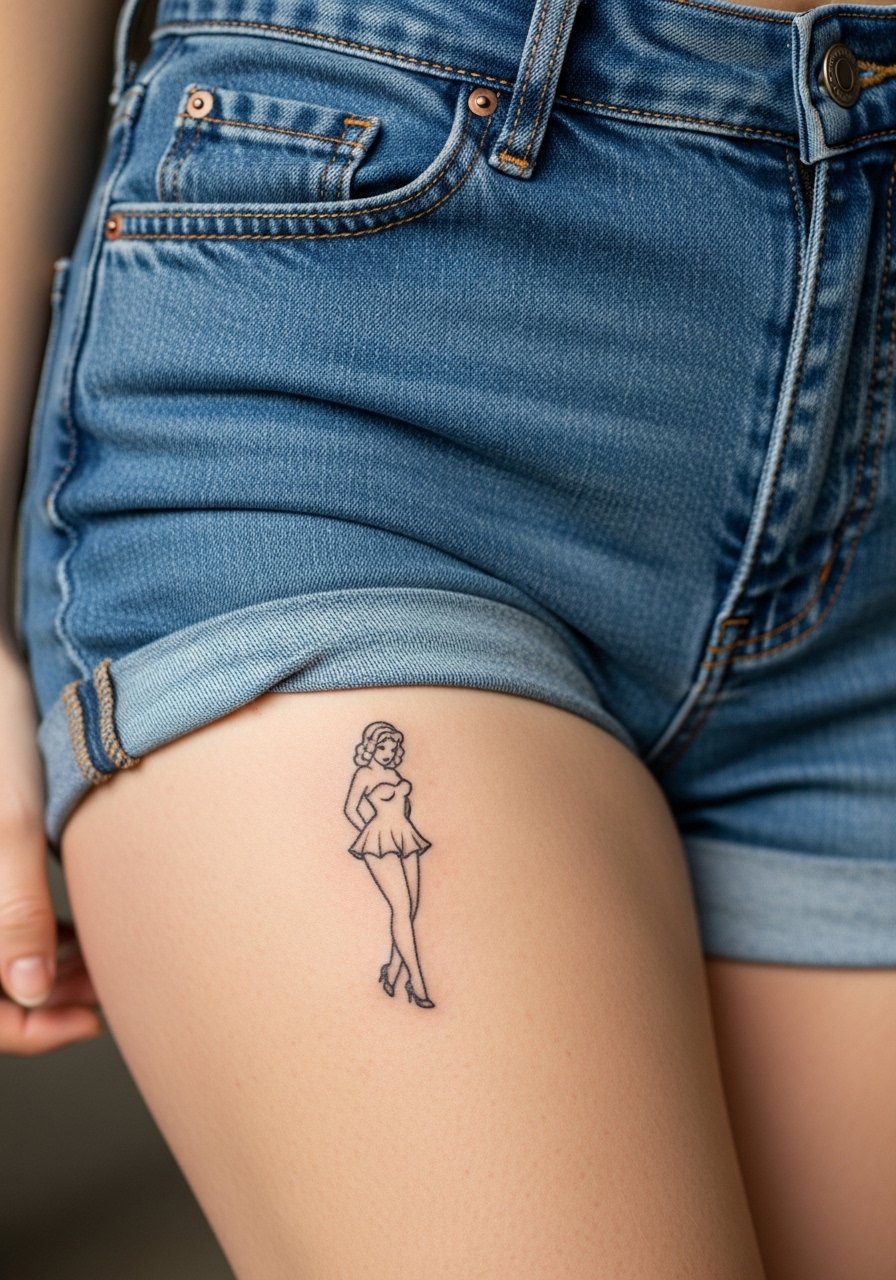
Upper-thigh flash reads intimate but shows well with summer skirts. For a pin-up silhouette that stays delicate, ask for bold outlines at the edge and softer internal shading so the silhouette remains readable as the ink ages. Sessions are moderate in length and the pain is generally a 4 to 6 depending on proximity to bone. One mistake is overcrowding the silhouette with extra props that shrink the negative space. For the session wear, choose high-waisted shorts you can lower slightly so the artist only exposes the target area.
8. Tiny Ship Wheel on Skin Behind the Ear
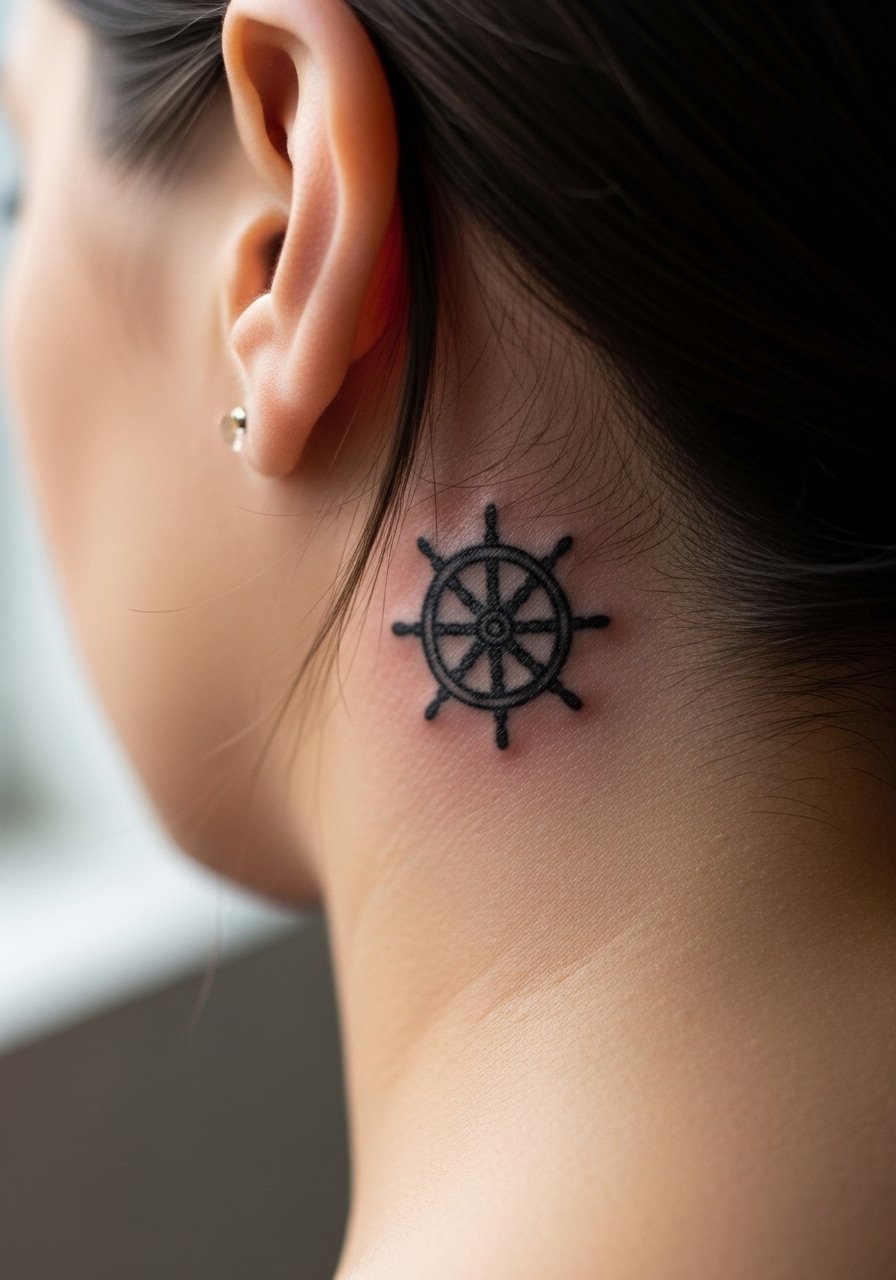
Behind-the-ear work requires careful placement because the skin there is thin and mobile. Ask for the wheel to be compact but with slightly stronger outer spokes. Sessions are quick and the pain is a 3 to 4, but the hairline can hide slow fading. A common error is requesting ultra-fine interior lines for a design that small. That interior detail often disappears after a year. Also note that behind-the-ear pieces need a tidy hairline clean-up and a conversation about visibility. For showing it off, short hair or a tucked-behind-ear style frames the area.
9. Old School Matchstick with Flame on the Finger

Finger work heals differently because the skin there renews quickly and takes ink shallowly. For a matchstick, ask the artist to slightly thicken the stem and focus saturation on the flame rather than hairline edges. Expect touch-ups earlier than arm work, often within 12 to 18 months. Sessions are short but painful, typically a 6 of 10. A frequent mistake is packing too much micro detail into the flame. That detail blurs with constant hand use. When showing this off, go minimalist with rings and consider a thin stacking ring set that complements without pressing on the design.
10. Small Leopard Head on Shoulder Blade

Shoulder blade pieces sit on a broad, flat plane, which helps small animal heads keep their shape. Tell your artist you want clear separation between spots and outline so the pattern does not pool. The session runs about an hour and pain is moderate, often a 4. One mistake is asking for hyper-real texture in a flash piece. That realism and tiny dot work can merge into blotches when the area stretches. This placement looks great in halter tops or with a loose tank top you can slide to show the design.
11. Little Sparrow on Inner Bicep
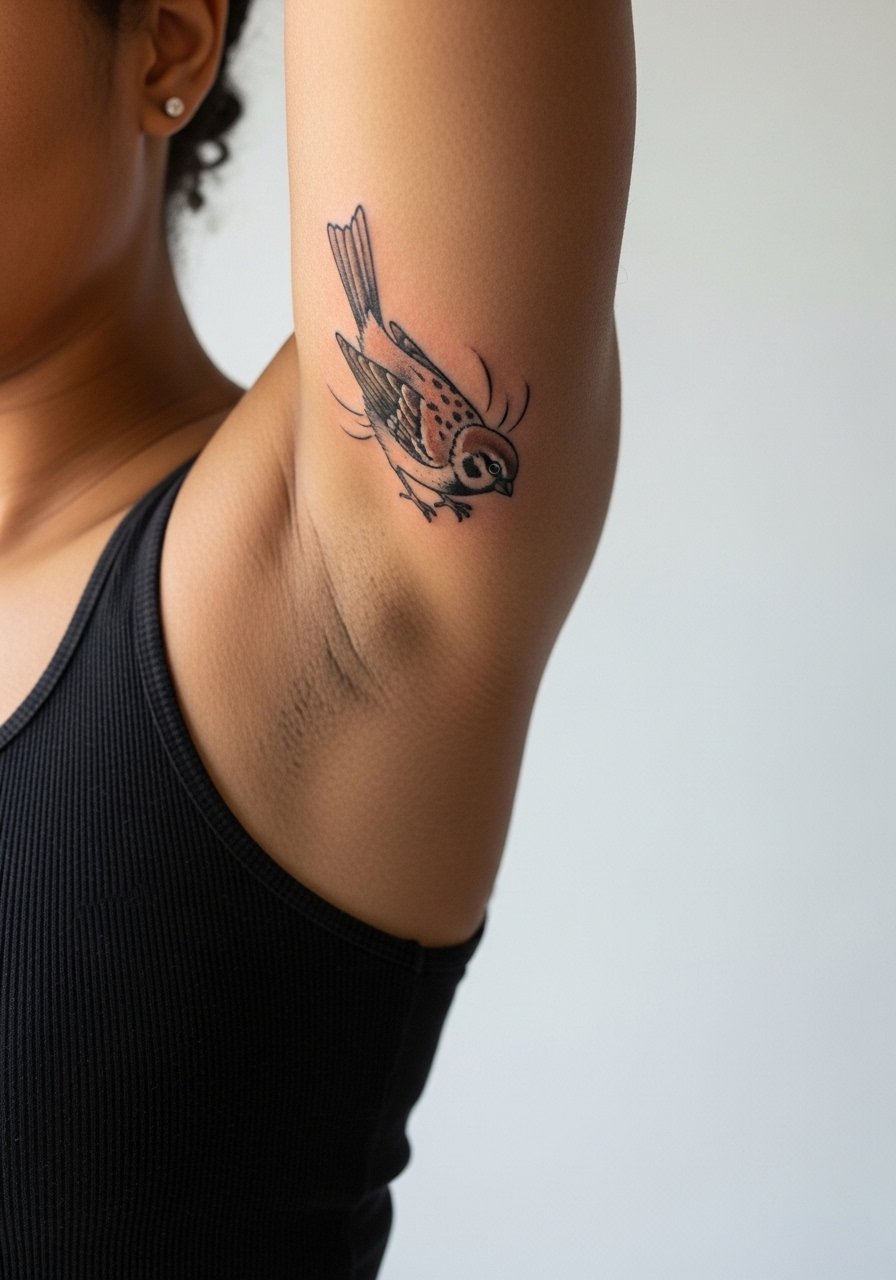
Inner bicep skin is softer and moves with every arm motion, so sparrows here need a bit more spacing in wing detail. In consultation, ask the artist to avoid dense shading along the fold near the armpit. Sessions are moderate and the pain can spike around the armpit edge. A common error is placing the bird too close to the crease, which can smudge as the skin stretches. Hand this one off to an artist comfortable with inner-arm placement. For the appointment, wear a sleeveless button-down you can adjust so the bicep is exposed without dragging fabric over the fresh ink.
12. Micro Bold-Lined Heart on Sternum

Sternum pieces are sensitive and need an artist experienced with chest contours. Ask for a slightly bolder outline on a small heart so the shape survives movement and pressure from clothing. Sessions can be more painful and are often longer than a wrist piece. A mistake is requesting tiny inner filigree on the sternum, which can blur with the chest expanding and contracting. For session wear, a fitted sports bra or bandeau is best so the artist only works on the central area and you stay comfortable.
13. Tiny Anchor on Calf
Calf skin is forgiving and makes tiny anchors read bold from a short distance. Recommend to your artist that the shank be open rather than densely shaded so the imprint keeps definition as the ink settles. Sessions are quick and pain is usually low, around a 3. A typical mistake is shrinking the anchor too small so the negative space vanishes over time. When showing it off in summer, pair with strappy flat sandals that keep attention on the lower leg without covering the design.
14. Minimalist Lighthouse on Upper Thigh
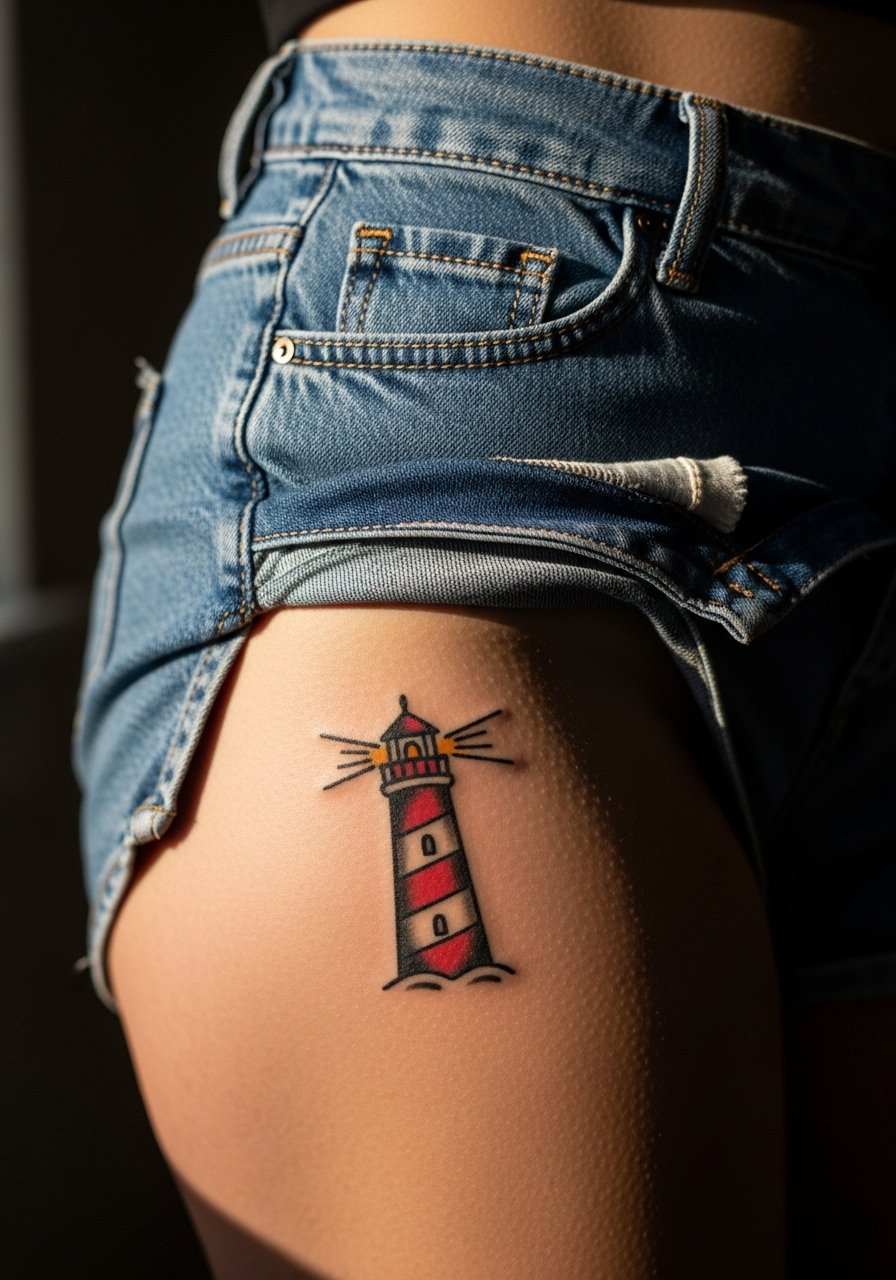
Upper-thigh pieces let you play with scale while preserving delicate flash forms. For a lighthouse, ask for strong outer lines and cleaner negative space in the beams so the motif stays readable. Sessions can be longer because of the surface area, and pain is generally a 4 to 5. One mistake is adding too many tiny windows or rails that disappear as the skin stretches. This placement pairs well with skirts and high-waisted shorts, and for session comfort pick loose drawstring shorts so the artist can access the thigh without fabric pressure.
15. Floral Swag with Banner on Lower Collarbone

Lower collarbone work benefits from open spacing between blossoms and banner text. In consult, specify banner thickness and ask the artist to keep the text bold enough to be legible at small scale. Sessions are moderate and pain sits around a 5 due to proximity to bone. Typical mistakes include crowding the flowers into the banner edge which causes the whole composition to lose separation when healed. For a night out, pair with an open-back midi dress that frames the collarbone without rubbing the fresh ink.
16. Micro Compass Rose on Back of Neck

Back-of-neck pieces sit where hair and clothing can cause friction, so keep the compass rose compact and with clear outer edges. Ask the artist to avoid tiny inner ticks that get lost against hairline movement. Sessions are brief and pain is moderate. A common error is requesting thin internal ticks for ornamentation; those vanish as the area ages. If you work in a conservative environment, consider visibility implications. Short hair or a half-up style helps show or hide the piece.
17. Mini Rose with Dot Work on Knuckles

Knuckle tattoos are high-wear zone and tend to fade faster. For a rose here, ask for bolder outlines at edges and dot work for internal shading rather than tiny strokes. Expect touch-ups as early as year one. Sessions are quick but uncomfortable, often a 6 to 7. People often mistake fine detail for charm on knuckles, but that detail disappears with frequent hand use. Rings and simple accessories can draw attention, such as a thin signet ring that sits adjacent without covering the tattoo.
18. Tiny Snake Along Side Torso, Rib Variation

Snakes on ribs sit squarely in the fine line controversy. One group of artists says rib skin moves too much for narrow lines, and those lines blur inside two to three years. The other group says careful depth and slightly thicker lines solve that problem. Ask your artist which camp they are in and request spacing and depth accordingly. Sessions can be long and painful, often a 7 or higher. A frequent mistake is compressing coils into tiny loops. That detail vanishes with breathing and movement. For the appointment, wear a cropped athletic top you can shift for access without exposing the rest of the torso.
19. Tiny Eagle Head on Outer Bicep
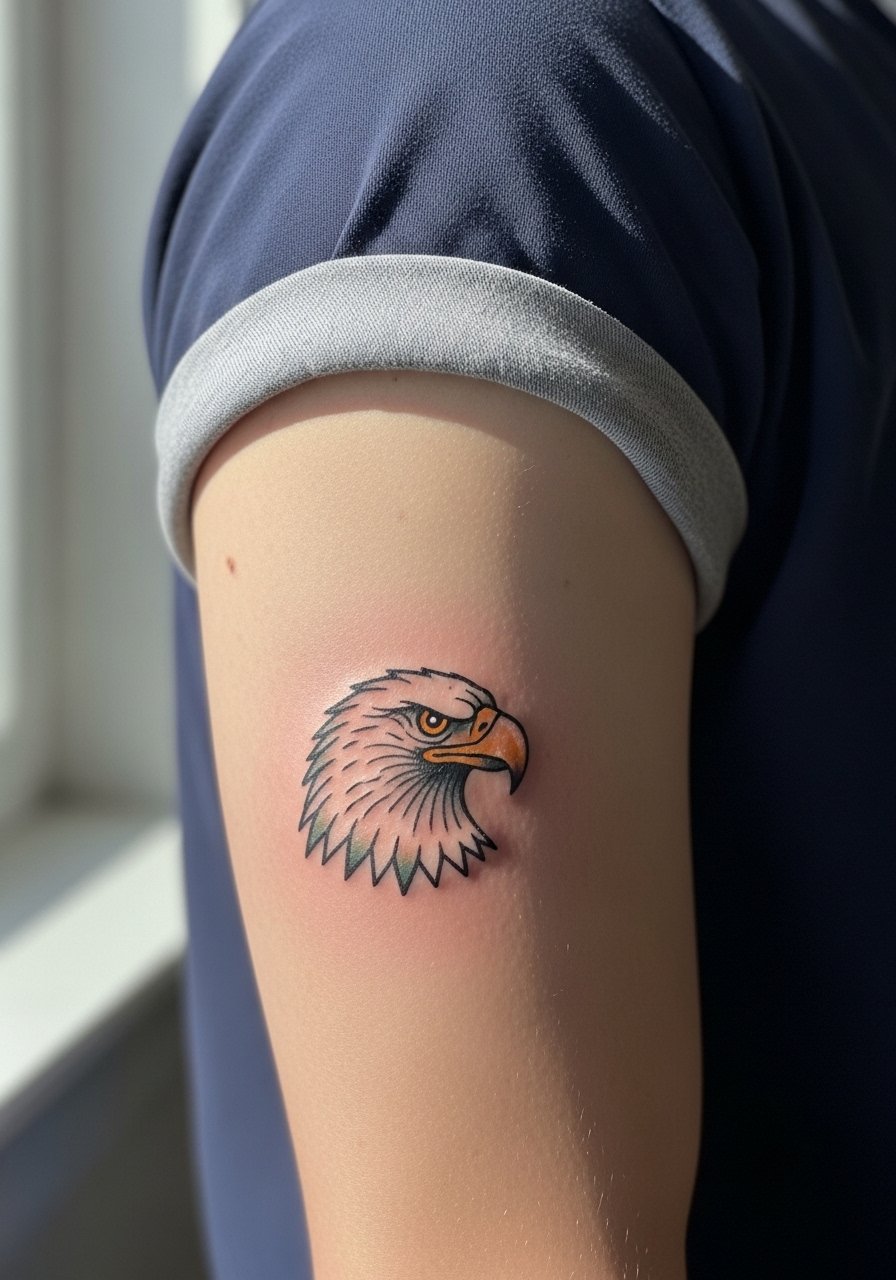
Outer bicep bodies small animal heads well because the skin is relatively stable. For an eagle, ask for the beak and eye to be bold points so the face remains readable at distance. Sessions are moderate and pain is low to moderate. A common mistake is over-detailing the feathers around the eye. Those little strokes can melt together as time goes by. For casual showing, roll the sleeve of a short-sleeve button shirt to frame the design without smothering it.
20. Micro Map Coordinates on Upper Arm
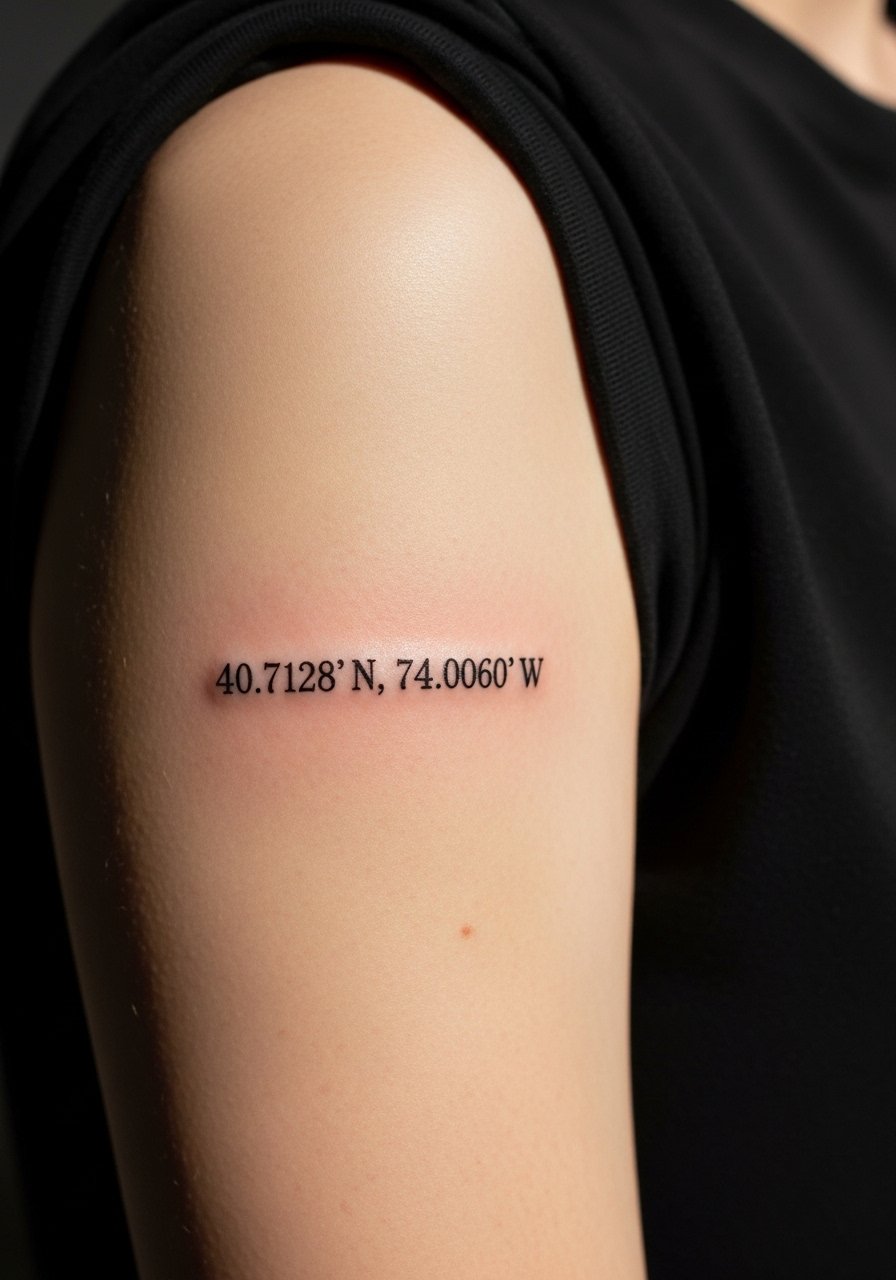
When tattoos include text, keep character size large enough to remain legible as the skin shifts. If you want coordinates, specify the exact text to the artist so spacing and kerning are correct. Expect a session under an hour and pain around a 3. A typical mistake is choosing a tiny, ornate font that looks unreadable after a year. If the coordinates are meaningful, a slightly bolder serif holds up better than hairline script. This pairs well with a minimalist chain pendant that sits above the text without crowding the arm area.
21. Tiny Fortuneteller Palm Card on Palm Edge

Palm tattoos are high maintenance and fade faster than most spots due to constant abrasion. For a tiny fortune card, work with an artist familiar with palm placements and expect multiple touch-ups. Sessions are short but sharp in pain, often a 7. A common mistake is treating palm skin like arm skin and requesting the same line density. Palm skin needs different saturation and often rework. Consider career implications because palm visibility is immediate. Ask about touch-up likelihood before booking.
Frequently Asked Questions
Q: Will fine line old school flash blur faster than bolder traditional pieces on places like the wrist or ribs?
A: In my experience, fine line tends to soften faster on high-movement or high-friction areas like wrists and ribs. Bolder outlines and slightly more spacing increase longevity, and the difference between a one-needle hairline and a modestly thicker line is significant when it comes to two- to five-year results.
Q: How often should I realistically expect to touch up a small finger or knuckle piece?
A: Fingers and knuckles commonly need touch-ups within 12 to 24 months because the skin renews quickly and sees constant use. Plan for at least one touch-up session in the first two years and discuss longevity during your consultation.
Q: Are there placements I should avoid if I want a delicate old school look to last?
A: Avoid ultra-delicate scripts on ribs and tiny single-needle wrists unless your artist specifically recommends depth and spacing to compensate. High-friction zones like palms and sides of fingers also wear faster, so pick bolder lines or accept earlier touch-ups.
Q: What should I wear to the appointment for a collarbone or sternum piece?
A: For collarbone work pick a wide-neck shirt you can pull aside. For sternum, a fitted sports bra or bandeau keeps the working zone contained. For rib and thigh sessions, loose shorts or cropped tops let the artist access the area without fabric pressure.
Q: Can I still get old school motifs like pin-ups and anchors if I want something subtle and delicate?
A: Yes. The trick is simplification. Keep silhouettes bold at the edges, reduce internal micro detail, and ask for controlled saturation. That approach preserves the flash look while keeping the piece understated.
Q: Where do I find artists who do delicate old school flash without over-detailing the work?
A: Look through local flash sheets, independent walk-in night pages, and community directories. Searching portfolios tagged with "flash sheets" or "small traditional" helps. Seek shops with a track record of healed photos that match the small-scale approach you want.
