
Fine line henna-inspired pieces are everywhere online, and that popularity brings friction. Hands fade fast and patch unevenly, booking mix-ups can wreck a holiday plan, and thin lines often disappear in photos on darker skin tones. These ideas focus on placements, touch-up reality, and wardrobe pairings so you can choose a dainty design that photographs well and lasts longer than a weekend trend.
1. Fine Line Floral Vine on the Wrist
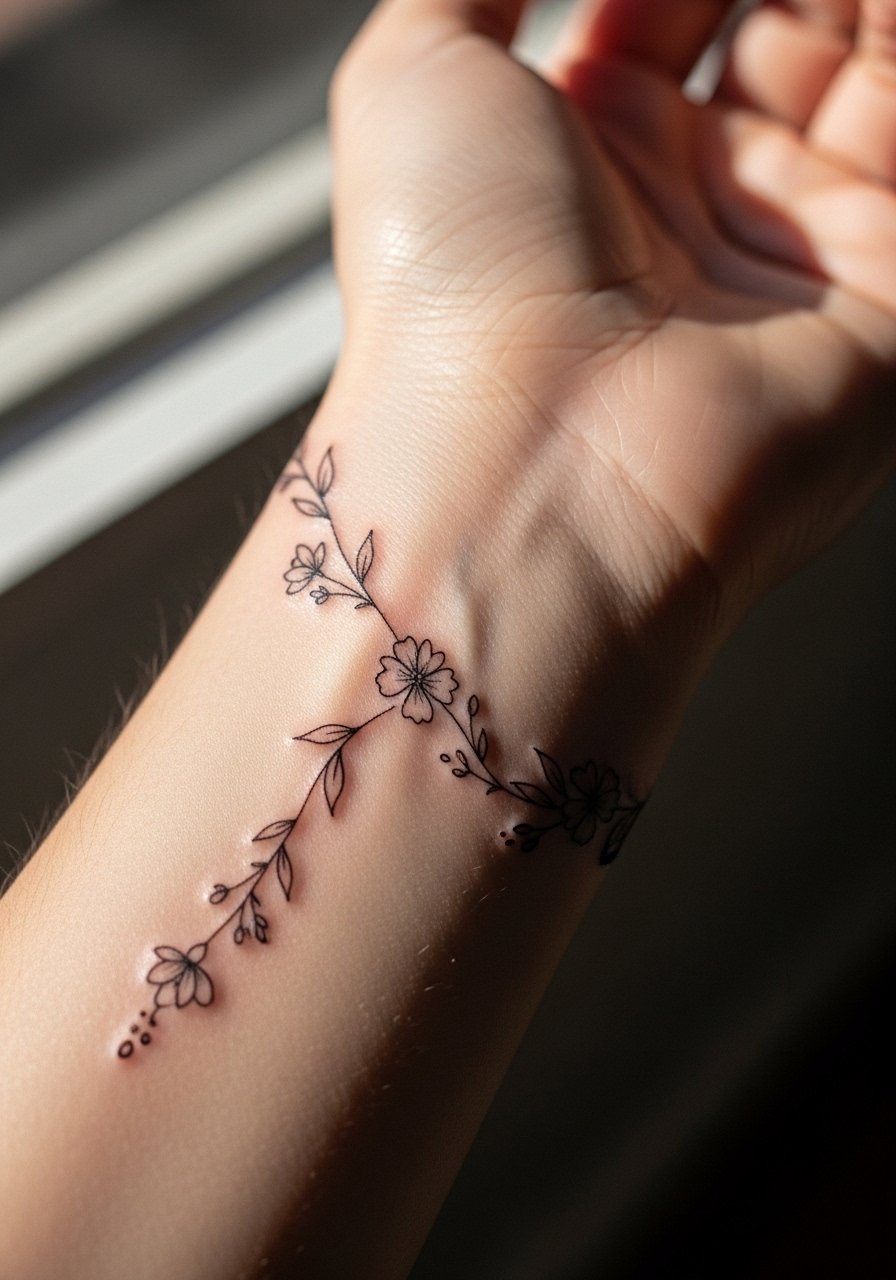
I point people to this when they want a henna look without committing to a full hand piece. Tell your artist you want single-needle linework with slightly spaced petals so the lines do not merge in a year. Expect low pain and a 30-60 minute session for a 2-3 inch vine. The common mistake is asking for hairline lines that age like a smudge on wrists. Pair the finished piece with a dainty gold chain bracelet on the opposite wrist to frame the work without crowding it. For appointments wear a sleeveless top or loose long sleeves to give clear access.
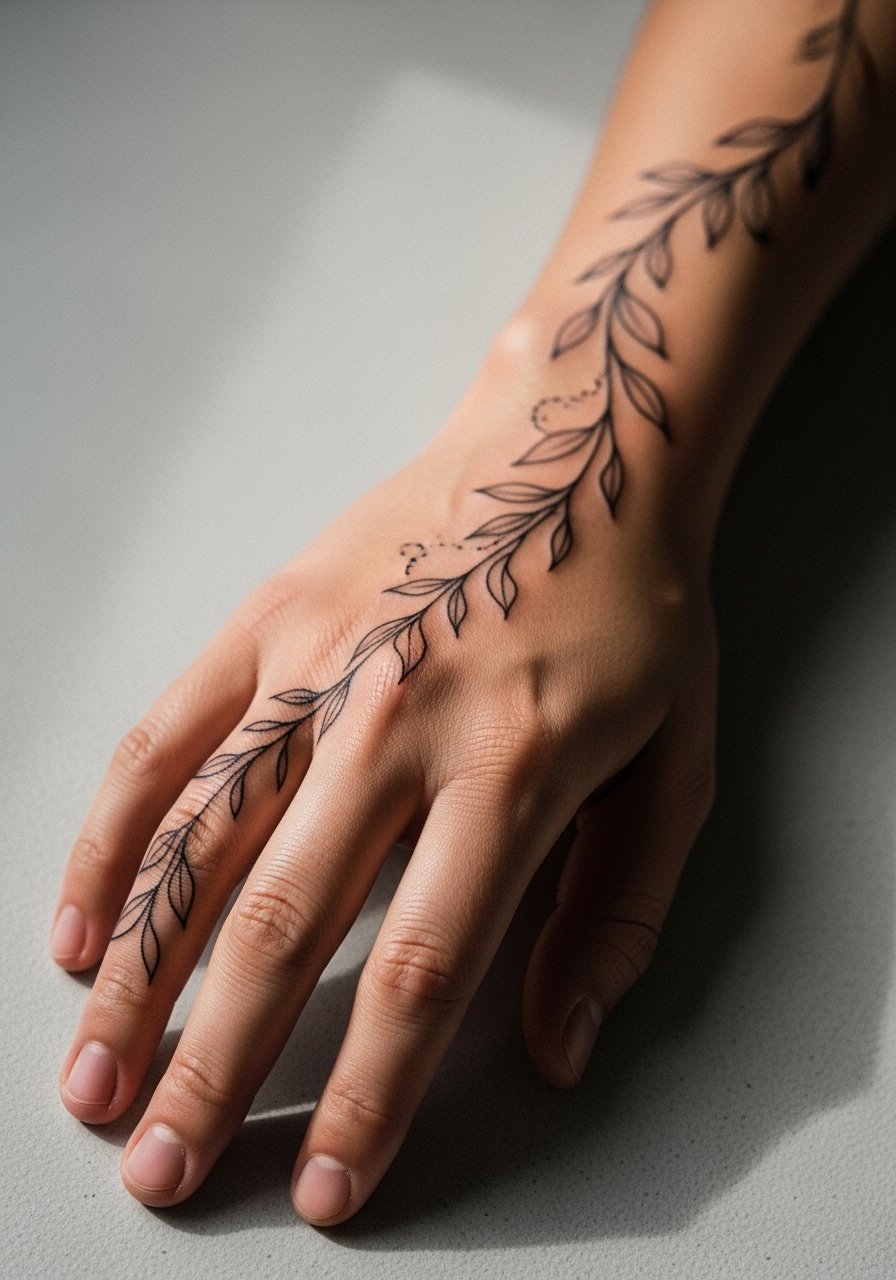
2. Asymmetrical Floral Back-of-Hand Pattern

This is a social-media favorite because it photographs with rings and manicures. Ask for bold outlines around the main blooms and micro dot shading along fingers so the details survive daily wear. Hands do fade fastest, so expect a touch-up window earlier than arm pieces. A frequent mistake is packing too much fine detail onto fingers. For show-off styling, wear a thin gold pinky ring and neutral polish so the design reads in photos. Session tip, go ring-free and polish-free so nothing interferes with stencil placement.
3. Shoulder Floral Mandala

Shoulder mandalas are useful when you want to hide at work and reveal on vacation. In consultation, specify a 4-6 inch scale and ask for slightly heavier outer linework so the piece keeps contrast as it heals. Pain is mild for most people and the session runs 60-90 minutes depending on size. One design error is packing the mandala too tightly against bone; give it breathing room so it ages clean. For outings pair it with an off shoulder linen top in a neutral tone. For the appointment wear a loose button-down you can slide aside.
4. Boho Henna-Inspired Ankle Bracelet
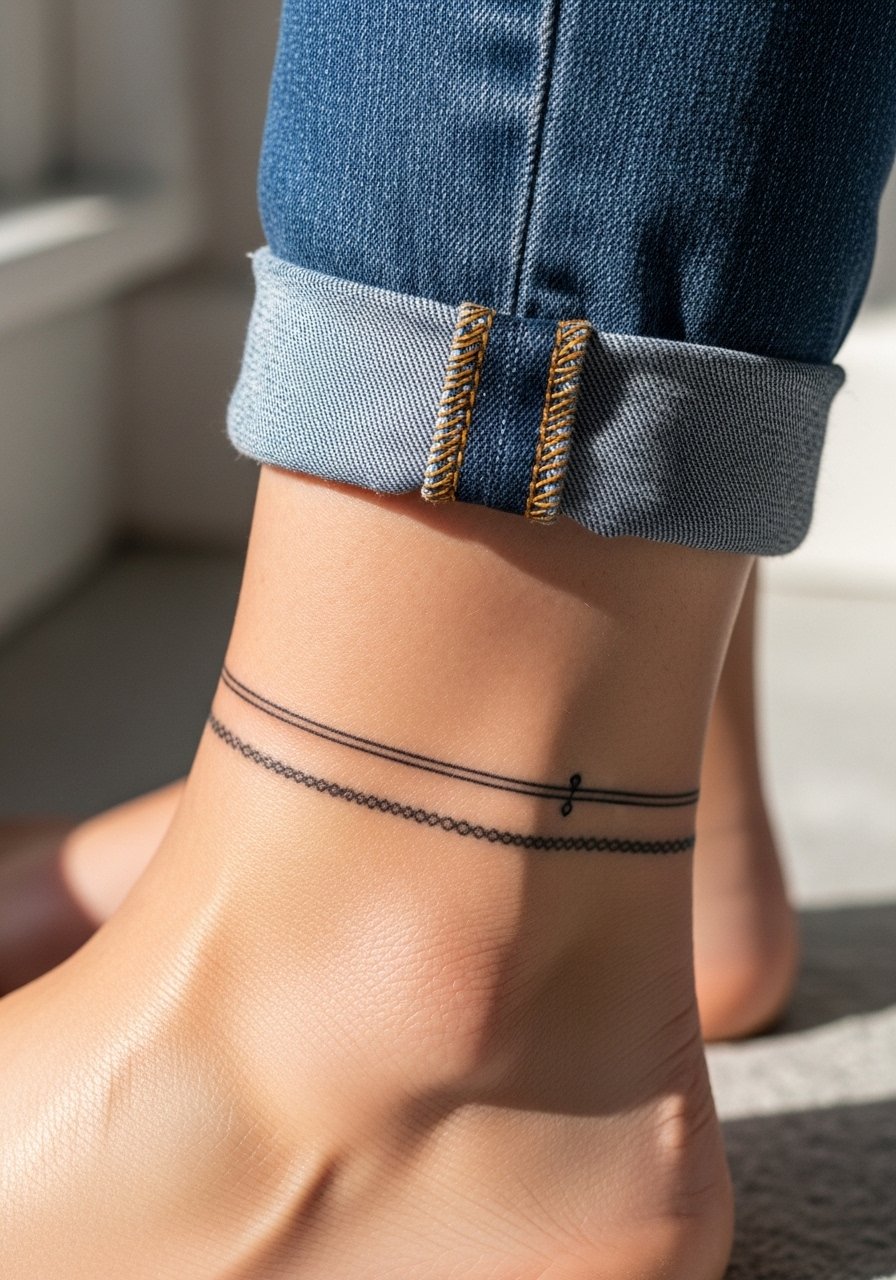
Ankle bracelets are festival-ready and low-risk for first-timers. Ask for a thin wrap with repeated micro-motifs rather than one continuous dense pattern to reduce friction wear. Session time is short, often under 45 minutes, and pain is tolerable for most. The usual mistake is making the band too tight around the ankle bone, which distorts if weight shifts. Show it off with strappy flat sandals and cuffed linen pants to keep the band visible and graceful.
5. Simple Mehndi Floral on the Forearm
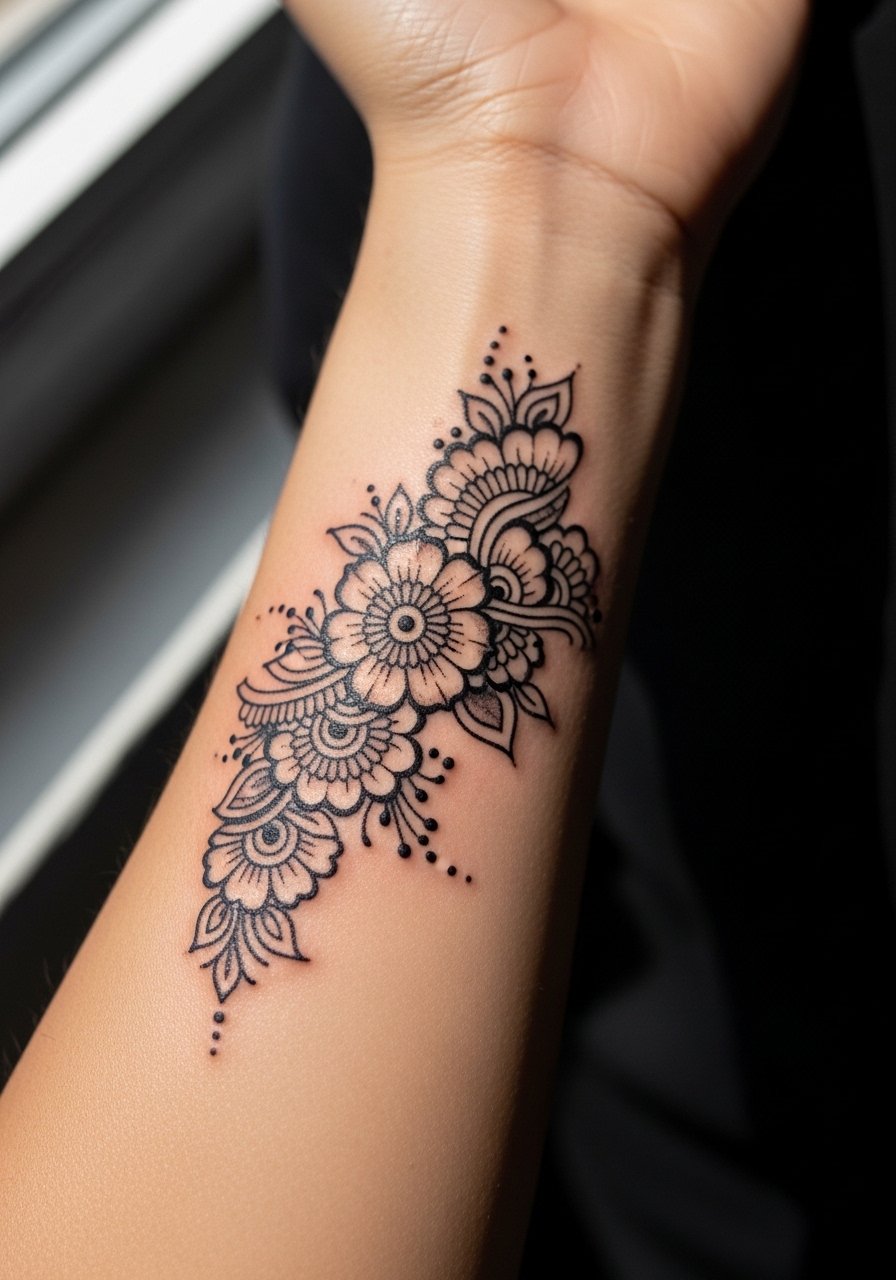
This placement is a useful transition from henna to permanent ink because it sees less friction than hands. Ask for medium-weight linework and spaced motifs so the pattern stays readable at eight months and beyond. Many people request ultra-fine detail that blends after a year. If you want longevity, favor bold outer contours with delicate internal dot work. For showing it off, roll up an olive chambray shirt sleeve and add a thin cuff bracelet on the opposite arm. Sessions usually take 45-75 minutes depending on coverage.
6. Peony Bloom on the Collarbone
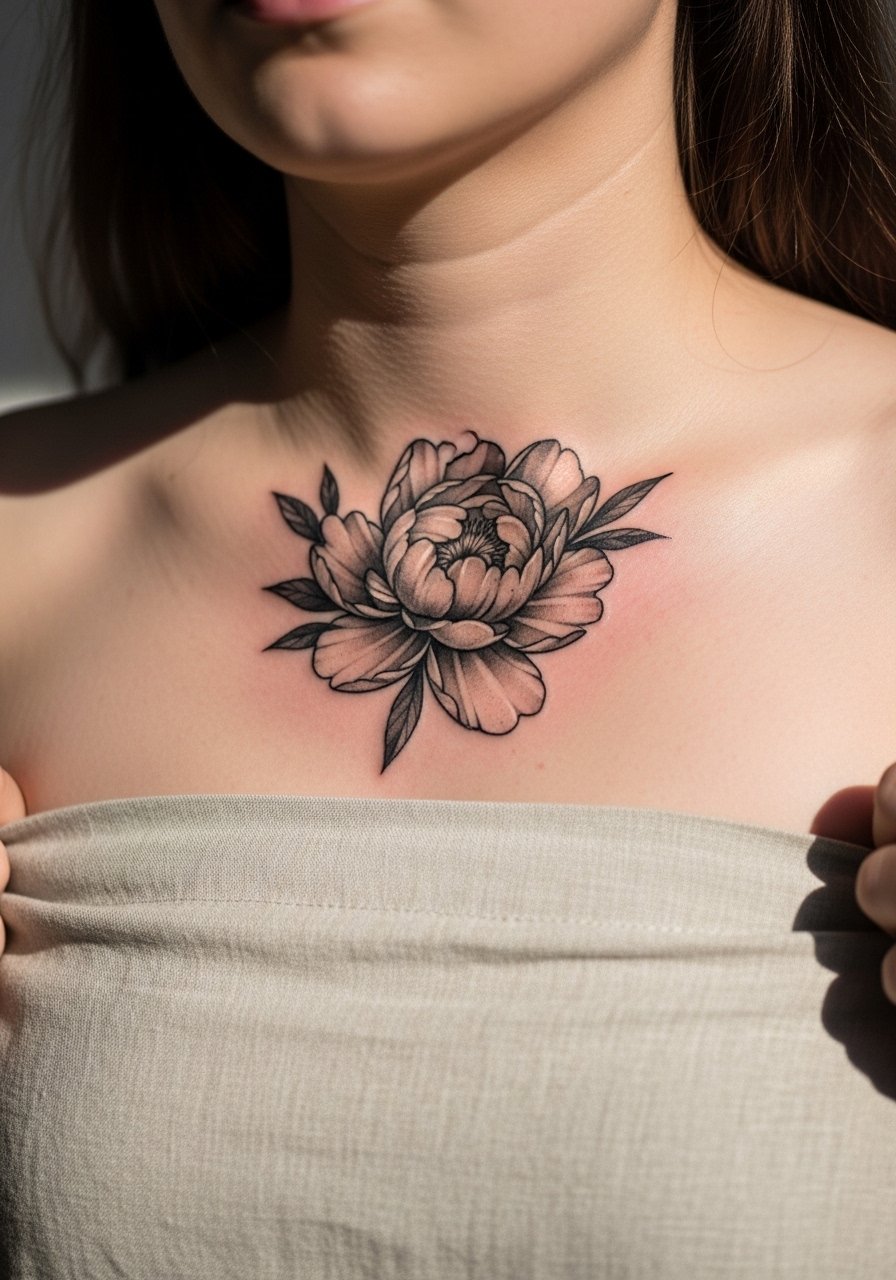
Collarbone blooms are discreet and stable with body changes, which is why I recommend them to people worried about stretching on wrists. Specify a 2-4 inch size and ask for soft gray shading around the petals so it keeps depth without heavy saturation. Pain is moderate and sessions can run 60 minutes. The common mistake is placing the center directly over bone with zero negative space. Outfit pairing works well with a strapless linen top or V-neck blouses that let the bloom peek through. For the appointment wear a loose tank or button-down you can unbutton.
Pre-Session Essentials
The wrist, fingers, and collarbone pieces above heal differently from larger work, so a few small things smooth the session and the first week.
-
CeraVe Healing Ointment. Lightweight and non-comedogenic, it is a low-grease option people mention for fine line areas where clogging the needle channels matters.
-
Shea Butter Stick. Handy for ankle and thigh pieces in cooler weather because it moisturizes without leaving a heavy residue that traps sweat.
-
Bio-Oil Skin Care Oil. Many people use it when testing how a healed design will look on skin tones before deciding on a permanent option.
-
Coconut Oil Balm. Favored for shoulder work where breathability helps prevent maceration during warm weather healing.
-
Niacinamide Serum. Used by some to even out tone on darker skin after the initial healing window when assessing contrast for future pieces.
7. Finger Extension Vine Pattern
Finger extensions give the illusion of length and movement but demand strategic spacing. Ask for slightly bolder main stems and lighter secondary tendrils so details do not bleed across knuckles. Pain is higher on finger joints, and sessions are often split into short blocks to manage sensitivity. People commonly over-detail the first phalanx and then need touch-ups within a year. For photos, complement the piece with a thin signet ring or minimal ring set to keep attention on the extension. During the session remove all jewelry and keep nails short.
8. Minimalist Leaf Trail on the Inner Arm
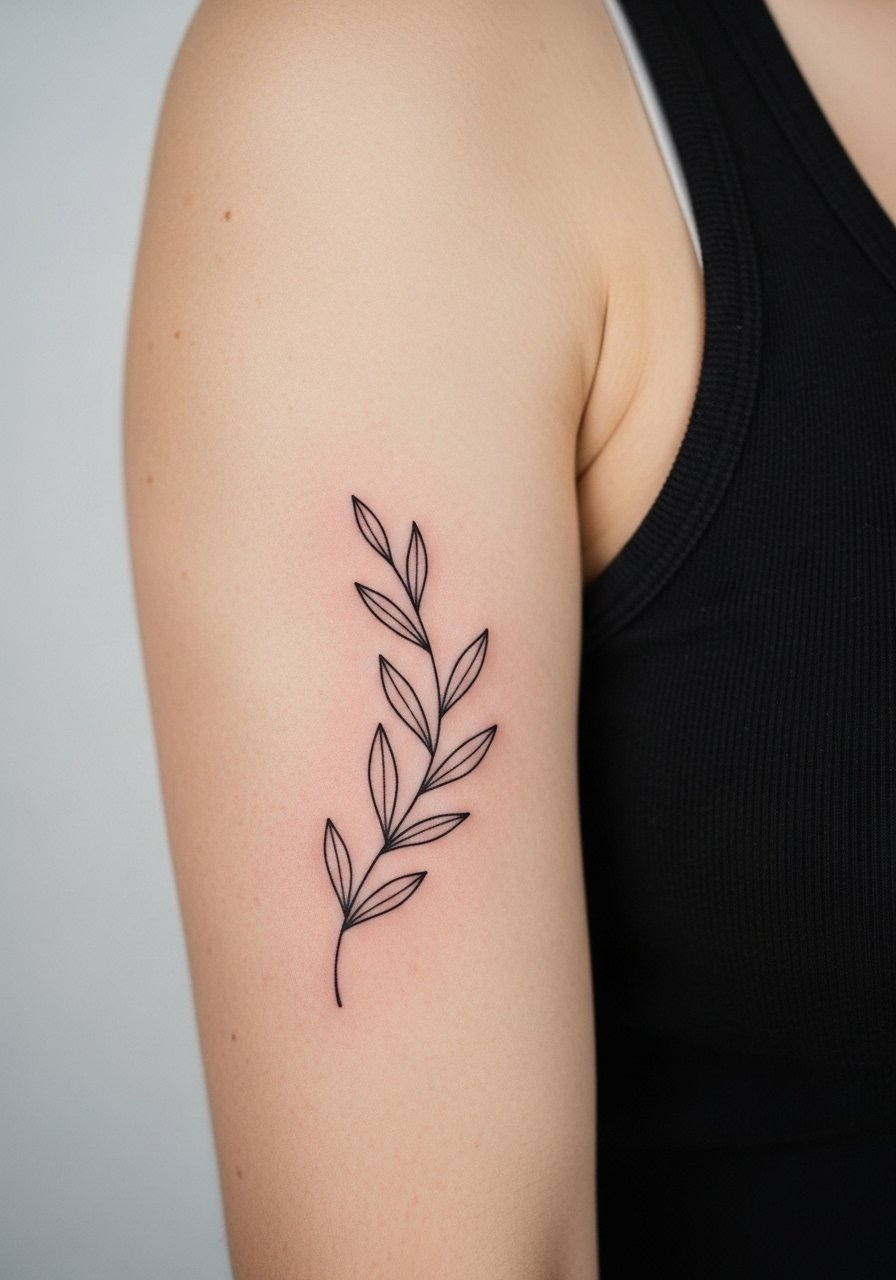
The inner arm is forgiving for first-timers and a good place to test a henna-style look. I suggest a linear 4-inch trail with single-needle stroke leaves and open spacing to reduce blowout risk. Pain ranges from low to moderate and session time is typically under an hour. A common mistake is making the trail too dense, which causes premature softening. For the session wear a loose tank top so the artist can raise your arm without pinching fabric. Inner bicep pieces age well if you avoid constant friction from backpack straps.
9. Ornate Paisley on the Back of the Neck
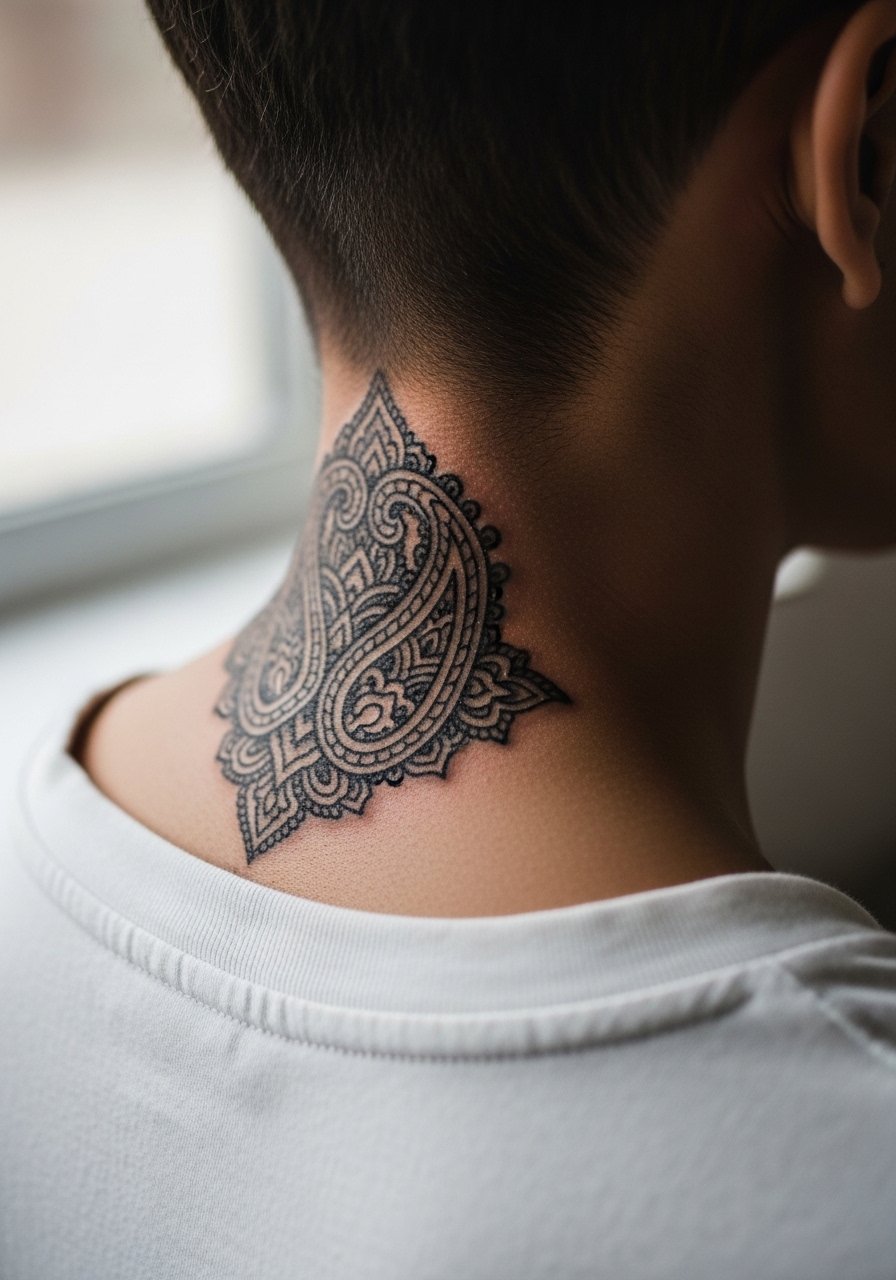
Paisley motifs on the nape read as cultural nods, so consider subtle variations rather than direct replicas. Ask your artist for a 3-inch motif with medium line weight to maintain contrast against darker tones. Pain is low and sessions are brief. A mistake I see is using ultra-fine filler that disappears on darker skin in photos. For wardrobe, a wide-neck shirt or loose hair styling keeps the motif visible. If you plan a shorter cut, discuss how the design will sit under hair before booking.
10. Swirling Vine Shoulder Cap
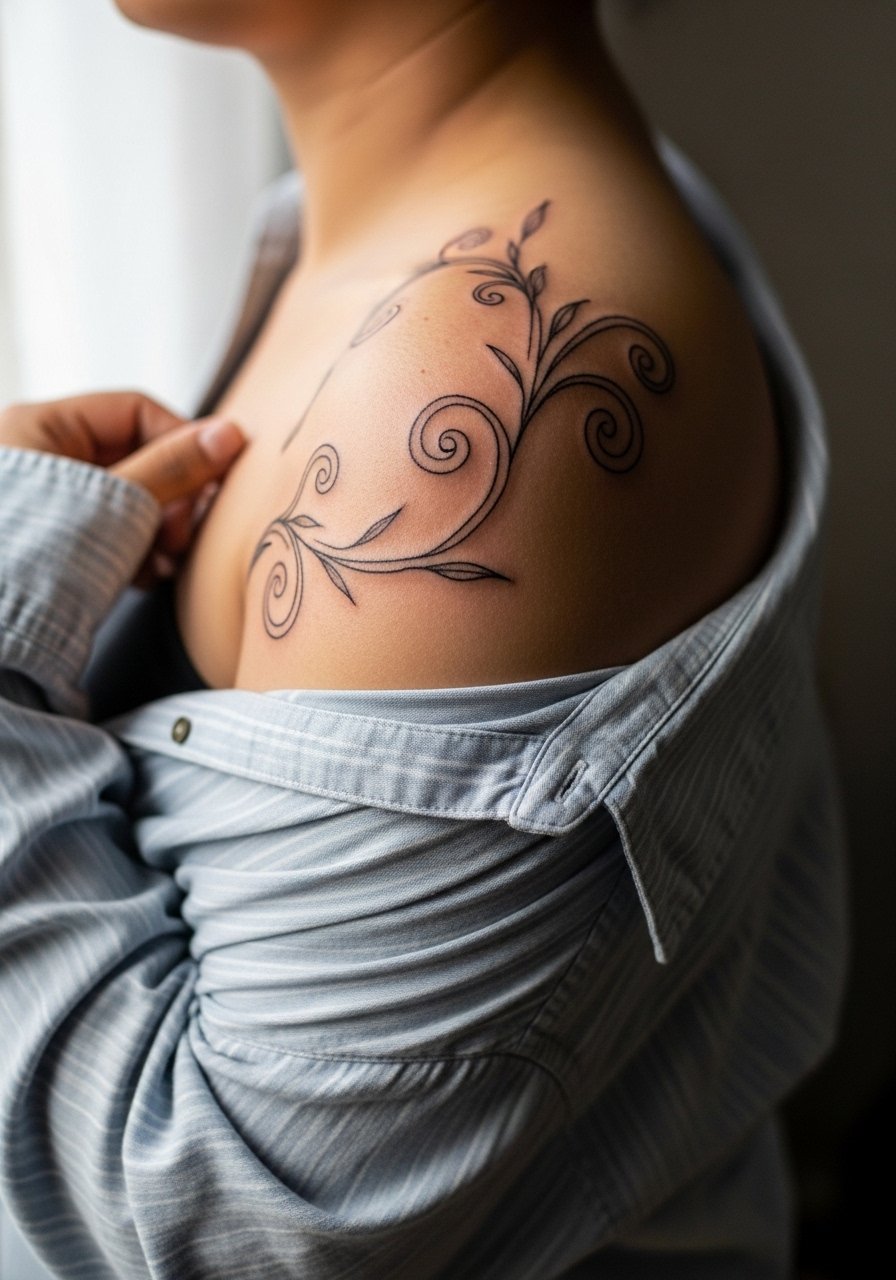
This curve-forward placement is excellent for off-shoulder tops and avoids wrist friction entirely. Request a 5-inch curve with slightly reinforced outer strokes so it keeps definition over time. Pain is mild and an average session runs 60 minutes. A common error is following a body curve too tightly, which can distort if you change weight. For the session pick a loose button-down you can slide off one shoulder. Expect touch-ups as needed around year three depending on sun exposure.
11. Tiny Lotus on the Ankle Bone

A small lotus on the ankle bone is symbolic and easy to hide under socks when necessary. Keep the motif under two inches and favor dot work over super-fine lines because tiny dots hold better on that zone. Pain is moderate at the bone and sessions are short. The usual mistake is cramming in too much shading. Pair it with strappy flat sandals and high-waisted jeans rolled at the cuff so the ankle remains visible without rubbing the piece. Expect a touch-up window sooner than for upper arm work.
12. Layered Floral Cuff on the Thigh

Thigh cuffs let you add motifs over time and avoid arm wear. Ask for a 4-6 inch band with negative space between layers so it can expand visually if you add flowers later. Sessions can be 60-120 minutes and are comfortable for people who want a private piece. A common mistake is starting the cuff too tight around the leg which limits future expansion. For showing it off, choose high-cut shorts or a wrap skirt so the cuff sits on display. During the appointment wear shorts you can easily shift without discomfort.
13. Tiny Constellation on the Finger
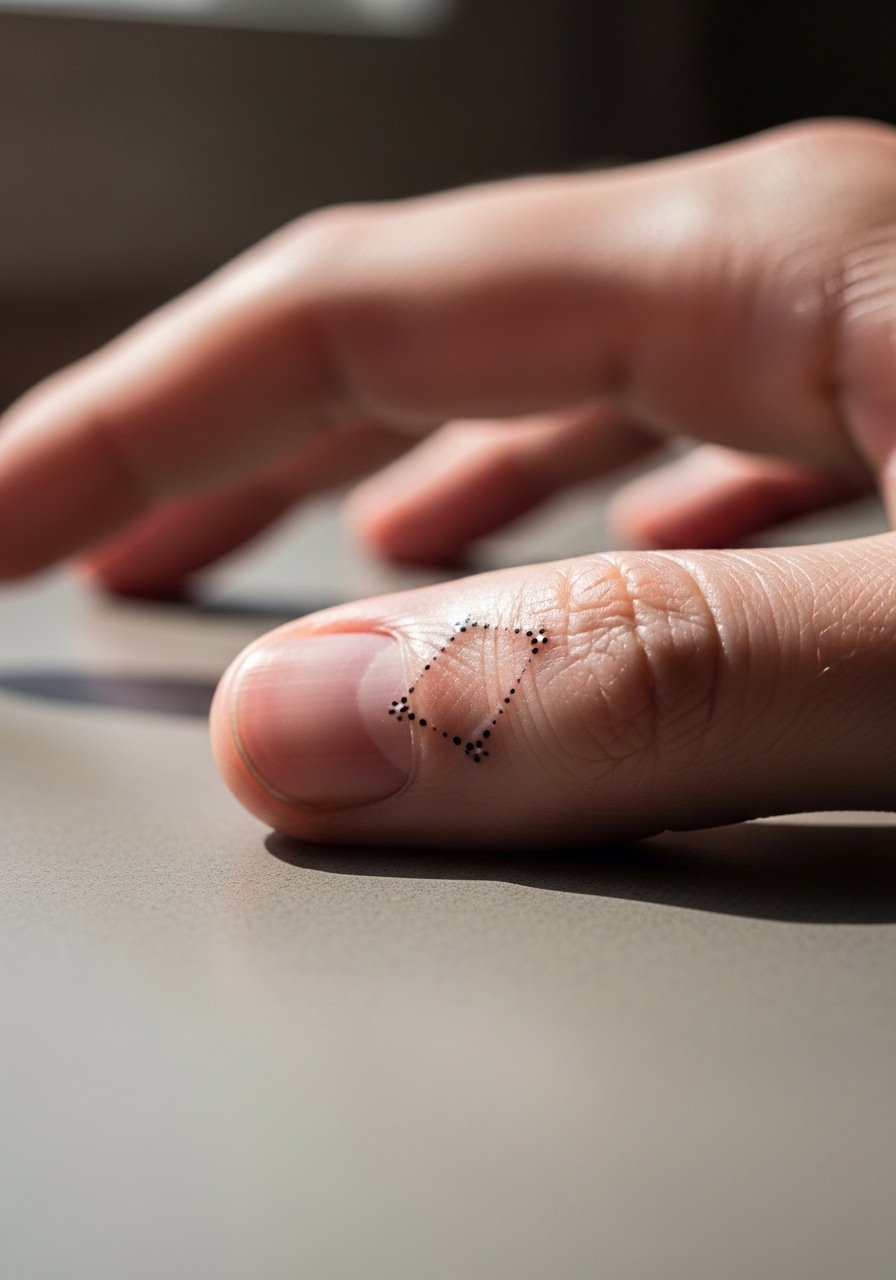
Micro-constellations translate well into henna-style fine line work if you avoid packed starfields. Tell your artist you want spaced dots connected by short strokes so the piece breathes. Fingertip and side-of-finger work hurts more and healing is subject to constant washing. A frequent oversight is asking for clusters that blur into an indistinct mark. For wearing, keep rings minimal during healing and expect a likely touch-up around year one. This design is a good starter piece to test your skin's response to finger ink.
14. Micro Script on the Ribcage
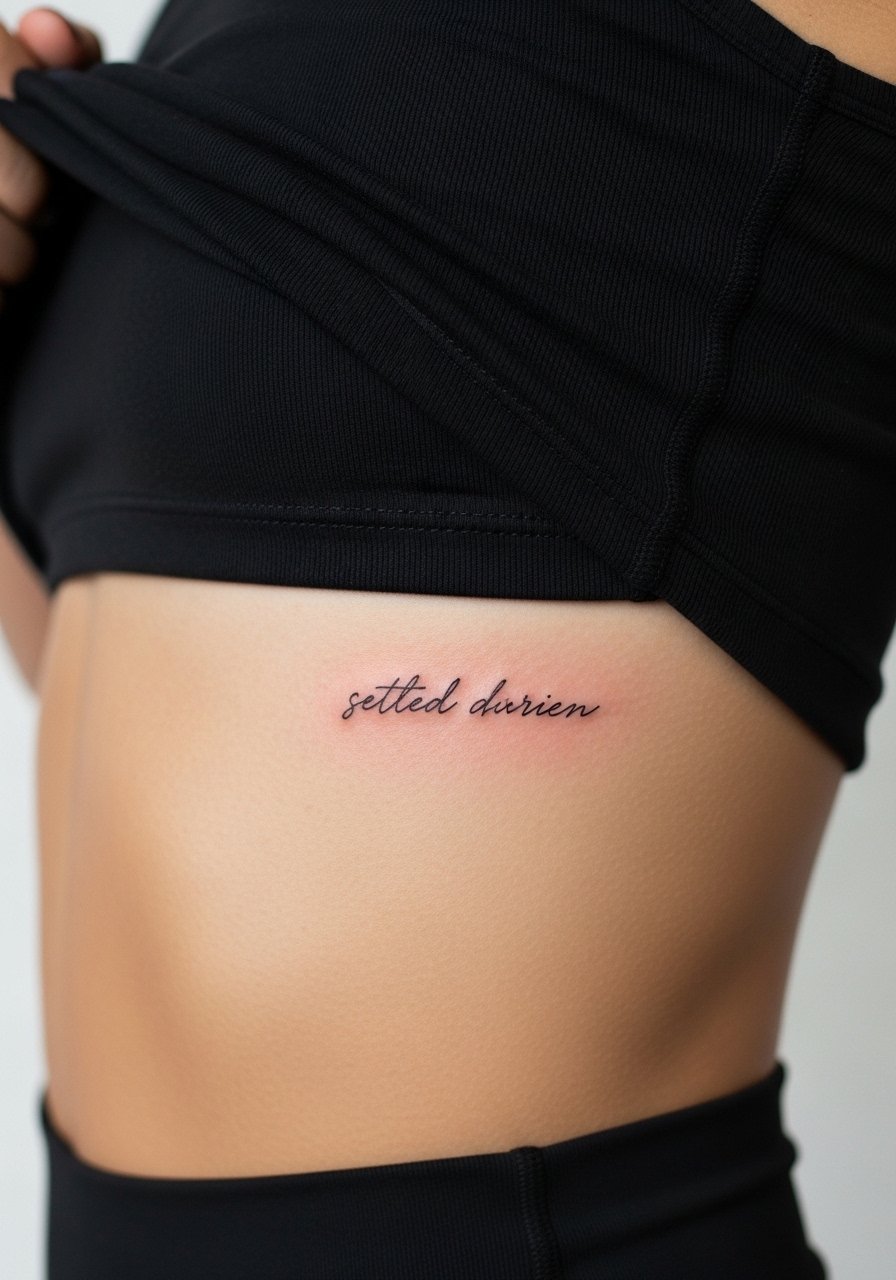
Ribcage script has a certain intimacy but it brings a placement debate. Artists split into two camps on fine line ribs. One camp says the skin stretch and movement blur thin lines within two years. The other camp says with correct depth and spacing the lines can settle cleanly. Tell your artist you want wider letter spacing and a slightly heavier primary stroke to give it longevity. Pain is higher on the ribs and sessions may require breath-control breaks. Wear a cropped top you can lift for the session. Plan for a possible touch-up if you choose ultra-fine lettering.
15. Single-Stem Rose on the Side of the Hand
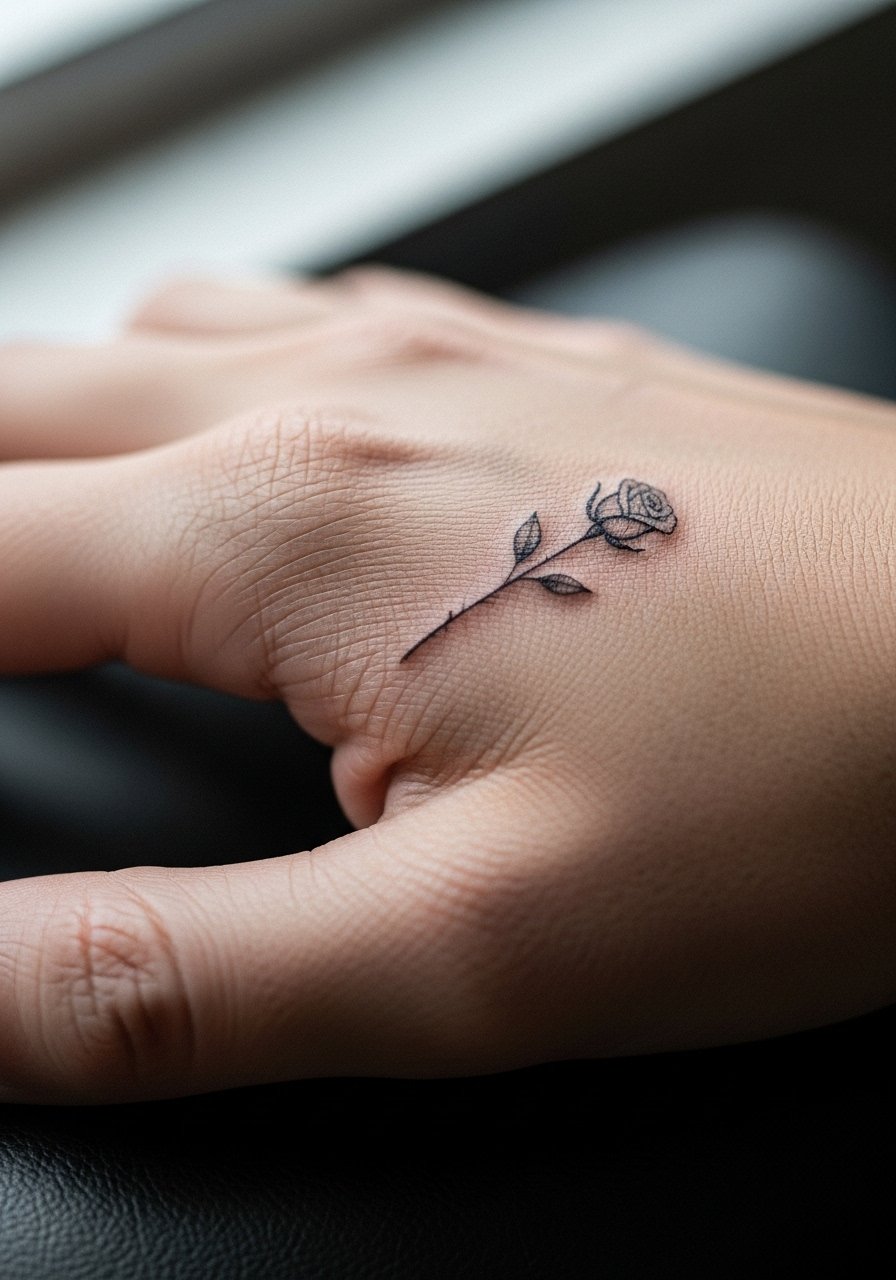
A single-stem rose is a compact statement that pairs well with rings. For durability, ask for a reinforced stem outline and minimal inner stippling so the bloom does not merge. Pain is moderate and sessions are brief. Common mistakes are over-shading the petals which loses clarity on hands. For styling, go bare-handed or add a minimal ring set to highlight the composition in photographs. Expect more frequent touch-ups than forearm pieces.
16. Mini Mandala Behind the Ear
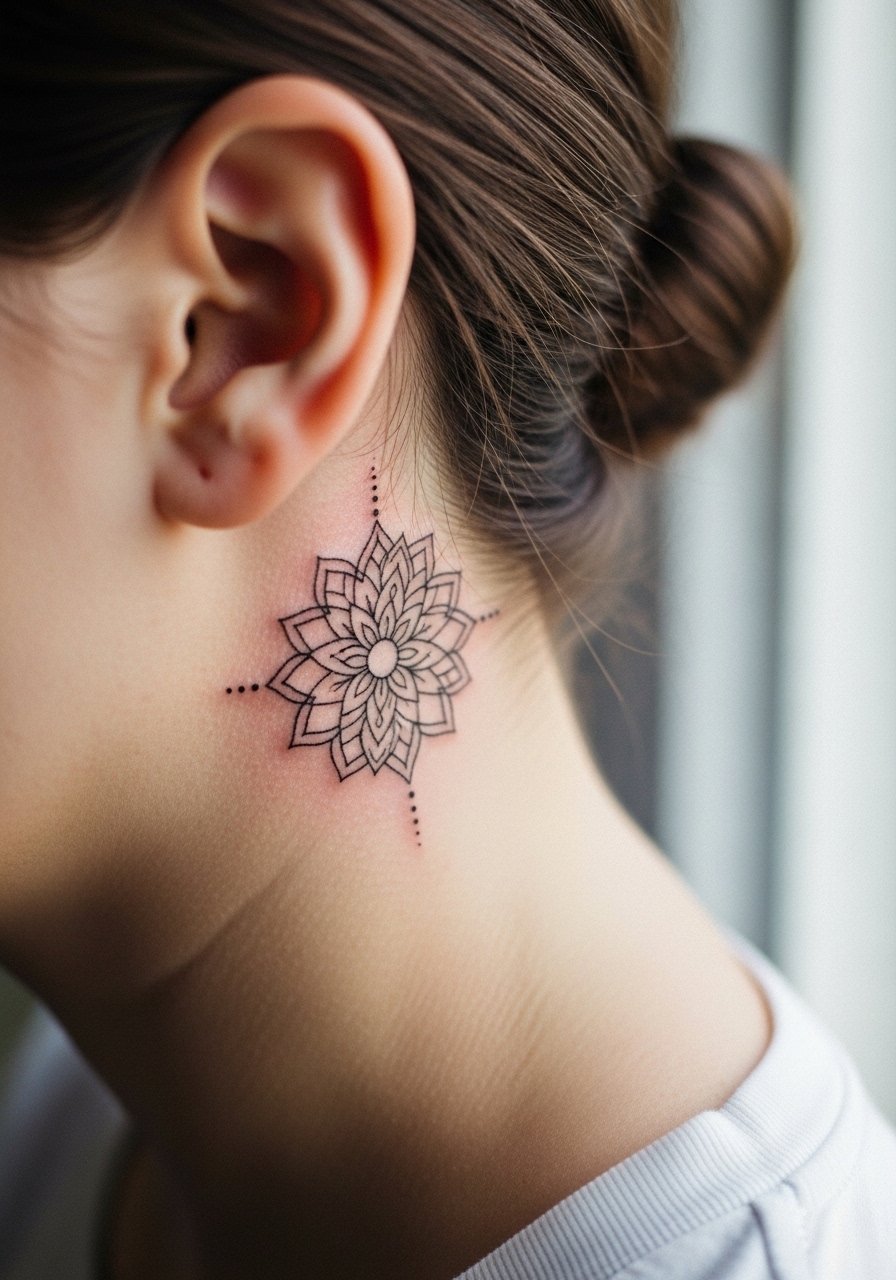
Behind-ear minis read like hidden badges and are a subtle way to test visibility near hairlines. Specify a small, open mandala with clear negative space so it does not become a dark blob under hair. Pain is low and sessions are quick. A mistake is requesting dense shading near the hairline that disappears when hair grows back. For placement chat, mention how you plan to wear your hair and whether you want the design visible. These hold up well if you keep the area sunscreened when exposed.
17. Henna-to-Ink Starter Trio

This is a practical progression idea for anyone testing permanence. Get three small flash pieces spaced for future expansion and wear one as a henna mock-up first to assess fading, pain, and personal attachment. Tell your artist you want three micro placements under three inches so you can track how each location ages. Expect short sessions per piece and a possible early touch-up on the hand-adjacent design. The smart approach is to test contrast and photos before committing to a larger custom piece. Plan clothing for the session depending on the chosen placements so access is easy.
Frequently Asked Questions
Q: Will fine line wrist and hand tattoos fade faster than forearm pieces?
A: Yes, hand and wrist placements face more friction and washing, so lines tend to soften earlier than forearm pieces. Opt for slightly bolder primary strokes and give your artist permission to leave more negative space; that reduces the visual blending that shows up after a year or two.
Q: How can I make sure a dainty design shows up well on darker skin tones?
A: Choose heavier outlines around the main motif and contrast with dot work rather than hairline filler. Studio lighting when photographing healed work and simple accessories like a thin chain pendant necklace or neutral manicure can also help the design read in photos.
Q: Is the shoulder a good place to hide ink for conservative workplaces?
A: Shoulder pieces are ideal for hiding under standard work clothing while still being easy to show off in tanks or off-shoulder tops. If discretion is a priority, pick upper shoulder placements that sit below the collar so a crew or collared shirt covers them completely.
Q: What should I wear to a session for an ankle or thigh piece?
A: For ankle work wear loose joggers or shorts you can roll up without pressure. For thigh pieces pick high-cut shorts or a wrap skirt so the artist can access the outer thigh without fabric bunching. Comfort matters because session time can stretch if stencil repositioning is needed.
Q: Saniderm versus dry healing for fine line work, which side should I pick?
A: Artists split into two camps. One camp prefers protective film because it keeps the area clean and reduces scab picking. The other camp favors dry healing for breathability and less maceration. The right call depends on your skin's tendency to sweat or pick and your artist's preferred protocol, so ask where they land before you book.
