
Fine line spines are the sort of decision that looks effortless on a saved pin and suddenly very real when the stencil sits on your back. Trends favor whisper-thin stems and tiny glyphs, but the ones that still read crisp at year three often started with slightly bolder line choices and placement that avoids constant friction. Read these 27 ideas with quick consultation notes and styling tips so you know what to ask for before you book.
1. Fine Line Floral Cascade Down the Spine
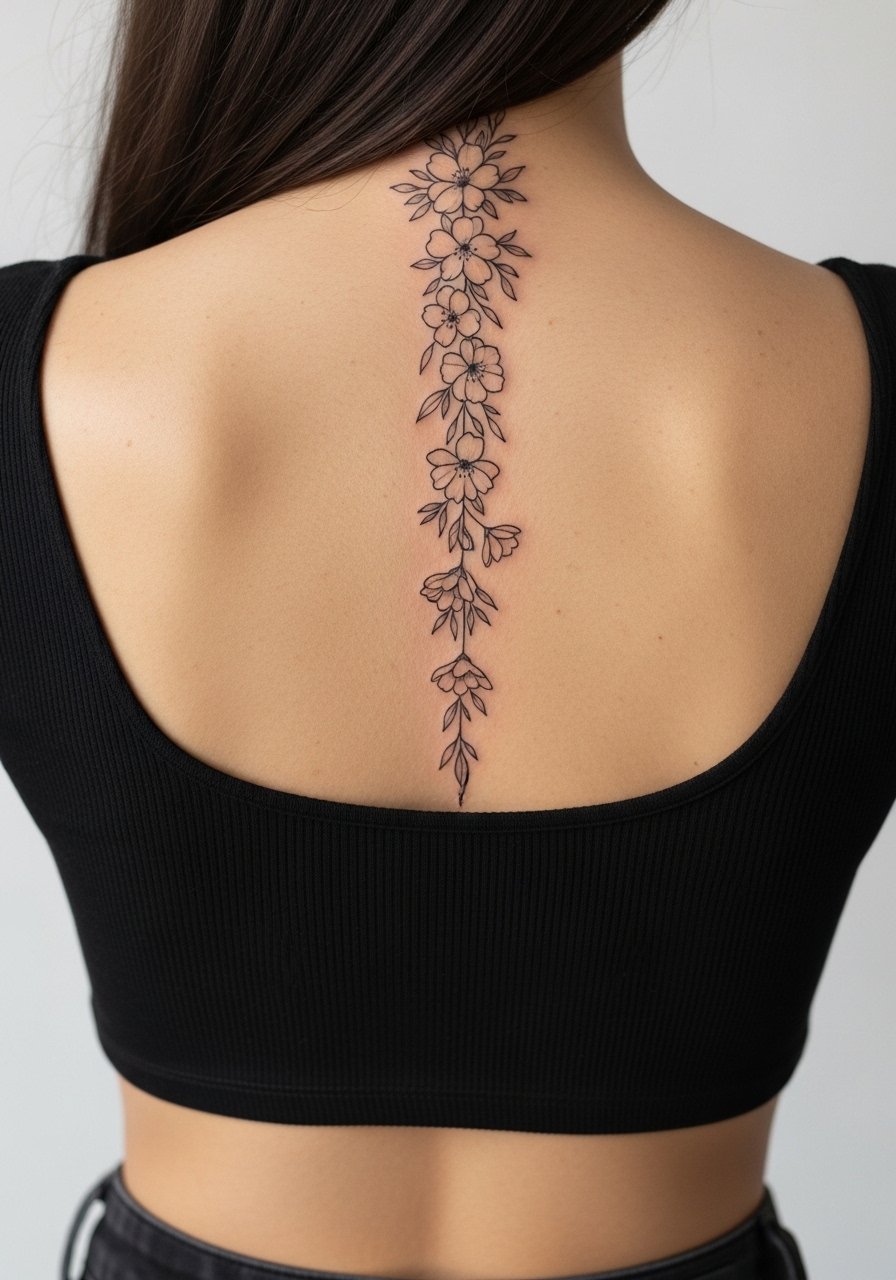
I recommend this when you want movement that follows the spine curve rather than a straight vertical motif. Tell your artist to stagger bloom sizes and leave narrow negative space between petals so the design breathes as the skin stretches. A common mistake is packing tiny petals too close together, which invites merging and a blurry look after two to three years. Expect moderate pain for long runs down the spine and plan for a short break each hour. For showing it off, pair with an open-back halter top that frames the cascade without competing.
2. Dainty Butterfly at the Base of the Spine

This placement is deliberate if you want something hidden under most clothing. During consultation ask for slightly heavier outline on the wing edge so the motif survives waistband abrasion. The lower back stretches with weight changes, so choose a wing pattern that reads well even when lines soften. Sessions are short and the pain is tolerable but the proximity to bone can sting on some people. For summer looks try a flowy sarong coverup that teases the design without rubbing the ink.
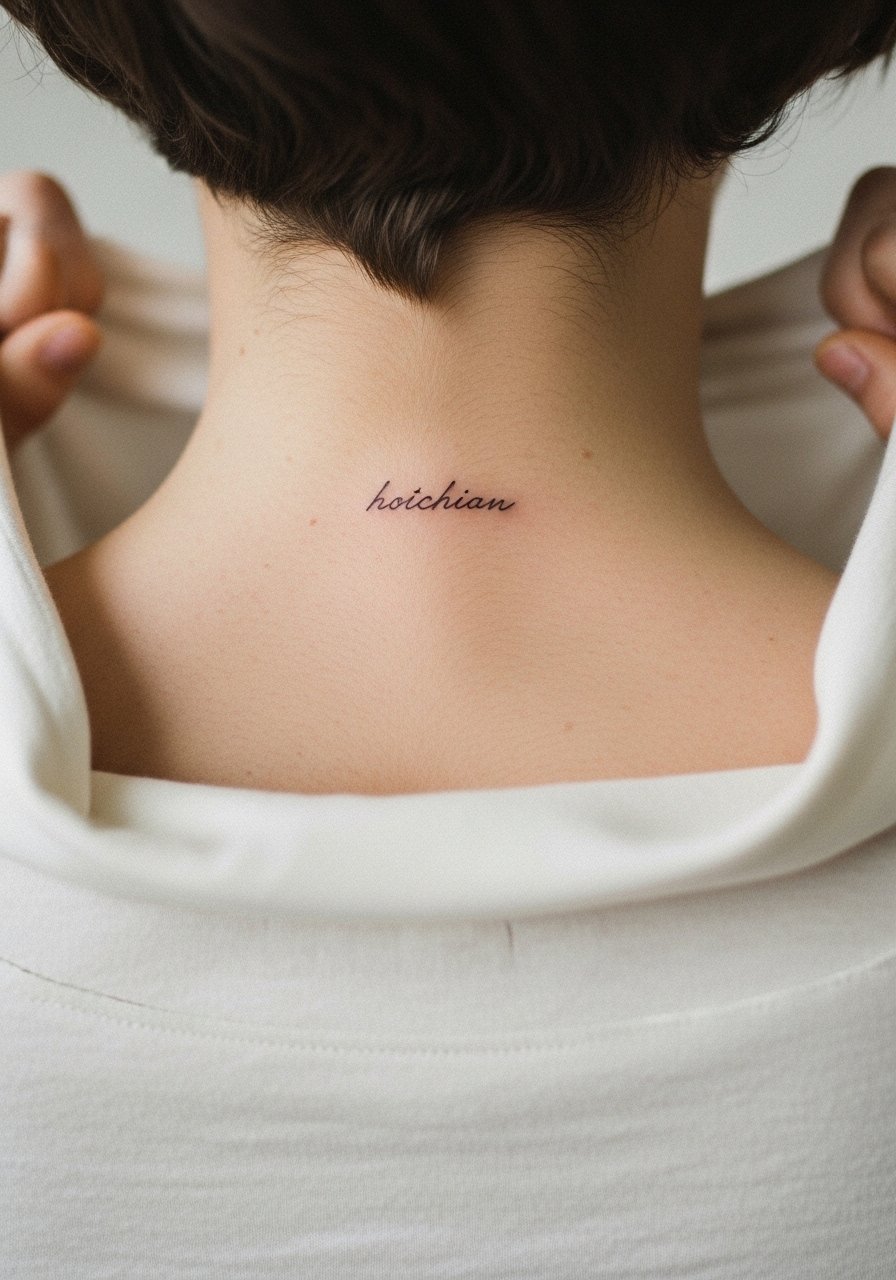
3. Vertical Script Quote Along the Spine

When you want a mantra elongated with the body, bring exact lettering and font examples to the consult. Ask the artist to space letters slightly wider than you think is needed so the script keeps legibility at year two and beyond. The biggest mistake is choosing a font designed for print that is too delicate for skin. This is a longer single-session piece and the neck junction can be more sensitive. Pair the finished piece with an off-shoulder sweater or a low-back blouse to let the vertical script breathe on display.
4. Geometric Vertebrae Outline, Fine Line

This one reads like anatomy without being literal. Ask for negative space between segments so each vertebra has room to age. The common error is making the pattern too small which causes nearby lines to merge into a single patch as the skin moves. Expect higher blowout risk on the lower back where the tissue sits over soft fat, and discuss needle depth with the artist to avoid overworking. For evenings out, complement the symmetry with a strappy satin dress and a delicate body chain that follows the spine.
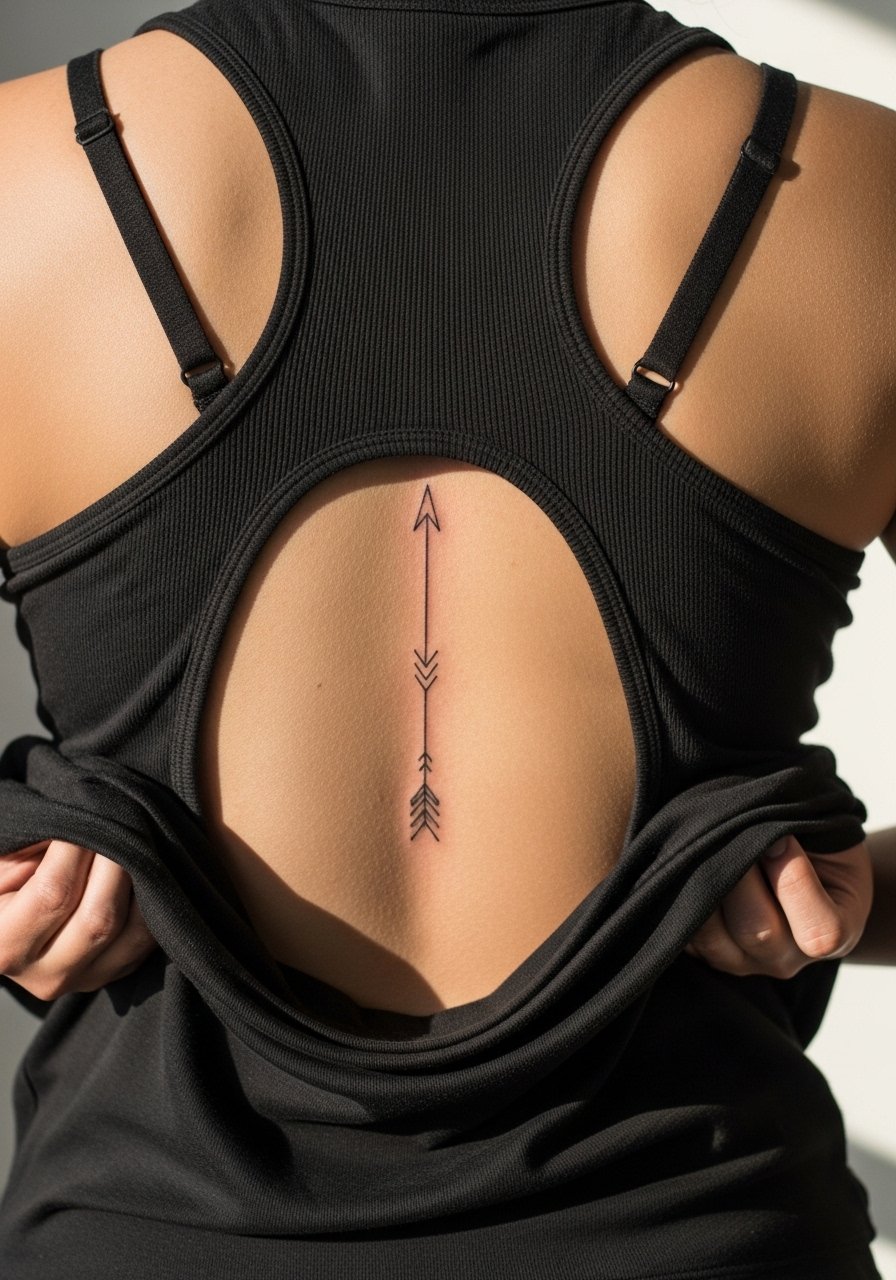
5. Single Line Arrow Pointing Down
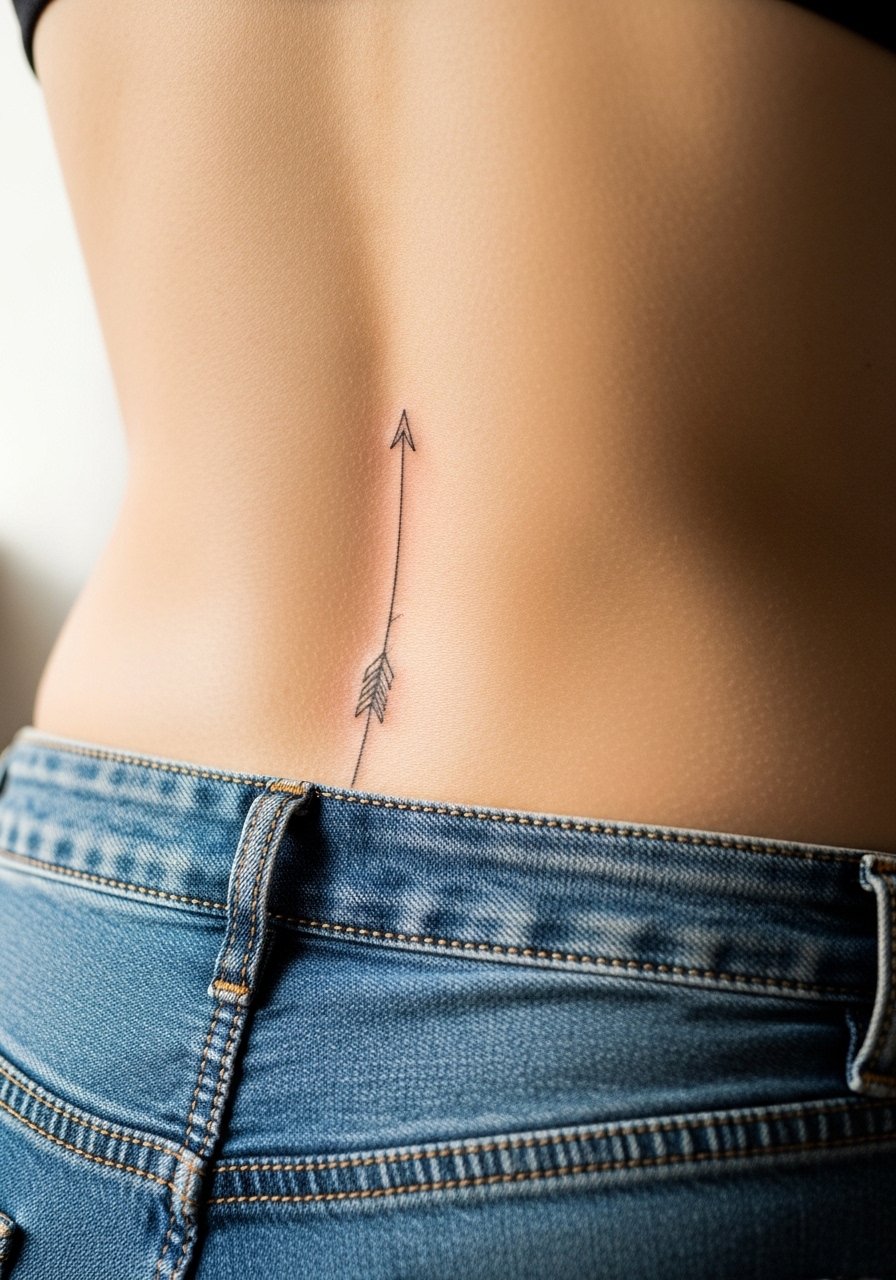
The appeal here is simplicity and fast healing. When you consult, request a single pass with a slightly thicker single-needle to reduce the chance of early fading. A common mistake is overdesigning the shaft with extra ornaments that blur over time. Session time is short and pain is typically brief since the piece is small. If you plan to show it with jeans, a low back crop top provides a neat peek without constant waistband rubbing.
6. Vine Tendrils Wrapping the Full Spine

This organic approach drapes with posture and flatters curves by following the spinal column. Tell your artist to vary leaf spacing and avoid tight clusters, because tight dot shading in vines often fills in by year two. The long run requires two sessions and higher tolerance for discomfort. There is a debate about fine line longevity on high-friction spots. One camp says fine line ages into a soft glow that still looks intentional. The other camp warns that thin lines blur faster and recommends bolder weight. Ask your artist which side they favor and why.
Studio Day Picks
These first six spine looks cover low-back peeks and full-back runs, so a mix of small prep items smooths the session and first week.
-
Stencil transfer paper kit. Lets you preview the exact placement on skin before the needle touches down, which matters when a millimeter shifts an entire cascade.
-
Topical numbing cream. Applied per instructions it eases long sessions on the mid to lower spine without altering the artist's linework.
-
Thin protective film roll. Useful for the first day on low-back and waistline pieces that rub against clothing.
-
Fragrance free gentle body wash. Cleanses healing spine work without stripping the delicate needle channels that fine line pieces depend on.
-
Aquaphor healing ointment. A thin layer can guard fragile lines during the initial skin barrier recovery phase.
7. Constellation Stars Along the Upper Spine

Pinpoint stars are delicate and look intentional when spaced correctly. Bring exact star coordinates or a reference grid so the artist keeps the gaps consistent. The mistake is over-concentrating tiny dots which merge and lose pattern clarity at 2 to 3 years. Session time is typically short but each dot requires precision, and the upper spine can be tetchy under the shoulder blades. For show-off outfits, choose a wide-neck shirt that exposes just enough to reveal the constellation.
8. Heart with Drip Effect at the Neck-Spine Junction
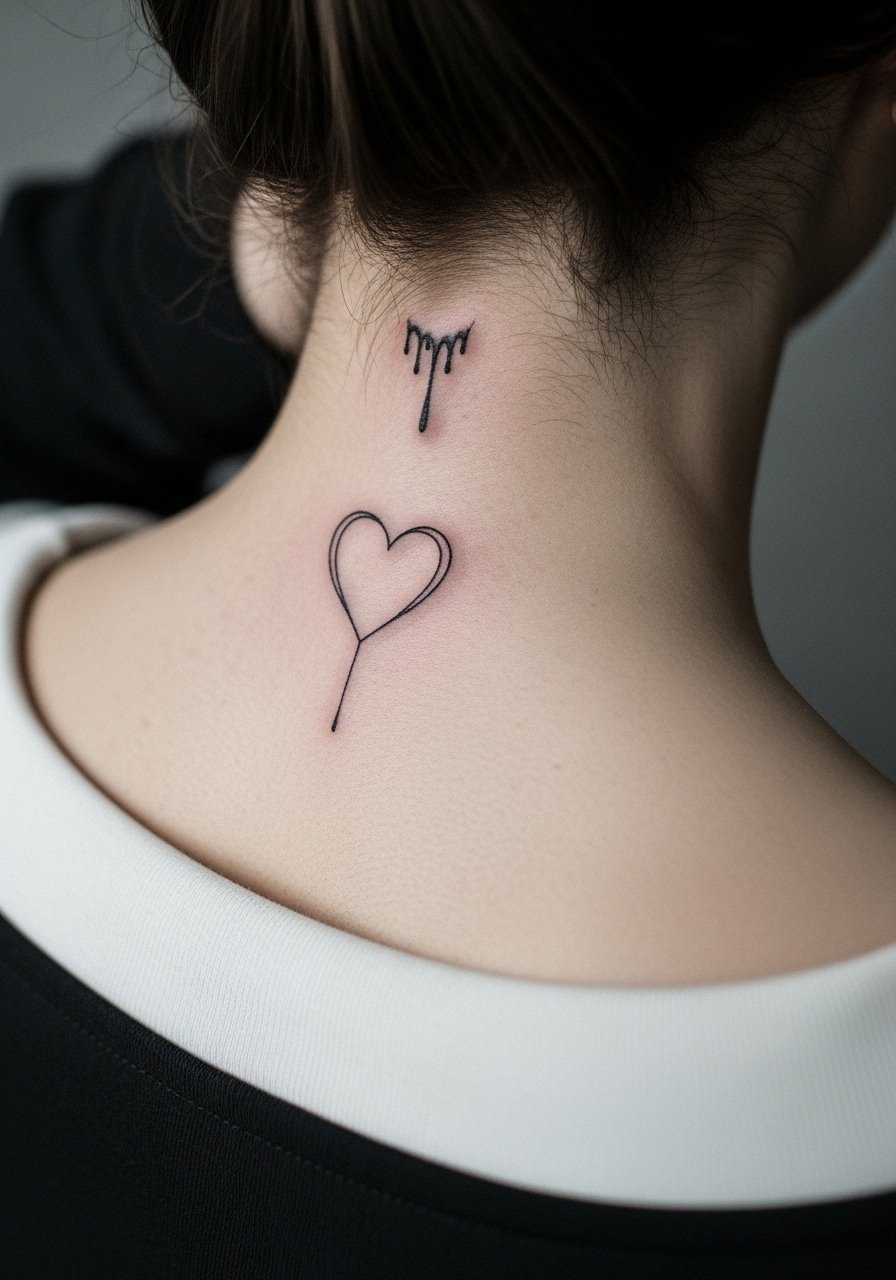
This compact modern motif reads intimate and is highly visible with certain necklines. Ask for the drip to be sparsely inked so it does not pool into a single blot as it heals. The nape is sensitive and can sting more than mid-back work. A common oversight is choosing dense shading on the drip which ages poorly. For evening styling, a thin choker or an open-collared top balances the small image without crowding the neck.
9. Micro Lotus Blooming Mid-Spine

A small lotus is a low-commitment spiritual marker that heals cleanly when given room. In consultation ask for slightly larger petal tips than you imagine because tiny nearly closed petals tend to blur. Most people leave with a single short session and minimal downtime. The mid-spine sits better for micro-realism than the lower spine that endures waistband friction. Pair it with a strappy sports bra for workouts that show the center detail.
10. Wave Ripples From the Waist Up

This design moves with the body and looks custom when the ripples align to the small of the back. Tell the artist to orient the crest lines with your natural waist curve so the composition does not look skewed as you shift posture. A frequent error is mirroring the reference art without adjusting for body topology, which makes the piece look off-center on the living canvas. Expect moderate session length and a touch-up at year two if you sit a lot. For beach days, a high waist thong bikini lets the ripples read without interference.
11. Feather Falling Down the Spine

Feathers elongate the back visually but need a thoughtful shaft thickness to last. Ask for tapered shafts with slightly denser edgework near the quill so the feather keeps definition after a couple of years. The full vertical length requires stamina and breaks during the session are helpful. A mistake is over-detailing every barb with tiny stipple shading, which can soften into a gray mass. For outfits, a white silk blouse with an open back puts the feather on quiet display.
12. Single Needle Mandala Center

Mandala detail reads meditative but single-needle work needs spacing that respects healing. During consult ask for slightly more negative space between concentric rings to avoid dense areas that tend to merge. Artists split on whether mandalas are best on ribs or mid-back because skin movement differs. One camp says mid-back holds symmetry better. The other warns that dense dot work on any moving surface will require touch-ups. If you like symmetry, plan for a two-session approach and wear a loose tank top to the appointment.
13. Moon Phases Vertical Stack
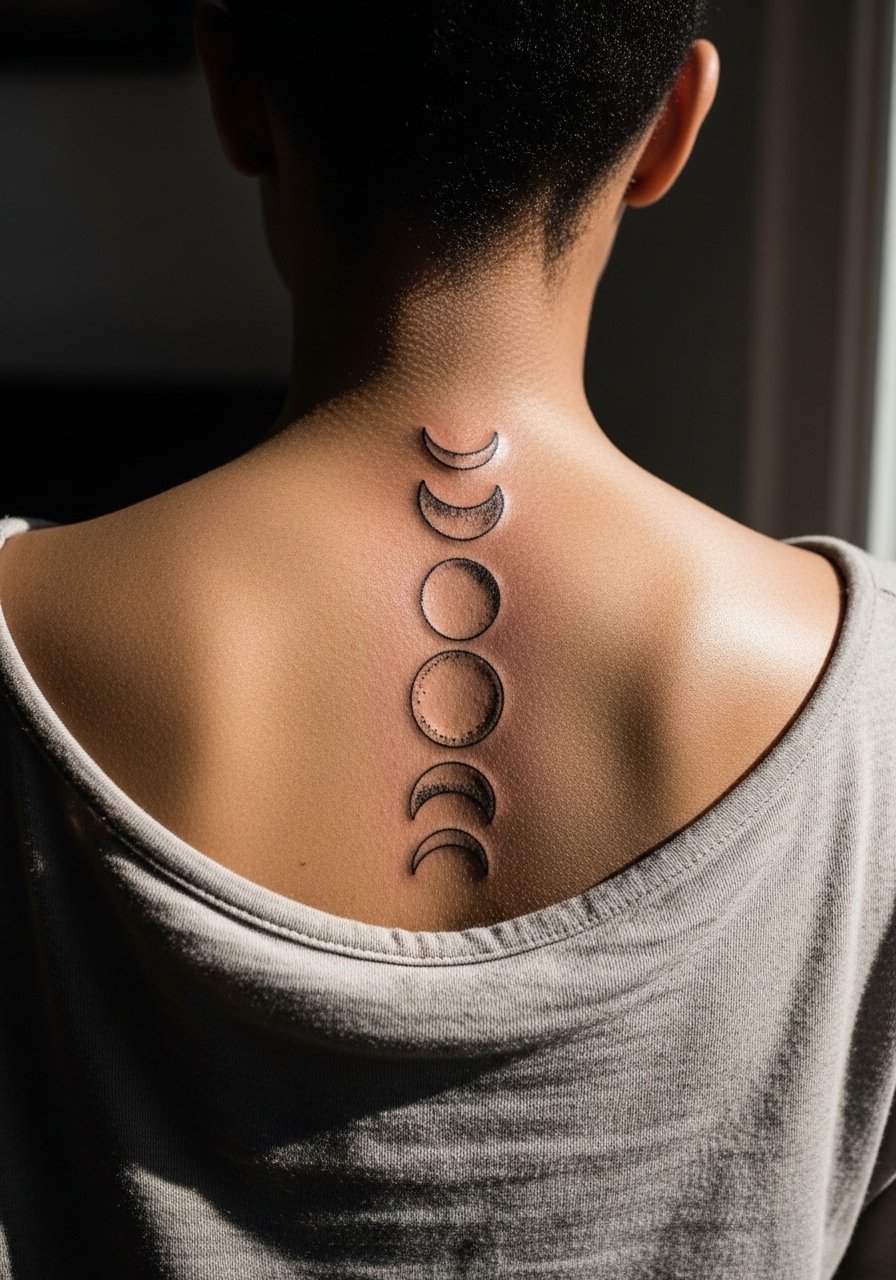
Phased crescents are minimal and scale well when spaced correctly. Ask your artist to size the crescents so they remain distinct as the skin ages and to avoid filled-in crescents that can pool. A common mistake is putting phases too close together which leaves no breathing room in five years. The upper spine placement is visibly elegant with open backs. Try a backless mini dress for nights you want the stack to show.
14. Micro Script Word at the Nape
Single-word scripts at the nape read intimate and need solid spacing. Bring the exact word spelled out and confirm kerning with the artist because skin stretches differently at the neck. The nape is sensitive and can lead to more twitching, so plan a quick session and relax your shoulders. A typical mistake is choosing a micro font that has serifs which do not translate well. For showing the piece, a dainty choker necklace sits above the word without crowding it.
15. Minimalist Arrow with Negative Space
Negative space arrows are elegant if you and the artist plan the white areas carefully. Ask the artist to stencil the negative spaces directly on skin so you can preview how highlights will read on your tone. The error many make is assuming empty space needs no thought. Session time is short but alignment matters more than you think. Pair it with a racerback tank for workouts that reveal the motif when you move.
16. Small Vertebrae Dot Work Stack

Dot work can read delicate and textured when done with variation in dot density. Ask for broader spacing between stacked elements so the dots do not fill into a solid patch. The main mistake is over-tight dot packing in small pieces. Expect more session time than a single-line tattoo because precision dot work is slow. For appointment comfort, wear a loose button-down shirt you can pull aside without strenuous undressing.
17. Tiny Solar Glyph at the Tailbone
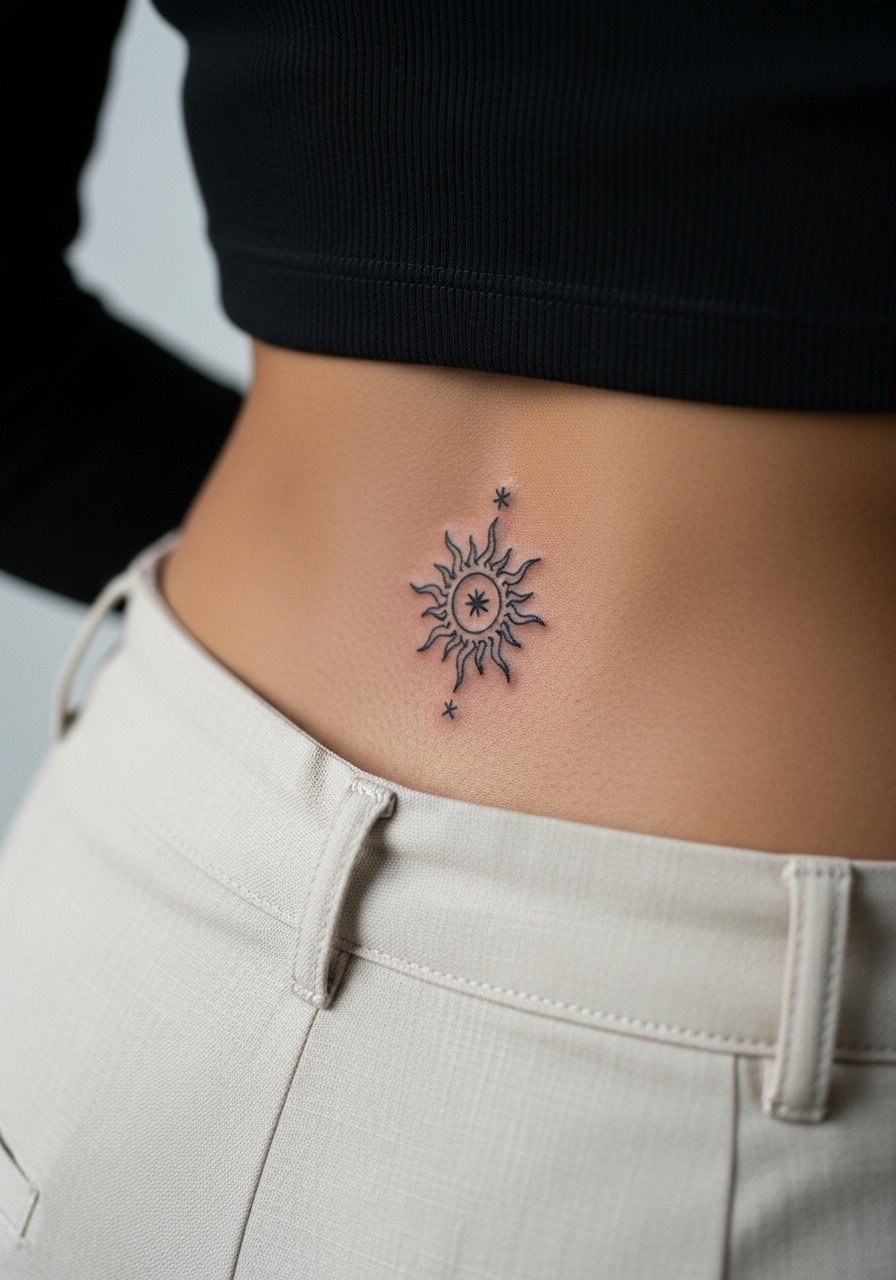
Tailbone placements hide well under clothing but demand caution with waistbands. During consult request minimal shading and a slightly thicker outer ring to hold the glyph against abrasion. People often underestimate waistband friction which can lead to early fading. The session is quick but plan to sleep carefully the first couple nights. For casual looks, a low rise jean allows a subtle peek without constant rubbing.
18. Interlocking Crescent Chain Down the Spine

A chain of crescents reads modern but needs rhythm. Ask for consistent spacing and a mockup on your spine so the breaks land naturally between vertebrae. A common error is forcing identical shapes without compensating for the spine's curve which makes the chain appear to shift. This design can be more sensitive on the upper back but is manageable in one to two sessions. For evening wear, a gold body chain women frames the chain without covering it.
19. Feather Drip Blending Into Lower Dimples

This sensual contouring plays with anatomy and should be previewed in several sitting poses. Tell your artist to map how the drip will land when you stand and when you bend to avoid awkward placement. The risk is letting drips extend into high-friction zones which accelerate blur. Expect moderate session time and a possible light touch-up after a year. For beachwear choose a flowy sarong coverup that shows the dimples without pressure.
20. Micro Mandala at the Base of the Neck

A compact mandala anchors the upper spine elegantly when the artist spaces the radiating lines. Ask for simplified ring counts to avoid overly dense interiors that tend to become muddy. The base of the neck can be fidgety during the session so short bursts with breaks work best. A common mistake is packing too many fine dots in the center. Wear an off-shoulder sweater to show the detail without covering the mandala.
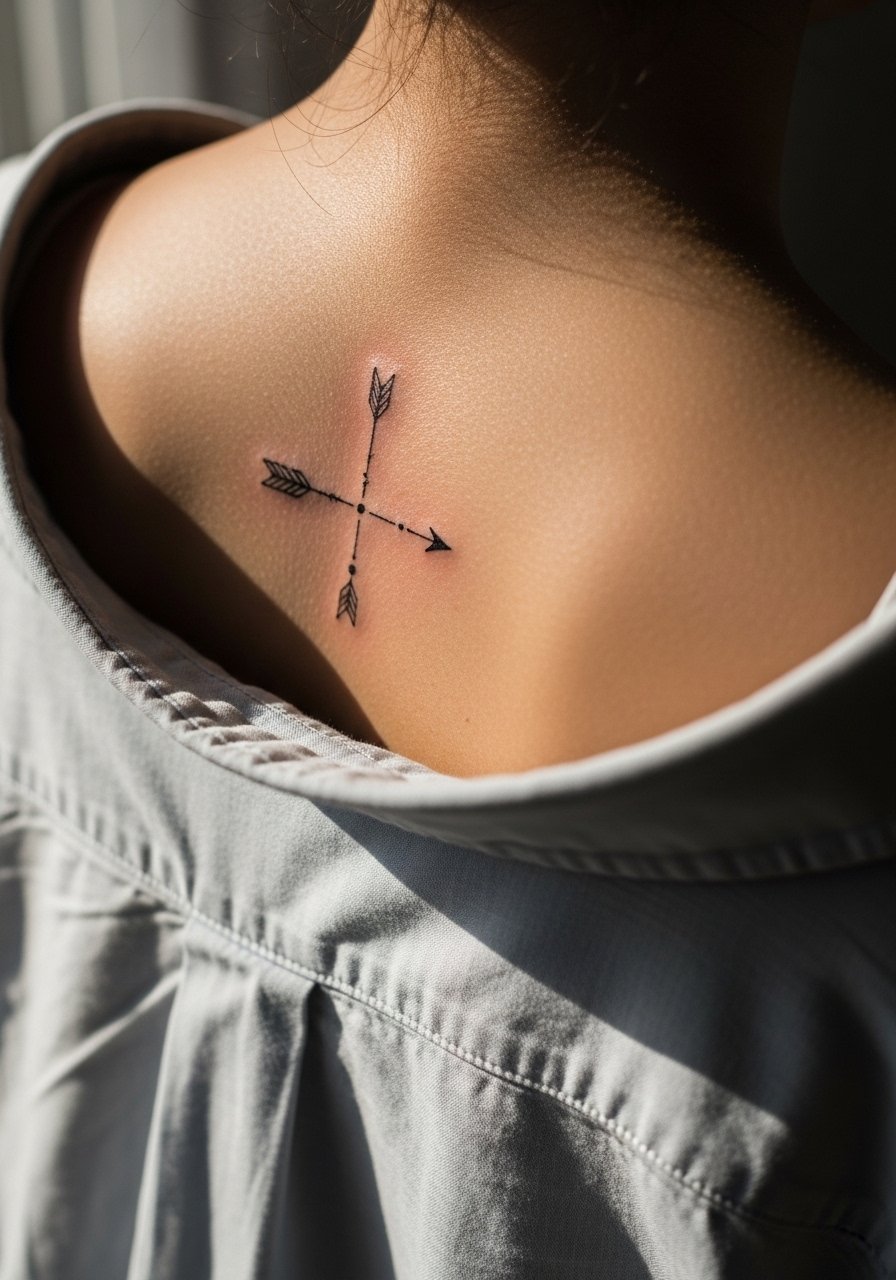
21. Tiny Compass Needle Along the Midline

A compass needle is about precision and orientation. Bring directional notes so your artist places the needle exactly how you want it to point when you stand naturally. The usual error is centering by eye without accounting for shoulder slope which tilts the visual result. The piece is short and low-pain for most people. Try a strappy sports bra for workouts that let the needle show.
22. Tiny Floral Cluster at the Upper Tail

Clusters are forgiving when the elements are spaced with age in mind. Ask for slightly bolder petal outlines on the outer blooms to preserve silhouette against waistband wear. Many people request dense clusters that flatten into single shapes with time. Sessions are brief but placement can be sensitive for some. A high waist thong bikini is useful for showing this location while reducing waistband contact.
23. Tiny Wave Crest Near the Lumbar Curve

A horizontal crest can complement the natural curve in the lower back. Ask the artist to map placement while you stand and while you bend so the crest does not break awkwardly. The mistake is assuming a straight reference will translate to a curved body surface. Expect a single short session and touch-ups if you frequently wear tight belts. For casual days, yoga pants high waist keep the area comfortable during healing.
24. Minimal Plant Sprig Running Up the Spine

A single sprig is a low-commitment organic choice that flatters movement. Ask for leaf spacing that anticipates skin shifting so the silhouette remains readable over time. Tiny leaves drawn too close become indistinct as the years pass. The session is gentle but requires attention to curvature. For wardrobe, a loose linen tank top frames the sprig without competing with the lines.
25. Stacked Tiny Symbols for Personal Codes

Stacked icons are excellent for coding personal milestones. Decide on consistent sizing and spacing at consult so each symbol keeps identity. A common misstep is mixing vastly different detail levels which makes one symbol dominate the others over time. Sessions are short and each icon heals at different rates depending on proximity to friction. For a weekend reveal, pair with a low back crop top that lines up with the stack.
26. Tiny Arrow and Dot Anchor
This micro combination reads like a GPS marker when placed thoughtfully. Ask for the dot slightly separated from the arrowhead to preserve the negative space as the skin ages. The mistake is letting the dot be the same diameter as the line which blurs faster. Appointment time is minimal and discomfort low. For studio comfort, a loose button-down shirt lets you expose the mid-back without fuss.
27. Moon with Tiny Stars Trail Down the Spine

Combining a moon and star trail gives a directional narrative that reads well vertically. During consult decide on star spacing and smallness so stars remain visible in five years. People often choose stars so tiny they disappear into grain. Expect a short session and minimal aftercare complexity. For nights out, a backless mini dress shows the trail elegantly.
Frequently Asked Questions
Q: Do fine line spine tattoos fade faster than bolder spines and why?
A: From what I have seen, fine line work on high-friction areas like the lower back or where waistbands sit tends to soften sooner than bold blackwork. One camp argues fine line ages into a soft halo that still looks intentional. The other camp recommends slightly heavier line weight for longevity. Ask your artist which approach they use and whether they plan touch-ups at the one to three year mark.
Q: How painful is a full vertical spine run compared with a small lower-back piece?
A: Pain varies but long vertical runs often feel more intense because the session length is longer and you are in one position. Small lower-back motifs sting near bone and from waistband contact but are usually over quickly. Request breaks every 30 to 45 minutes and bring a comfortable cushion for longer sessions.
Q: Should I use protective film or dry healing for a spine tattoo?
A: Artists split on Saniderm style protection versus dry healing. One camp likes protective film for the first day or two to reduce scabbing. The other camp warns that trapped moisture can lead to softer scabs. This depends on your skin type and the artist's aftercare routine. Follow the artist's recommendation and ask how they handle fine line pieces specifically.
Q: Can fine line work be done on darker skin tones and still show up in photos?
A: Yes but it depends on contrast choices and negative space. I have seen fine line pieces on darker skin tones that read beautifully when artists use slightly heavier outlines and intentional gaps. For photos, ring lights help but the design itself should prioritize readable shapes over ultra-thin strokes. Discuss contrast strategy with the artist using healed portfolio examples.
Q: What should I wear to a spine tattoo session to make access easy and protect the area afterward?
A: Wear clothing that gives the artist clean access and that you can move around without rubbing the fresh tattoo. Options include a loose tank top or a button-down you can pull aside. For lower-back work choose pants with an elastic waist you can lower slightly. Avoid tight belts for the first week.
