
Bold trad sleeves are trending for a reason, but the gap between what looks great on a phone screen and what still reads clean at year three is real. Fine detail and tiny script can vanish fast while thick outlines and saturated fills hold their shape. Below are 27 cute traditional tattoo sleeve ideas that balance nostalgia, wearability, and real-world aging so you can pick a sleeve that still looks intentional after the touch-up window.
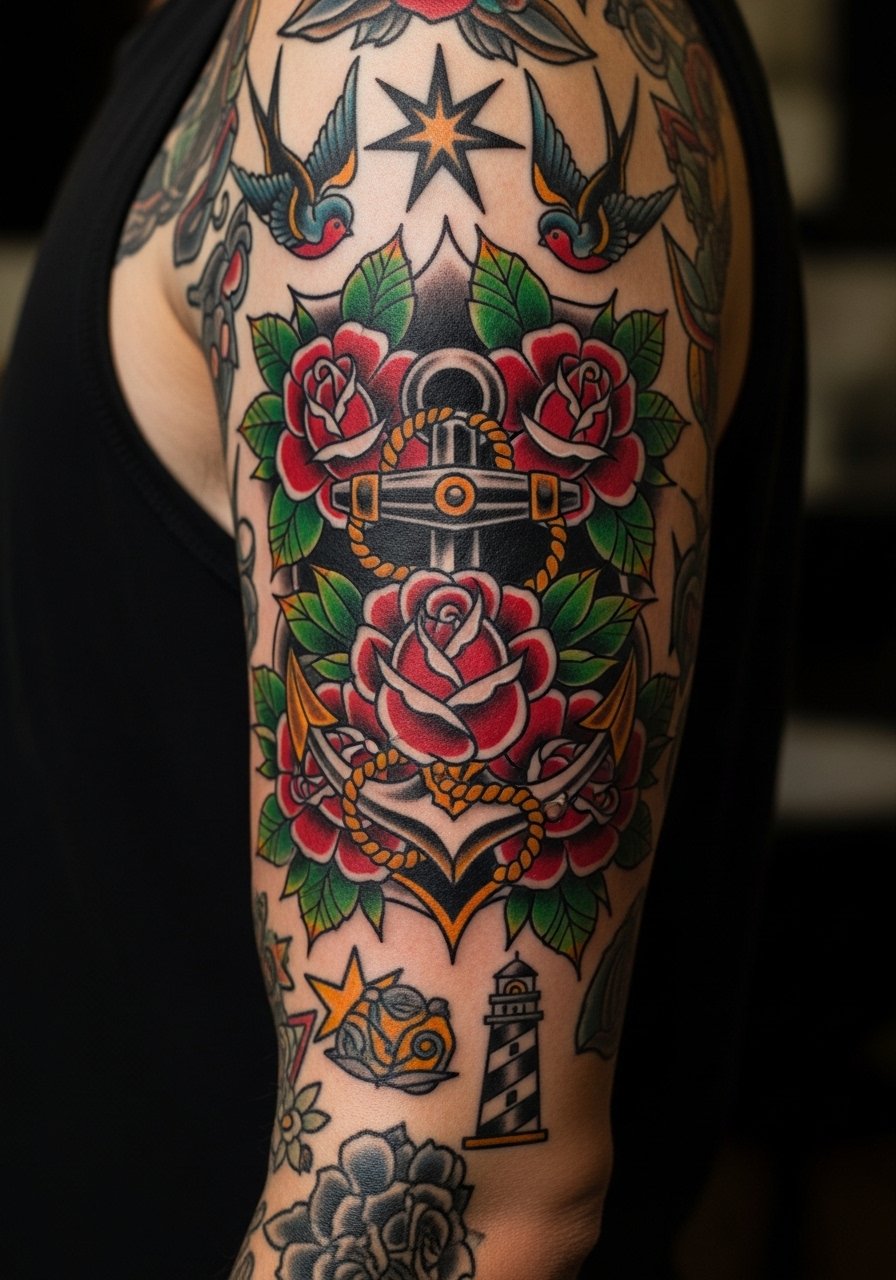
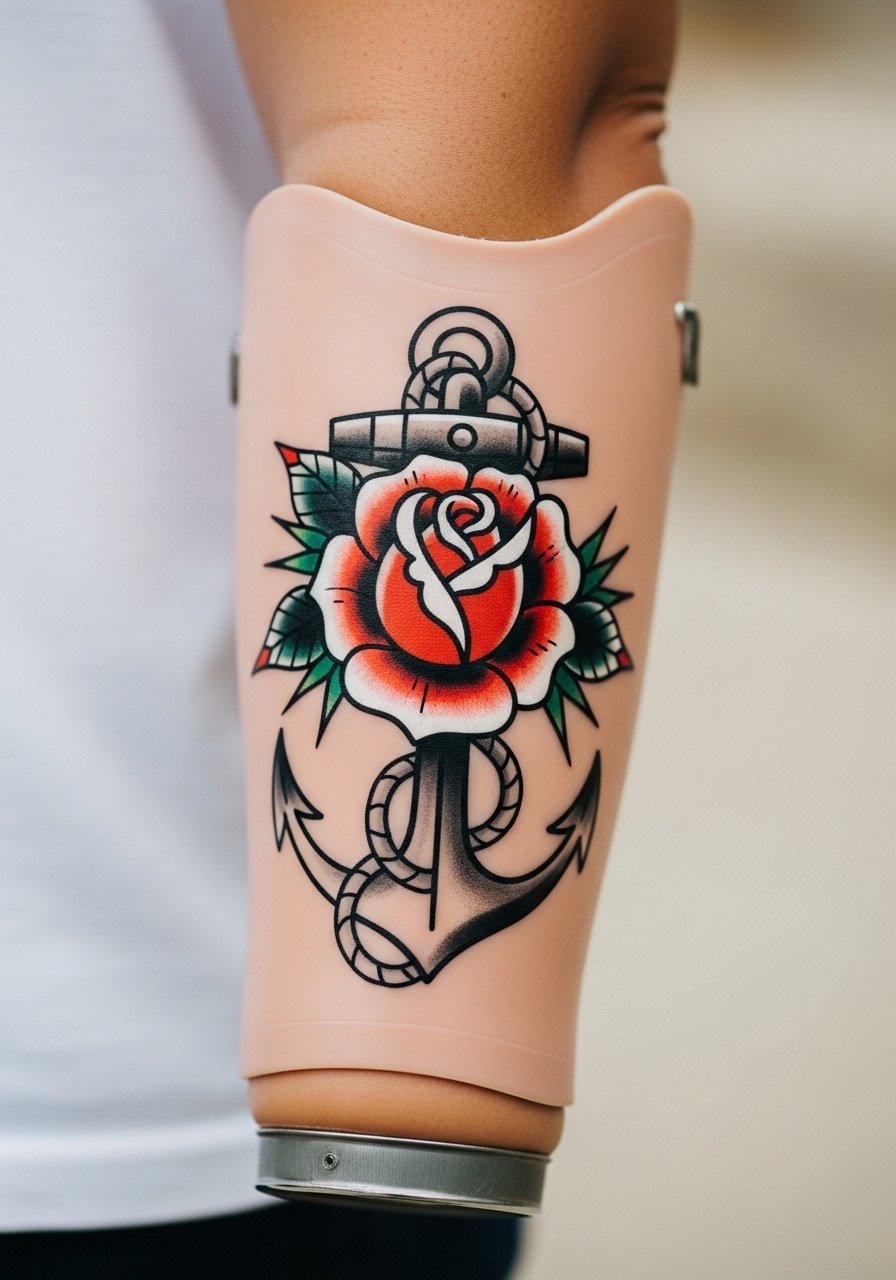
1. Anchor with Roses Sleeve
I've seen this one on so many arms and for good reason. Start the anchor on the shoulder cap and let roses spiral toward the wrist so there are three focal points that read from a distance. Tell your artist to use thicker black outlinework around the anchor and slightly more spacing in the petals to prevent crowding as the piece ages. A common mistake is packing too many small roses tight together, which blurs into texture by year three. Expect forearm wraps to take multiple sessions and feel like a steady 4 out of 10 for pain. For showing it off, roll the sleeves of a chambray shirt rolled sleeves to frame the nautical palette and keep attention on the reds and blacks.
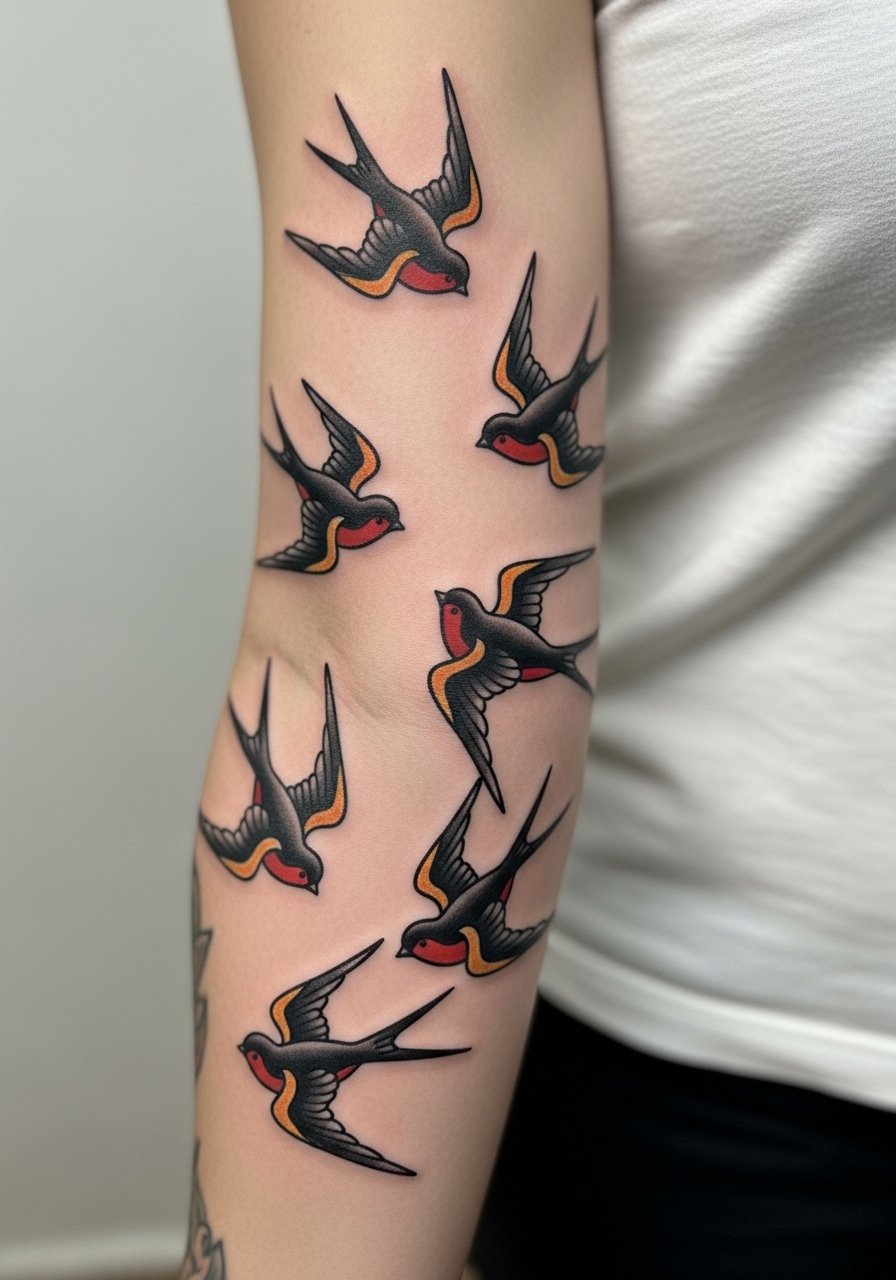
2. Swallows in Flight Full Arm Wrap
Fair warning, full-wrap swallows ask for consistent spacing so each bird reads separately when the arm moves. I recommend a mid-size swallow motif repeated with alternating blue and red fills for contrast. During consults, point out which direction you want negative space to flow so the flock feels natural when your arm bends. Elbow sections sting more than the forearm and sessions over the joint can be sharp. For casual outfits that make this shine, pair it with a sleeveless hoodie black or a vintage muscle tee, both let the wing motion be visible.
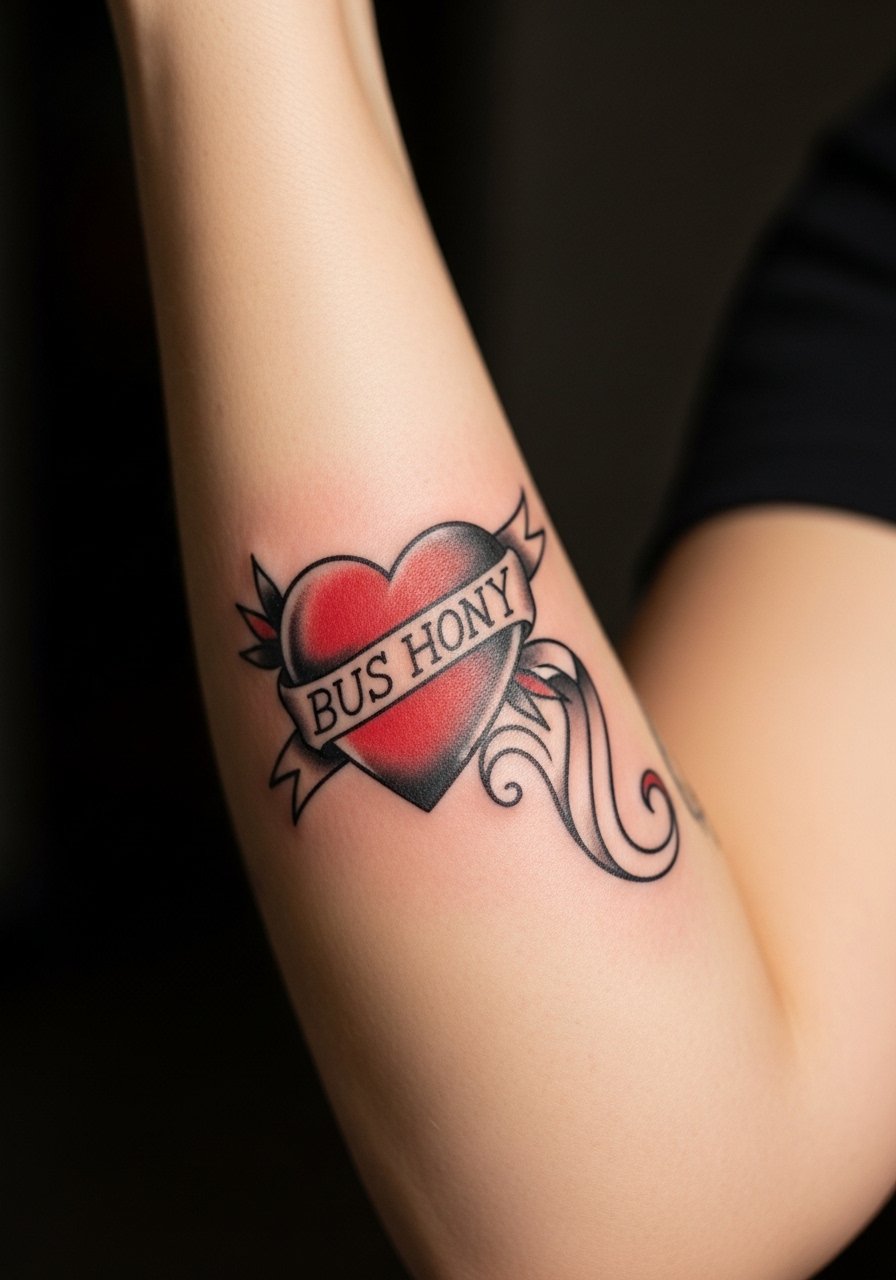
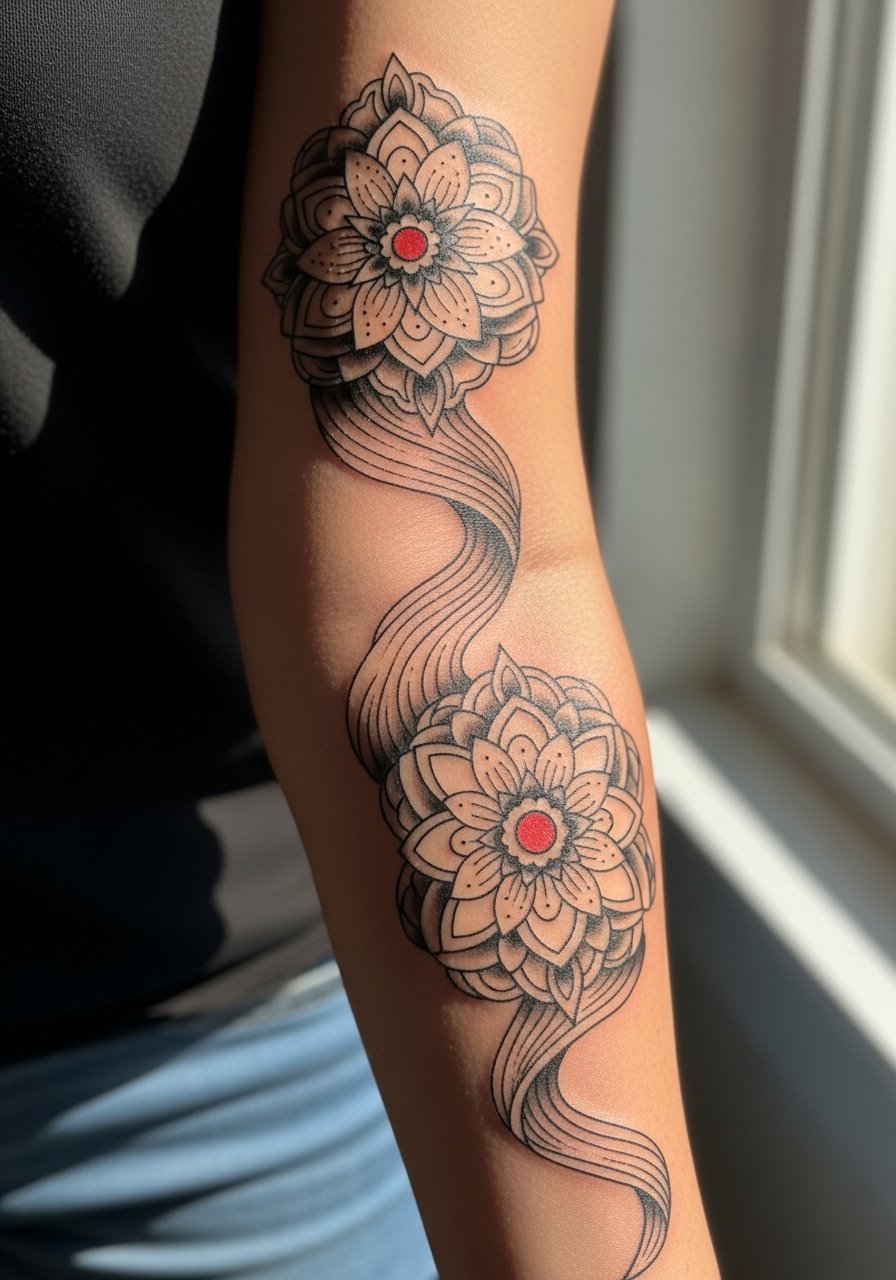
3. Heart with Banner, Inner Bicep Flow
The inner bicep is a secret reveal spot so design this heart large enough to keep the banner text legible over time. The biggest mistake is choosing tiny script inside the banner. Ask for letters at least medium weight and insist the artist space the banner away from dense fillers. Healing is calmer on the inner arm than the wrist but touch-ups are common at year two for thin lettering. For a date or dedication, keep the text short and bold. When you want to show it off, pair the piece with an off shoulder blouse cream and a thin gold chain necklace so the neckline pulls the eye down to the banner.
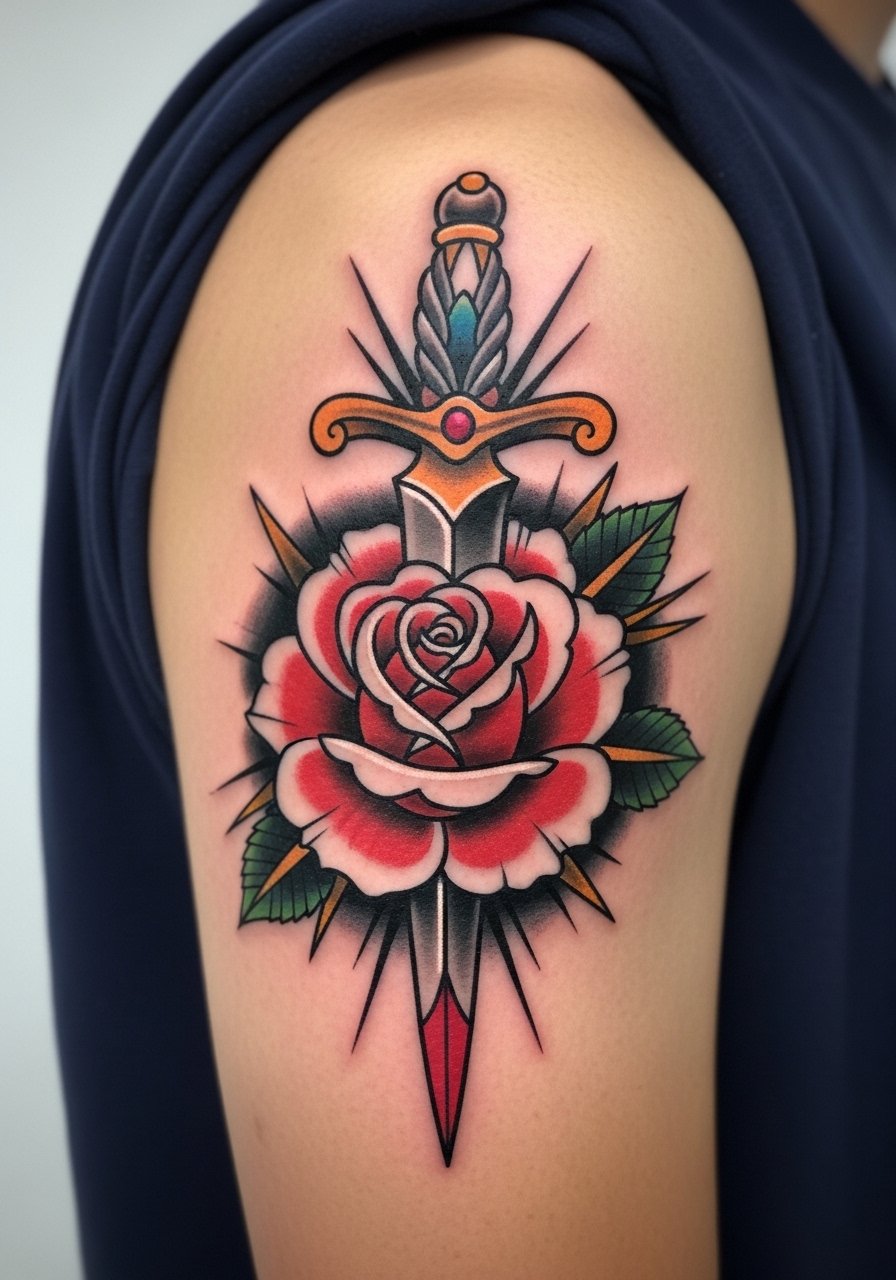
4. Dagger Through Rose, Shoulder Cap Start
There is a punchiness to this motif that ages well if you avoid tiny stipple in the blade. Start the dagger at the shoulder cap and angle it toward the elbow so the rose sits on the bicep high point. During the consult mention you want solid saturation in the blade and heavier black outlinework around the thorned stem to resist spreading. Sessions that include the shoulder feel like moderate pressure with quick stings at the cap when shading hits bone. Wear a halter tank olive green to show the shoulder cap without competing with the color palette.
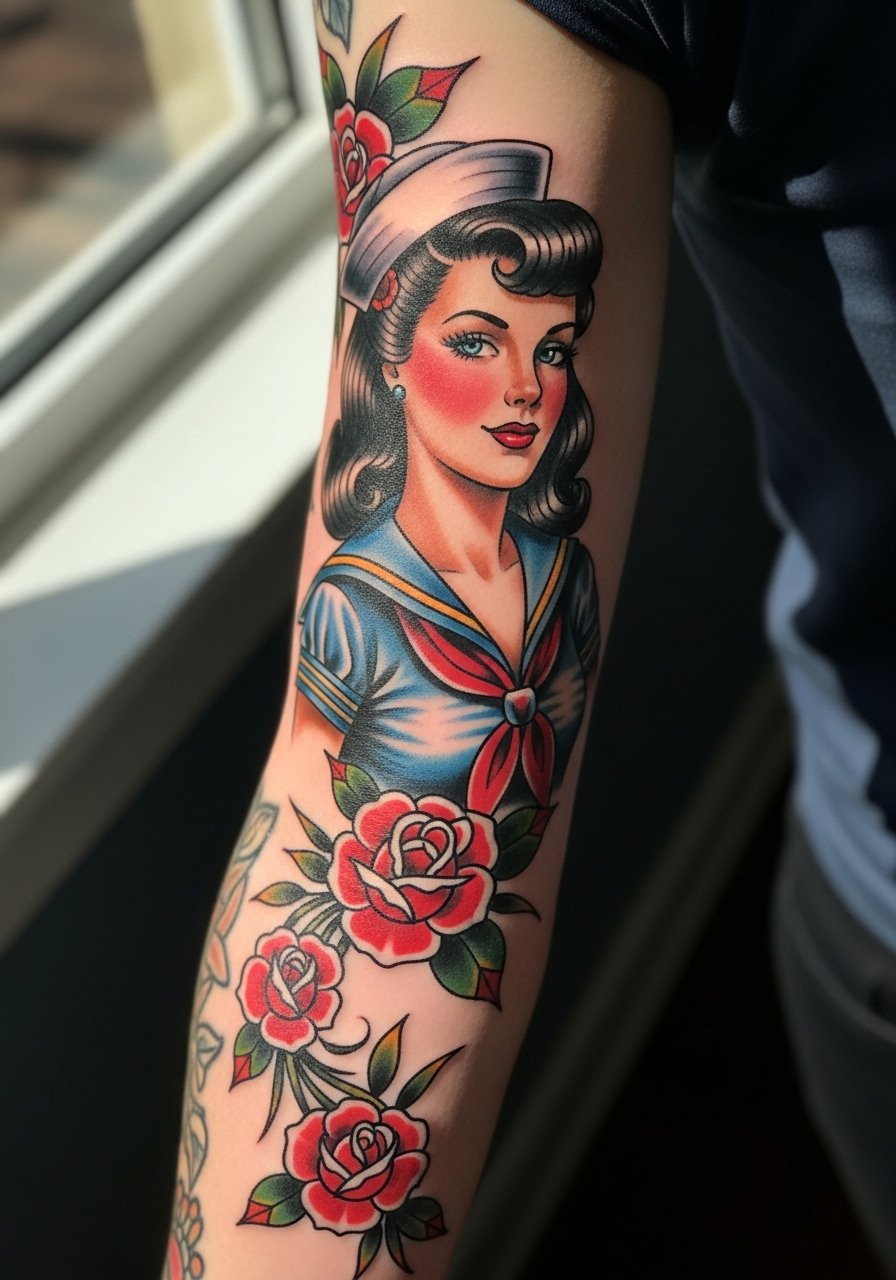
5. Pin-Up Girl with Floral Border
When you want retro charm, ask for a portrait reference that matches the pose you like and ask your artist to simplify facial detail for longevity. Overworked tiny facial shading fades into a patch at year two if it is too delicate. Place the portrait on the upper arm and let flowers cascade down toward the wrist for three focal points. These sessions are long and often split across multiple days for color saturation. For session wear, a sleeveless chambray shirt gives easy access to the whole upper arm and protects the piece between breaks.
6. Eagle with Banner, Wing Span Across Arm
Artists tell me eagles need room to breathe so keep the wings large and allow negative space between feathers. A cramped wing loses detail fast when viewed from a distance. Place the main body on the outer bicep and let wing tips wrap to the inner forearm. Expect 3 to 5 sessions depending on how much gradient you want in the feathers. This design reads powerfully across a tee sleeve or a rolled button-down for a vintage vibe.

Pre-Session Essentials
The first six arm-heavy ideas above can rub against clothing and need slightly different prep depending on where they live on the arm.
- Lush Tattoo Balm. A non-greasy balm some people prefer over heavier ointments during the first week, useful for color saturation without leaving a shiny residue on forearm pieces.
- Oz Ink Aftercare Spray. A lightweight mist that helps humid-weather heals, handy for wraparound sleeves that trap sweat during summer sessions.
- InkSafe Balm. Vegan formula that absorbs cleanly, good for inner bicep and wrist areas where residue makes fabric stick.
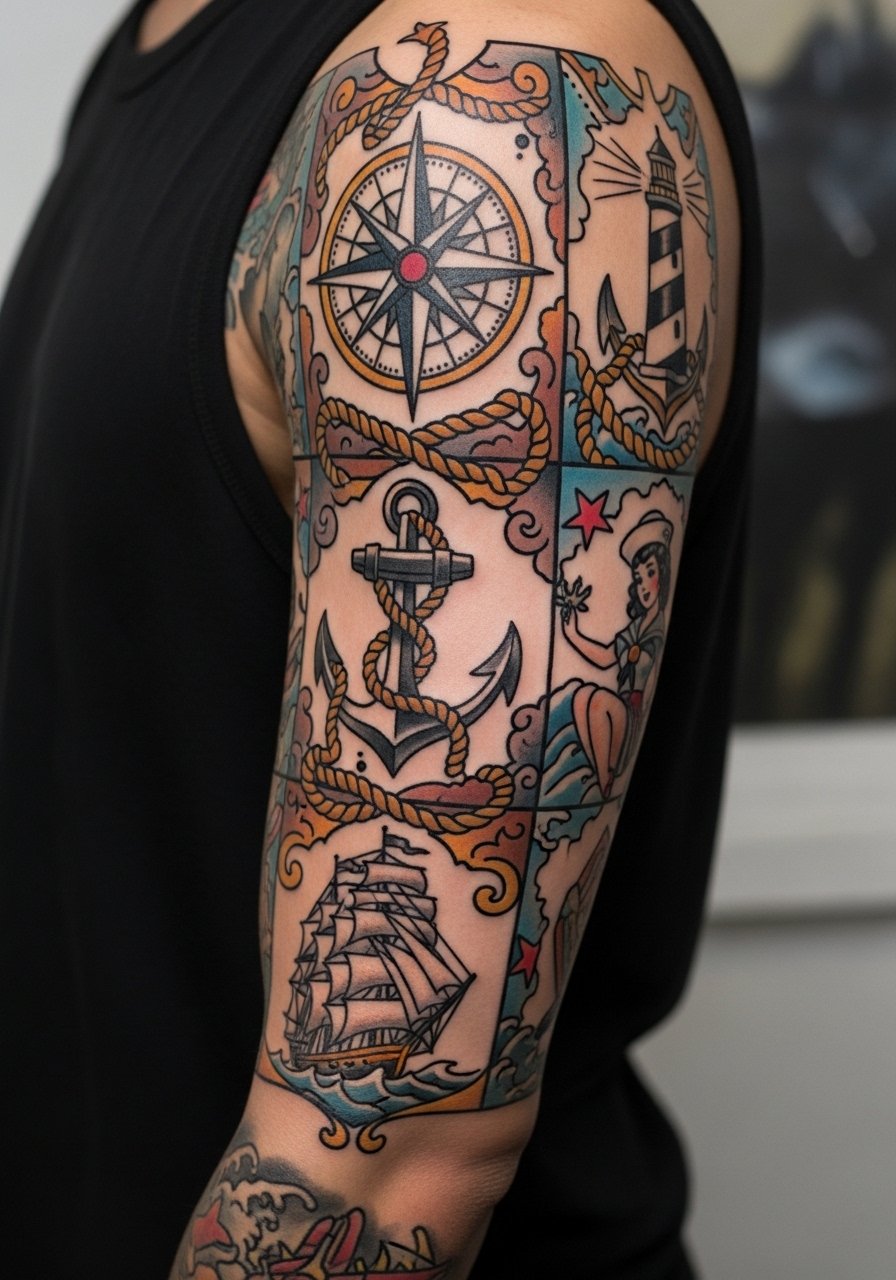
- HealFast Patch. Small protective patches for forearm sections or wrists that face frequent friction, so you can protect problem zones without covering the whole arm.
- Hustle Butter. Thinner than heavy ointments and often chosen for color sleeves to avoid clogged pores during the first few days of healing.
7. Ship at Sea with Waves, Full Wraparound
There is energy in a wraparound ship because motion keeps the composition alive when you turn your arm. Ask for simplified rigging lines and stronger black waves so the ocean reads from afar. The worst version packs tiny rope details into tight spaces which softens into gray texture with time. Plan five sessions and prioritize the sails and wave outlines early so the motif reads between appointments. For evening looks, a rolled cuff slim jeans and a tucked tee show the arm without competing prints.

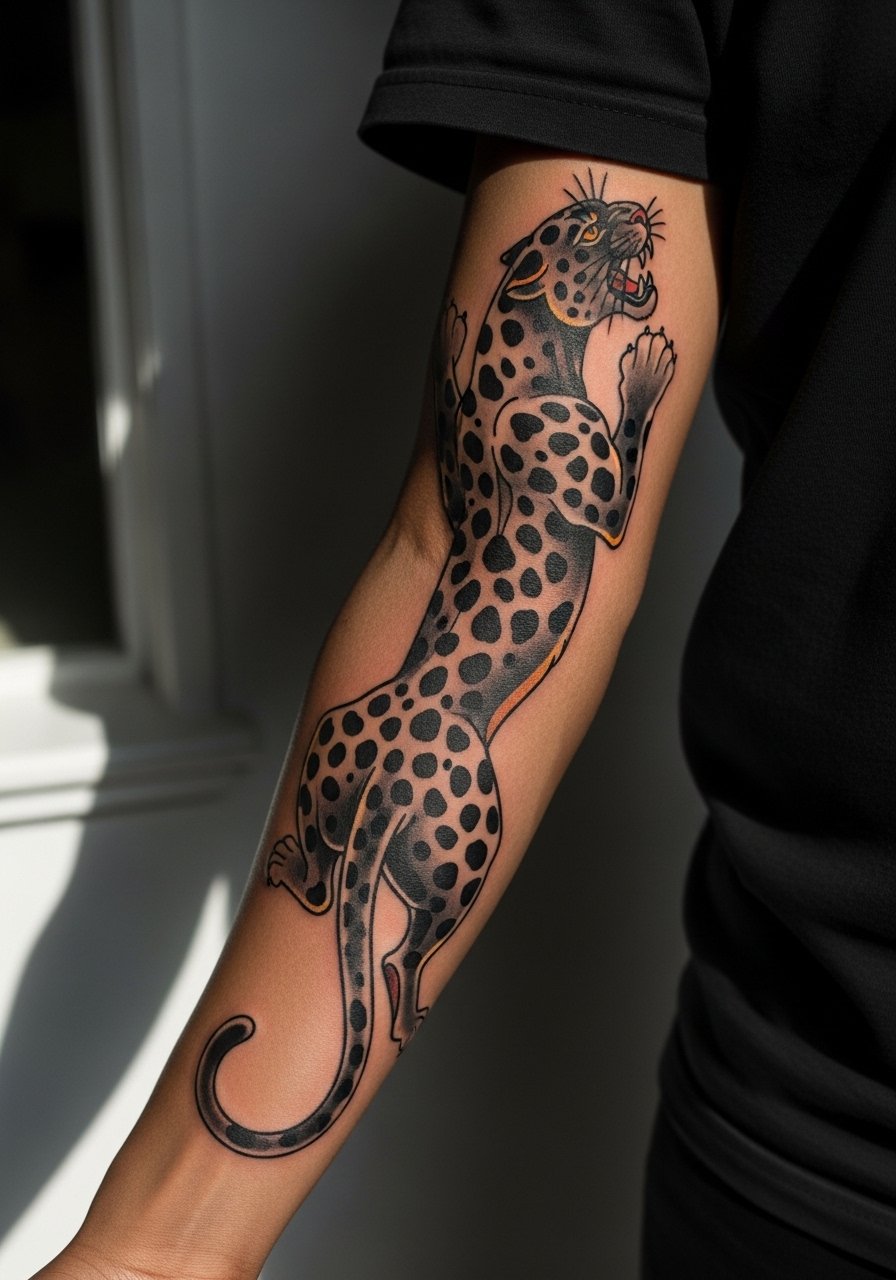
8. Panther Climbing Continuous Pose
Fair warning, full black or heavy shading around the joints can be harsh during healing. A prowling panther works best when placed so the limb shape enhances the pose, for instance starting near the wrist and climbing toward the bicep. Ask your artist to map the musculature in the stencil session so the panther does not look distorted when your arm moves. Sessions involve heavy black saturation, and elbow areas feel sharper on pain. Let the artist know you want contrast spots and not pure black block to avoid a flat look later.
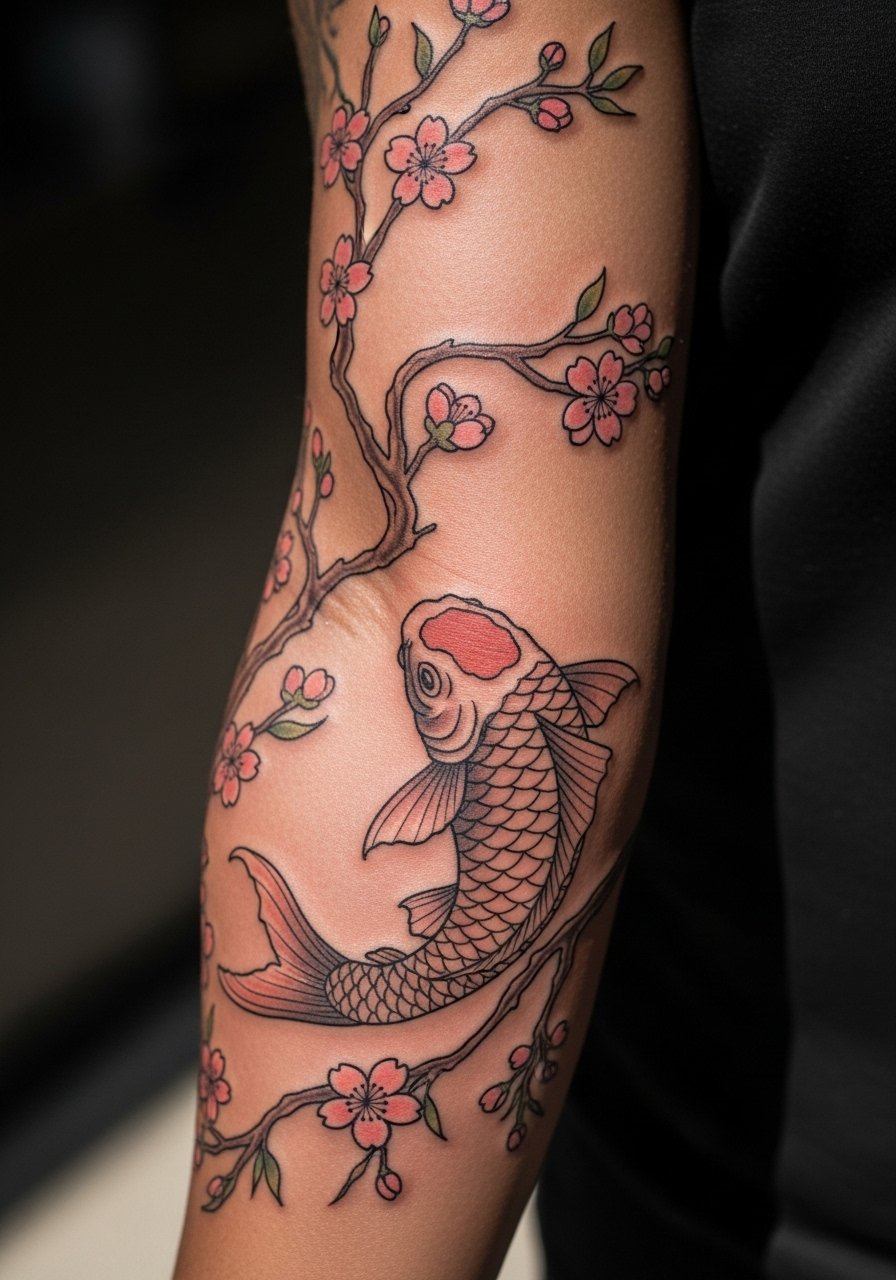
9. Cherry Blossoms with Koi, Inner Arm Vertical Flow
This is one of the rare vertical-flow options that reads sweet and intentional. The inner bicep vertical layout invites a reveal when you bend your arm. A common mistake is shrinking the koi too small. Request larger scale elements and pastel fills that still sit inside thick black outlinework to avoid muddiness on darker skin tones. For session wear when the flow starts on the inner arm, a strapless tank top or sports bra makes access easier without fabric dragging. Also note cultural origins and ask for tasteful interpretation rather than direct replication.
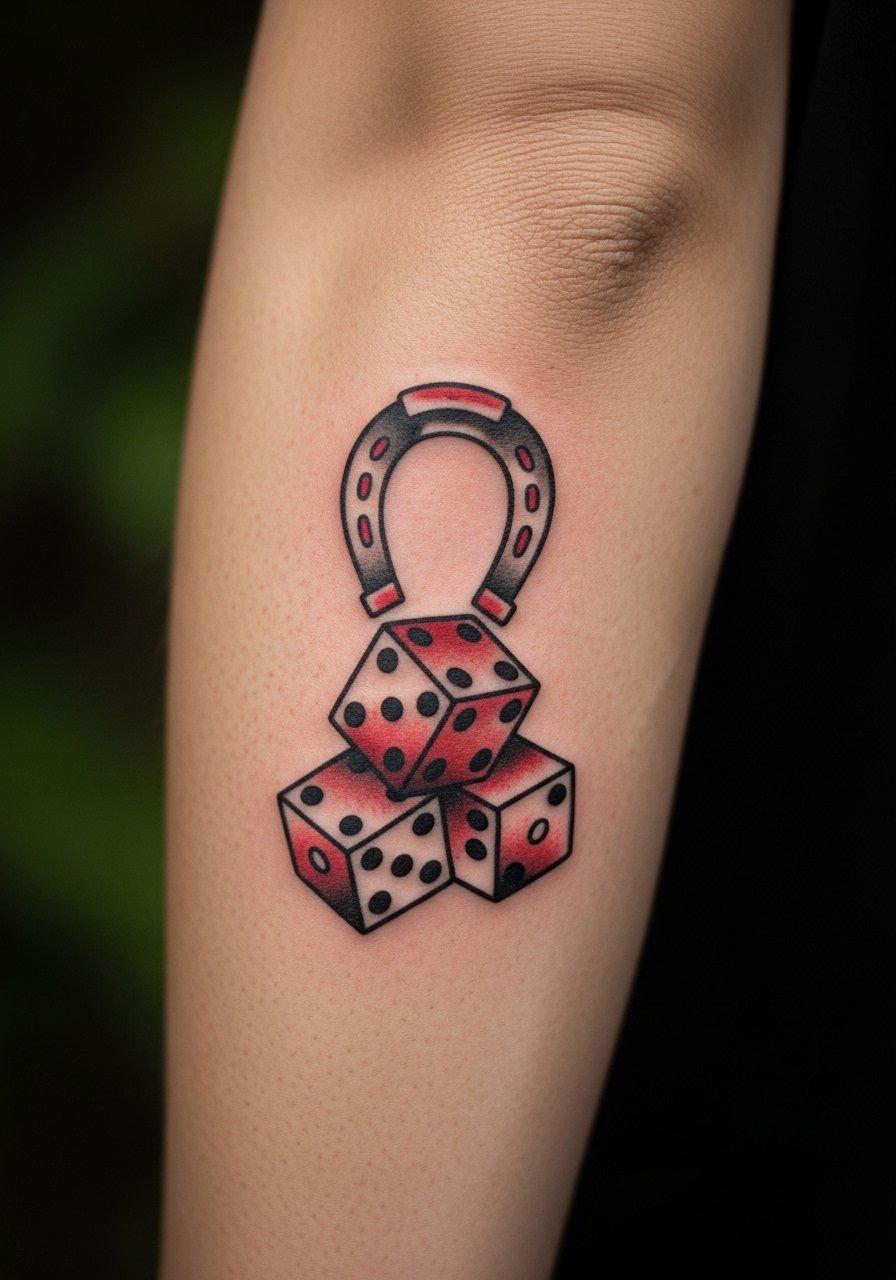
10. Dice and Horseshoe Forearm Stack
The forearm stack is playful and low fuss but suffers when motifs get too tiny. Ask for slightly enlarged dice pips and a thick horseshoe outline so luck motifs still read at six months. The session is tolerable for most people, though the outer forearm can be sensitive near the wrist. For a clean show-off look, wear a 3/4 sleeve fitted tee with sleeves pushed up to frame the stack. The touch-up window is usually at year two for crisp pip edges.
11. Butterfly with Floral Border, Shoulder to Wrist
Butterflies soften traditional palettes and pair well with floral borders that help the piece flow. To avoid fading into a pastel wash, ask for thicker outlines around the wings and slightly denser color fill. The most common mistake is ultra-thin wing veins that fade first. Expect five sessions for shoulder-to-wrist coverage and plan a touch-up around year three if you want the pastel pops maintained. Pairing the sleeve with rolled cuff slim jeans and a dainty ring stack draws the eye down to the border and complements the femininity.

12. Old-School Cat with Bow and Vine Fillers
This playful retro cat benefits from a larger bow and simplified facial features so the charm remains after a few years. Put the cat on the upper arm with vine fillers weaving to the forearm so the composition feels continuous. People often ask for tiny whiskers which can blur, so request simplified whisker marks that read as dots or short strokes. For casual display, a muscle tee vintage frames the bicep and keeps attention on the bright bow. Sessions are medium firmness and usually require a single color session after the linework appointment.

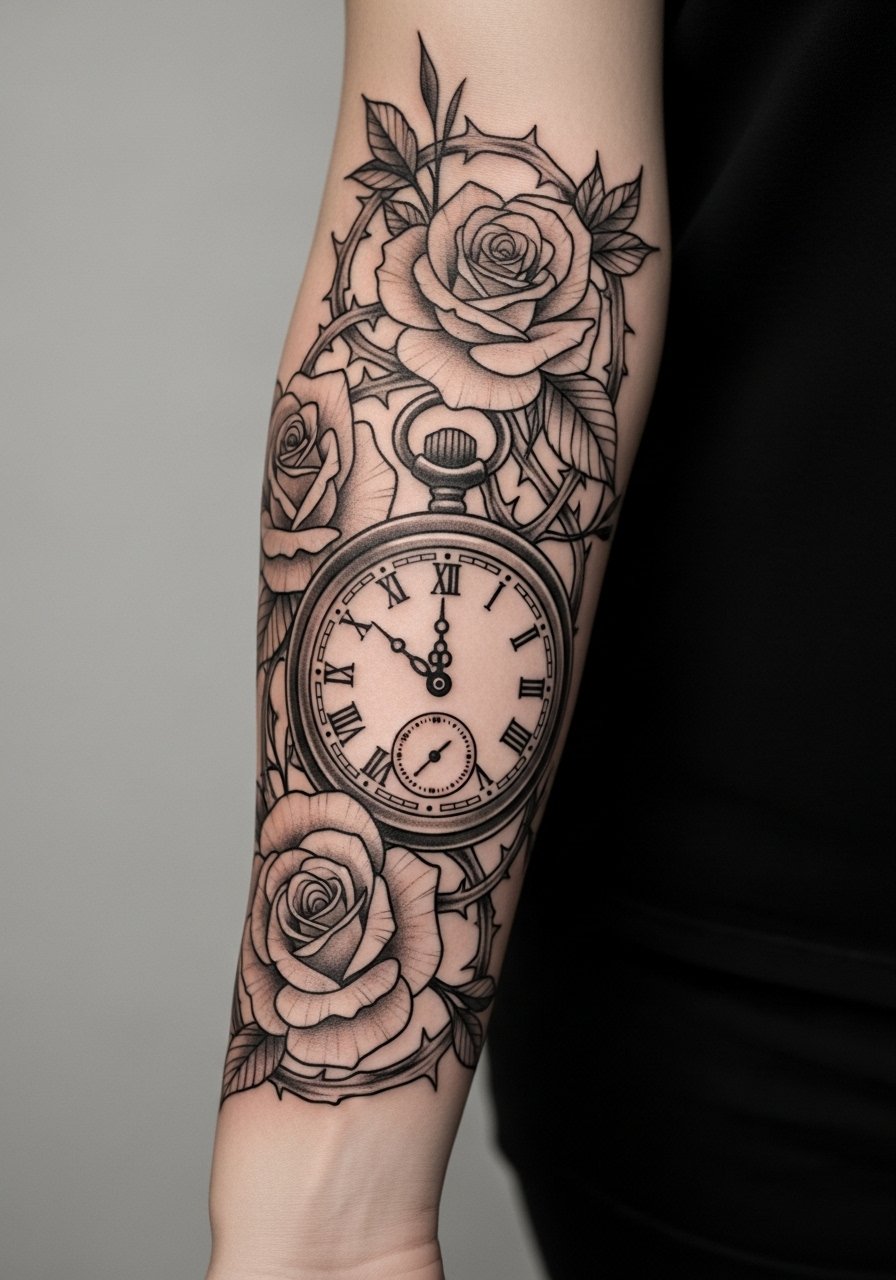
13. Pocket Watch with Gears, Bicep Centerpiece
A mechanical pocket watch reads as a focused statement when it sits on the bicep. Avoid cramming countless tiny gears inside the case, because tiny negative space disappears first. Ask your artist for fewer, larger gears and metallic hues layered over gray wash rather than overdetail. The consult should include a mockup of the case scale on the bicep so you can confirm readability. Sessions feel like long stretches of shading and can require two passes for metallic saturation. This motif pairs well with a simple cuff on the opposite arm to balance weight.

14. Vertical-Flow Sleeve That Starts Inner Bicep
This under-covered layout starts inside the arm so the reveal is intentional. I advise mapping three focal motifs stacked vertically rather than a top-down cascade so each element has room to settle. A frequent error is trying to cram six small motifs into the same vertical space which ages poorly. For the session, wear a strapless tank top or a top that allows the arm to move freely for position checks. Expect touch-ups sooner for inner arm work because it sees friction when your arm rubs the torso.
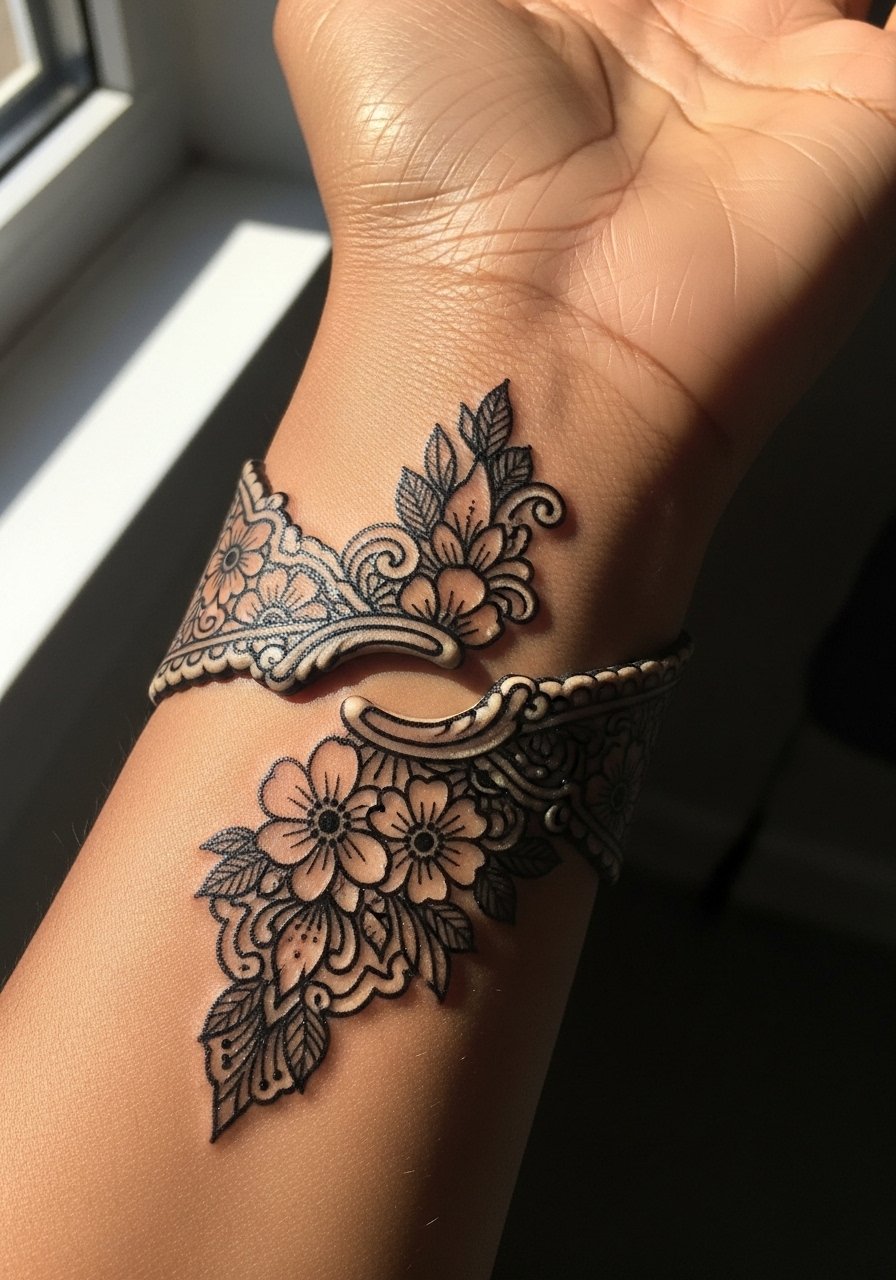
15. Ornamental Wrist Cuff with Floral Trim
A wrist cuff ties a sleeve together and works as a modular endcap if you plan to add more later. The trick is to avoid too many tiny filigree loops that disappear after a year. Ask for slightly bolder outlinework on cuff edges and open negative space in the center. These heal fast but face constant friction so protect them from bracelets during the first month. For showing off this cuff, cuff your jeans and add a delicate ring stack or keep the hem clean so the wrist reads as its own finished piece. Try a rolled cuff slim jeans look when you want the wrist visible.
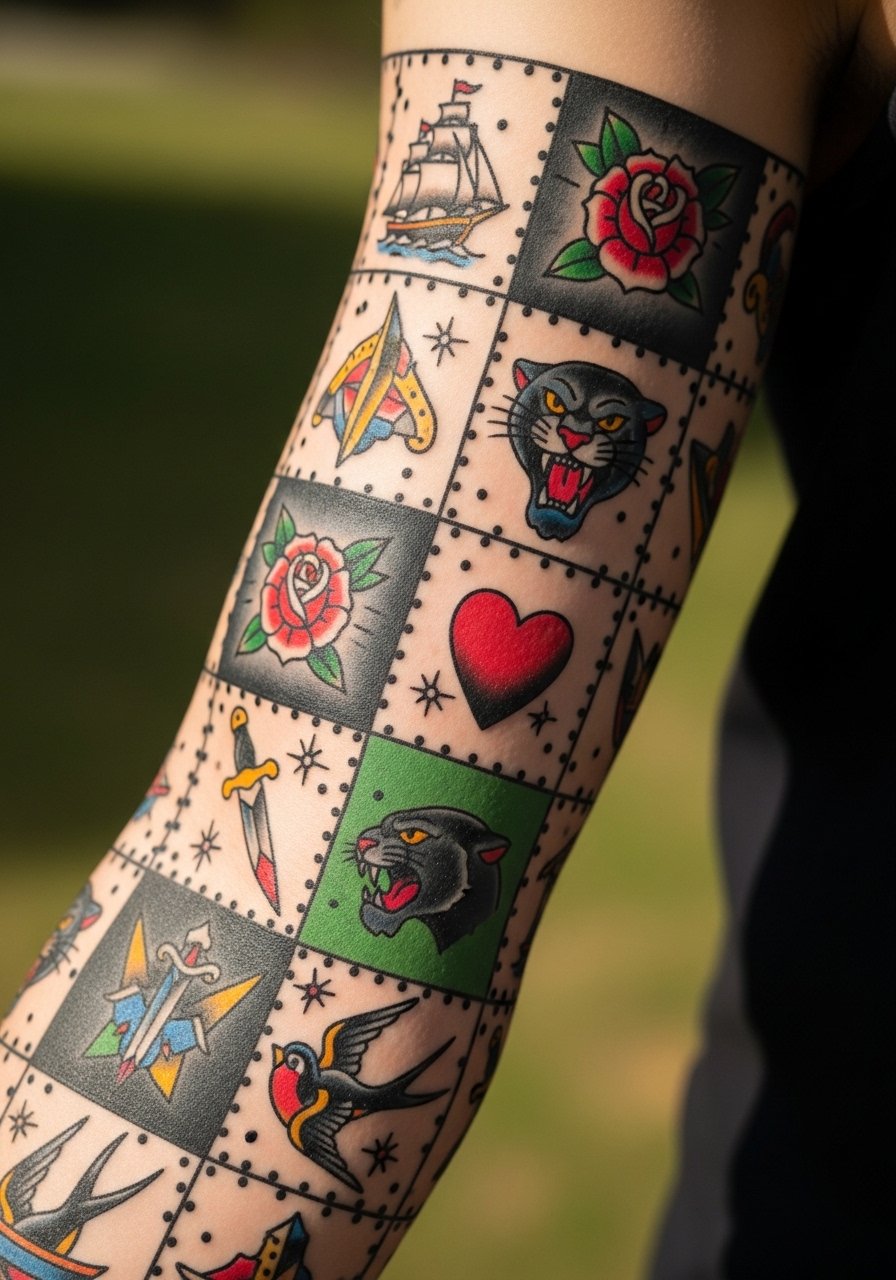
16. Patchwork Cute Trad Sleeve, Start Small Then Fill
Patchwork sleeves let you start with a few flash pieces and fill in later so budget breaks down more manageably. The key is to keep consistent linework weight and a common color palette so future fills match. A common regret is mixing inconsistent outline weights across different artists. During consults, ask the artist to note line thickness for future reference. For session-day clothing, a loose button down shirt you can pull aside gives clean access without dragging fabric over fresh ink.
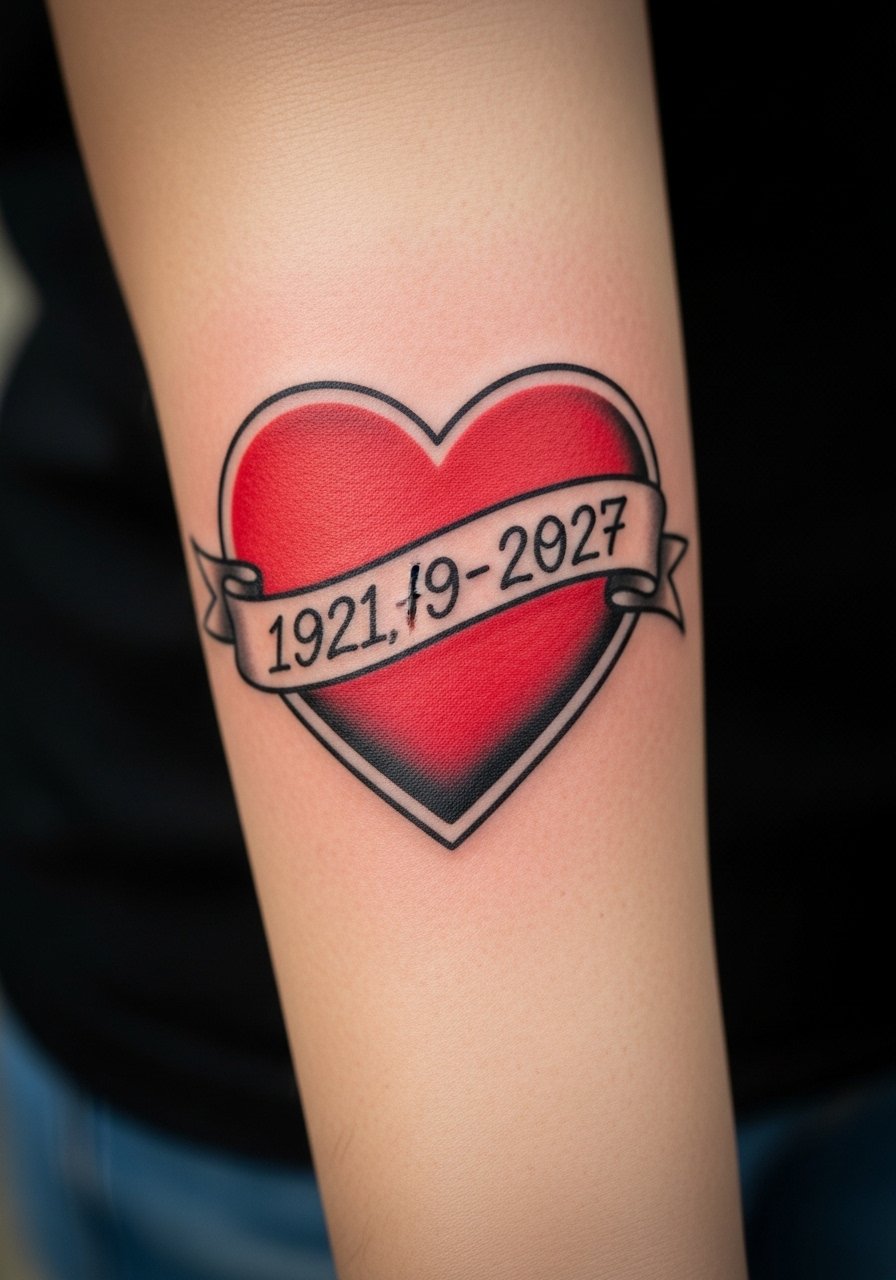
17. Memorial Heart with Banner and Date
Memorial banners are rising after holidays for those who want a visible tribute. Keep the date bold and in a simple font to avoid blurring. Artists split on how thin banner lettering should be, so explicitly ask which thickness will hold up on your skin tone. A simple three-digit or short year reads longer than a long script. For showing it off, a thin chain pendant necklace sits just above the banner and frames the message without competing.
18. Sailor Patchwork with Compass and Rope
Sailor flash works as a cohesive patchwork when you stick to a limited palette and repeat rope motifs to tie pieces together. Design the compass slightly larger and let rope elements weave into neighboring pieces so the composition reads as a sleeve not separate tattoos. The mistake is treating each flash as isolated without connecting fillers, which looks disjointed when finished. Session wear is standard sleeveless or rolled sleeve attire to access the outer arm.
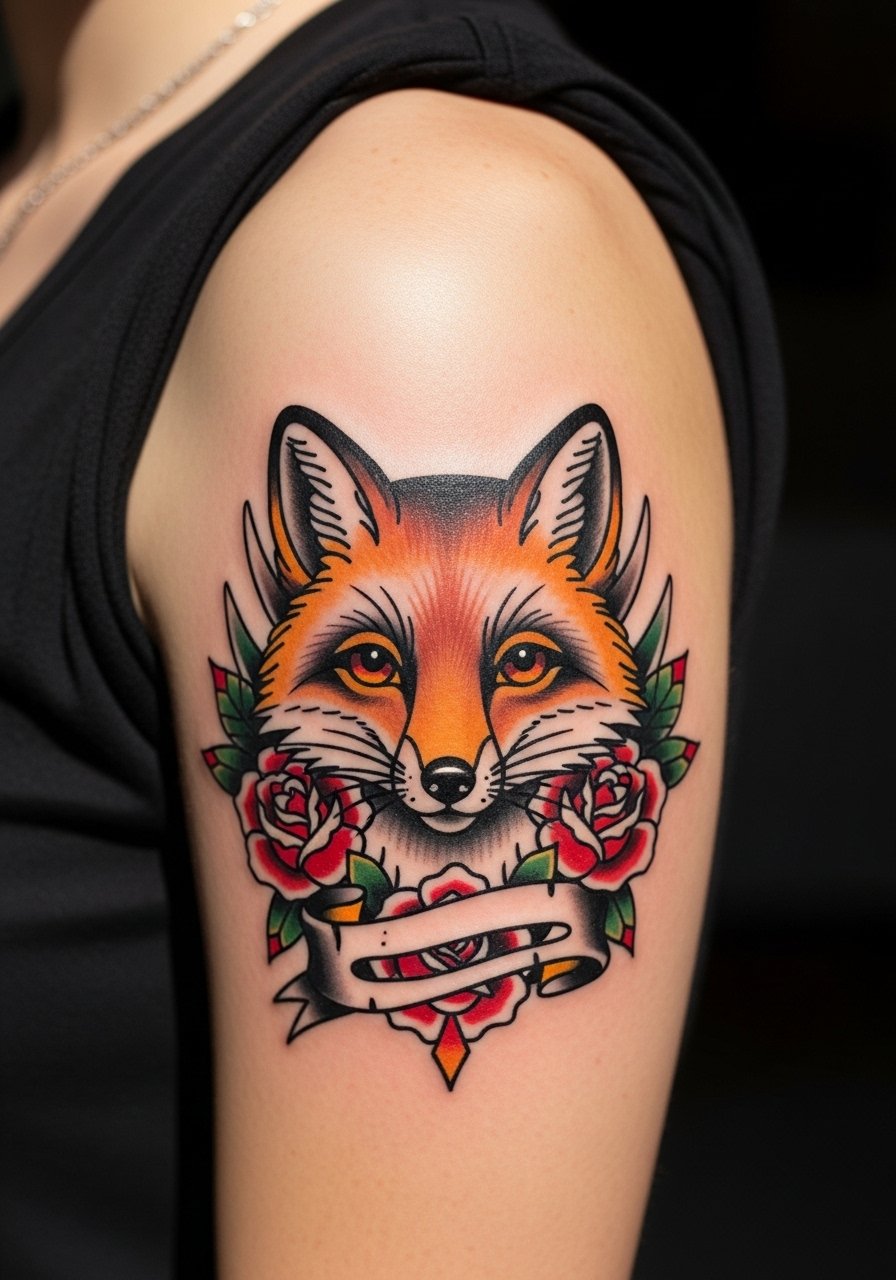
19. Fox with Roses and Banner
A fox adds whimsy and pairs well with roses for contrast. Choose facial lines that are simplified and expressive rather than photorealistic. Too much tiny fur detail becomes indistinct over time. For placement, the fox works on the upper arm facing down the arm axis so the pose follows muscle flow. The session includes both linework and layered color, and touch-ups are often needed in areas exposed to sunlight. A simple open-back top shows the fox without competing with other accessories.
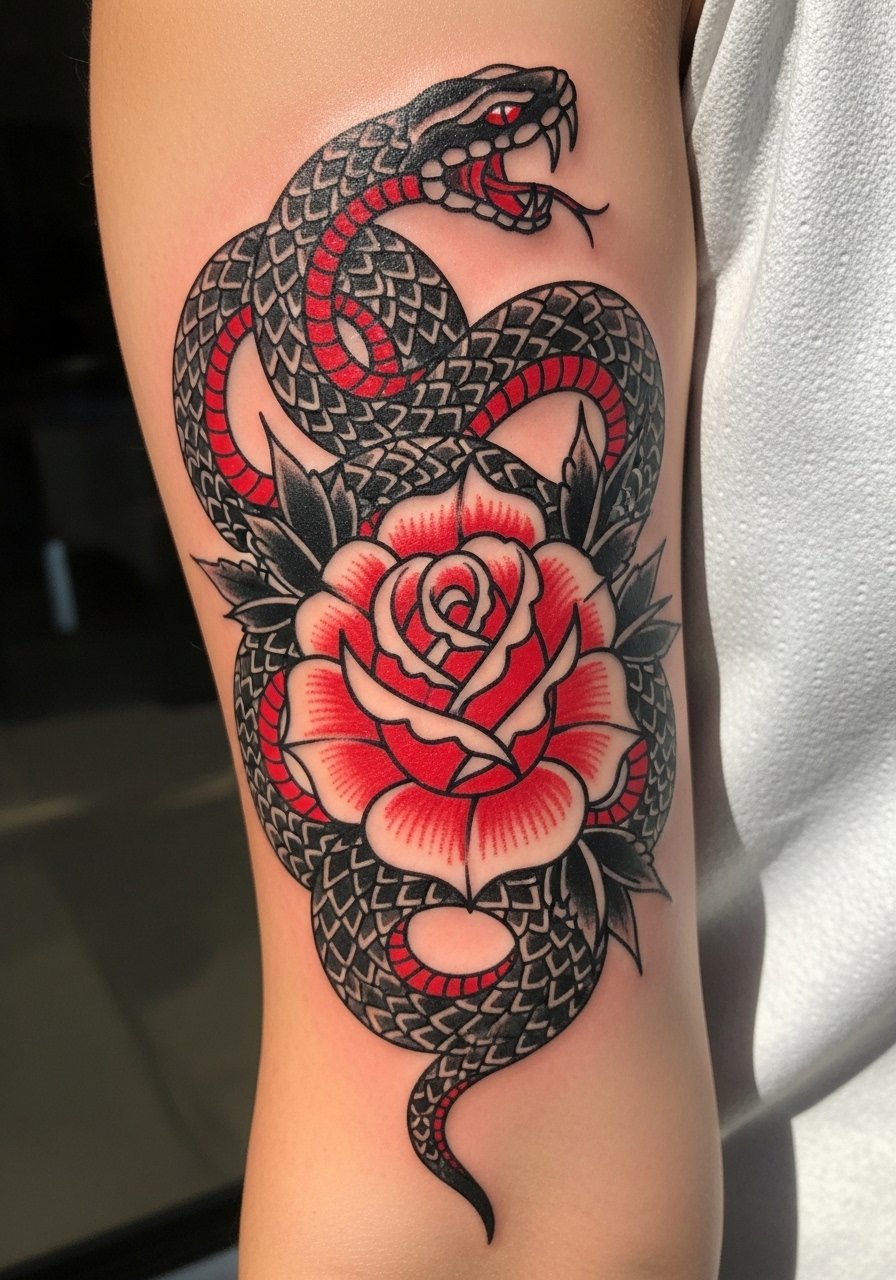
20. Snake Wrapped Around Rose, High-Contrast Work
Fine line fans clash with trad purists over snakes that rely on thin detailing. One camp says tight scales blur quickly and prefer thicker pattern blocks. The other camp says careful spacing and proper depth keeps thin scales legible. Ask your artist where they land and request scale spacing that matches your skin elasticity. This piece often wraps the arm so pay attention to how coils sit over joints. For session wear, a loose tank top is ideal so the coil wraps can be checked in multiple positions.
21. Elbow Wraparound Waves or Dice
Elbow wrap pieces look dynamic but the joint is notorious for sharper pain and tricky healing. If your design crosses the elbow, ask for slightly larger elements at the joint so they do not blur into a patch. The biggest mistake is placing dense detail right over the crease. Expect extra time during sessions as the artist repositions your arm frequently. For protection after the session, plan clothing that keeps the elbow from rubbing, like long sleeves rolled up, and wear a button up long sleeve shirt you can pull above the elbow during healing.

22. Three-Quarter Sleeve with Pocket Watch and Rose
If you prefer to stop above the wrist, a three-quarter sleeve gives impact without constant wrist friction. Place the pocket watch on the bicep and let roses fill down toward the mid-forearm. The advantage is less wear from daily hand washing. The common error is leaving the cuff unfinished which makes the piece feel incomplete. Plan your sessions so the edge gets a clean finishing band to read as intentional. This layout ages more predictably than full wrist-to-shoulder wraps.
23. Cute Trad on Prosthetic Limb Adaptation
This is a rare but growing avenue for customization. The main consideration is matching scale and flow to the limb surface rather than arm anatomy. Artists who do prosthetic inlays measure and mock the design on the prosthetic first so the motifs wrap naturally. Expect a consultation about adhesives and aftercare differences. If you are adapting traditional flash, ask for enlarged focal points and simple outlines that read well against the prosthetic material. This approach opens up inclusivity in sleeve design while demanding specialized planning.
24. Starter Mini Sleeve for First-Timers
If you want the sleeve look without committing to a full arm, start with a cluster of three connected pieces that cover the outer forearm. The trick is keeping linework consistent so the additions later match. A mistake beginners make is mixing fine line flash with heavy-trad pieces which looks mismatched as the sleeve grows. Sessions are shorter and more frequent. This builds momentum and lets you test pain tolerance and healing rhythm before committing to full saturation.

25. Cuff-to-Shoulder Flock with Small Fillers
A sleeve that starts as a cuff and builds upward with small swallows or stars lets you pace sessions and adjust theme as it grows. Keep filler motifs simple and repeat a signature color accent to unify the sleeve later. A common oversight is variable outline weight between sessions. Ask your artist to document needle choices and line thickness if you plan different artists in the future. This strategy also handles budget shifts because you can add pieces one at a time.

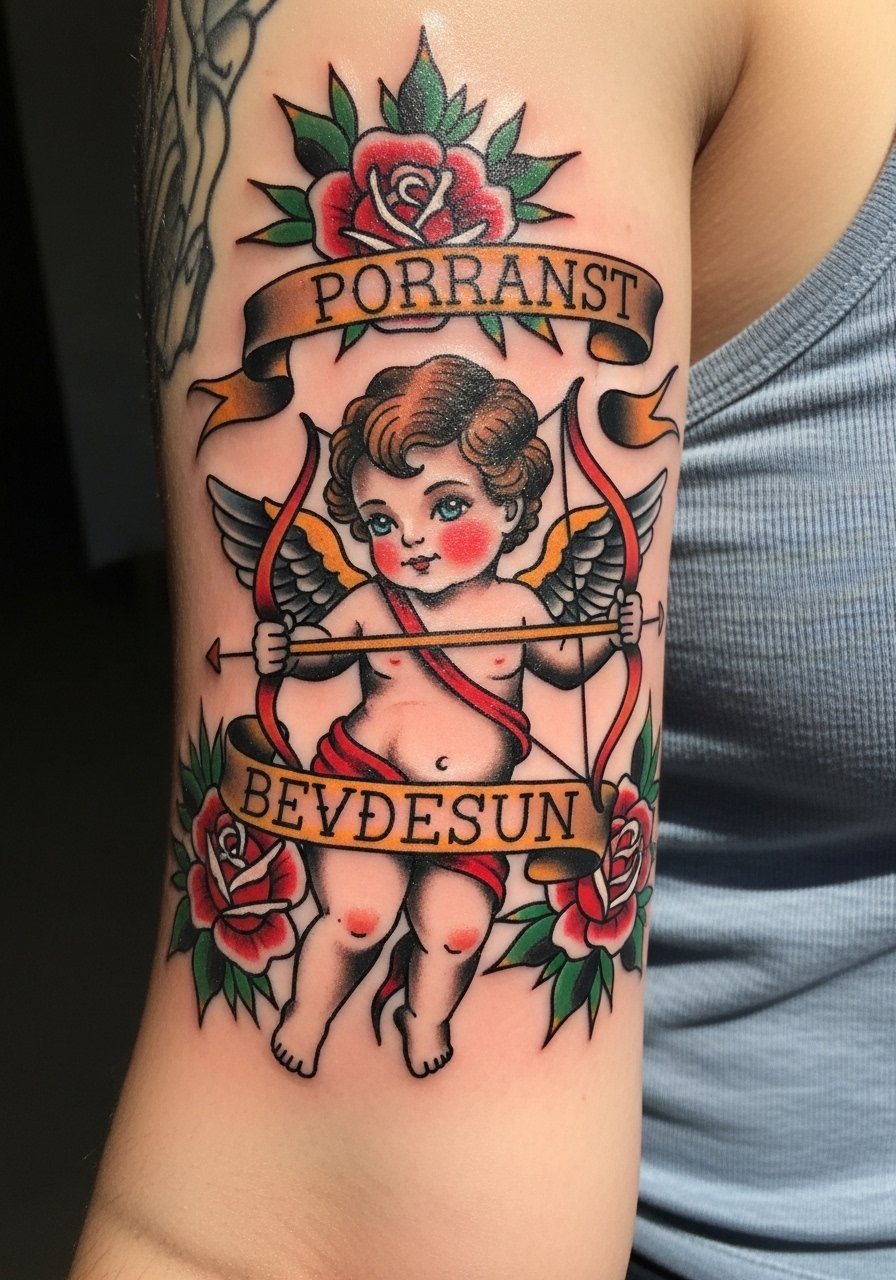
26. Cupid Cherub and Floral Mix for Playful Retro
Cherub motifs are playful and suit a cute trad aesthetic when paired with roses and scroll banners. Keep cherub faces simplified so features do not blur. Place the cherub on the outer bicep and frame with flowers to keep the scene from looking isolated. Sessions for portrait-like cherubs require measured shading rather than tiny strokes. This motif also ages well if you prioritize saturated fills over ultra-fine facial detail.
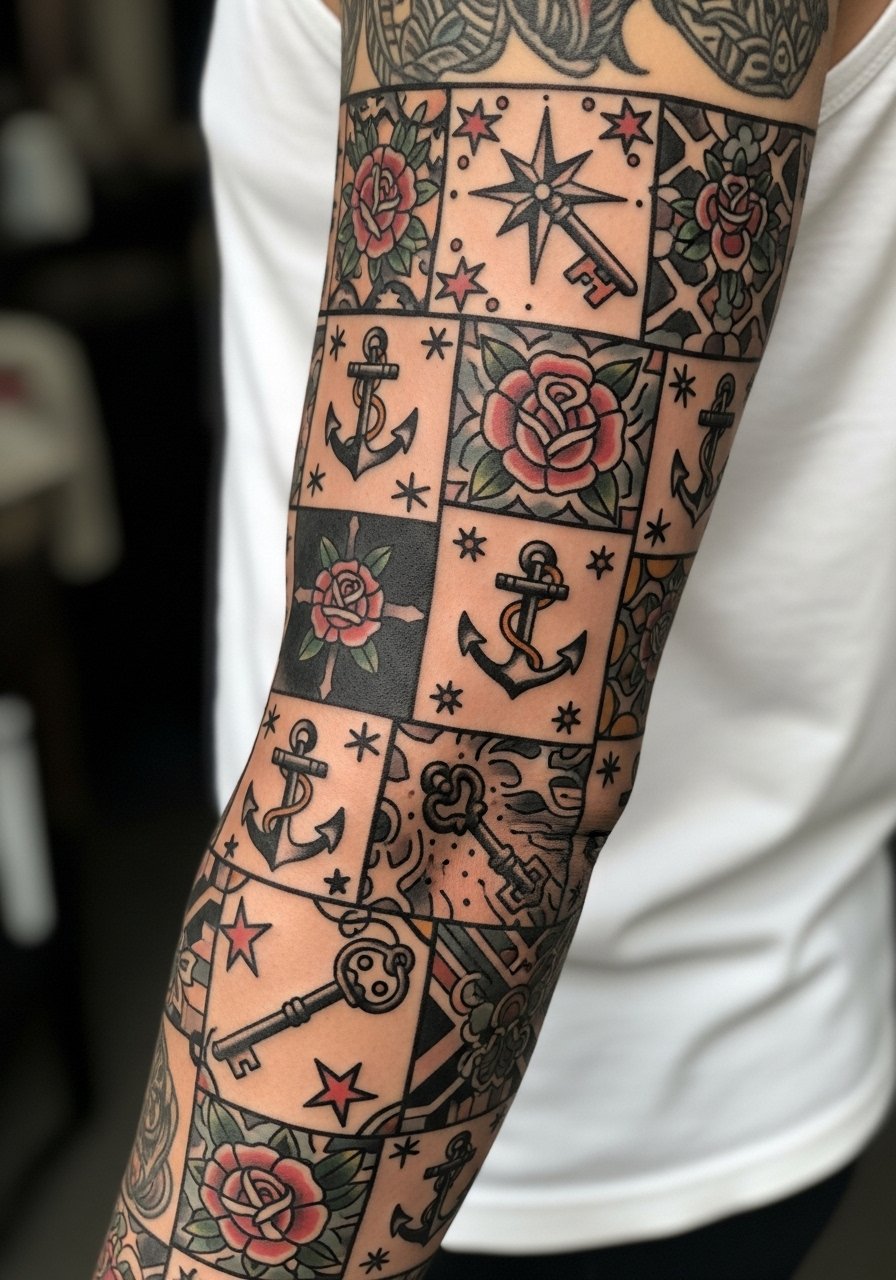
27. Mix of Small Trad Fillers and Larger Anchors for a Patch Sleeve
Finish with a pragmatic approach that many collectors prefer. Combine a few anchors or pin-up focal points with smaller filler motifs like stars, keys, or small roses. The secret to cohesion is repeating one accent color across all pieces and keeping outlinework consistent. A common mistake is overfilling negative space which makes the sleeve read dense and muddied. Plan sessions by priority, starting with focal pieces and leaving the fillers for later so you can reassess flow as the arm develops.
Frequently Asked Questions
Q: Will fine line elements in a cute traditional sleeve blur faster than thick outlines?
A: From what I have seen, yes, very thin elements tend to soften sooner, especially over joints or on sun-exposed spots. If you want delicate detail, ask your artist to slightly thicken the outlinework and to space elements so they do not merge as the skin ages. That approach preserves the look while keeping the cute trad feel.
Q: How should I plan sessions for a full arm sleeve to avoid artist ghosting or rescheduling headaches?
A: Break the work into four to six sessions with clear priorities: start with the major focal points, then do color saturation, then fillers. Use booking platforms that offer deposit protections and confirm guest-spot dates early. If an artist has a long waitlist, schedule the first session and ask for a tentative timeline for the remaining sessions so you can plan around life events.
Q: Are there wardrobe tips to make sleeve sessions easier and the finished sleeve pop?
A: Yes. For shoulder-cap or upper-arm sessions wear a loose button down shirt you can pull aside. For inner bicep starts wear a strapless or wide-neck top so the artist can move the arm freely. For showing off the finished sleeve, rolled sleeves, sleeveless hoodies, and cuffed jeans frame the arm without competing prints.
Q: Which healing approach do artists and forums disagree on most for full color trad sleeves?
A: The split is real on Saniderm versus dry healing. One group says protective film keeps out germs and reduces mess. The other group favors dry healing for better airflow and fewer adhesion issues. Ask your artist which method they use most and why. Their preference usually aligns with their aftercare outcomes across clients.
Q: Should I be worried about my skin tone making cute trad designs muddy?
A: Not necessarily. The trick is line weight and saturation. On medium and dark skin tones, insist on thicker black outlines and stronger color contrast so motifs pop. Most artists know how to adjust saturation and spacing for different tones, so show healed photos on similar skin tones when you consult.
