
Fine line phoenix trends look incredible on a scroll, but they do not all age the same. I have seen bold black and grey pieces settle into a strong silhouette while ultra-detailed variants blur into soft gray fields after a few seasons of sun and friction. Think about placement, spacing, and session pacing before the needle hits. The first idea below starts with a forearm design that balances detail with longevity.
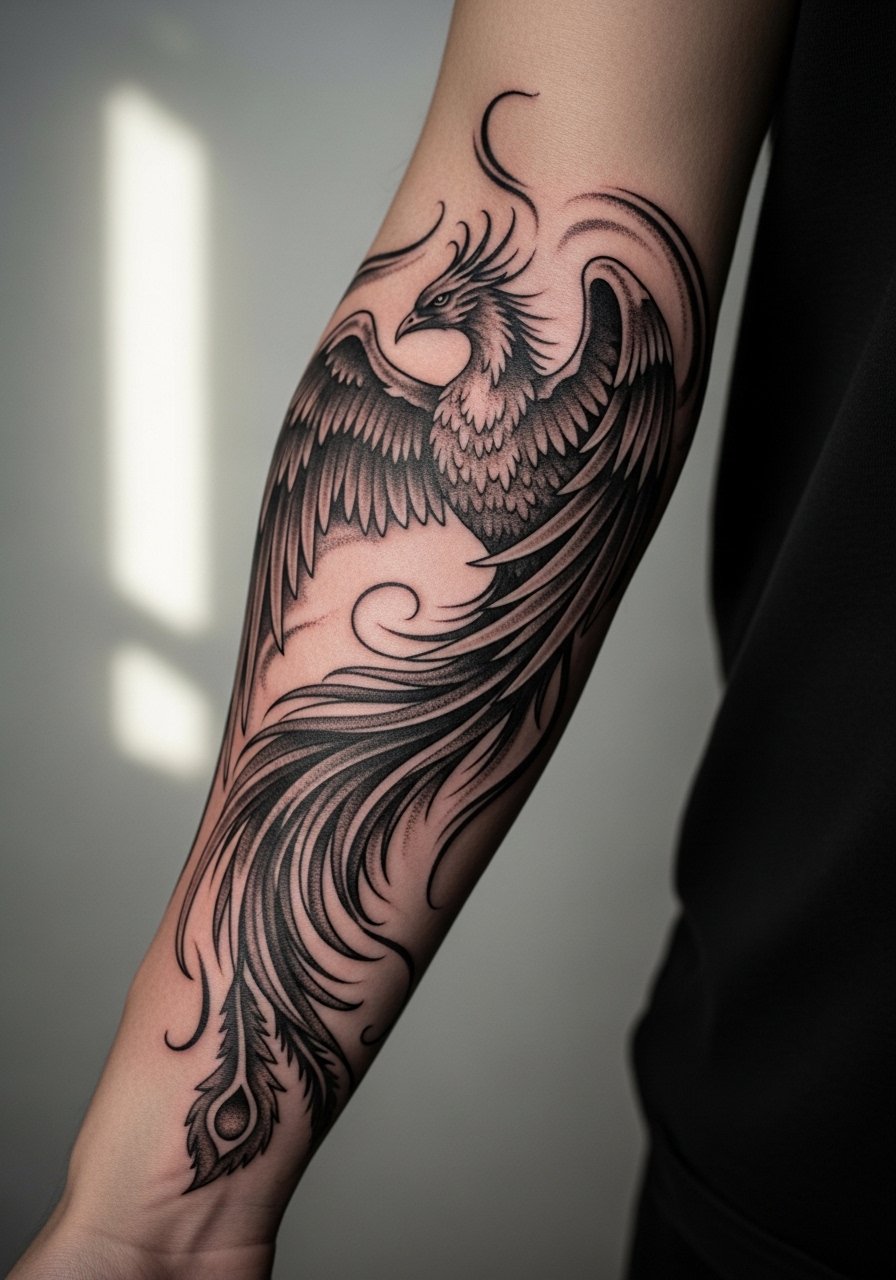
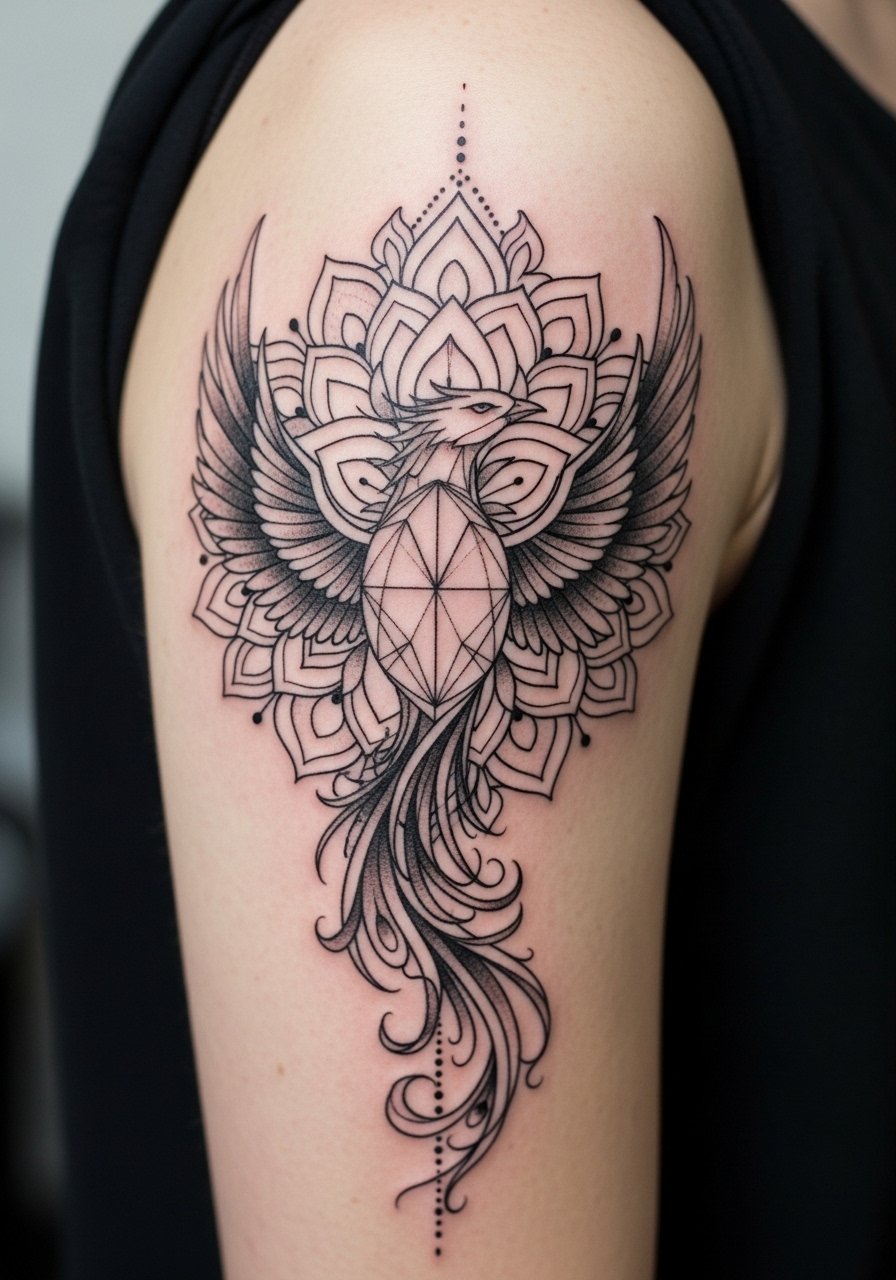
1. Rising Fine-Line Phoenix on the Inner Forearm

I've seen this placement hold detail better than many spots because the inner forearm gets less direct sun and abrasion. Tell your artist you want slightly heavier primary contour lines with delicate internal detail so the silhouette reads from a distance while the finer work gives texture up close. Pain is low to moderate and a single session of 60 to 120 minutes is common. A common mistake is asking for ultra-tight filigree too small to survive two years. For showing it off, roll sleeves and pair with a loose linen button-down so the tattoo has room to breathe visually.
2. Sternum Phoenix with Soft Whip Shading

Sternum work reads dramatic but the skin there can be unpredictable. One camp says dense detail on the sternum blurs with movement and breathing. The other camp says with correct needle depth and spacing it settles fine. Mention that debate to your artist and ask how they space lines across a curved chest. Sessions feel staccato because the area is sensitive, so expect breaks and two shorter passes rather than one long sit. Wear a zip or pull-on top for easy access to the area during the appointment.
3. Shoulder Blade Phoenix in Illustrative Blackwork

This placement gives room to play with contrast and silhouette. I recommend asking for heavier saturation in the primary body and feather tips left lighter for negative-space highlights, which helps the piece age into readable shapes rather than a flat gray panel. Pain is moderate, session time often 2 to 4 hours depending on coverage. For evenings out, an open-back midi dress shows the design without asking for drastic exposure during daily life.
4. Geometric Phoenix Wrapping the Calf
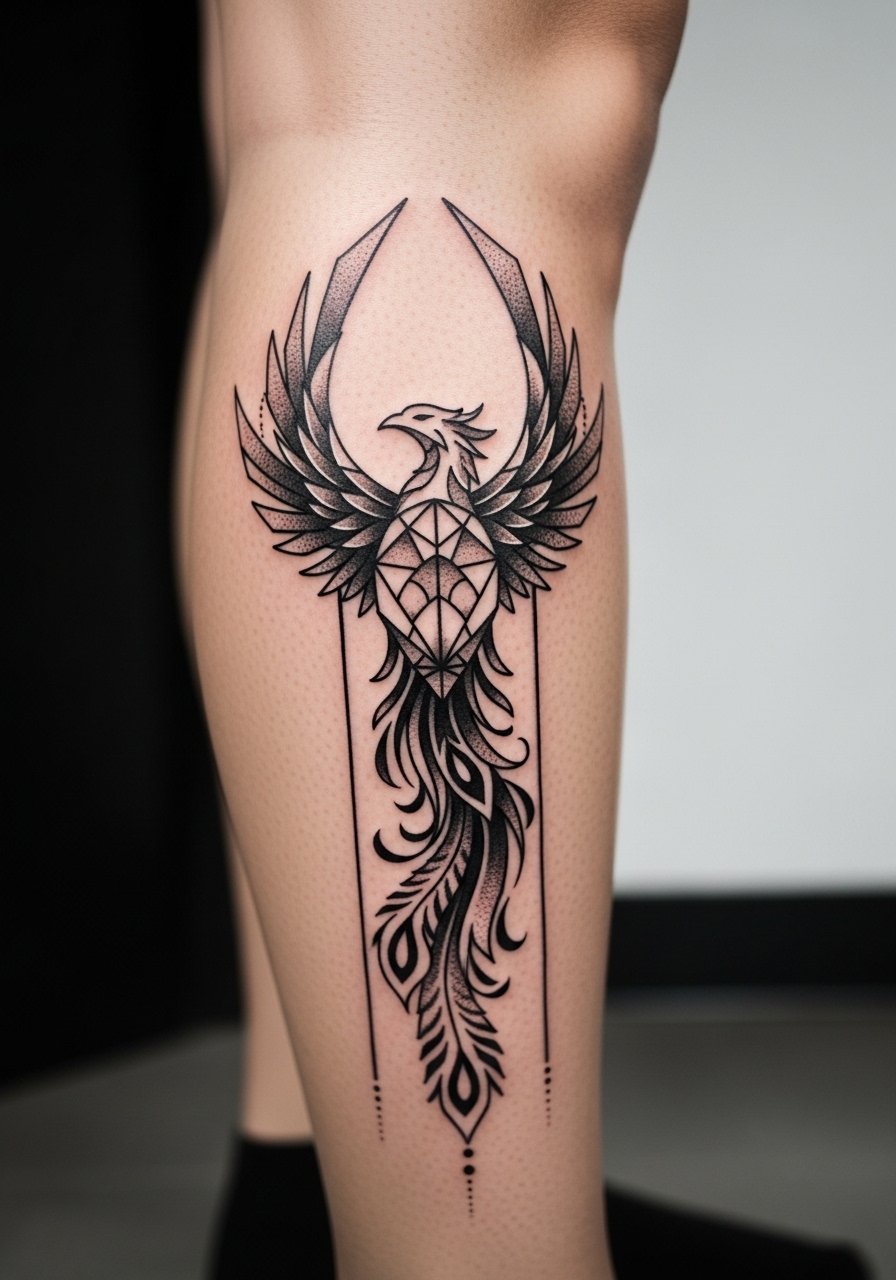
A wrapped calf piece benefits from a mix of solid planes and dot work to avoid large areas of even saturation. In consultation, show examples of the geometric balance you want and say explicitly where you want dense shading versus open skin. The calf is moderate on pain and often done in one or two sessions. If you plan to wear boots, a loose drawstring linen pant or shorts for the session will keep pressure off the fresh ink while it starts to heal.
5. Negative-Space Phoenix on the Ribcage

Ribcage pieces are gorgeous but they also spark debate. One camp warns that fine line on ribs blurs quickly because that skin stretches and moves. The other camp insists that with correct depth and a bit of spacing, lines hold. If you want negative space, ask for broader gap widths and fewer micro details. Pain is high on most pain scales and sessions are often split into shorter appointments. For the session, wear a cropped top you can shift up easily so the artist has unobstructed access.
6. Dot-Work Phoenix Half-Sleeve with Feather Trails
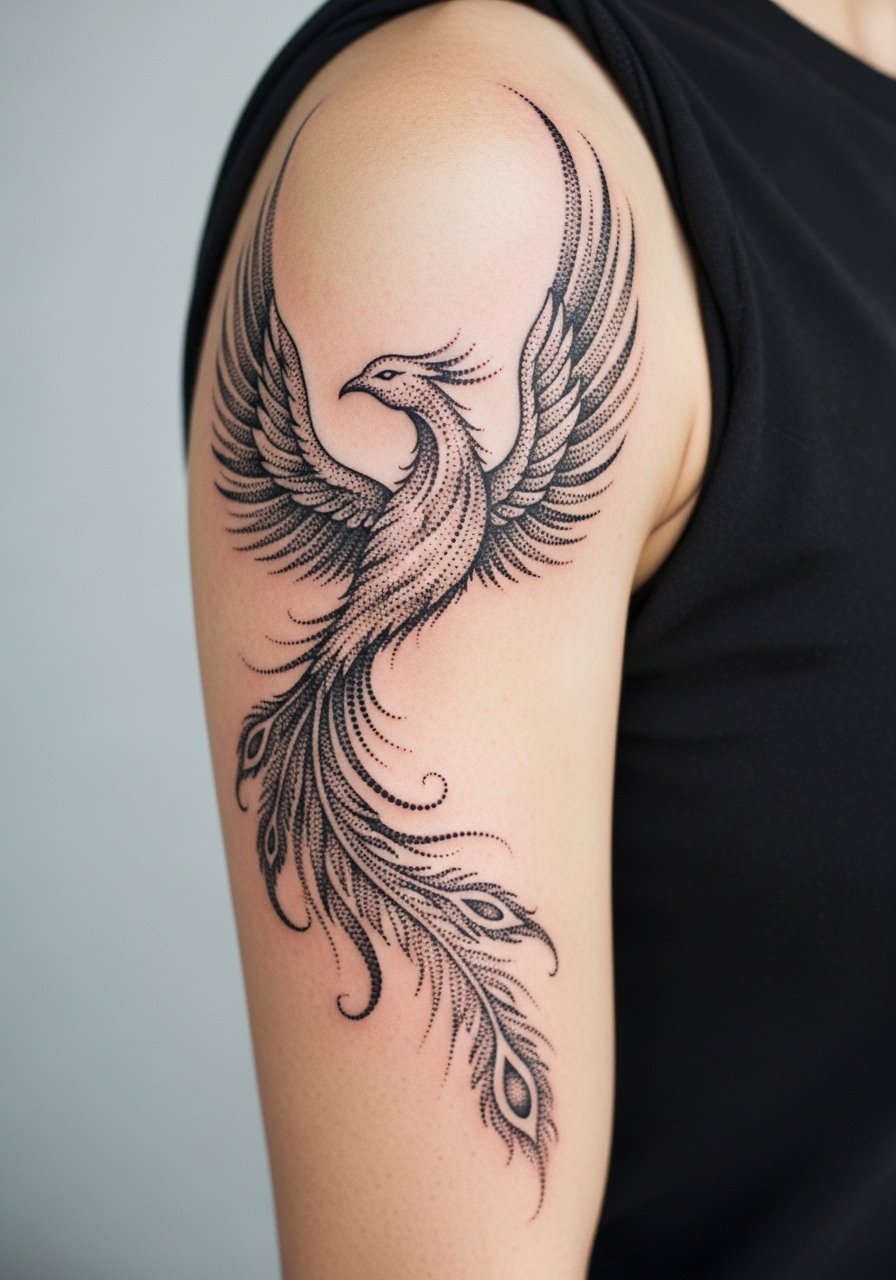
Dot work plays beautifully with black and grey tones because it creates texture without relying on heavy saturation. When you consult, specify stipple density in areas you want soft transitions and ask the artist where they would add solid blacks to anchor the composition. Expect moderate pain and two to three sessions for a half-sleeve. For showing off the arm, pair the piece with a racerback tank so the feather lines read cleanly against bare skin.
Studio Day Picks
The forearm, sternum, shoulder blade, calf, ribcage, and half-sleeve ideas above each ask for different prep, so pack a few specific items to make the session easier.
-
Stencil transfer paper kit. Lets you test placement on skin ahead of time, which matters for curved areas like the ribs and sternum.
-
Topical numbing cream. Useful for sensitive ribs or sternum sessions when you want short windows of relief without extending session length.
-
Thin protective film roll. Helps protect ankle and wrist pieces from friction during the first week of heavy movement.
-
Fragrance-free body wash. Use during the initial clean phase to avoid irritation on areas with fine detail.
-
Aquaphor healing ointment. A thin layer in the first few days can help keep linework from drying out, especially on smaller detailed forearm and wrist pieces.
7. Thigh Phoenix with Flowing Tail and Soft Shading

The thigh gives breathing room for a phoenix that wants to stretch and curl. I tell clients to pick a tail length that works with their clothing choices so the piece is easy to hide or show. Pain is moderate and sessions can be relaxed because the area tolerates longer sittings. A common mistake is crowding too many small feathers near the hip crease, which can rub during recovery. Wear high-waisted shorts or a skirt for the session so the artist can work without fabric tugging.
8. Minimalist Phoenix Feather Wrapping the Wrist
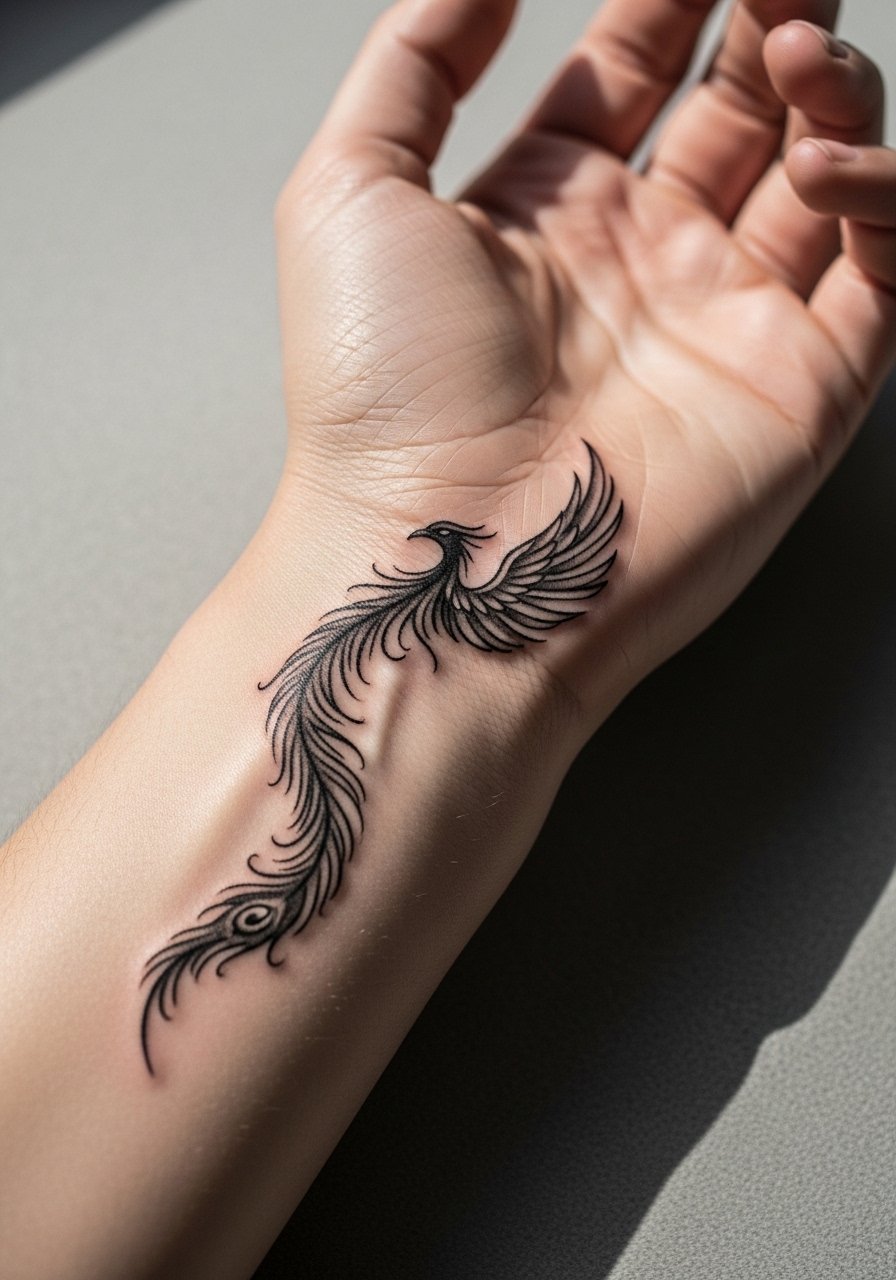
Wrist tattoos require restraint. The biggest error is over-detailing a very small circumference. Ask for a slightly bolder outline with internal shading kept loose so the feather keeps shape as it ages. The wrist is sensitive and typically a short, single-session piece. For showing it off, stack with a thin chain bracelet or minimalist watch so the skin art looks integrated with your everyday accessories.
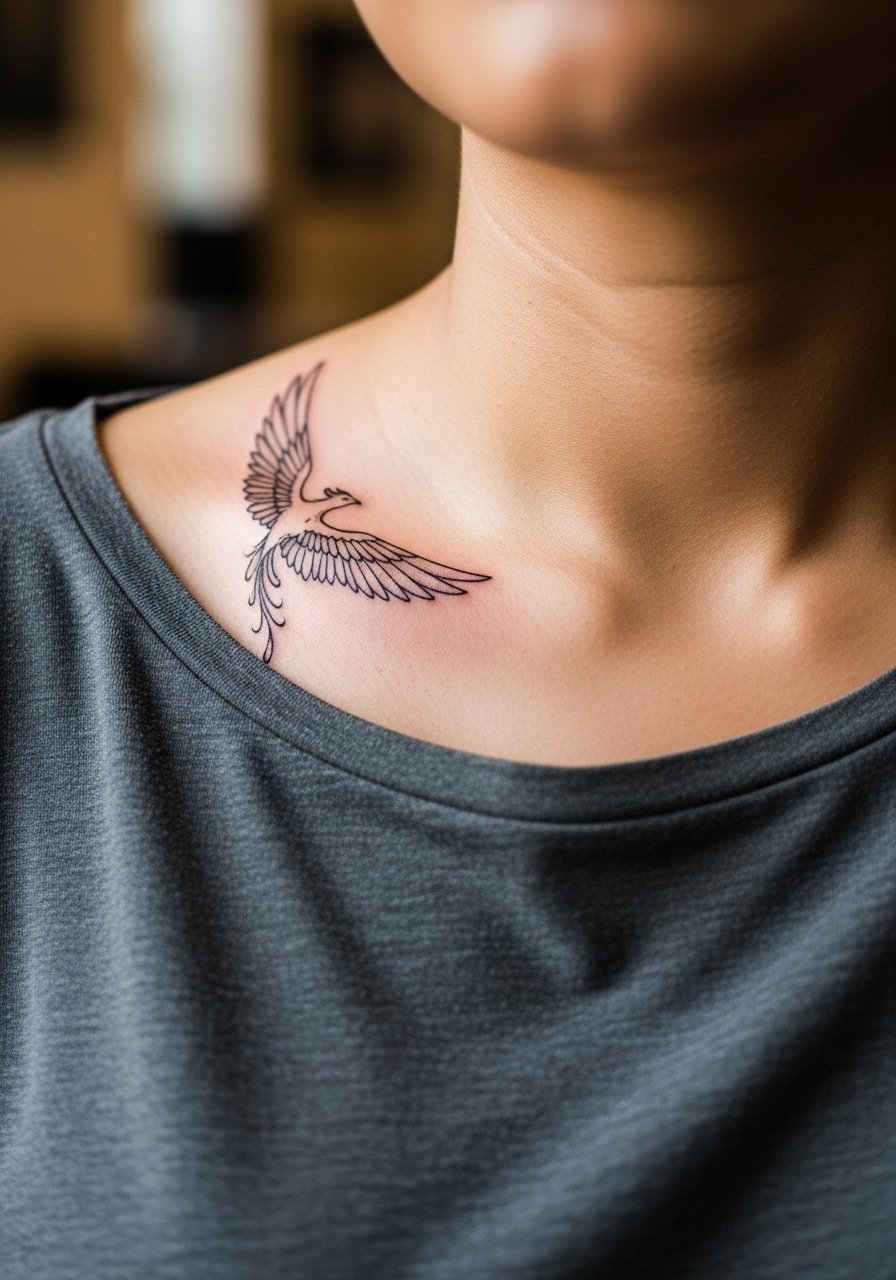
9. Collarbones Framing Phoenix Wings
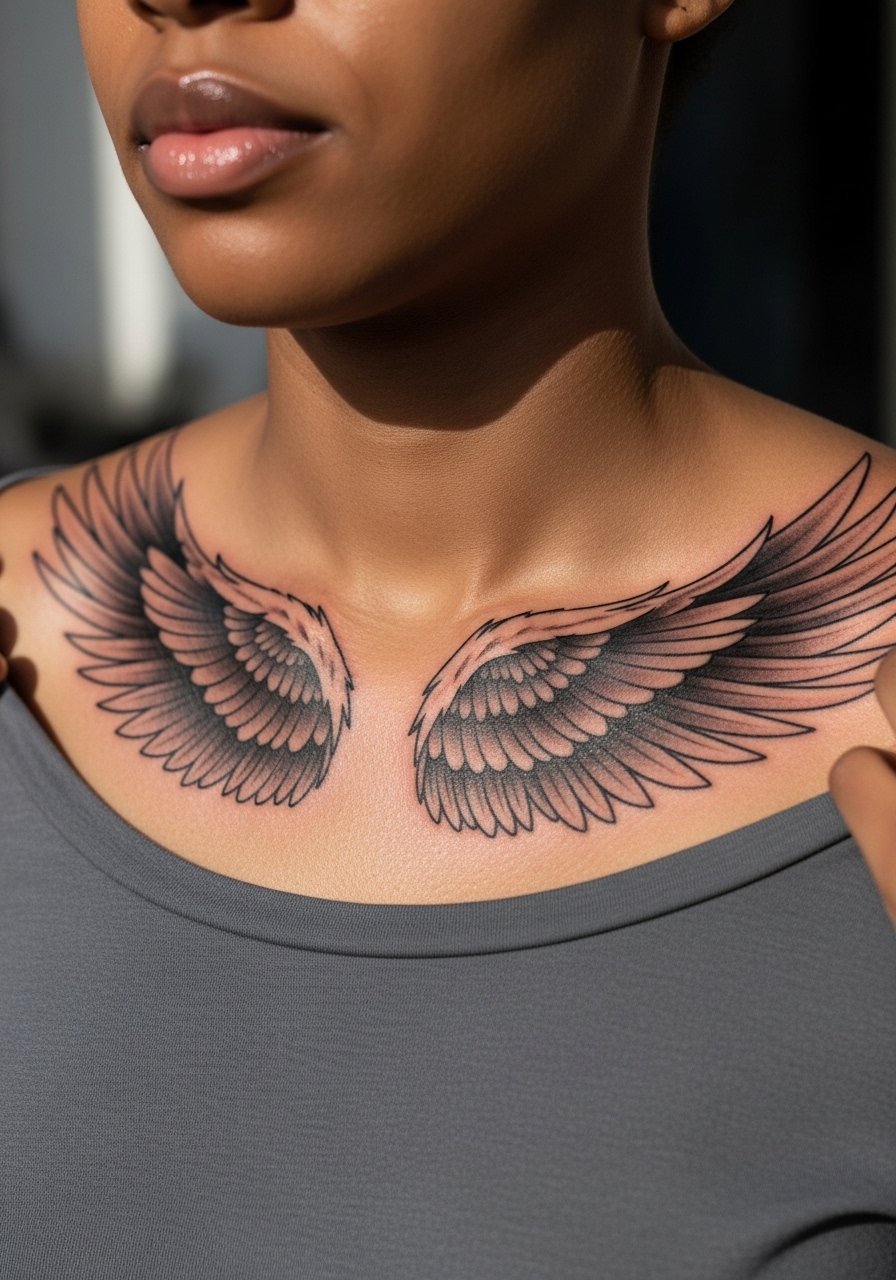
Collarbone pieces have immediate presence but the skin there can flatten small details. I suggest asking the artist for bold primary contours and feather interiors that read as value shifts rather than tiny strokes. Pain is moderate and sessions are usually one to two hours. For outfits, an open-neck blouse or a thin pendant necklace will frame the wings without competing for attention.
10. Tiny Phoenix Behind the Ear, Subtle and Personal

Behind-the-ear placements read intimate and discreet. They need an artist who understands tiny scale, because blowout risk is higher in very small designs near cartilage. Plan for a quick 20 to 40 minute session and expect the lines to soften more quickly than on the forearm. If you have long hair, wear it up for the appointment so the artist has clear access. Remember that visibility is subtle, so think about workplace considerations before you book.
11. Forearm Wrap with Whip and Stipple Shading
This variant leans on motion, with feathers that flow around the arm. In consultation, specify where you want heavier whip shading and where stipple gives softer transitions. Blowout risk is low on the forearm, but avoiding too-thin details on the wrap helps longevity. Sessions can be two to four hours and may need a touch-up at year two depending on exposure. For casual wear, roll sleeves or choose a loose button-down shirt so the wrap reads clearly when you move.
12. Tiny Phoenix on the Ankle, Subtle Silhouette
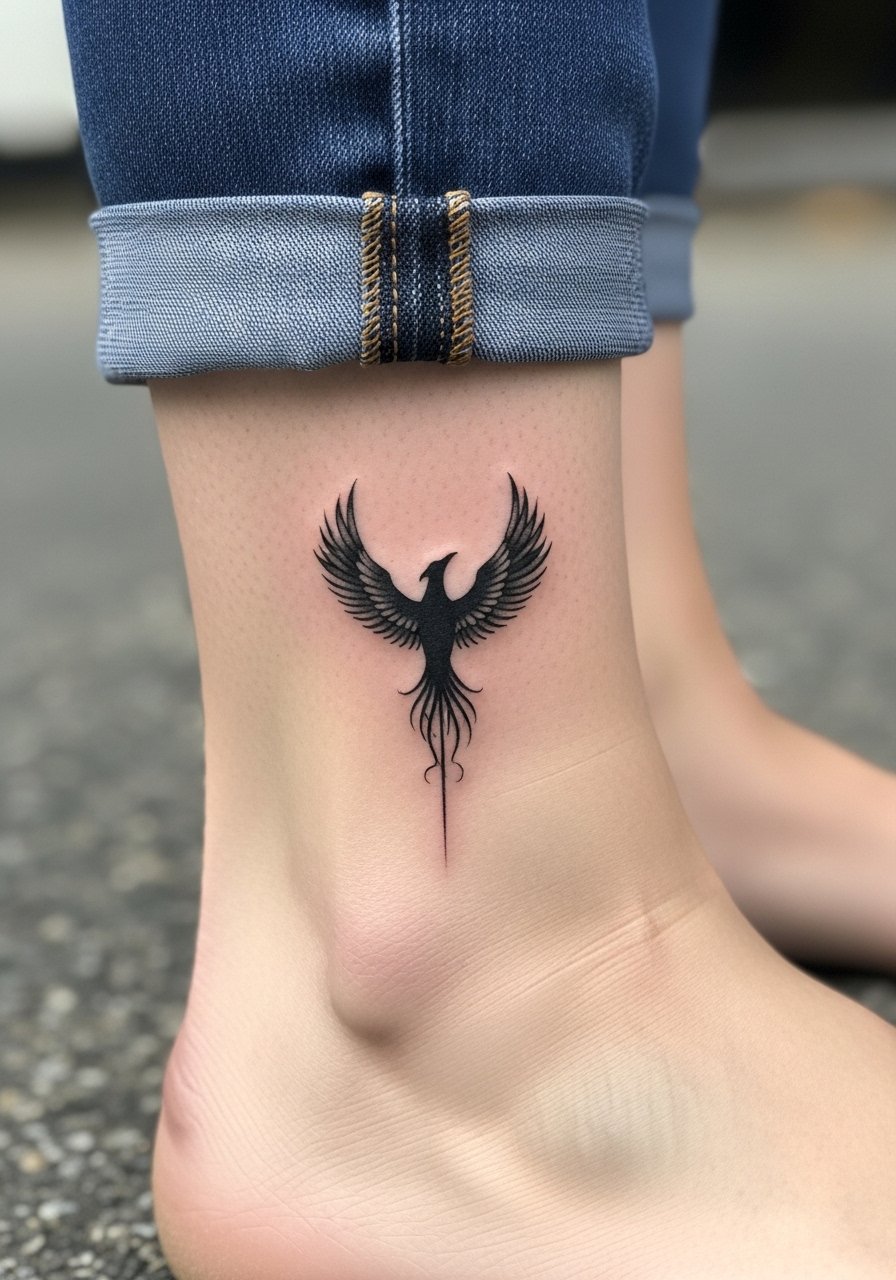
Ankle placements are low visibility and high friction. The common mistake is crowding too many small lines into the circumference where shoes and socks rub. Ask for a small bold silhouette rather than intricate filigree. Pain is low to moderate and a single short session often does the trick. For the appointment and healing phase, wear sandals or rolled-up pants to avoid rubbing.
13. Full Back Phoenix with Illustrative Feather Anatomy

A full back piece lets you treat the phoenix like anatomy. I advise mapping out feather groupings with your artist and leaving breathing room in dense zones so the composition does not become a single dark mass. Sessions are long and usually broken into several days. Expect moderate discomfort when sitting near the spine and shoulder blade. For show-off moments, an open-back dress highlights the sweep without needing constant exposure.
14. Instep Phoenix in Fine Line Detail
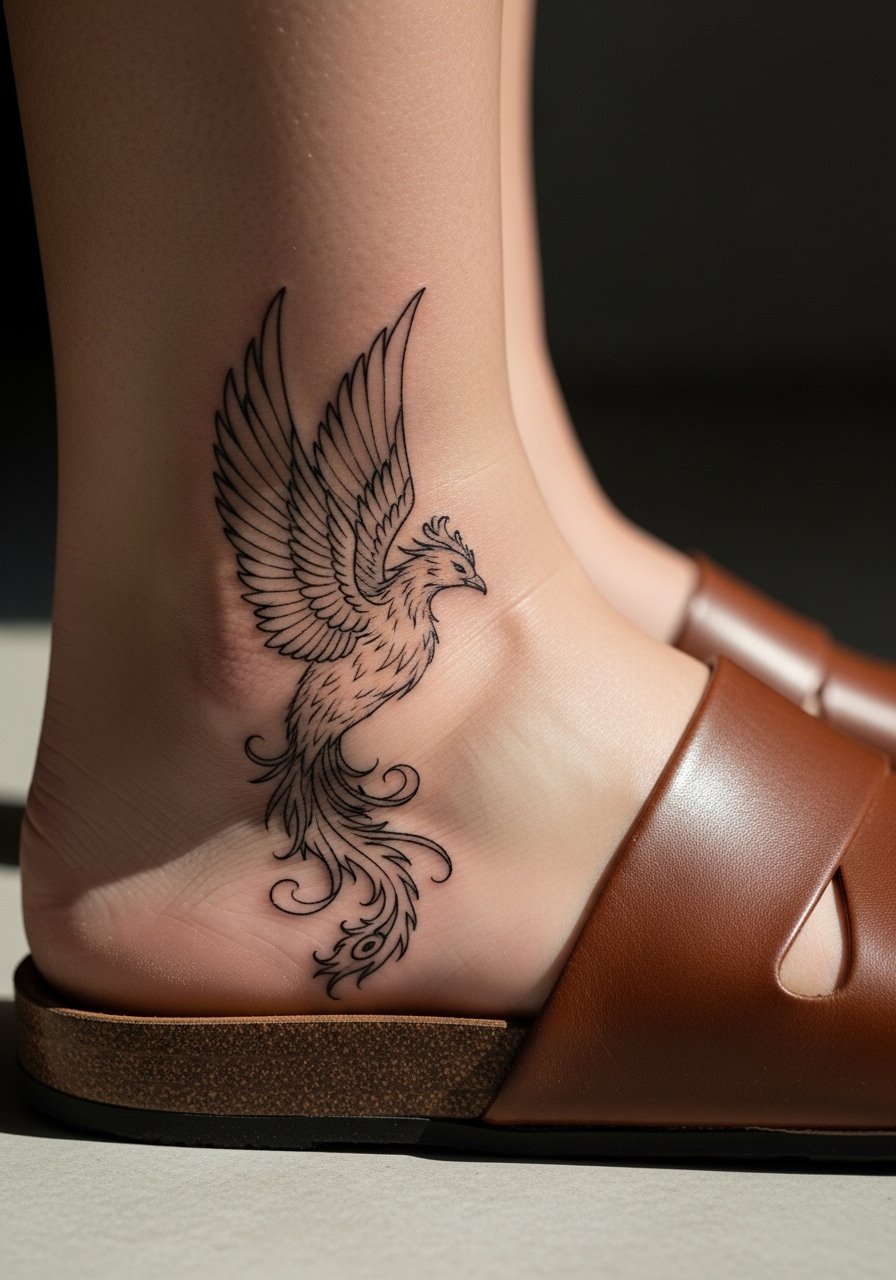
Foot tattoos are notoriously tricky because of constant friction and thin skin. A common mistake is asking for dense fine lines on the instep. If you want longevity, favor bolder shapes and avoid micro hairline details. Pain is higher and touch-ups are common as the area deals with shoe rubbing and moisture. Wear sandals to the session so the artist can work without constraint, and plan for a slower heal schedule.
15. Minimal Phoenix Along the Collarbone with Pendant Pairing
This is a delicate placement that benefits from negative space. I often tell people to ask for feather suggestions that taper toward the shoulder to prevent bunching near the sternum. Pain is moderate and sessions are short. For jewelry pairing, a simple thin chain pendant necklace sits above the script or motif without competing with the linework.
16. Inner Bicep Micro-Phoenix with Subtle Stipple

Inner bicep work looks private because the area is hidden when arms hang. It requires an artist confident with close-proximity shading. Pain can be higher because of sensitivity, and sessions are often shorter to allow breaks. A typical mistake is compacting too much detail into a tiny field. For the appointment, wear a tank or sleeveless top you can lift easily so the artist can access the area without tugging fabric.
17. Calf Piece with Feather Trail and Shadowing

Calf placements tolerate contrast well, which helps a phoenix hold up over time. Tell your artist where you want deep blacks for anchor points and where you prefer softer gray transitions to suggest texture. Sessions are moderate and often done in a single visit. The biggest mistake is letting the tail cross into high-friction zones like sock edges. For comfort at the studio, bring loose pants that can be pulled up without pressure.
18. Sleeve Phoenix Intertwined with Floral Dot Work

Combining botanical elements gives the phoenix context and lets artists break up large dark fields with lighter floral zones. In consultation, specify which elements should read as foreground and which should recede. Blowout risk is minimal on the outer sleeve, but dense line clusters near joints can soften faster. Sessions are multiple and you may need a year-one touch-up. Pair the sleeve with rolled-up cuffs or a loose button-down shirt when you want the full design to show.
19. Geometric Phoenix Mandala Fusion on the Upper Arm
A mandala fusion forces clarity in spacing. Ask for larger negative gaps between concentric details so the pattern does not merge with time. Pain is moderate and most artists will want multiple passes for crisp geometry. The mistake is cramming too many tiny segments into a small radius. For session comfort, short sleeves or a tank top makes access simple and prevents fabric disruption.
20. Wrist Feather Band in Black and Grey
A continuous band looks elegant but wrist skin moves a lot. I recommend a slightly thicker baseline to keep the band readable and to avoid lines fading into each other. Expect a quick session and a touch-up within two to three years for the crispest look. Avoid wearing tight watches right after the session to reduce friction while the tattoo seals.
21. Small Shoulder Blade Phoenix Crescent

This compact placement gives a hint of motion without committing to a full back piece. I suggest asking for a crescent composition that leans toward the outer shoulder so it reads when you wear tanks. Pain is low to moderate and a short session usually suffices. The common mistake is overloading the crescent with tiny feathers that become a gray smear. If you want occasional visibility, plan outfits that show the upper back like racerback tops.
Frequently Asked Questions
Q: How long will a black and grey phoenix keep its fine details on the ribs or sternum?
A: It depends on spacing and how much sun and friction the area sees. Ribs and sternum move a lot, so tiny details can blur faster than on the forearm. Ask for slightly larger gaps and bolder anchors if longevity is a priority. Expect a possible touch-up at year two to three for small details.
Q: Are black and grey phoenix pieces painful on the inner bicep or calf?
A: Inner bicep sessions tend to register higher pain because the skin is thinner and more sensitive. The calf is usually easier and tolerates longer sessions. Break the appointment into shorter passes for sensitive spots and talk with your artist about pacing.
Q: Should I pick bold saturation or stipple shading if I want this tattoo to look good at year five?
A: Both can age well if applied with spacing in mind. Bold saturation gives a strong long-term silhouette while stipple and dot work keep texture without creating a dense gray patch. When in doubt, favor clearer shapes over micro detail.
Q: How do I find an artist who understands black and grey phoenix anatomy without naming specific accounts?
A: Use local shop directories, search convention guest lists, and check community forums or hashtag threads that showcase healed work. Look for healed photos of comparable placements so you can see how the artist's work holds up over time.
Q: Do workplace policies still affect visible placements like wrists or collarbones?
A: Some industries remain conservative about visible tattoos. If you have career considerations, choose placements that are easy to cover for interviews or client meetings. For flexible showing, collarbones and forearms can be hidden with clothing when needed.
