
Fine line trends look great on a saved board but longevity depends on placement and spacing, not just how intricate the stencil is. Geometric takes the John Wick mood and translates motion, symmetry, and silhouette into shapes that read clean for years when executed with breathing room. Below are 21 geometric takes that balance bold geometry with practical advice for consultations, healing, and how to show the piece off.
1. Minimal Wick Silhouette on Inner Forearm
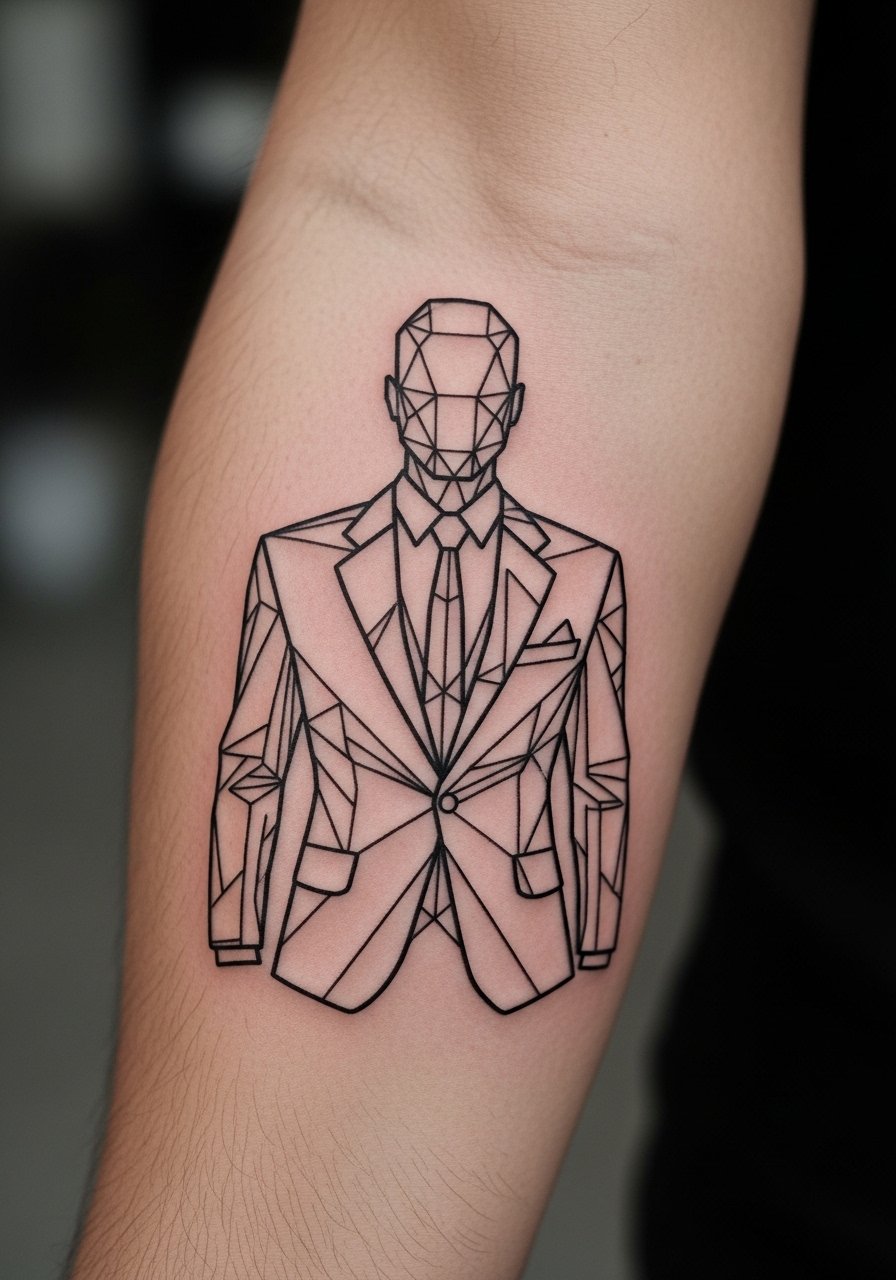
I recommend this for someone who wants a readable John Wick nod without a literal portrait. The inner forearm is forgiving for fine line geometry but common mistakes include going too small and cramming detail. Ask your artist to scale the silhouette so negative space creates the suit and tie rather than tiny interior lines. Expect a two-hour session for a crisp black outline and light stipple shading. Pain is moderate and touch-ups are often needed at year two if the lines sit too shallow. For showing it off, roll sleeves and try a rolled linen shirt to frame the forearm while keeping the design visible.
2. Geometric Dog Paw with Facets on Wrist
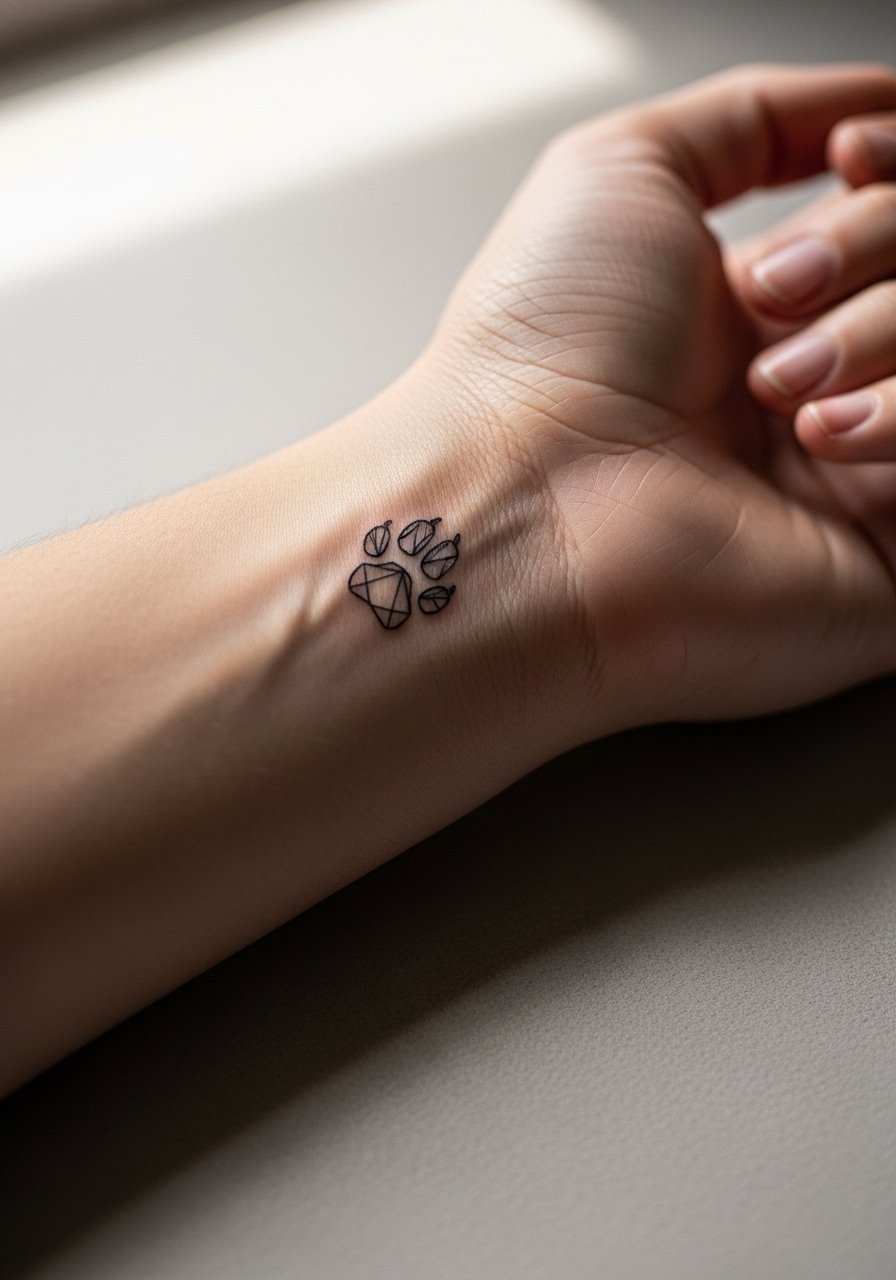
Wrist placement makes detail readable but increases blowout risk if the pattern is too dense. The piece works best with bold channels and open facets rather than micro-dot fills. Tell your artist to prioritize solid linework and slightly larger negative spaces between facets. Session time is short, thirty to sixty minutes, but expect more frequent touch-ups than forearm pieces because of wrist motion and washing. A common mistake is asking for hairline facets that merge after a year. For appointments wear a loose button-down shirt you can pull aside for wrist access without tugging.
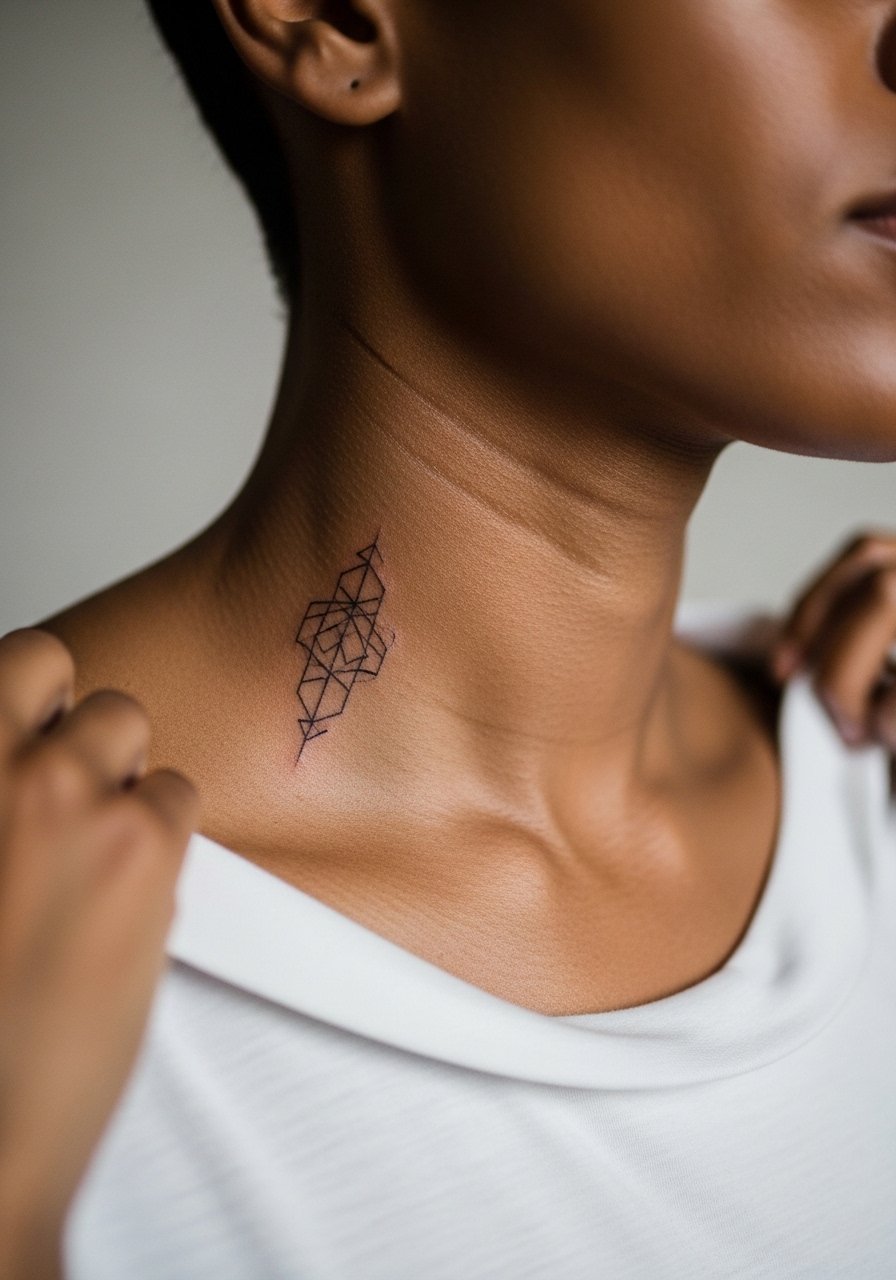
3. Suit Lapel Linework Along the Collarbone
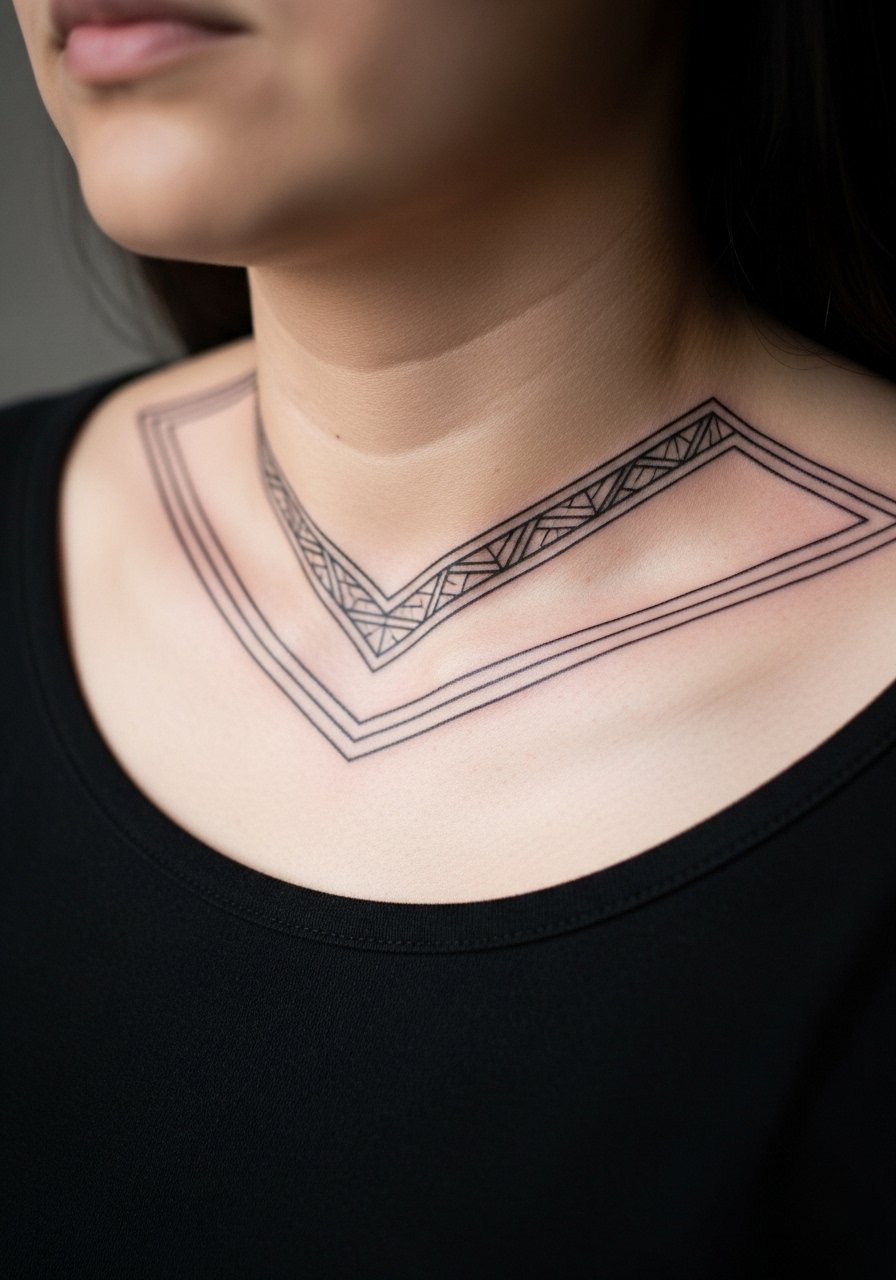
This collarbone idea references the clean geometry of a suit. The collarbone area is visible and ages well when lines have a bit of depth. Fair warning, movement and clothing friction can blur ultra-fine lines faster here. Ask for slightly thicker linework than your screen mockup and a gentle stipple fill where you want tone. Expect a one to two hour session and plan on a touch-up at year three for most skin types. For evenings out, pair it with an open-back midi dress or a wide-neck shirt to let the collarbone lines read without competing jewelry.
4. Angular Bullet Mosaic on the Calf
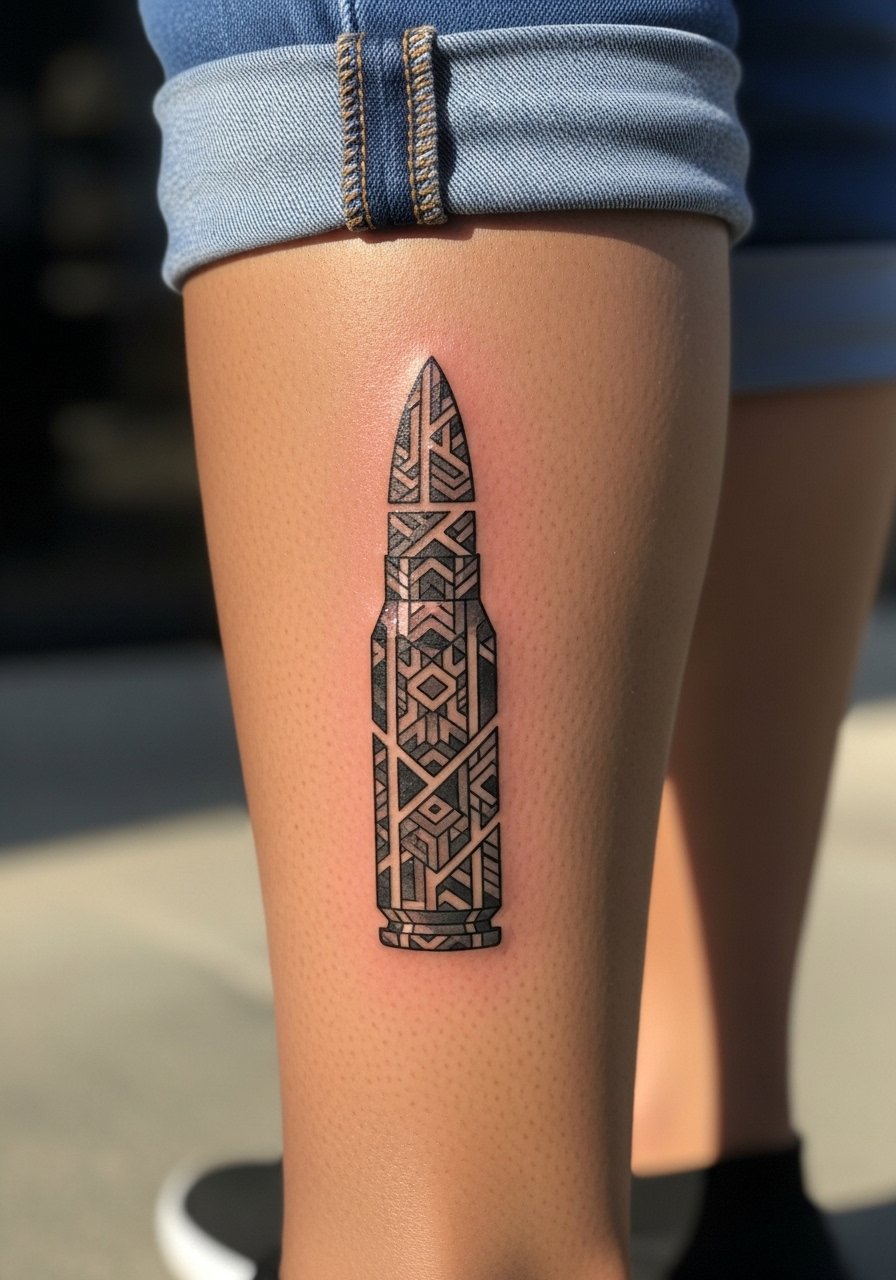
A calf placement lets complex geometry breathe and read from a distance. The mosaic approach breaks a firearm motif into shards that age better than tiny realism. Tell your artist to avoid micro-hatching inside small shards and instead use blocky saturation with occasional stipple. Sessions run two to three hours for larger mosaics. Pain is generally mild to moderate. The main mistake is squeezing too many tiny shapes into one patch. For casual wear roll your jeans or wear drawstring linen pants so the design sits visible without tight fabric rubbing the first month.
5. Continental Coin in Geometric Low-Back
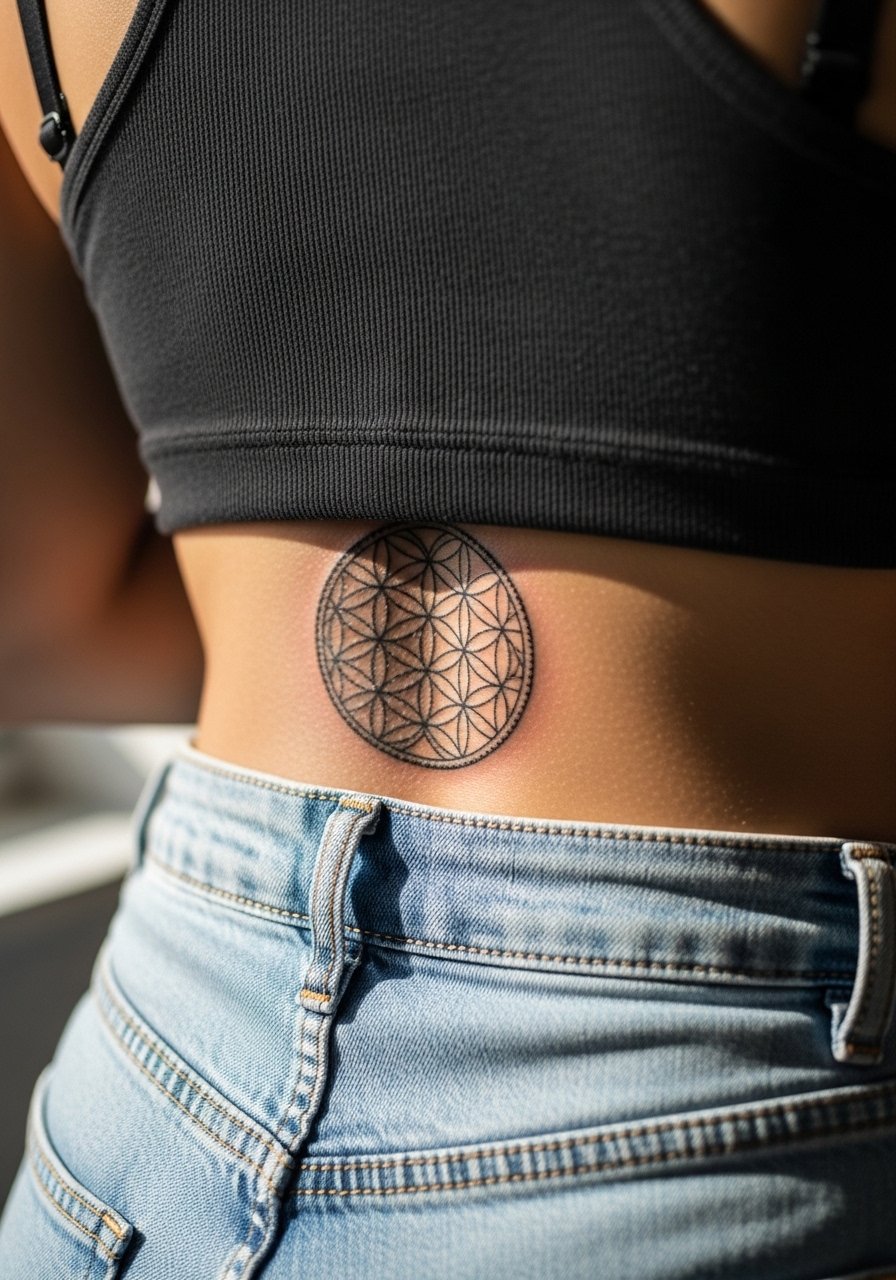
This lower back placement gives room for a circular geometric emblem that riffs on the film's coin motif without copying logos. Lower back skin moves with bending and sitting so line spacing matters. Ask for a thicker outer ring and inner negative space to prevent merging as the skin shifts. Sessions are two to three hours depending on size. A frequent mistake is over-detailing the interior, which can look busy after a year. For the session wear a tank top with high-waisted jeans so the artist can access the lower back without you feeling exposed.
6. Geometric Dog Portrait on Outer Bicep
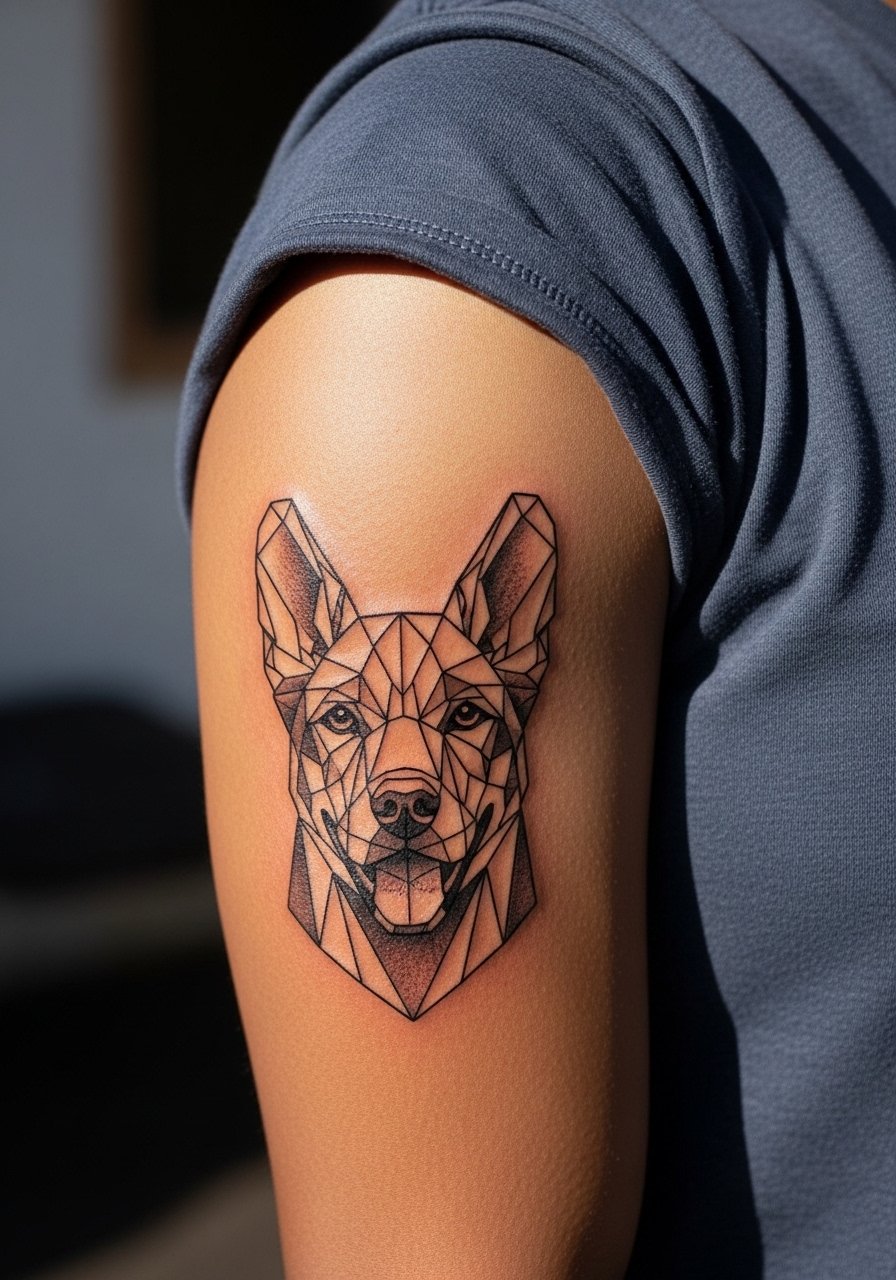
A geometric dog portrait reads as an affectionate nod without hyper-realism. Outer bicep is low on blowout risk and holds saturation well. In consultation ask your artist for a balance of solid planes and negative space so the snout reads under movement. Session time typically two hours. Common mistake is asking for extreme micro-detail which blurs into grey after two years. For showing it off wear a short-sleeve button shirt with the sleeve rolled to keep attention on the portrait while avoiding shoulder friction.
Pack Smart
Those first six ideas all lean on visible areas that need different prep, from wrist and chest friction to lower-back sitting. A few compact items smooth the session and the first week.
-
Stencil transfer paper kit. Helps you test position and scale on skin before the needle hits, which matters for forearm and collarbone pieces.
-
Topical numbing cream. Apply as directed forty to sixty minutes before if you are nervous about calf or rib sessions.
-
Thin protective film roll. Useful on wrist and finger pieces where daily washing and friction can challenge fresh lines.
-
Fragrance-free gentle body wash. Cleans healing skin without stripping or irritating the fine linework on visible placements.
-
Aquaphor healing ointment. A thin layer helps lock moisture the first few days for fine line and geometric work without clogging.
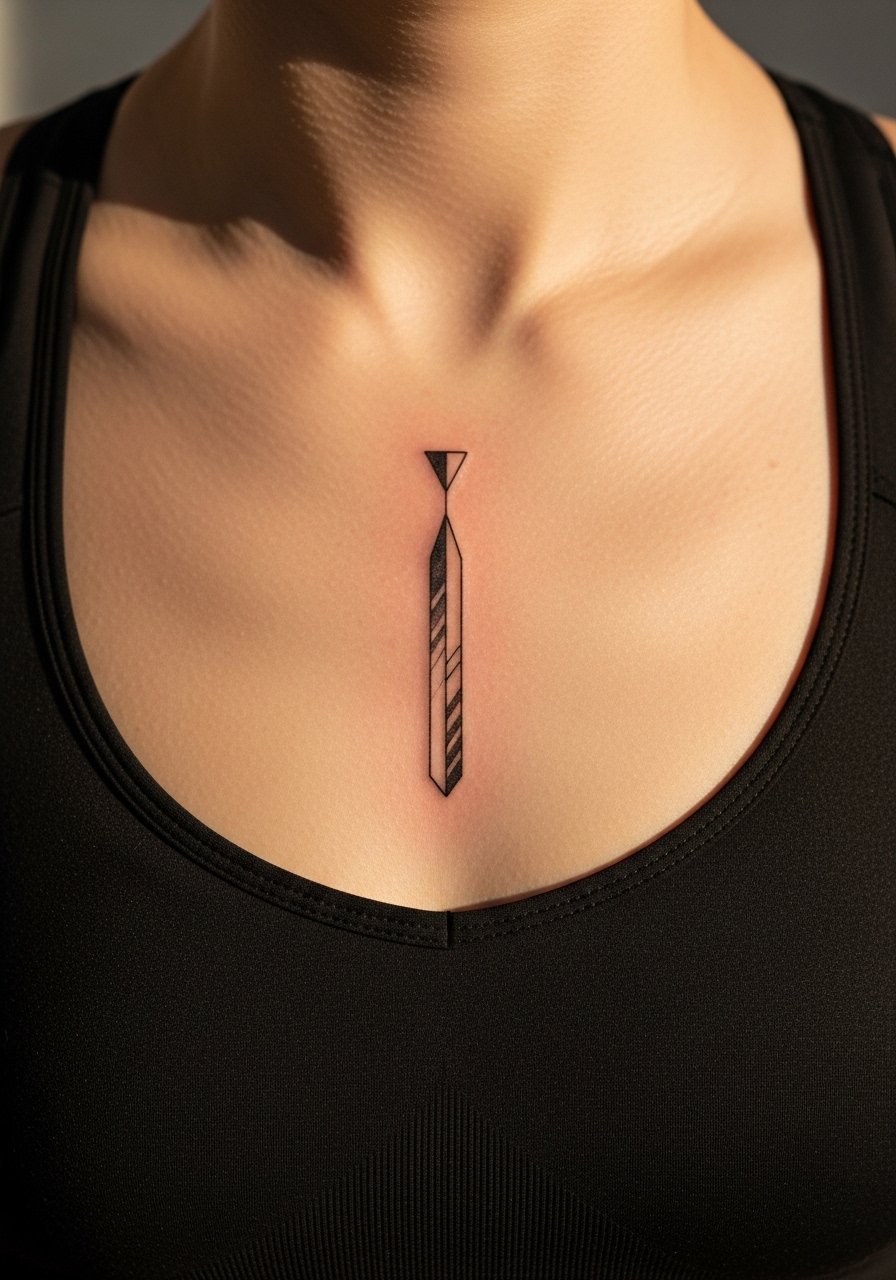
7. Negative Space Suit Tie Along the Sternum
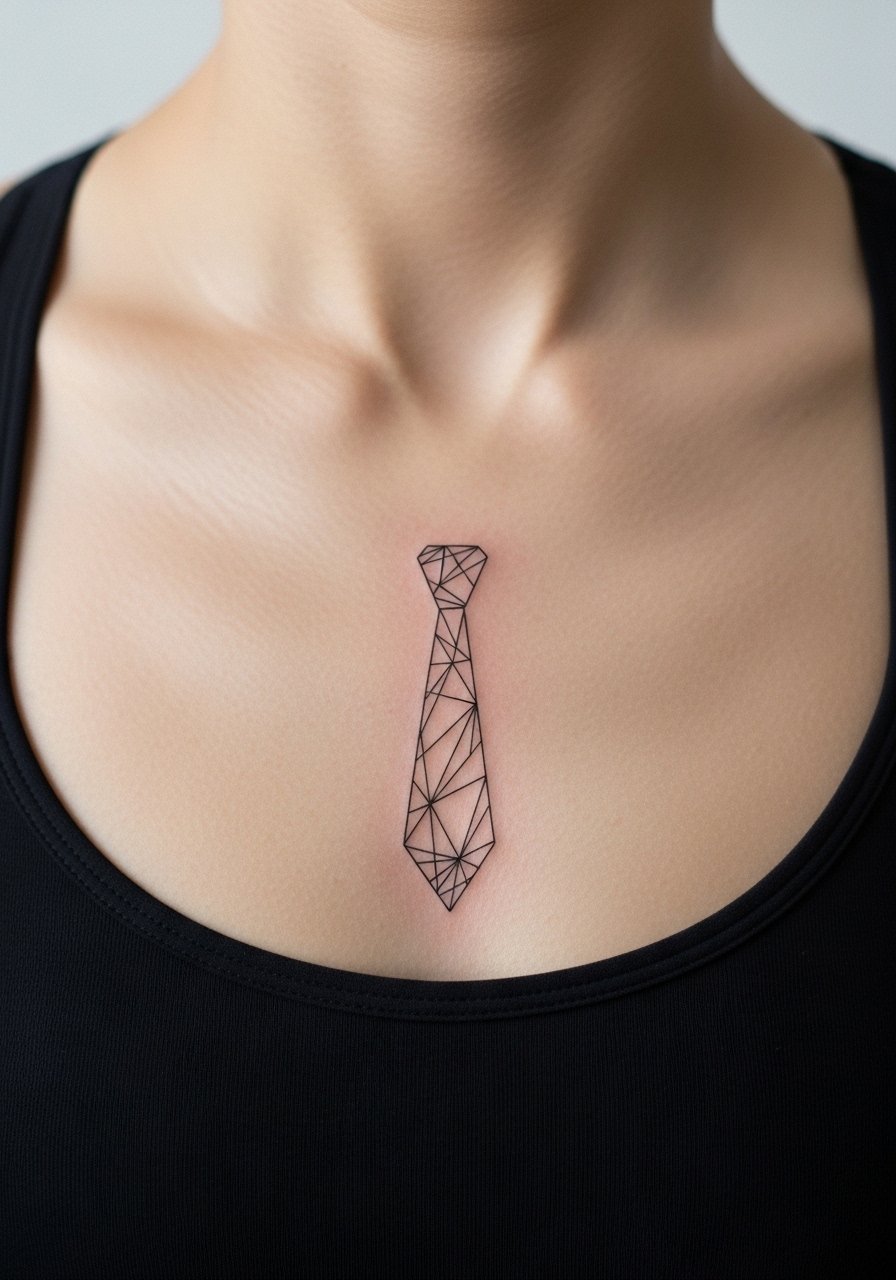
Sternum pieces are visually striking and sensitive. This negative space tie relies on skin showing through for contrast rather than heavy fill. Pain is higher and healing can take longer. Two camps exist here about suitability. One camp says sternum skin shifts too much and fine detail will blur quickly. The other camp argues that with intentional spacing and slightly heavier lines it holds up. Ask your artist which side they fall on and expect a touch-up at year two. For the appointment wear a fitted sports bra so access is clear and the artist can work without tugging.
8. Geometric Crossed Pistols on Upper Arm
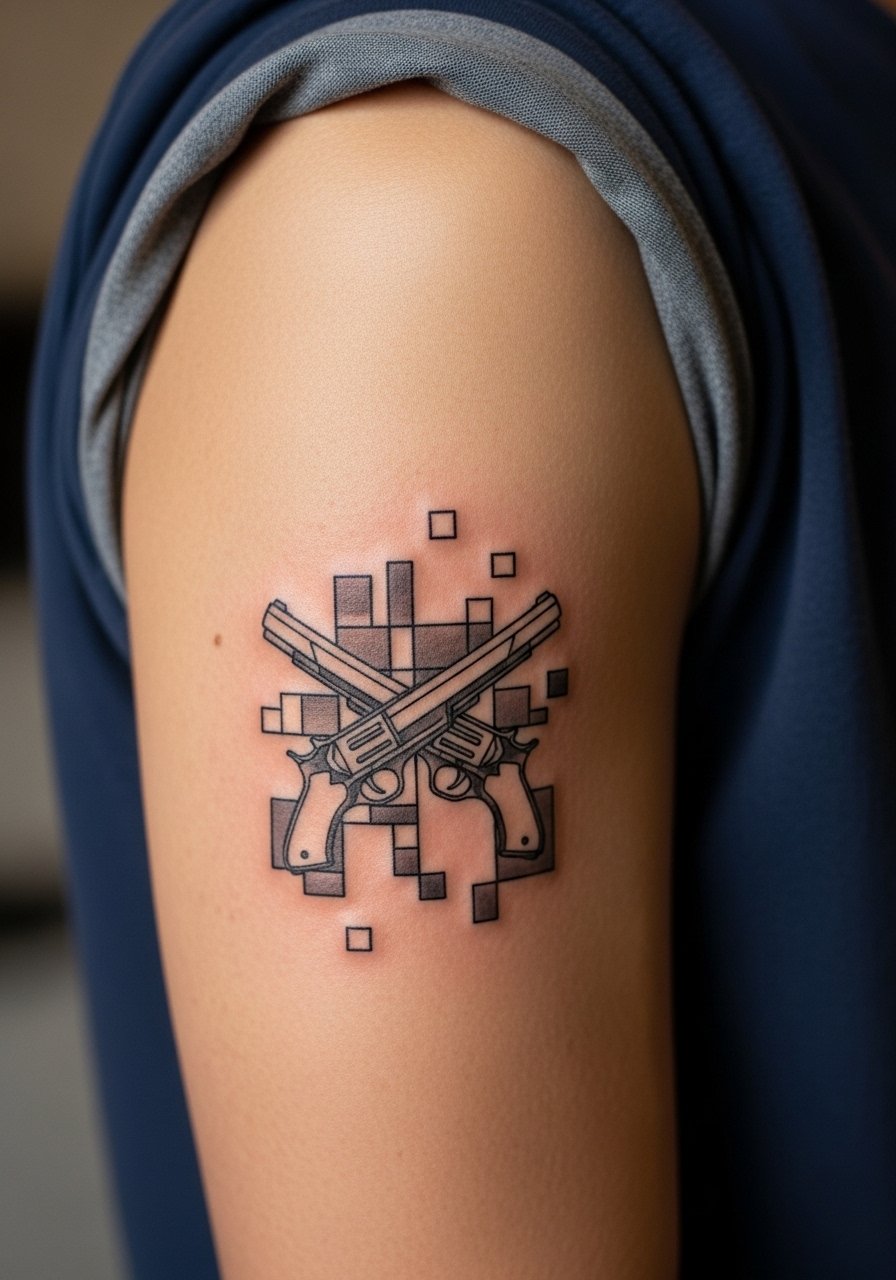
This motif is the most literal nod to the films yet breaks into shapes instead of realism. Upper arm is good for moderately complex geometry and tolerates saturation. During consultation say you want bold outer contours and internal negative panels rather than tiny stippling. Sessions range one to three hours depending on scale. The mistake is over-detailing small internal parts that look muddled after movement. For showing it off, wear a loose tank top or a short sleeve that keeps the shoulder visible without constant fabric rub.
9. Hexagonal Mandala with Hidden Pupil on Back of Neck
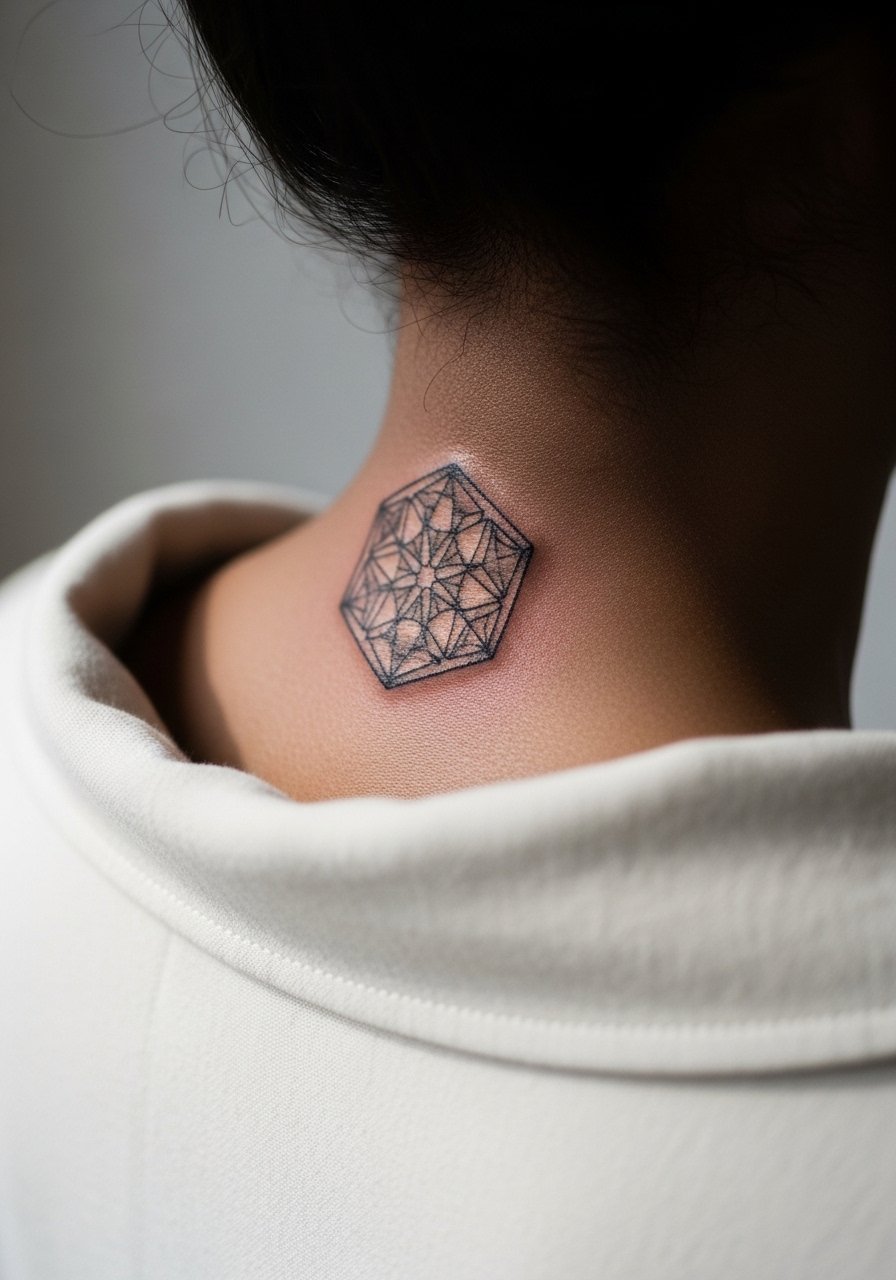
The back of the neck suits compact, symmetrical designs. Textural mistakes happen when artists try to pack too many tiny rings into a small patch. Tell them to scale the mandala so the central "pupil" reads from a few feet away. Pain is moderate. Expect a single session under two hours and touch-ups at year three if you want crisp radial edges. For daily wear a collared shirt pulled aside gives access without exposing shoulders. Consider career impact before committing since neck tattoos remain visible in many workplaces.
10. Linear Suit Sleeve Band on the Wrist and Finger
Finger and wrist wrap designs are striking but require design breathing room to avoid early blur. Fingers have high blowout risk and heal differently than the wrist. If you want continuity across the two, ask for slightly bolder wrist lines and a simplified finger motif. Sessions are split into short blocks because fingers scab and need careful aftercare. The common mistake is expecting tattoo-level detail on the fingers to survive long-term. For the appointment wear a long-sleeve shirt you can push up so the artist can work without the cuff rubbing the fresh ink.
11. Stylized Continental Window on Upper Back
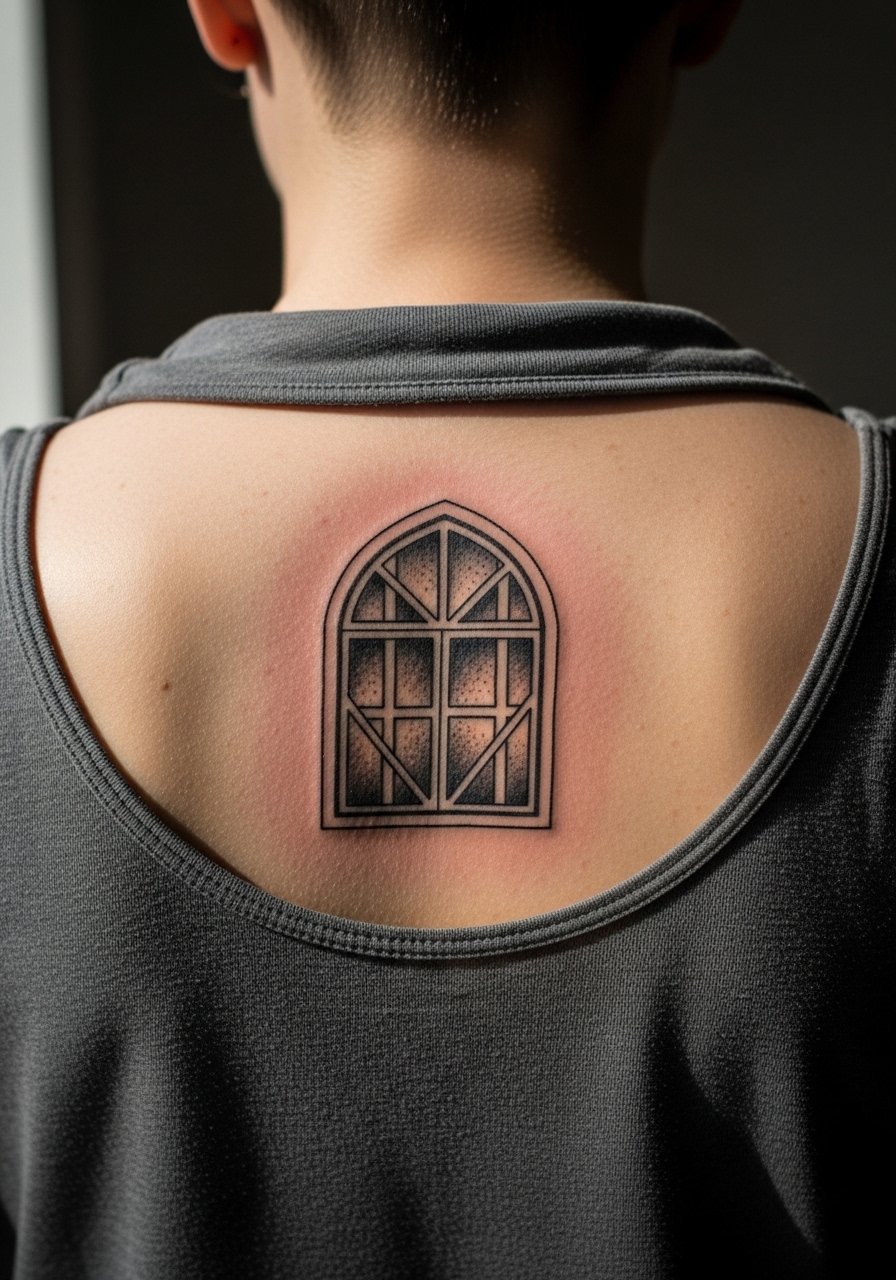
Upper back gives generous canvas for linear geometry. This window-like motif uses repeating panes to suggest architecture without literal buildings. The skin here is stable so lines age well if spacing is generous. Consult on final scale so the pattern interacts with shoulder movement without bunching. Sessions can be longer, three to five hours depending on size. A pitfall is creating seams that meet with poor alignment across curves. For the session use a button-down worn backwards or a loose tank to give the artist full access.
12. Fragmented Face Mask on the Ribcage
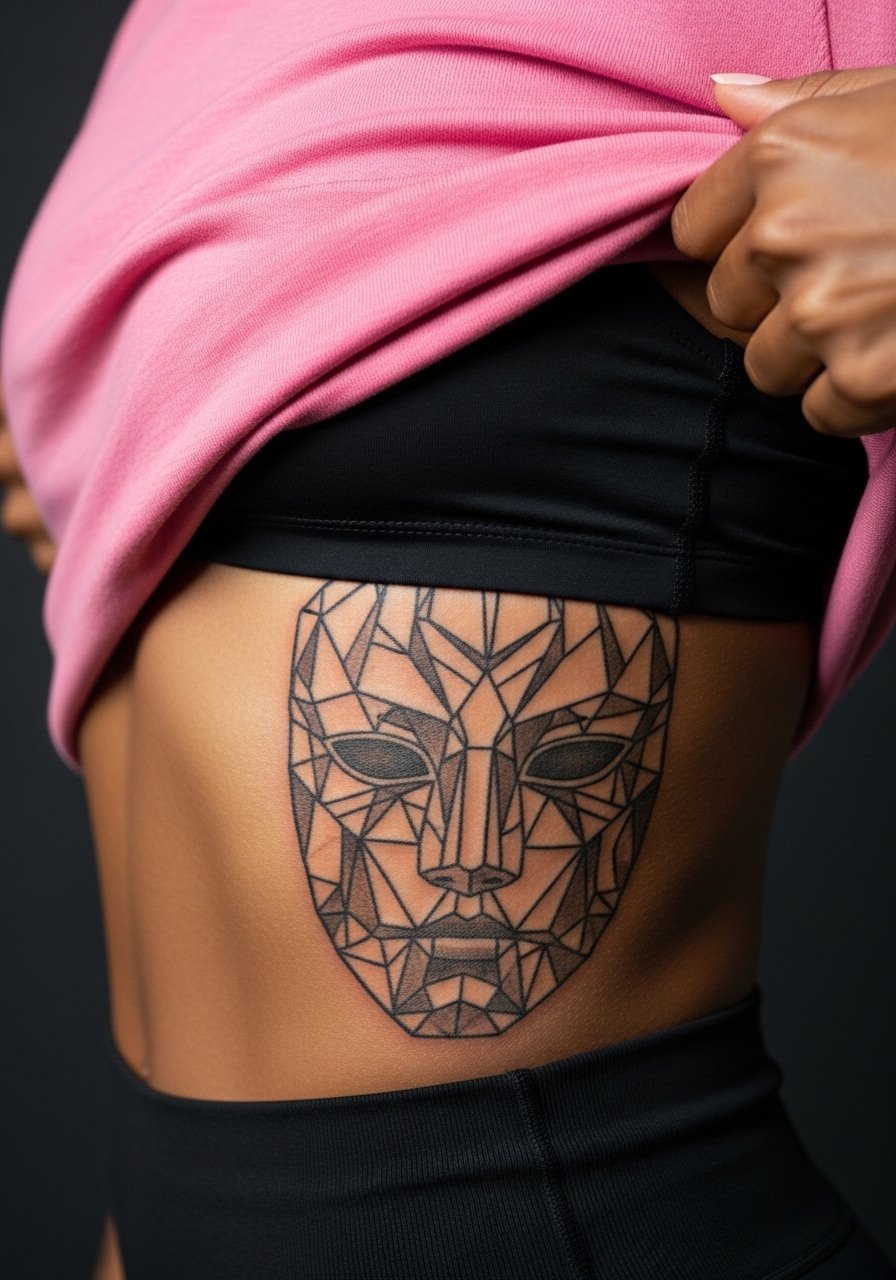
Ribcage is high on the pain scale and sensitive to breathing. This fragmented mask looks dramatic but small internal pieces can blur on this stretch-prone skin. Ask for larger geometric planes and deeper linework that will not shallow out during healing. Expect a multi-hour session and allow for a longer first-week recovery window. Artists split on fine line here. One camp calls ribs unsuitable for delicate geometry due to stretch and movement. The other says careful depth and spacing resolve that concern. Make sure your artist explains their approach before booking.
13. Minimalist Coin Stack on Ankle
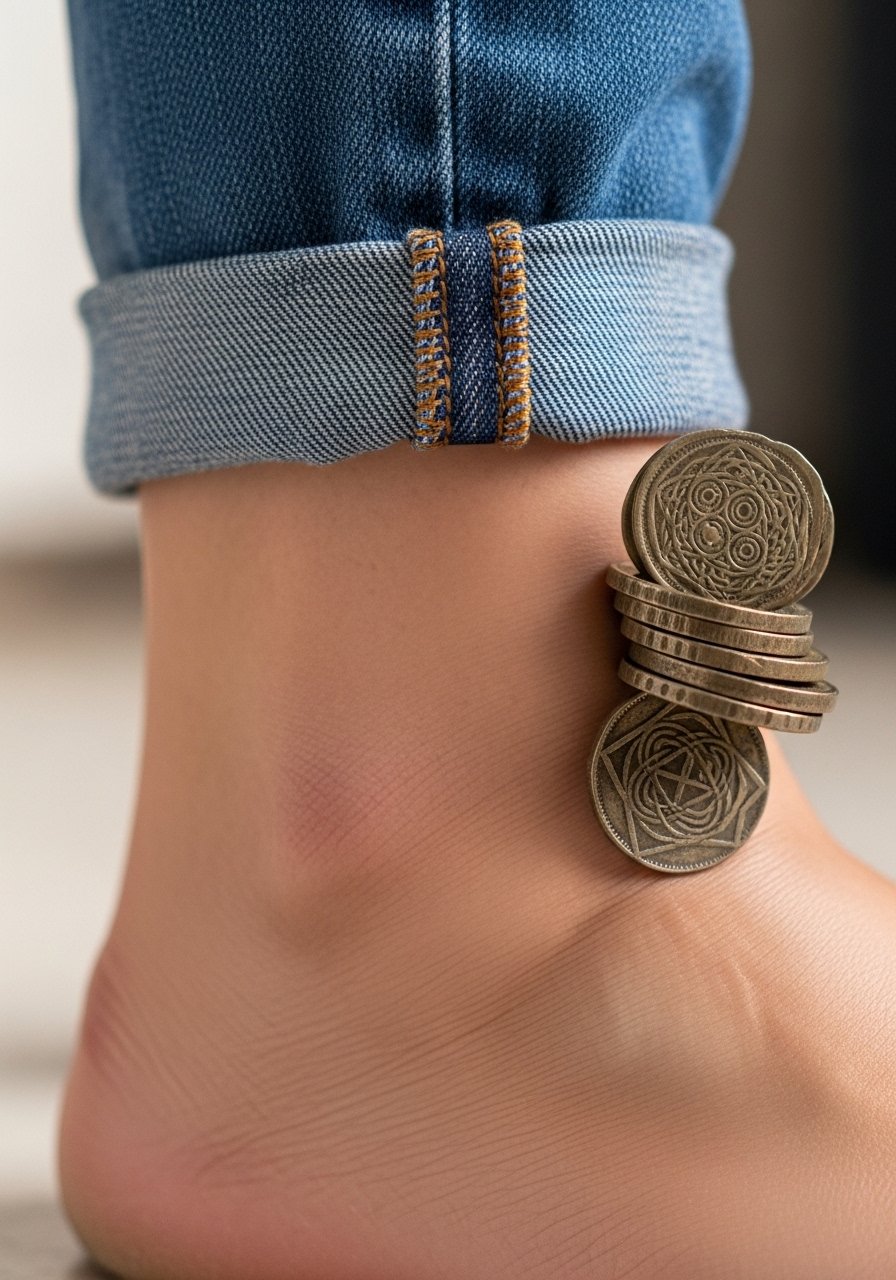
Ankle work reads on summer footwear but faces constant friction and swelling. For stacked coin motifs prioritize thicker outer rings and negative inner space so coins keep separation as they age. Sessions are short, often under an hour per coin. Mistakes include asking for excessive micro-detail that will be lost in shoe straps and socks. For the session wear jeans you can roll up easily so the artist has clear access without pressure on the fresh ink.
14. Linear Tie Clip Down the Sternum Center
A vertical graphic down the sternum reads architectural but must respect breathing and chest movement. Fine line-only treatments can fade unevenly here. Ask for a slightly heavier central line with tapered terminals and small negative notches for interest. The pain is higher and healing needs mindful clothing choices to avoid rubbing. Session time is typically under two hours. A regular error is pushing for hairline details that disappear within a year. For the session choose a fitted sports bra you can remove briefly so the artist has clear, stable access.
15. Geometric Headlight Lines on the Calf Shell
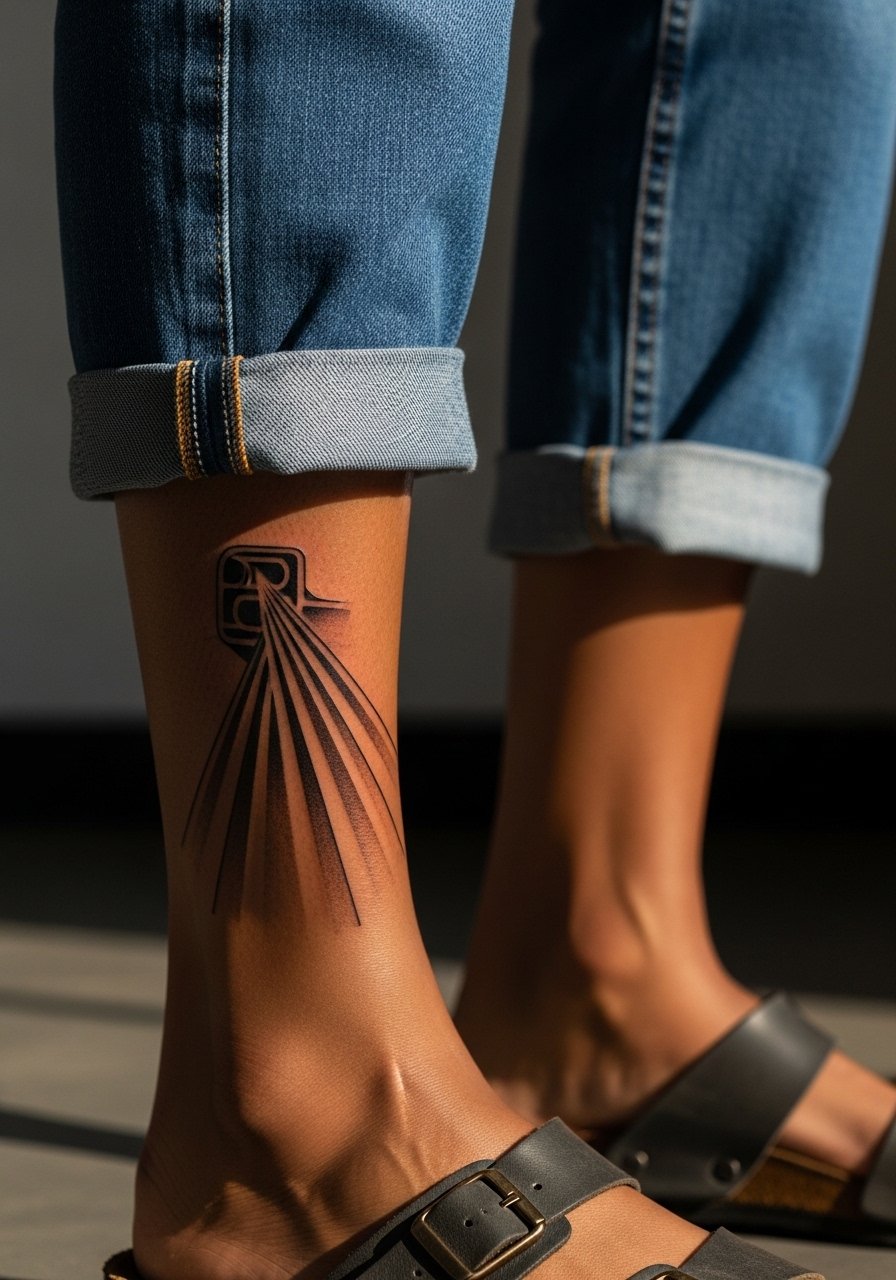
Calf geometry benefits from long, flowing lines that follow muscle contours. Tell your artist to map the lines with the muscle when you stand so they do not appear skewed when you move. Sessions usually run one to two hours. The mistake is designing lines that ignore muscle flow which can warp the visual when you walk. For show-off wear sandals or rolled jeans and consider a casual linen short to keep the calf visible while styling.
16. Minimal John Wick Glyph on the Inner Bicep
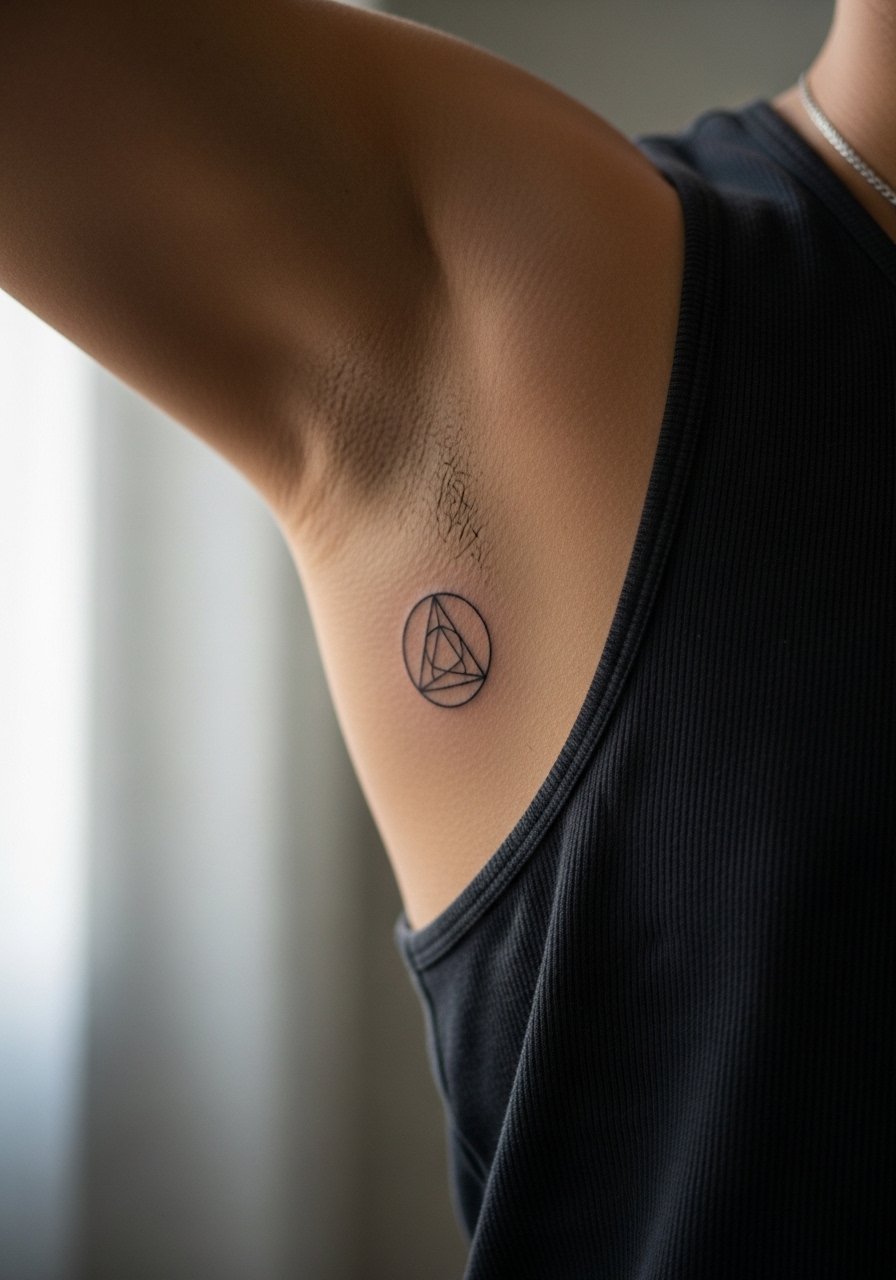
Inner bicep work is hidden by default and suits symbolic glyphs. The area is softer and can blur if the lines are too close. Ask for slightly thicker linework and allowance for negative space so the symbol remains crisp when healed. Sessions are short but healing can be slower due to sweat and arm friction. A common mistake is seeking tiny fine details that the inner arm cannot hold for long. For the session wear a loose tank top so the artist can access the area without discomfort.
17. Geometric Dog Tag on the Upper Chest
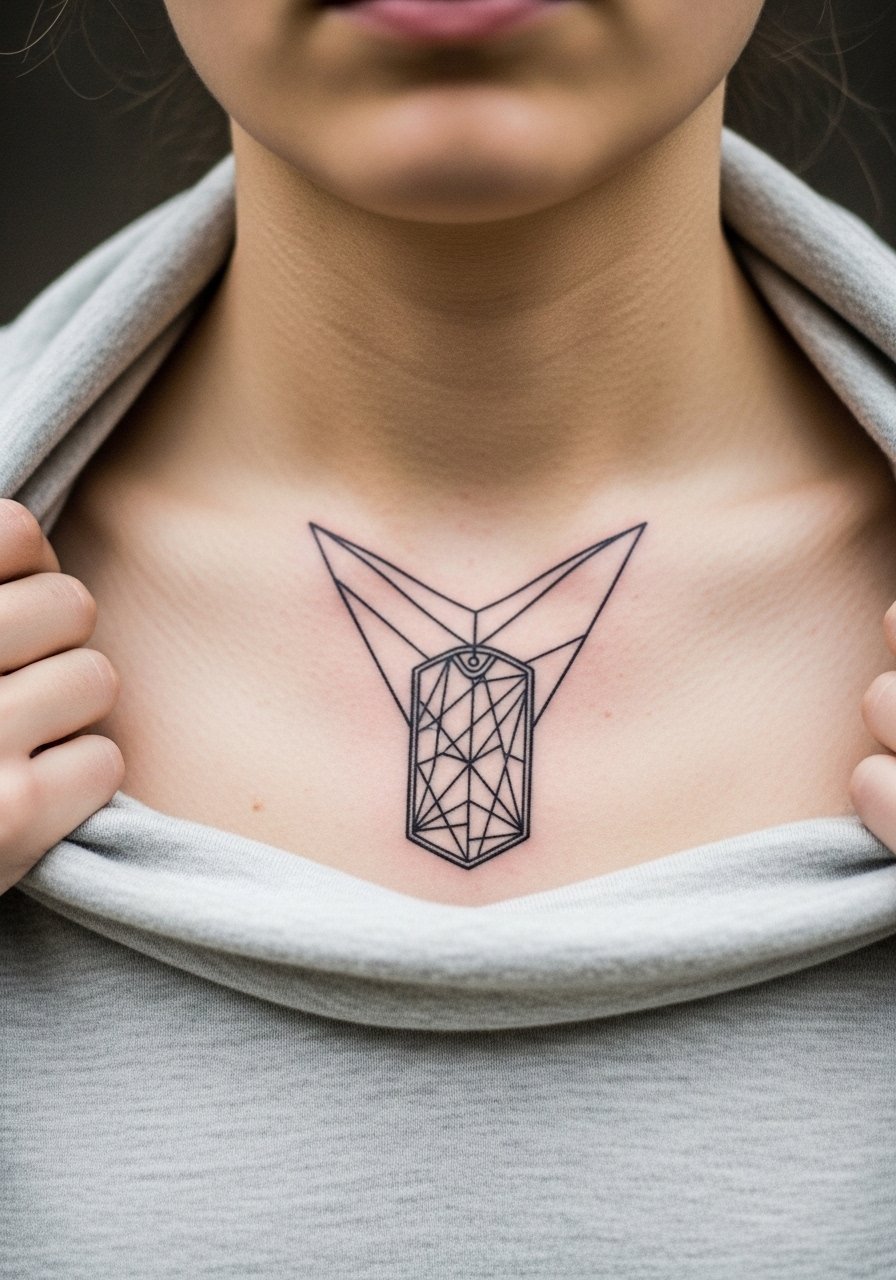
Upper chest placements see sun and shirt friction, so plan for bigger lines and negative space inside the tag shape for clarity. Ask your artist to orient the tag with the clavicle so it sits naturally under shirts. Sessions usually one to two hours. The frequent mistake is miniaturizing the tag until the interior fills into a single tone after a year. For clothing, an open-neck tee keeps the tag visible and avoids constant collar rubbing.
18. Constellation of Bullets Along the Rib Line
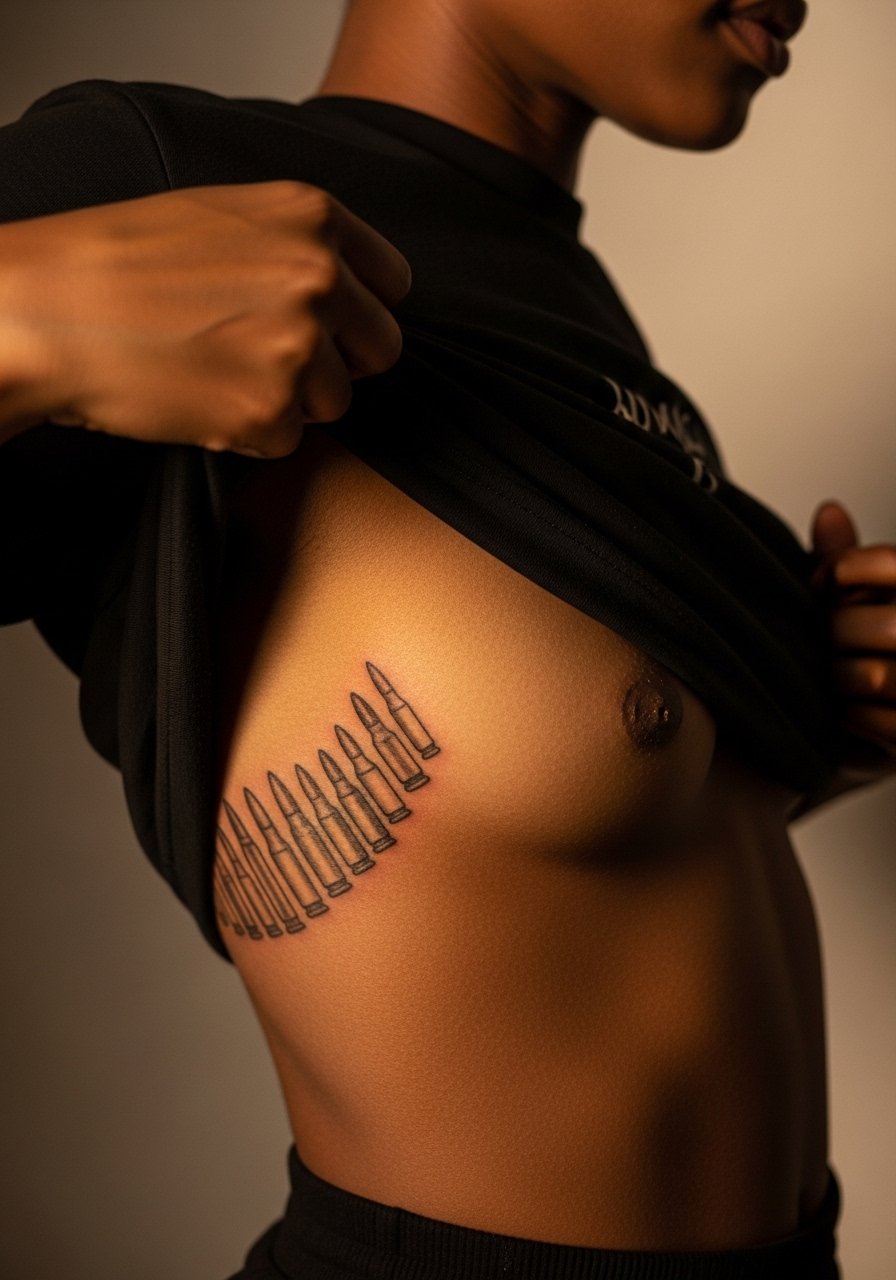
This linear constellation benefits from spacing that follows rib curves. The rib area is high on pain and movement, which makes micro-detail vulnerable. Ask for bold outer edges and simplified interiors so each shape reads after healing. Sessions are often split because of the pain. Artists differ about fine line on ribs. One camp says the stretch and breathing will blur delicate work. The other camp says correct depth and spacing keep the pattern crisp. Expect to schedule a touch-up and bring patience for recovery.
19. Axis Linework Across the Shoulder Blade
Shoulder blade pieces sit on stable skin and age well if lines are drawn to complement the blade's plane. A consultation tip is to test the design while flexing the shoulder so the axis lines do not misalign when moving. Sessions usually two to three hours for larger radial patterns. The mistake is not accounting for bra straps or backpack straps that can rub during healing. For the appointment wear a tank top with high-waisted jeans so access is clear and your clothing does not irritate the fresh work.
20. Fragmented Numbering in Roman Numerals on the Forearm
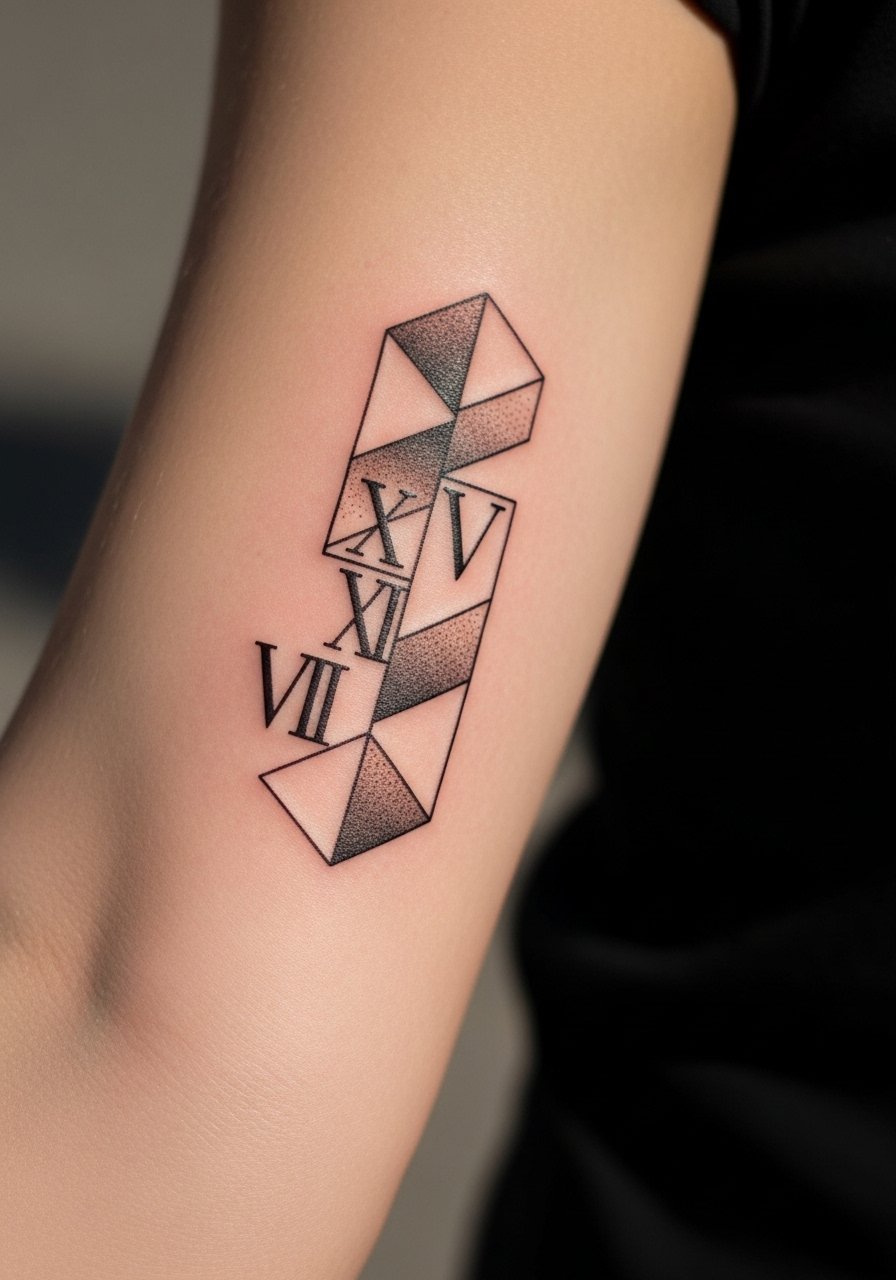
Roman numerals translated into geometry make for personal but graphic pieces. Forearm skin holds linework well if the numerals are not too tight. Specify exact numerals in the stencil phase so the artist does not improvise spacing. Sessions run under two hours for short sequences. A common error is requesting very thin serifs that collapse over time. For showing off pair the forearm with a thin chain pendant necklace that draws the eye to the wrist and forearm without covering the numerals.
21. Geometric Collar-Line Emblem on the Throat Side
Side-neck placements are visible and require a conversation about career considerations. This emblem benefits from slightly heavier outlines so wind and shaving do not soften the edges too quickly. Pain is moderate. Plan for a touch-up at year two. The common mistake is asking for hairline geometry in such a mobile zone. For the session use a wide-neck shirt you can pull to the side so the artist works cleanly without exposing the chest or shoulders.
Frequently Asked Questions
Q: Will geometric linework blur faster on the ribs than on the forearm?
A: Ribs are more prone to blurring because the skin stretches with breath and movement. Geometric work will hold better on the forearm where skin is flatter. If you want ribs, ask for larger shapes and slightly heavier lines so the pattern keeps separation as the skin heals.
Q: Can a tiny geometric dog portrait age well on the hand?
A: Hands take a beating from washing and friction so tiny portraits often lose crispness quickly. If you want a hand piece choose bold planes and accept regular touch-ups. Consider placing a slightly larger, simplified version on the lower forearm instead.
Q: How should I prepare clothing-wise for a sternum or rib session?
A: Wear something that exposes only the area and keeps you covered elsewhere, like a fitted sports bra or a cropped top you can lift. A sports bra is ideal for sternum work because it exposes the center chest while keeping you comfortable during longer sessions.
Q: Artists disagree about fine line on ribs and neck. How do I pick the right approach?
A: Name both camps in your consultation. One camp warns that mobile skin blurs fine detail fast. The other says depth and spacing solve it. Ask to see healed examples from your artist's portfolio for the exact placement you want and schedule a touch-up if you plan very fine lines.
Q: What should I wear to show off a forearm geometric piece without drawing attention away from the tattoo?
A: Neutral rolled-up sleeves or a rolled linen shirt works well. A rolled linen shirt keeps the arm visible and provides a soft backdrop that lets clean linework be the focal point.
