
Fine line geometric shoulder patterns look clean on a phone screen, but what holds after a few summers of sun and short sleeves is another story. The designs that age best give lines room to breathe, follow muscle flow, and account for daily friction from straps and bags. Below are 17 shoulder-focused geometric patterns with what to ask your artist, how they age, and simple styling tips to show them off.
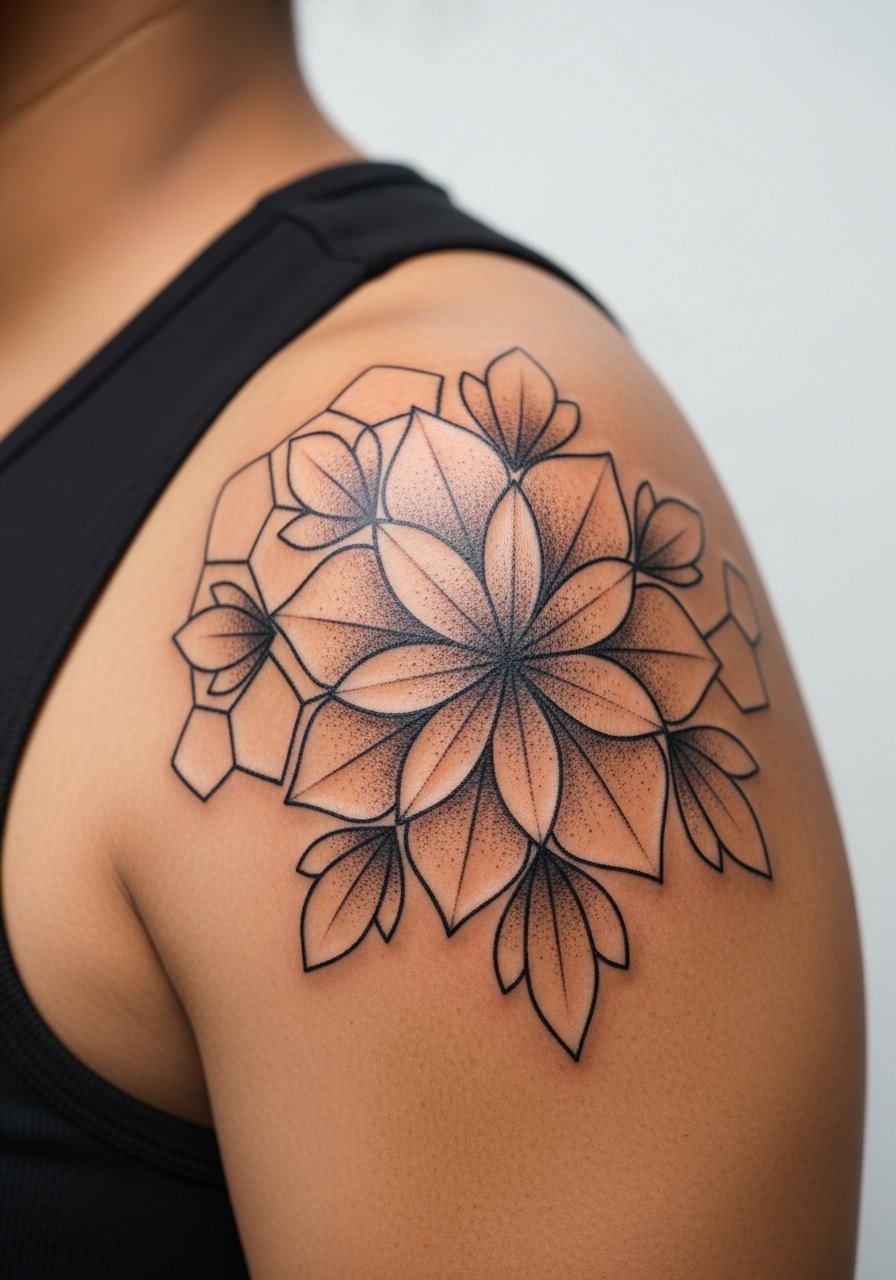
1. Mandala Shoulder Cap with Radial Negative Space

A mandala that hugs the shoulder cap reads like armor when scaled correctly. I usually recommend bringing images that show both the whole shoulder and a cropped close-up so the artist knows how much negative space to leave between concentric rings. The biggest mistake is making the inner rings too tight on curved anatomy, which causes dense linework to blur after two to three years. For pain, expect a five out of ten at the shoulder. Sessions run one to two hours for a medium cap. Tell your artist you want radial spacing and stipple shading instead of packed lines if you want longevity. Pair this with an off-shoulder blouse when showing it off, the cut frames the cap without covering the center.
2. Interlocking Triangles Over the Deltoid
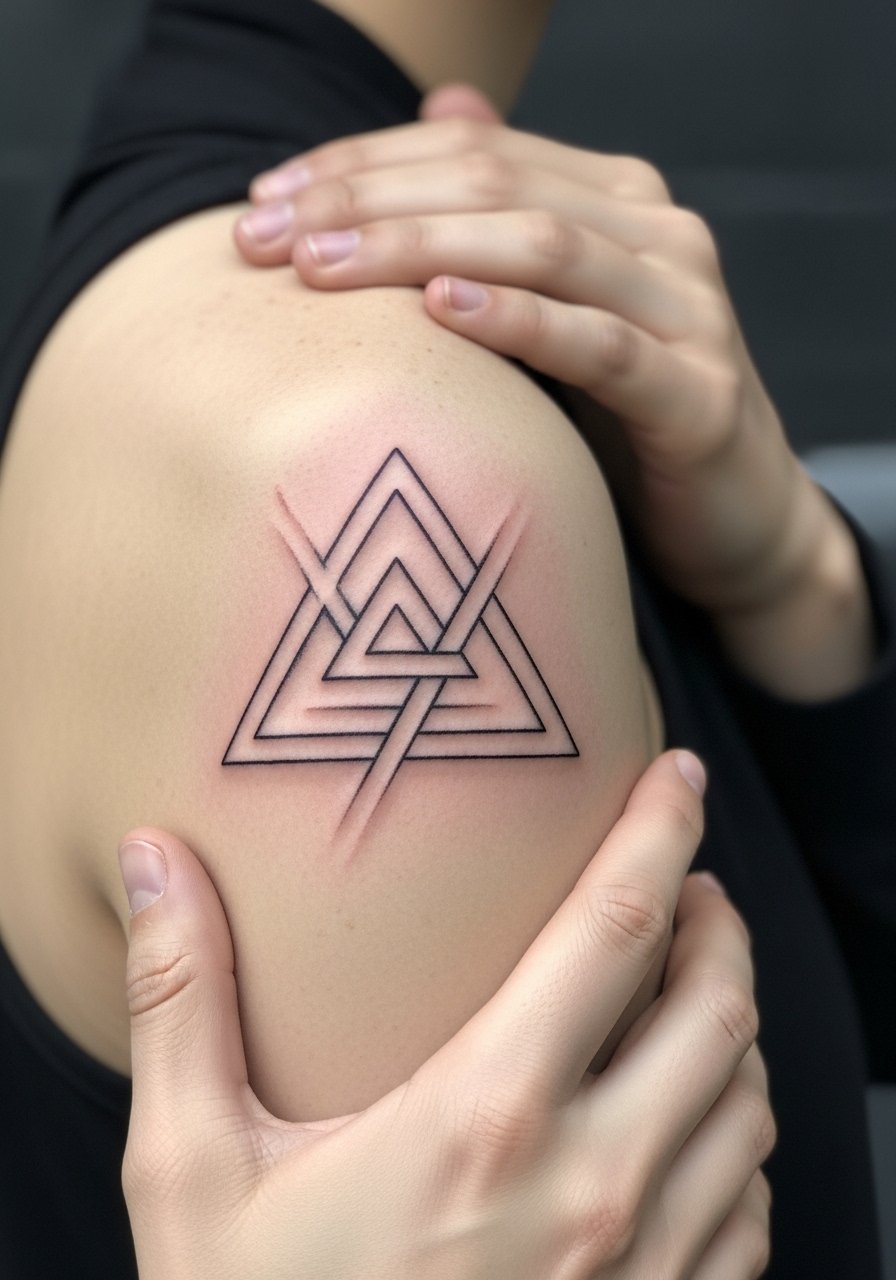
Interlocking triangles make a small design read like a sleeve from certain angles. I tell clients this is a good choice if you want a geometric feel without committing to a full sleeve. A common error is requesting very thin lines inside a tight grid. On rounded areas like the deltoid, those thin interiors tend to soften by year three. Ask for slightly heavier main anchors and lighter interior hairlines so the structure keeps its shape over time. Session length is usually 60 to 90 minutes. Wear a loose button-down shirt to your appointment so the artist can access the outer shoulder easily.
3. Hexagonal Tiling with Negative Space Bands

This pattern uses alternating filled hexagons and blank bands to create movement across the shoulder. It works well for someone who wants texture without heavy saturation. The common aging problem is overfilling the small hexes, which leads to merging in two to four years. During consultation, ask the artist for deliberate negative bands at muscle transitions so the pattern breathes with movement. Pain is moderate and sessions vary from 90 minutes to two hours. For showing it off, short-sleeve linen shirts roll up cleanly and keep the edge visible without competing with the pattern.
4. Compass Rose Anchored on the Shoulder Blade
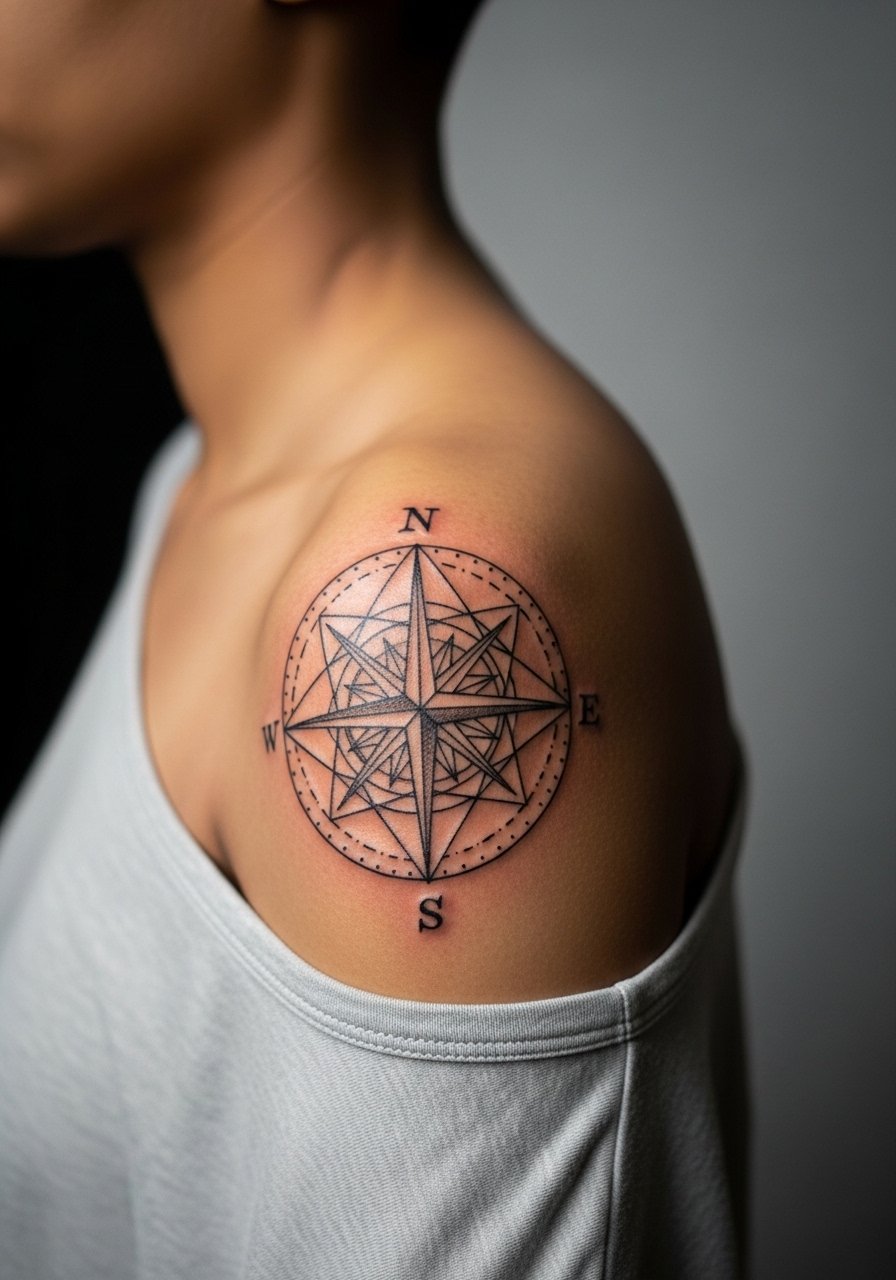
A compass rose sits nicely on the shoulder blade and reads as both geometric and directional. I recommend this for someone who wants a focal piece that can extend into a back or chest project later. A frequent mistake is scaling the points too narrowly. Narrow points on curved shoulder blade skin are prone to blurring. Ask for reinforced outer points and slightly thicker anchors. Expect a two-hour session for a medium compass. If your wardrobe includes open-back tops, this pairs with wide-neck blouses to reveal the piece without full exposure.
5. Concentric Rings That Follow the Deltoid Flow
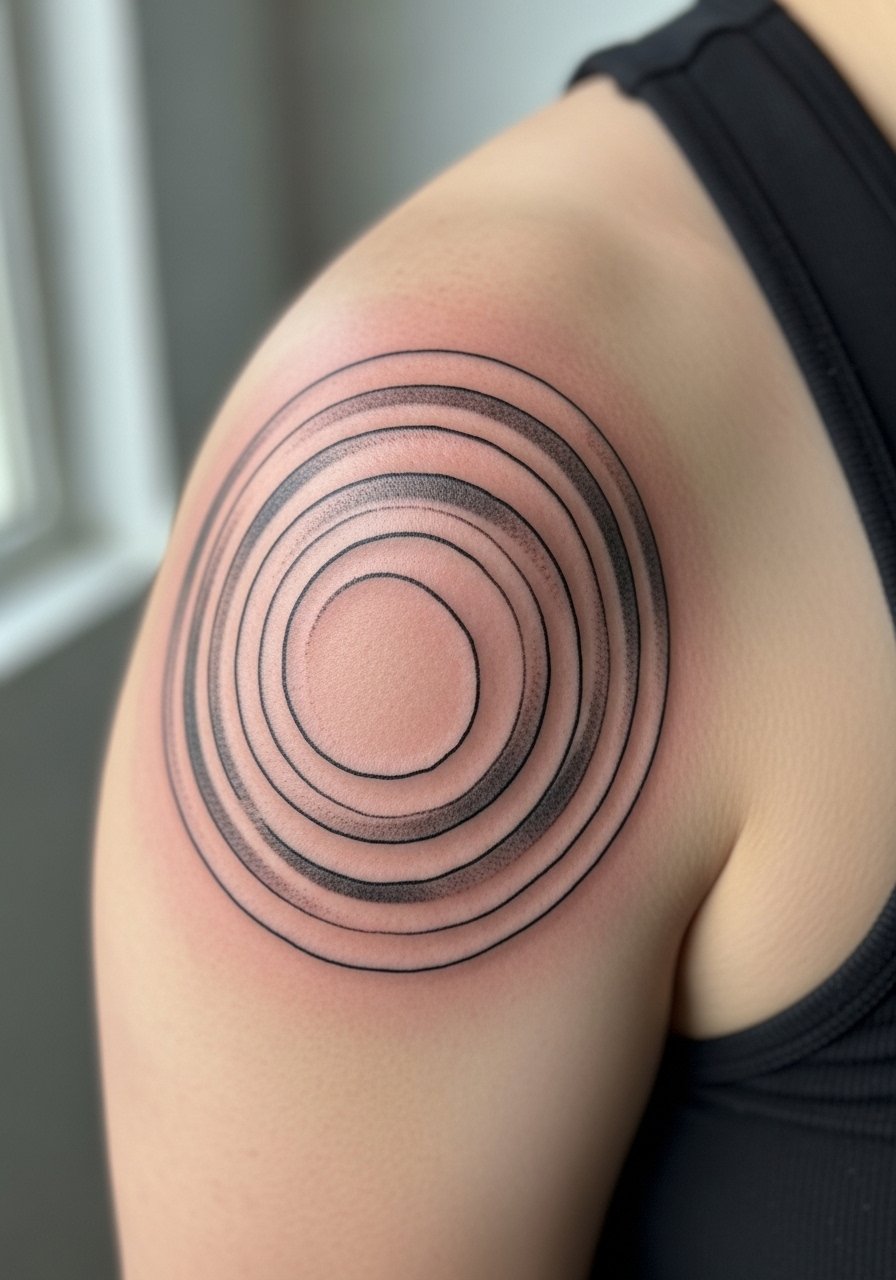
Concentric rings look minimal from afar and intricate up close. The design must follow the muscle flow so rings do not compress on movement. A typical error is treating the shoulder like a flat canvas, which leads to distortion when the arm moves. Tell your artist you want the rings mapped on your arm while you flex a bit so placement accounts for curvature. For longevity, avoid packing tiny inner rings. Pain is moderate and a single session often covers this design. During the appointment, wear a tank top you can pull aside so the artist has stable access.
6. Sacred Geometry Yoke That Extends Toward the Collarbone

This yoke pattern balances symmetry across the shoulder and toward the collarbone. It reads as structured from the front and expansive from the side. The controversy is live among artists on whether ultra-fine symmetry holds on the collarbone edge. One camp warns that the collarbone movement softens fine detail within two years. The other camp says careful spacing and correct needle depth mitigate that risk. Ask the artist which side they fall on and insist on slightly larger pivots where the design crosses the clavicle. Sessions can reach two to three hours if you want mirrored precision. For showing it off, an open-neck dress keeps the yoke visible and elegant.
Session Day Picks
These items match the shoulder and collarbone designs above and smooth out the appointment and first week.
-
Stencil transfer paper kit. Lets you test the exact placement on the rounded shoulder before ink, which is useful for yokes and rings.
-
Topical numbing cream. Applied as directed before a longer shoulder session eases the edge on sensitive collarbone sections.
-
Thin protective film roll. Useful during the first days when straps and bags rub the outer deltoid and potentially disrupt scabbing.
-
Fragrance-free body wash. Cleanses the shoulder area without irritating linework that relies on crisp edges.
-
Aquaphor healing ointment. Thin layers protect fresh lines on curved skin without clogging the channels essential for fine details.
7. Dot Work Crescent Along the Shoulder Curve
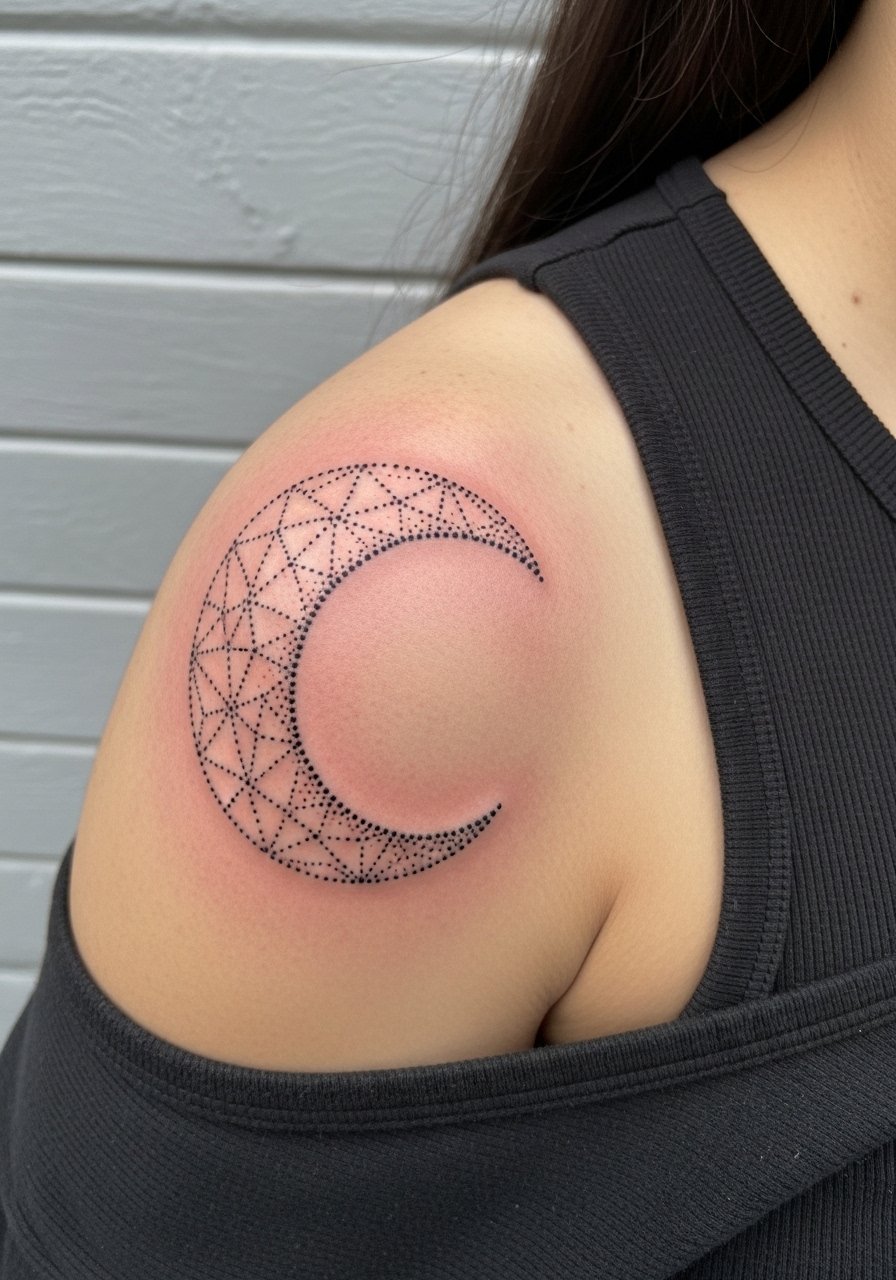
Dot work uses stipple shading to suggest volume without heavy fill. On the shoulder the technique gives a soft gradient that follows the curve. The common mistake is placing dots too densely near edges, which can read like weight over time. Ask for graded density and clear negative edges so the crescent keeps its silhouette at six months and five years. Sessions are usually 90 minutes. It can feel like prolonged tapping but is generally lower on the pain scale than solid black fills. For showing this crescent, a scoop-neck tee frames the curve while keeping the rest covered.
8. Architectural Grid That Bridges Shoulder and Upper Arm

A grid pattern that bridges the shoulder and upper arm reads like a structural panel. It is best for someone planning to expand into a half sleeve later. A real mistake is starting the grid too low or too compact at the shoulder seam, which causes distortion where skin stretches. Tell your artist you plan future expansion so they can design anchor lines for seamless additions. Expect two to three hours for a medium grid. The session will feel like consistent linework in a single plane. This pairs nicely with rolled short sleeves and a linen blazer for a tailored show-off look.
9. Floral Geometry Where Sacred Meets Organic
Combining floral motifs with strict geometry softens the shoulder without losing structure. I recommend this for people who want geometry but also a softer, wearable edge. A mistake I see is copying a botanical reference without adjusting petal spacing to the deltoid curve. Ask your artist to redraw petals to fit the shoulder muscle so the pattern does not compress when you raise your arm. Expect 90 to 120 minutes for a detailed piece. For show-off outfits, pair this design with an off-the-shoulder sweater to reveal the outer petal arc.
10. Chevron Bands That Respect Muscle Topography
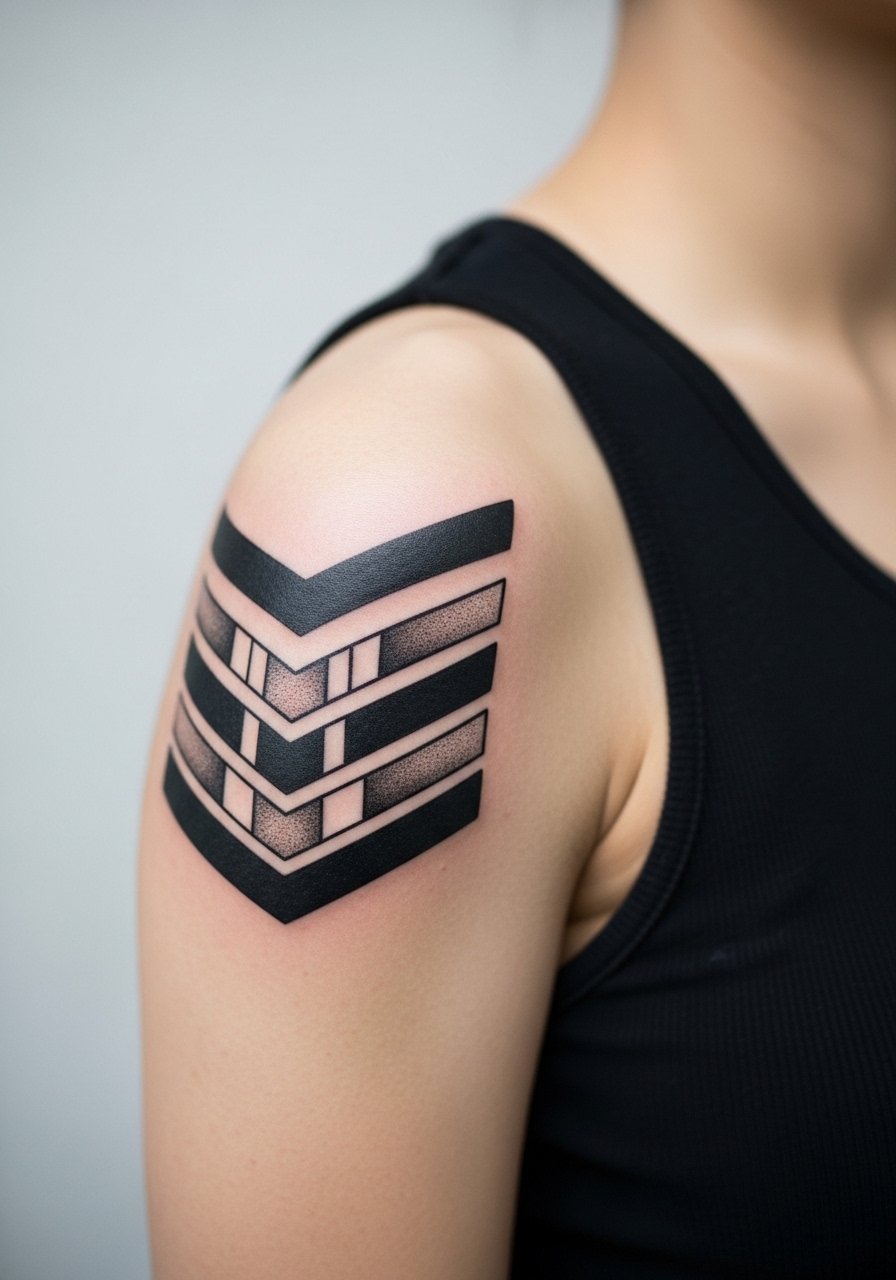
Chevron bands read bold and rhythmic across the shoulder. The trick is aligning the bands with muscle topography so they do not appear skewed when you move. The common error is forcing parallel chevrons without accounting for the roundness of the deltoid. Ask for mockups on your arm in multiple poses. These are low to moderate pain and usually done in a short session under two hours. For wearing and photographing this pattern, a sleeveless crop top keeps the bands visible and crisp.
11. Minimalist Single-Line Geometry at the Shoulder Tip
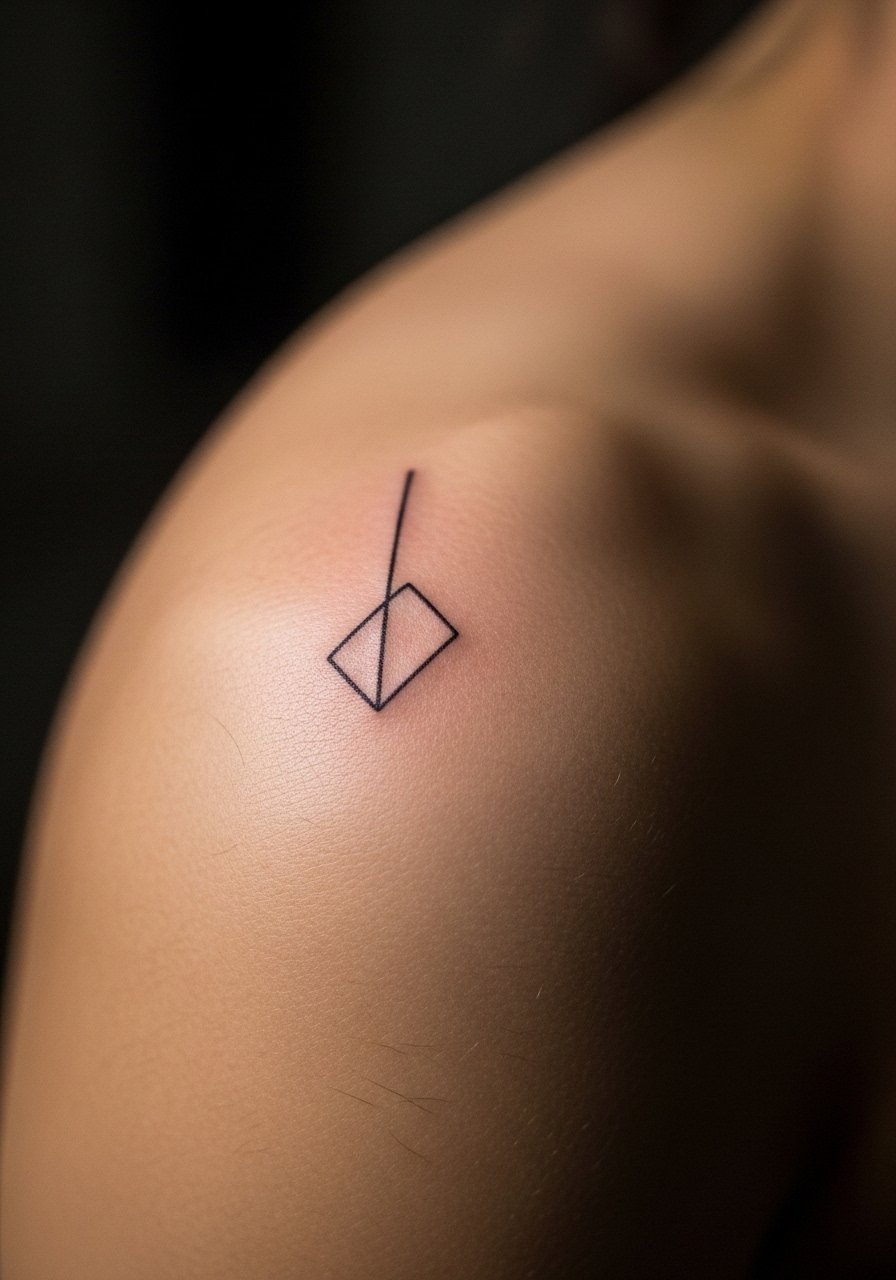
A single-line geometric motif can read discreetly yet intentional on the shoulder tip. It is ideal for someone who wants minimal footprint with geometric intent. The primary mistake is making lines too thin for the rounded edge. Small single-line designs can break or blur sooner than planned. Ask the artist for slightly bolder anchor lines and space them from the edge of bone. A session is often under an hour and the pain is low. For the appointment, wear a racerback tank so the artist can reach the shoulder tip without the fabric pressing on the area.
12. Sacred Cube Cluster Sitting on the Anterior Deltoid

A cluster of tiny cubes creates dimensionality when positioned on the anterior deltoid. It is a good pick for someone who wants geometric depth without a heavy cover. The mistake people make is shrinking cubes so small their perspective lines merge. On the rounded front shoulder those merges appear within two to four years. During consultation, request enlarged vanishing points and slightly increased spacing to prevent early merging. Session time for a compact cluster is about 60 to 90 minutes. This placement pairs well with sleeveless shirts and a thin chain pendant that sits above the design.
13. Radial Spike Pattern Anchored Near the Trapezius

Radial spikes create a sunburst effect from the shoulder into the trapezius. This pattern suits someone who wants an energetic focal point. A common error is starting spikes too close to the neck where movement can soften points. Ask the artist to anchor the center lower on the shoulder so spikes radiate cleanly across the muscle. Pain may rise near the upper neck edge but is usually manageable. Expect a two-hour session for a medium burst. For outfits, a wide-neck top shows the radiating lines elegantly without full exposure.
14. Geometric Wave That Flows Into the Upper Arm

A wave of geometry that moves into the upper arm reads dynamic and natural with shoulder motion. I often recommend this if you plan a future sleeve since the flow makes additions seamless. The error is blocking the wave with random angles that fight muscle lines. Ask the artist to map the wave along your arm in neutral and flexed positions. This design often takes 90 minutes. For session comfort, choose a top you can pull aside such as a button-down shirt to keep the area accessible without tugging.
15. Monoline Spiral That Sits Over the Deltoid Peak

A monoline spiral plays with motion on the peak of the deltoid. It is subtle from far away and intricate in close. The biggest mistake is compressing turns too tightly, which leads to blending over time. Ask for larger turn radii and visible negative breathing room. Sessions are short, often under an hour, and pain is low. This piece pairs with sleeveless linen tops when you want to display the spiral without distraction.
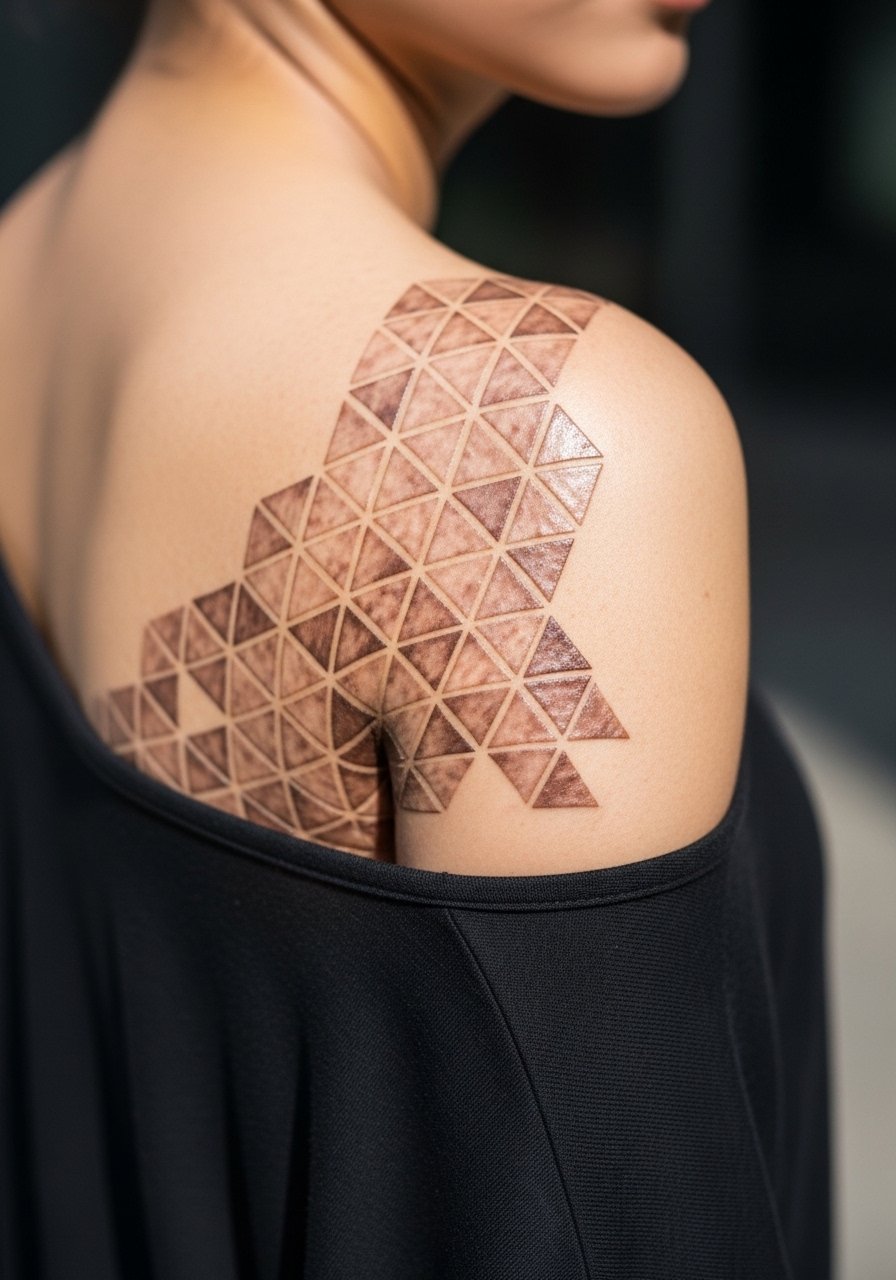
16. Layered Polygon Mesh Across the Shoulder Saddle

A layered polygon mesh reads intricate without being heavy. It suits someone who likes a technical aesthetic. A common failure is stacking too many overlapping polygons without clear hierarchy. That causes the mesh to flatten visually within a couple of years. Tell your artist you want a primary layer and one accent layer with staggered spacing. Sessions can run two to three hours for a detailed piece. For showing, short sleeves or a cropped tee keep the saddle area visible and the mesh readable.
17. Asymmetrical Geo-Scale That Transitions to the Back
Asymmetrical geo-scales offer a dynamic look that moves toward the back. This is a strong option for someone who wants a single shoulder statement that can connect to a back piece later. The mistake is mirroring both sides too precisely when the intention is asymmetry. During consultation, ask for a hand-drawn mock that emphasizes gradual transition and varied scale size. Expect two to three hours if the design reaches the upper back. Consider wardrobe pieces like an open-back top for photos since the transition looks best revealed in motion.
Frequently Asked Questions
Q: Will fine line geometric work blur faster on the shoulder than bold blackwork?
A: From what I have seen, fine line blurs earlier on rounded, frequently sun-exposed areas unless you plan spacing and slightly heavier anchors. Bold blackwork tends to hold shape longer but reads heavier. If longevity is a priority, ask for reinforced main lines and deliberate negative space so the geometry keeps form at three to five years.
Q: How do I prepare clothing for a shoulder session that crosses the collarbone?
A: Choose a wide-neck shirt or a button-down you can slide aside so the artist has stable access without you having to lift your arm continuously. A breathable fabric helps during longer sessions and keeps sweating to a minimum. A wide-neck shirt is an easy option to bring.
Q: Should I expect a touch-up for radial or concentric shoulder designs?
A: Yes. Radial and concentric designs sit on curved anatomy and usually benefit from a touch-up between year one and year three. The need depends on your skin type, sun exposure, and how dense the initial linework was. Asking for touch-up policy during booking is practical.
Q: Are geometric shoulder tattoos appropriate for conservative workplaces?
A: Most shoulder placements are easy to cover with shirts and blouses, so they are usually workplace-friendly. Hand and neck placements still pose the biggest visibility issues. If your industry is conservative, plan placement slightly more posterior so standard tops conceal the piece.
Q: How should I choose between symmetric mandalas and asymmetrical geo-scales for shoulder work?
A: Symmetric mandalas highlight centrality and balance and work well when you want a clear focal cap. Asymmetrical geo-scales feel more like movement and suit someone planning a back or sleeve connection. Think about future expansions and ask the artist to draft both in place on your body before committing.
