
Fine line manta ray tattoos read like a quiet motion on skin. They work best when the lines have room to breathe and the placement either protects them from constant friction or shows them off on purpose. Small adjustments at consultation, like asking for slightly heavier outer contours or negative space in the wings, change how these pieces look at year two and year five. Start here with ideas that fit different placements and lifelines.
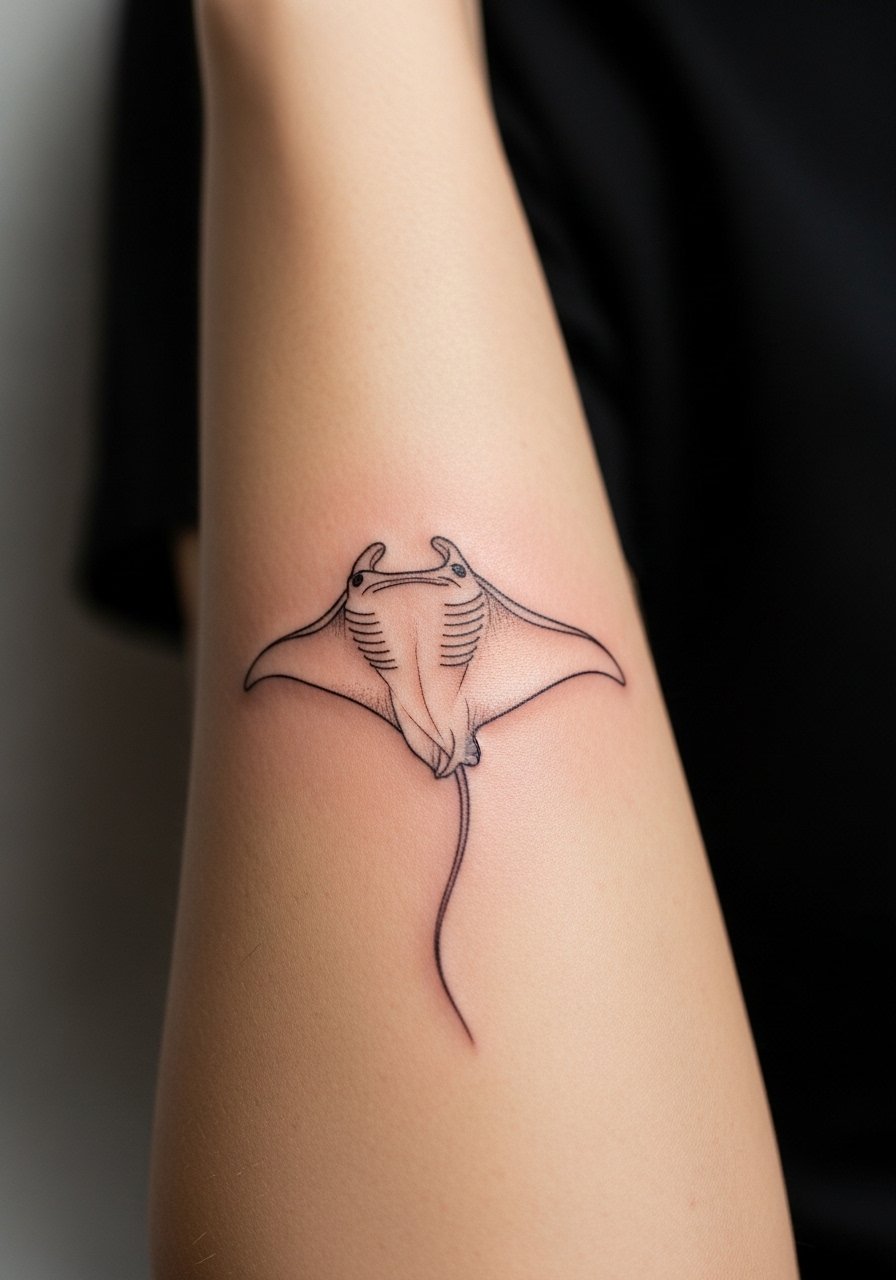
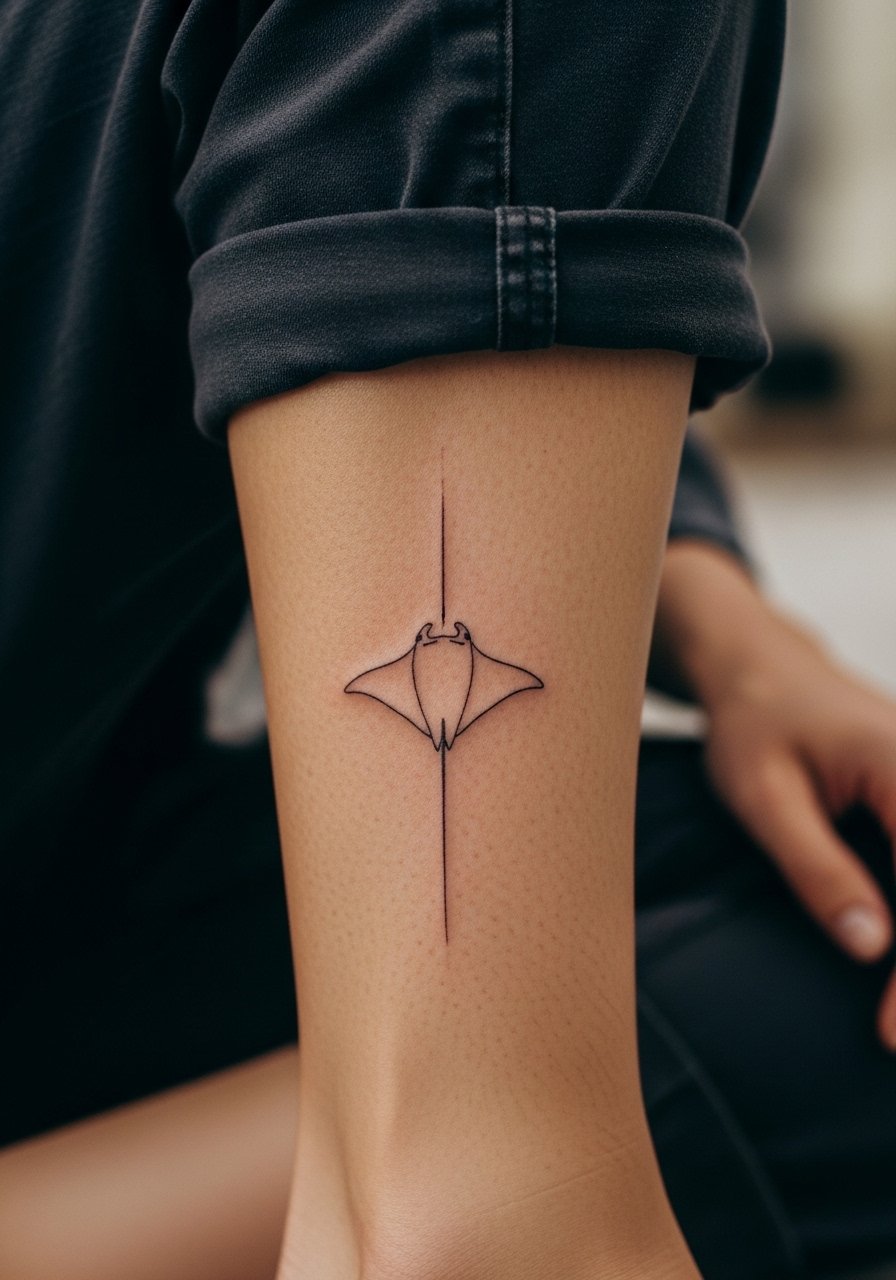
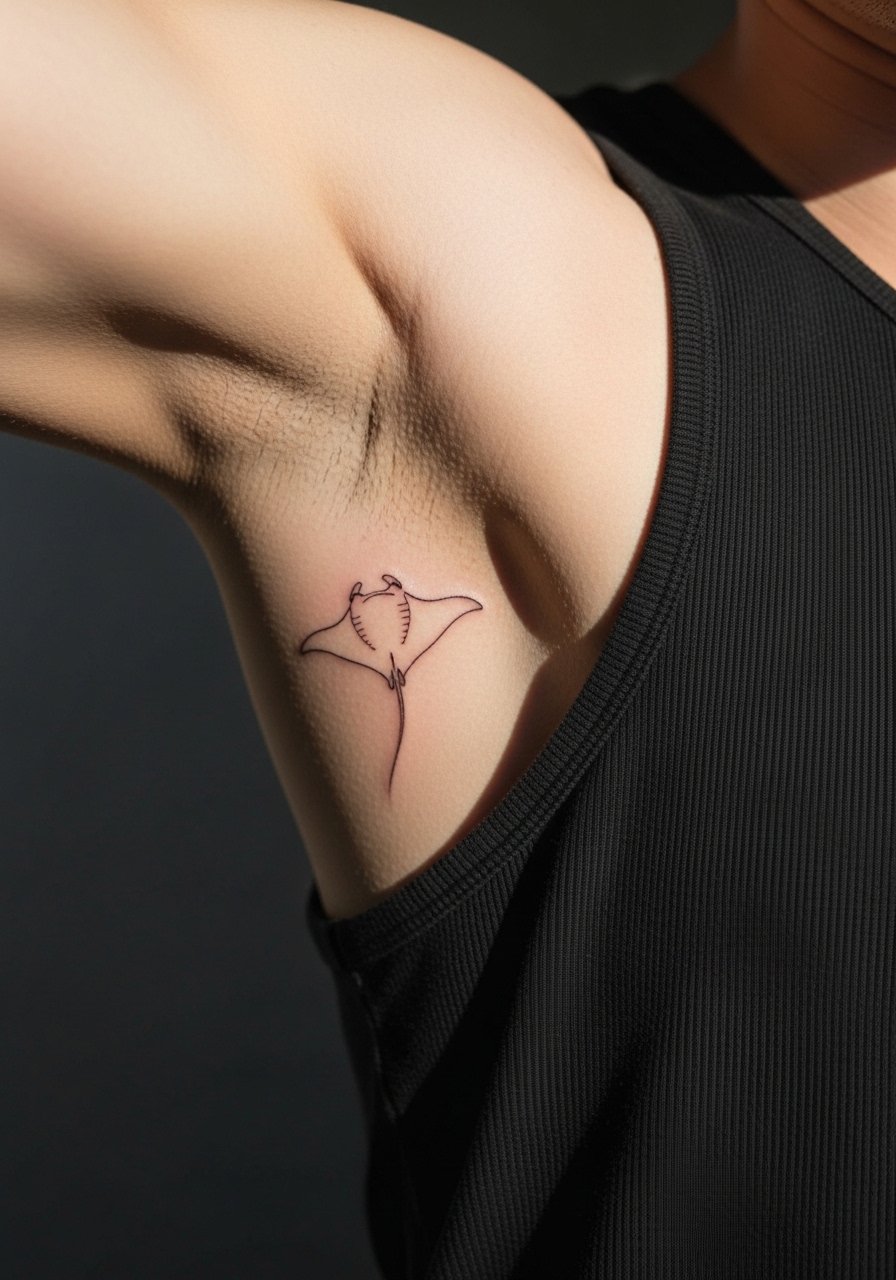
1. Delicate Manta Ray on Inner Forearm
I've seen this placement hold up when the linework avoids hairline-thin strokes too close together. Ask your artist for slightly increased line weight on the contour and for open negative space inside the wing to prevent merging over time. The session is straightforward and usually low on pain, about 45 minutes for a small piece. Common mistake is asking for ultra-fine single-needle lines that blur by year three. For showing it off pair with a rolled-sleeve linen shirt to frame the forearm without hiding the silhouette. Expect touch-up talk around year two if you wear sunscreen inconsistently.
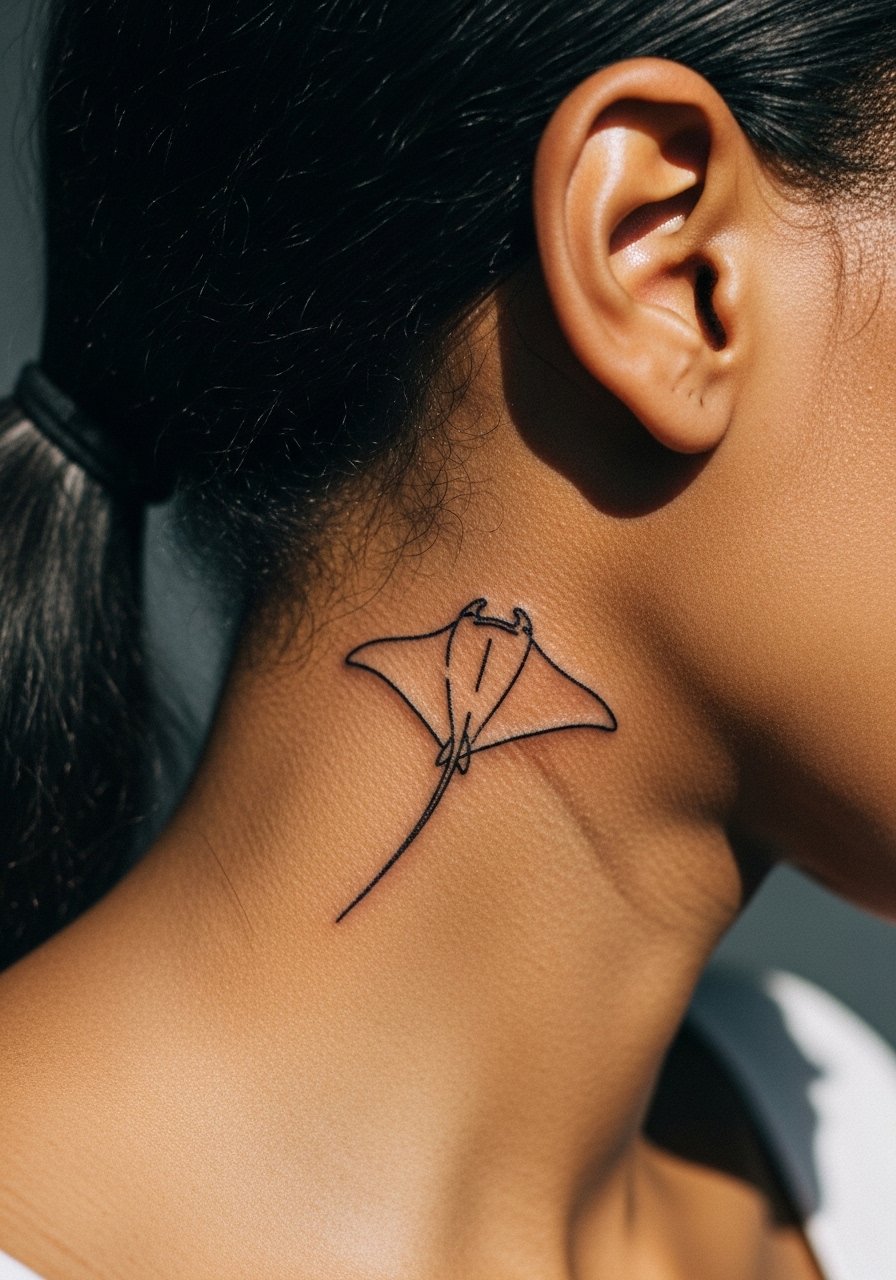
2. Tiny Manta Ray Behind the Ear, Below Hairline
Personal observation lead: these tiny placements read like a secret. Behind-the-ear work must be described as on the skin behind the ear, below the hairline on the neck when you bring references. The area is sensitive and the session is quick but fussy, usually 15 to 25 minutes. One camp in the community says tiny fine line here fades fast; another argues a shallow touch-up keeps it crisp. If you want to hide it for work, the hair does the job naturally. Seek an artist experienced with delicate curves around hairlines. Sensitive area requires specialist technique, so ask about their touch-up policy.
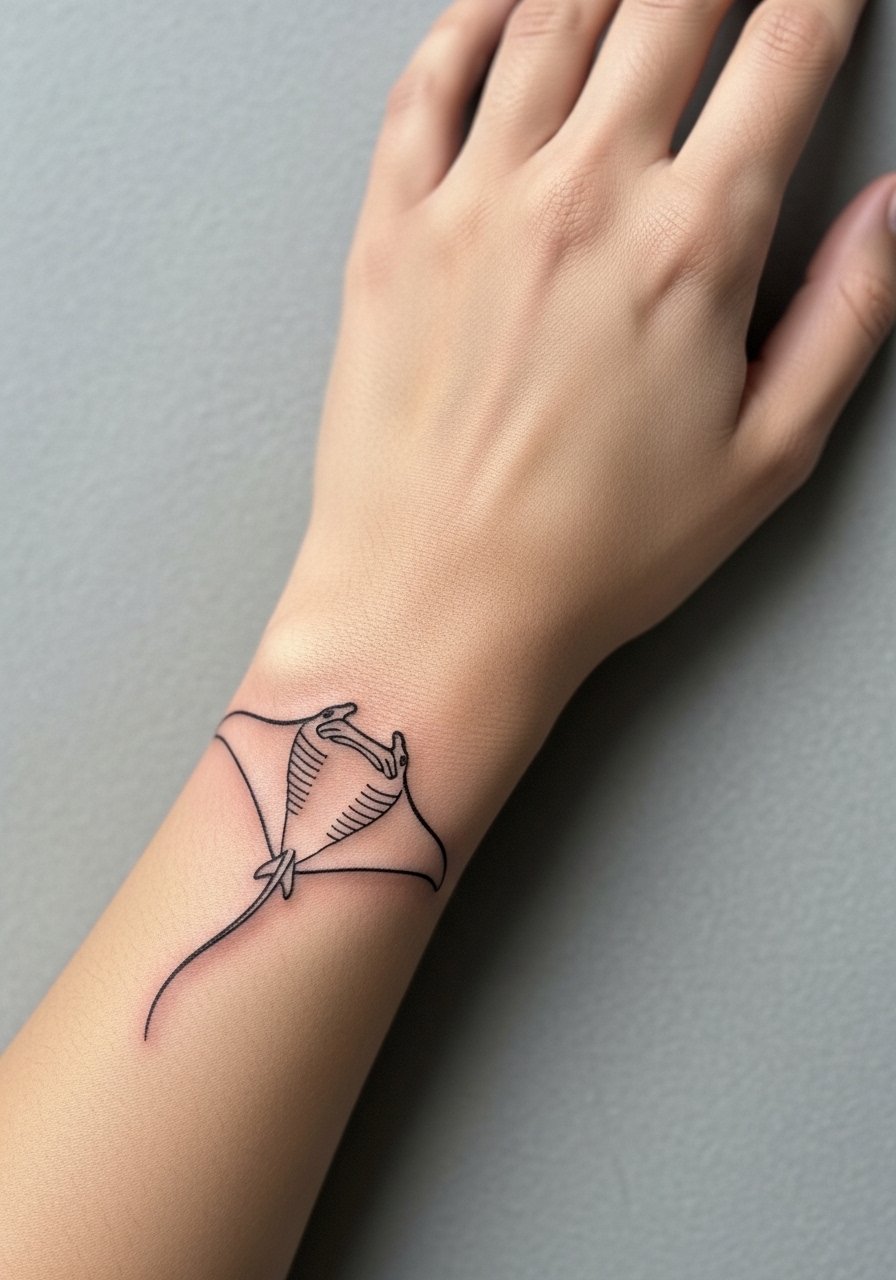
3. Wrist Outline Manta Ray That Wraps the Radius
Pain warning lead: the wrist registers higher on the scale than the forearm but the result reads like jewelry when you keep it shallow and spare. For this wrap, tell your artist you want the wings to follow the bone curve and to avoid dense inner crosshatching that will clog. The biggest mistake is packing detail into a tiny circumference. Session time typically 30 to 40 minutes. Pair this with a minimalist thin chain bracelet that sits just below the tattoo so accessories complement without crowding the linework. Expect the line edges to soften slightly by year two.
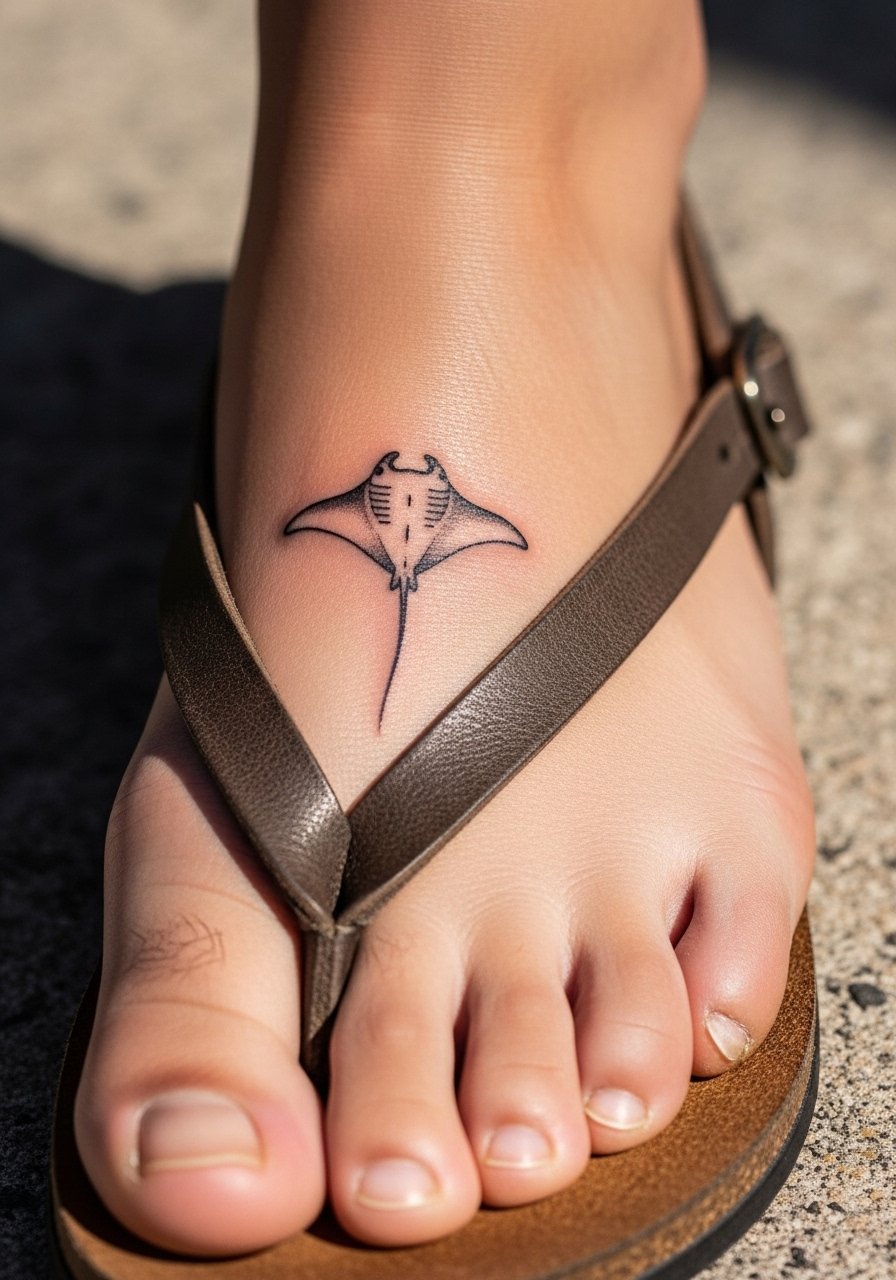
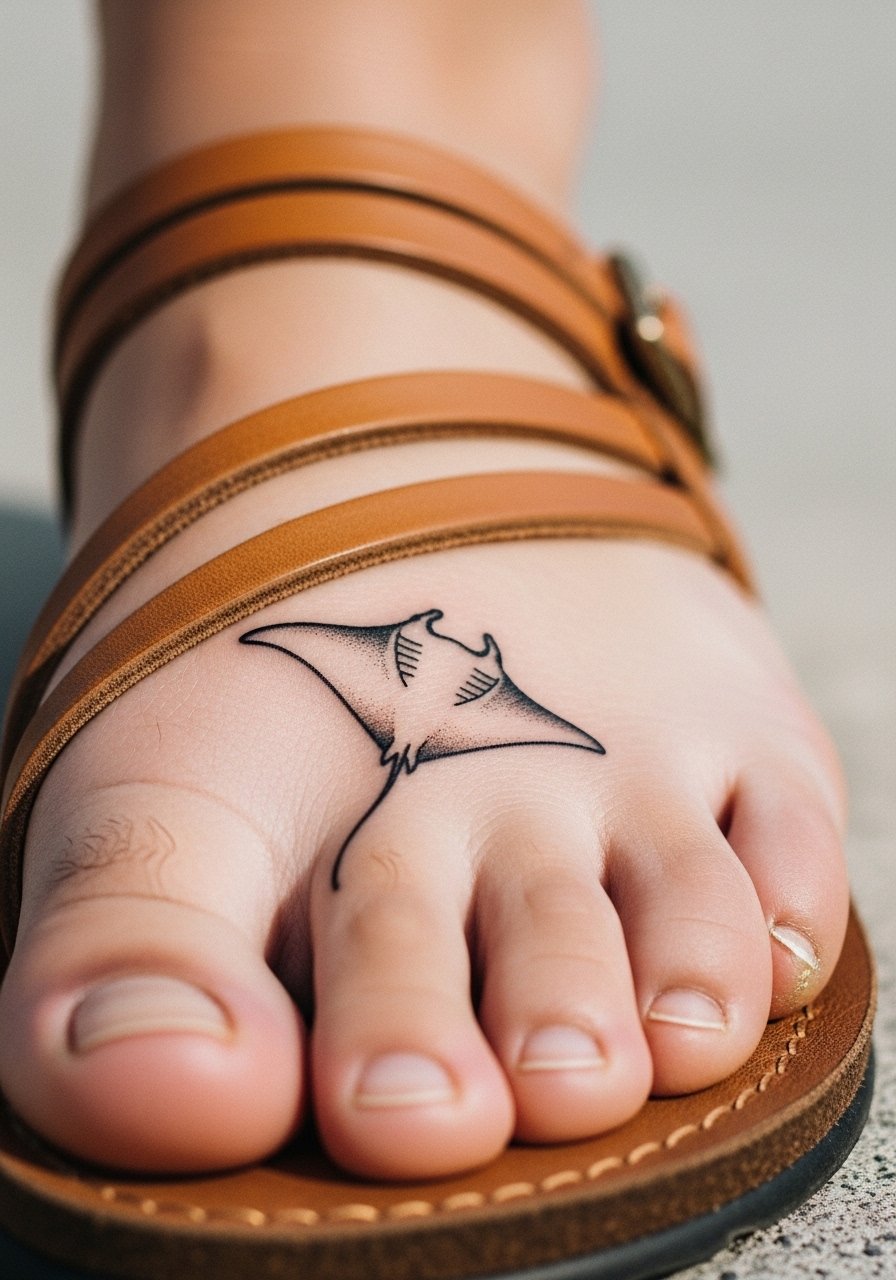
4. Small Manta Ray on the Ankle with Negative Space Wings
Aging/healing lead: ankle placements are exposed to shoes and socks friction, so negative space in the wings helps maintain shape as saturation fades. Tell the artist to keep the lower edge of the wings airy instead of filling them in. Session feel is short but the ankle can be sharp for some people. Common mistake is choosing a dense filler that interacts badly with shoe rubbing. For showing this off, cuffed jeans or a pair of low-profile sandals will put the curved silhouette on display. Plan for a possible touch-up after a year if footwear rubs the area.

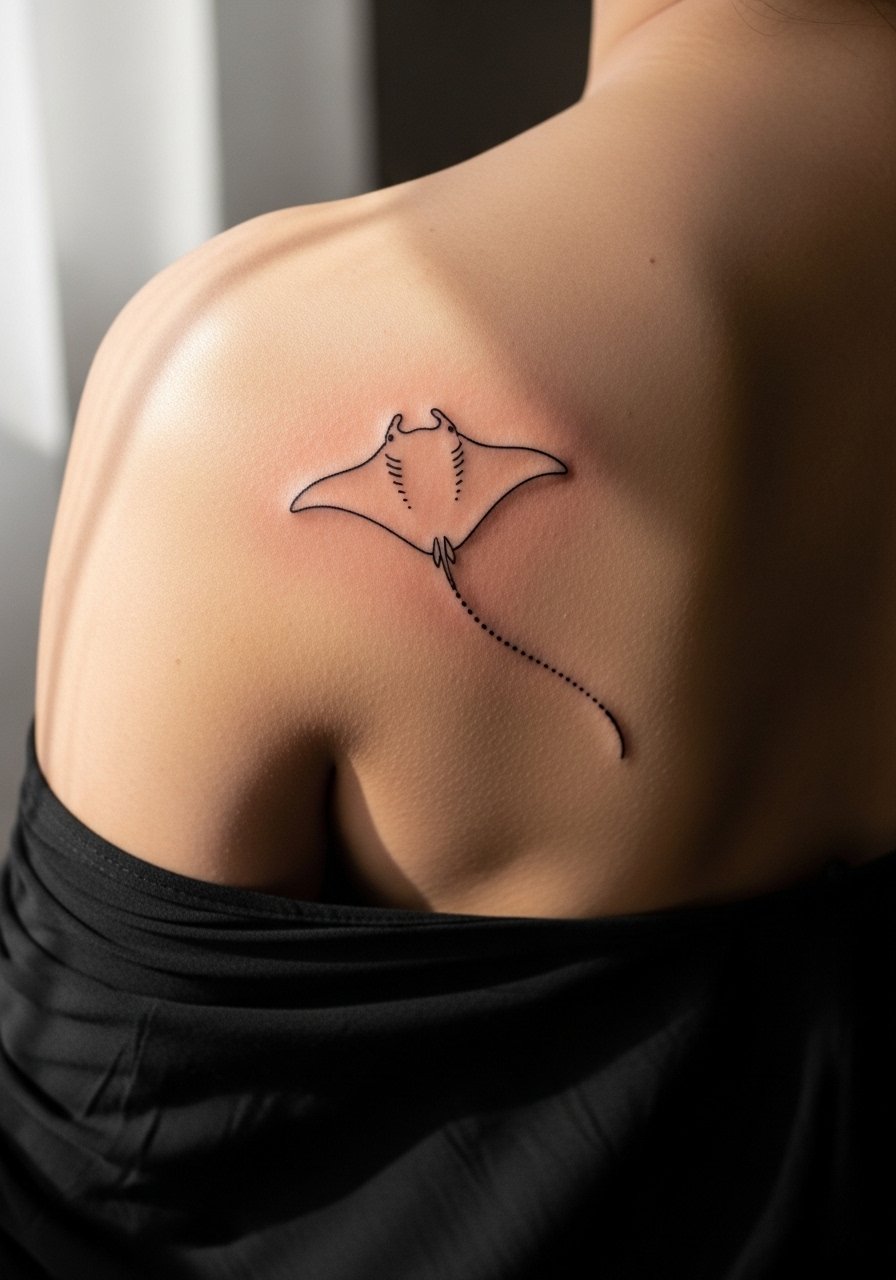
5. Shoulder Blade Single-Contour Manta Ray
Visual impact lead: the shoulder blade gives the wings room to breathe so a single-contour manta ray reads elegant from distance. In consultation, ask for a slightly bolder outer contour and for inner details rendered in stipple shading not solid fill, to avoid broad blur later. Session is medium difficulty and comfortable if you can lie still on your stomach. A common mistake is trying to compress a large complex composition into the same footprint. Pair this with a button-down shirt you can pull aside during the session so the artist has clean access. Healing is usually smooth with minimal touch-up needs.

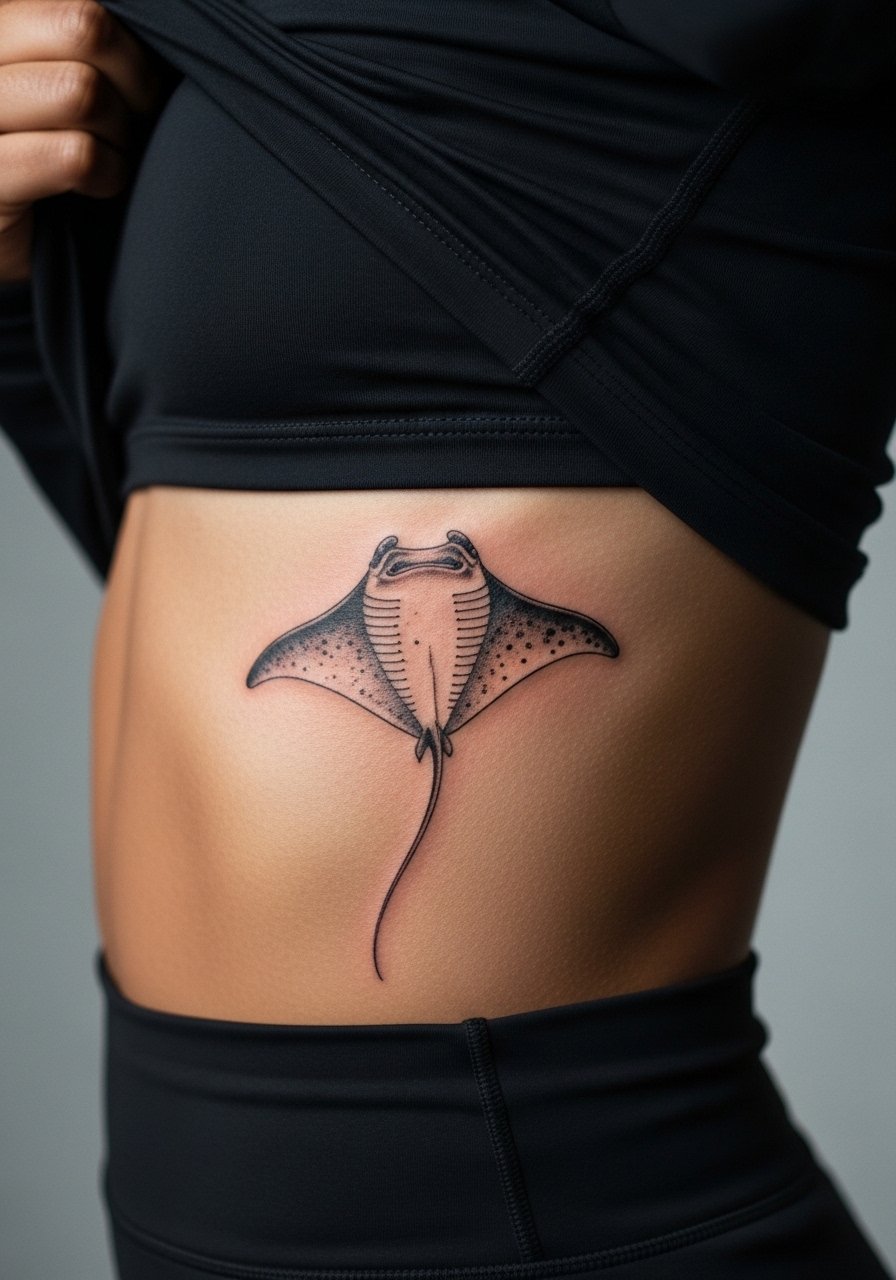
6. Ribcage Flowing Manta Ray That Follows the Curve
Consultation lead: ribcage placements split artists into two camps. One camp says fine line on ribs blurs quickly because the skin stretches and moves. The other camp says with proper depth and spacing it settles fine. Tell your artist you want the piece to follow the ribs' natural curve with slightly more spacing between lines. Pain is higher here and sessions tend to be slow and stop-start. Expect touch-ups earlier than arm pieces, often around year two to three. For session comfort, wear a cropped athletic top lifted just enough to expose the area.
Studio Day Picks
The rib, shoulder, wrist, ankle and behind-the-ear ideas above all ask for small prep items that make the session and the first week easier.
-
Stencil transfer paper kit. Lets you and the artist preview placement on skin before the needle touches, especially helpful for the shoulder blade and rib layouts.
-
Topical numbing cream. Applied about 45 minutes prior, it helps manage rib and ankle sensitivity without interfering with linework.
-
Thin protective film roll. Keeps wrist and ankle pieces protected from friction during the first few days.
-
Fragrance-free gentle body wash. Cleanses healing areas without stripping oils that support linework integrity.
-
Aquaphor healing ointment. A thin layer for the first few days helps with dry flaking on low-saturation fine line areas.
7. Collarbone Minimal Manta Ray with Open Wings
Mistake lead: people often place too much detail along the collarbone which ends up distorted by clothing and movement. For a piece that ages well, ask for an open wing design that uses negative space and a slightly heavier outer contour. Session is short and the collarbone can be tickly rather than painful. Show-off pairing works best with a thin chain pendant necklace that sits just above the wings without competing. Expect healing to keep the silhouette clear if you avoid abrasive fabrics while it settles.

8. Calf Longform Manta Ray in Flowing Single Line
Personal observation lead: the calf is forgiving for longer, single-line compositions because the skin moves less and the silhouette reads while walking. Tell your artist you want a continuous line that tapers at the tail and for the wings to include small breaks of negative space. Session takes about 60 minutes for a mid-sized piece and pain is manageable. A common issue is trying to cram extra texture which makes the wings look muddy after healing. For the session, wear loose drawstring linen pants you can roll up without creating pressure on the area.
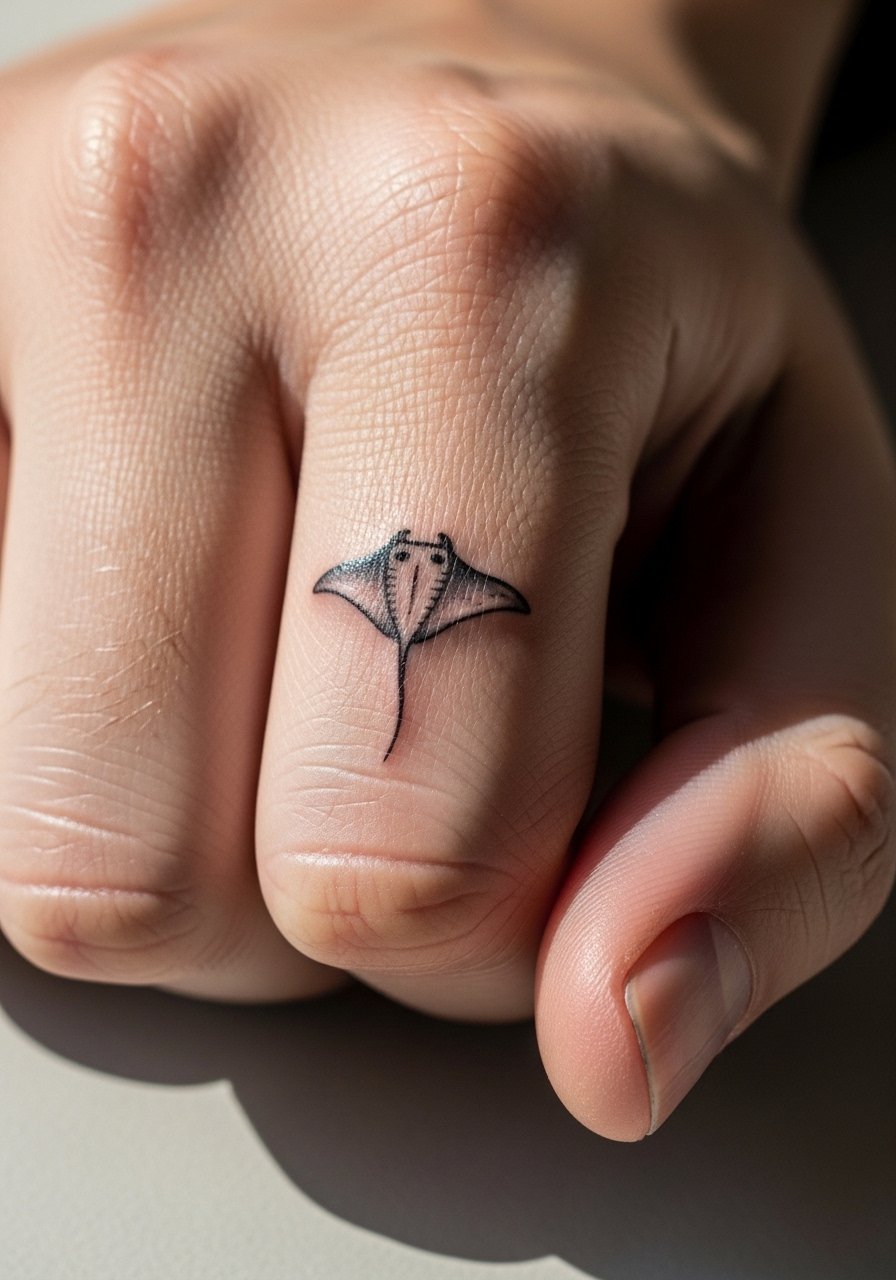
9. Micro Manta Ray on a Finger Side
Mistake lead: the finger is clear and crisp at first but constant hand washing and skin shedding mean lines soften fast. If you want a finger-side manta, ask for a simple silhouette with no interior detail. Session is very short but higher in touch-up likelihood. People underestimate the need for annual or biennial touch-ups for finger placement. For a subtle show-off, consider stacking a minimalist ring set that frames the design and keeps attention off detail loss. Hands also face workplace considerations, so factor that in.

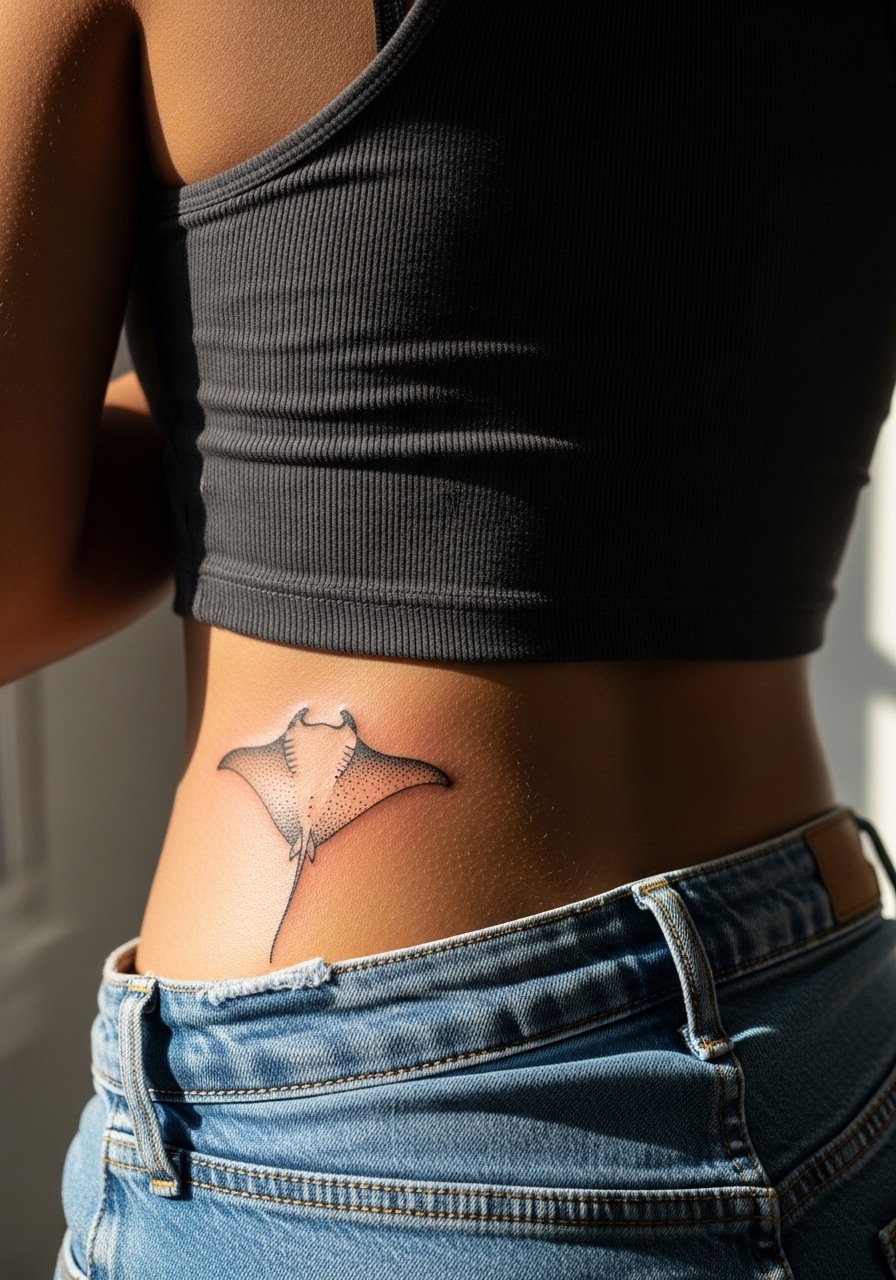
10. Lower Back Minimal Manta Ray with Dot Shading
Visual impact lead: lower back gives a broad canvas so adding subtle stipple shading in the wings creates depth without heavy fill. Ask your artist for spaced dots rather than solid gradients to avoid early blur. Sessions are moderate and healing is easy if clothing sits high enough to avoid chafing. Common mistake is requesting too much saturation which becomes a soft block with time. For showing it off in summer, a high-waisted bikini bottom that reveals the curve complements the piece. Expect touch-ups after three to five years depending on sun exposure.
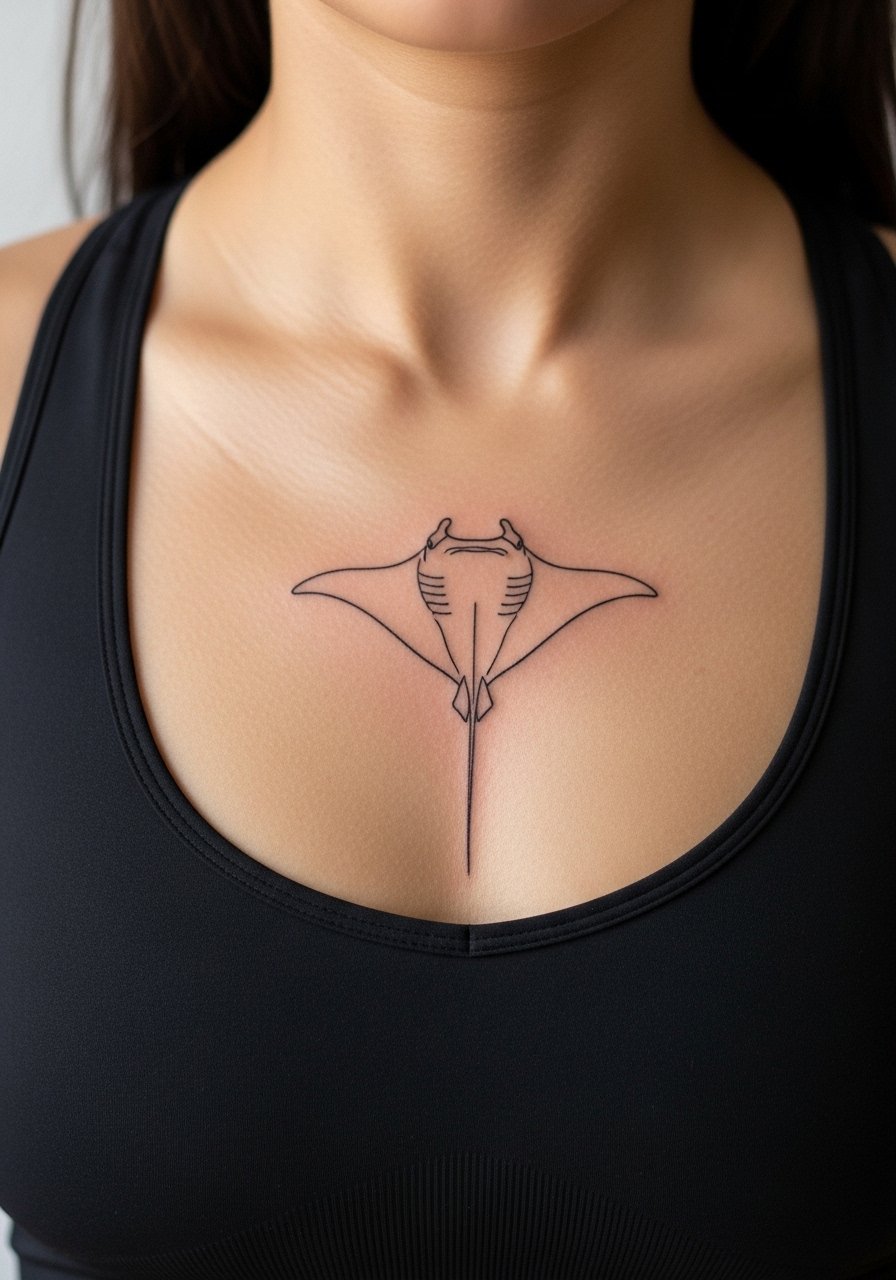
11. Sternum Centerpiece Manta Ray, Subtle and Symmetrical
Consultation lead: sternum pieces require a fitted sports bra or bandeau top during sessions so the artist can map the centerline without exposing more than the area. Ask for symmetry in the outer wings and for interior minimal linework to preserve clarity. Pain is higher in the sternum and sessions may be split. This placement ages well if spacing is generous. For session comfort, wear a fitted top you can pull down slightly to expose only the sternum area. Specialist technique is ideal for this spot.
12. Thigh-Side Manta Ray That Tucks Under Clothing
Personal observation lead: the outer upper thigh is forgiving for larger, decorative rays that tuck under shorts or skirts. Tell the artist you want the tail to angle toward the hip so it looks intentional when revealed. The session is comfortable and usually longer for larger work. A common mistake is over-detailing the wing interior which does not age as well under friction from clothing. For session wear, bring loose high-waisted shorts you can shift without rubbing the area. Touch-ups are less frequent here than on hands.

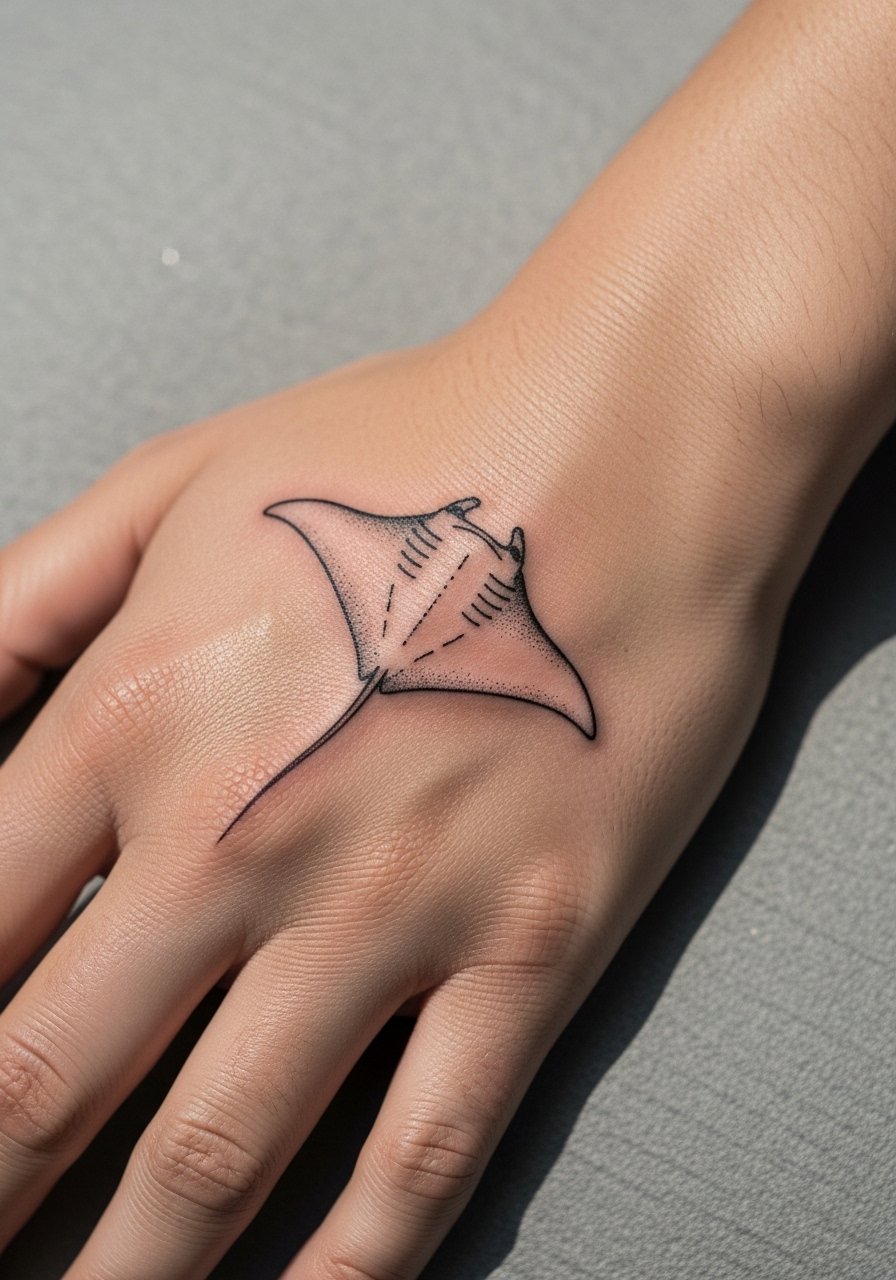
13. Tiny Manta Ray on the Back of the Hand
Pain warning lead: hand tattoos are visible and exposed but they also face constant friction that softens linework fast. If you want a back-of-hand manta, keep the design as an outline with minimal interior detail and prepare for touch-ups. Session is quick but healing requires careful hand use. A common mistake is expecting the same longevity as an upper arm piece. For a clean look, pair with a lightweight cotton glove during chores in the first two weeks to reduce abrasion. Consider career implications before booking.
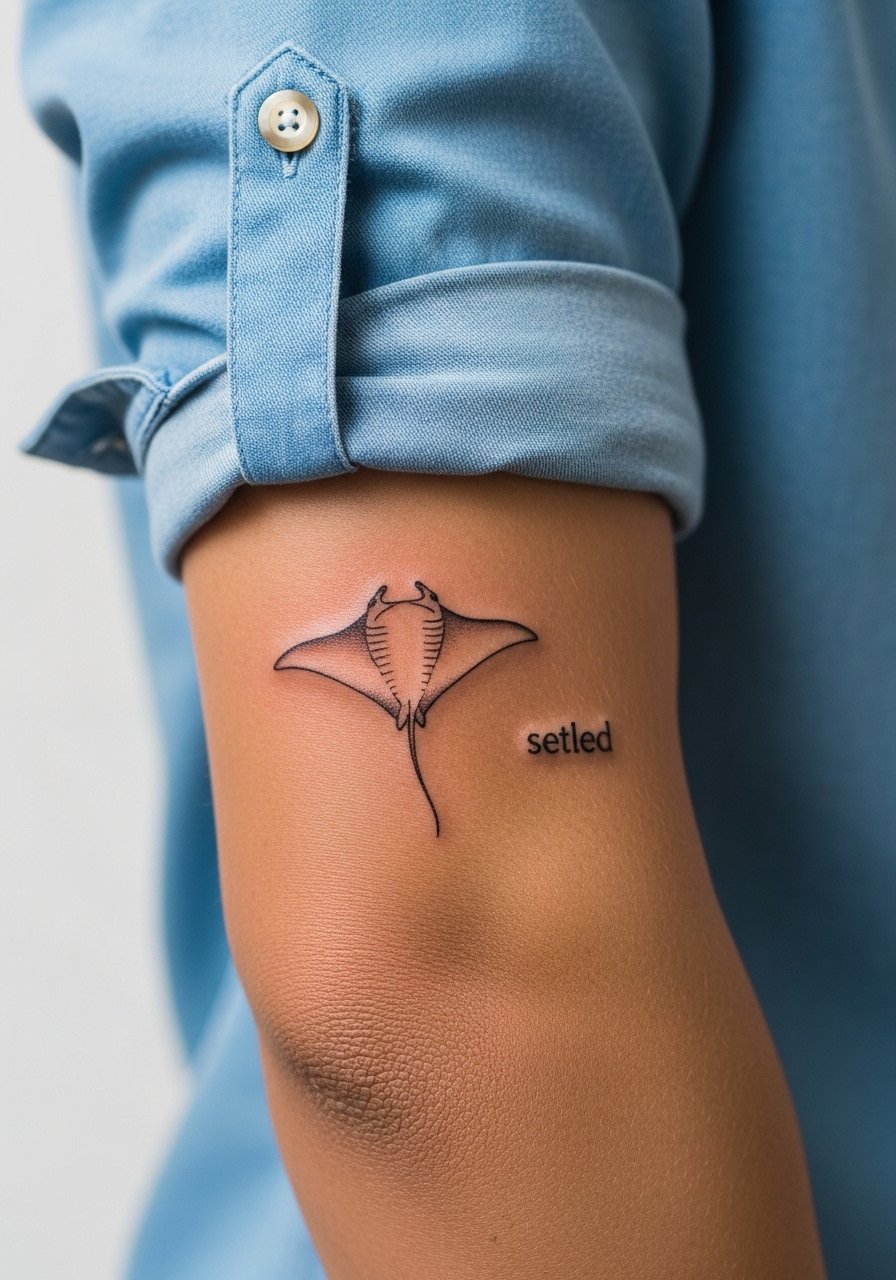
14. Inner Bicep Curved Manta Ray in Single-Line Form
Consultation lead: inner bicep skin is softer and the area sees less sun, so single-line manta rays can remain crisp longer if spaced. Request slightly bolder outer control lines and light interior stipple. Session is ticklish for some and usually moderate in length. The mistake is packing too many curves in a small height. For the session, wear a loose tank top so the artist can access the inner arm easily. Touch-ups tend to be less frequent than on hands and fingers.
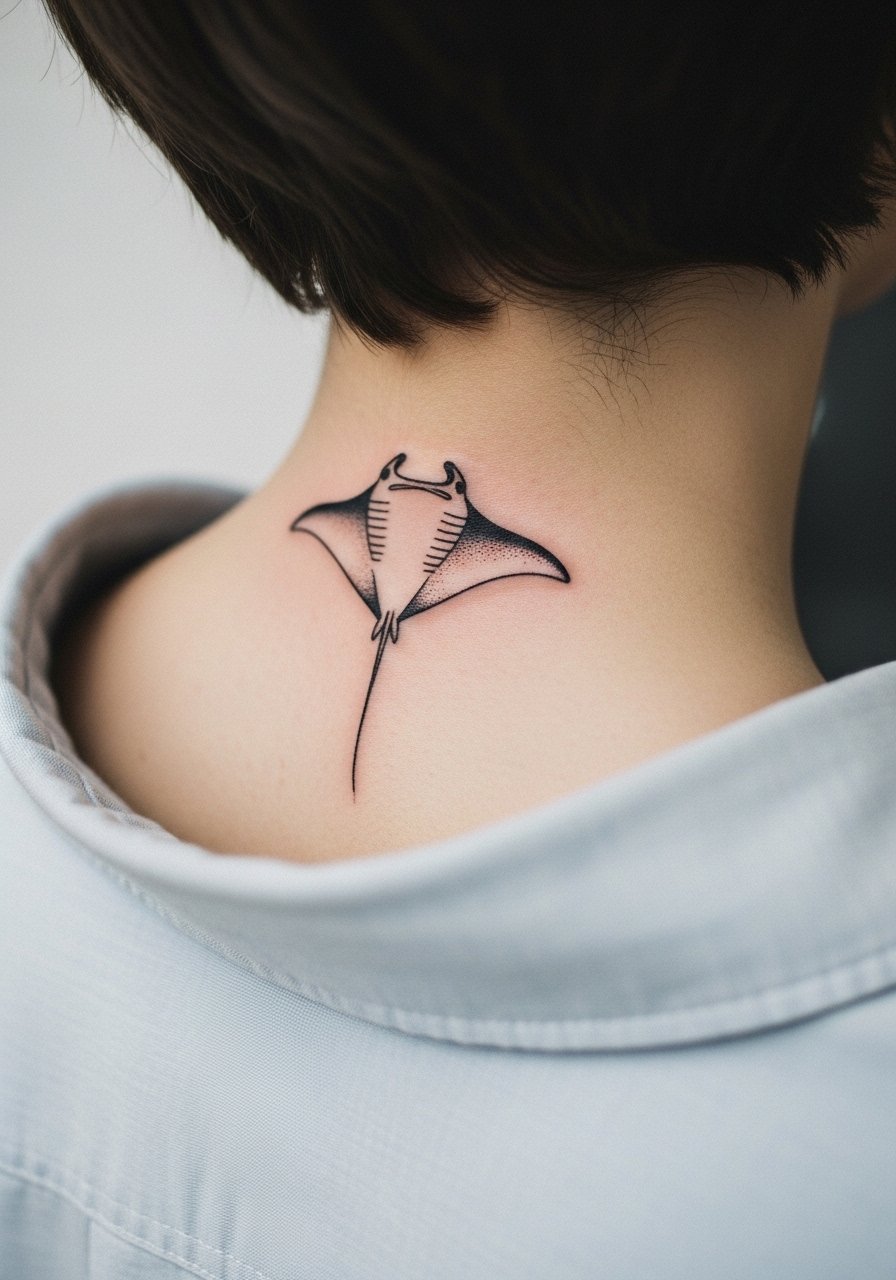
15. Small Manta Ray at the Nape, Side Neck Framing
Styling lead: side neck pieces must be shown with a wide-neck shirt or collar pulled to the side during the session to avoid overexposure. Ask for a tilted placement that reads well with hair tucked behind the ear. Pain is low to moderate and the session is brief. The common error is choosing dense lettering or marks near the linework which competes visually. For daily wear, a wide-neck sweater or collared shirt that frames the tattoo keeps the composition balanced.

16. Minimal Manta Ray Across the Scapula with Dot Trail
Visual impact lead: a trail of stipples trailing from the wingtip across the scapula adds motion without heavy fill. Tell the artist to keep stipple density low and to avoid solid fills near the spine. The session is medium and you will need to lie on your stomach. Most mistakes are about putting shading too close to thin lines which encourages blur. For showing it off, an open-back dress lets the negative spaces read. Healing usually keeps the contour intact with occasional long-term touch-ups.
17. Micro Manta Ray Near the Ankle Bone
Mistake lead: placement too close to the ankle bone can make the lines look uneven as the skin wraps. Ask for slightly curved wings that mirror the bone and for the tail to avoid the joint area. Session is quick and can be sensitive. For shoe season, a pair of simple sandals keeps the tattoo visible without friction from enclosed shoes. Expect gentle softening by year two if footwear rubs the spot.

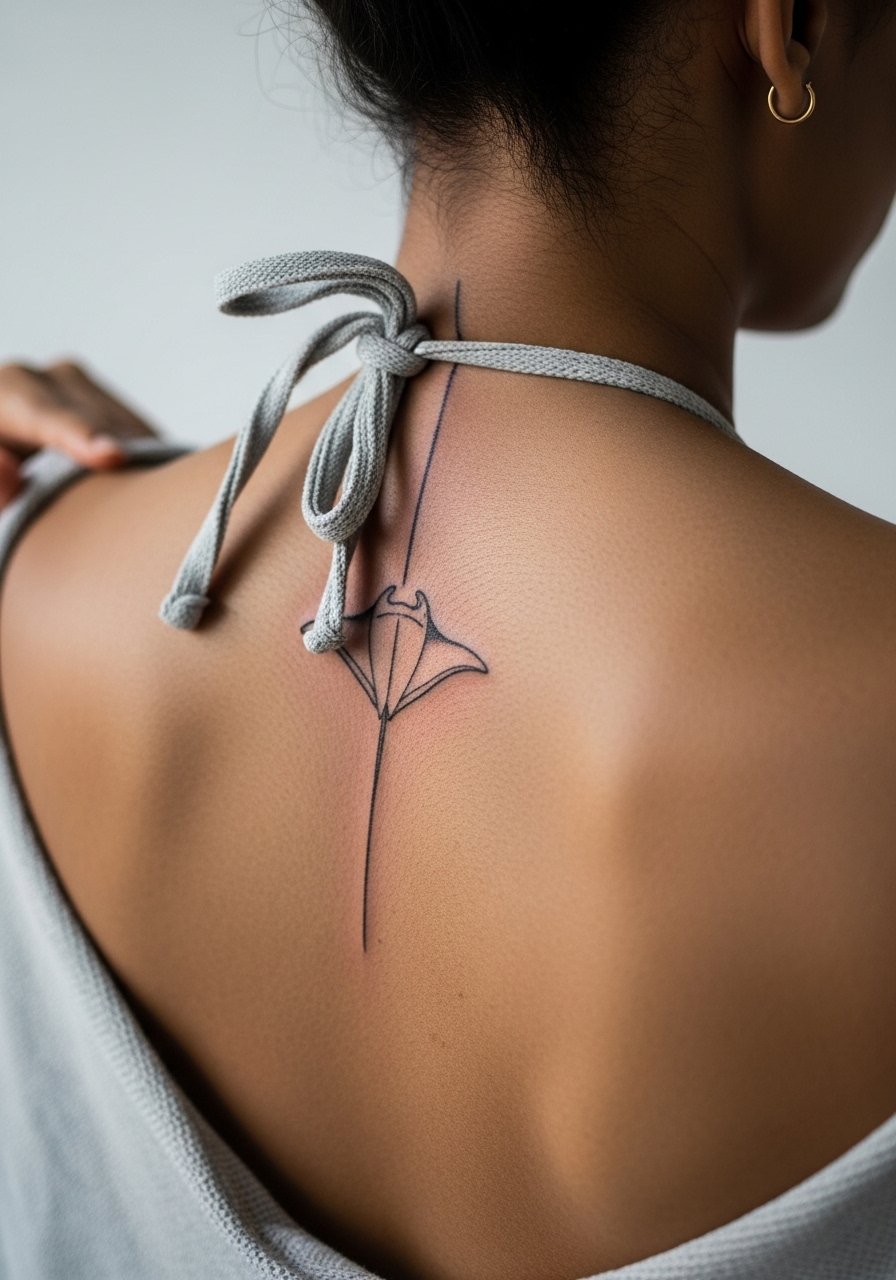
18. Single-Line Manta Ray Along the Spine
Aging/healing lead: spine placements need generous spacing between lines to avoid blur as the skin stretches. Request single-line contours and avoid dense internal textures. Sessions on the spine can be intense and may be broken into parts. A common problem is trying to make a highly detailed piece thin enough to fit; those details rarely last. For showing off in summer, a halter top or open-back style highlights the vertical motion. Seek an artist used to long, central lines.
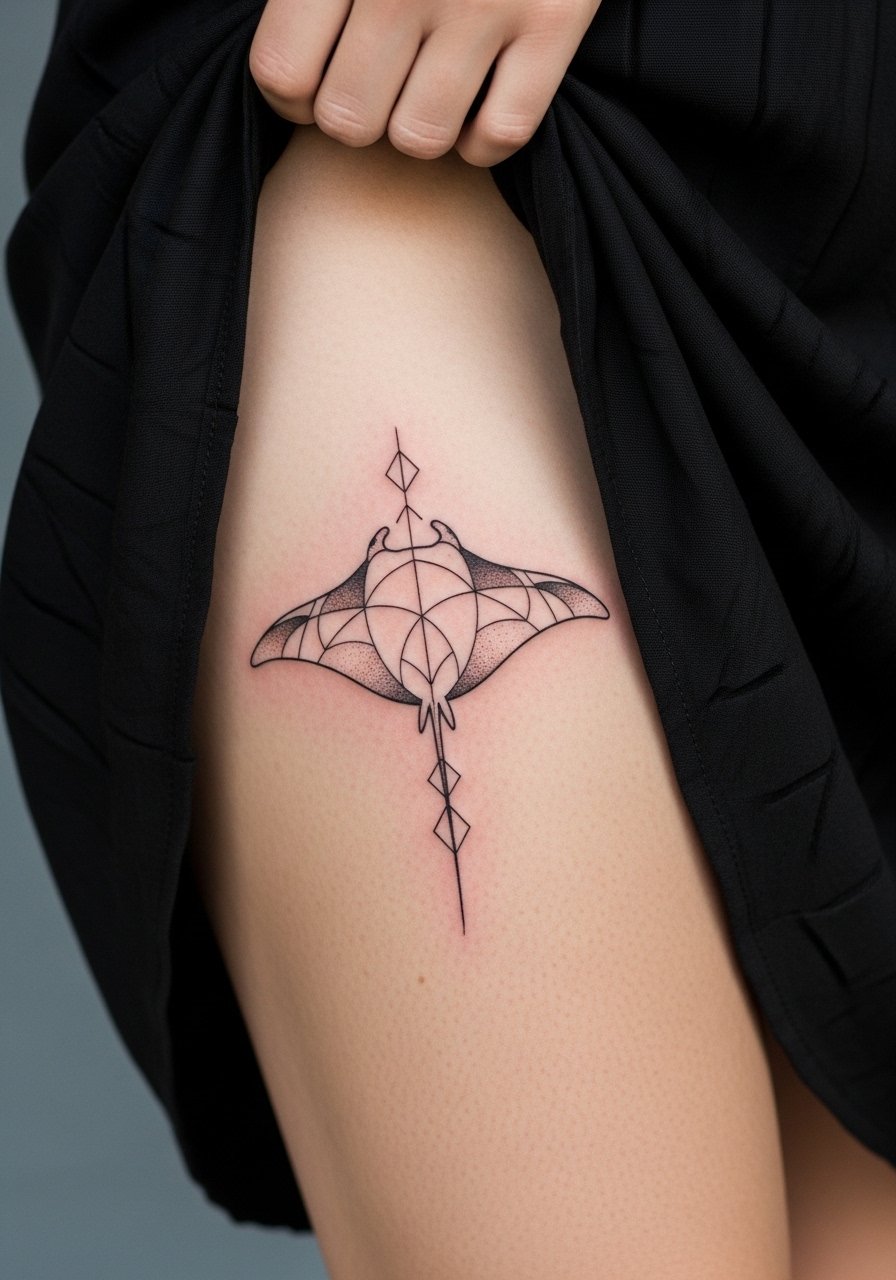
19. Geometric Negative-Space Manta Ray on the Thigh
Visual impact lead: pairing geometric shards with negative-space wings gives a contemporary edge while preserving linework clarity. Tell the artist you want the geometry to sit behind the ray not inside it, so the silhouette remains clear. Session is longer for a larger thigh piece and healing is typically straightforward. Mistake is adding too many intersecting lines that create visual noise after healing. For showing it off, a flowy midi skirt that parts or lifts offers a teasing reveal without rubbing the area.
20. Tiny Manta Ray on the Top of the Foot
Pain warning lead: top-of-foot tattoos can be sharp and the skin is thin so linework must be simple. Ask for a compact silhouette with no interior shading to reduce blur from shoe contact. Session is quick and healing requires boot or shoe choices that avoid pressure. A pair of sandals with open toe minimizes rubbing during the first weeks. Expect annual touch-ups if you wear closed shoes frequently.
21. Tiny Continuous-Line Manta Ray on the Inner Wrist
Personal observation lead: continuous-line designs on the inner wrist read like a small script. Ask for a slightly heavier starting point and tapered line to maintain contrast as the piece ages. Session length is short and the area is sensitive but manageable. The common mistake is excessive fine interior detail that disappears after healing. For showing it off, try a minimalist watch that sits above the tattoo without covering it. Plan for a possible touch-up at two to three years.

22. Manta Ray Sleeve Accent Near the Elbow
Consultation lead: elbows and surrounding zones bend and stretch, so keep any manta ray accents there slightly larger and avoid super-fine crosshatching. Tell your artist you want a simplified silhouette with spaced linework to resist distortion. Sessions around the elbow can feel scratchy and may be split. A common mistake is compressing too much detail into a joint area. For the session, wear a loose button-down shirt you can roll up so the artist has access without pressure. Expect touch-ups earlier than on flatter areas.
23. Micro Manta Ray on the Side of the Finger Knuckle
Mistake lead: knuckle placements are high movement zones, so simplicity is essential. Ask for a tiny silhouette with no interior marks and expect annual touch-ups. The session is very short but the finished piece will soften quickly if overworked. For hand use during healing, a pair of thin cotton gloves during dirty work cuts down on abrasion. This placement also has workplace visibility considerations, so weigh that in your decision.
24. Double Manta Ray Duo Flowing Across the Lower Rib
Controversy lead: double rays on the ribs bring up the same debate as single fine line ribs. One camp warns about early blur due to skin movement. The other camp insists spacing and proper depth make paired designs durable. For a duo, ask for mirrored spacing and for the artist to stagger the lines to follow the ribs. Sessions will be long and painful for most people. The common mistake is putting the two rays too close together which accelerates visual merging. Expect touch-ups sooner than for back or thigh work.

25. Tiny Manta Ray on the Side of the Toe
Visual impact lead: toe tattoos are tiny and wear quickly but can be a playful secret when kept to outline form. Session is brief and the area is sensitive. Ask for a single contour line and accept that frequent touch-ups may be necessary. Avoid trying to add interior shading. For summer reveal, pair with a simple toe-ring or a sandal that keeps the area visible without pressure. Longevity is limited compared with larger placements.
26. Minimalist Manta Ray on the Outer Hip
Personal observation lead: the outer hip is forgiving and allows slightly larger shapes that peek out of swimwear. Tell your artist to angle the wings to follow the hip curve and to avoid dense fill near the waistband. Session is comfortable and healing is easy with roomy bottoms. A common mistake is placing the tail where elastic bands sit which causes irritation. For session wear, choose high-cut swim bottoms or loose shorts so you can shift fabric without rubbing. Touch-ups are moderate and usually tied to sun exposure.

27. Micro Manta Ray at the Base of the Neck, Back
Consultation lead: the base of the neck reads like a small emblem and works well with minimal linework that follows the trapezius. Ask for a centered placement and for the artist to avoid tight interior textures. Session is brief and sensitivity is low to moderate. The common mistake is trying to extend the piece into denser work that does not read in small scale. For showing it off, a collared shirt pulled to the side frames the area without overexposure. Expect occasional touch-ups if regularly exposed to sun.
Frequently Asked Questions
Q: Will a fine line manta ray blur faster on the ribs than on the forearm?
A: It depends on how tight the lines are and how much spacing the artist allows. Ribs move a lot which can encourage lines to soften, so many artists prefer slightly heavier contours there. For the forearm, thinner styles often last longer because the skin is flatter and gets less friction.
Q: How should I describe the exact line weight and spacing to an artist during consultation?
A: Bring photos that show line weight you like and say aloud that you want a slightly heavier outer contour with open negative space in the wings. Mention whether you prefer stipple shading or no interior fill. Asking those specifics prevents the common mistake of getting lines that are too fine for the chosen placement.
Q: Do tiny manta rays on fingers or toes need annual touch-ups?
A: From what I have seen, yes, those spots usually need touch-ups more often than larger placements because of constant washing and fabric contact. Expect one to two touch-ups within the first few years if you want them to stay crisp.
Q: How should I dress to the session for a chest, rib, or sternum manta ray?
A: Wear a wide-neck shirt, fitted sports bra, or cropped top you can shift so the artist accesses only the area. For chest and sternum work try a fitted top you can pull down slightly. For ribs, a cropped tank works well. If you want an example, a racerback tank top covers comfortably and allows access.
Q: Are there cultural considerations with manta ray imagery I should be aware of?
A: Manta rays appear in different coastal cultures and carry specific meanings in some traditions. If you plan a design referencing indigenous or cultural motifs, consider subtle variation and ask the artist about respectful adaptation rather than direct replication.
Q: How do I find an artist who keeps fine line manta rays looking crisp over time?
A: Use discovery pathways like local shop directories, convention lists, and community forums. Look for portfolios showing healed work in similar placements and ask about healed photos. Every artist's technique varies, so view healed images and ask about their touch-up policy before booking.
