
Fine line Alice in Wonderland tattoos are everywhere on saved boards and shop walls right now, and the favorite look for many is minimal linework that reads small and delicate. What people do not always see is how placement and spacing determine whether those tiny lines still look clean after a few years. Read on for compact Alice in Wonderland designs that are built to age, with what to ask your artist and wardrobe tips for showing them off.
1. Minimalist Mad Hatter Silhouette on Upper Arm

I've seen a handful of these on upper arms and they tend to age better than tiny facial details because the outer arm gets less daily abrasion. Ask your artist for a single continuous outline with slightly heavier anchor lines where the silhouette meets the hat, so the shape reads as it heals. Fair warning, upper-arm sessions are low on the pain chart but require the artist to keep steady spacing to avoid future blur. For the appointment, wear a sleeveless fitted tee women so the artist has clean access without you getting cold. Expect a single short session and a possible touch-up at year two if you want the crispest edge.
2. Fine Line Cheshire Grin on Forearm

I've noticed small Cheshire grins read as mischievous without needing full body detail when the smile is pared down to curve and eyes. When you consult, bring references that show the exact eye-to-grin spacing and tell the artist you want negative space between teeth to prevent merging. The forearm is forgiving for fine line, but avoid making the grin narrower than two inches because that is a common mistake that causes lines to compress as skin shifts. For showing it off, roll sleeve cuffs or wear a rolled cuff chambray shirt to keep attention on the forearm. Session feels like light buzzing and takes under an hour.
3. Outline Alice in Dress at the Collarbone
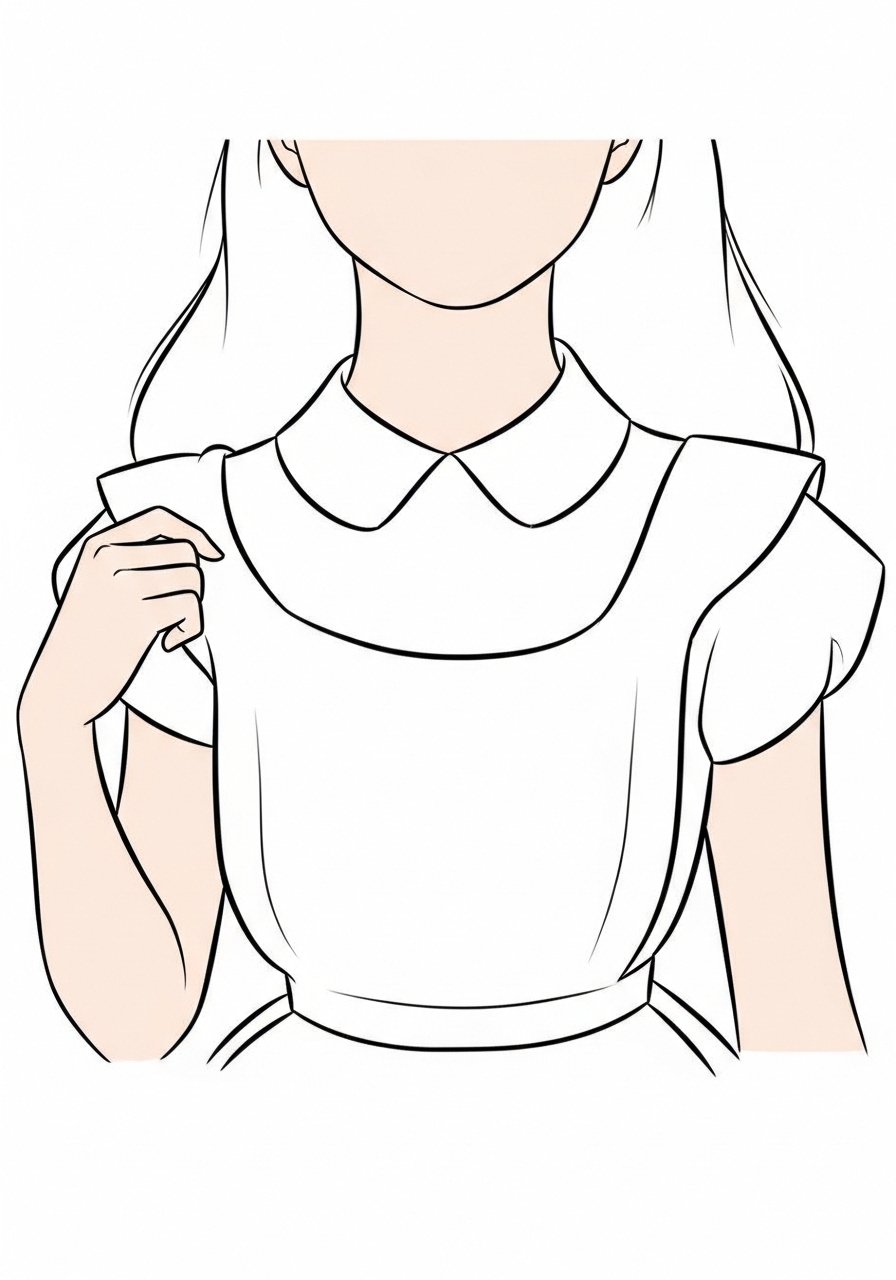
Most collarbone outlines look delicate immediately but they need a little breathing room from the neckline to avoid clothing rubbing during healing. In consultation, ask for an open silhouette and slightly thicker neckline lines where fabric meets skin, so the linework keeps definition at year two. The collarbone is a mildly sensitive spot but tolerable, and the session is short for a three-inch outline. For outfits, an off shoulder linen blouse or a delicate drop necklace frames the piece without crowding it. Common mistake is requesting micro detail at that size, which blurs faster than broad, confident lines.
4. Watercolor White Rabbit on Inner Wrist or Calf
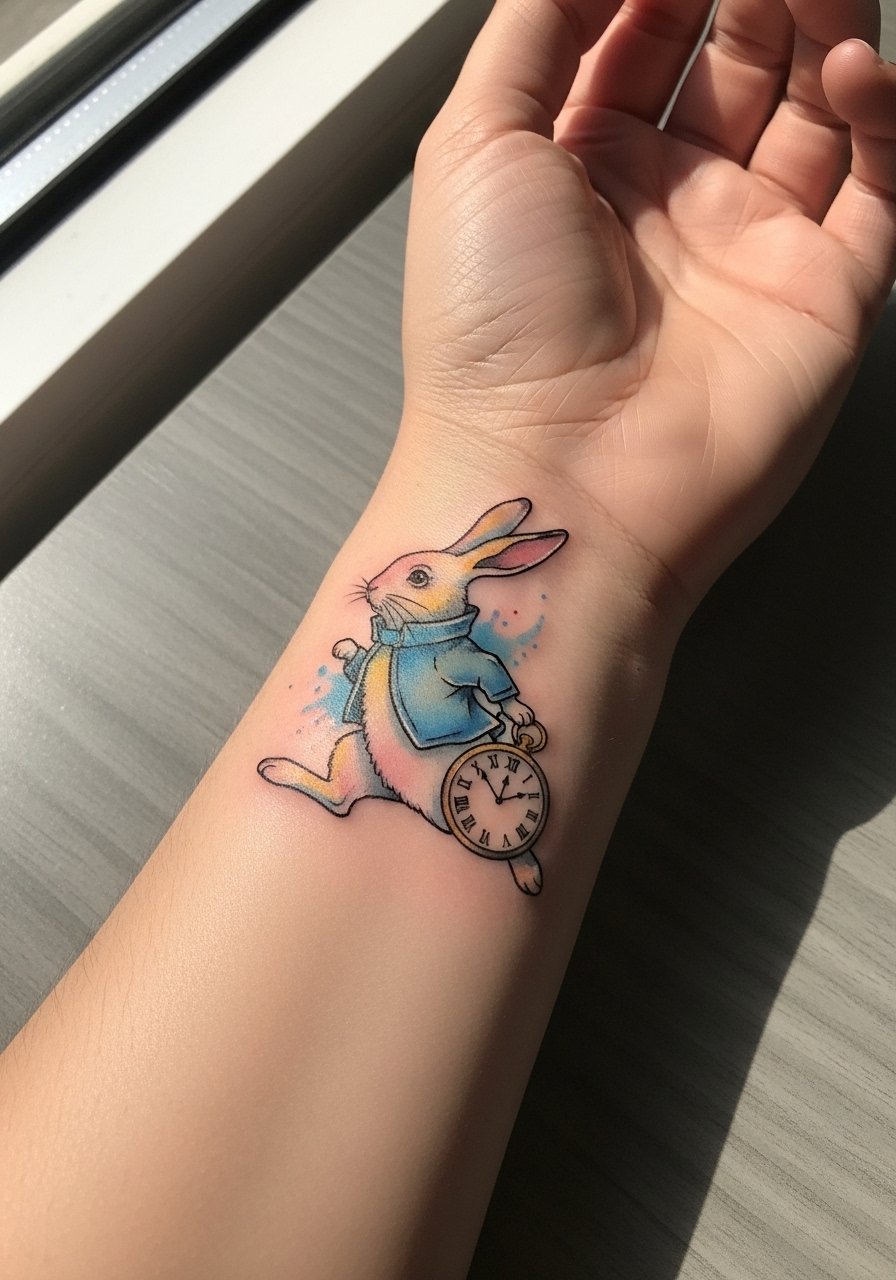
Watercolor pieces can look ethereal but they also demand placement that avoids heavy friction. I recommend the inner wrist or calf for this White Rabbit, and to tell your artist you want the clock treated as a clear graphic so it holds up against the wash. The wrist heals with more scabbing and hand motion, so thin washes need extra spacing from the clock to avoid smearing. For the session, wear a short-sleeve button-down so the artist can access the wrist easily. If you love color but worry about longevity, ask for slightly stronger saturation on the clock and softer washes elsewhere to keep the narrative readable at year three.
5. Rabbit Hole Falling Outline Behind the Ear or on a Finger
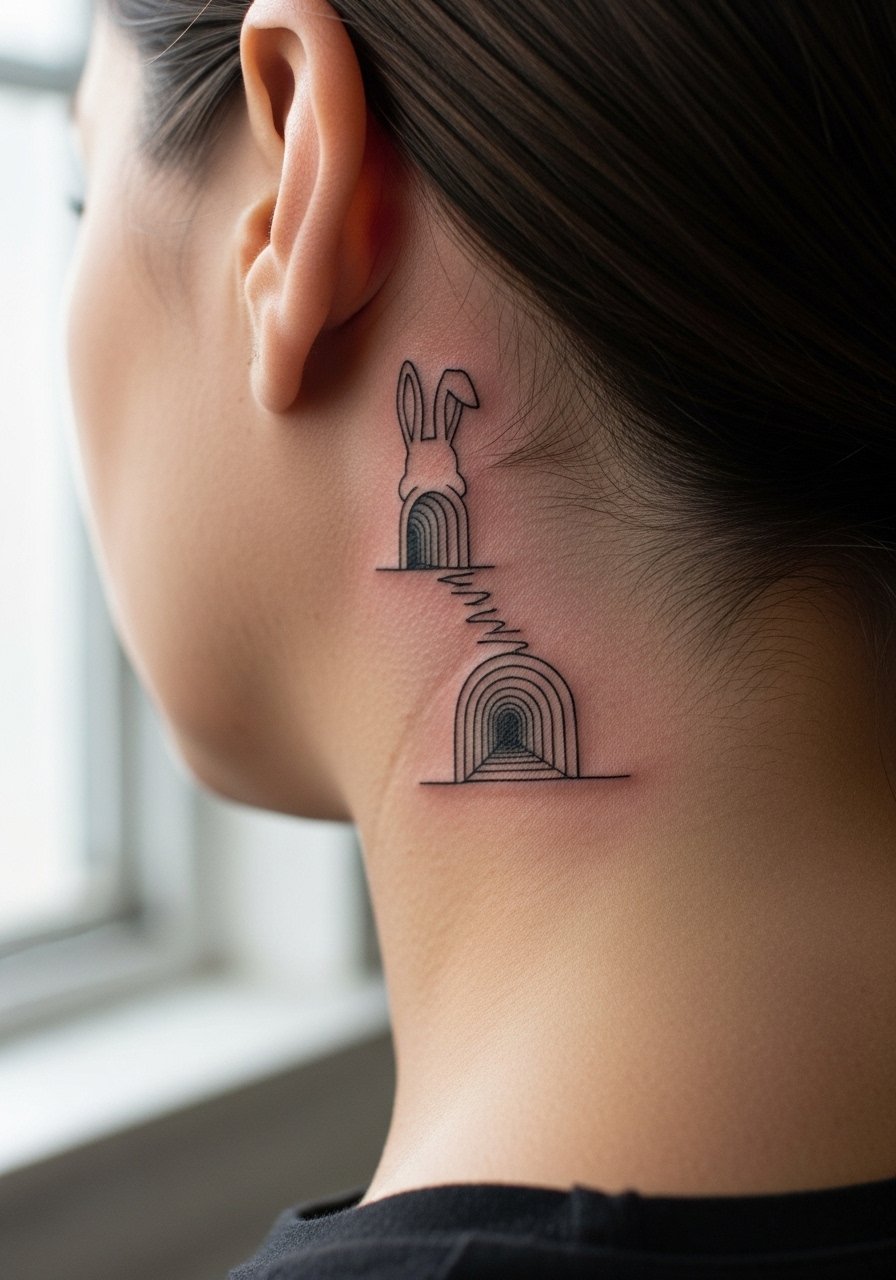
The rabbit hole outline is small and symbolic, and I often recommend behind-the-ear placement for a private nod to the story. Tell your artist you want the hole to read as a tapered funnel rather than a tight spiral, that prevents crowding as the skin settles. Behind the ear is delicate and can sting more than upper arms, but a single quick pass usually does it. Common mistake is going tiny on fingers where daily washing and friction blur the funnel within a year. For finger placement, expect touch-ups sooner and plan design spacing accordingly.
6. Micro Cheshire Cat with Flowers on Shoulder Blade
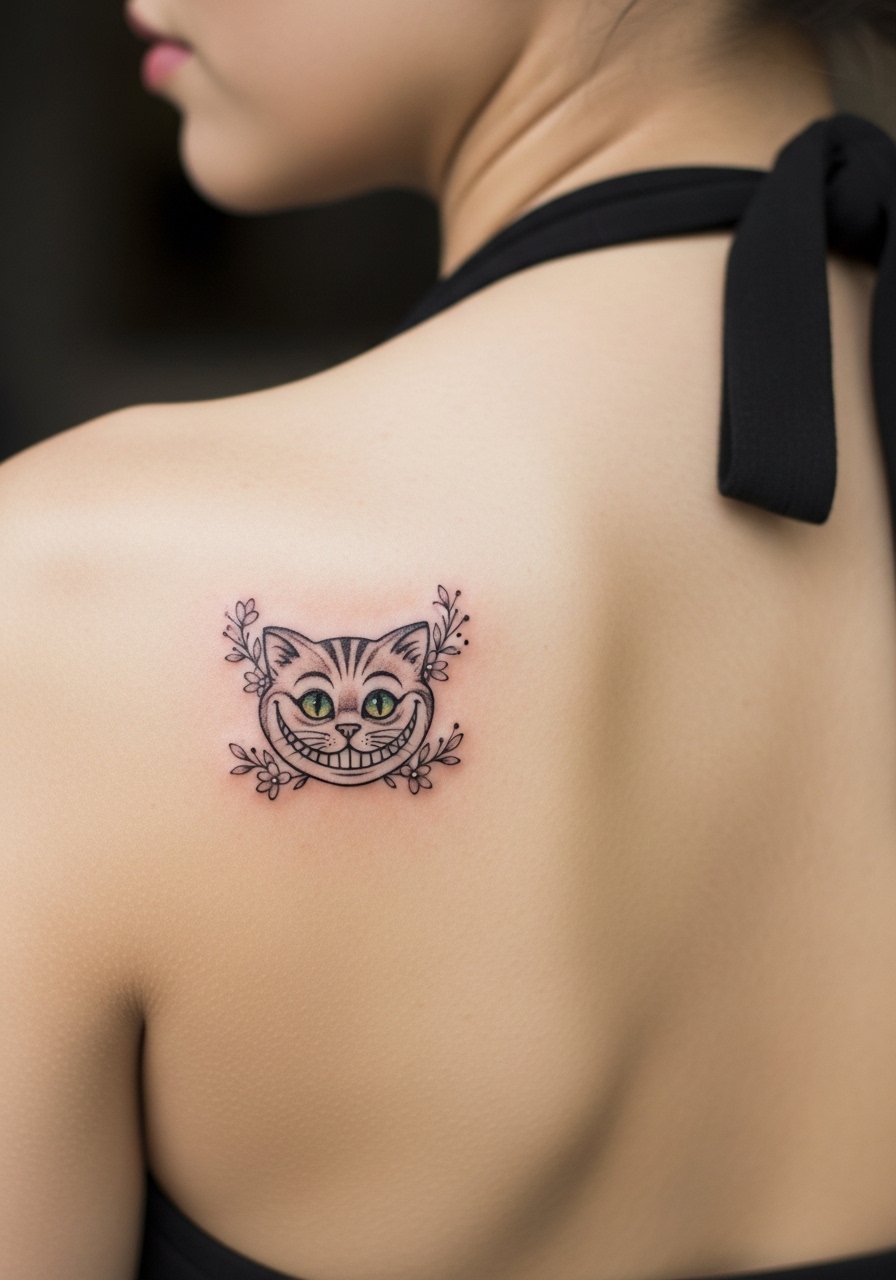
This tiny combination reads like a hidden detail when placed on the shoulder blade, and it survives well because the area is low-friction. In consultation request the cat's grin as a single line arc with separate floral dot work below so each element heals without merging. Shoulder blade sessions are comfortable and work in one pass. For showing it off, a backless halter top reveals the area without overexposing the rest of the back. Expect a minor touch-up by year three if you want the green eye accent to stay vivid.
Studio Day Picks
The small wrist, collarbone, and behind-the-ear pieces above benefit most from targeted prep and a couple of low-profile supplies.
-
Stencil transfer paper kit. Lets you preview line placements on skin so tiny shapes like the rabbit hole and micro Cheshire sit exactly where you want them.
-
Topical numbing cream. A light numbing cream applied as directed eases sensitivity for wrist and behind-the-ear sessions without changing the artist's work.
-
Thin protective film roll. Useful for wrist or finger work to shield fine line pieces from immediate friction when you need to use your hands.
-
Fragrance-free gentle body wash. Cleanses without irritating delicate linework during the first week on collarbone and shoulder blade tattoos.
-
Aquaphor healing ointment. A thin layer in the first few days helps keep micro line channels from drying out, which is helpful for fine line Alice silhouettes.
7. Fine Line Mad Hatter Top Hat on Inner Forearm
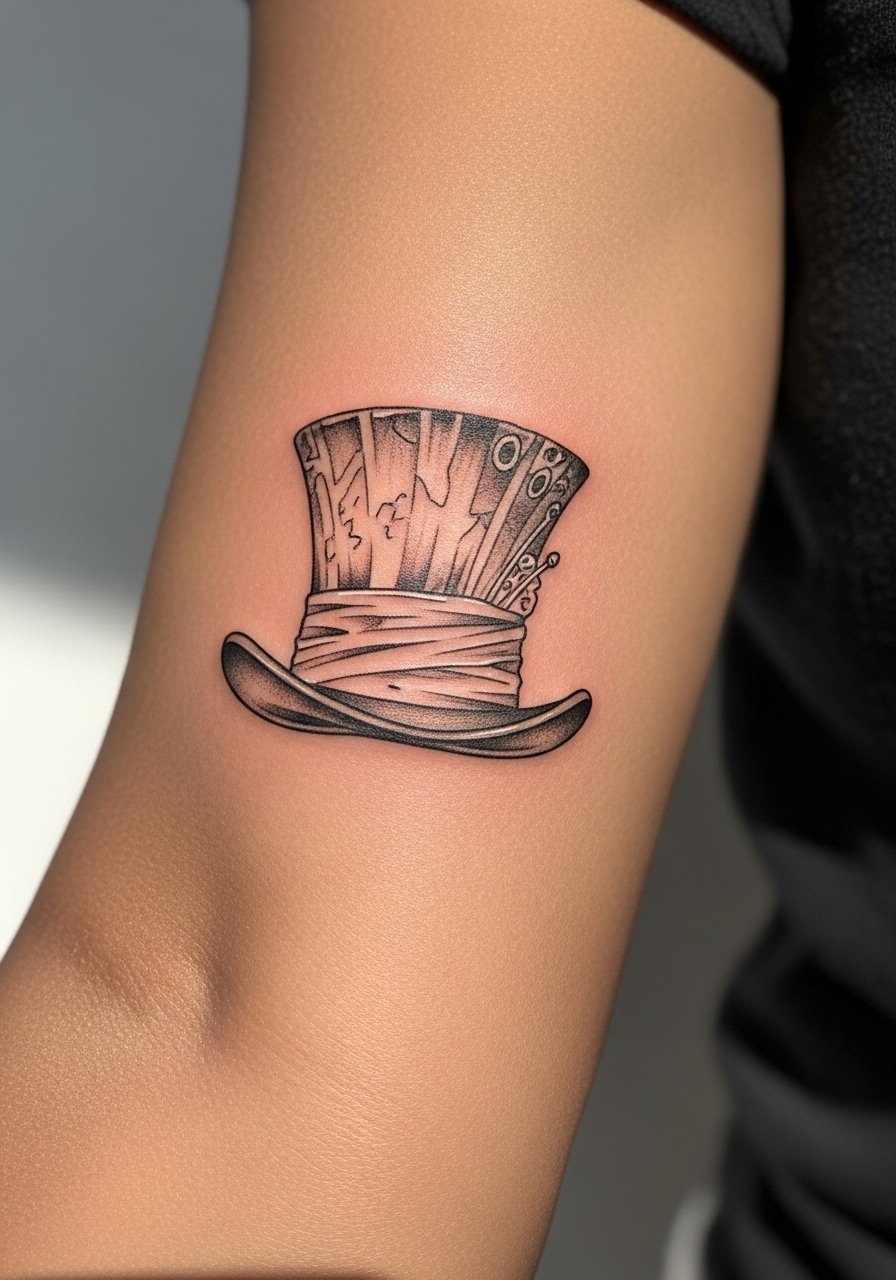
When you want a motif without full character work, the top hat is a compact option that reads like a character shard. In consultation say you prefer a classic band and a single thin shadow line beneath the brim to give depth without heavy saturation. The inner forearm is a medium-pain spot and is forgiving for fine line, but the main mistake is requesting extremely thin crosshatching at small scale which tends to blur. Session time is brief and touch-ups are usually cosmetic around year two if you want the shadow refreshed.
8. Minimalist Playing Cards Stack at the Wrist or Ankle

This stack works when the cards are simplified to three clean outlines and one tiny suit mark. I tell people to avoid tiny interior numbers and instead use one bold pip to keep each card readable at small sizes. The wrist is a high-motion zone and tends to scab more, so plan for a quick touch-up at year two. For showing it off, a matte gold bangle set complements the wrist without covering the design. During the session wear sleeveless or roll your sleeves so the artist has unobstructed access.
9. Outline Teacup with Steam on the Collarbone

A simple teacup is a great small statement for the collarbone because the steam lines give motion without dense detail. In the consultation ask for spaced steam lines and a tiny base line instead of many short strokes that can merge. Collarbone friction is the main aging factor so avoid placing the cup directly under thin straps. For the session plan a strapless or open neckline top so the artist can work comfortably. This piece takes under an hour and usually holds well with a single touch-up in the first two years if needed.
10. Fine Line Alice Silhouette Falling on Spine
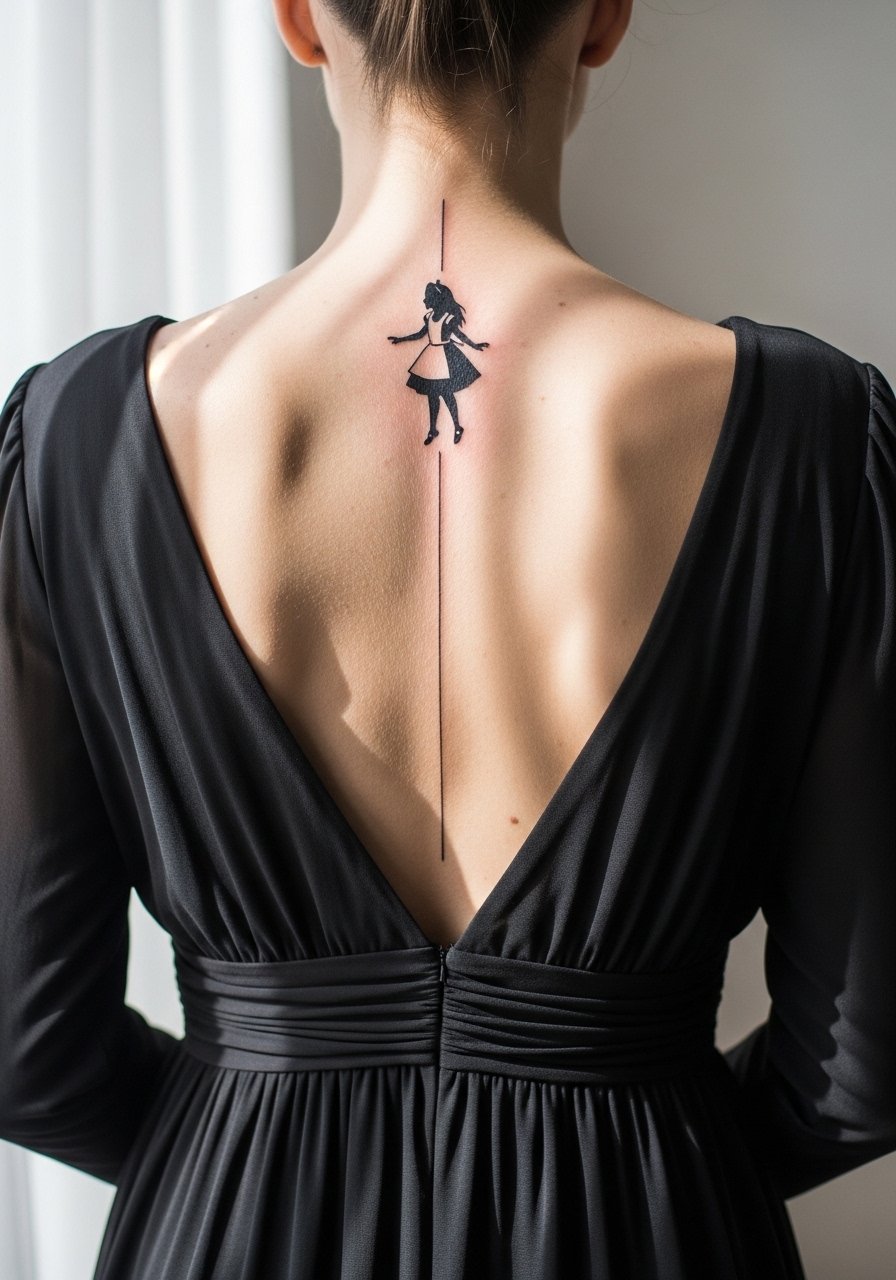
Artists are split on fine line down the spine. One camp says the skin there moves too much and lines blur within a couple of years. The other camp argues that with deliberate needle depth and a touch-up plan, fine line silhouettes settle well. Ask your artist which camp they fall into and whether they recommend slightly thicker anchor lines. The spine offers a vertical canvas that reads strongly with a four-inch silhouette and pairs well with low-back dresses like a low back dress for evenings out. Expect a longer session than a wrist piece and plan for a touch-up at year two or three depending on your skin.
11. Micro White Rabbit with Pocket Watch at the Ankle
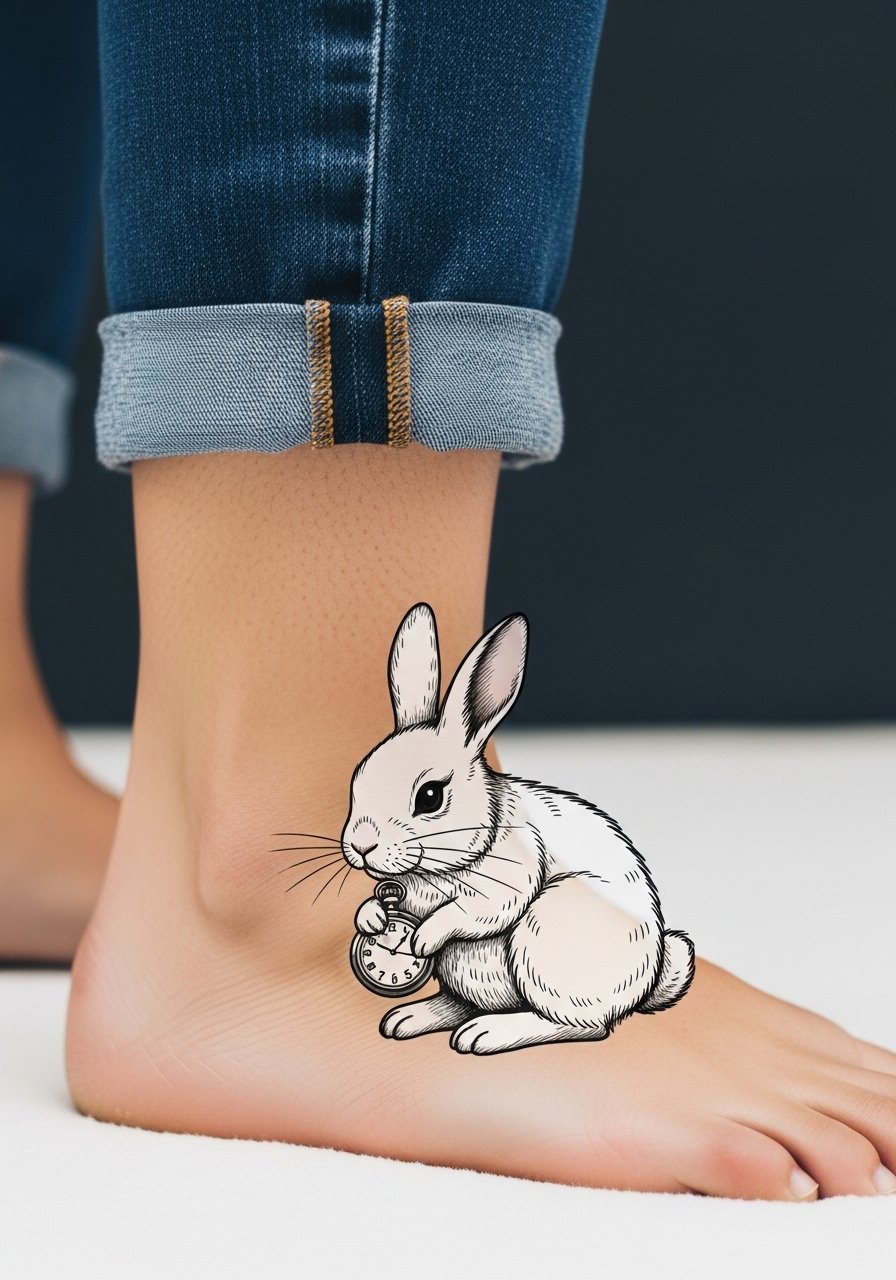
Ankle pieces face constant rubbing from shoes and socks, so I tell clients to keep micro motifs at least 1.5 inches so the watch face remains legible. The main mistake is squeezing too much dial detail into a very small watch. For the appointment, wear cuffed slim jeans or shorts so the artist can elevate your leg without tugging on fabric. If you plan to show the ankle in summer, pair the tattoo with strappy flat sandals to keep the area visible and avoid irritation during the first week. Touch-up timelines depend on footwear friction and can be sooner than forearm pieces.
12. Minimalist Keyhole Portal Behind the Ear or on a Finger

The keyhole is an abstract way to reference the story without characters, and I recommend behind-the-ear placement for a private feel or a finger for visibility. Behind the ear needs a clear silhouette with no internal shading so the shape keeps its negative space as it heals. Finger placement increases the chance of early touch-ups because of washing and use. During the appointment for a behind-the-ear piece, show up with your hair up and easily movable. For fingers, ask the artist about planned touch-up paths and accept the possibility of maintenance at year one.
13. Miniature Alice Dress Outline on the Ankle or Collarbone
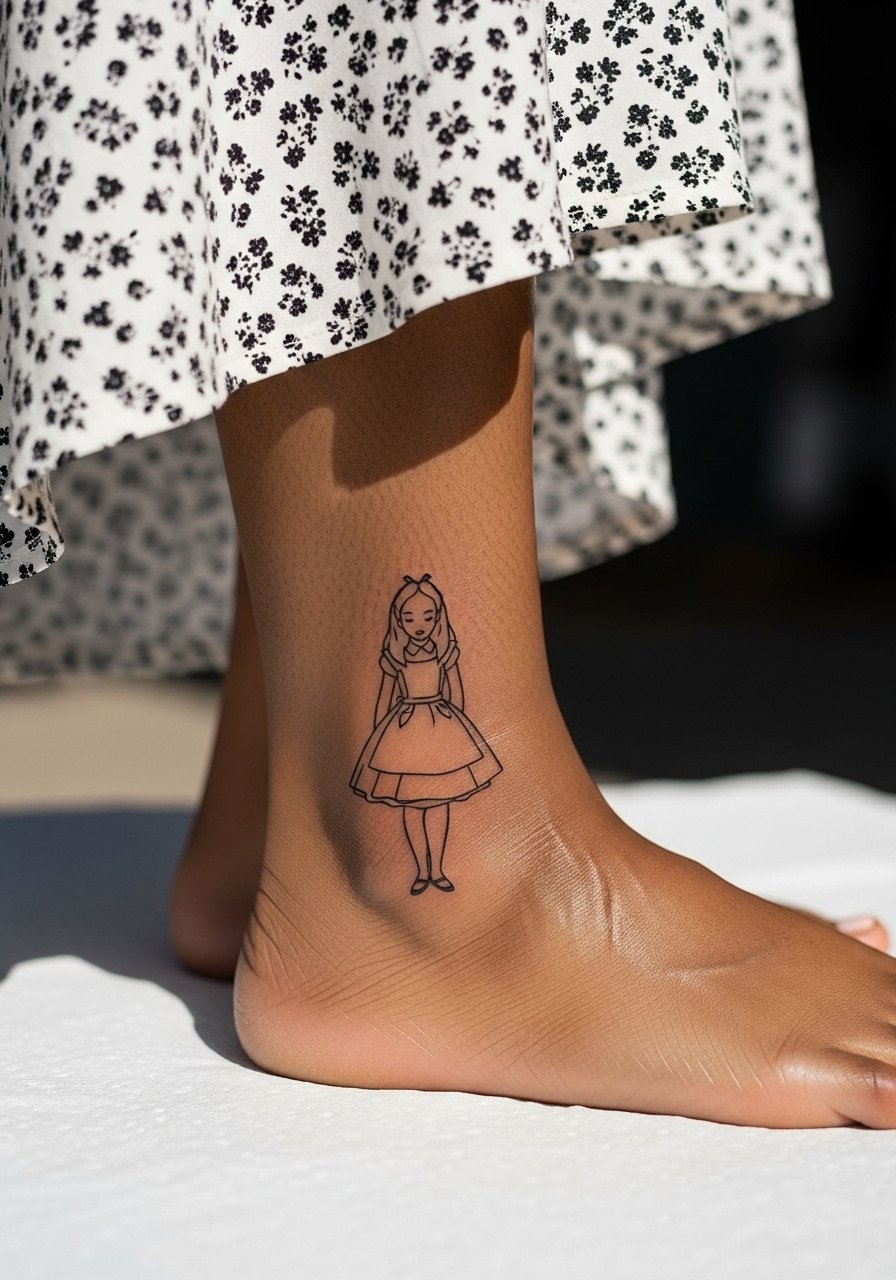
A tiny dress outline reads like an emblem more than a portrait and is forgiving across several placements. If you choose the ankle, make the skirt lines open and avoid tiny lace detail that compresses with wear. The collarbone version needs slightly bolder neckline lines where clothing will touch. For the session, ankle work is quick and you should wear shoes that do not rub the area in the first week. A common error is asking for micro frills that look lovely in photos but need frequent touch-ups in real life.
14. Stipple-Shaded Pocket Watch with Tiny Hands on the Ribcage
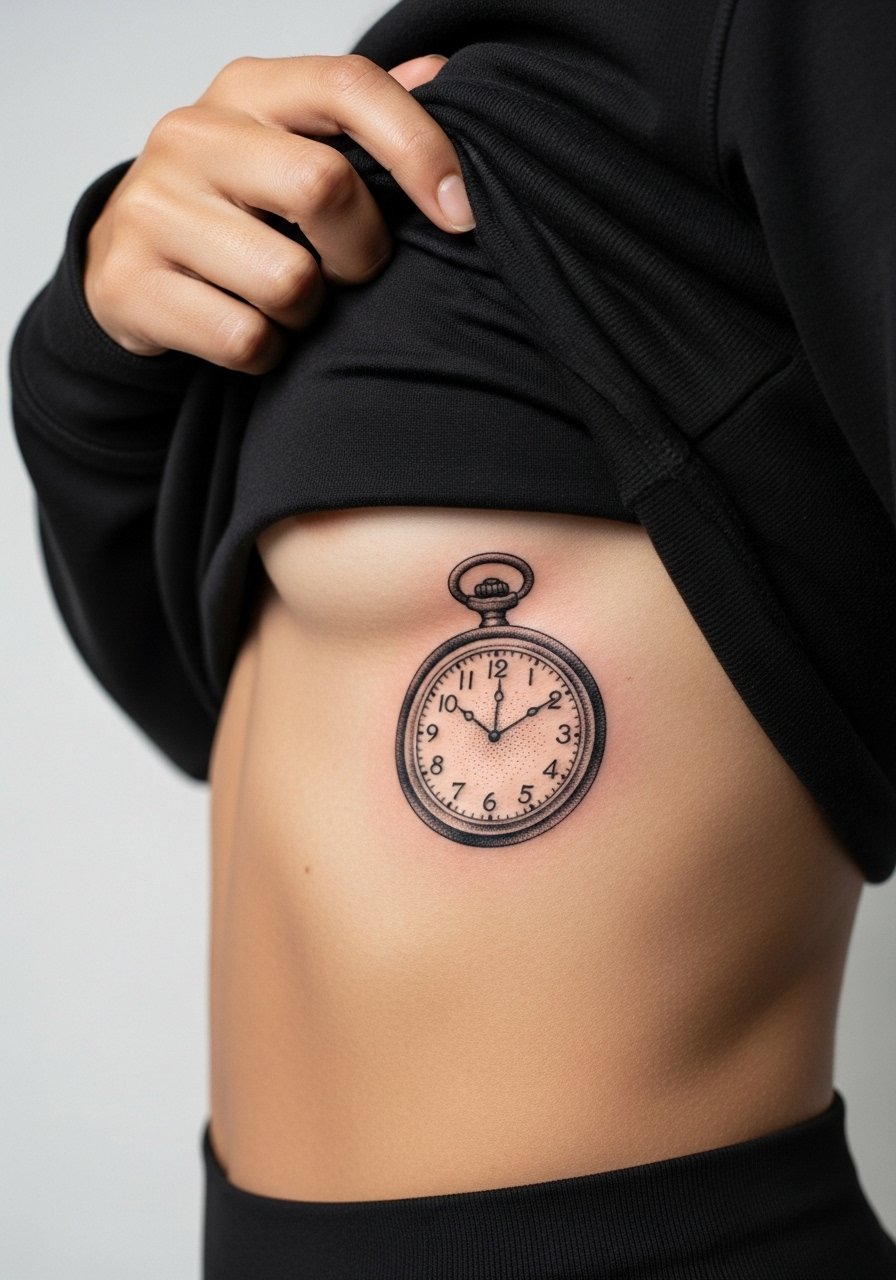
Ribcage work is higher on the pain chart and some artists avoid tiny stipple detail there because the skin flex causes dots to spread. If you want the watch, ask the artist for spaced stippling and slightly larger hands so the time remains readable at six months. There is controversy among artists: one camp says dense dot work blurs on ribs within two years, the other camp says proper spacing and needle depth mitigates this. Decide which approach your artist uses before booking. Bring a front-open robe or sports bra for the session so you can lie prone comfortably. Expect a longer session and plan touch-ups at two years if you want the dots crisp.
15. Minimalist Pocket Key with Floral Accent on the Inner Bicep
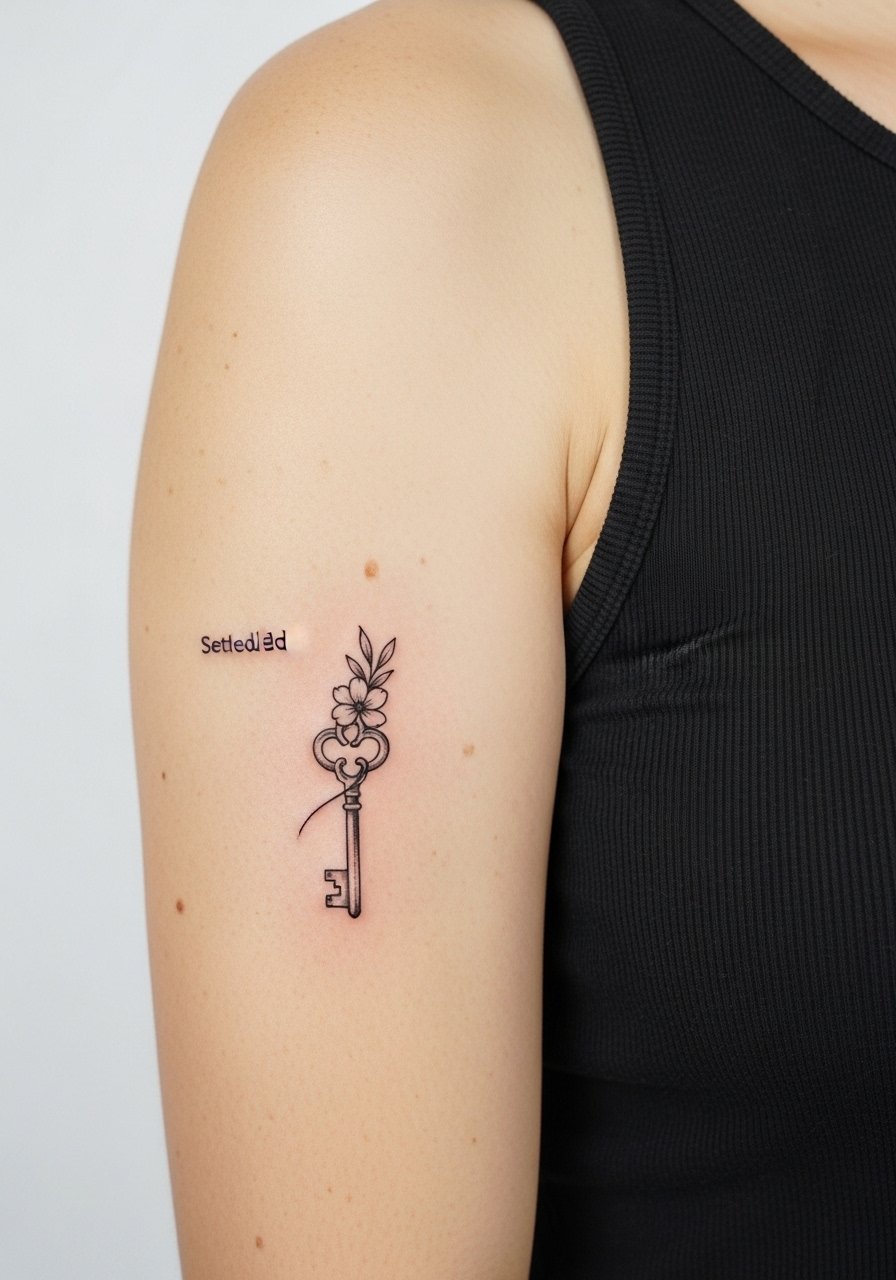
Inner bicep skin is thinner and can be more sensitive, so I recommend a single confident outline for the key and small stipple flowers below rather than detailed petals. In consultation request spaced petals and a clear loop on the key, which prevents merging as the area settles. For the appointment, wear a loose tank top so you can raise your arm without constriction. Expect a medium-pain session and a likely touch-up at year three if you sit a lot with arms pressed against chairs, which can slightly soften lines over time.
16. Tiny Wonderland Quote Script Near the Collarbone

Text tattoos need letter spacing intentionally wider than you think, especially in a delicate font. Tell your artist the exact word and preferred font size and request a printed transfer to check spacing on skin. The collarbone placement can rub against straps, so ask for placement slightly lower or higher than tight strap lines. Session time is brief but mistakes are very visible, so insist on a clear transfer and small practice strokes. If you plan to layer accessories, a thin chain pendant sits well above a short script without crowding.
17. Rabbit in Pocket Minimal Line on the Thigh
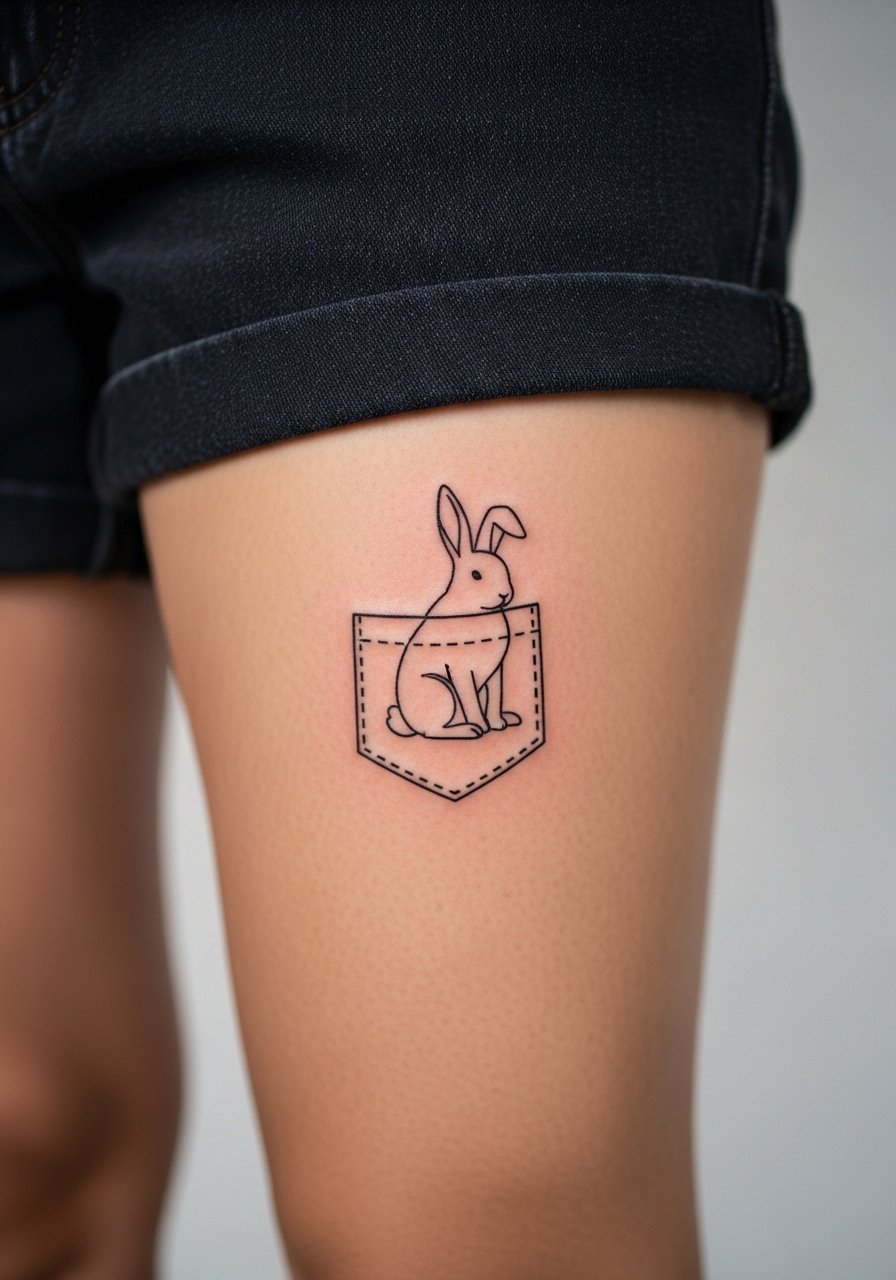
Thigh pieces are forgiving and great for slightly larger micro designs that still feel private. I recommend a simple pocket shape with a rabbit ear peeking out so the silhouette stays readable at small scale. During the consultation ask for a clear negative space between the rabbit and pocket rim to prevent merging. For the session wear loose joggers or shorts so the artist can position your leg comfortably and you can keep pressure off the area afterward. Touch-ups are less common here, but if you sit a lot the top edge can soften over time and benefit from a refresher.
Frequently Asked Questions
Q: Will fine line Alice silhouettes blur faster on the spine than on the arm?
A: It depends on the artist technique and your skin type. Spine skin moves a lot with posture, so many artists recommend slightly stronger anchor lines there. Ask whether they plan deeper single-pass anchors or lighter strokes and schedule a touch-up plan at booking.
Q: Do watercolor White Rabbit designs need different aftercare than black fine line pieces?
A: The basics are the same, but watercolor areas often need gentler washing and less vigorous patting while they scab so the color settles. Follow your artist's timing for moisturizing and avoid sunscreen on fresh color until the surface fully heals.
Q: How small can a pocket watch or clock be before it loses detail?
A: From what I've seen, keep pocket-watch faces at least about 1.25 to 1.5 inches if you want hands and numerals to stay legible. Smaller than that and the artist should simplify the dial to one bold element instead.
Q: Are behind-the-ear tattoos appropriate for professional settings?
A: They are easy to conceal with hair or collars if needed, but consider your daily work environment and whether visible ink is a factor. Behind-the-ear pieces do require an artist experienced with the area because the skin and bone proximity change how the needle feels and heals.
Q: How often should I expect touch-ups for micro Alice motifs on hands or fingers?
A: Finger and hand work often needs maintenance by year one or two because of washing and friction. Plan on a maintenance window and discuss a realistic touch-up timeline during your consultation.
Q: Where can I look for more minimalist Alice references and shop portfolios?
A: Search hashtags like #MinimalistAliceTattoo and #FineLineWonderland on image platforms, use the Tattoodo app for local portfolios, and check Pinterest boards for layout ideas. For in-person bookings, look at location tags from city tattoo conventions to find fine line specialists.
