
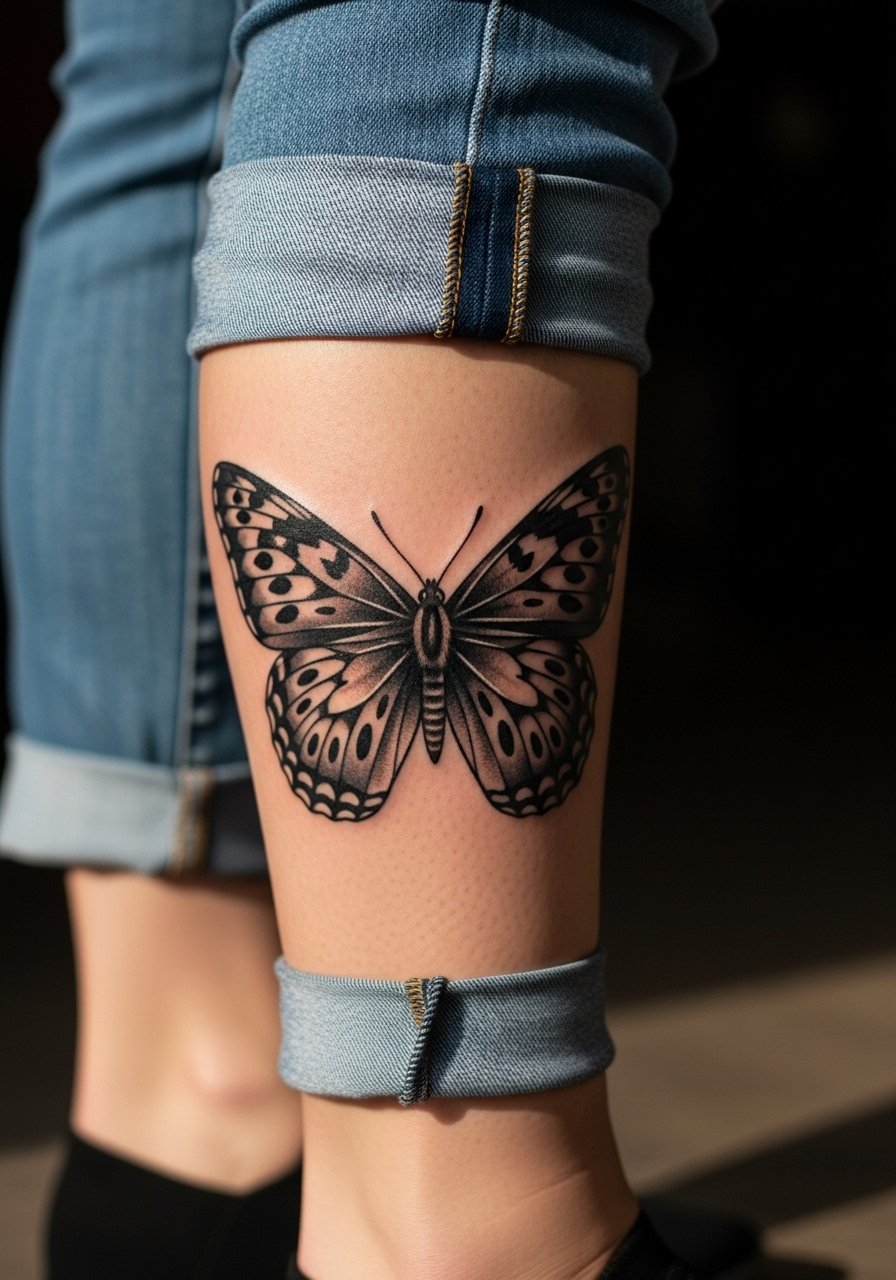
The tattoos that still read clean after five or ten years are often the ones that made conservative choices early on. Too many people chase microscopic veins and forget about placement, friction, and spacing. Pick a species, pick a placement with low rubbing, and ask for defined vein work with modest spacing. The forearm monarch below shows how to get photographic detail while keeping the piece touch-up friendly.
1. Realistic Monarch Wing Spread on Forearm

I recommend this when you want high vein detail without a sleeve commitment. Fair warning, forearm work reads best if the wings get 2 to 4 inches of real estate. Tell your artist you want slightly heavier vein linework and a soft magnum fill so the small veins do not bleed out over time. Common mistakes are asking for wafer-thin veins and tiny stippling that merge with daily wear. Expect a one to two hour session and moderate pain on most scales. For showing it off, roll a sleeve and wear a rolled cuff chambray shirt that frames the forearm without crowding the design.
2. 3D Butterfly in Flight on Shoulder
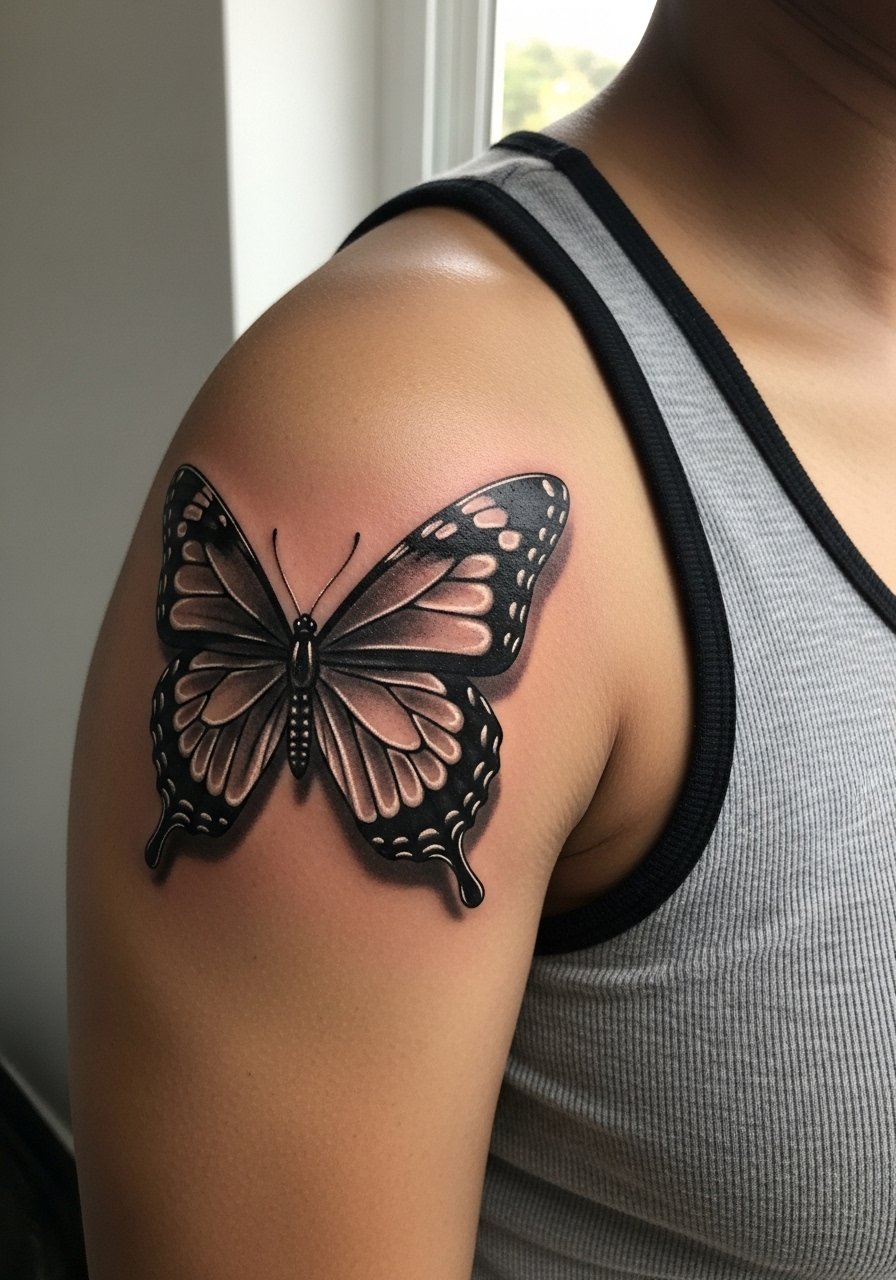
This one is a visual trick that pops off curved skin. Shoulder placement means lower friction and a two to three session build for depth work. During the consult ask for black and gray base with white highlights rather than full color layers if you want a photo-pop effect without long color healing. Artists split on whether heavy white highlights hold on darker skin. One camp says contrast saves the illusion, the other says whites can fade faster. The session feels tolerable and you can wear a sleeveless button down to the appointment for easy access.
3. Photorealistic Butterfly Cluster on Ribcage
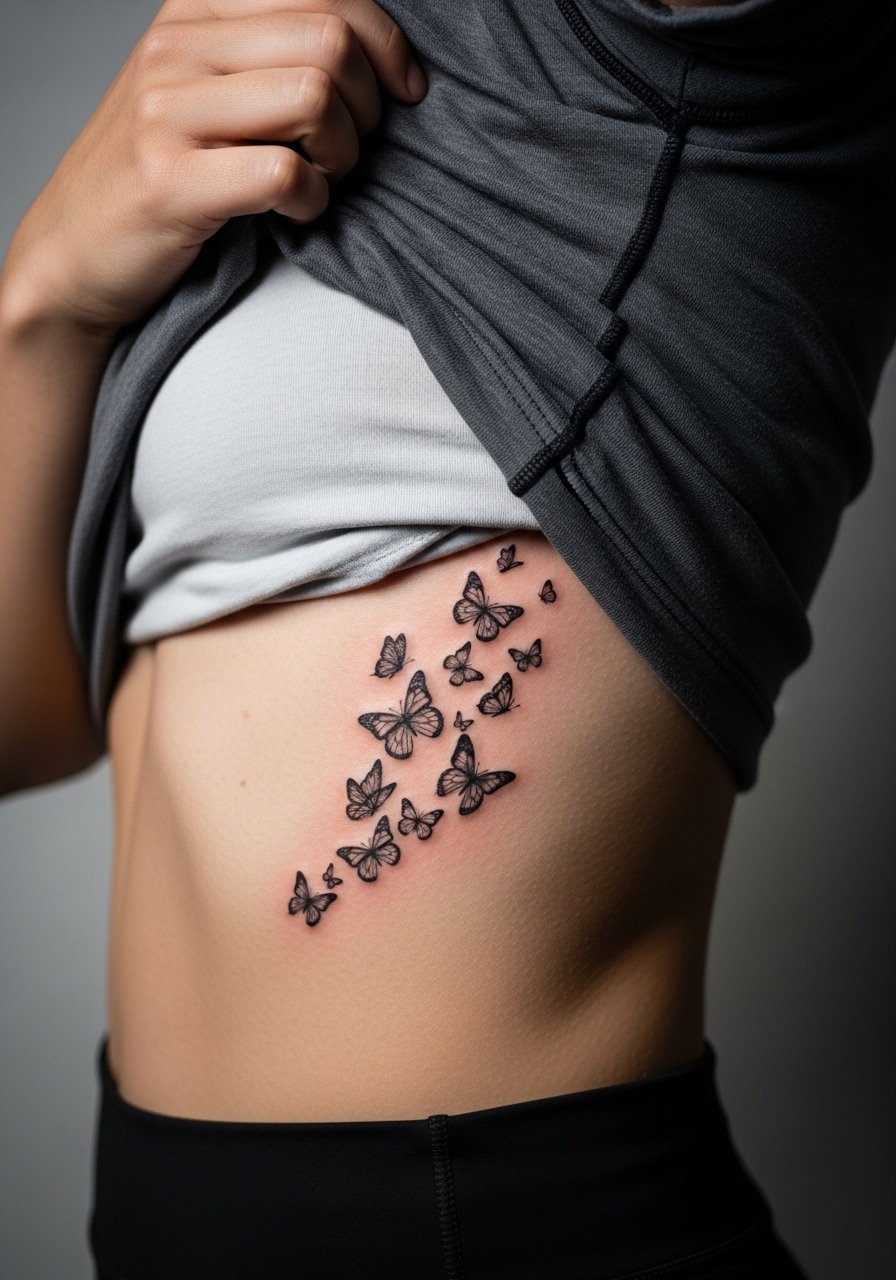
Fair warning, ribcage sessions score high on most pain charts but deliver intimate compositions. For a cluster ask for slightly larger gaps between individuals so shading ages cleanly. A common error is asking for tiny, closely packed butterflies that blur into one patch after two years. Plan for multiple sessions and expect touch-up sooner than on low-friction areas. For the appointment wear a sports bra you can lift or a loose tank. If you prefer privacy, search Pinterest boards or Tattoodo to find local artists who specialize in torso realism.
4. Single Swallowtail Outline Filled on Wrist

Wrist work is deceptively delicate. Small swallowtails look sharp fresh but the skin and constant movement mean thin vein detail will soften. Ask your artist for a bold outline with compact shading, not wafer-thin veins. The session is quick and pain is moderate. The most frequent regret I see is wanting minute detail at 1.5 inches. If you want longevity, scale slightly larger. For styling, pair the tattoo with a thin silver bangle set on the opposite wrist so the jewelry frames the piece without crowding the linework.
5. Layered Metamorphosis Sequence on Inner Bicep
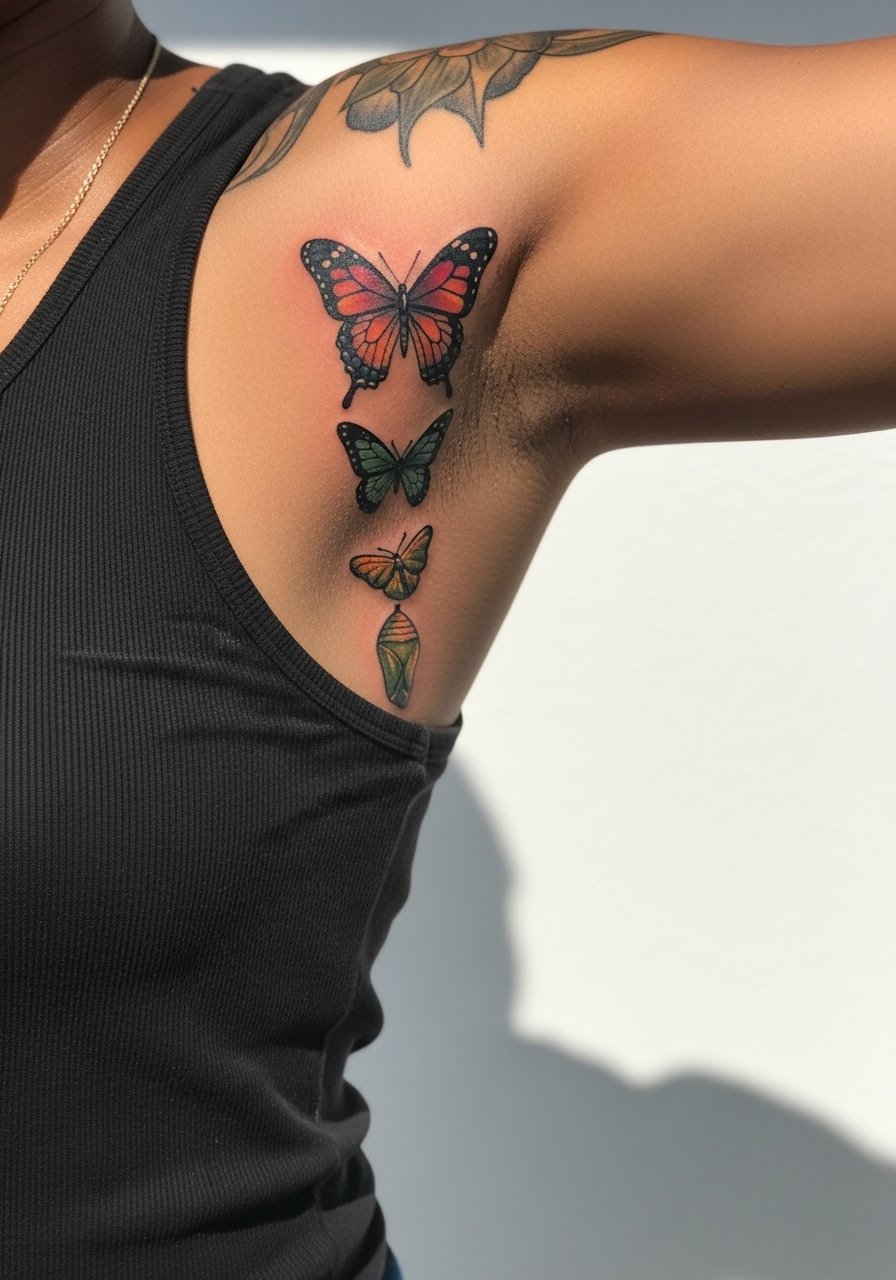
The inner bicep is great for narrative tattoos that read vertically. Expect higher sensitivity but also cleaner preservation because the area gets less sun than outer arms. During the consult ask the artist to space stages apart and to use progressive saturation so each phase maintains definition. A common mistake is compressing the sequence into too small a column. Plan for multiple sessions and book touch-ups as the outermost color can need refreshing. For the session wear a loose tank so the artist has clean access to the inner upper arm.
6. Textured Blue Morpho Wing Closeup on Collarbone
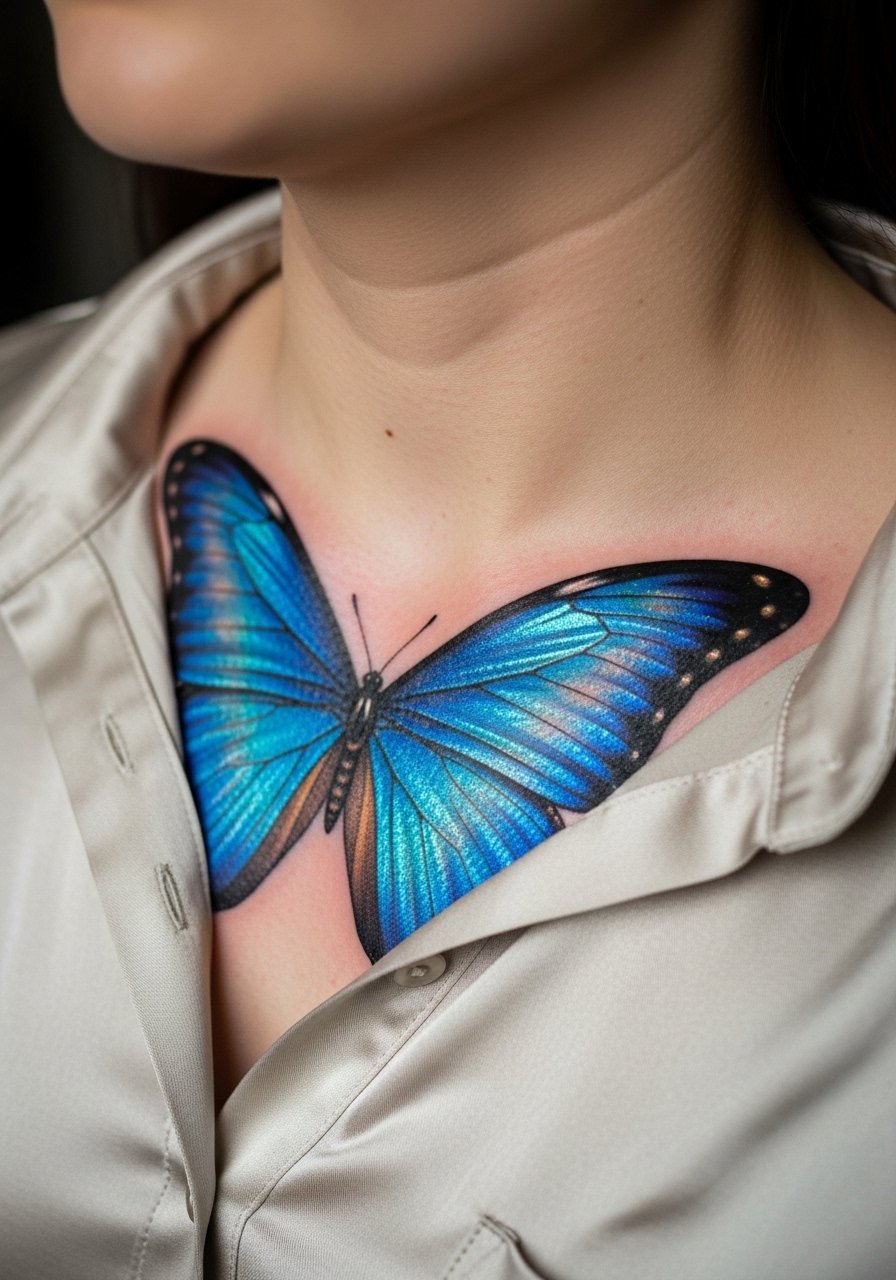
Collarbone pieces benefit from curved surface shading to suggest iridescence. They age well if you avoid micro stippling directly on the bone where blowout risk rises. Ask for layered magnum fills and subtle white highlights to mimic sheen. The session runs one to two hours and the area can bruise more easily. The biggest mistake is packing too many tiny highlights which scatter with movement. For showing it off, a v neck silk blouse in cream or a wide-neck tee complements the sheen and keeps attention on the clavicle.
Studio Day Picks
Those forearm and collarbone pieces above require different prep than the ribcage and inner bicep work, so a few studio items make both sessions smoother.
- Dragonhawk Fold Pro machine cartridges. Thin liners are ideal for vein work in monarch and fritillary pieces without overloading the skin.
- Dragonhawk Deluxe Cartridges 1205RL 15RM. A mix of liners and round magnums helps artists shift between crisp veins and soft shading on shoulder and collarbone pieces.
- Thin protective film roll. Keeps wrist and finger work clean during the first week when friction is highest.
- Topical numbing cream. Useful for longer ribcage or inner bicep sessions to reduce discomfort without changing the artist’s technique.
- Aquaphor healing ointment. A thin layer in the initial days can protect fine line details on forearm work while the skin seals.
7. Realistic Butterfly with Dew Drops on Ankle
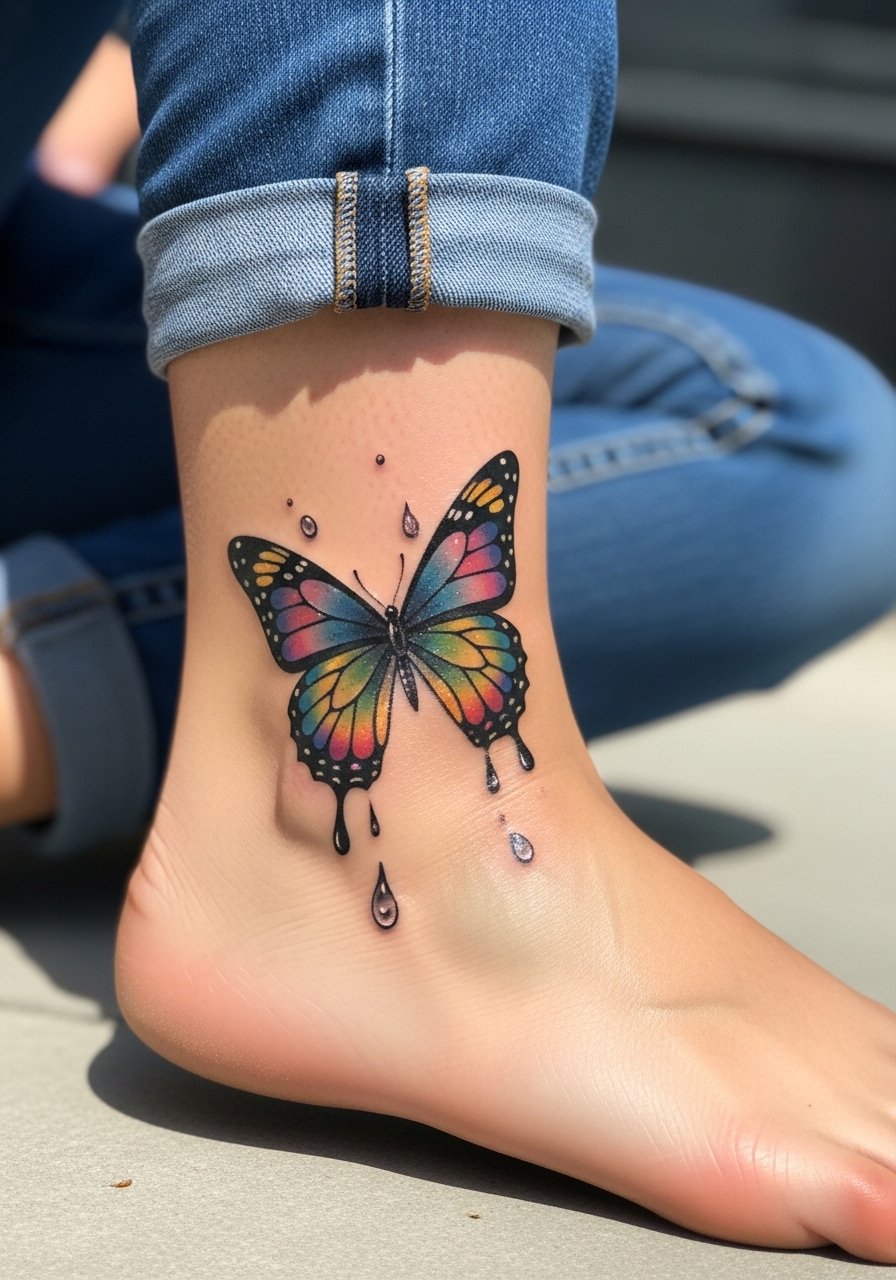
Ankle designs are small and susceptible to rubbing from socks and shoes. Dew drop highlights give dimensionality but need crisp contrast so they read after the first heal. Ask for glossy white spots done sparingly and a slightly darker outline to prevent the droplets from vanishing. Sessions are short and pain is low to moderate. Common mistakes include placing the piece where shoe straps sit. For show-off outfits, cuffed jeans or a cuffed ankle jeans roll perfectly to reveal the tattoo without scraping it.
8. Oversized Atlas Moth on Thigh
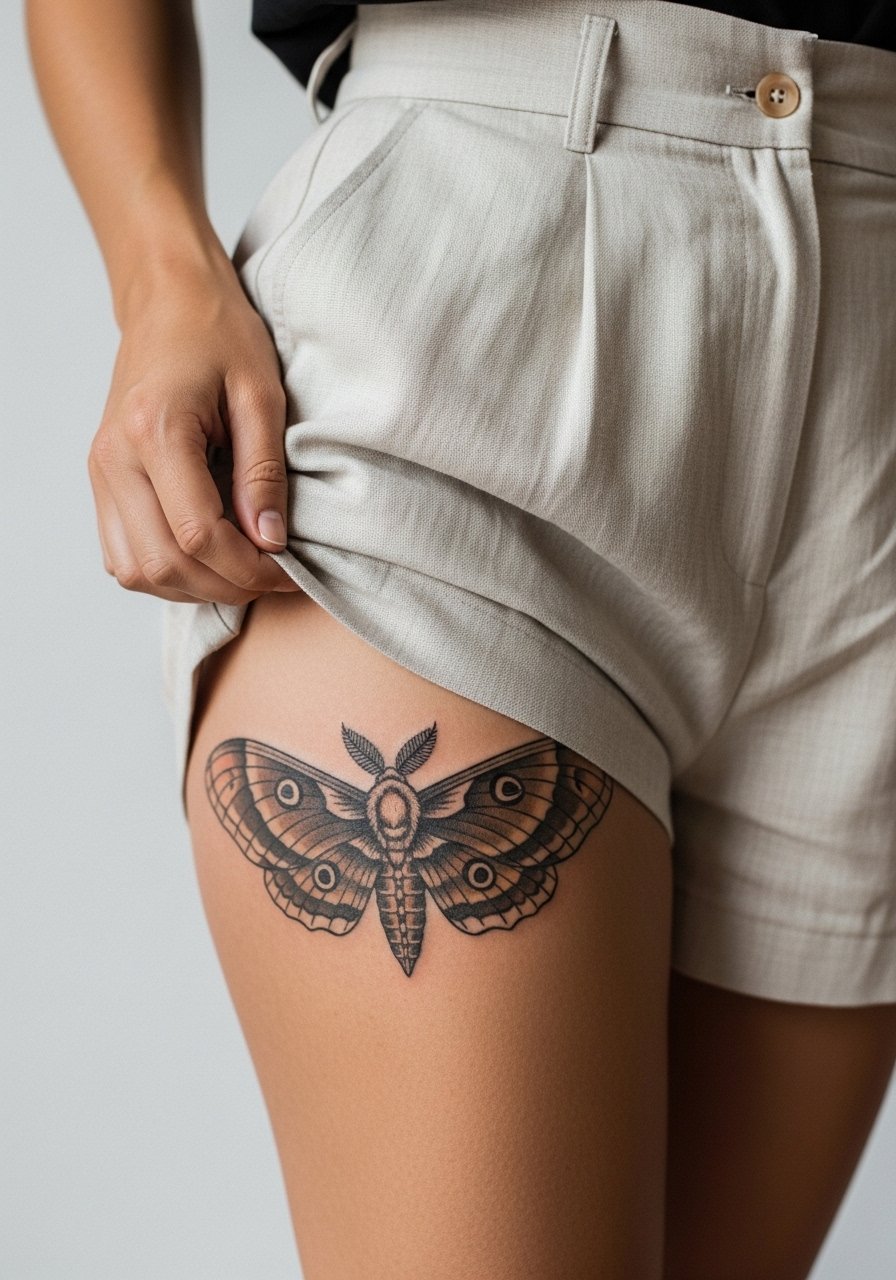
Thighs are forgiving for bold realism and are excellent for exotic species that need scale. Expect three to four sessions and moderate discomfort in deeper tissue layers. Ask for earthy tones with crisp marginal lines to prevent the large patterned wings from merging with time. A common misstep is overcrowding the wings with extra background elements which age poorly. For showing the piece, high-waisted shorts or a side-slit dress in linen keeps attention on the leg and lets the moth breathe.
9. Minimal Realistic Silhouette Behind the Ear
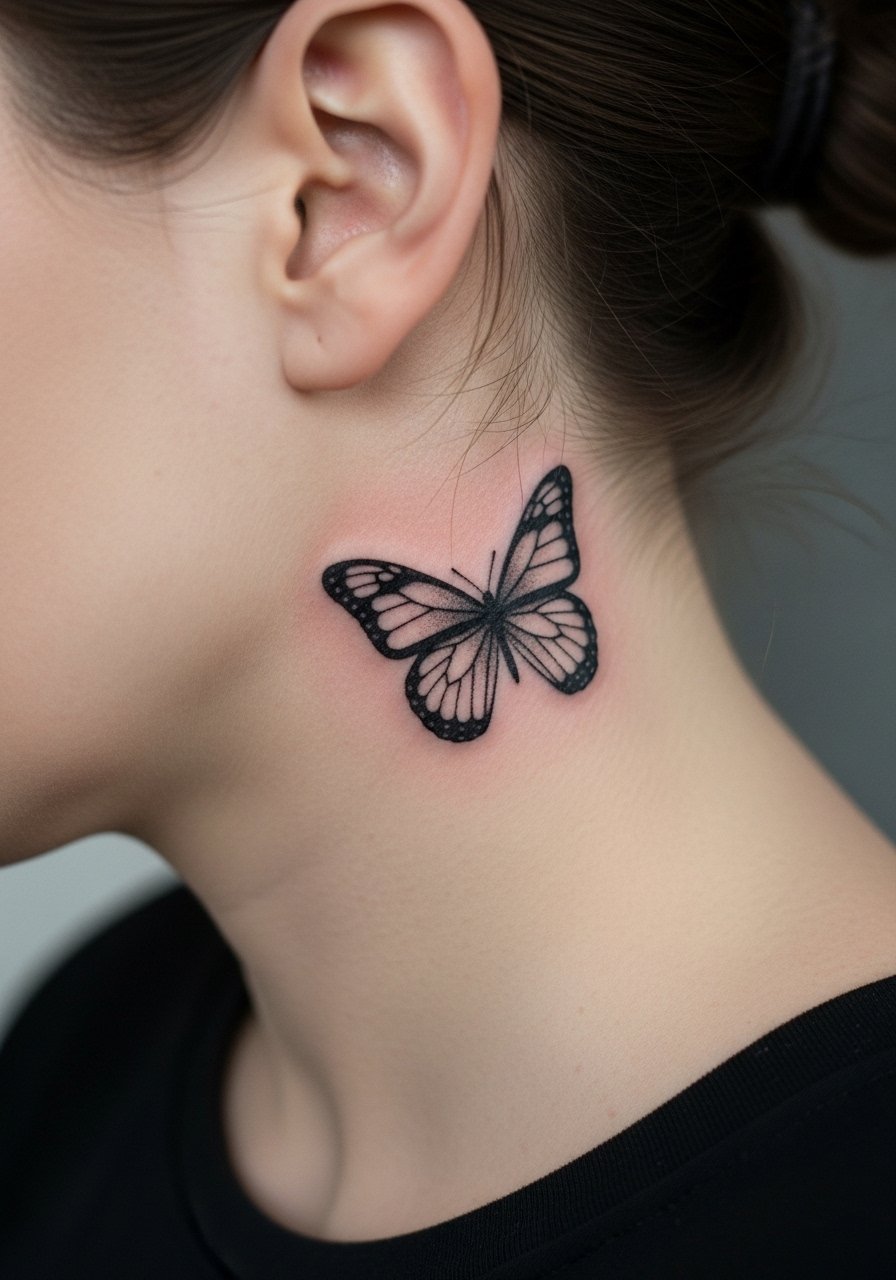
This is a low-visibility option for first-timers who want realism on a small scale. Healed silhouettes rely on solid black shading more than vein detail because the canvas is tiny. Be explicit that you want a 1.5 inch shaded silhouette, not micro veins. Pain is low and sessions are quick. A misstep I see is asking for script or tiny details in such a small spot. If your career requires discretion, behind-the-ear placement is subtle. Consider how hair styles will reveal the area.
10. Realistic Butterfly Emerging from Chrysalis on Spine
Spine pieces read as narrative and are powerful when scaled correctly. Pain is variable but often higher along the vertebrae. For longevity ask for solid contrast and avoid ultra-fine veins directly on the ridge where movement causes early softening. Artists disagree about fine line on ribs and spine. One camp says the skin stretch blurs lines quickly. The other camp says with correct needle depth and spacing, fine line can settle nicely. Ask your artist where they stand before booking. For the session wear a sports bra you can shift so the artist has clear access.
11. Hyper-Detailed Fritillary Veins on Calf
Calf placement gives room for micro-realism without high friction. The area tolerates dense vein networks when the artist spaces veins and uses magnums for soft fill. A frequent error is packing veins too close together which creates a webbed blur after the first year. Sessions are usually two to three hours and tolerable. Expect touch-ups around year two for micro veins. For casual styling, cuffed jeans that stop above the calf show off the work without trapping it under shoes.
12. Realistic Butterfly on Finger with Shadow
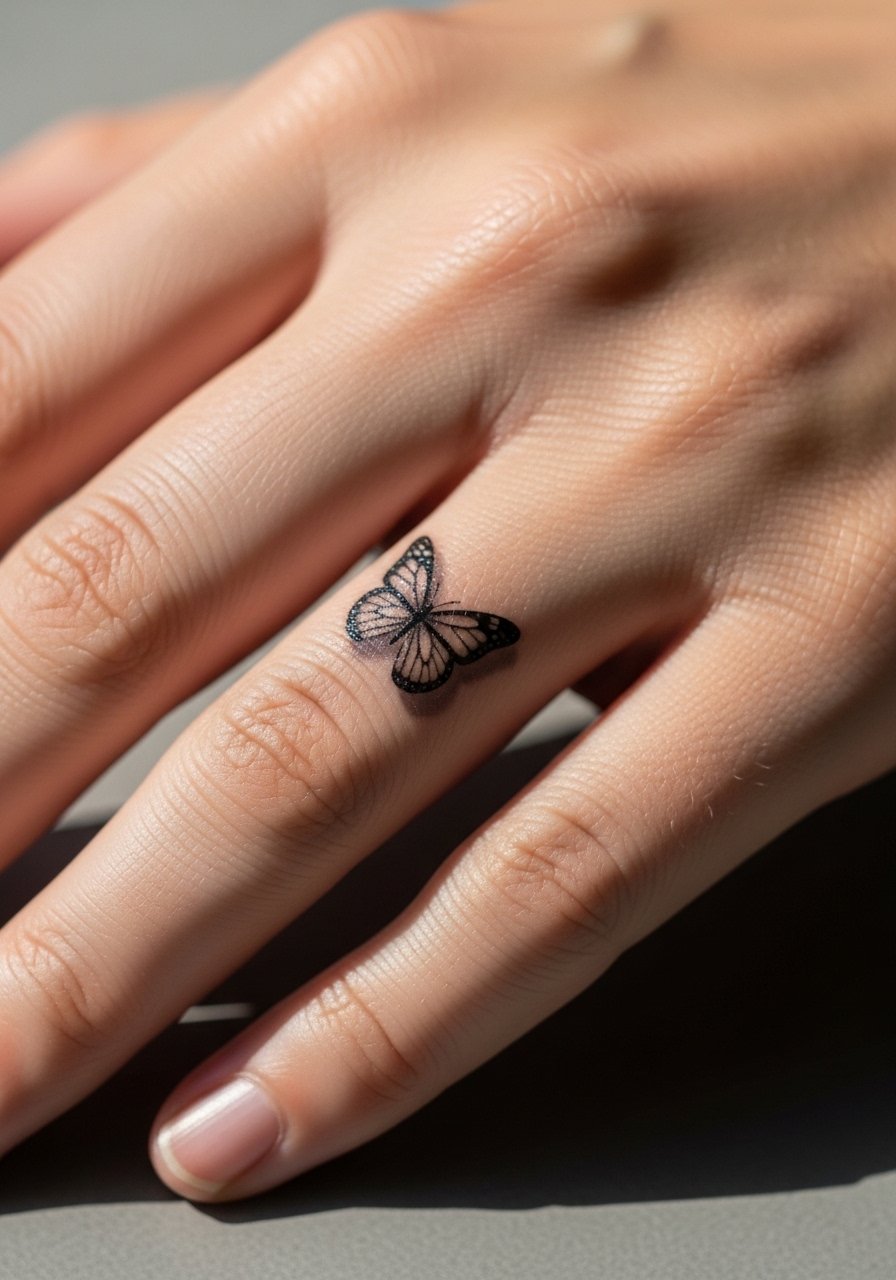
Finger realism is challenging because skin on fingers sheds and rubs constantly. The shadow trick helps the tiny butterfly read as three dimensional without relying on micro veins that will vanish. Ask for slightly bolder contrast and a shadow that sits just off the main form. Prepare for a single session and a likely touch-up within a year. Fingers heal differently and can scab heavily, so follow a strict 10 to 14 day watch window. Keep in mind some employers still have policies about visible hand tattoos.
13. Paired Mirrored Butterflies on Sternum
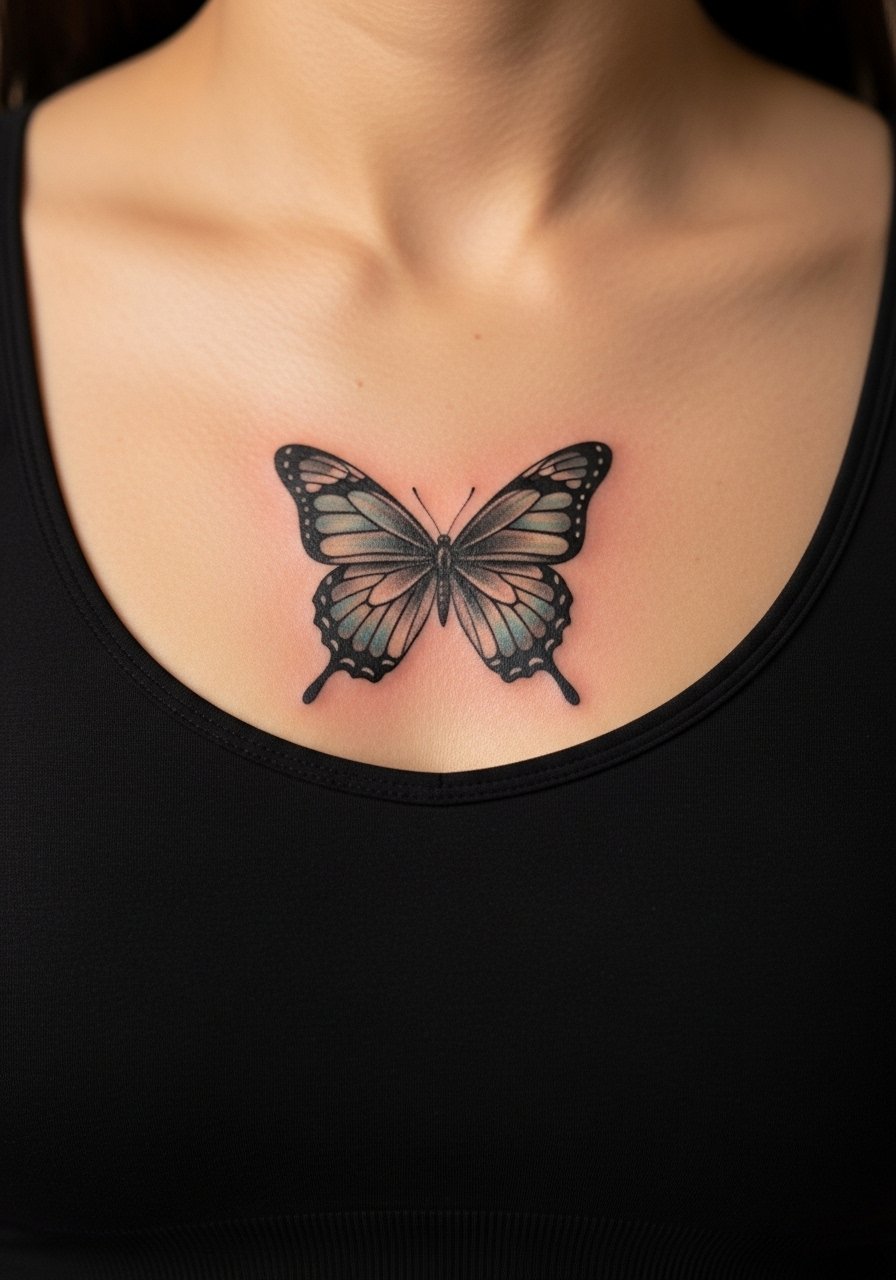
Sternum symmetry reads intimate when matched precisely. Pain varies and the area can be sensitive. Ask for mirrored references and for the artist to match wing veins rather than mirror-painting them by eye. A big mistake is expecting tiny perfect symmetry at small scale. Plan for two sessions and remember that sternum pieces can change with chest expansion and weight shifts. For sessions wear a zip-up or a fitted sports bra so the artist can reach the area cleanly.
14. Negative Space Butterfly on Upper Arm

Negative space realism uses the skin as part of the design and ages well because there is less ink to migrate. Ask your artist to consider the surrounding black saturation weight so the butterfly shape stays crisp. Expect moderate pain and a single session for a mid-sized piece. A common mistake is making the surrounding fill too thin which allows patchy fading. For session wear a loose short-sleeve tee that gives full arm access.
15. Stipple-Shaded Monarch Fragment Over Elbow
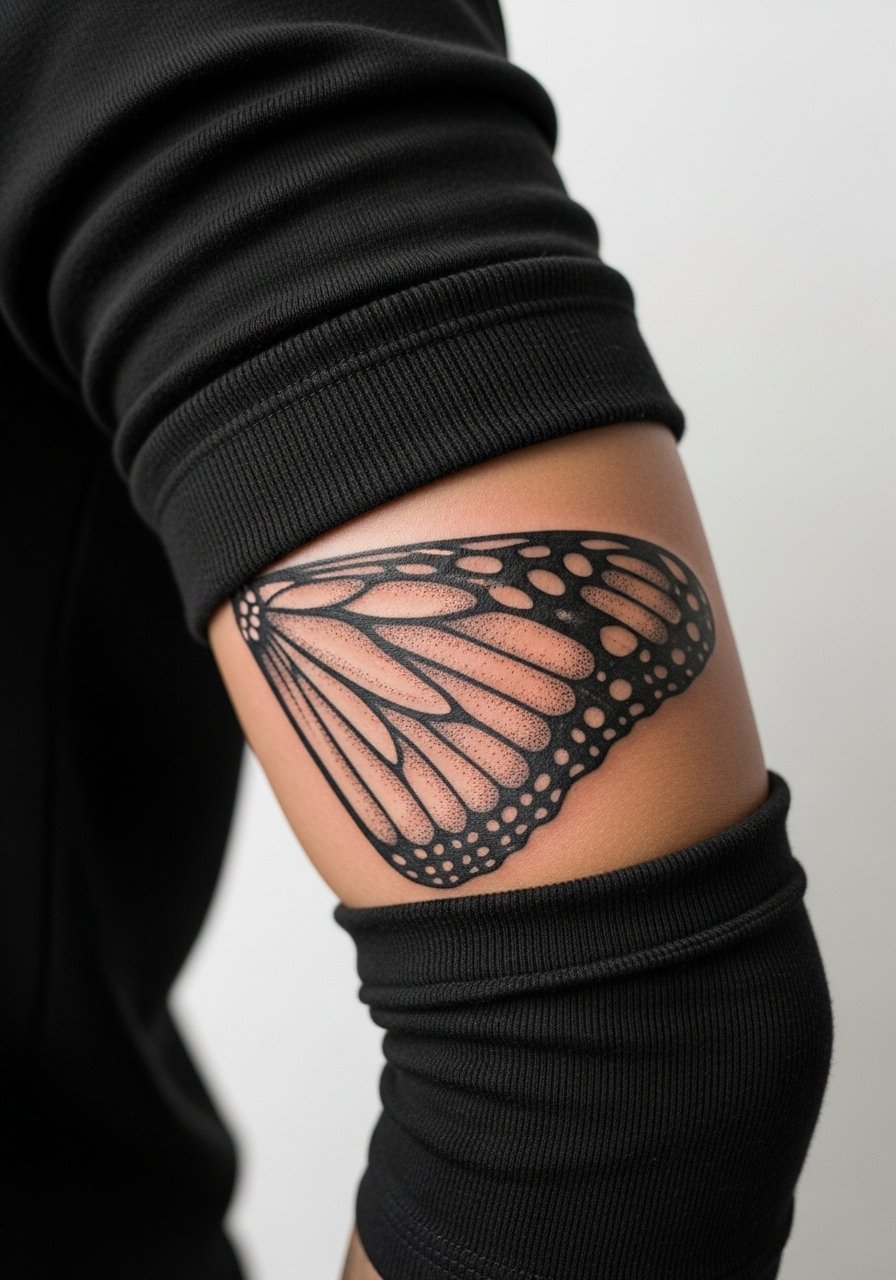
Elbow-area tattoos are high-risk for early fading because the skin flexes constantly. Stipple shading can work if the dots are spaced for movement and the piece avoids dense blocks of tiny shading directly on the crease. Tell the artist you want a fragment that skirts the olecranon rather than sits squarely in the fold. Expect a shorter session but higher chance of touch-up. Functionally, wearing long sleeves during the initial weeks helps avoid abrasive contact.
16. Botanical Surround Butterfly on Upper Thigh

Upper thigh allows large realism with floral context that does not compete with the main subject. It is a forgiving surface that keeps pigments vibrant longer than ankles or hands. Ask the artist to separate floral elements with negative space so the wings keep their identity over time. Sessions are multi-hour and pain varies. For show-off outfits, high-waisted shorts or slit dresses in linen let the leg view sit naturally without drawing attention away from the wings. Expect touch-ups after the first two to three years depending on sun exposure.
17. Photorealistic Blue Morpho on Back of Hand

Hand tattoos read immediately but can be the first to soften because of constant washing and UV exposure. Photorealistic pieces on the hand should use saturated outlines and restrained micro detail. The most common regret is expecting finger-like longevity on a constantly used canvas. Plan for a quick session and accept a touch-up schedule. Keep in mind some workplaces still have restrictions on hand tattoos, so think about career impact before booking.
Frequently Asked Questions
Q: Will tiny realistic veins hold up on darker skin tones?
A: Darker skin can show incredible depth when artists use higher contrast and denser outlines. The trick is asking for defined vein linework that is not wafer-thin. From what I have seen, contrast beats micro stippling on deeper tones. If you are worried, request healed photos on similar skin tones or look through hashtags like #realistictattoo and #butterflytattoo to compare.
Q: How should I dress for a ribcage or sternum session to keep clothing from irritating the fresh ink?
A: Wear a sports bra or a cropped top you can shift without fully undressing, or a zip-up hoodie that lets the artist access the area cleanly. A sports bra is an easy choice because it covers everything except the working zone and prevents fabric from rubbing the fresh work.
Q: Do 3D butterfly techniques require different touch-up timing than flat color realism?
A: Yes. 3D work often leans on highlights and contrast that can soften as whites fade. Expect touch-ups for highlights sooner than you would for base color. A realistic schedule is to budget a touch-up within two to four years for highlight maintenance.
Q: If I want a small finger or wrist butterfly, how likely is a yearly touch-up?
A: Small finger and wrist pieces are subject to friction and frequent washing, so yearly touch-ups are common. If you prefer less maintenance pick slightly larger scale and bolder contrast to delay the need for a refresh.
Q: Should I pick Saniderm or dry healing for a color-heavy butterfly?
A: Artists and clients split into two camps. One group prefers protective films like Saniderm because they keep the area clean and can lock in color during the first days. The other group favors dry healing and gentle scabbing to preserve texture. The right choice depends on your skin type and the artist’s recommended aftercare approach. Trust your artist for specifics, and follow the written aftercare they provide when you leave the shop.
